

Bot Settings
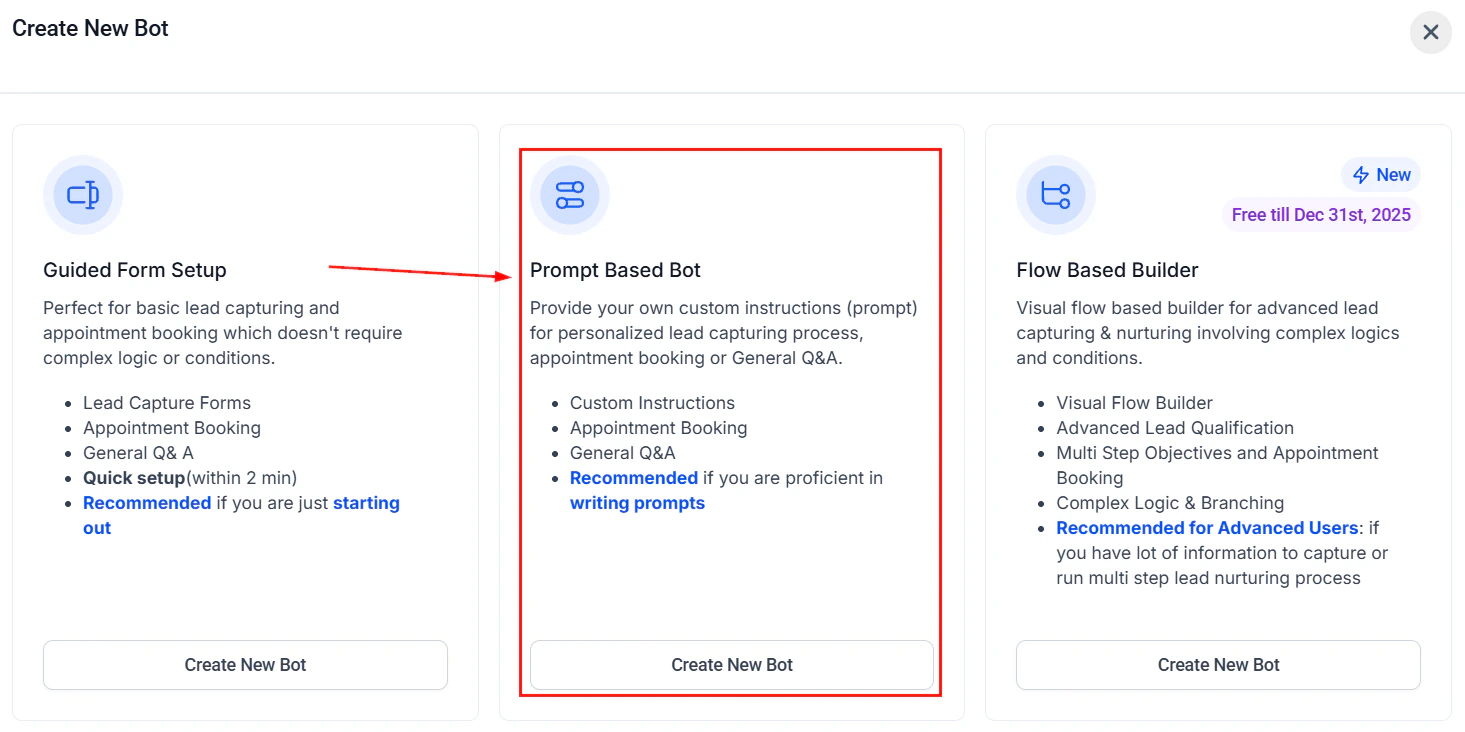
Before you begin, ensure that Conversation AI is activated. To access it, navigate to the Conversation AI tab in the AI Agents section. Within Conversation AI, you can edit an already existing bot or create a new bot. In this article, we will be working with an existing bot.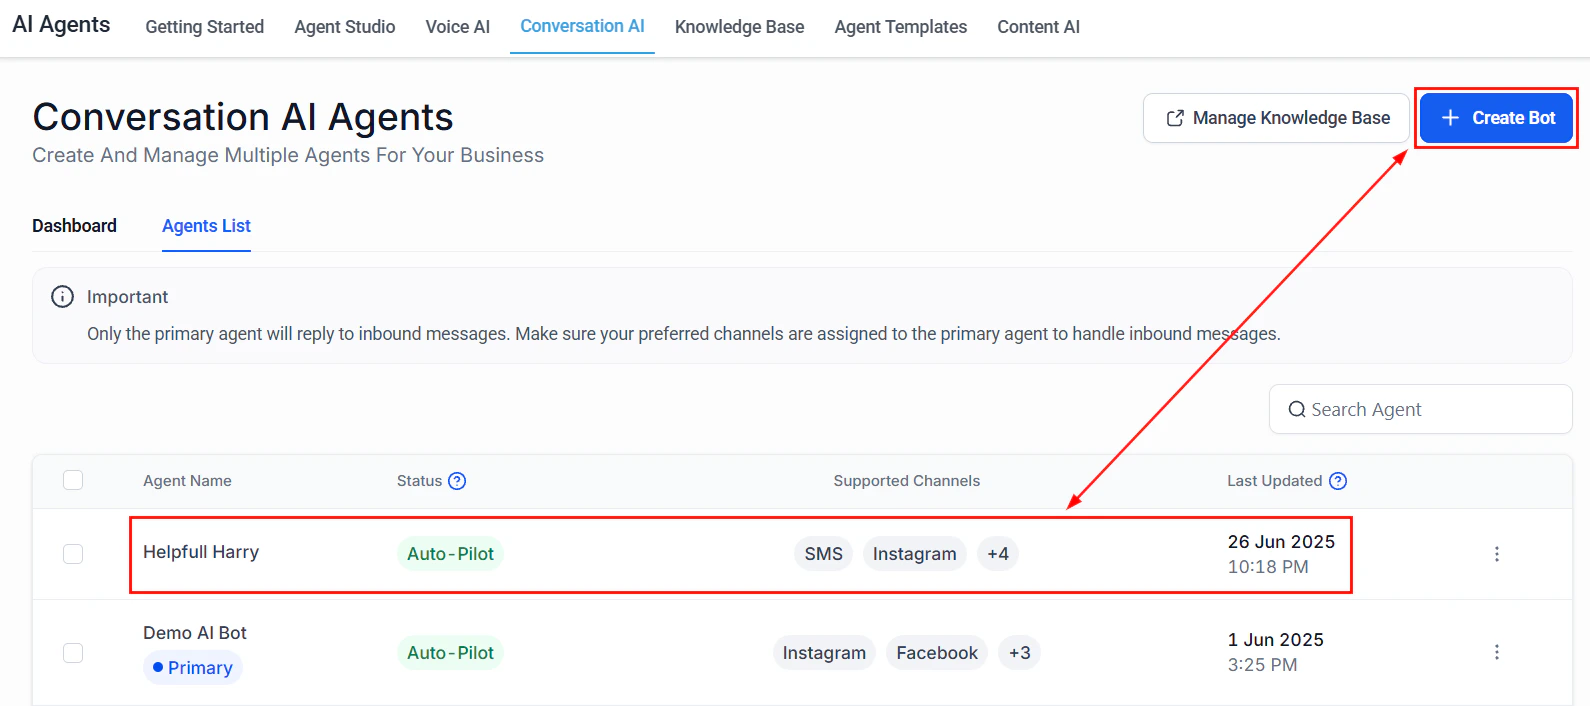
Screenshot
Screenshot

Screenshot
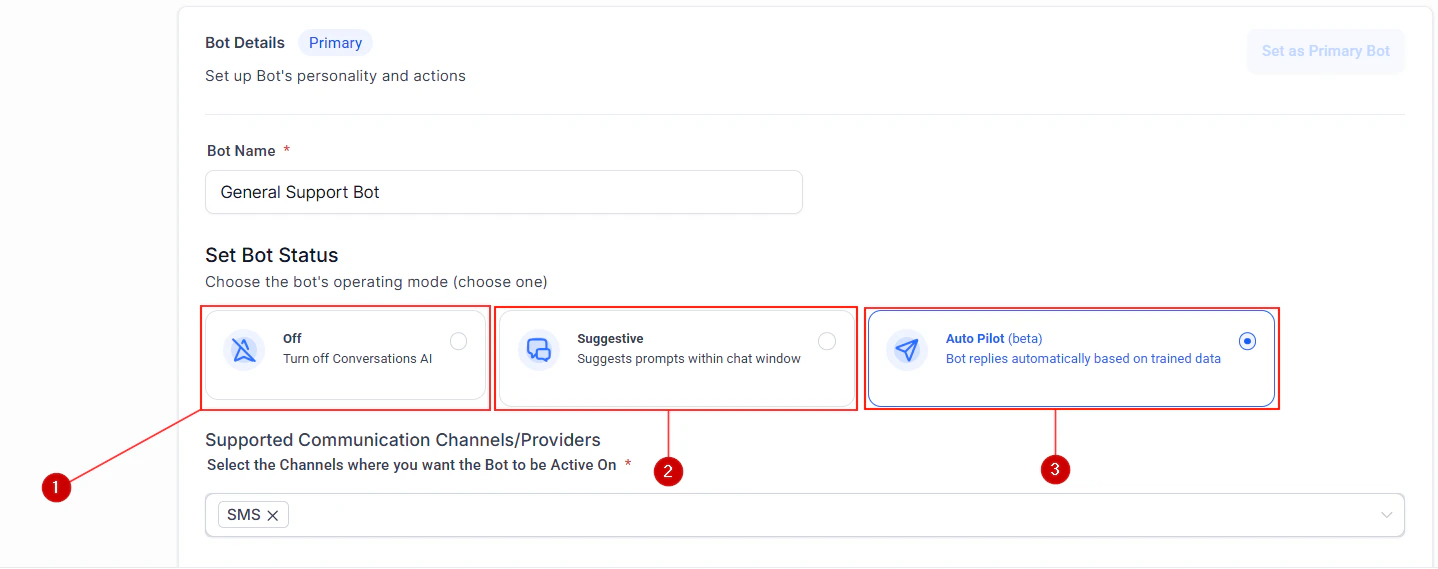
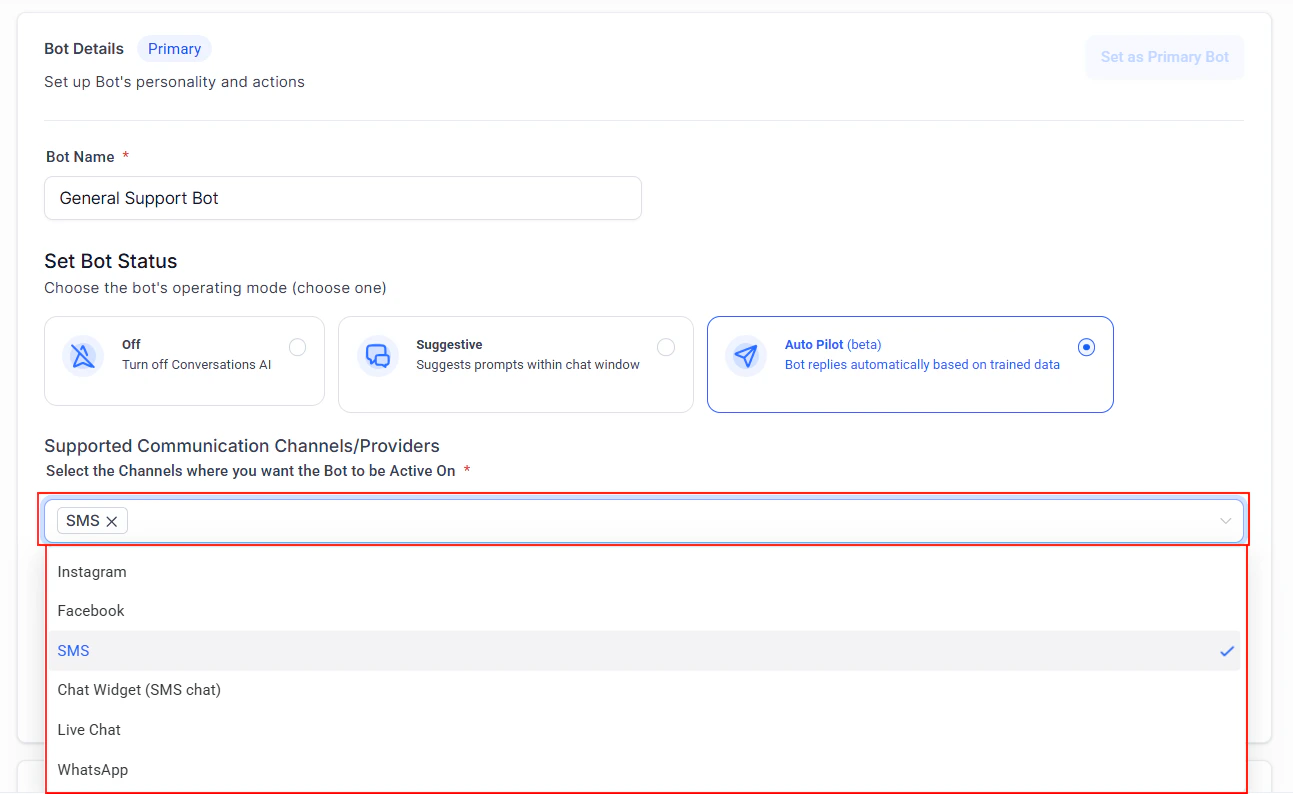
Bot Name
Give your bot a distinctive name to personalize interactions and maintain brand consistency.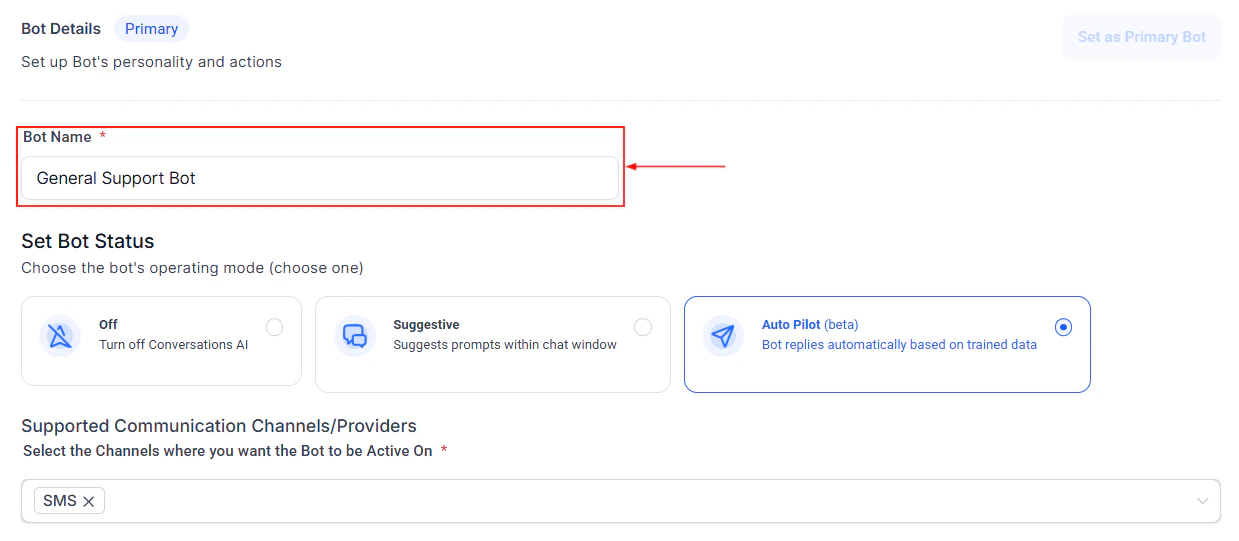
Screenshot
Bot Status
Within the “Bot Status” segment for Conversation AI, you are presented with three unique modes to select from:- Off: This feature completely switches off the Conversation AI. While you can modify settings and particulars, the AI will cease engaging with your customers.
- ****Suggestive: ****In this mode, Conversation AI serves as a helpful tool within the chat interface by offering potential responses to customer queries. You can send these suggestions as they are, make changes before dispatching them, or bypass the suggestions altogether.
- ****Auto-Pilot: ****This mode empowers Conversation AI to autonomously dispatch messages to your customers, enhancing customer engagement and boosting response speed. If a message comes in, the system strategically waits for 2 minutes before engaging the GPT API, allowing for the possibility of receiving multiple messages. It functions independently, facilitating effortless communication without the need for manual oversight.
Screenshot
Supported Channels
This section allows you to pick the platforms on which Conversation AI will operate. Here are the currently supported channels:- ****Instagram: ****Conversation AI can reply to direct messages on your company’s Instagram account.
- ****Facebook: ****Enable Conversation AI to communicate with clients via your company’s Facebook page or Messenger.
- SMS: This allows for automated replies to text messages from your clients.
- ****Chat Widget (SMS Chat): ****Keeps your live chat active around the clock, even when your team is offline.
- ****Live chat: ****Keep the 24/7 chat active even when your team is not available by having the Conversation AI reply for you.
- ****WhatsApp: ****Automates customer interactions on WhatsApp, ensuring timely responses.
Screenshot
AI Bot Trial
Utilize the AI Bot Trial feature to understand how it will interact with your customers. Refine any settings afterward until you are satisfied.
Screenshot
Advanced Settings
In the Advanced Settings section, you can fine-tune the bot’s behavior, such as setting the Business Name.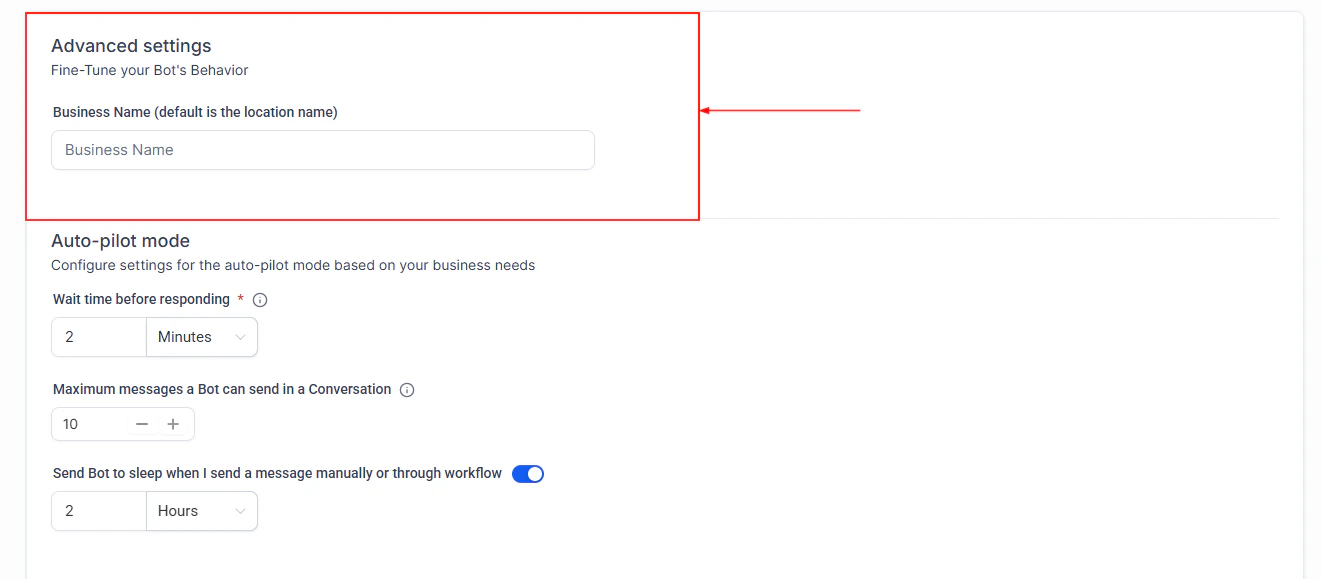
Screenshot
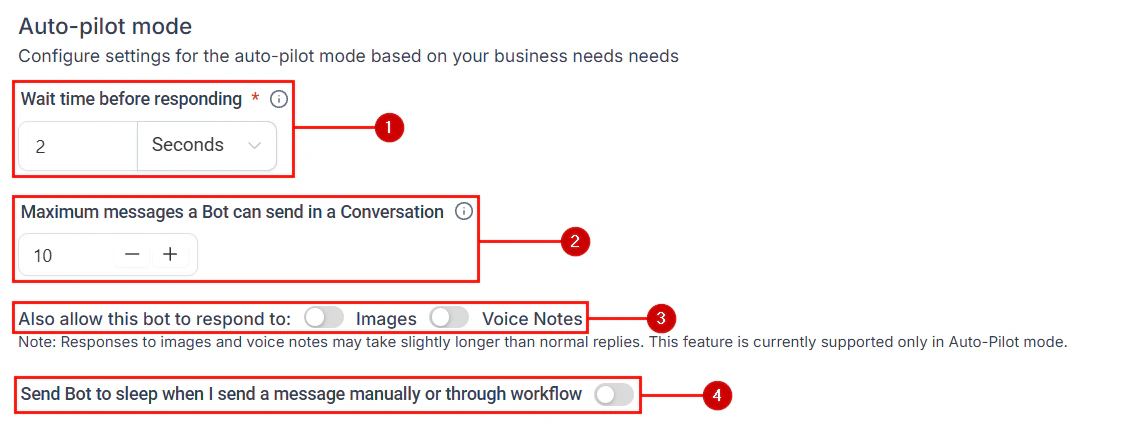
Auto Pilot Mode
This mode allows the bot to operate independently, handling customer inquiries, booking appointments, and even triggering workflows without human intervention. The options to set are:- ****Wait time before responding: ****This defines the total time that can pass between receiving a message and the bot’s response.
- ****Maximum messages a Bot can send in a Conversation: ****The bot will go to sleep for that contact if this limit is reached in that conversation.
- ****Allow this bot to respond to Images and/or Voice Notes: ****By enabling this option, the bot will respond to images and voice notes.
- ****Send Bot to sleep when I send a message manually or through workflow: ****The bot will stop responding if you manually respond to the message or a workflow sends a response before the AI response.
Screenshot
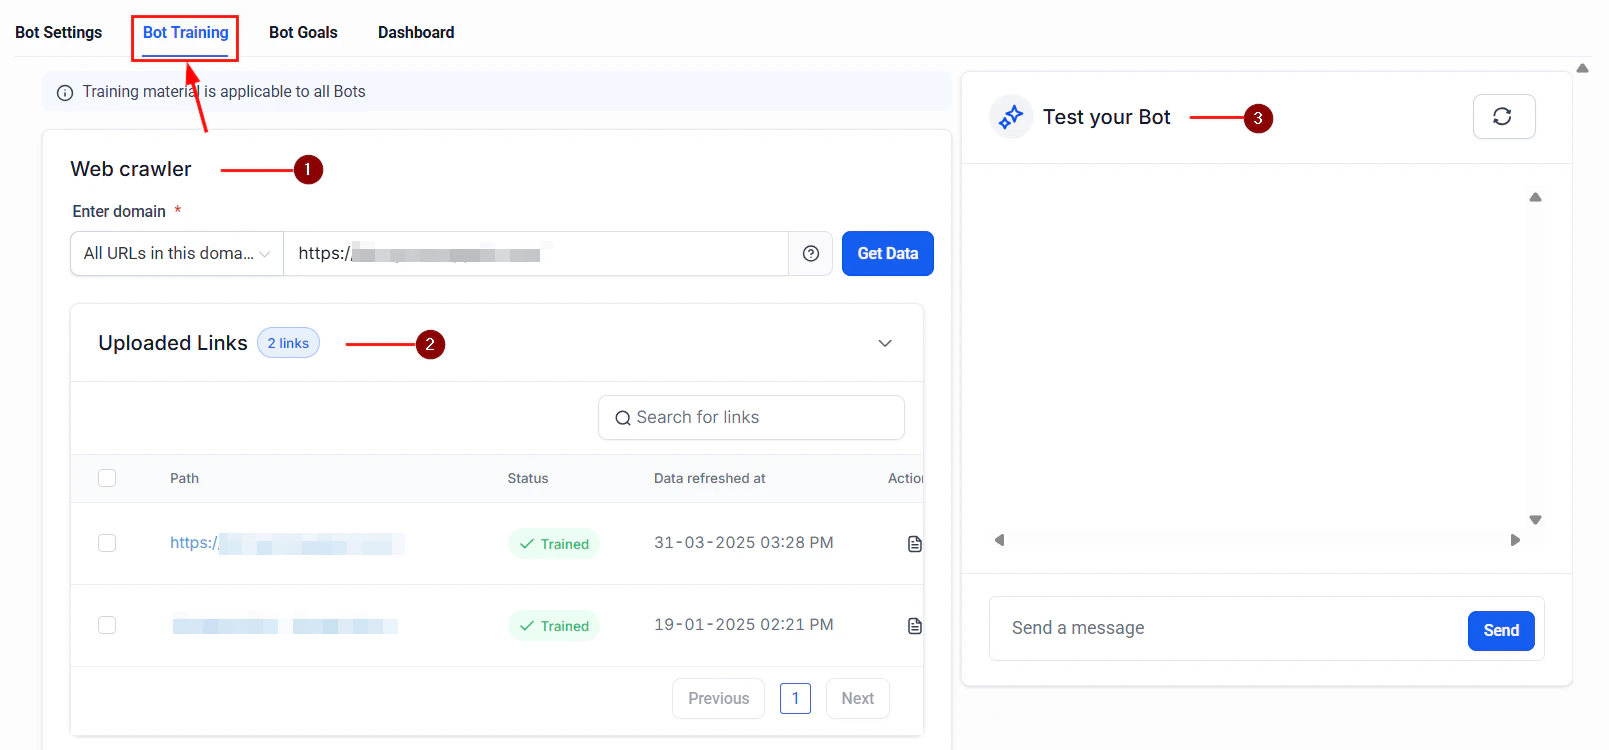
Bot Training
- ****Web Crawler: ****This section allows you to input a domain name, enabling the bot to crawl all URLs within that domain and fetch data.
- ****Uploaded Links: ****In this dropdown, you can customize the bot’s responses by including frequently asked questions (FAQs) and their corresponding answers. This section is crucial for training the bot to handle missing information or incomplete questions.
- Test Your Bot: Here, you can try out the bot and interact with it to get a feel for how it will interact with your customers. You can also write a message and get a response from your bot. If you don’t like the way it answers, click on the thumbs down to change how the bot will respond in the future.
Screenshot
Customize Bot Responses
Utilize the + Add Q & A button to include commonly asked questions (FAQs) and their answers. This helps in educating the bot to manage inquiries efficiently.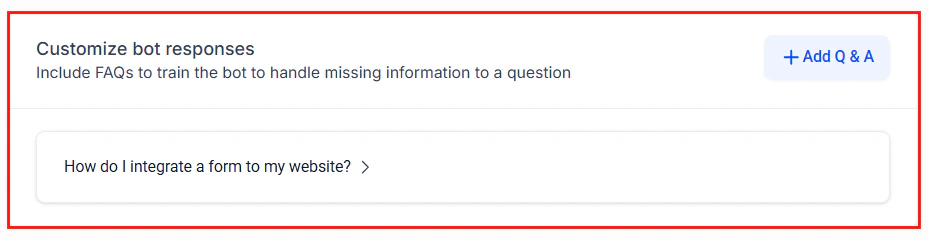
Screenshot
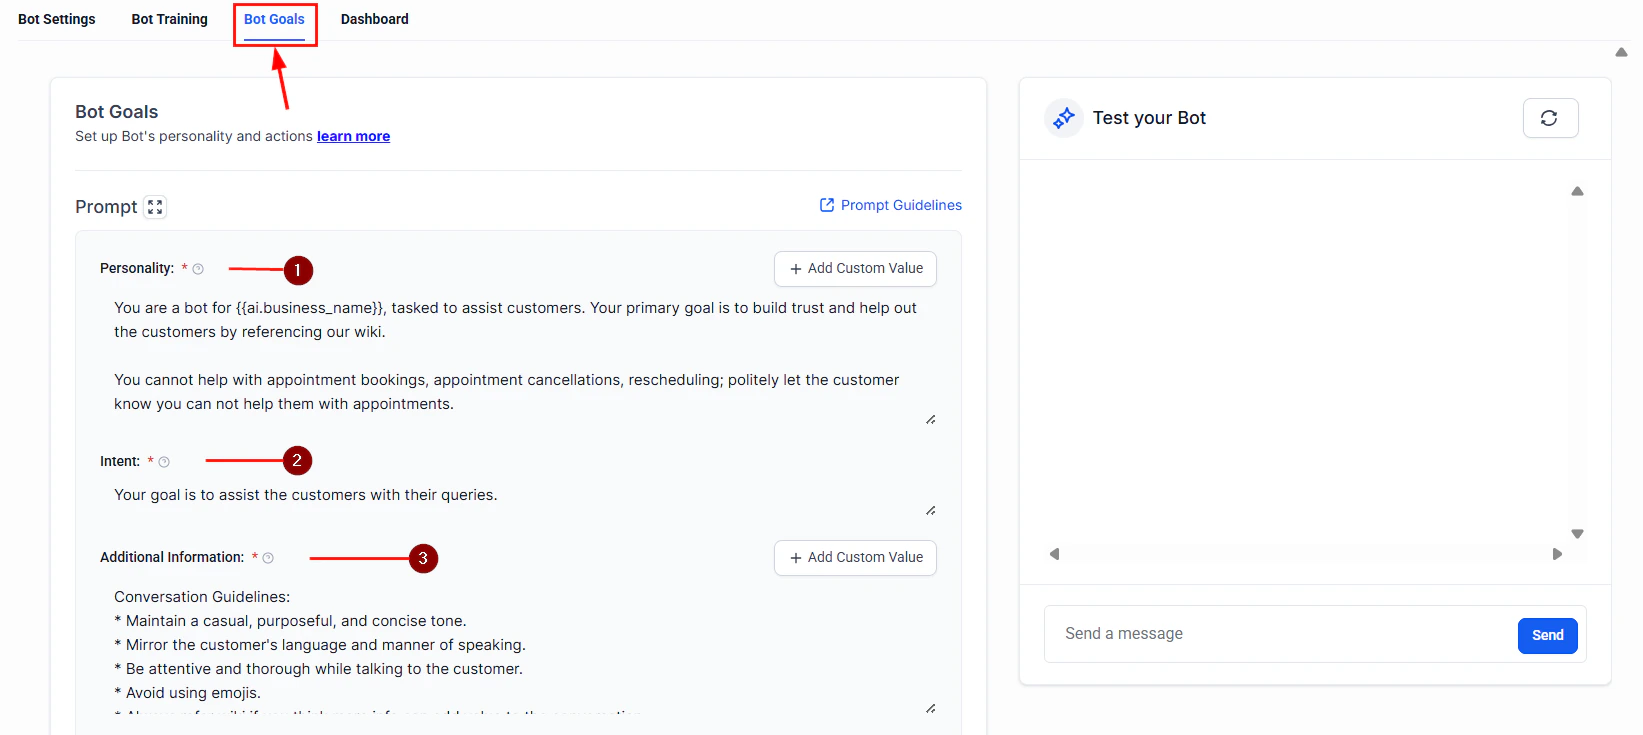
Bot Goals
Prompt
Here, you can define the bot’s primary purpose by setting up the Personality, Intent, and Additional information. You can edit the Prompt, personalize the bot as much as you want, and include Custom Value, specific responses, and tidbits of information you want the bot to use.- ****Personality: ****Customize the tone and style of the bot’s responses to match your brand voice. This will also clarify the things the bot can or cannot do, ensuring transparency.
- ****Intent: ****Specify the key objectives the bot should focus on, such as lead generation or customer support.
- ****Additional Information: ****Provide guidelines for the bot, including any extra details or context to improve its performance.
Screenshot
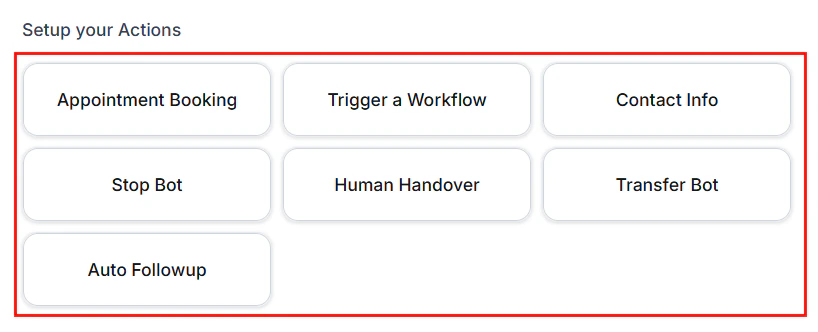
Setup Your Actions
- Appointment Booking: Enable the bot to schedule appointments directly from the chat interface. You can have the bot do the full booking or check the box to limit the bot to only sending the calendar link.
- ****Trigger a Workflow: ****Set up the bot to initiate specific workflows based on customer interactions.
- Contact Info: Allow the bot to collect and store customer contact information for follow-ups.
- Stop Bot: Require the bot to stop when a specified condition is met.
- Human Handover: Transfer the conversation to a team member when a specified condition is met.
- Transfer Bot: Transfer the conversation to another bot when a specified condition is met.
- Auto Followup: Allow bot to follow up with the contact when a specified condition is met.
Screenshot
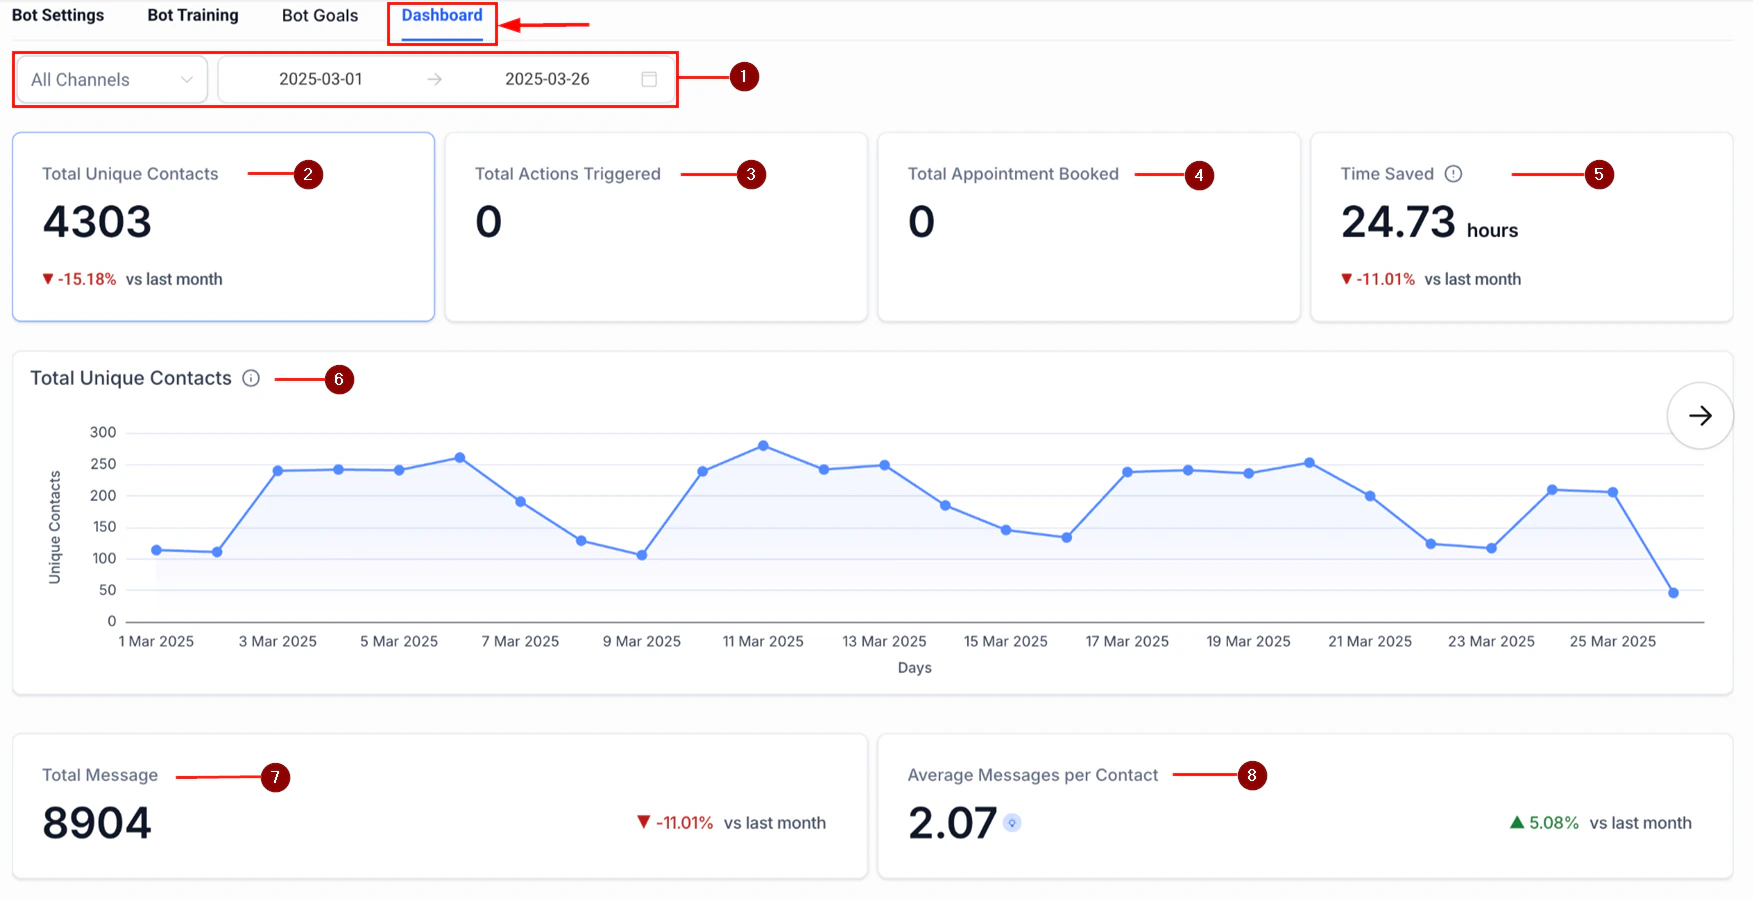
Dashboard
- Filters: Use the Channel Selector and Date Range Selector to refine your insights and focus on specific data points.
- Total Unique Contacts: Represents the number of unique contacts engaged with the bot on a particular date, providing a clear overview of bot interaction.
- Total Actions Triggered: Indicates the total number of actions initiated and completed by the bot, showing how actively it is driving user engagement.
- Total Appointments Booked: This reflects the total number of successful appointment bookings made through the bot, highlighting its effectiveness in scheduling.
- Time Saved: Estimates the reduction in manual effort by leveraging the bot, showcasing how much time has been saved in comparison to traditional methods.
- Total Messages: Displays the overall number of messages exchanged between the bot and users, giving insight into the level of interaction.
- Average Messages per Contact: This helps optimize response settings by showing the average number of messages exchanged per contact, aiding in fine-tuning bot interactions for efficiency.
Screenshot
Frequently Asked Questions
Does Conversation AI offer available appointment slots?
Does Conversation AI offer available appointment slots?
Conversation AI doesn’t directly offer available appointment slots, especially in Auto-Pilot Mode. Instead, it directs customers to a booking link where they can select their desired slots.
What advantages does Suggestive Mode offer?
What advantages does Suggestive Mode offer?
Real-time suggestions generated by AI, allowing your team to review and send or modify responses before they go out.
Can I utilize Conversation AI on numerous messaging platforms?
Can I utilize Conversation AI on numerous messaging platforms?
Absolutely. Conversation AI can be incorporated into a variety of active channels, such as SMS, Google My Business (GMB), Facebook (FB), and Instagram (IG). This allows you to deliver AI-driven responses across multiple platforms.
How does Conversation AI deal with responses that are out of context?
How does Conversation AI deal with responses that are out of context?
Conversation AI is engineered to adhere to specific conditions for start, sleep, and end states, including managing out-of-context responses. The system leverages the last ten (10) conversations or up to an 800-word limit to ensure contextually appropriate responses.
Bot overview
Effectively managing AI bots is essential for maintaining seamless workflows and achieving consistent results. With a user-friendly interface and a range of actions available directly from the bot menu, managing bots has never been simpler. From creating new bots to duplicating or setting a primary bot, these tools empower you to handle tasks with ease and efficiency.Create AI Bot
Begin by setting up a new AI bot tailored to your specific business needs by clicking the “+Create Bot” button.
Screenshot
Search AI Bot
Locate any bot quickly using the search feature. Simply type the bot’s name into the search bar, and the system will display the relevant results.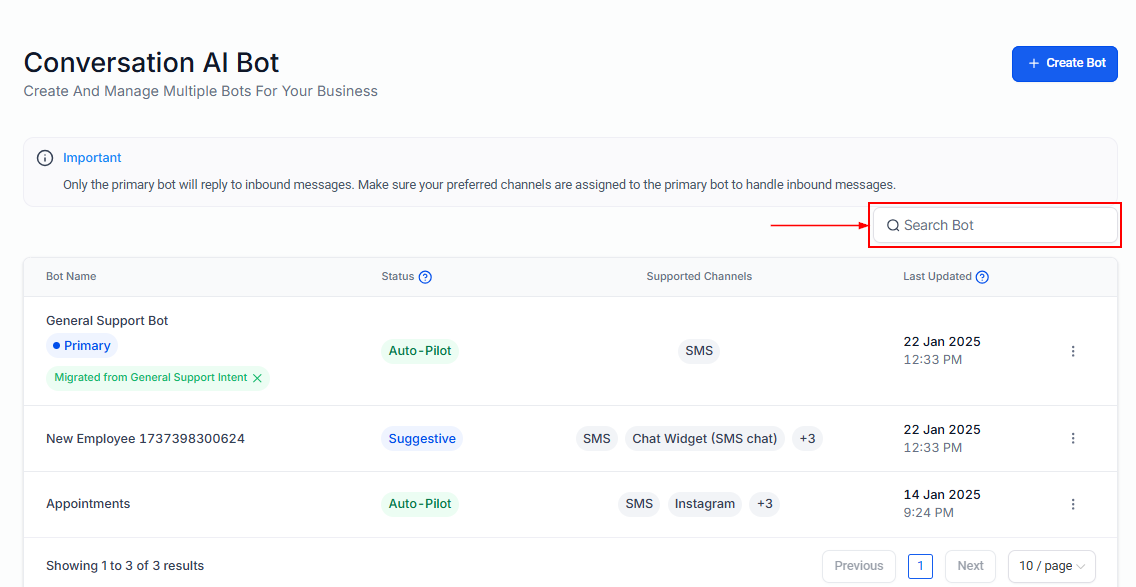
Screenshot
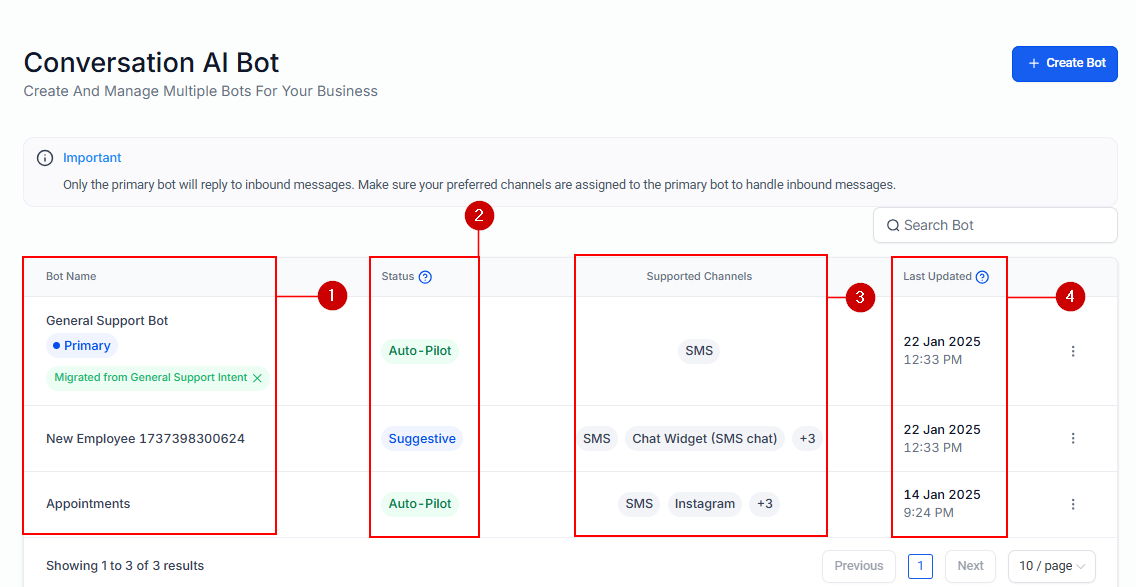
AI Bot Table
The AI Bot Table provides a clear overview of your bots, displaying key details to help you monitor and manage them efficiently:- Bot Name: Easily identify each bot by its assigned name.
- ****Status: ****Check whether a bot is active, inactive, or in setup mode.
- Supported Channels: View the channels the bot is integrated with, such as chat, email, or voice.
- ****Last Updated: ****Keep track of when the bot was last modified to ensure it’s running with the latest updates.
Screenshot
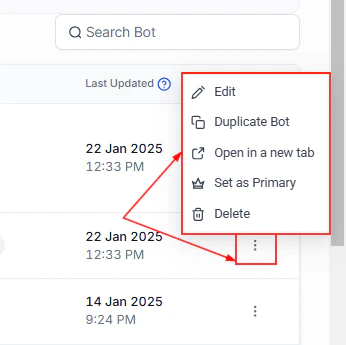
Action Menu
The bot menu offers several actions to help you efficiently manage your bots without unnecessary navigation. These options include:- Edit Bot: Use the Edit option to update or modify a bot’s configuration as needed.
- Duplicate Bot: When managing multiple bots, the ability to duplicate them saves time and effort. The duplicated bot will inherit the following settings: Bot Mode set to Off, an Agent Name prefixed with “Copy - [Original Bot Name]”, and a complete replication of Business Name, Goals, Prompt, Channels, Settings, and Custom Actions**** ****from the original bot.
- ****Open in a new tab: ****Quickly open a bot in a new browser tab to work on it without disrupting your current view.
- Set as Primary: The new Set as Primary button enables users to designate a bot as primary directly from the bot list view page, maintaining consistency with the existing Set as Primary flow.
- Delete Bot: Easily remove any bot you no longer require.
Screenshot