

Why schedule messages
- Time zone alignment — send messages when contacts are most likely to be active, even if that falls outside your working hours.
- Campaign timing — coordinate outreach around events, launches, or follow-up sequences without manual intervention.
- Drafts for review — compose messages in advance and schedule them for a final send at the appropriate moment.
- Avoid instant send errors — scheduling gives you a window to catch and cancel a message before it goes out.
Scheduling an SMS
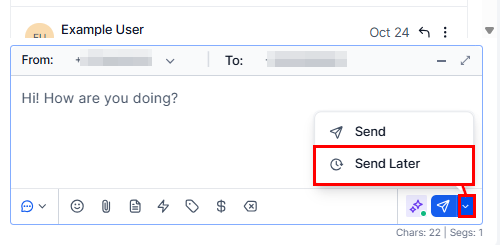
The Send Later option in the SMS composer dropdown
1
Open the conversation
Navigate to Conversations and open the contact you want to message.
2
Select the SMS channel
Click the SMS tab in the message composer.
3
Compose your message
Write the SMS text. Add emojis, snippets, trigger links, custom values, attachments, or payment links using the toolbar icons.
4
Open Send Later
Click the timer icon or the dropdown arrow next to the Send button and choose Send Later.
5
Set the schedule
A date and time picker appears. Select:
- Date — the delivery date.
- Time — use 24-hour format. Enter the time the message should go out.
- Timezone — the contact’s local timezone is pre-selected if available. Adjust if needed.
6
Confirm
Click Schedule, then click Send Later to confirm. The message enters a queued state in the conversation thread with a scheduled indicator showing the delivery date and time.
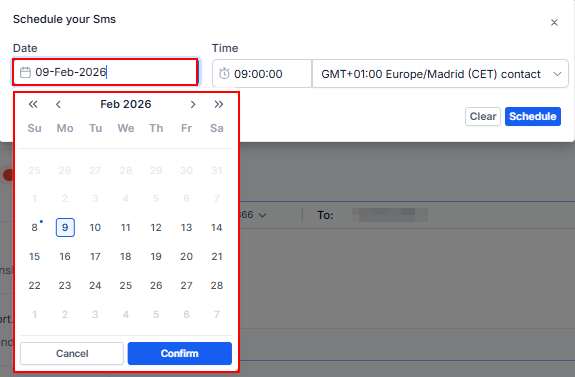
Date and time picker for scheduling a message delivery
The Send Later option in the SMS composer dropdown
The date and time picker for scheduling an SMS message
Scheduling an email
1
Open the email channel
In the contact’s conversation, click the Email tab in the composer.
2
Fill in all header fields
Complete the From, To, Subject, and any CC or BCC fields.
3
Compose the body
Write and format the email body. Add attachments, merge fields, or templates as needed.
4
Open the send options
Click the dropdown arrow next to the Send button. Two scheduling options appear:
5
Send Later
Choose Send Later, set the date, time, and timezone, then click Send Schedule.
6
AI Scheduling
Choose Send with AI Optimization, select the time window (e.g., “next 24 hours” or “next 48 hours”), and click Send with AI Optimization. The system picks the best moment within that window to maximize open rates.
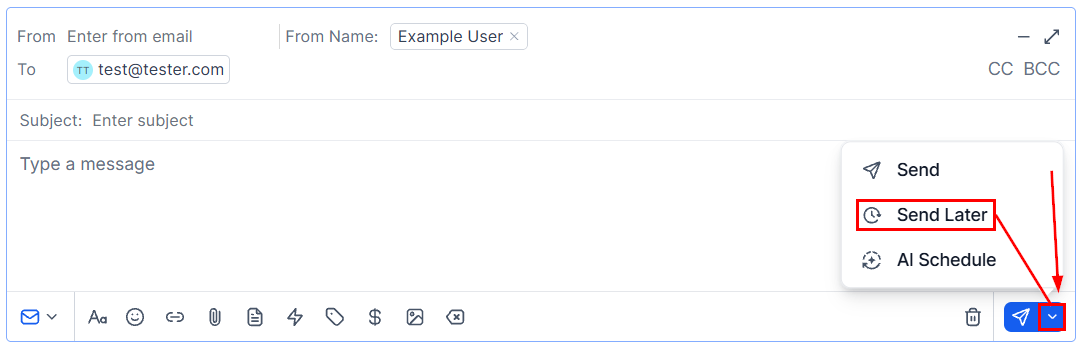
Email send options including Send Later and AI Schedule
Scheduling WhatsApp messages
WhatsApp messages can also be scheduled, but are subject to the platform’s 24-hour session window. Scheduled WhatsApp messages must be set to send within 24 hours of the contact’s last inbound message.1
Open the WhatsApp channel
In the conversation, click the WhatsApp tab.
2
Compose the message or select a template
Within a live session, write any message. Outside the session window, use an approved WhatsApp template.
3
Click the dropdown arrow next to Send
Choose Send Later.
4
Set date and time
Pick the delivery time. Ensure it falls within the active session window if you are not using a template.
5
Confirm
Click Schedule.
Viewing scheduled messages
Scheduled messages appear in the conversation thread with a visual indicator — typically a clock icon or “Scheduled” label — showing the exact date and time of delivery. Anyone with access to the conversation can see pending scheduled messages. You can also identify conversations with pending scheduled messages by checking the conversation list, where a schedule indicator may appear alongside the latest message preview.Canceling a scheduled message
1
Find the scheduled message
Open the conversation containing the queued message.
2
Click Cancel
Click the Cancel link or button next to the scheduled message entry in the thread.
3
Confirm
Confirm the cancellation in the dialog that appears. The draft is permanently deleted.
Editing a scheduled message
The HoopAI platform does not support inline editing of a scheduled message after it has been queued. To make changes:- Cancel the existing scheduled message.
- Reopen the composer, make your edits.
- Reschedule the updated message.
Scheduling within workflows
For large-scale or automated scheduling — such as sending a follow-up SMS 2 hours after a form submission — use the Wait action in a workflow instead of manual scheduling. Workflows handle timing at scale without requiring per-contact manual scheduling. Manual scheduling via the conversations inbox is best suited for one-off messages where you want direct control over a specific conversation.Best practices
- Always verify the timezone before scheduling. A message scheduled for 9:00 AM in your timezone arrives at 3:00 AM for a contact on the opposite coast.
- Schedule follow-up messages immediately after an interaction while the context is fresh, then let the platform deliver them at the right moment.
- Use descriptive subject lines for scheduled emails so it is clear what is going out when reviewing the queue.
- Review your scheduled messages queue at the start of each day to ensure nothing needs to be updated or canceled before it sends.