

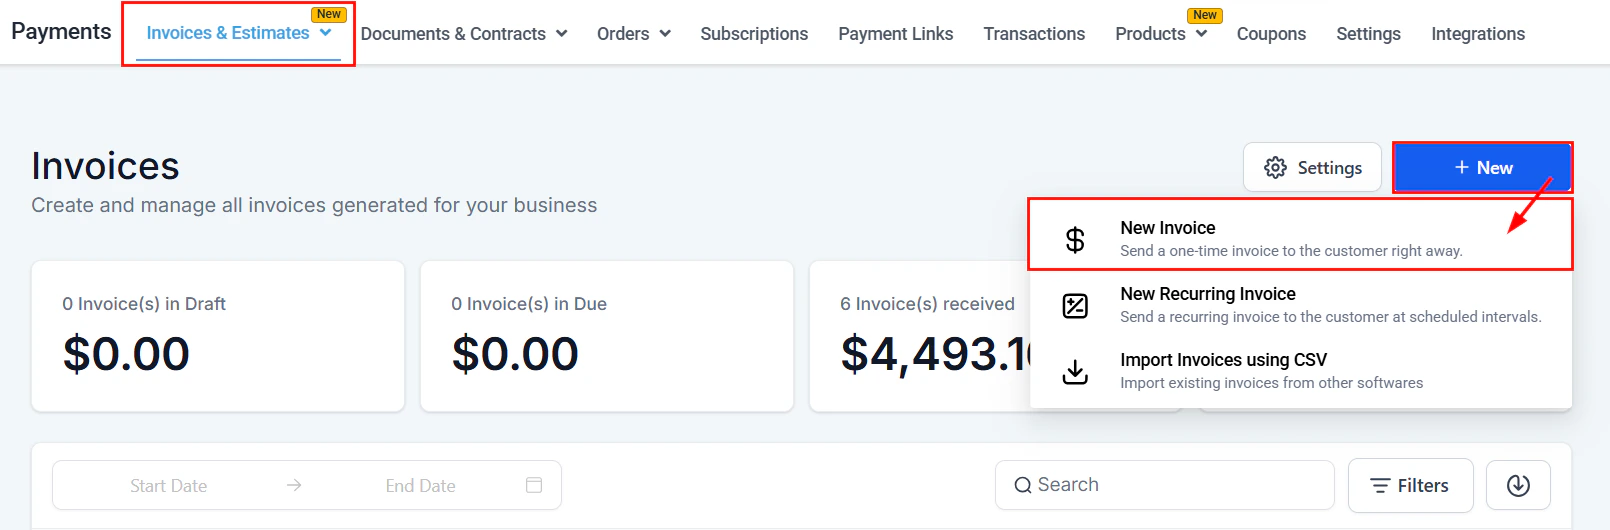
The Invoices dashboard showing draft, due, received, and overdue billing pipeline
Invoices overview
The invoices dashboard gives you a real-time view of your billing pipeline:Filtering and searching
Use the Filter dropdown to narrow invoices by:- Invoice status — All, Draft, Sent, Overdue, Payment Processing, Paid, or Partially Paid
- Payment mode — Live or Test
Invoice table columns
- Name — The label you assigned to the invoice
- Invoice number — System-generated reference number
- Customer details — Contact name and information
- Issue date — When the invoice was created
- Amount — Total invoice value
- Status — Current payment status
Actions menu
Click the three-dot menu on any invoice to:- Edit — Modify a draft invoice (drafts only)
- Copy link — Share a direct payment link with the customer
- View recurring template — Open the recurring invoice setup
- Download — Save the invoice as a PDF
- Void — Mark as non-collectible
- Clone — Duplicate the invoice
- Convert to template — Save as a reusable template
- Record payment — Mark as paid once payment is received
Creating a new invoice
Open the invoice editor
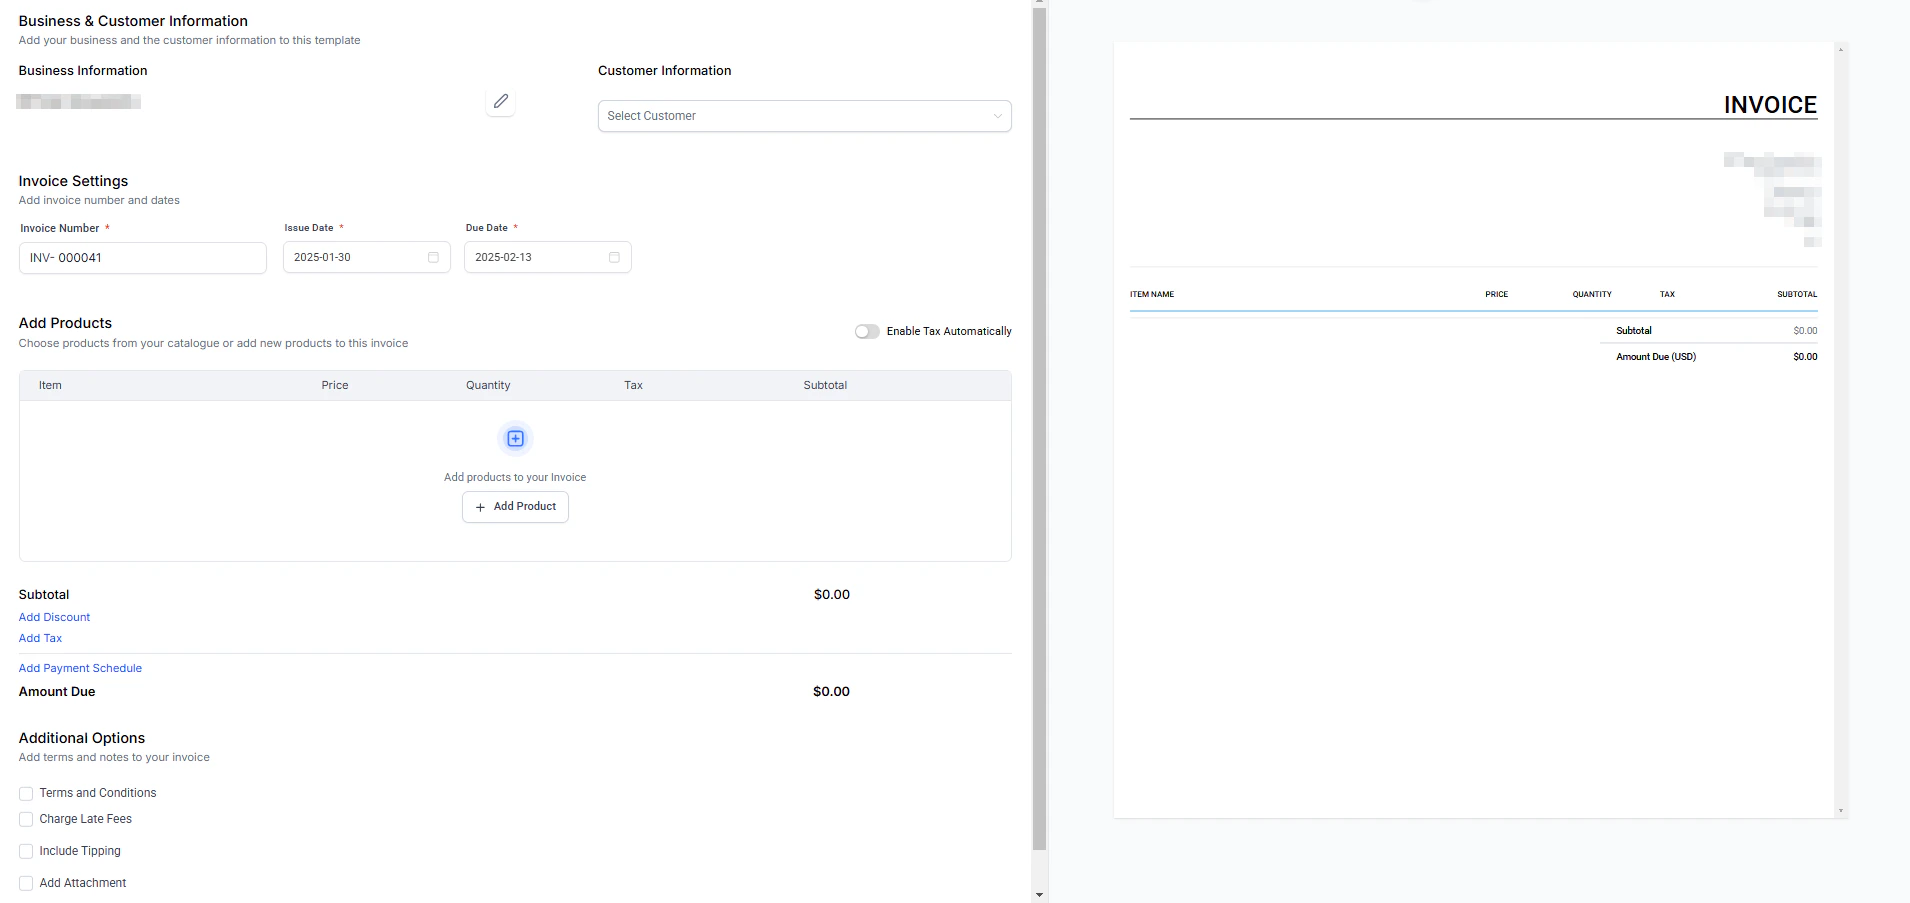
Creating a new invoice — the invoice builder with live preview
Name the invoice
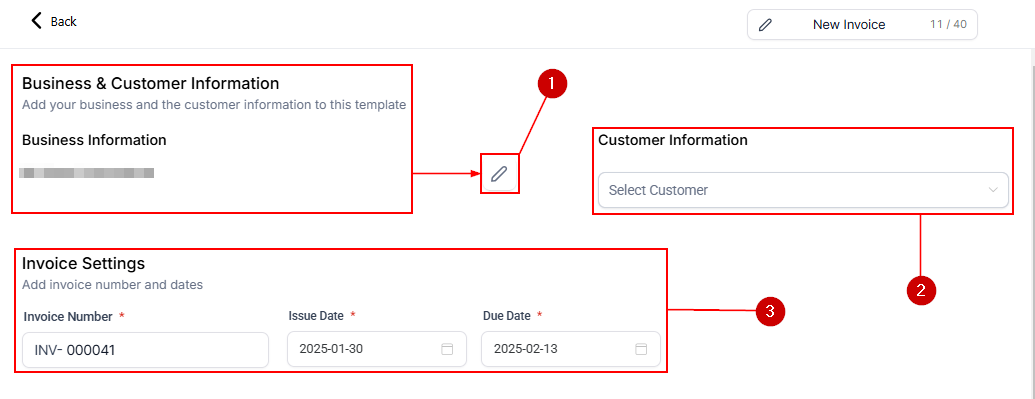
Add business and customer information
- Click the pencil icon to populate your business details from your CRM settings.
- Use the Select customer dropdown to attach a contact. You can add, edit, or clear the customer at any time.
- Set the Invoice number, Issue date, and Due date.
Add products
- Edit the price or quantity inline
- Add taxes per line item
- Add additional line items using the + icon
- The subtotal updates automatically
Apply discounts and taxes
Add notes, terms, and late fees
- Terms & conditions — outline payment terms, deadlines, and liability
- Charge late fees — set a flat or percentage fee with a grace period and maximum cap
- Include tipping — let customers add a gratuity
- Add attachment — attach up to 10 files (20 MB total)
Preview and send
Payment plans
Payment plans let you split an invoice into multiple installments — ideal for higher-ticket items or clients who need billing flexibility.
Payment plan setup — splitting an invoice into installment payments
Set up the invoice
Add a payment schedule
- Choose Percentage or Fixed amount
- Set the amount and date for each installment
- Click Add payment for additional installments
- Ensure the total equals 100% (percentage) or the full invoice amount (fixed)
Enable autopayment (optional)
Send the invoice
Recurring invoices
Recurring invoices automate billing for subscription-based products or services. The system generates and sends invoices on a schedule without manual intervention.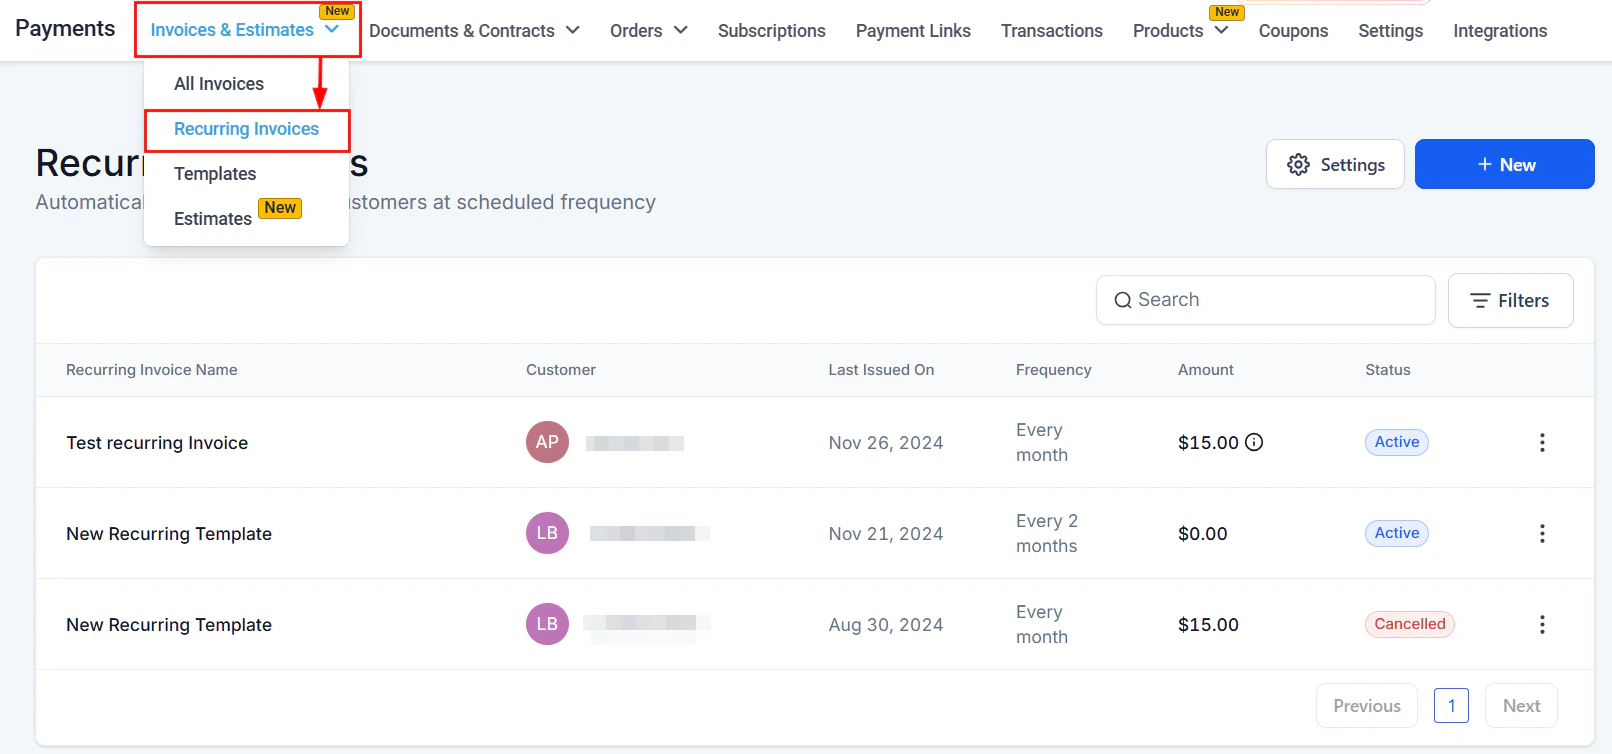
The Recurring Invoices tab listing all automated billing templates
Recurring invoice columns
Recurring invoice actions
- View history — See a full audit trail of every invoice sent under this template
- View — Open the recurring invoice details
- End — Stop future invoices from being generated
- Delete — Permanently remove (only if no invoices have been sent yet)
- Clone — Duplicate the recurring setup
- Convert to template — Save as a reusable template
Auto-payment for recurring invoices
Open the invoice builder
Enable auto-payment
Choose the payment method
- Customer card — uses the card the customer paid with originally
- Saved card — uses any card saved to the contact
- New card — enter new card details
Save
What happens if auto-payment fails?
What happens if auto-payment fails?
How do I stop auto-payments?
How do I stop auto-payments?
When is the customer notified of an upcoming auto-charge?
When is the customer notified of an upcoming auto-charge?
Invoice reminders
Stop chasing payments manually. Set up automated email and SMS reminders for unpaid invoices.
Invoice reminder setup — configure email and SMS notification sequences for unpaid invoices
Open reminder settings
Configure each reminder
- Enter a Reminder name for internal reference
- Select an Email template and SMS template (or create new ones via Preview)
- Set the Reminder frequency — how many days between sends
- Set Max reminders — the total number of times the reminder sends
- Optionally restrict sends to your Business hours and choose the time zone (business or customer)
Add additional reminders
Save
Taxes on invoices
Add taxes from payment settings
Apply tax in the invoice editor
- Automatically — applies the correct rate to all line items
- Per item — select a tax rate for each product individually
- To subtotal — apply one rate to the entire invoice total
Verify the breakdown
Late fees
Enable late fees on an invoice
Configure the late fee
- Fee type — flat currency amount or percentage of the invoice
- Frequency — how often the late fee accrues
- Grace period — days after the due date before the first fee applies
- Maximum — a cap on total late fees charged
ACH debit payments
ACH debit allows customers to pay invoices directly from their bank account. This requires Stripe Connect to be active on your account. When ACH is enabled, customers see a bank account option on their invoice payment page. They enter their routing and account numbers, and funds are pulled directly.Recording manual payments
If you receive payment outside the platform (cash, check, bank transfer), record it to keep your invoice records accurate.Open record payment
Choose the payment method
Enter amount and notes
Estimates overview
Estimates let you send a quote to a contact before committing to a formal invoice. Contacts can approve or decline the estimate, and approved estimates can be converted to invoices. The Estimates section shares the same interface as Invoices under Payments → Invoices & Estimates.Key estimate features
- Include payment plans — add installment schedules directly to an estimate so customers understand the billing structure before approving
- Approval workflow — customers receive the estimate by email or SMS and can approve it online
- Convert to invoice — once approved, convert the estimate to a live invoice with one click
CC and BCC on invoice emails
You can add CC and BCC recipients when sending invoices via email. This is useful for keeping your accounting team or manager in the loop on every billing communication without giving them platform access.Invoice templates and workflow automation
Convert an invoice to a template
Use the template in a workflow
Automatic invoice creation
Automatic invoice creation — invoices generated automatically on triggering events
Product description capability
Each line item in an invoice supports an extended description field. This is useful for providing customers with detailed explanations of the work or products being billed. In the invoice editor, click below the product name in any line item to expand the description field. Type your detailed description — it will appear on the customer-facing invoice beneath the product name.Opportunity custom values in invoices
Insert Opportunity Custom Values into the Terms and Notes fields of invoices and estimates. This allows dynamic data — such as deal names, close dates, or opportunity values — to appear on the document without manual typing.
Opportunity custom values — insert deal data dynamically into invoice terms and notes
{} custom value picker within the Terms or Notes text field to insert any opportunity variable.
Customizing the invoice layout
Open layout settings
Adjust the layout
- Reposition your logo
- Show or hide columns (quantity, unit price, tax)
- Edit footer content and payment instructions
- Adjust color scheme and branding
Save and preview
Invoice layout customization
Importing invoices via CSV
Prepare the CSV
.csv file.Import
Review
Frequently asked questions
Can I edit an invoice after it has been sent?
Can I edit an invoice after it has been sent?
What is real-time multi-currency support?
What is real-time multi-currency support?
Can I use invoices without Stripe?
Can I use invoices without Stripe?
How do I import invoices in bulk?
How do I import invoices in bulk?
Can I customize the invoice layout?
Can I customize the invoice layout?
Can I add CC and BCC recipients to invoice emails?
Can I add CC and BCC recipients to invoice emails?
How do I schedule invoice reminders?
How do I schedule invoice reminders?
What payment methods can customers use on an invoice?
What payment methods can customers use on an invoice?
Can I void an invoice I no longer need?
Can I void an invoice I no longer need?
How do I attach supporting files to an invoice?
How do I attach supporting files to an invoice?