

Services tab
The Services tab is your central catalog. Each row in the list shows the service name, duration, price, icons of assigned staff members, and a three-dot action menu for editing, duplicating, deleting, or sharing the service.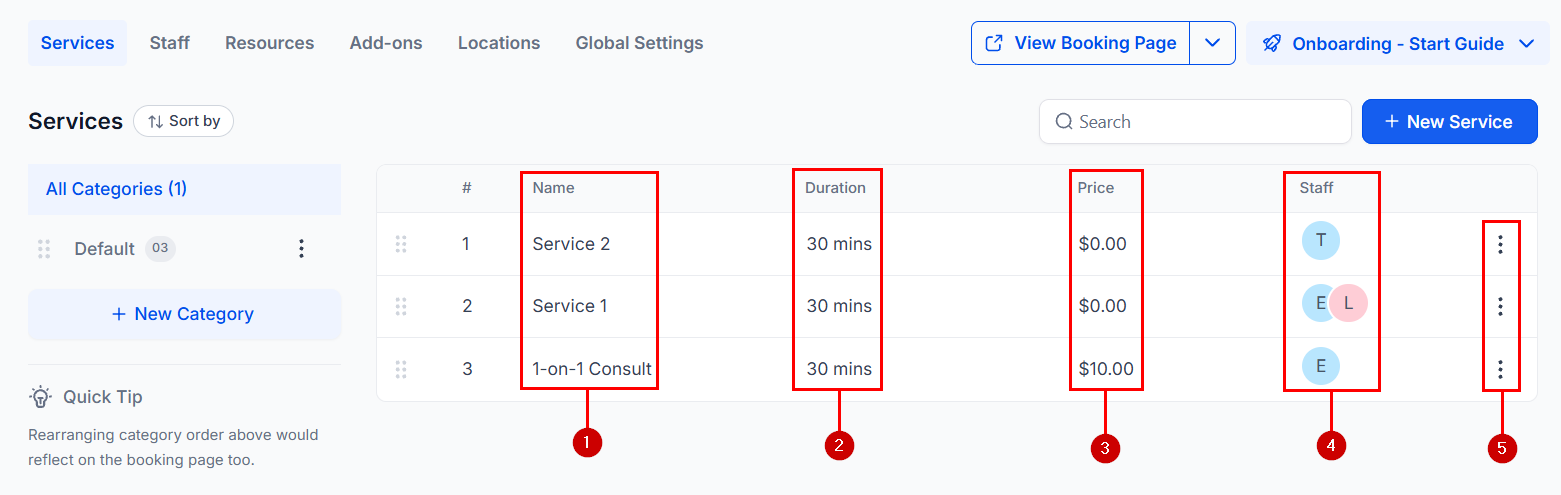
Services V2 list showing service name, duration, price, and assigned staff
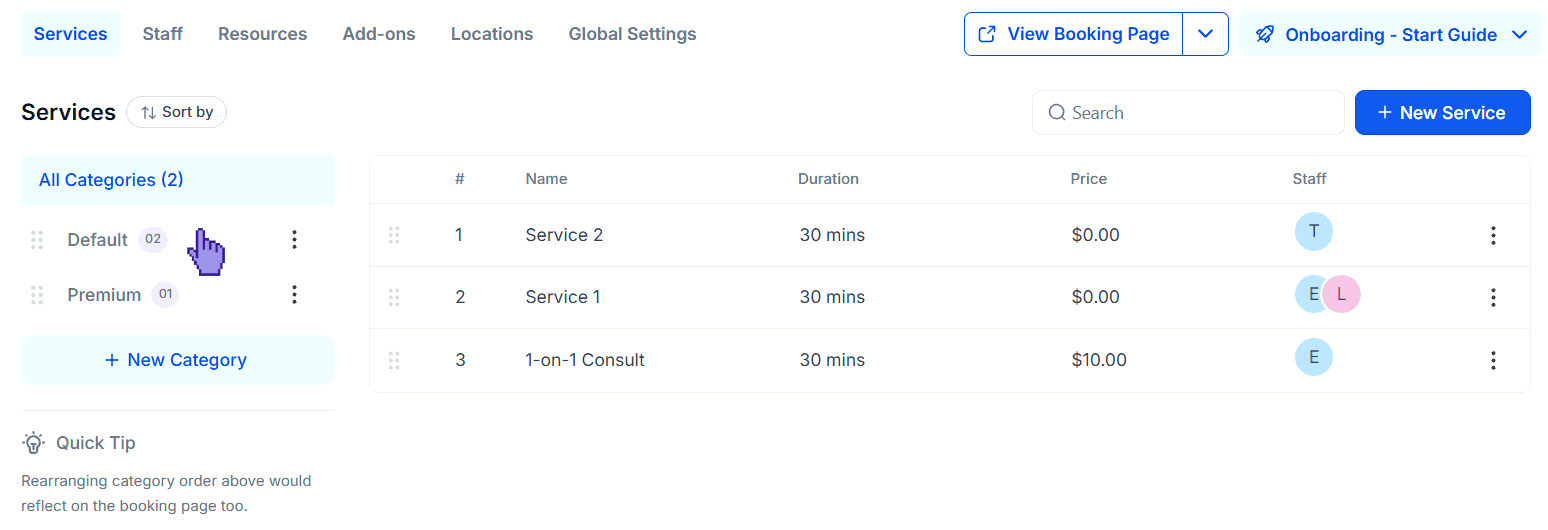
Category sidebar and drag-and-drop reordering in Services V2
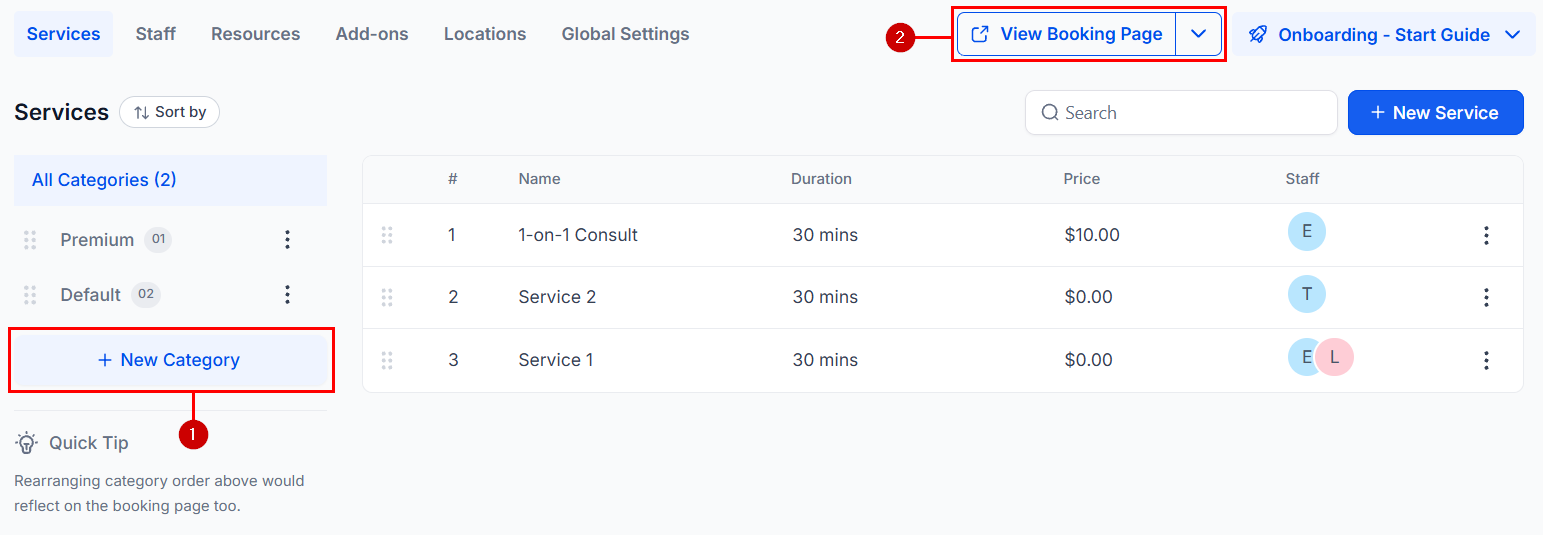
Categories sidebar in Services V2
Creating a service
Open the Services tab
Add a new service
Fill in the service details
Assign a category
Save the service
Staff tab
The Staff tab manages the team members who provide services. It shows each staff member’s name, email, phone number, access level (account user or admin), an edit button, and a share button for their personal calendar link.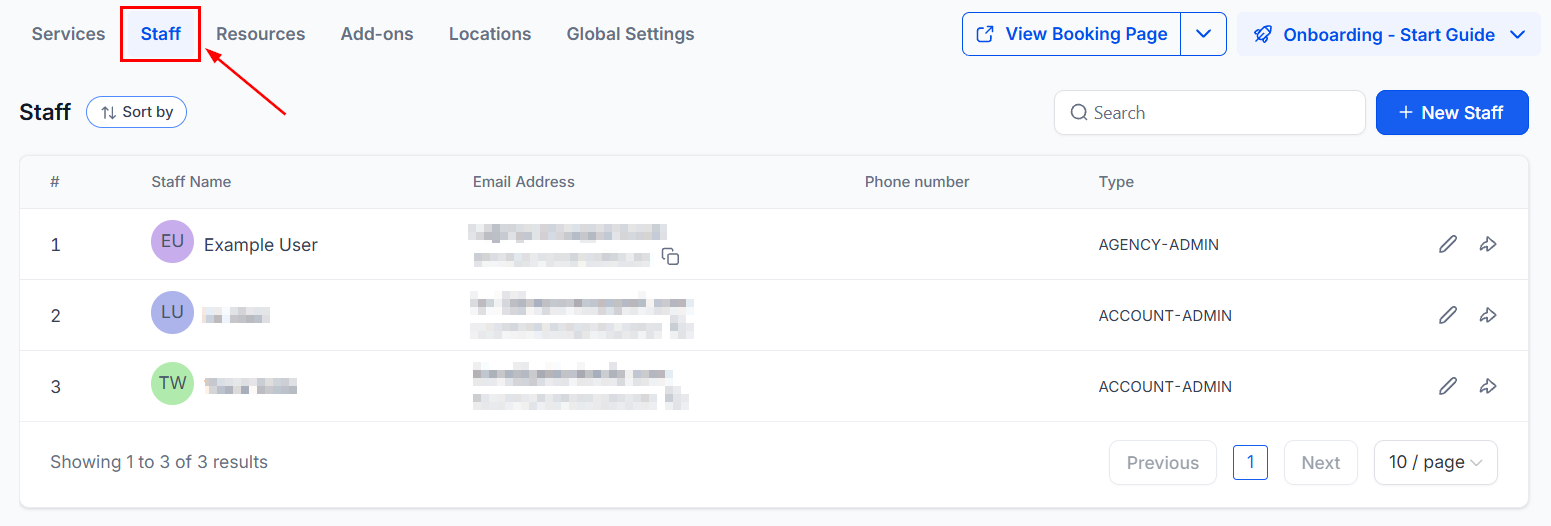
Staff tab displaying team members, contact info, and access levels
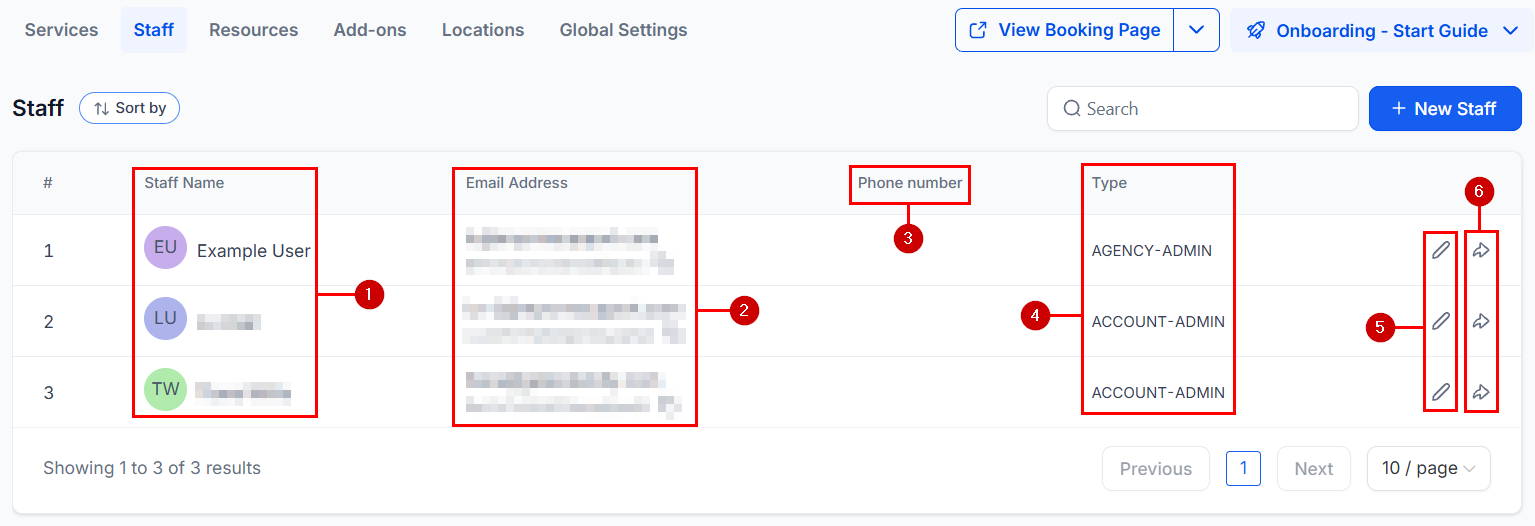
Staff list with name, email, phone, type, and action columns
Adding a new staff member
Click New Staff to add a team member. Fill in the following fields: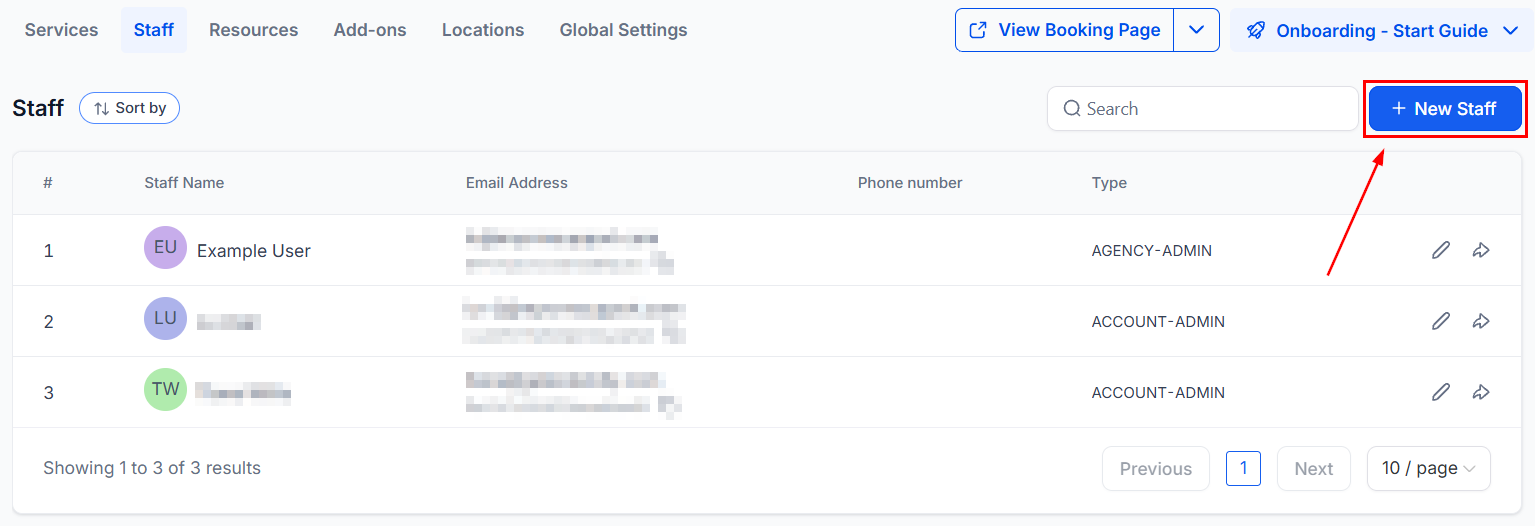
New staff member form with required and optional fields
Managing an existing staff member
Click the pencil icon on a staff row to open the editing module.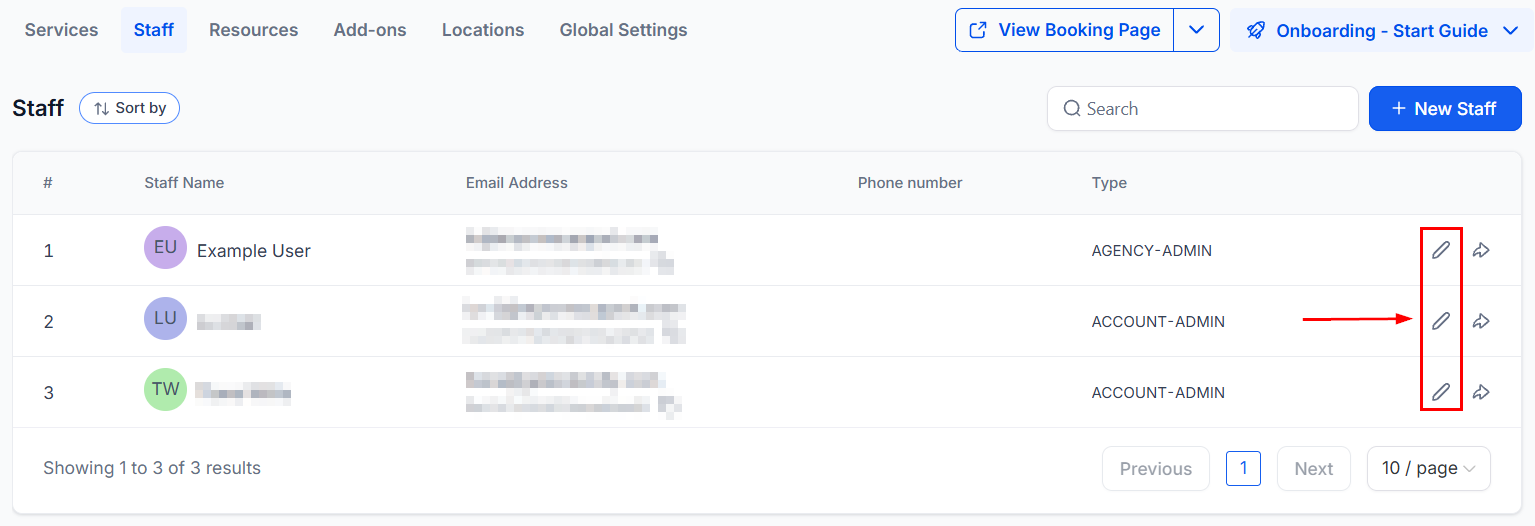
Staff edit module opened via pencil icon
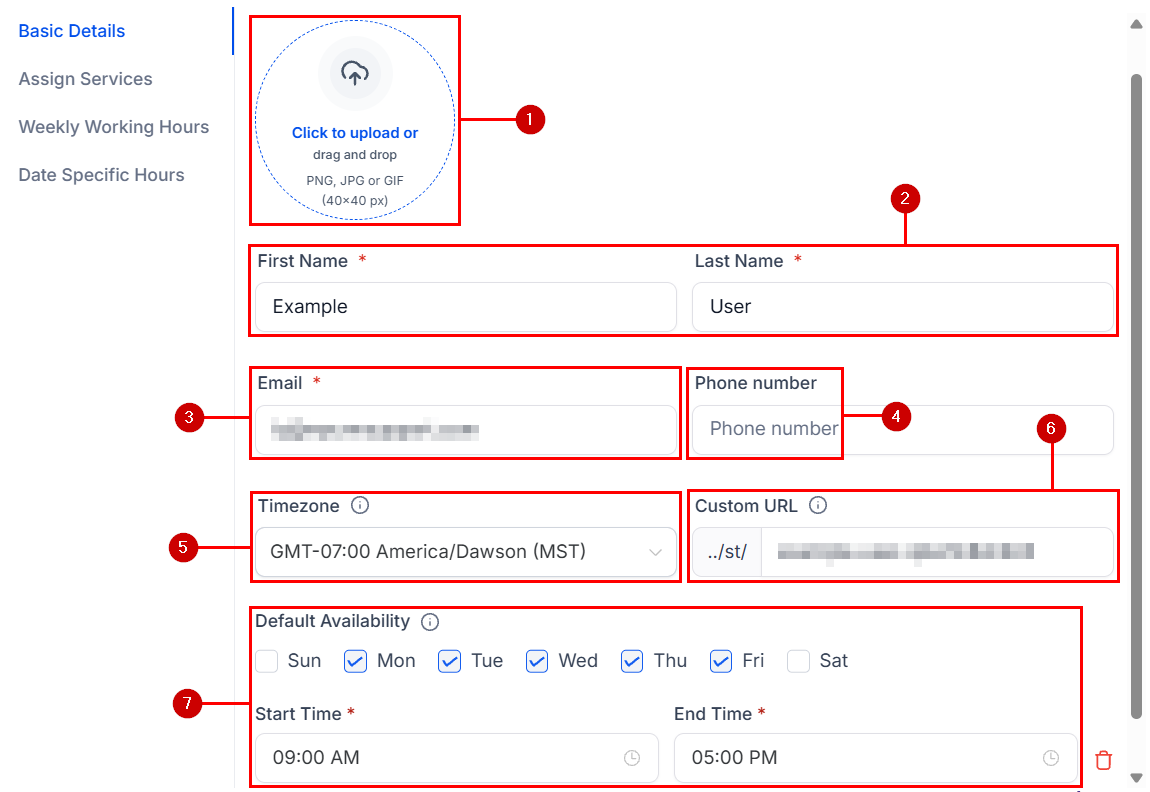
Basic details section inside the staff editor
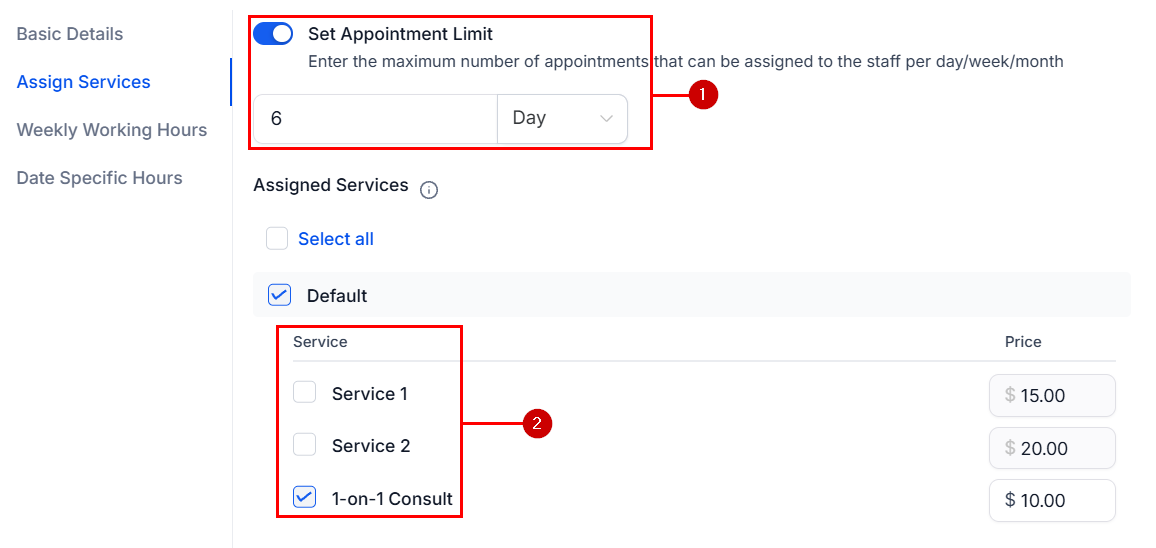
Assigned services panel showing appointment limits and linked services
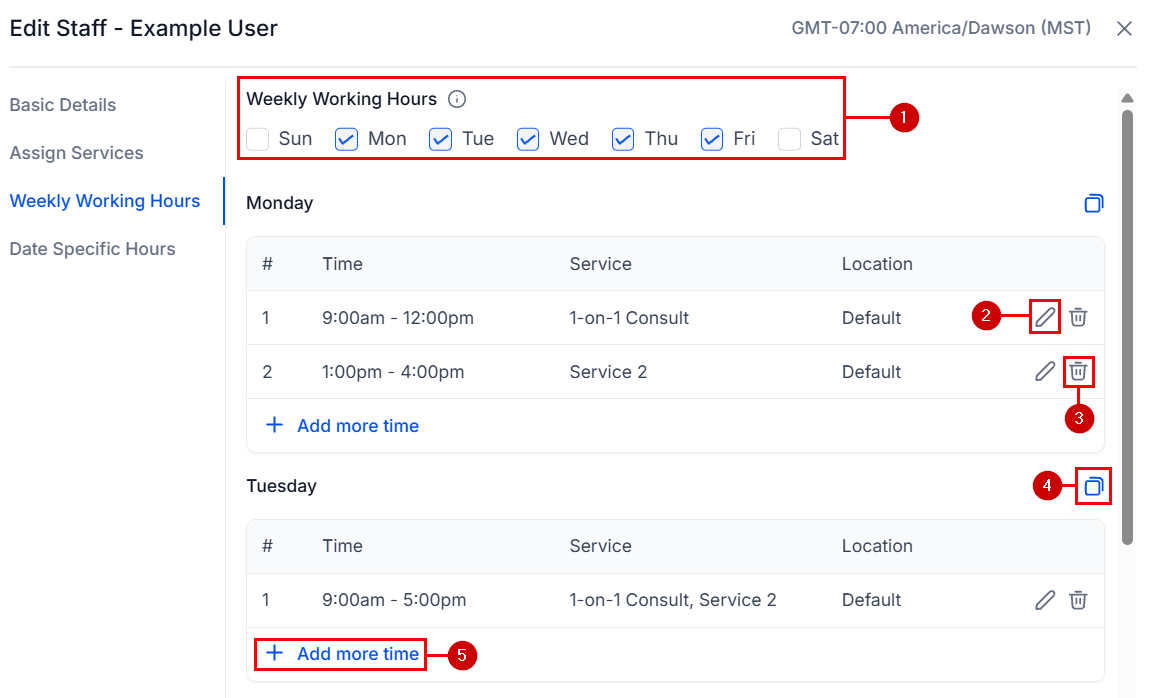
Weekly working hours configuration with per-day schedule controls
Open date-specific hours
Select the date or dates
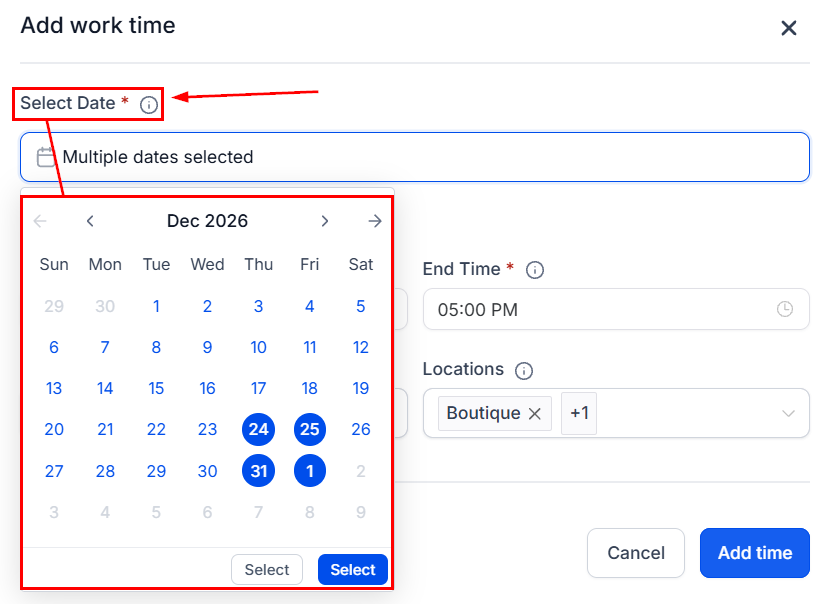
Date picker for selecting a specific override date
Set the availability
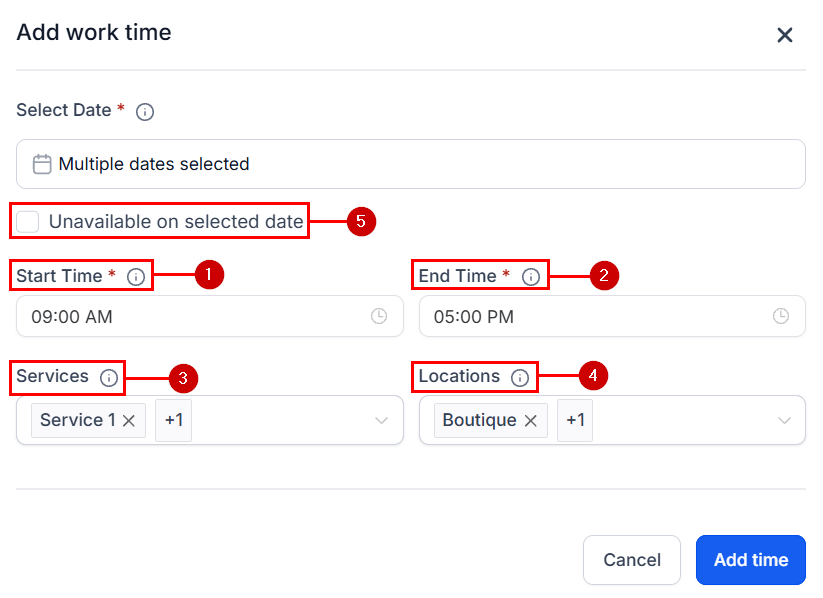
Override configuration showing time, services, and unavailable option
Save and manage
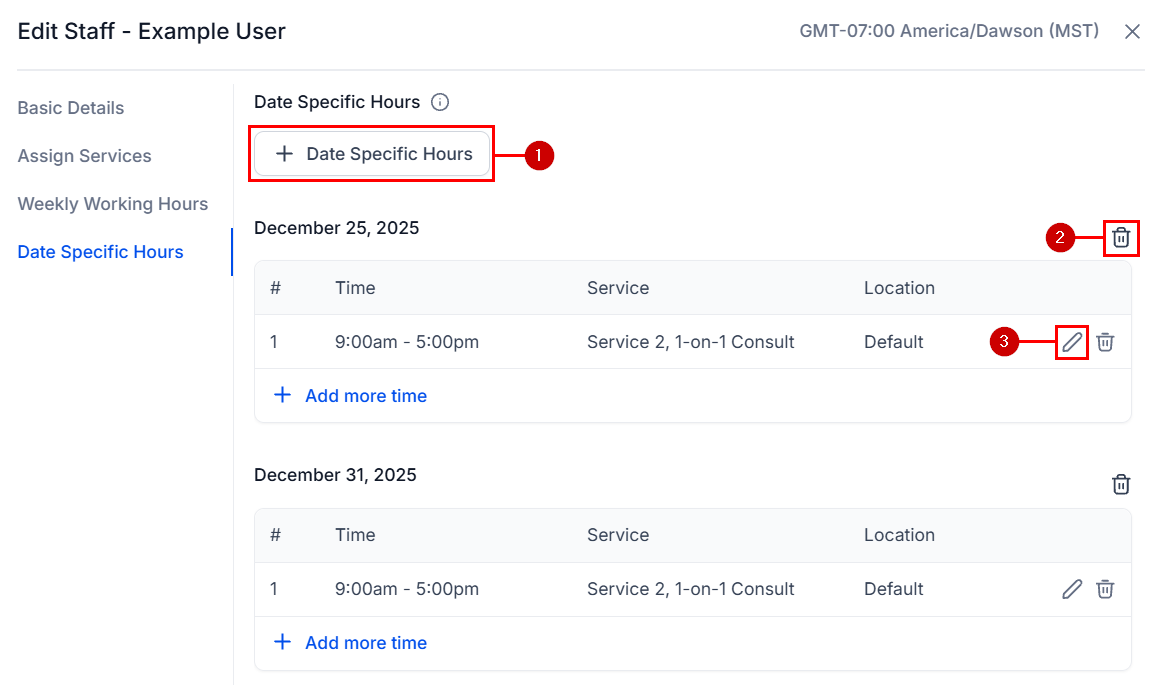
Date-specific hours list showing saved overrides
Resources tab
Resources are the physical assets required to deliver a service: rooms, chairs, stations, equipment, or any other item that can only be used by one (or a limited number of) appointments at a time. When a service that requires a resource is booked, the resource is automatically reserved, preventing overbooking.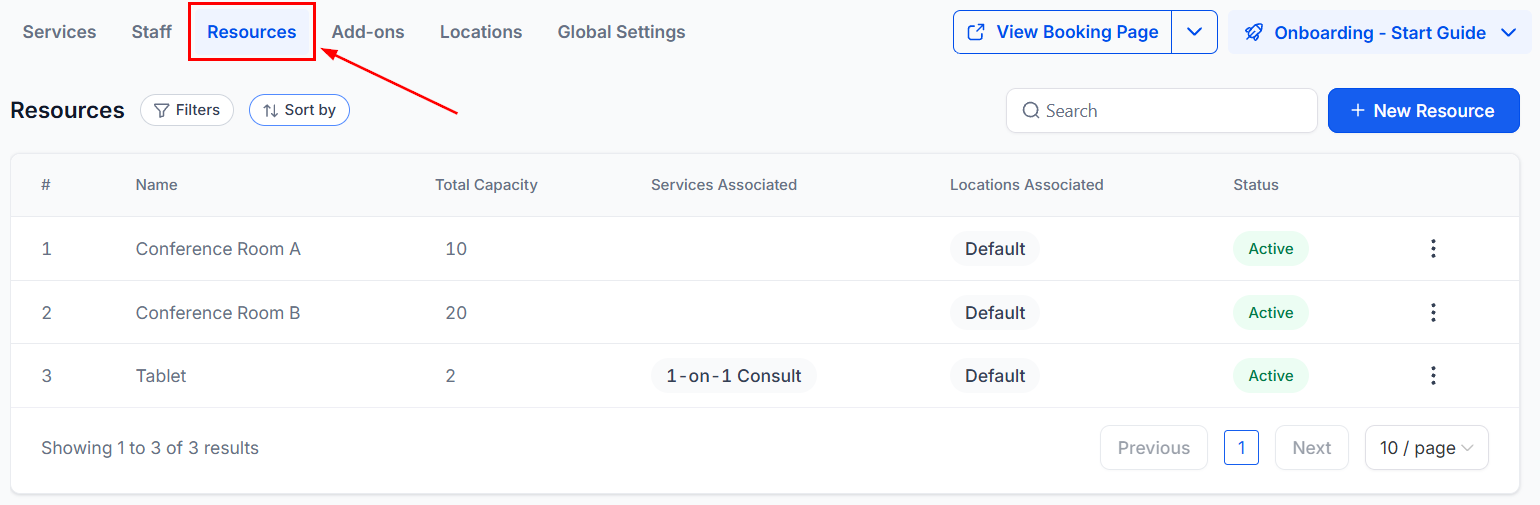
Resources tab showing resource name, capacity, associated services, and locations
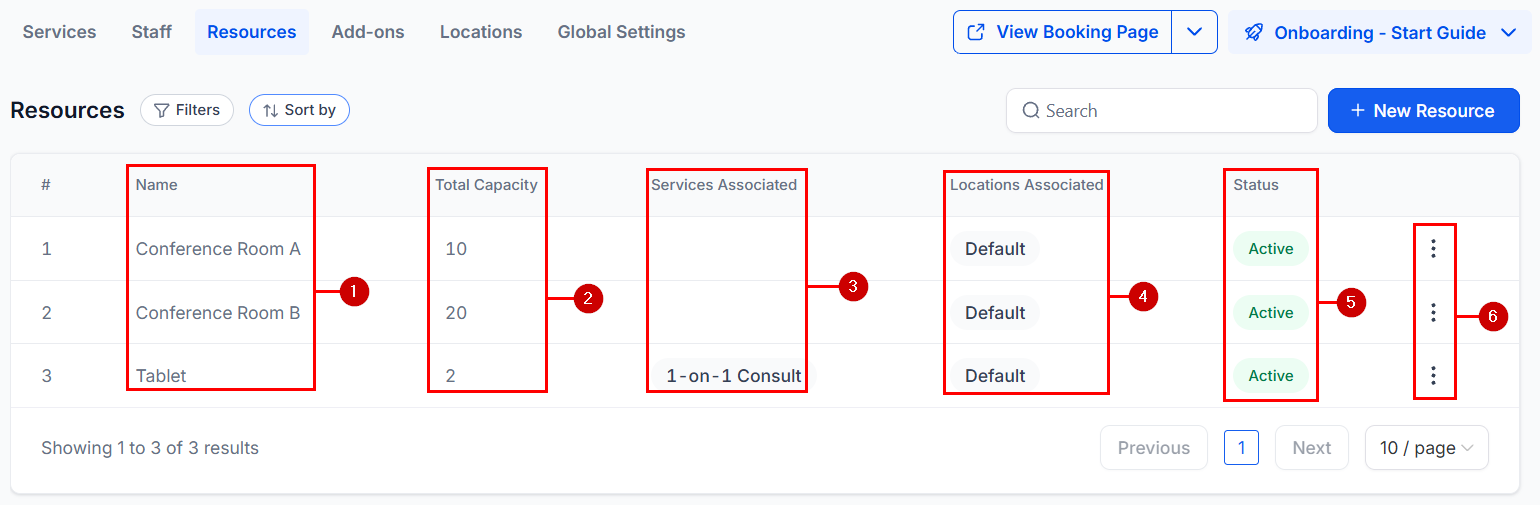
Resource list with capacity, associated services, and status columns
Creating a resource
Click + New Resource
Enter a name
Select the associated service
Set the location
Define the capacity
Create
Managing resources
Use the three-dot menu on any resource row to:- Edit — Open the same form used during creation.
- Deactivate / Activate — Mark a resource unavailable (e.g., a room under maintenance) without deleting it.
- Duplicate — Quickly create a copy of an existing resource configuration.
- Delete — Permanently remove the resource.
Add-ons tab
Add-ons are supplementary services or products that clients can select alongside a primary service at booking time — for example, a deep conditioning treatment added to a haircut, or a video recording package added to a photo session.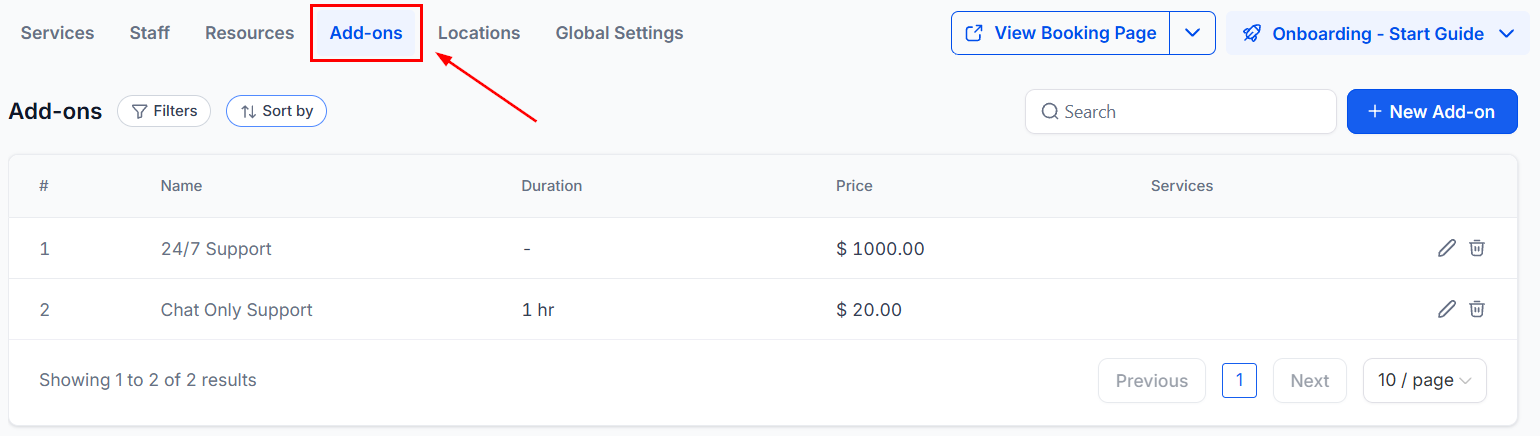
Add-ons tab showing name, duration, price, and associated services
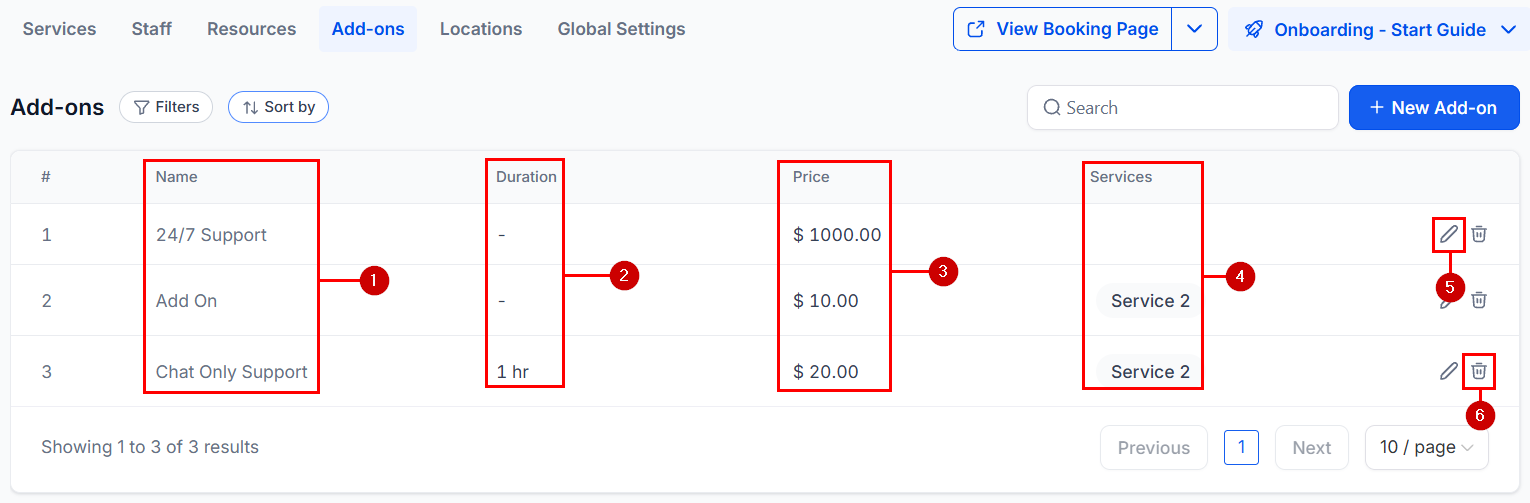
Add-ons list with service associations and action columns
Creating an add-on
Click New Add-on
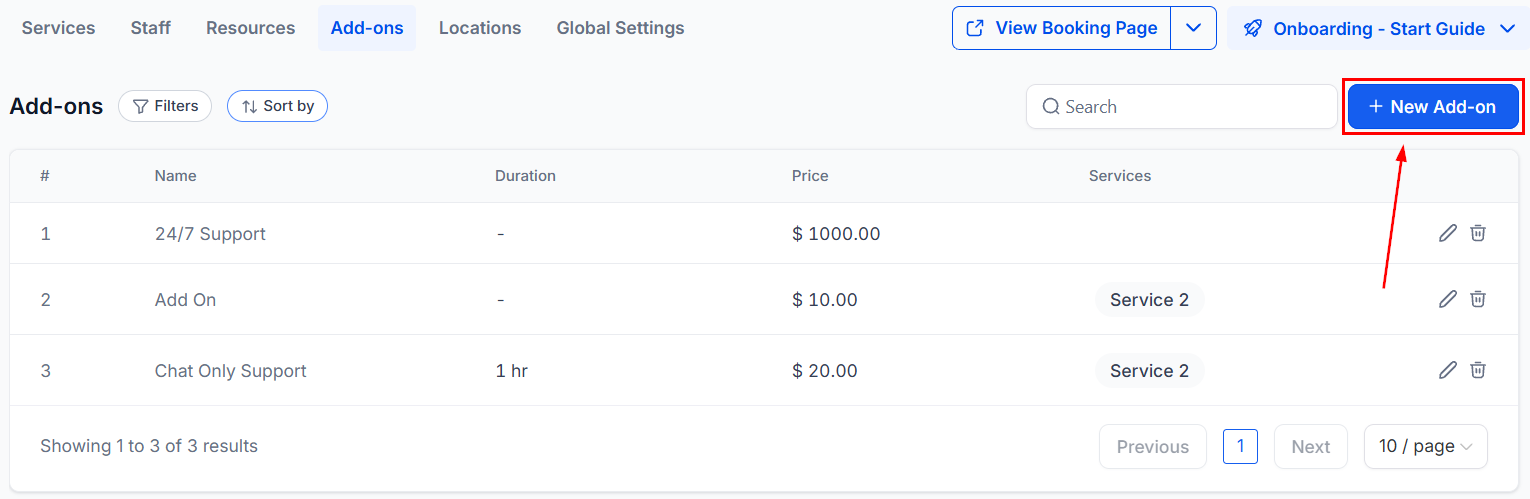
New Add-on button in the add-ons tab
Configure the add-on
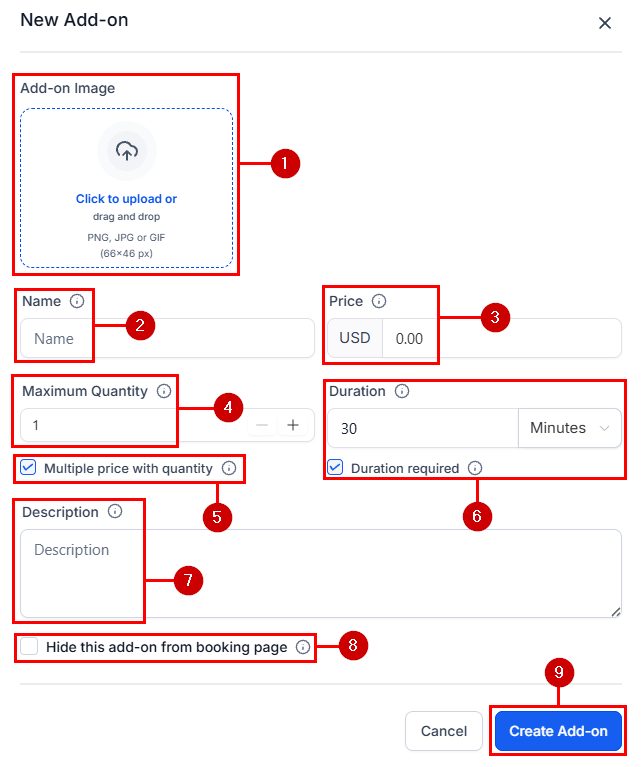
Add-on configuration form with all fields
Save the add-on
Assign to services
Add-on image
Add-on image
Name
Name
Price
Price
Duration
Duration
Maximum quantity
Maximum quantity
Multiple price with quantity
Multiple price with quantity
Description
Description
Hide from booking page
Hide from booking page
Managing service appointments
Service appointments appear in the main Calendars view alongside all other appointment types. Filter to see only service bookings by selecting Services from the view dropdown at the top of the calendar.
Calendar view with Services filter selected, showing service appointments
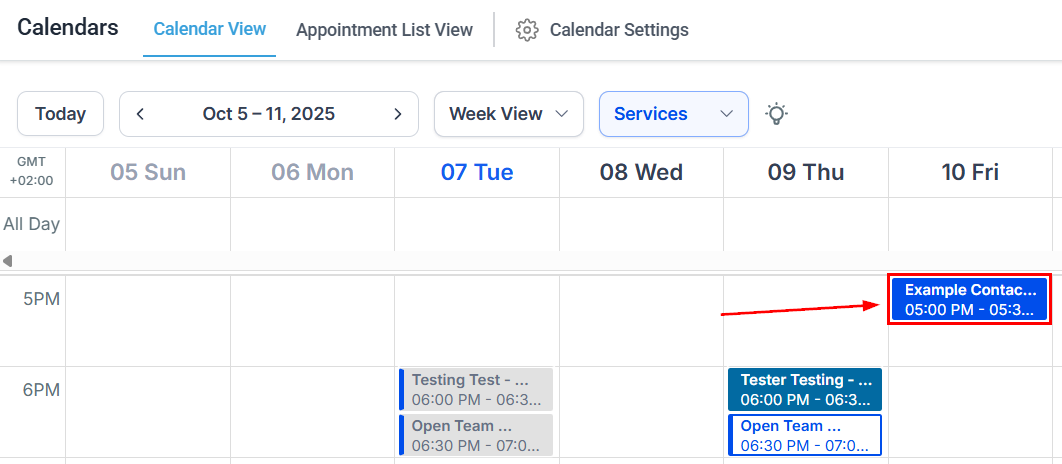
Service appointments displayed on the calendar
Viewing appointment details
Click any appointment to open the details panel on the right side. This panel shows:- Appointment time (day, date, timezone)
- Contact information (clicking the contact name opens their contact card)
- Location (shows “Default” for single-location businesses)
- Booked by (contact, staff, automation, etc.)
- Source (where the booking came from)
- Service details: service name, duration, assigned staff, resources, and add-ons
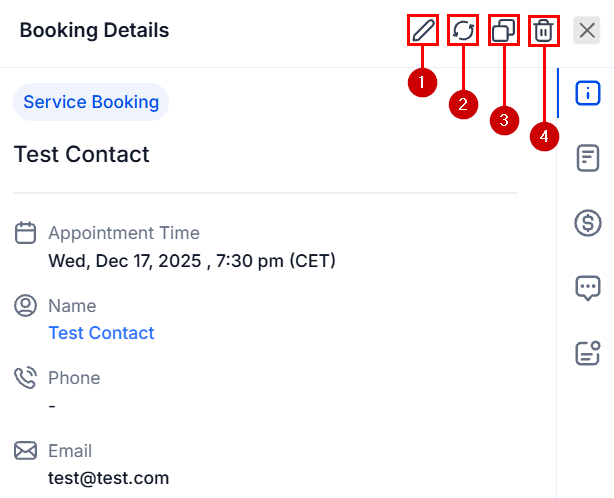
Appointment detail panel with action buttons and full service information
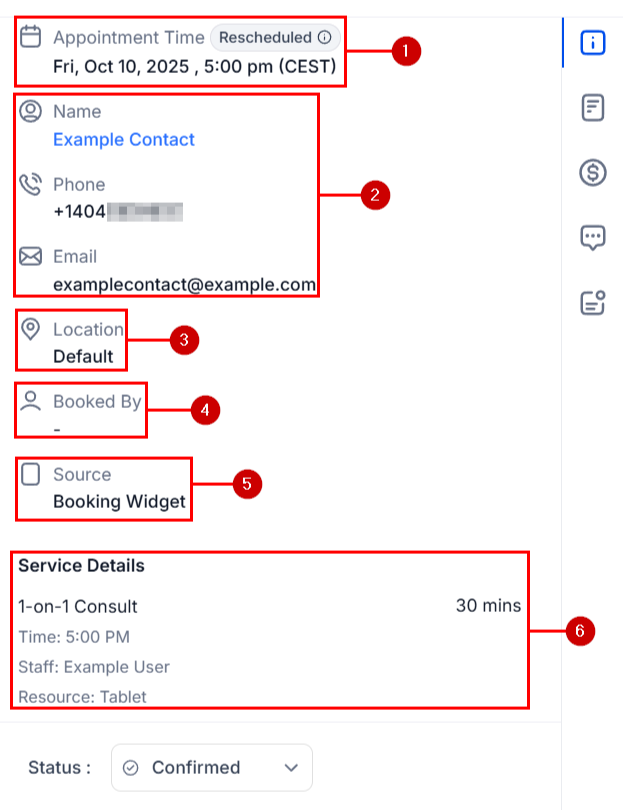
Appointment information including service, staff, resources, and add-ons
Editing an appointment
Click Edit in the appointment detail panel to open the edit module. From here you can:- Add or remove services and add-ons
- Change the assigned staff member
- Modify the service variant
- Update the location
- Change the appointment title, date, and time
- Adjust the timezone
- Update coupon codes
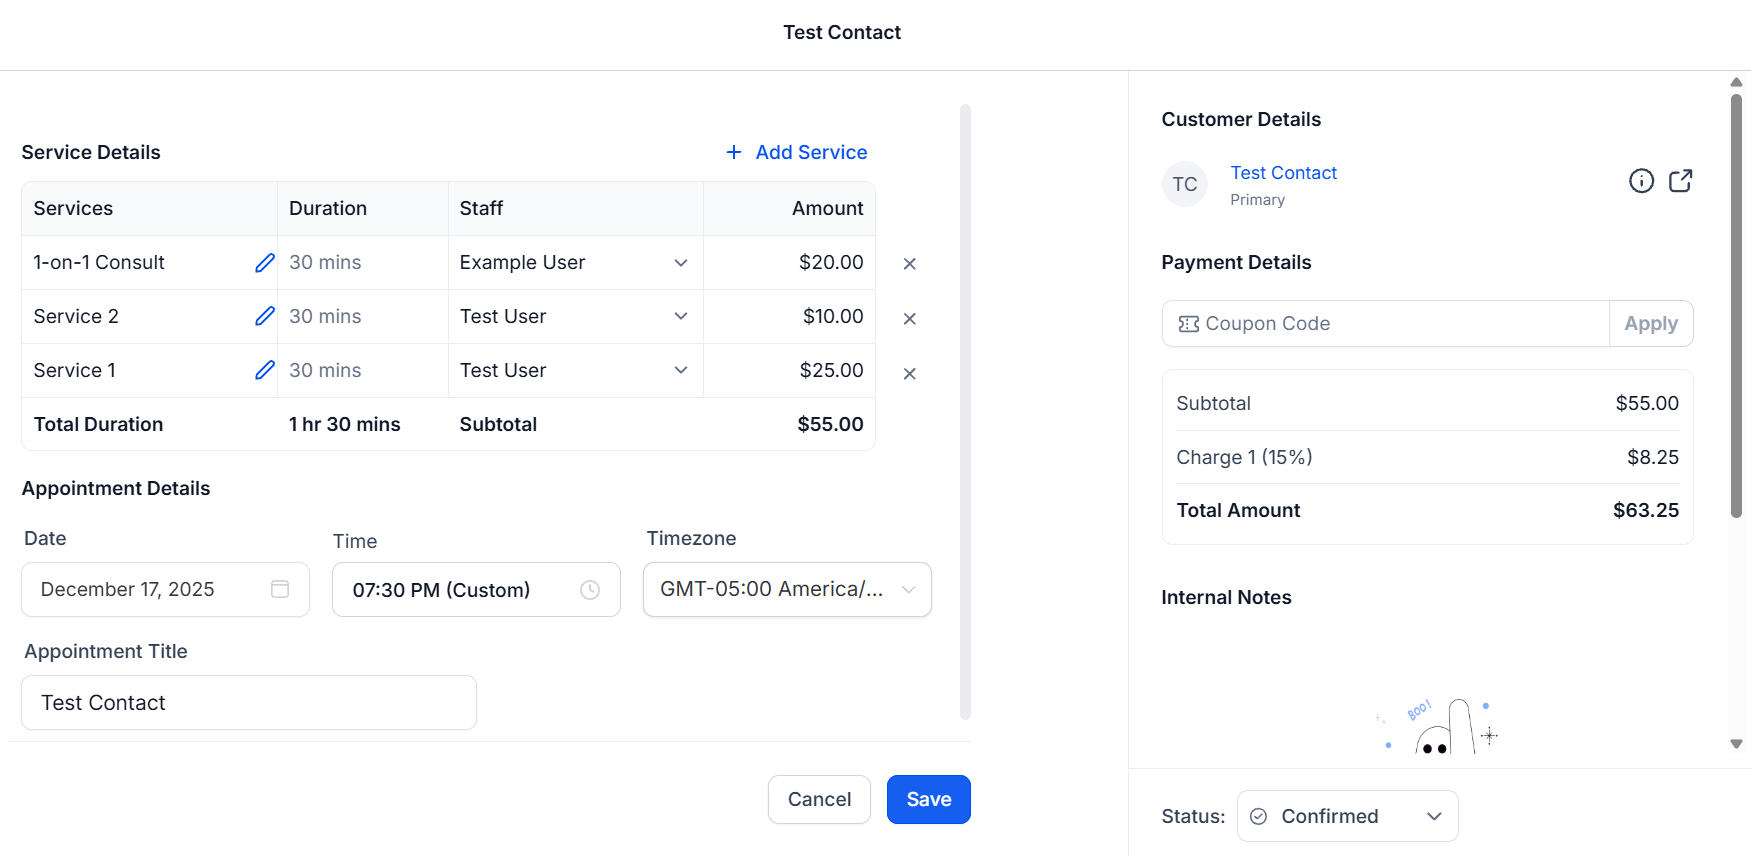
Appointment edit module showing all editable fields
Rescheduling an appointment
Click Reschedule in the appointment detail panel to pick a new day and time for the booking.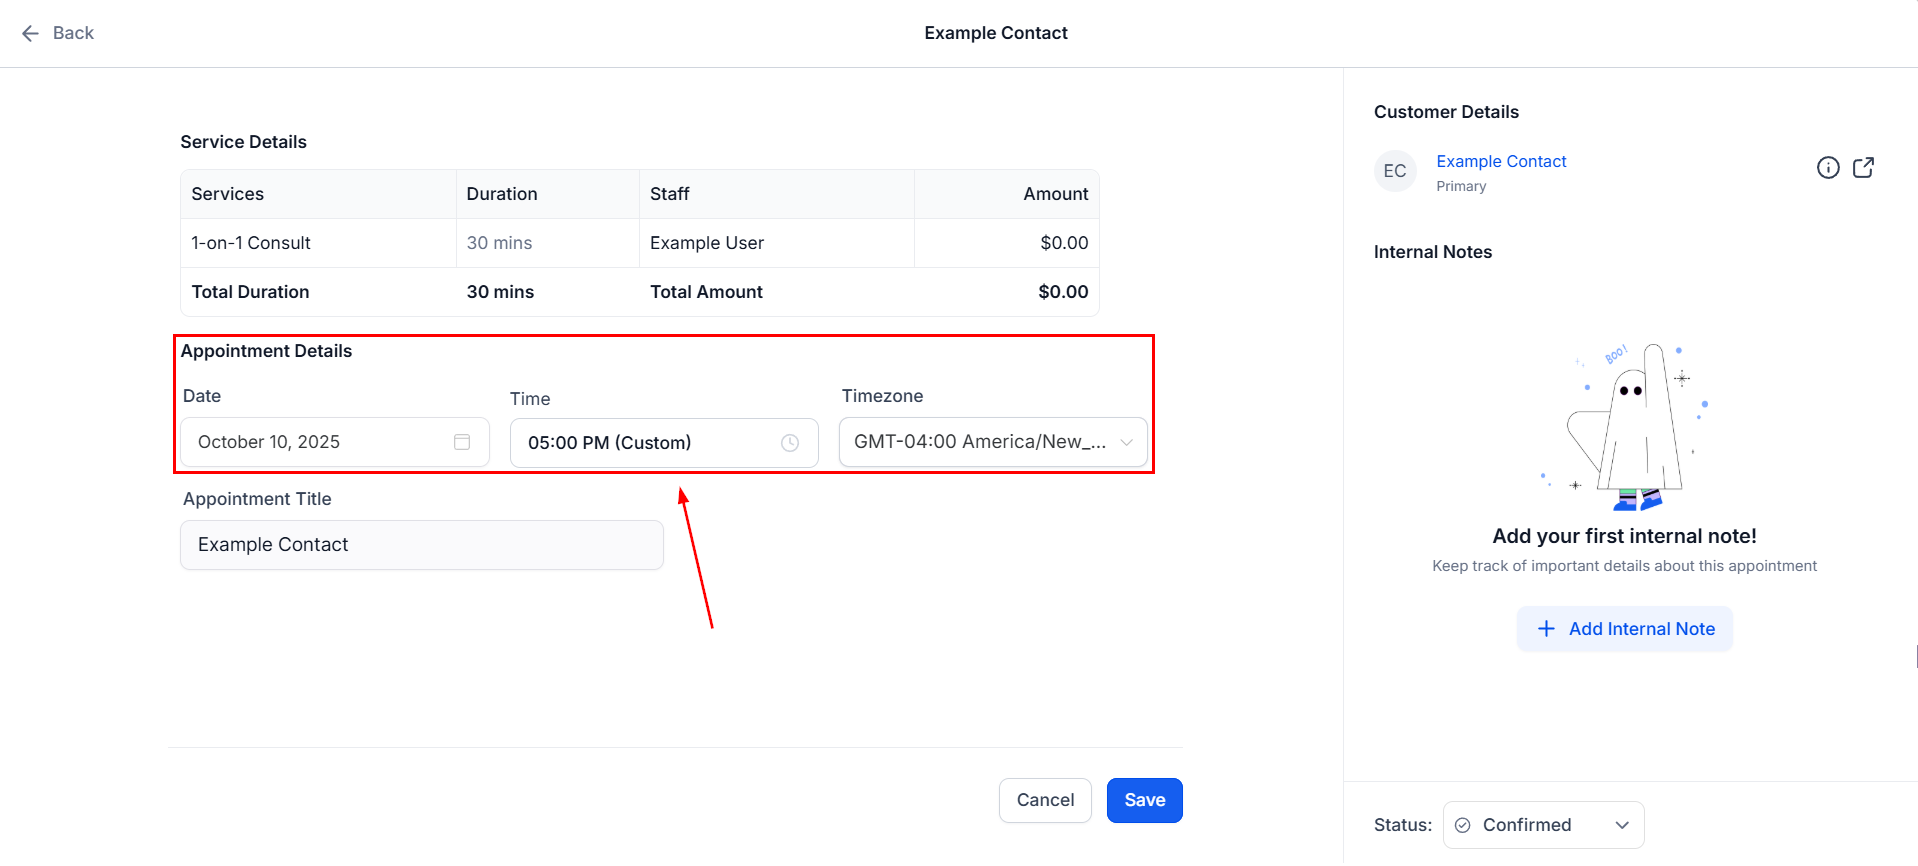
Reschedule view with date and time selection
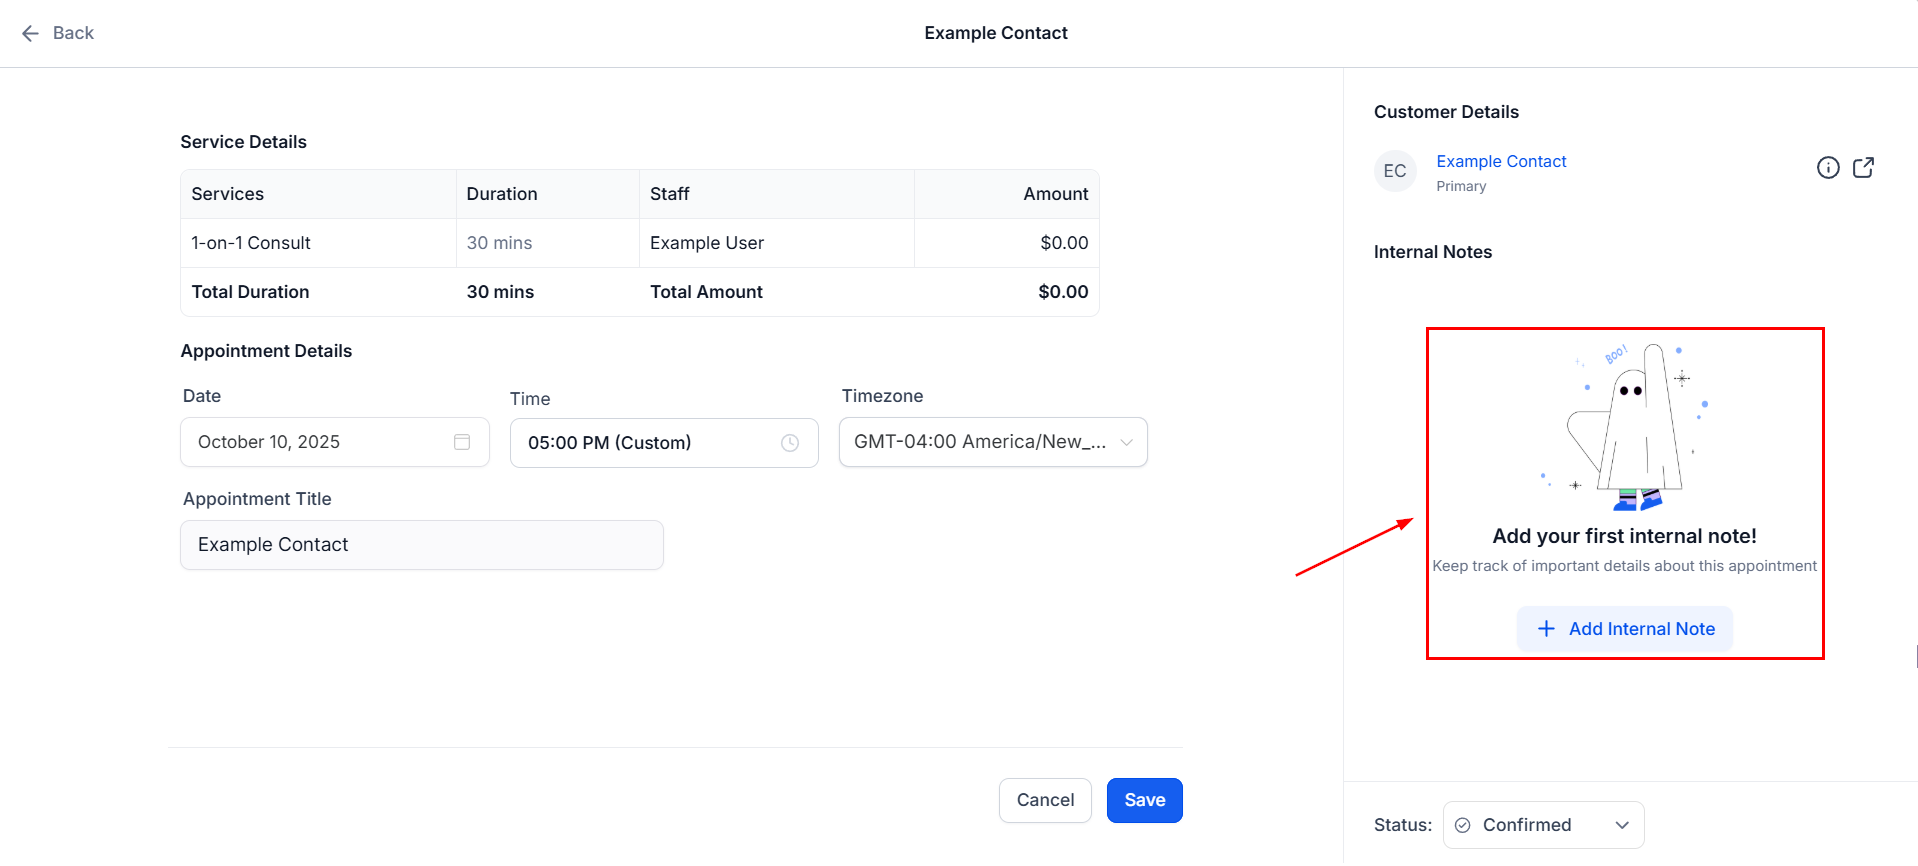
Internal notes section inside the appointment panel
Duplicating an appointment
Click Duplicate to open a booking form pre-filled with the current appointment’s details. Modify the contact, services, add-ons, staff, or timing as needed, then click Book Appointment.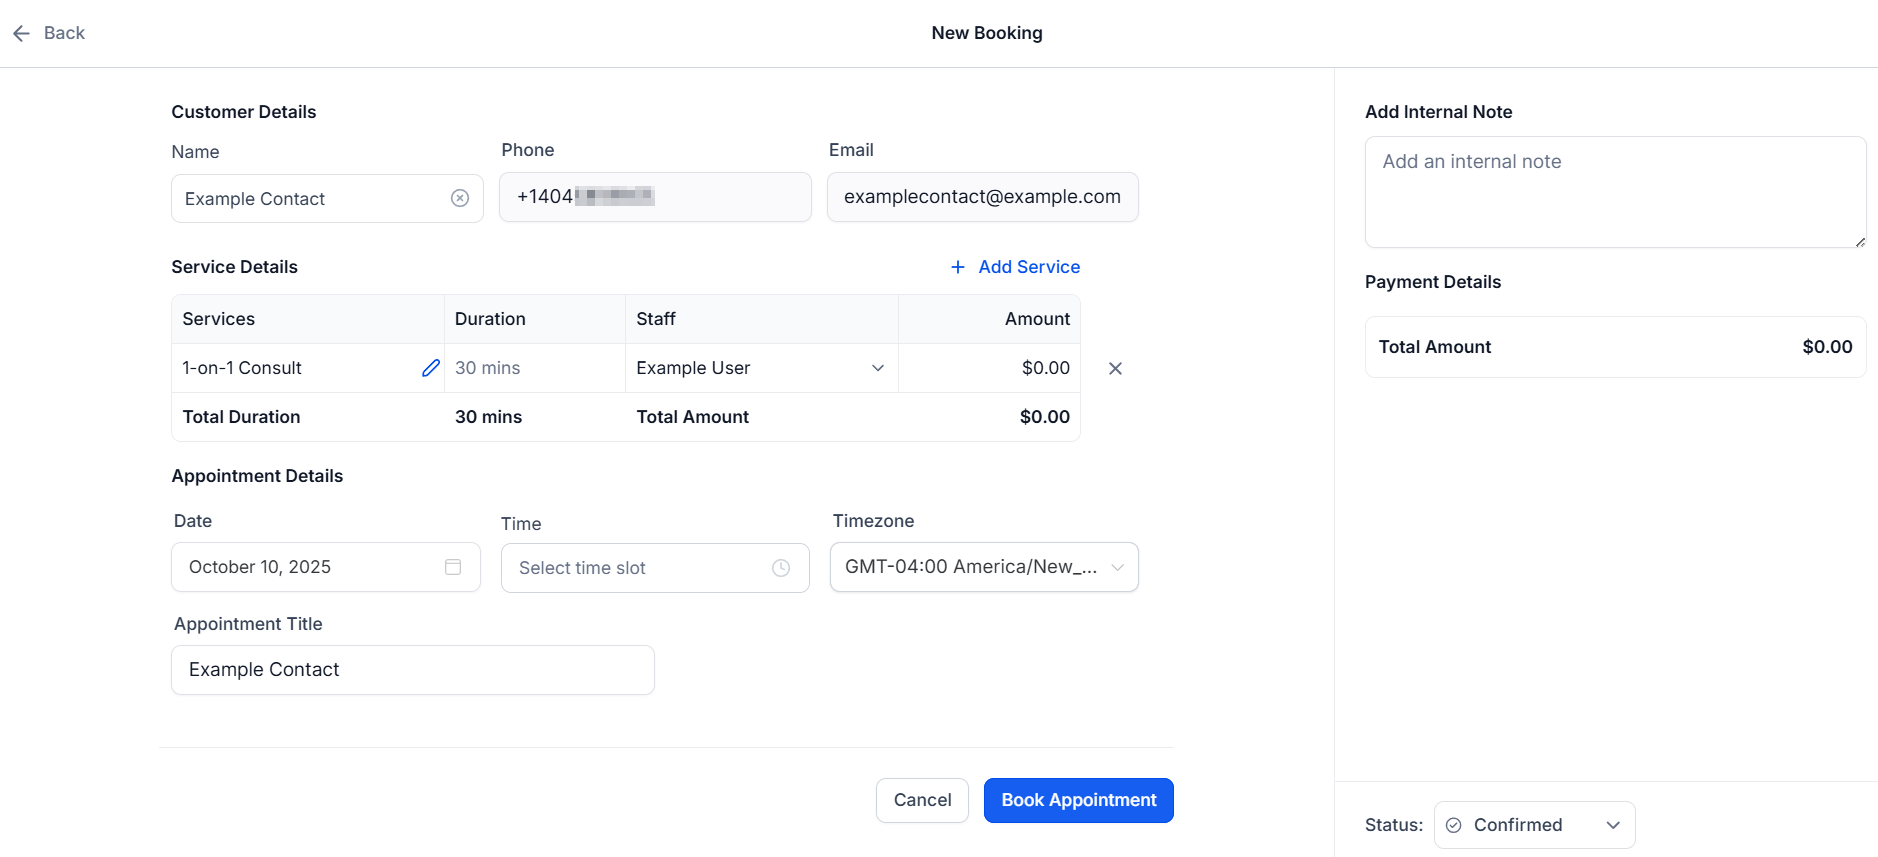
Duplicate appointment modal with pre-filled service and contact information
Creating a new appointment manually
Click + New
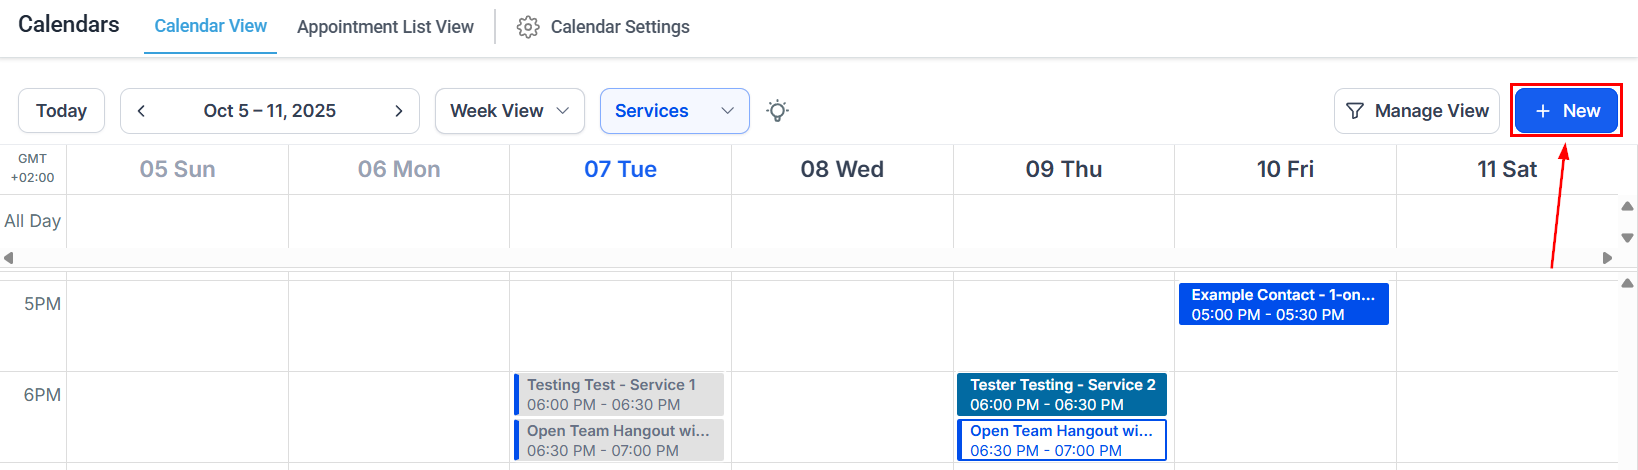
New appointment button in the calendar toolbar
Select a contact
Add services
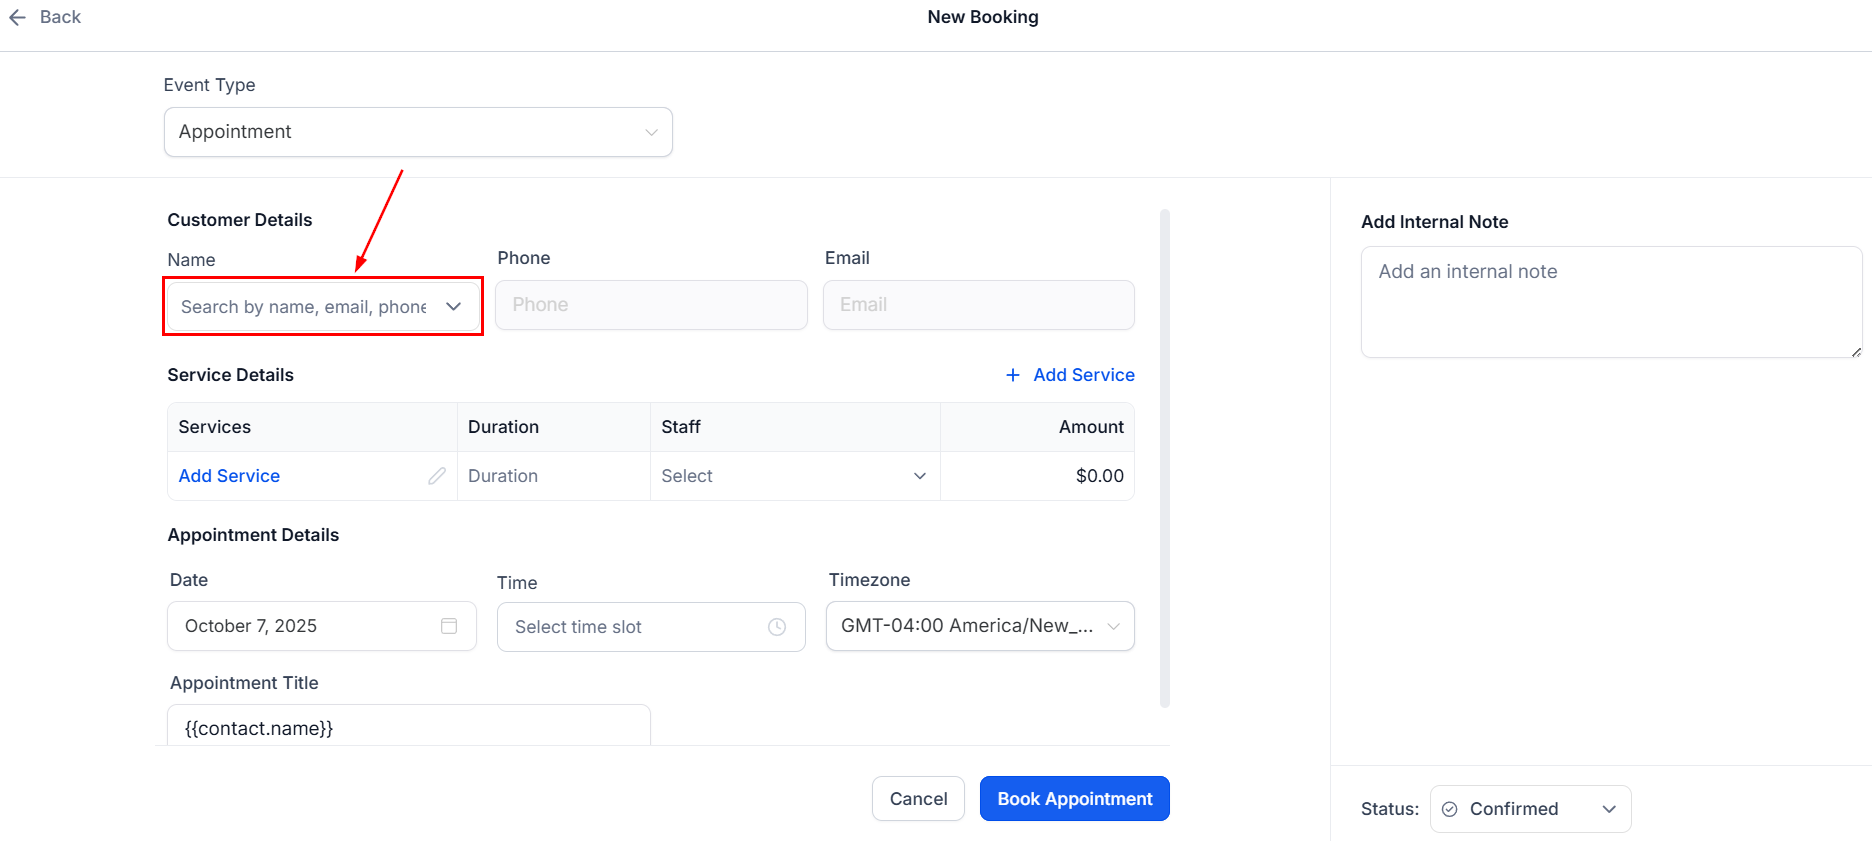
New appointment modal with contact and service selection
Add add-ons if needed
Set date, time, and book
Global settings
The Global Settings tab controls configurations that apply across all your services. It is divided into six sections.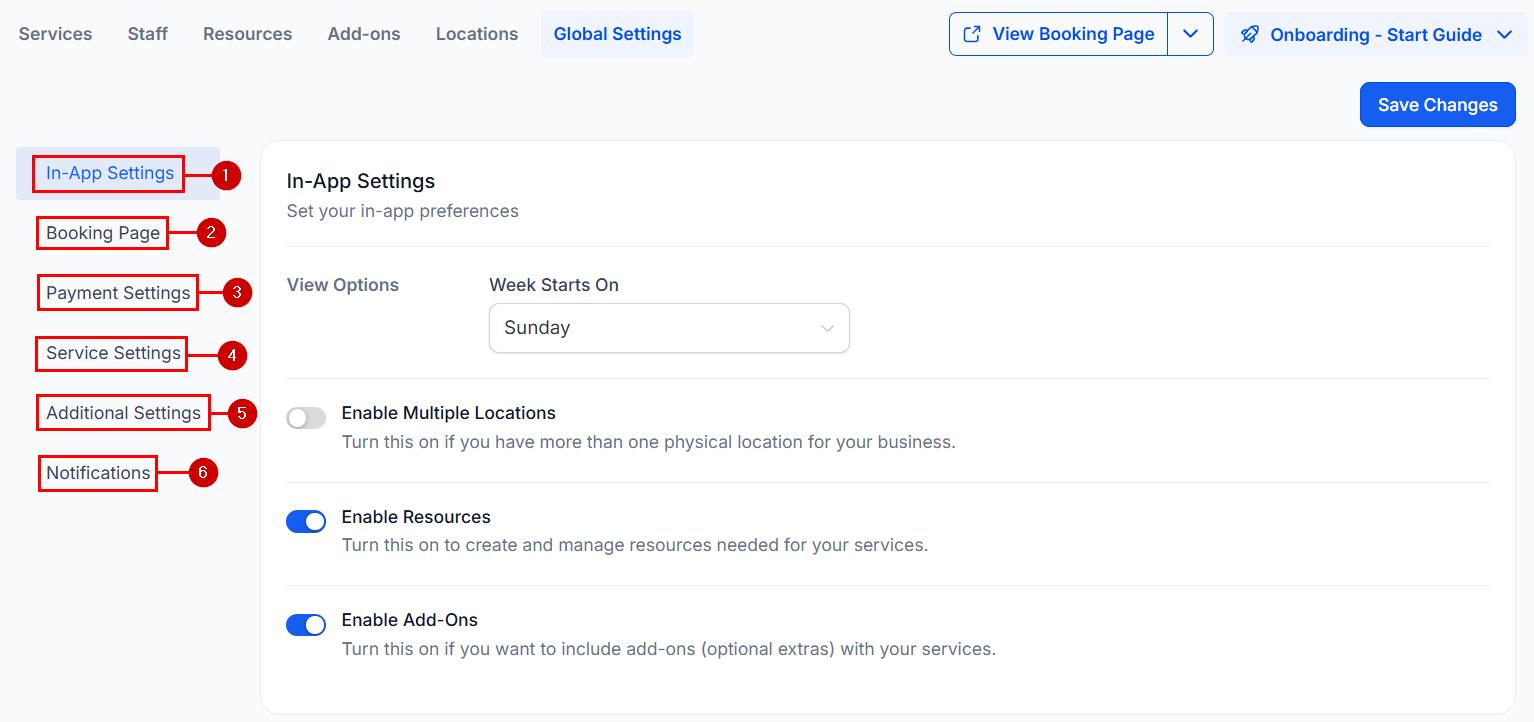
Global Settings tab showing the six configuration sections
In-app settings
Control your preferences for working inside HoopAI: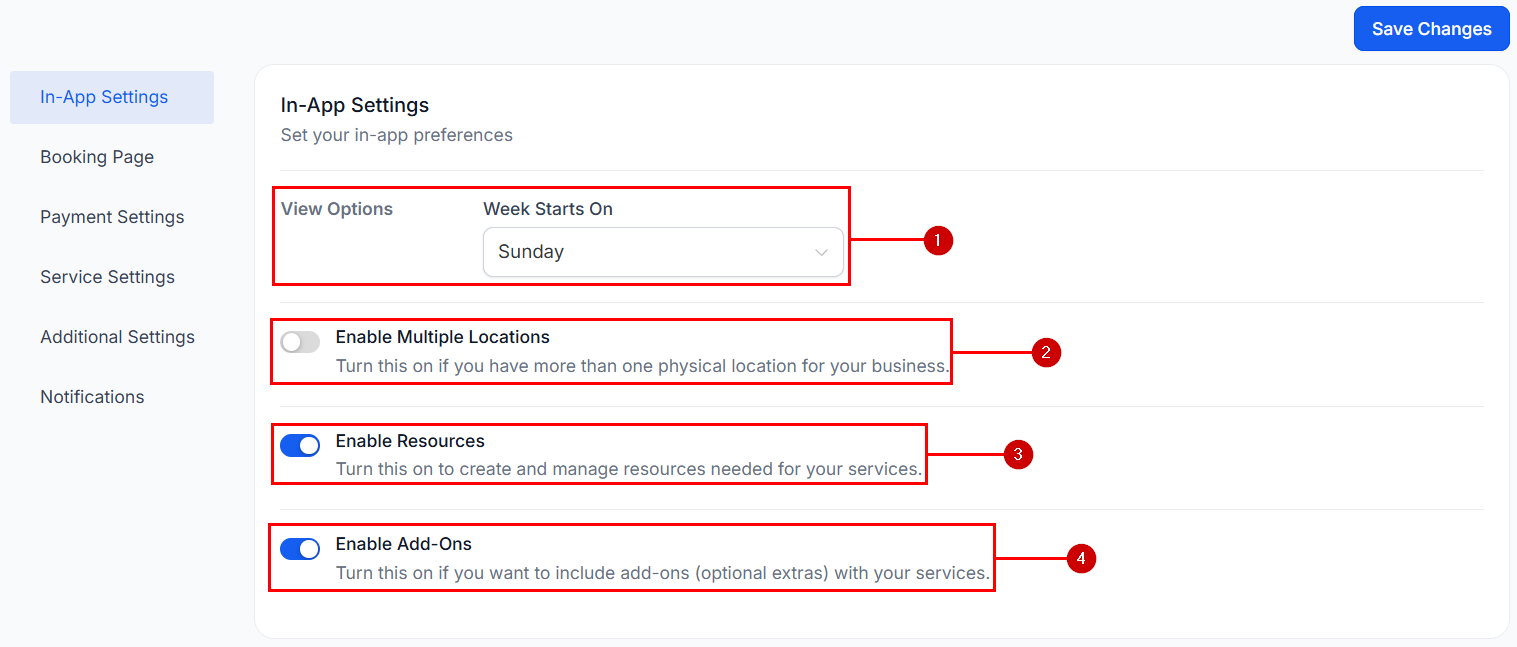
In-app settings panel with calendar and feature toggles
Booking page
Customize the client-facing booking experience:
Booking page customization — company name, logo, and slug
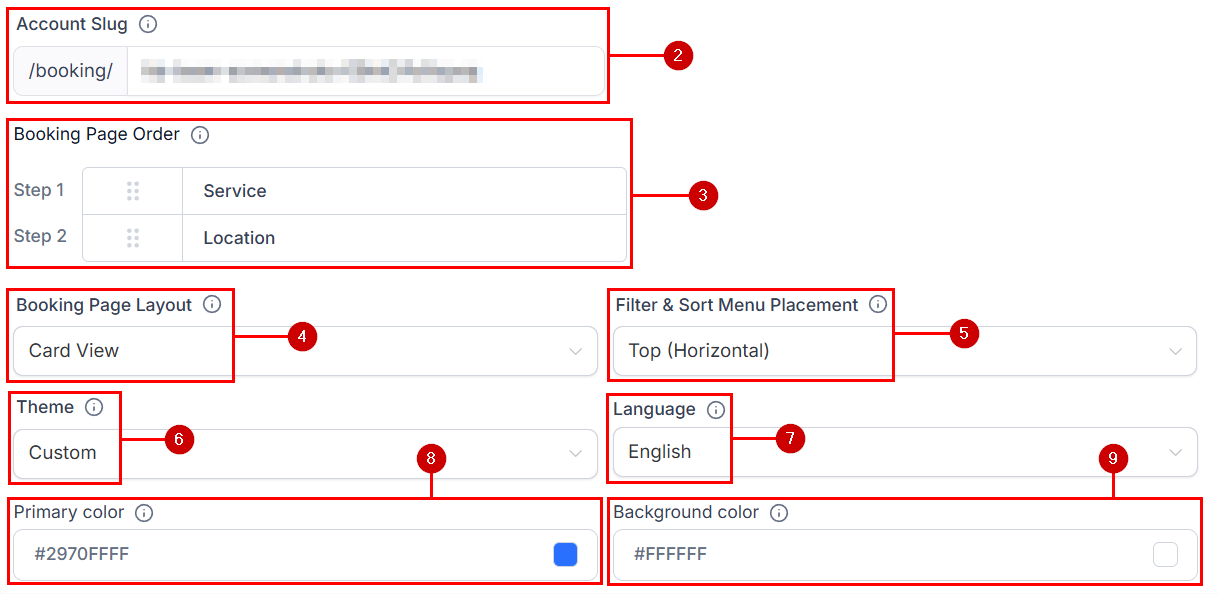
Booking page customization — layout, theme, language, and colors
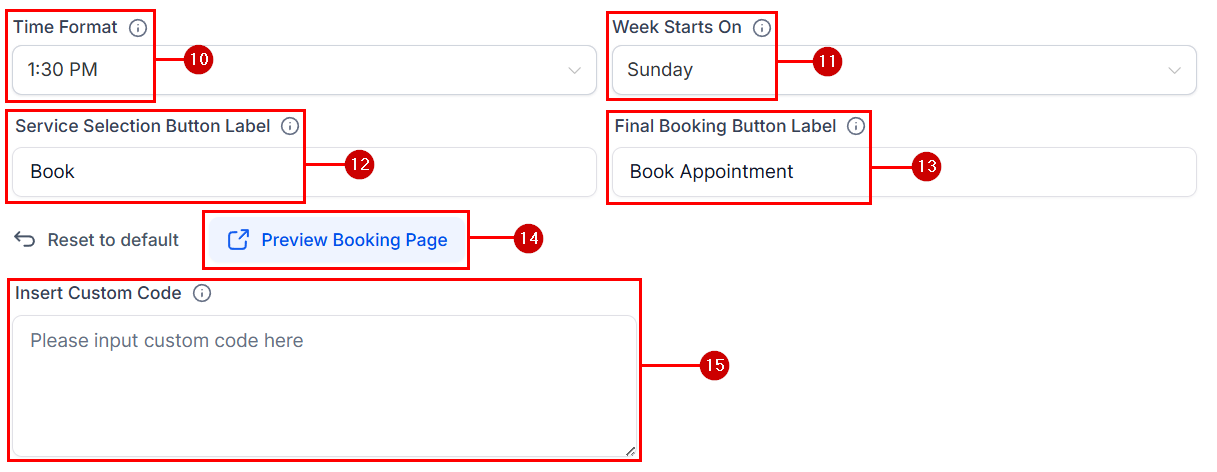
Booking page customization — custom CSS and button labels
- Company name and logo — Displayed at the top of the booking page
- Account slug — Unique identifier used as the base for all your service URLs
- Booking page order — Define whether clients choose a service or location first
- Booking page layout — Card view, list view, or client-selectable
- Filter and sort placement — Top or left of the booking page
- Theme — Light, dark, or custom (with custom colors)
- Language — Displayed language for the booking page
- Time format — 12-hour or 24-hour
- Service selection button label — Customize the text on the service select button
- Final booking button label — Customize the text on the booking confirmation button
- Insert custom code — Add custom CSS to further style the booking page
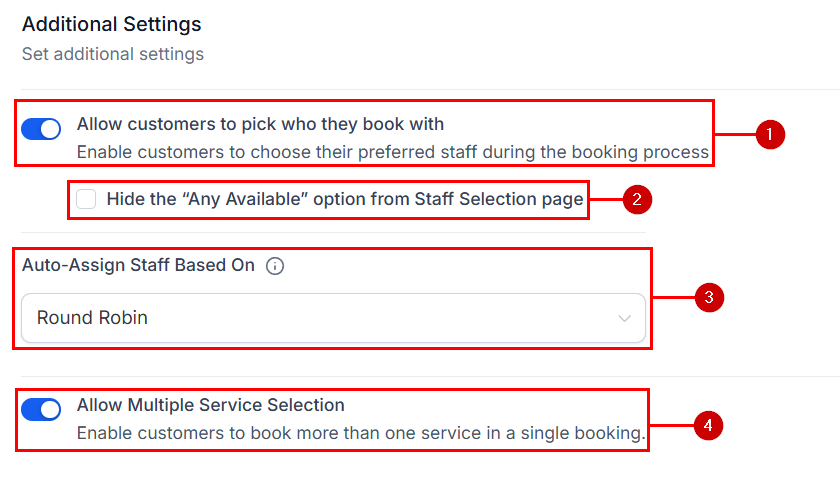
Additional settings for staff selection and multi-service booking
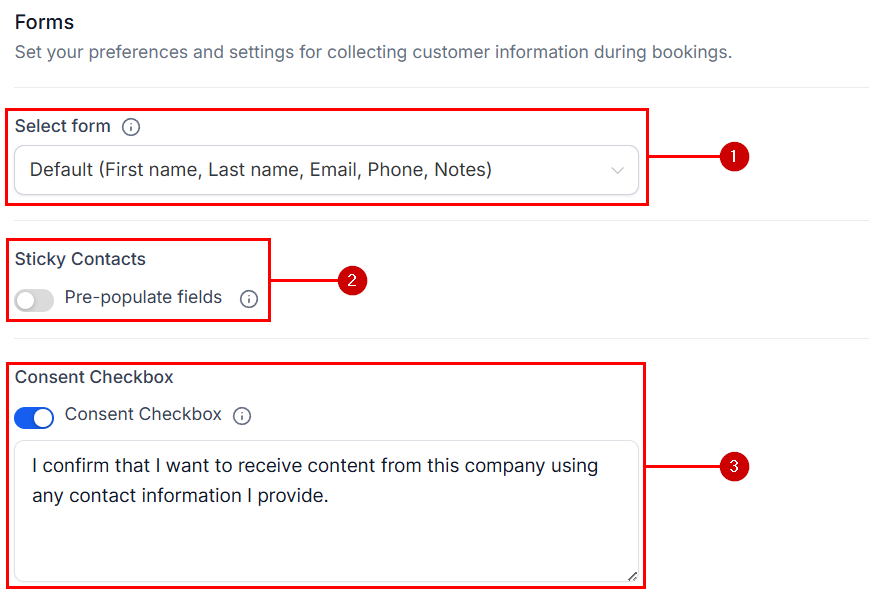
Form settings for customer data collection
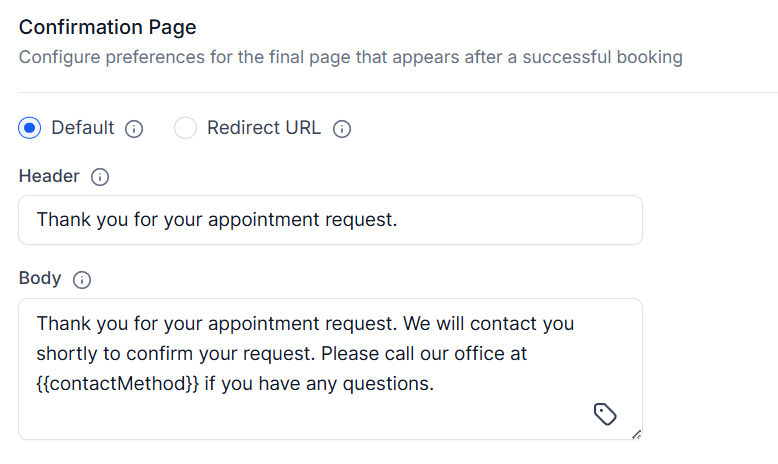
Confirmation page settings
Payment settings
Configure how clients pay for services.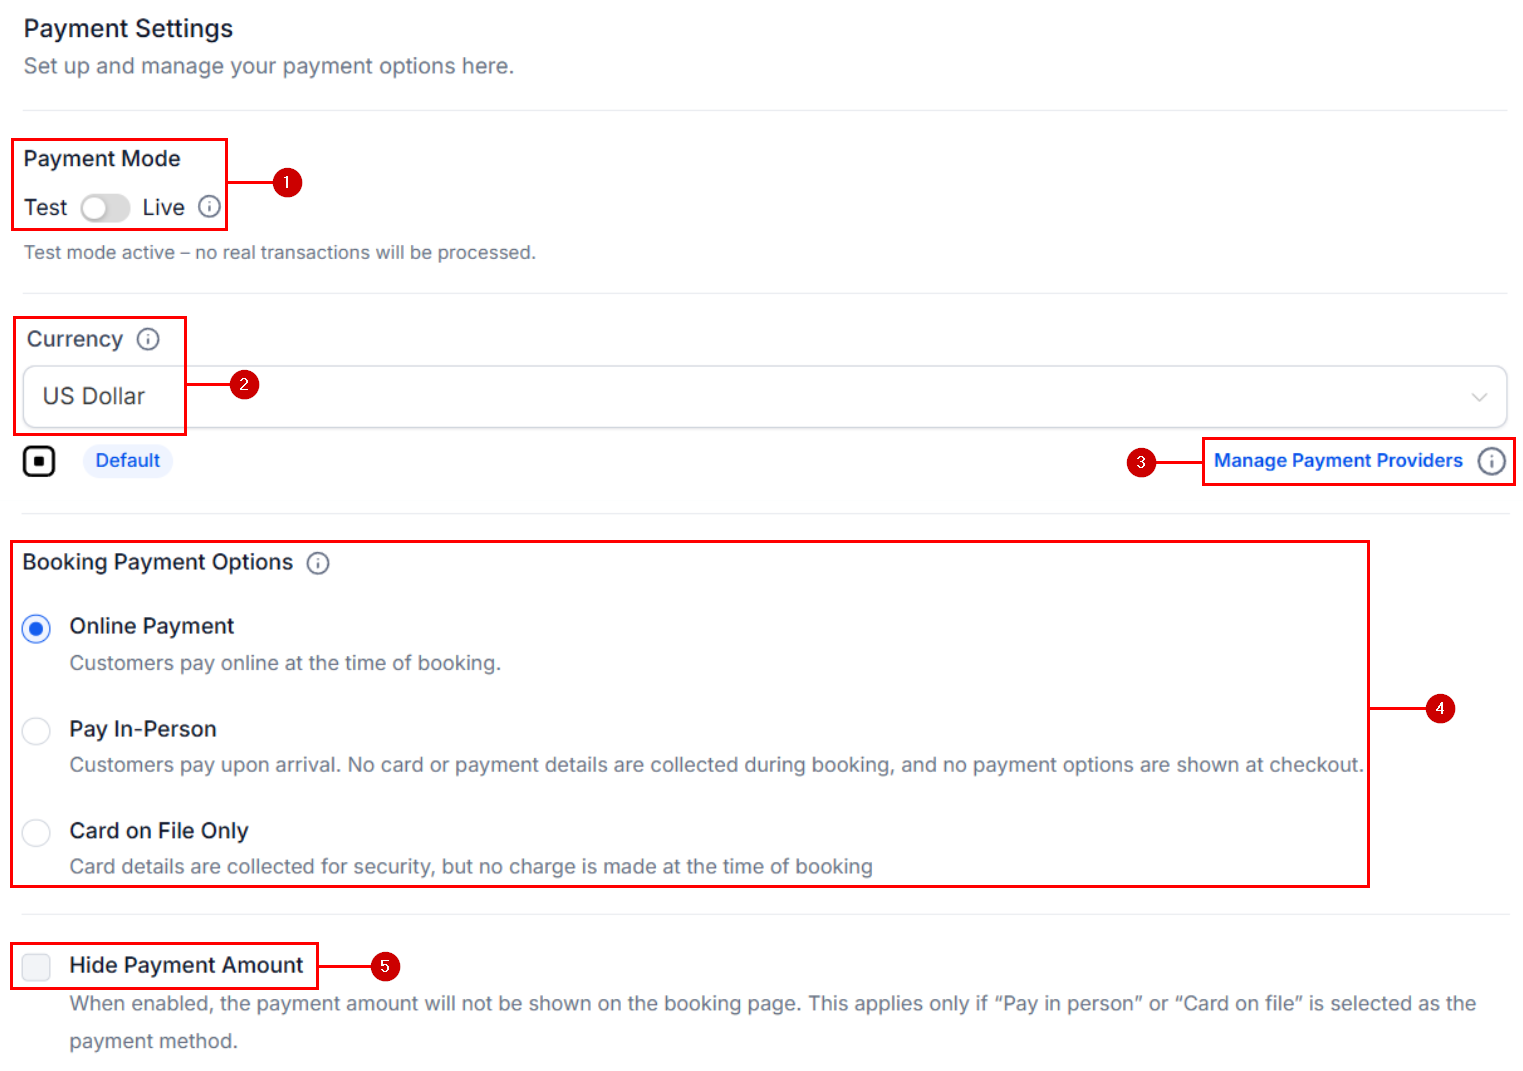
Payment settings panel with mode, currency, and checkout options
Service settings
Define global rules that apply to all services.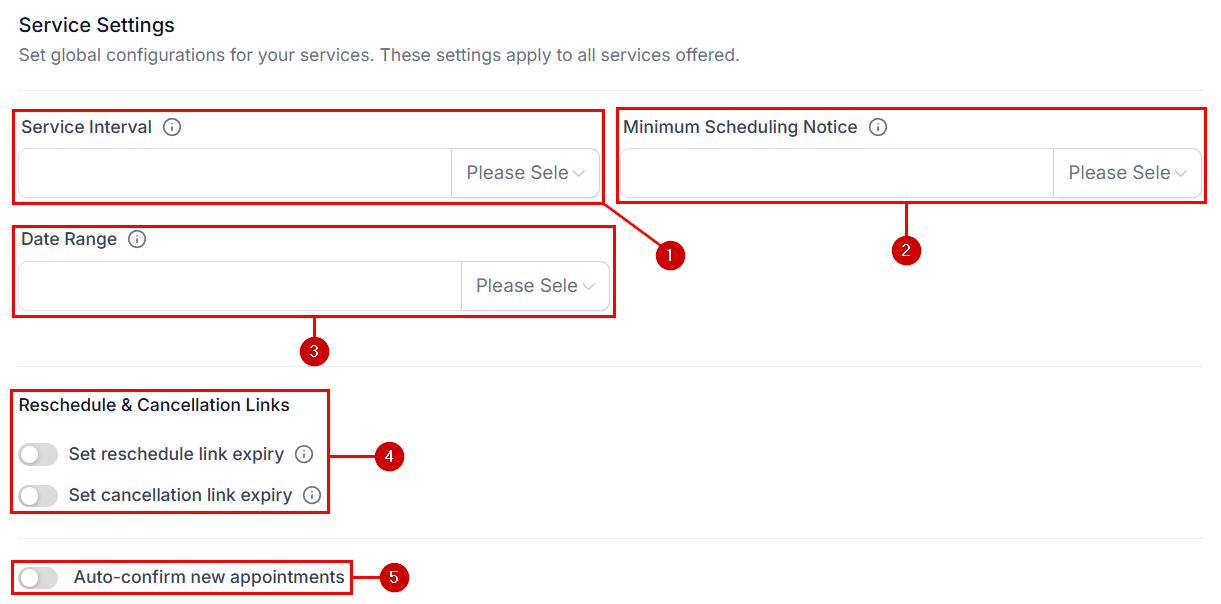
Service settings panel with scheduling and cancellation controls
Additional settings
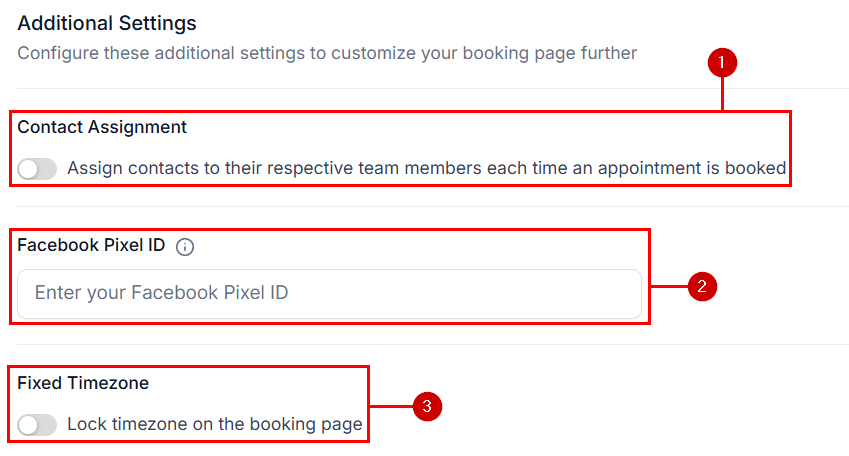
Additional settings for contact assignment, tracking, and timezone
Notifications
Configure which actions trigger notifications and how they are delivered.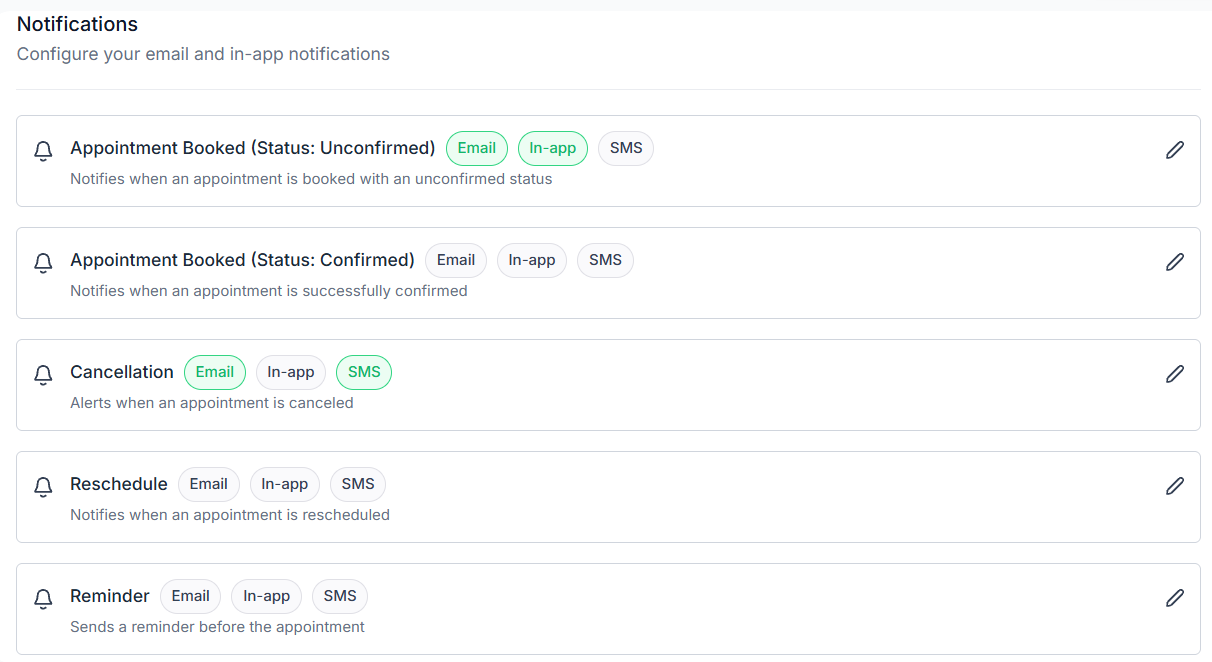
Notifications settings for email, in-app, and SMS alerts

Third-party calendar settings for Google and Outlook attendee permissions
Google Organic Booking with Services V2
Google Organic Booking lets clients find and book your services directly from Google Search and Google Maps, without leaving the Google interface. Services V2 powers the service list that gets submitted to Google. Requirements:- An active and verified Google Business Profile connected to HoopAI Integrations
- At least one Service calendar
Open Calendar Settings
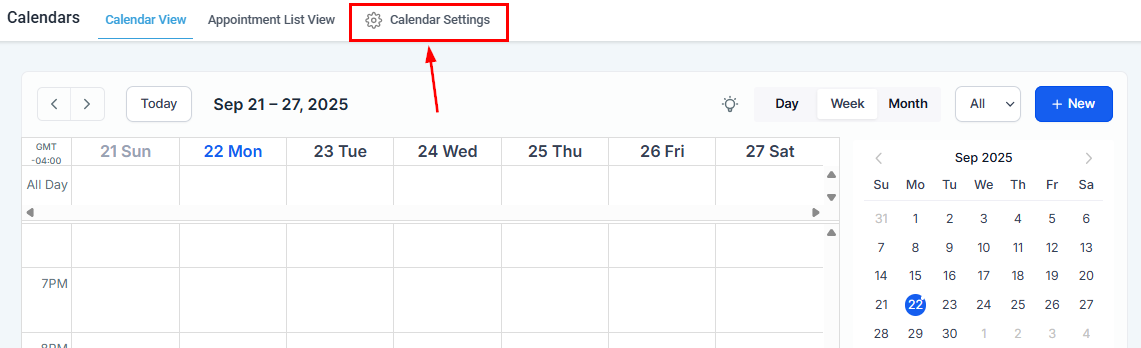
Calendar Settings Connections tab showing Google Organic Booking option
Enable Google Organic Booking
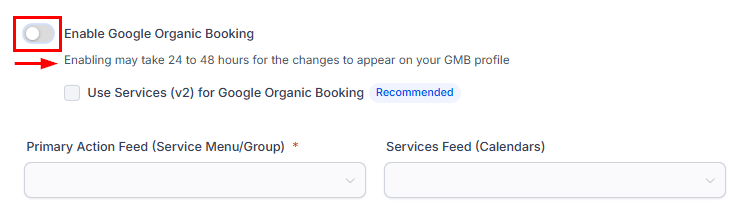
Enable Google Organic Booking toggle and confirmation
Enable Services V2
Select your feeds
Upload
Frequently asked questions
What is the difference between Services V2 and the original service configuration?
What is the difference between Services V2 and the original service configuration?
Can a service appear on more than one calendar?
Can a service appear on more than one calendar?
Why don't I see the Resources or Add-Ons tabs?
Why don't I see the Resources or Add-Ons tabs?
How do resources prevent double booking?
How do resources prevent double booking?
Can add-ons extend the total appointment duration?
Can add-ons extend the total appointment duration?
Can I allow clients to book multiple services in one appointment?
Can I allow clients to book multiple services in one appointment?
What happens to existing bookings if I disable a service?
What happens to existing bookings if I disable a service?
How long does it take for Services V2 to show up on Google after enabling Google Organic Booking?
How long does it take for Services V2 to show up on Google after enabling Google Organic Booking?