

Webhook action
Webhooks can capture and export data, such as form submissions or customer interactions, to other software tools or databases. This automatic data transfer enables seamless integration and synchronization across different platforms, enhancing productivity and data management.Setting Up Webhooks
Within your account, navigate to the Automation or Workflow section and select an existing workflow from the list, or create a new one.Identify the Data to Export
Determine which events or actions in your CRM should trigger the webhook. Common triggers include form submissions, new contacts, or updates to existing records.
Screenshot
Add the Webhook Action
Click the option to add an action to the workflow, then select the Webhook action.
Screenshot
Action Name
Enter a descriptive name for the action to reflect its purpose.
Screenshot
Method
Select either the POST or GET method depending on your needs. The GET method typically retrieves information, while the POST method usually sends information to another system to make a change.
Screenshot
URL
Provide the webhook URL of the external application where the data should be sent or received.
Screenshot
Custom Data
Specify the key-value pair for POST methods, for example- Key: Addr, Value: Address (selected from the value picker)
Screenshot
Query String Parameters
Define the data to be transmitted through the webhook in JSON format if you are using the GET method. Utilize merge fields to dynamically populate information such as contact details, opportunity status, or custom fields. For example:"first_name": "{{contact.first_name}}", "last_name": "{{contact.last_name}}", "email": "{{contact.email}}", "phone": "{{contact.phone}}", "status": "{{contact.status}}".

Screenshot
Headers
If the external system requires authentication or specific headers, you can include them here. For instance, you may need to add an API key or specify the content-type header, such as Authorization: Bearer<API_KEY>; Content-Type: application/json.

Screenshot
Practical Example: Exporting Form Submissions
Imagine you have an opt-in page where visitors can sign up for a free trial. You want to automate the creation of accounts for these new sign-ups in an external dashboard. Here’s how you could set up a webhook for this scenario:- Trigger Event: Form submission on the opt-in page.
- Data to Export: Contact information from the form (e.g., name, email).
- Receiving Application: An external dashboard for account creation.
- Webhook Configuration: Set up the webhook in your CRM to capture the form submission data and send it to the dashboard’s webhook URL. Once the data reaches the dashboard, it triggers the creation of a new account for the user.
Troubleshooting Tips
Webhook Not Triggering- Ensure the trigger event is correctly defined and that the webhook URL is accurately entered in your CRM. Test with different scenarios to isolate the issue.
- Check the receiving application for any errors in processing the webhook data. Verify that the data format sent by the CRM matches the expected format of the receiving application.
FAQs
Can I use webhooks with any third-party application?
Can I use webhooks with any third-party application?
Most modern applications support webhooks, but it’s essential to check the documentation of the specific software you’re integrating with for compatibility and setup instructions.
My webhook is not sending data — how do I troubleshoot?
My webhook is not sending data — how do I troubleshoot?
First confirm the workflow is Published and the trigger has fired (check Enrollment History). Then verify the webhook URL is correct, the method matches what the receiving server expects, and any required headers or authorization are configured. Use a service like webhook.site to inspect the raw payload HoopAI is sending.
Can I receive data back from a webhook call?
Can I receive data back from a webhook call?
Yes, with the Custom Webhook premium action. Enable the Save Response option and the response body is stored as a custom value you can reference in downstream actions.
Custom webhook premium action
The Custom Webhook Action is a game-changer for businesses that rely on real-time communication between their CRM and third-party services. It simplifies data sharing by allowing you to send and receive information directly to and from external systems. With features like customizable HTTP methods, secure authorization options, and seamless parameter setup, it helps streamline workflows, ensuring accuracy and saving time. Here’s how to use it effectively. In the workflow builder, pick a suitable Trigger and then select the Custom Webhook Action.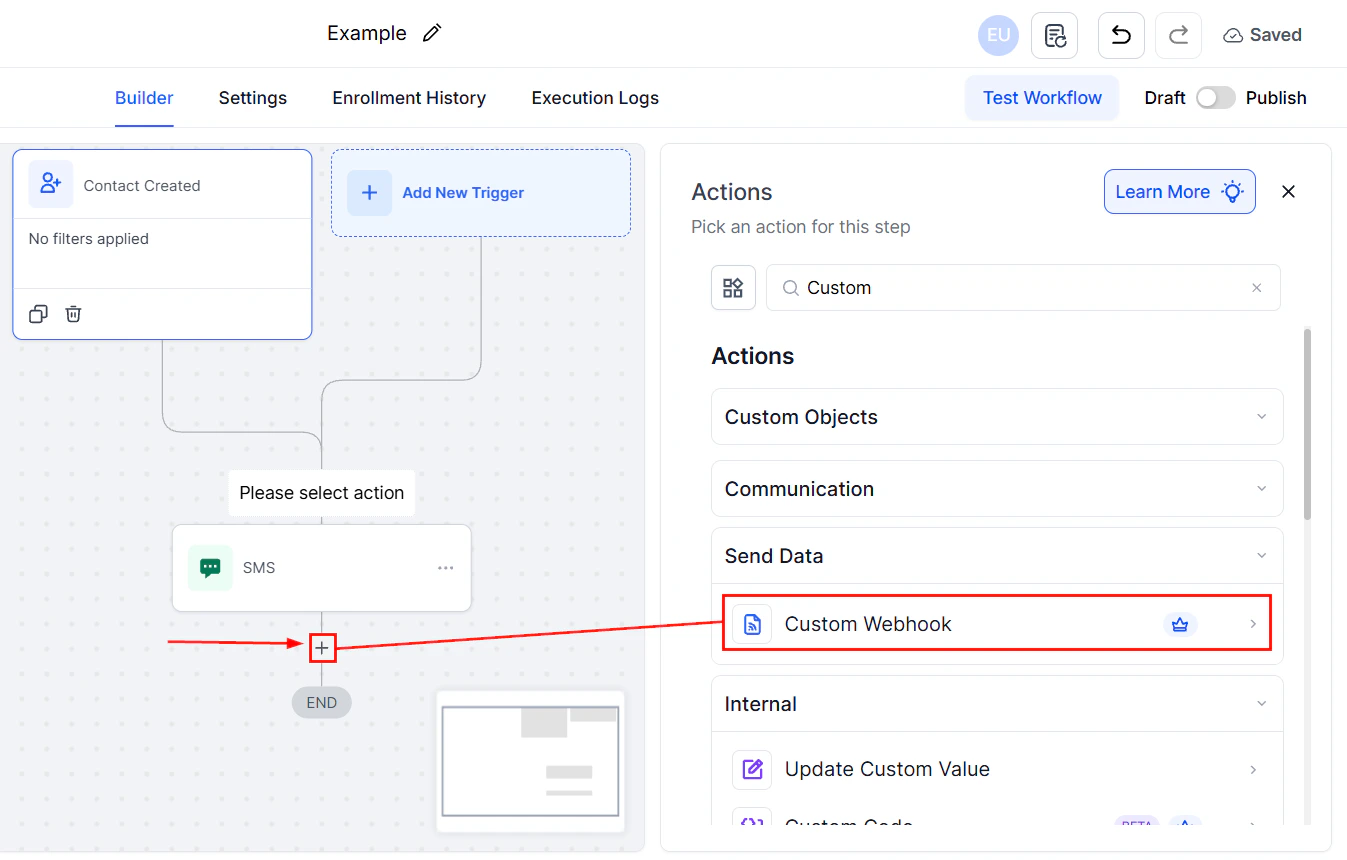
Screenshot
Select Event
Start by choosing the event that will trigger the webhook. For example, select options like CUSTOM, POST, or GET based on your requirements.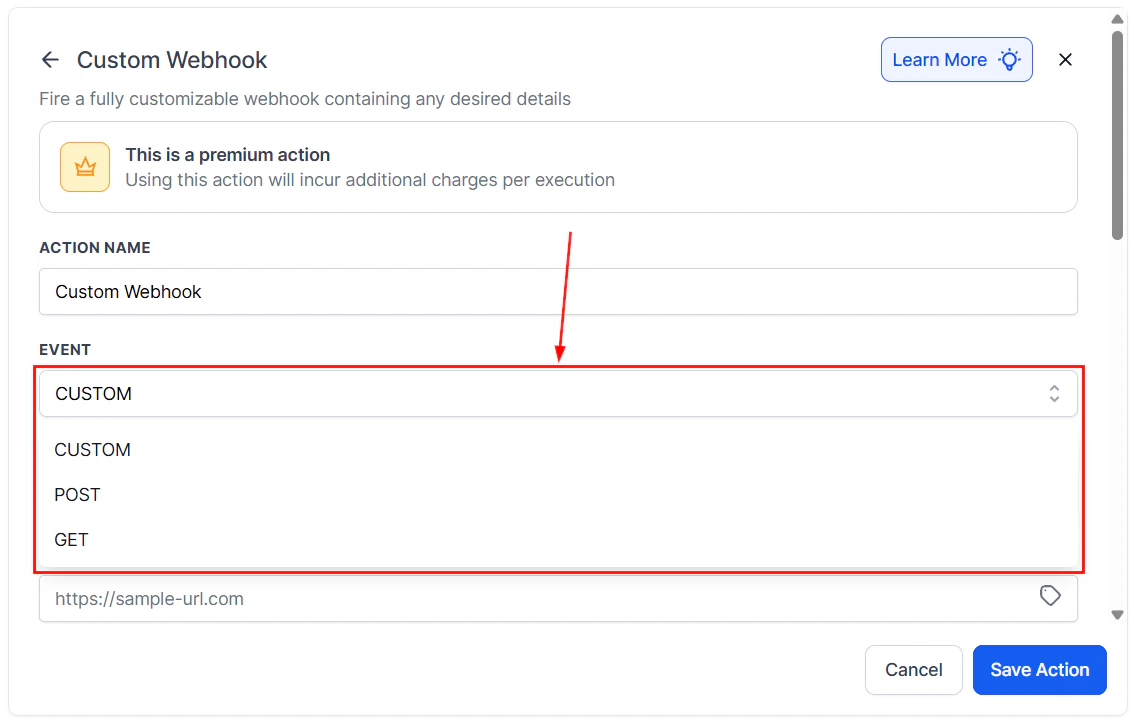
Screenshot
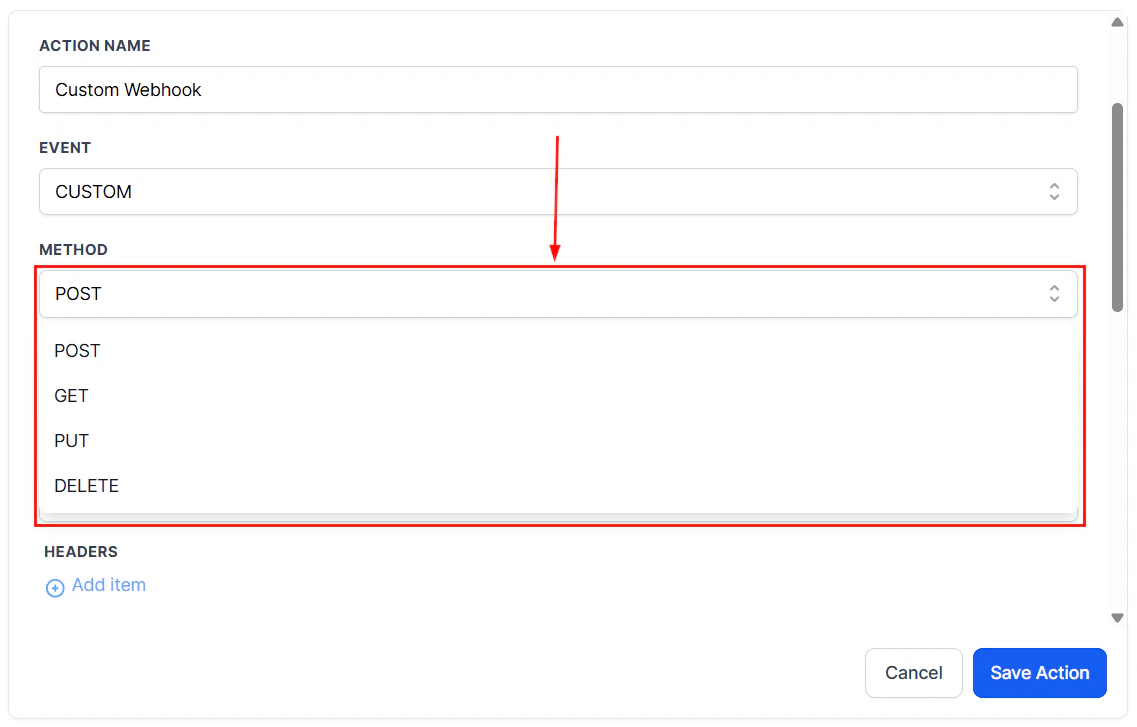
Select Method
Pick the HTTP method that best suits your data exchange needs:- POST: For sending data to a server.
- GET: For retrieving data.
- PUT: For updating existing data.
- DELETE: For removing data.
Screenshot
Fill URL
Enter the URL where the data should be sent. This is the endpoint for the external service you want to interact with. No coding is needed—simply paste the URL, and you’re ready to go.
Screenshot
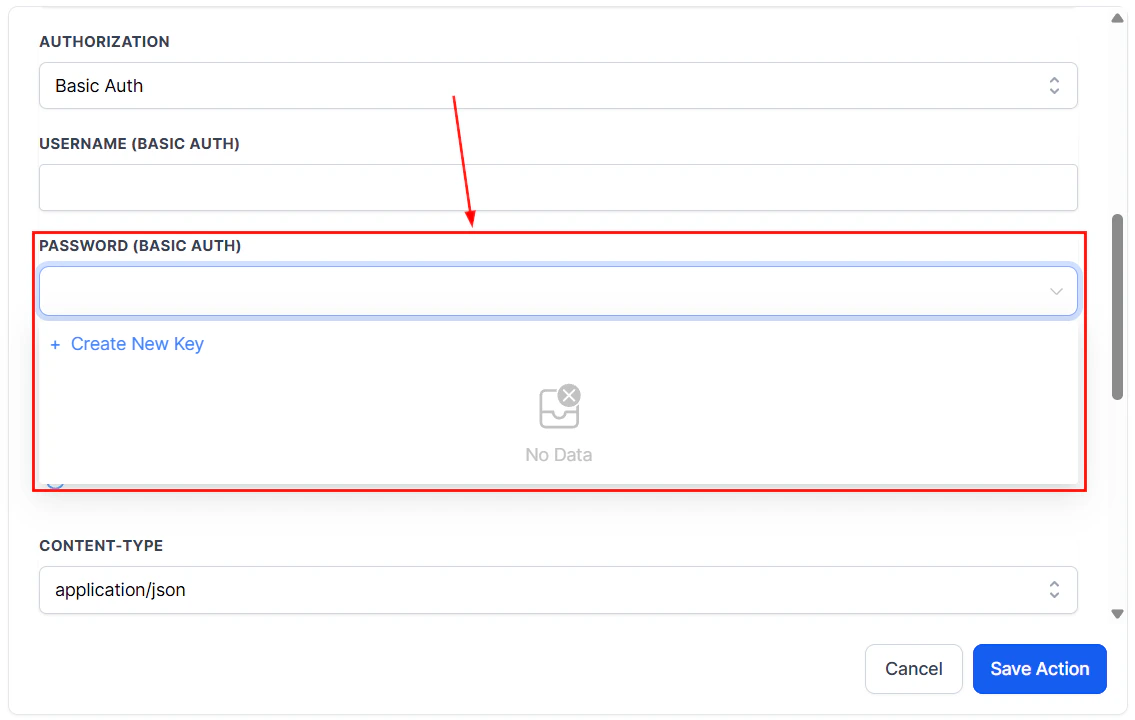
Authorization Method
Choose the appropriate security method to protect your data and ensure secure access. Options include API keys, bearer tokens, or other authorization techniques specific to the external system.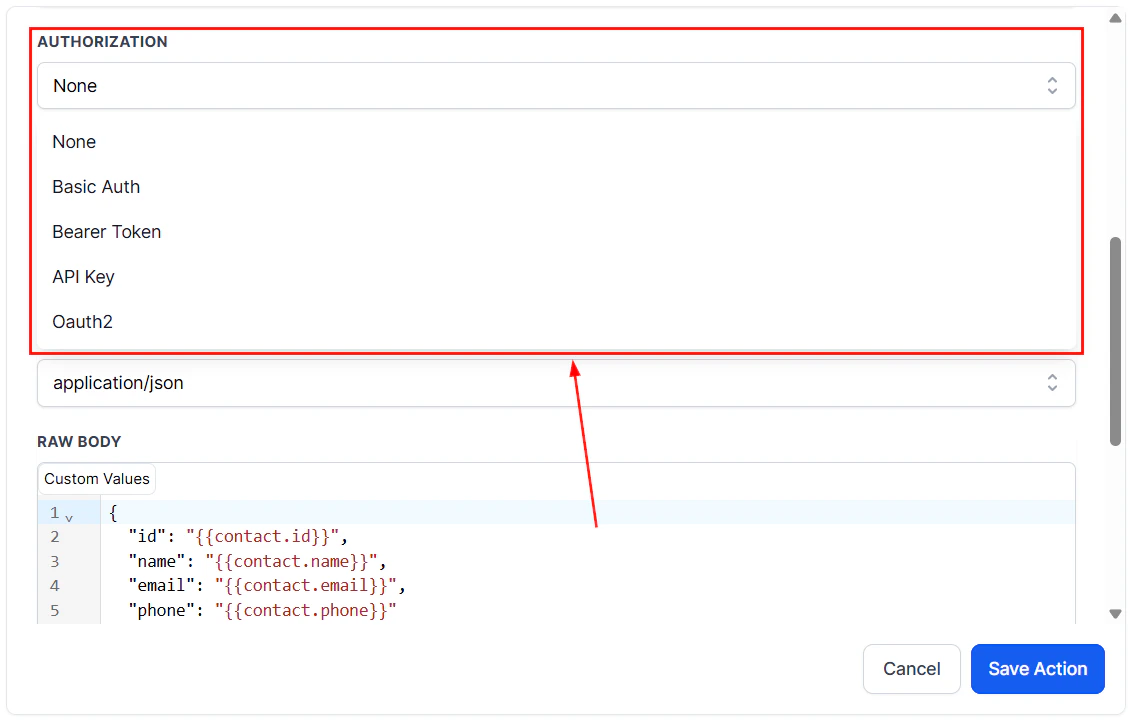
Screenshot
- For Basic auth, Bearer token, and API key authentication methods, you can view existing keys and create new ones.
- Keys are user-specific (only the creator can manage them), and for security purposes, key values are not displayed - only the assigned name.
- Updating a key will automatically delete the previously existing one.
- Keys can be populated using custom values you have created.
Screenshot
Headers & Query Parameters
Headers provide additional context for your data request, such as content type or authentication details. Query parameters allow you to filter or customize the response data, making your requests more efficient and precise.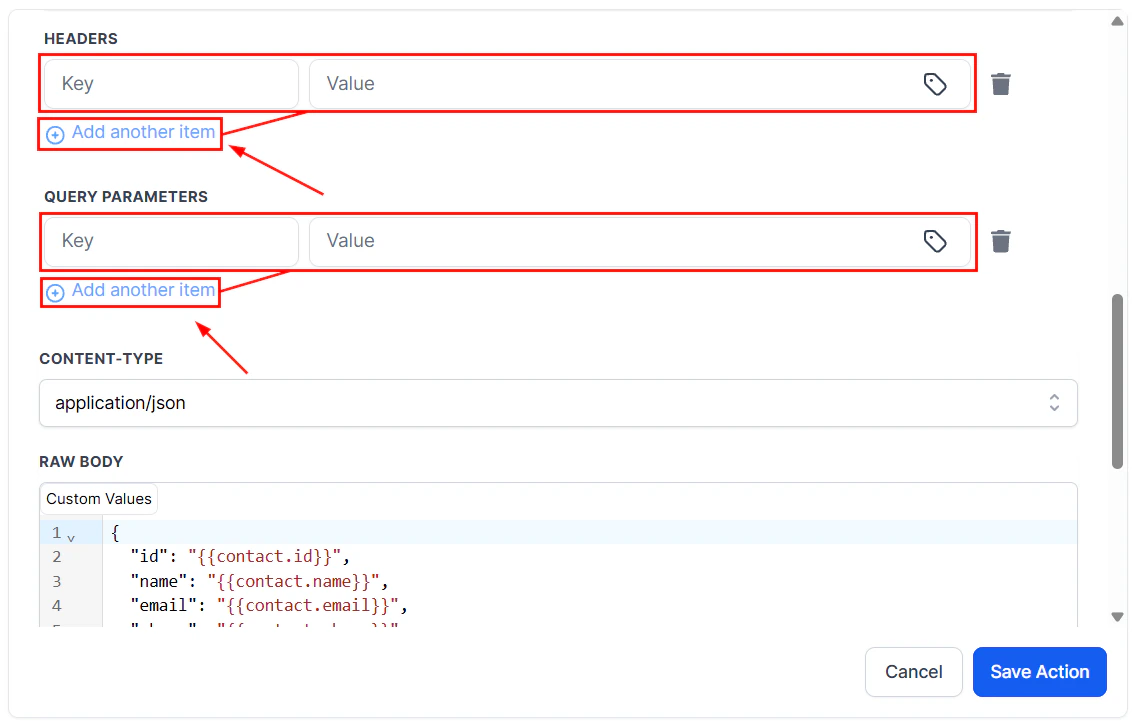
Screenshot
Content-Type
Specify the format of the data being sent, such as application/json or application/x-www-form-urlencoded, to ensure compatibility with the receiving system.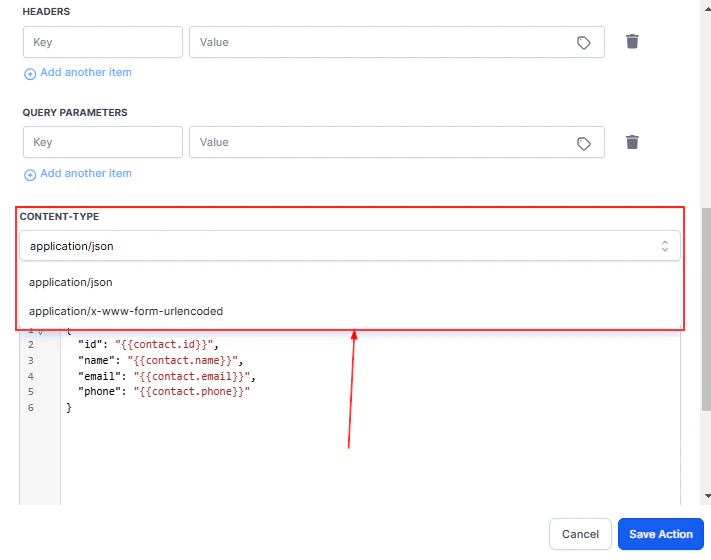
Screenshot
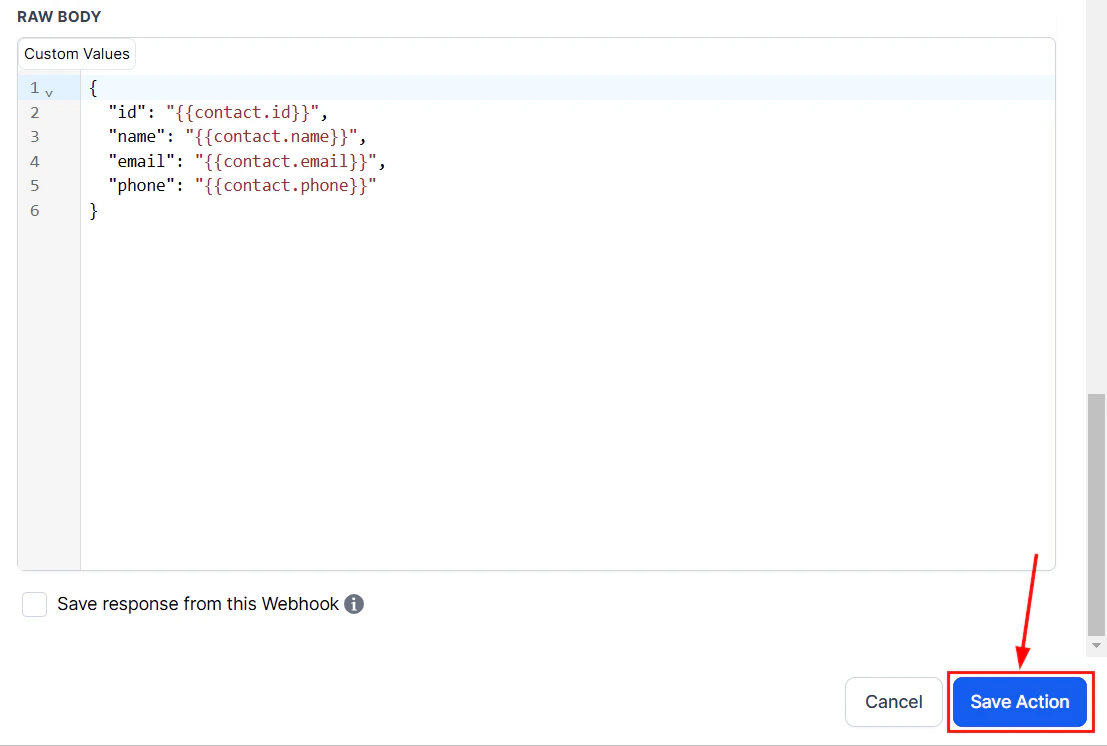
Raw Body
Use the Raw Body section to include custom values or specific information in your data payload. You can also check the box to Save responses from the webhook, allowing you to store and review them for future reference.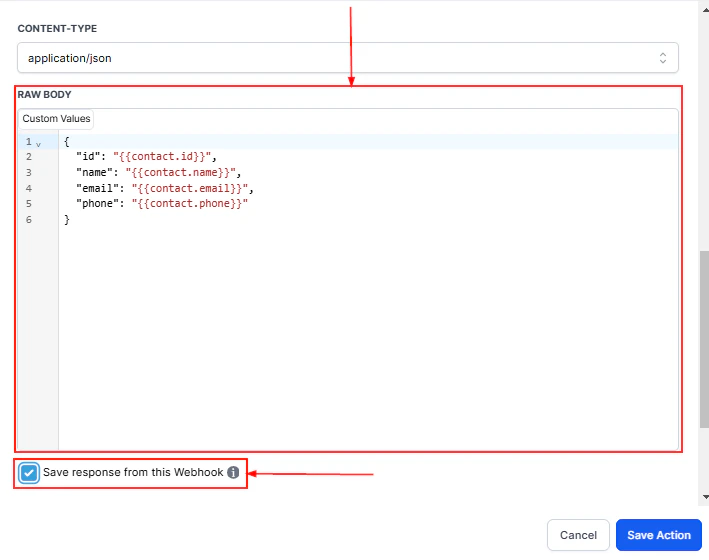
Screenshot
Feature Advantages
The Custom Webhook LC Premium Action offers numerous benefits:- Seamless Integration: Facilitates effective communication between CRM systems and external services, enhancing overall efficiency in data exchange.
- ****Flexibility: ****Supports a range of HTTP methods, authorization approaches, headers, and query parameters, enabling users to craft customized requests.
- Time-Saving: An intuitive interface with autocomplete suggestions simplifies data mapping, reducing manual efforts and enhancing efficiency.
- ****Improved Accuracy: ****Ensures consistency and precision in data exchange, minimizing errors and discrepancies across platforms.
- ****Real-time Updates: ****Enables timely notifications and updates, fostering responsiveness and informed decision-making.
- ****Workflow Automation: ****Streamlines workflows by automating data exchange, boosting productivity, and minimizing manual tasks.
- ****Scalability: ****Adaptable to diverse applications and industries, making it a versatile tool for businesses of all sizes and sectors.
OAuth2 in custom webhooks
OAuth2 is an authorization method especially suited for large APIs due to its advanced security measures. By leveraging OAuth2, users can integrate seamlessly with numerous APIs, including Google, Facebook, LinkedIn, and more, unlocking extensive possibilities and functionalities for their applications.How OAuth2 Authorization Works
To utilize OAuth2 authorization within workflows:Selecting OAuth2 Authorization
Navigate to the Automation > Workflows section in your account then select an existing workflow from the list, or opt to create a new workflow.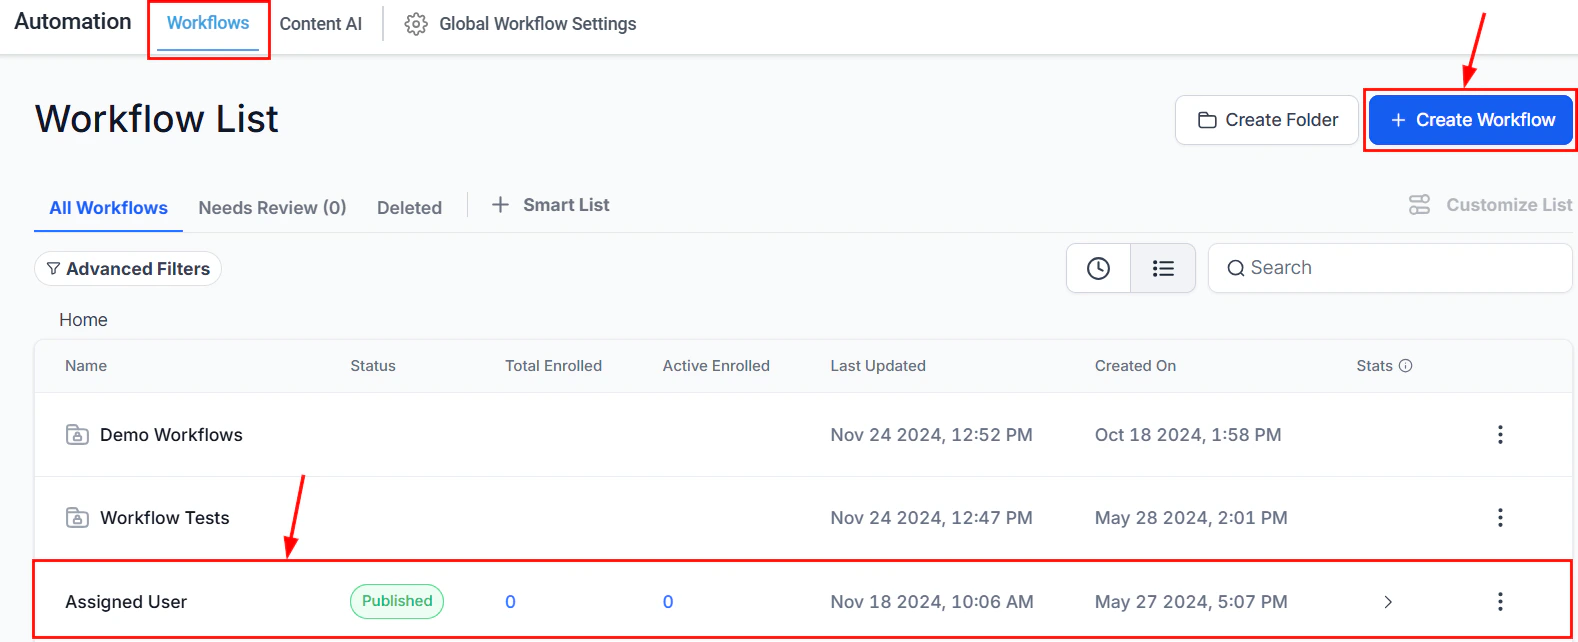
Screenshot
Screenshot
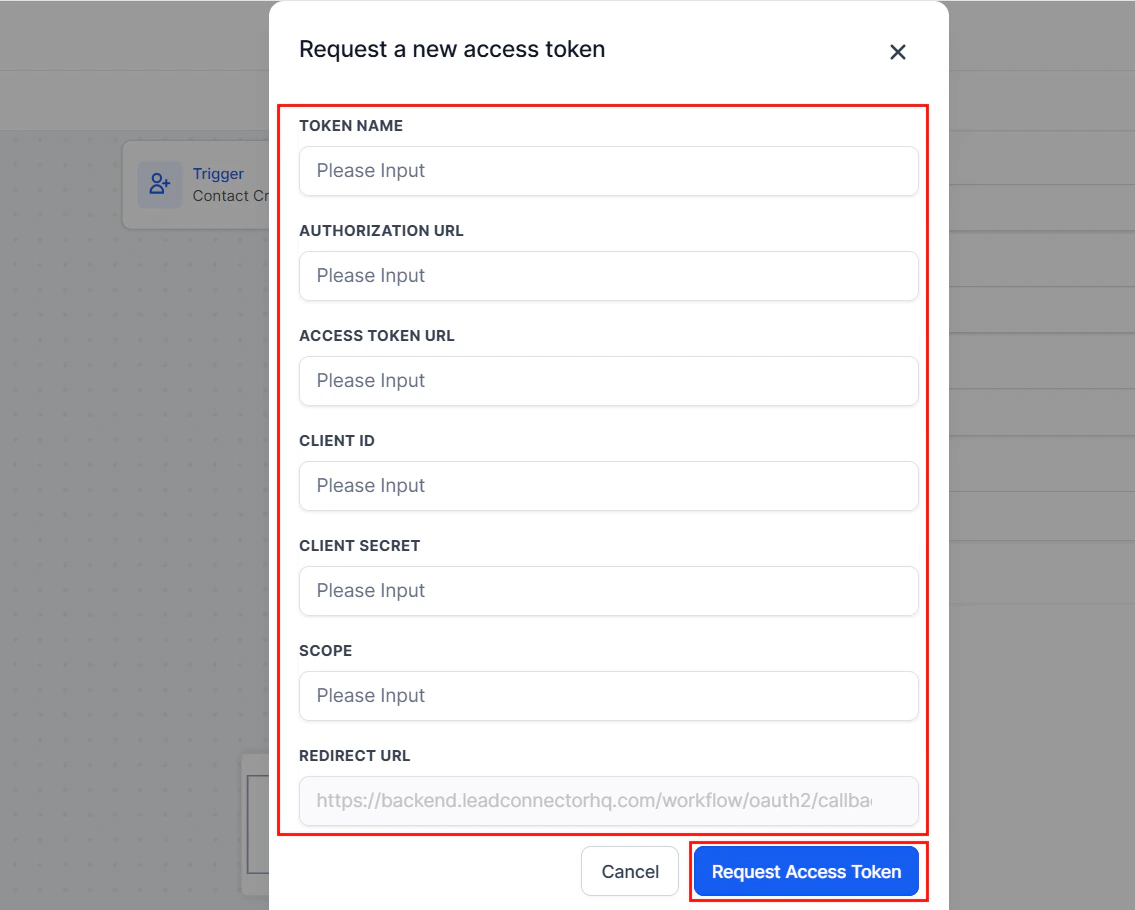
Token
Once OAuth2 is selected, you can either use an existing token by selecting it from the dropdown menu or request a new one.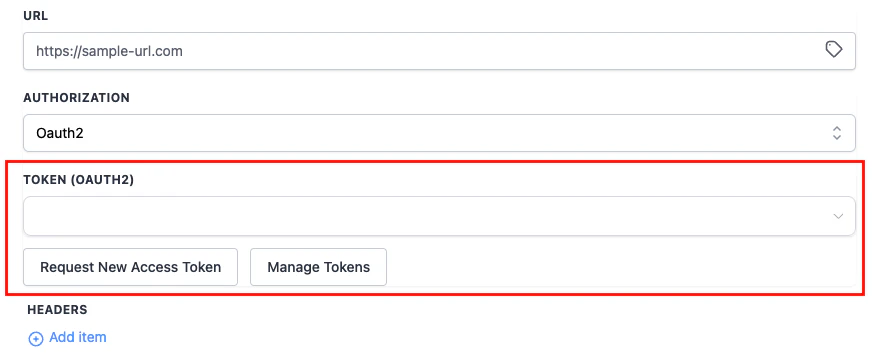
Screenshot
Screenshot
Screenshot
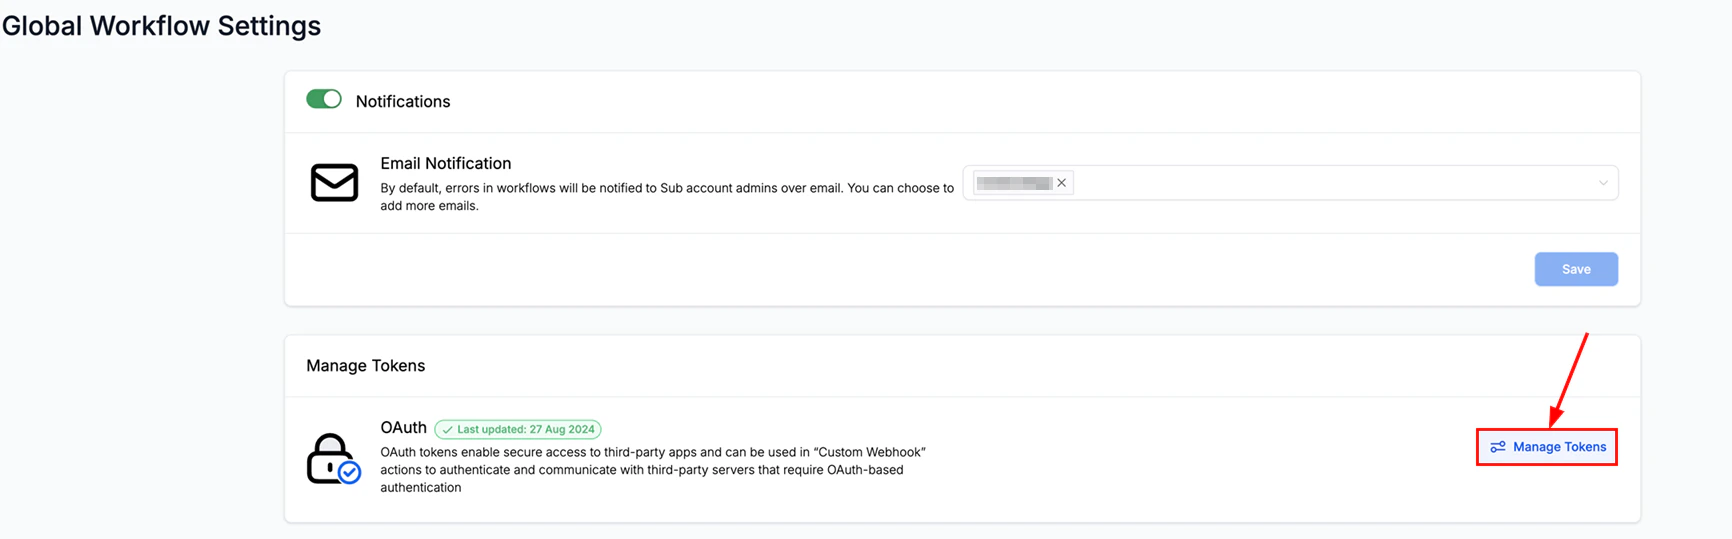
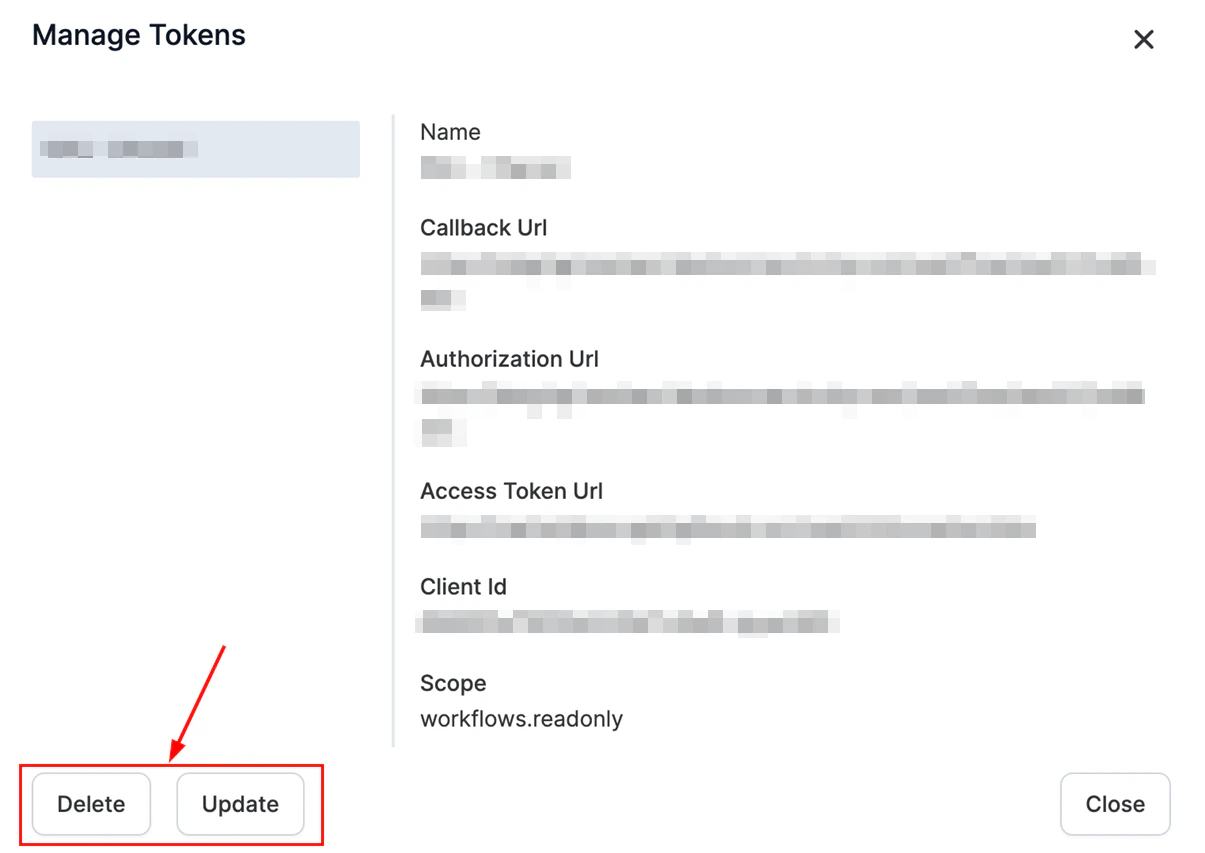
Managing Tokens
Tokens can be managed within the Custom Webhook action or in the Global Workflow Settings. From the action, click on Manage Token to open a pop-up window displaying all tokens.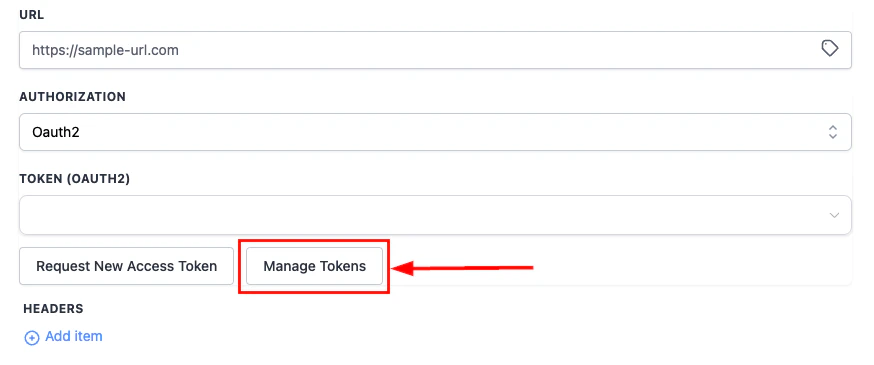
Screenshot

Screenshot
Screenshot
Screenshot
Which APIs support OAuth2 in custom webhooks?
Which APIs support OAuth2 in custom webhooks?
Any API that supports the OAuth2 authorization code or client credentials flow can be connected. Common examples include Google, Facebook, LinkedIn, and HubSpot. Check the API’s documentation to confirm it supports OAuth2 before requesting a token.
What happens when an OAuth2 token expires?
What happens when an OAuth2 token expires?
If the access token expires, subsequent webhook calls will fail with an authentication error. Request a new token from the Manage Tokens section (Global Workflow Settings > Manage Tokens > Manage OAuth Tokens) and update the action to use the refreshed token.