

Rearranging actions
Efficient workflow management often requires adjusting actions to ensure processes run smoothly. Whether you’re optimizing the sequence of tasks or correcting a misplaced step, moving actions within your workflow is a simple yet powerful feature. This guide walks you through the steps to reposition actions effortlessly and keep your workflow logic intact.Access the Workflow to Edit
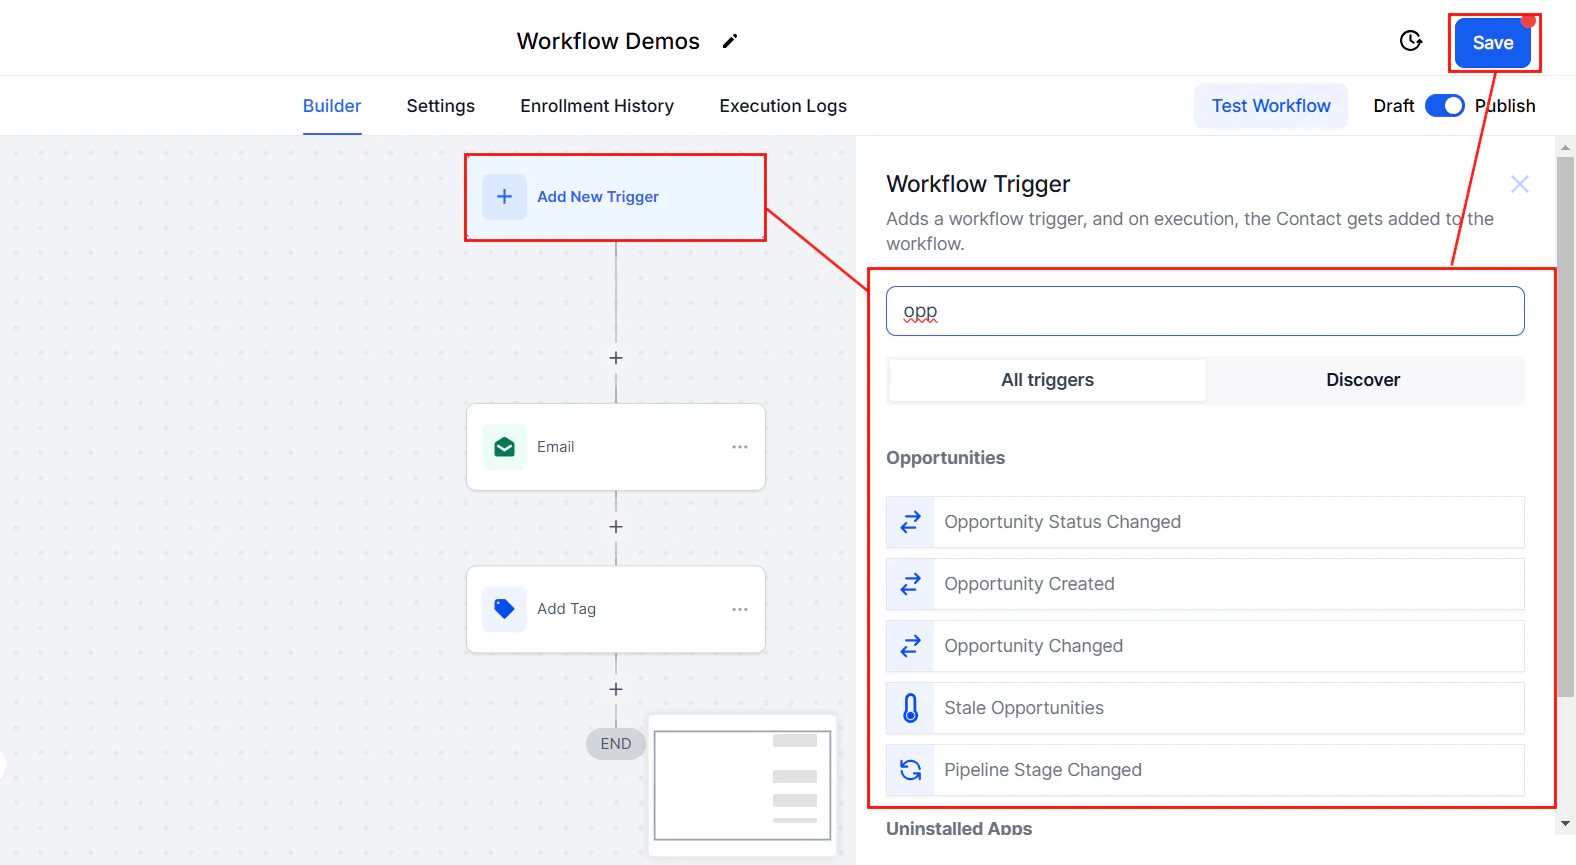
Navigate to the Workflow Builder in the Automation tab and select the workflow you wish to modify.
Screenshot
Select the Action to Move
Locate the action you want to reposition. Click on the three dots (often referred to as the “more options” icon) next to the action’s name to reveal a dropdown menu.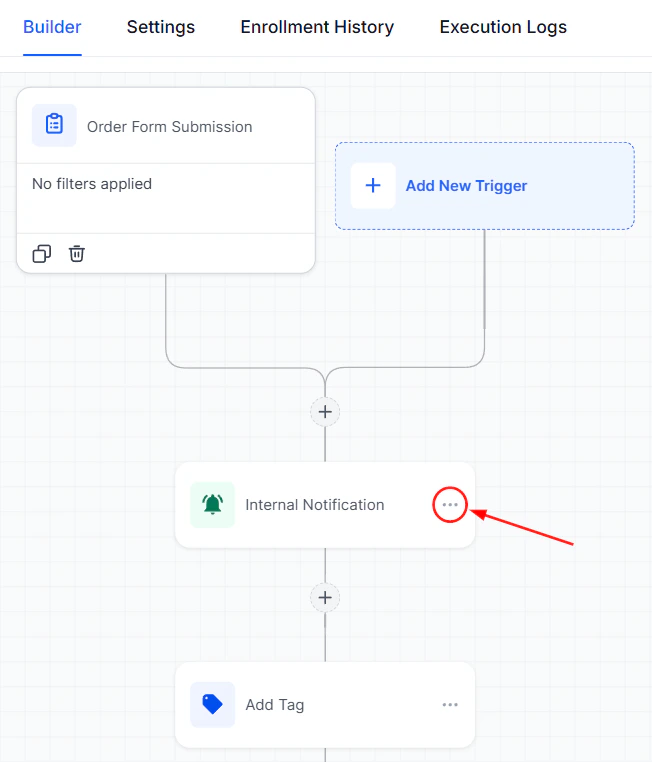
Screenshot
Choose “Move” From the Menu
From the dropdown menu, select the “Move Action” option. This will allow you to reposition one specific action within the workflow.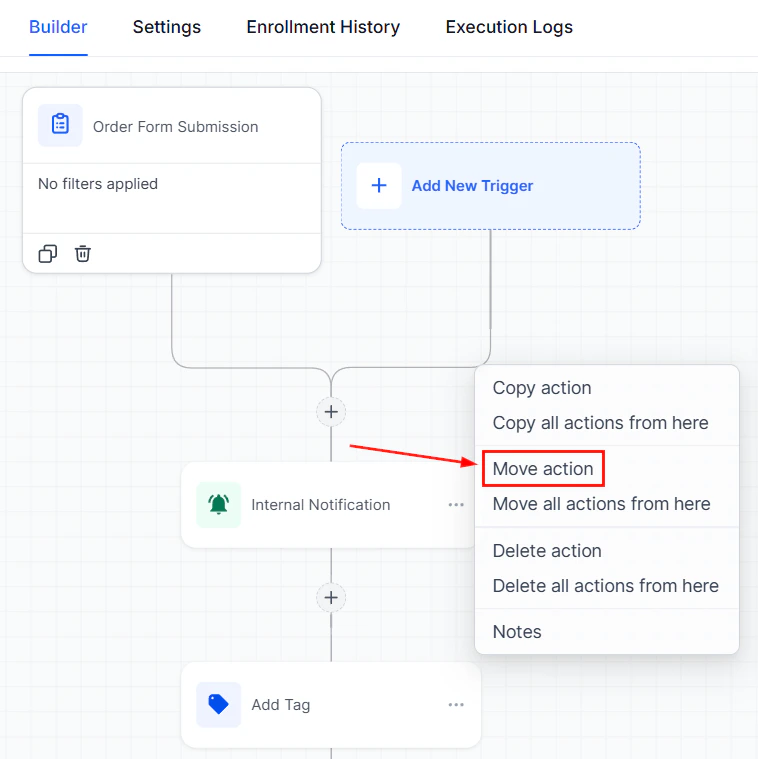
Screenshot
Reposition The Action
After selecting**** “Move Action,”**** navigate to the new desired location for the action within the workflow. Click on the**** “Move Here”**** button to place the action in its new position.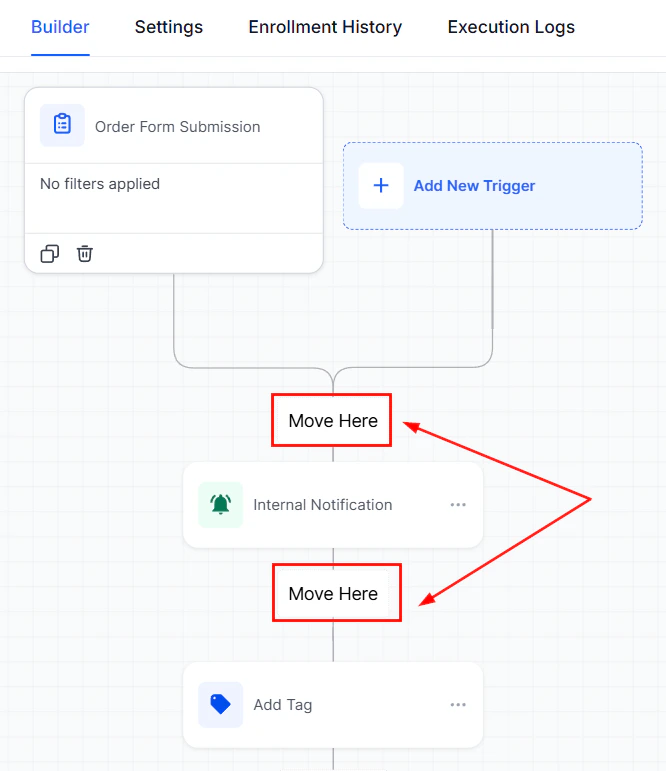
Screenshot
Save Your Changes
Once you’ve successfully moved the action to its new location, make sure to save your changes to update the workflow.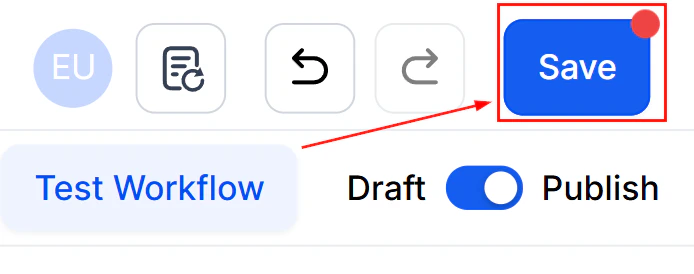
Screenshot
Additional Tips
- Moving Multiple Actions: If you wish to move a series of actions, select “Move All Actions From Here” instead of “Move Action.” This will relocate the selected action, along with all subsequent actions, to a new part of the workflow.
- Special Note for If/Else Actions: When moving an If/Else action, be aware that it will also move all steps below that action, including any branches (Yes and None). It’s crucial to rearrange the condition accordingly to ensure the logic of your workflow remains intact.
FAQs
What if I accidentally move an action to the wrong place?
What if I accidentally move an action to the wrong place?
Can I undo a move action?
Can I undo a move action?
Duplicating conditional branches
Workflows are an essential part of automating processes within your CRM, saving time and improving efficiency. In this guide, we’ll walk you through how to create and personalize workflows by adding conditions, duplicating branches, and customizing your setup to better suit your business needs. Go to the “Workflows” tab, select “Create New Workflow”, and click on “Start from Scratch”.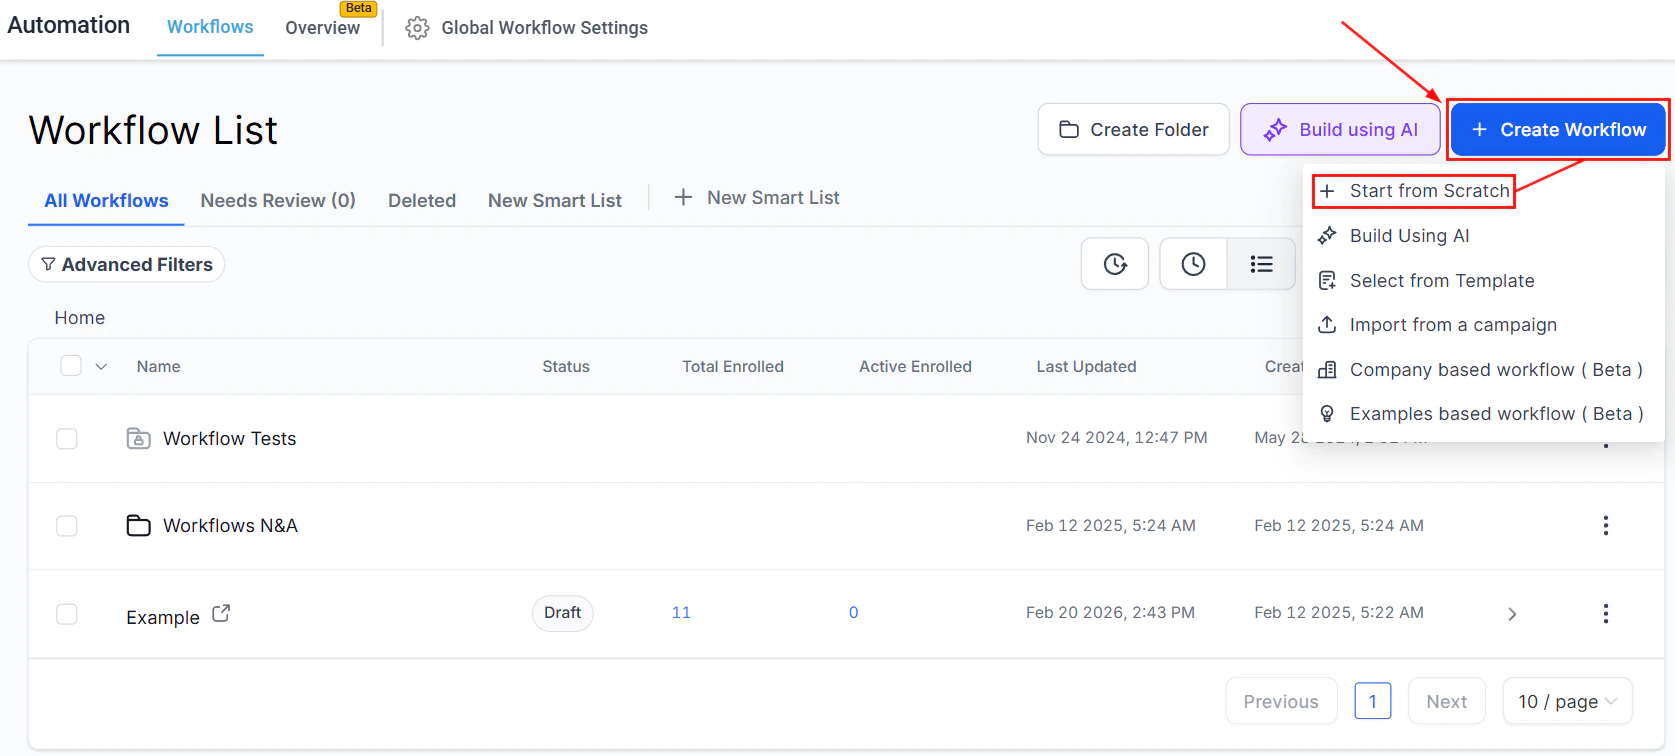
Screenshot
Adding Actions
Click on the “+” symbol to search and add the If/Else action to your workflow.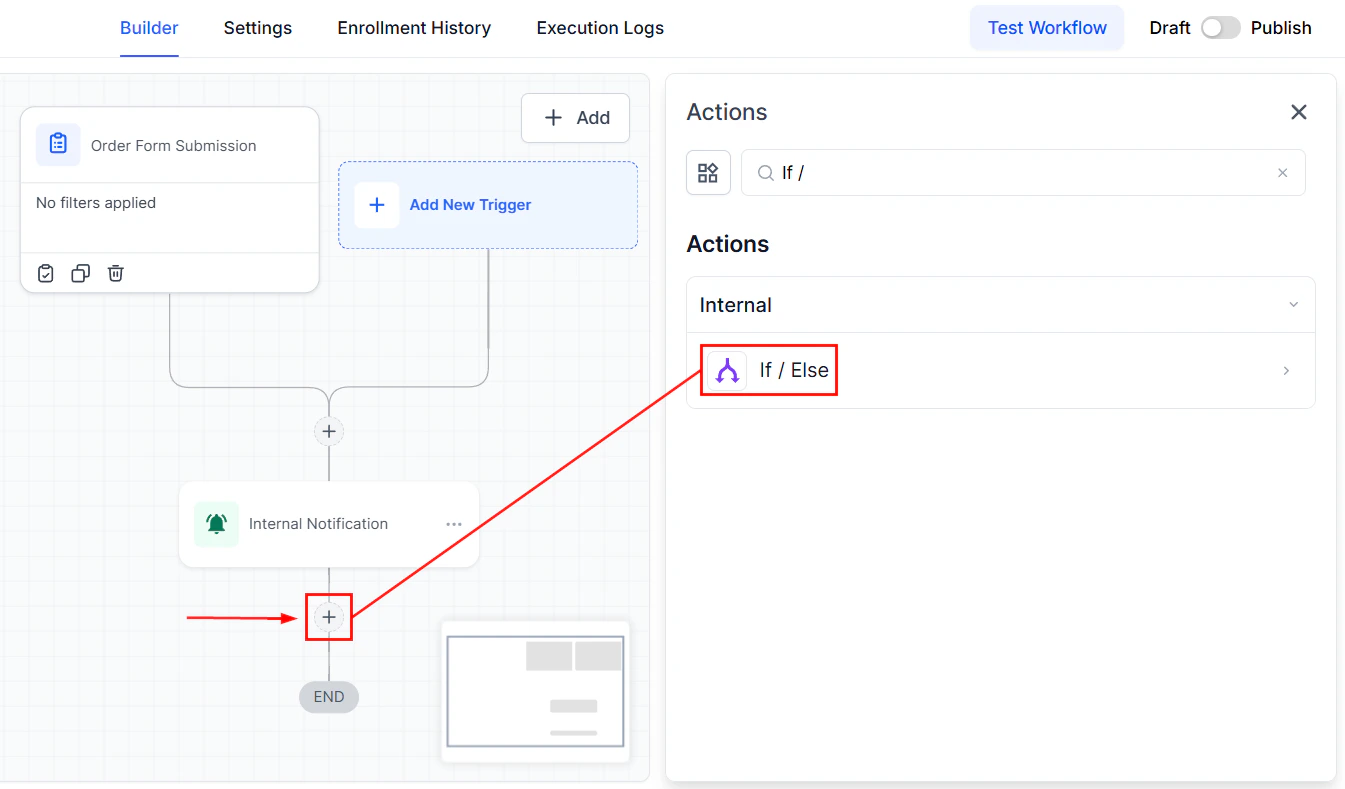
Screenshot
Screenshot
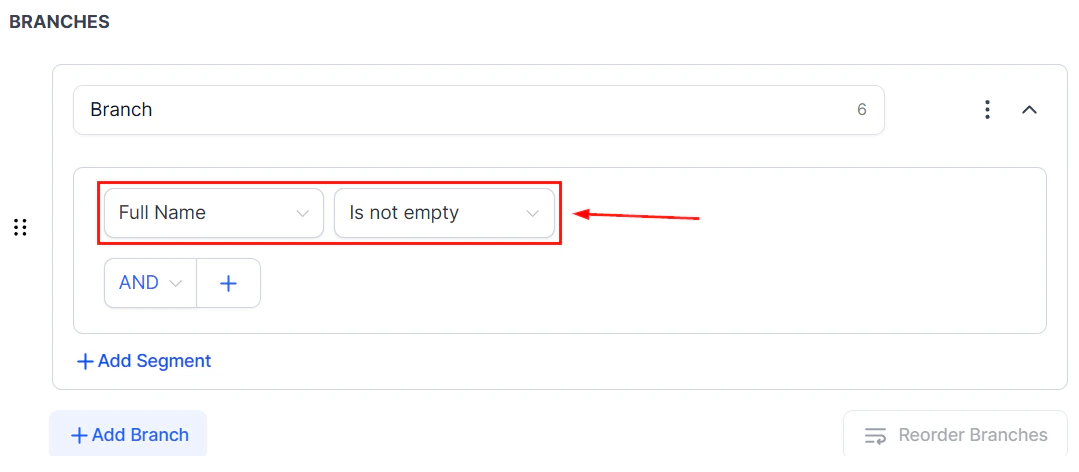
Duplicating Branches
After setting your conditions, click on the three dots menu to find the “Duplicate Branch” option. The duplicated branch will appear next to the original, allowing for easy modification and customization.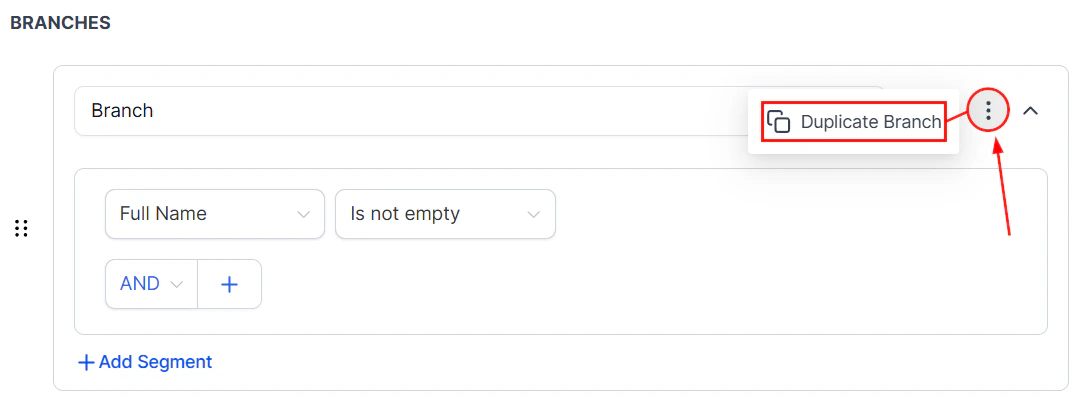
Screenshot
Reordering and Personalizing
Organize your workflow visually by dragging and dropping branches to the desired order.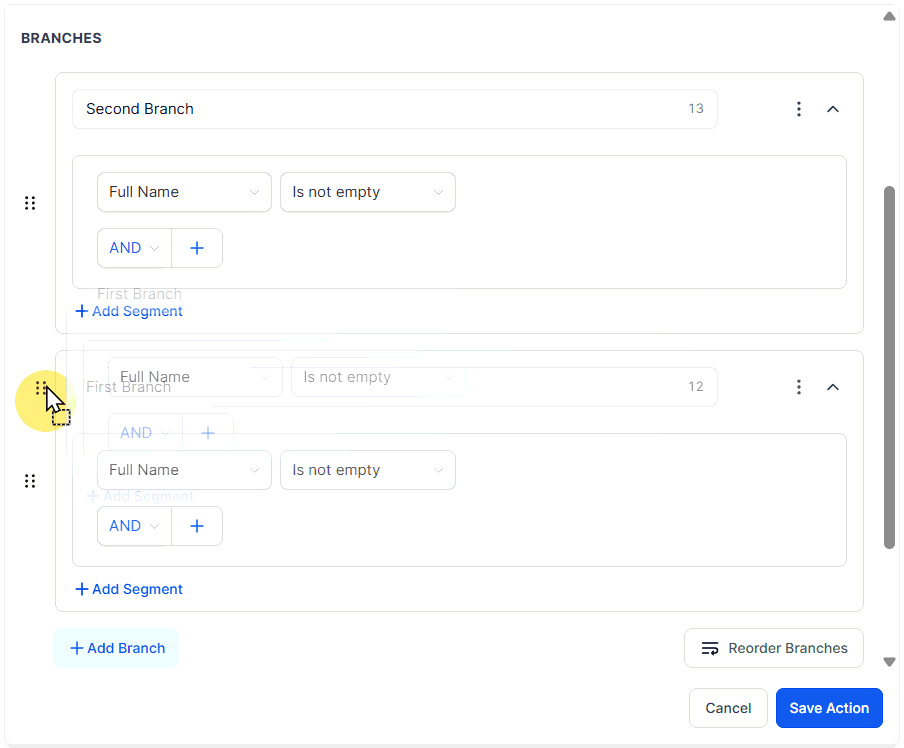
Screenshot
Screenshot
Finalizing Your Workflow
After duplicating and reordering branches and renaming for clarity, make sure to save your changes. Your workflow is now more tailored to your business needs and ready for implementation
Screenshot
Use Case
For example, in a workflow where tasks are categorized based on specific criteria, duplicating branches for each category and reordering them according to priority ensures that the most important tasks are handled first. Renaming branches for better clarity helps team members quickly understand the purpose of each, making the process more efficient and organized. By following these steps, you can create a highly customized workflow that is tailored to your needs. Whether you’re duplicating branches, reordering them, or renaming them for clarity, these adjustments will help you with your processes and improve team productivity.FAQs
What if I can't see the option to duplicate a branch?
What if I can't see the option to duplicate a branch?
How many branches can I duplicate?
How many branches can I duplicate?
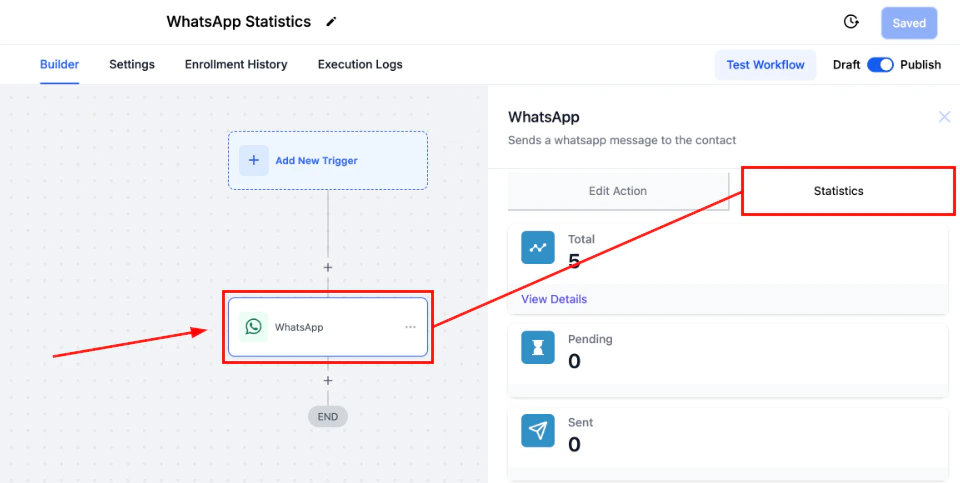
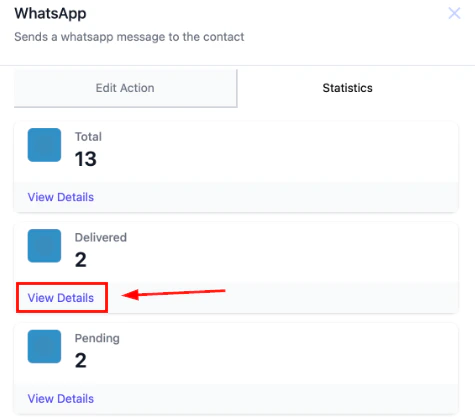
WhatsApp workflow statistics
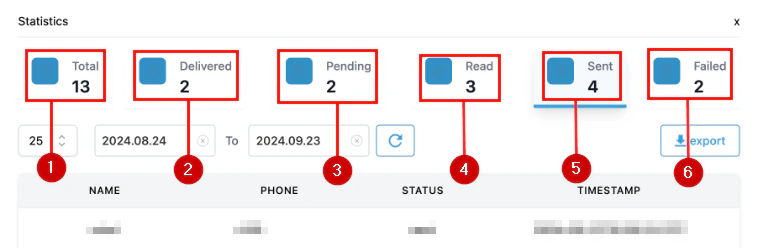
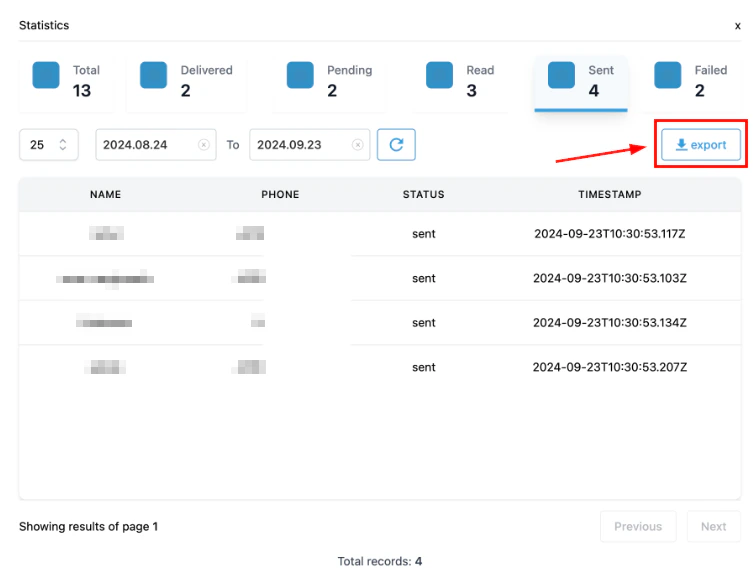
WhatsApp messages have different available statuses that give you a deeper insight into when and how your customers are interacting with them. Let’s look into what these statuses are and how to view them.What Statuses are available?
- Total: These will show the number of WhatsApp messages triggered by the selected workflow action.
- Delivered: Monitor messages that have reached the recipient’s device, symbolized by two ticks on WhatsApp.
- Pending: This will represent the contacts in the automation for which the WhatsApp message has not been triggered.
- Read: Represented by two blue ticks in WhatsApp, these are the total messages received and read by the recipient.
- Sent: Messages that have been sent but not received by the recipients, these messages are visualized on WhatsApp by the one-tick icon.
- Failed: These will be messages that encounter errors, such as unavailability on WhatsApp, blocked templates, or reaching per-user marketing limits.
Screenshot
How to View WhatsApp Statistics?
Navigate to the Workflow tab inside the Automation section and open any workflow that includes a WhatsApp action.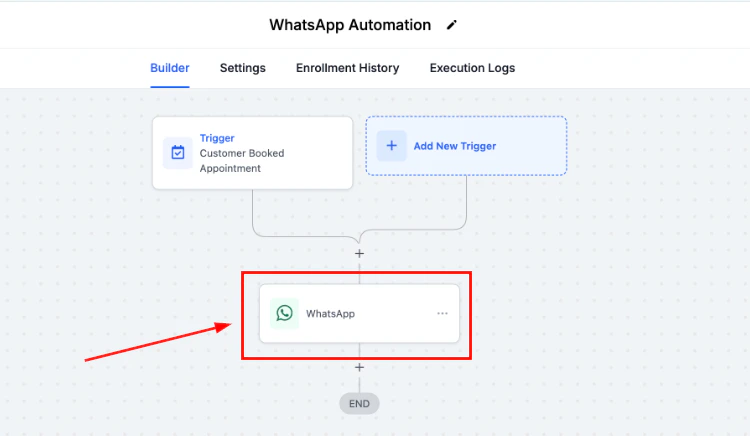
Screenshot
Screenshot
Screenshot
Screenshot
Opportunity custom fields in event start date
The Opportunity Custom Fields in the Event Start Date Action offer a powerful way to streamline your processes and ensure that important tasks are triggered at the right moment. By using custom fields, you can personalize workflows and enhance the accuracy of your actions. This article will guide you through the process of using Opportunity Custom Fields within the Event Start Date Action, helping you optimize your operations and improve productivity.Access the Workflow Builder
Navigate to the automation tab on the left sidebar menu. You can choose to create a workflow from scratch or edit an existing one.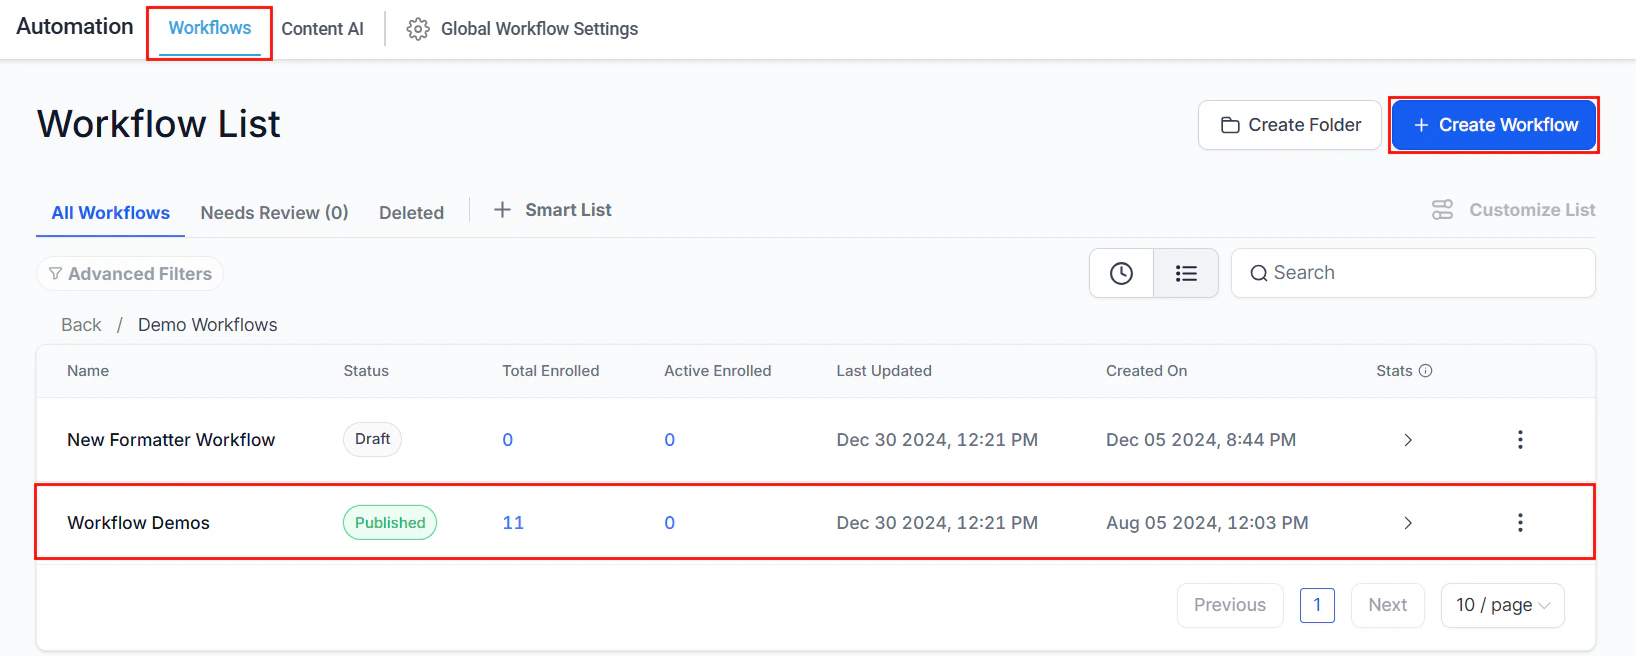
Screenshot
Screenshot
Setting Up Event Start Date Action
Add the relevant actions that should precede the Event Start Date Action, then add the “Set Event Start Date” action from your workflow actions.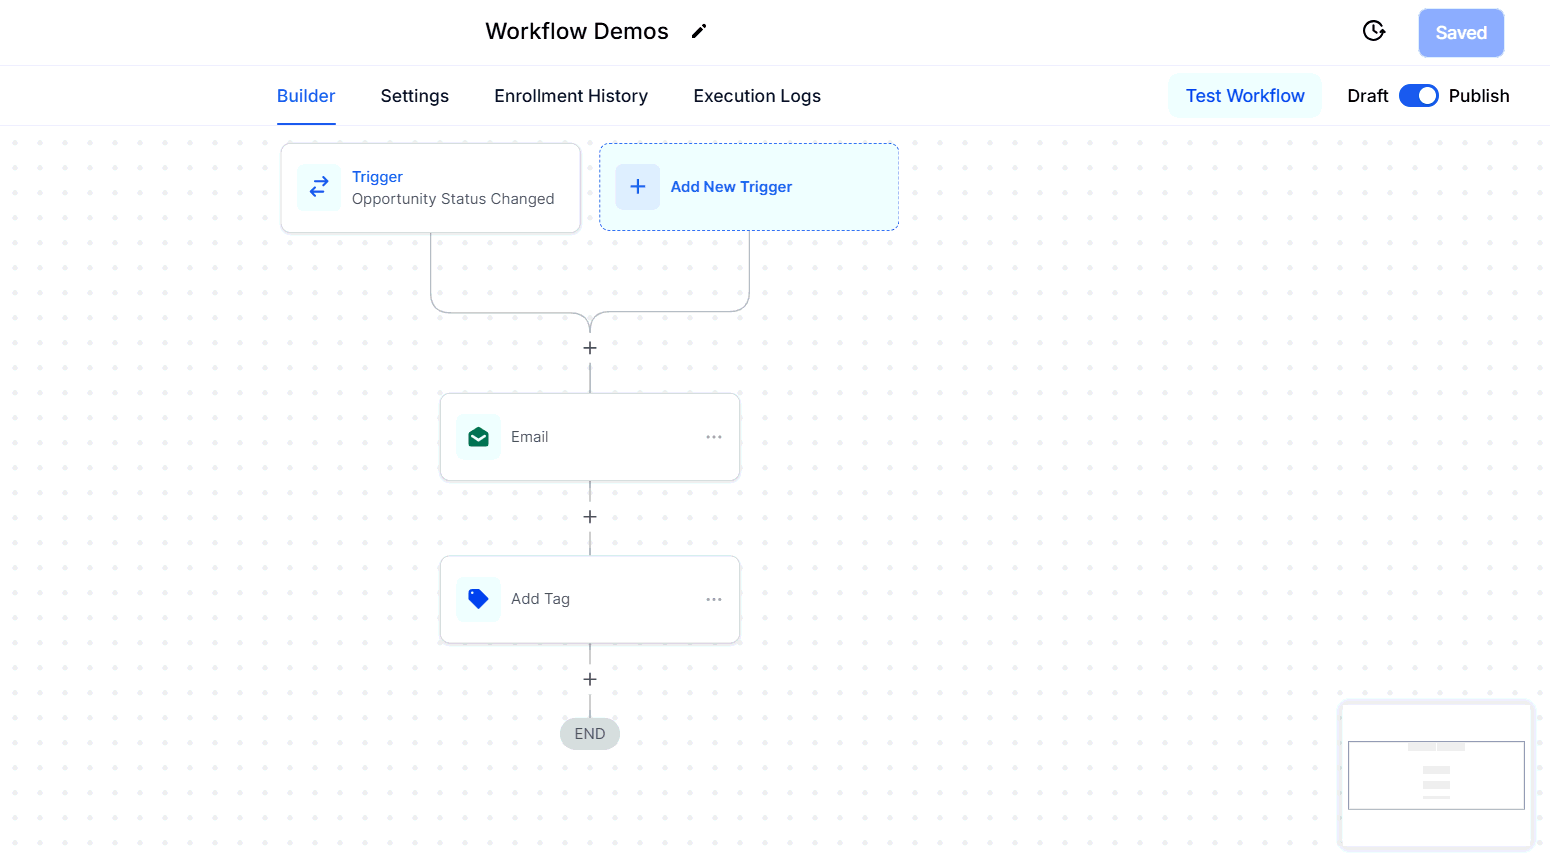
Screenshot
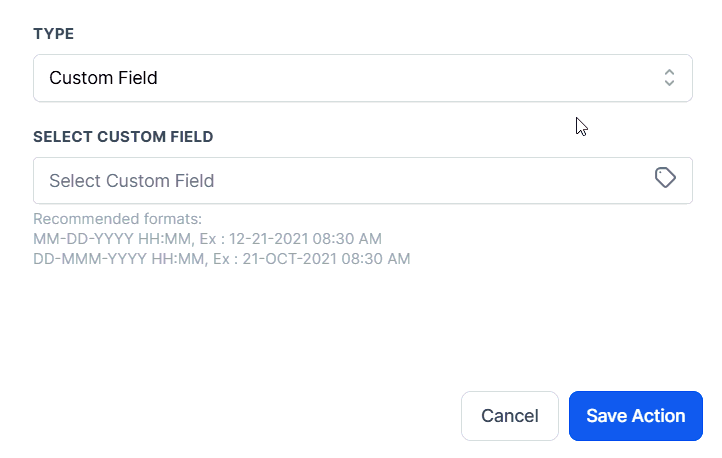
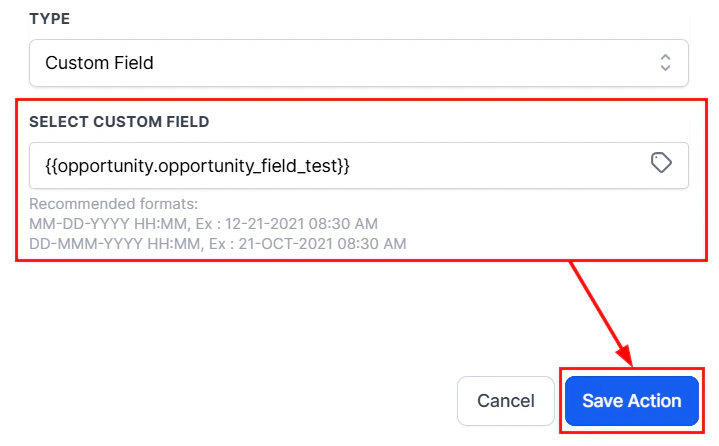
Selecting the Custom Field
In the action settings, select the type as a custom field. This will enable you to specify the desired opportunity custom field to be used for the event start date.
Screenshot
Screenshot
Screenshot
FAQs
What if I don't see the option to add opportunity custom fields?
What if I don't see the option to add opportunity custom fields?
Can I use multiple opportunity custom fields in a single workflow?
Can I use multiple opportunity custom fields in a single workflow?
Multiple opportunities
The “Allow Multiple Opportunities” toggle, enables more granular control by allowing workflows to handle multiple opportunities for the same contact. This feature ensures that each opportunity within a contact is treated as a distinct entity, allowing for separate workflow executions. In this guide, we will walk through how the toggle works, its benefits, and how to configure it for your workflows.What Does “Allow Multiple Opportunities” Do?
When enabled, the “Allow Multiple Opportunities” toggle allows workflows to independently manage multiple opportunities for the same contact, enhancing accuracy in opportunity management.- Enabled Toggle: Each opportunity is treated as a separate instance within the workflow.
- No Workflow Restarts: Updates to an opportunity do not restart the workflow; it continues from the current stage with the updated values.
Why Use This Feature?
This feature is beneficial in scenarios where a contact has multiple opportunities that require individual follow-ups or actions. It avoids the issue of workflows being skipped or overridden when multiple opportunities exist for the same contact.How to Configure the “Allow Multiple Opportunities” Feature
Follow these steps to enable this feature in your workflows:Navigate to the Workflow
From the Automation > Workflows section in your account, select the workflow you wish to modify.
Screenshot
Enable “Allow Multiple Opportunities”
Open the workflow settings. At the top of the settings page, you will find the “Allow Multiple Opportunities” Toggle.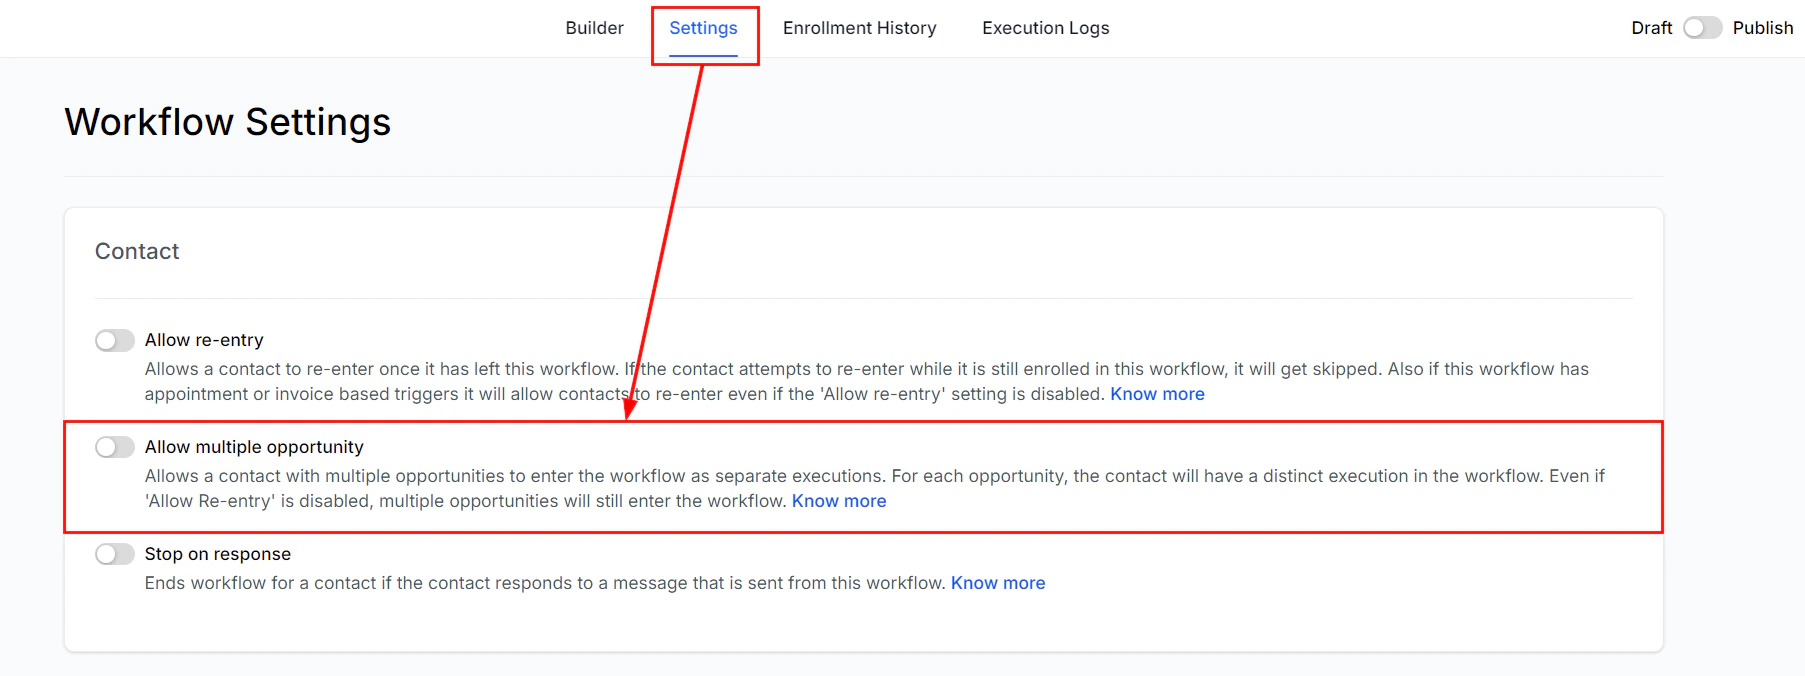
Screenshot
Screenshot
Save Changes
Remember to publish then save your workflow to activate the feature!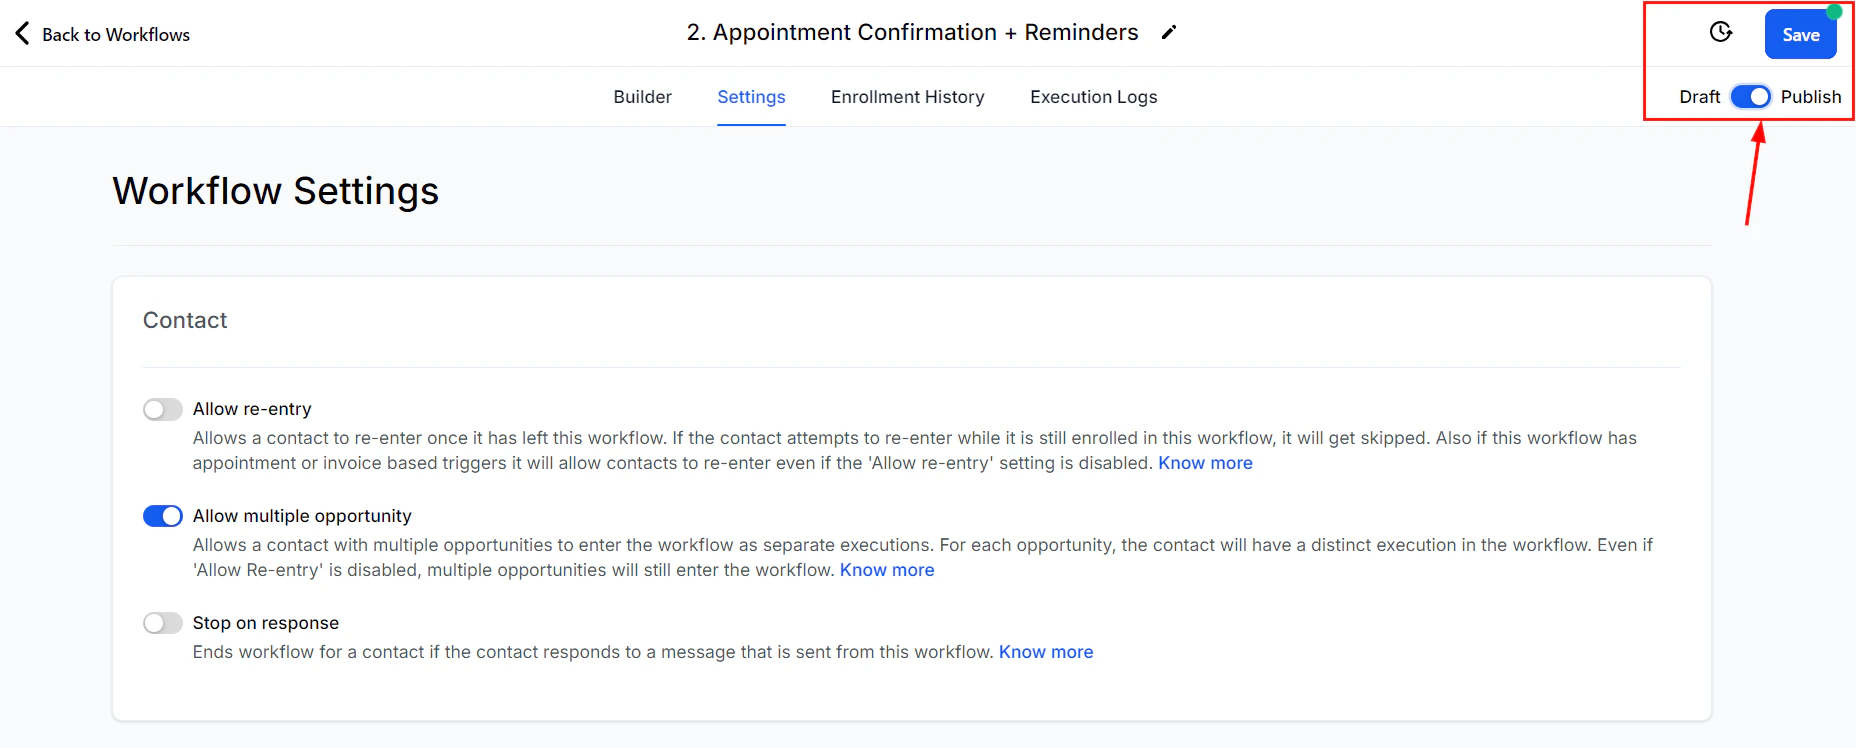
Screenshot
Practical Examples and Use Cases
A team member may be working with a client, who is interested in two different services: Service 1 and Service 2.- If the Toggle is OFF: If the opportunity for Service 1 is updated at 8 AM on January 1st, an SMS reminder is sent based on the workflow configuration. However, if the opportunity for Service is updated later that same day at noon, no SMS is sent, as the workflow is still tied to the first opportunity.
- If the Toggle is ON: When Service 1 is updated at 8 AM, an SMS is sent. Then, when Service 2 is updated at noon, a second SMS is also sent, treating each opportunity as a unique instance.
FAQs
What happens to workflows already created?
What happens to workflows already created?
Will the workflow restart if the same opportunity triggers it again?
Will the workflow restart if the same opportunity triggers it again?
Will contact details be updated when an opportunity is updated?
Will contact details be updated when an opportunity is updated?
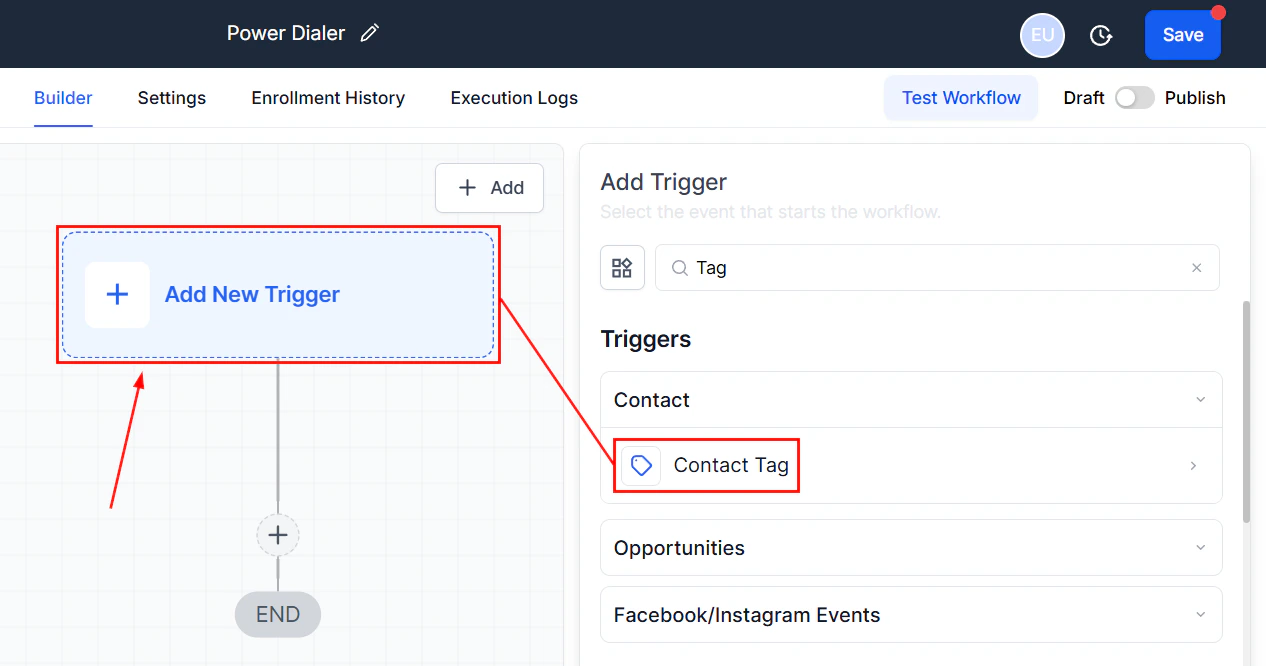
Power Dialer setup
The Power Dialer is an advanced feature within the CRM that automates the calling process, allowing users to dial through a list of contacts efficiently. This tool is particularly beneficial for users who regularly manage a large volume of calls. It saves time and ensures no contact is overlooked, improving follow-up and lead management. To make the most of this tool, you must set up a workflow specifically designed for the Power Dialer.Setting Up the Tag
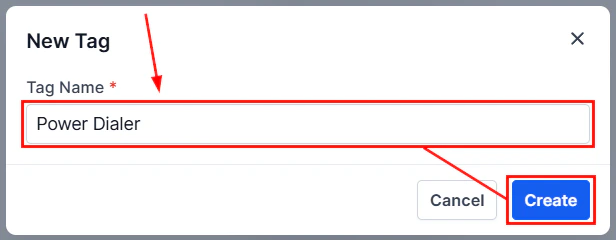
Navigate to the Settings section of the CRM, scroll down, and select ‘Tags’. To create a new tag, click the**** “+ New Tag”**** button to start.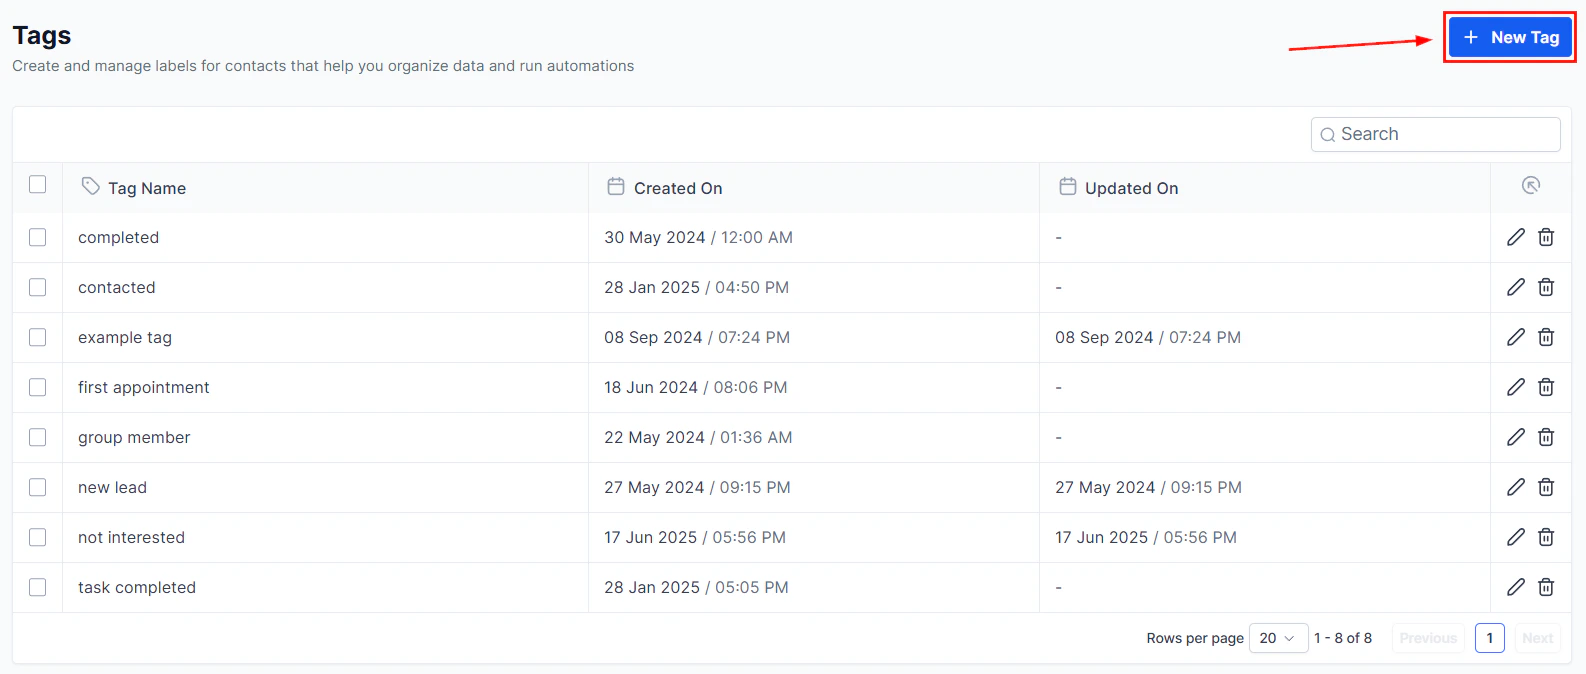
Screenshot
Screenshot
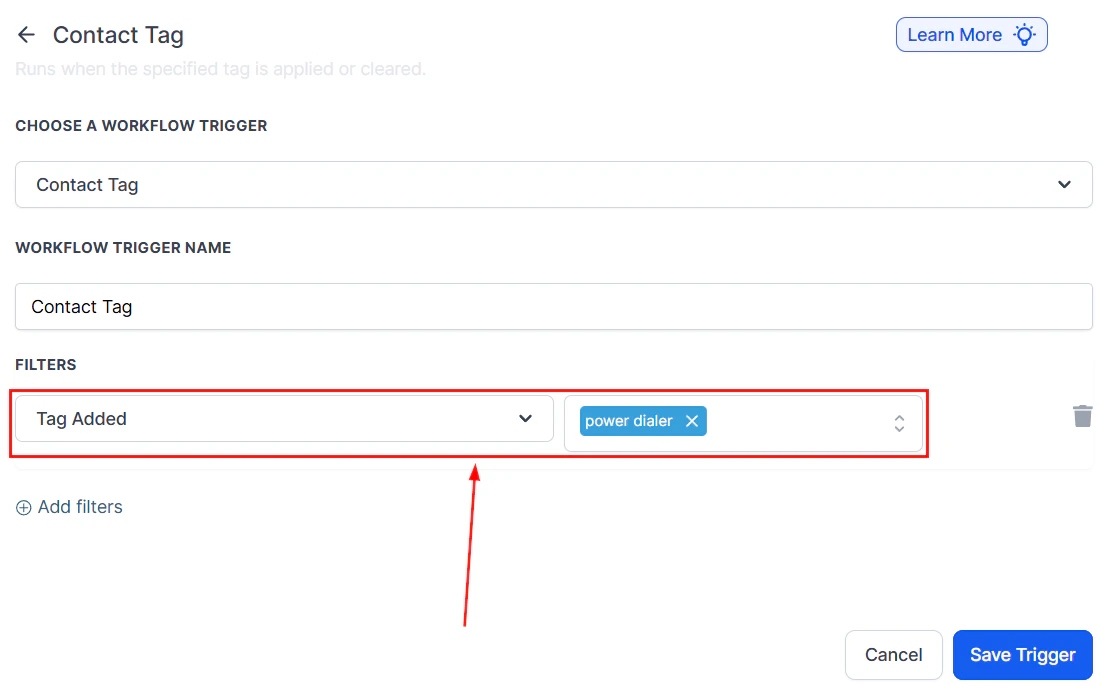
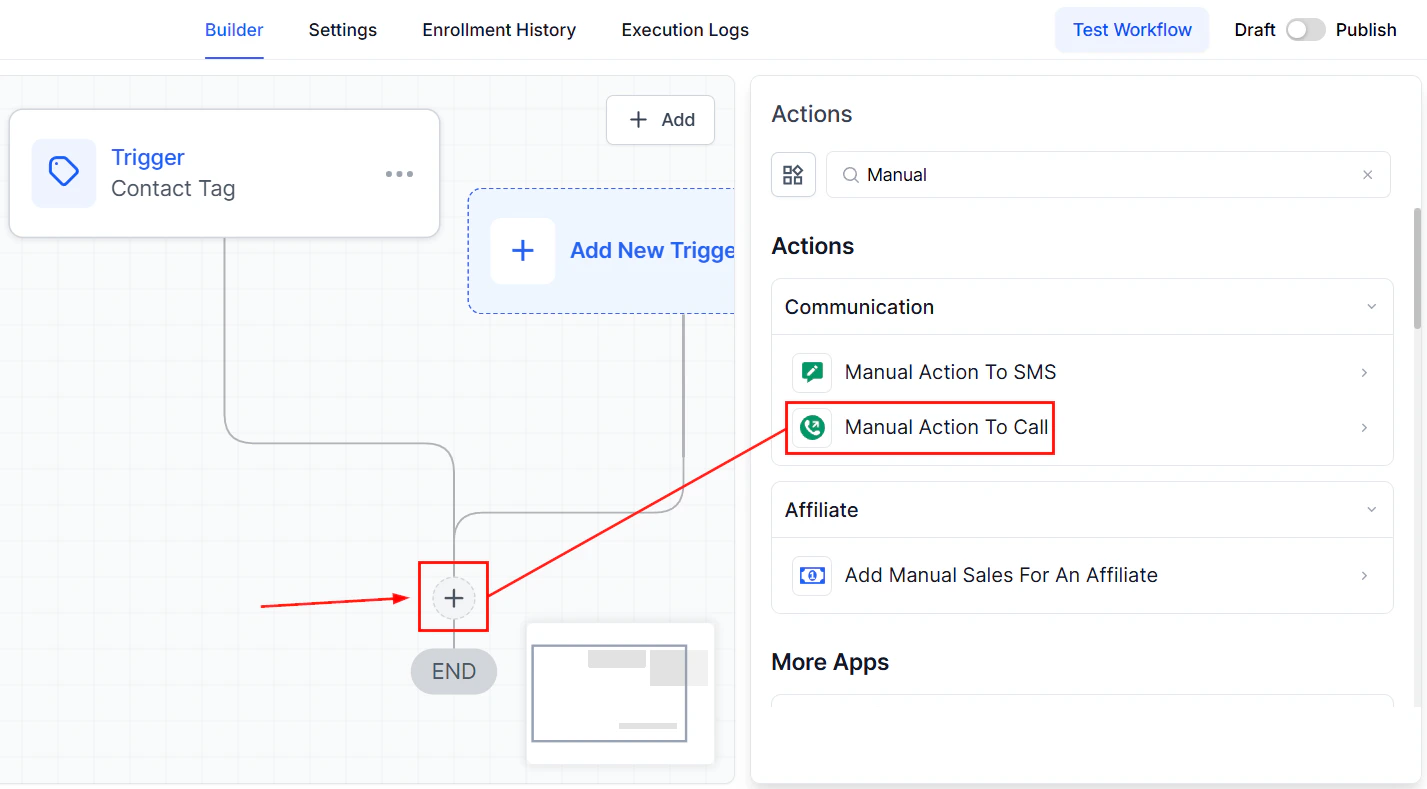
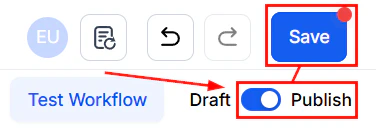
Setting Up the Power Dialer Workflow
Setting up the Power Dialer is straightforward and involves a few key steps: Go to the “Workflows” tab, select**** “Create New Workflow”, and click on “Start from Scratch”.****Screenshot
Screenshot
Screenshot
Screenshot
Screenshot
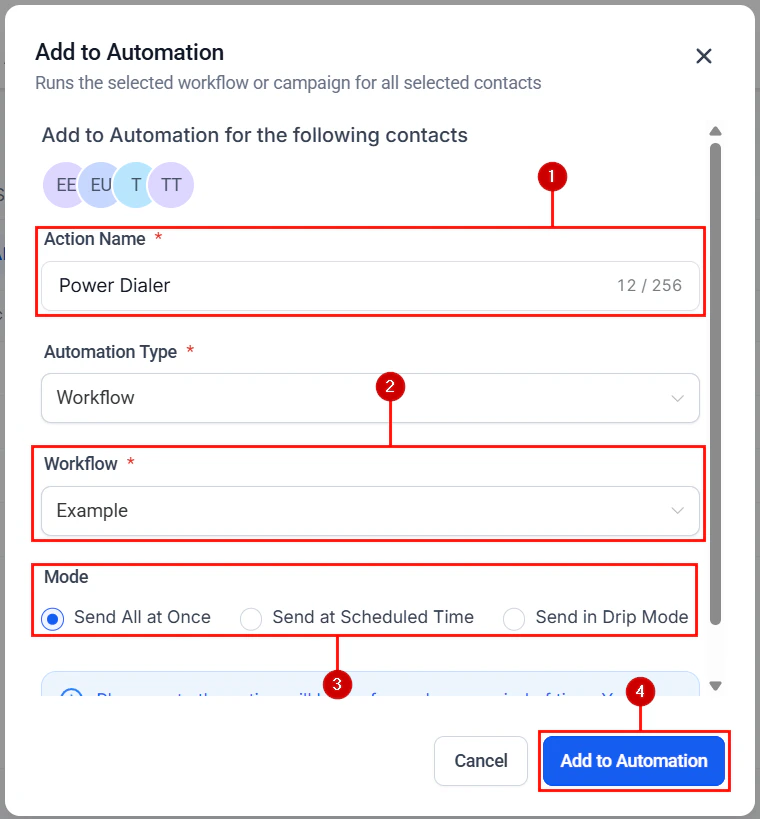
Adding Contacts to the Power Dialer
There are two primary methods to add contacts to your Power Dialer workflow:For Existing Contacts
Navigate to Contacts. Under the Smart List tab, you will find the existing contacts in the CRM. Select the contacts you wish to add and choose**** “Add to Automation”****.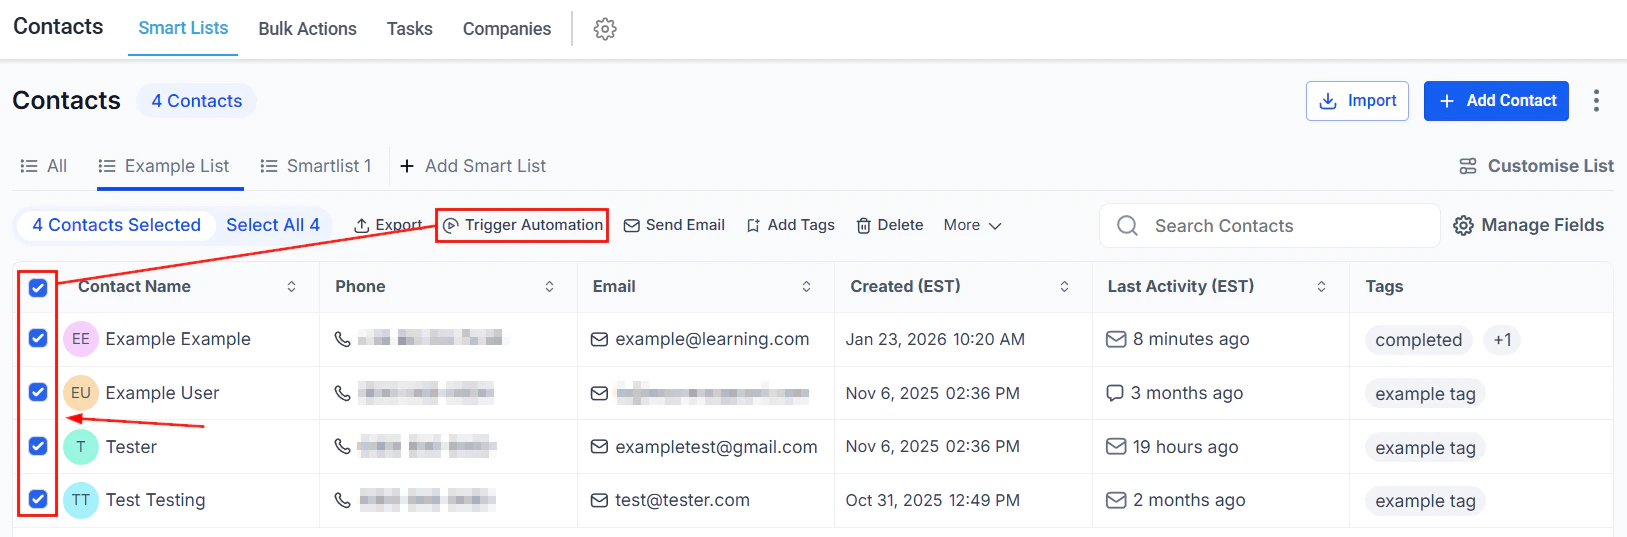
Screenshot
Screenshot
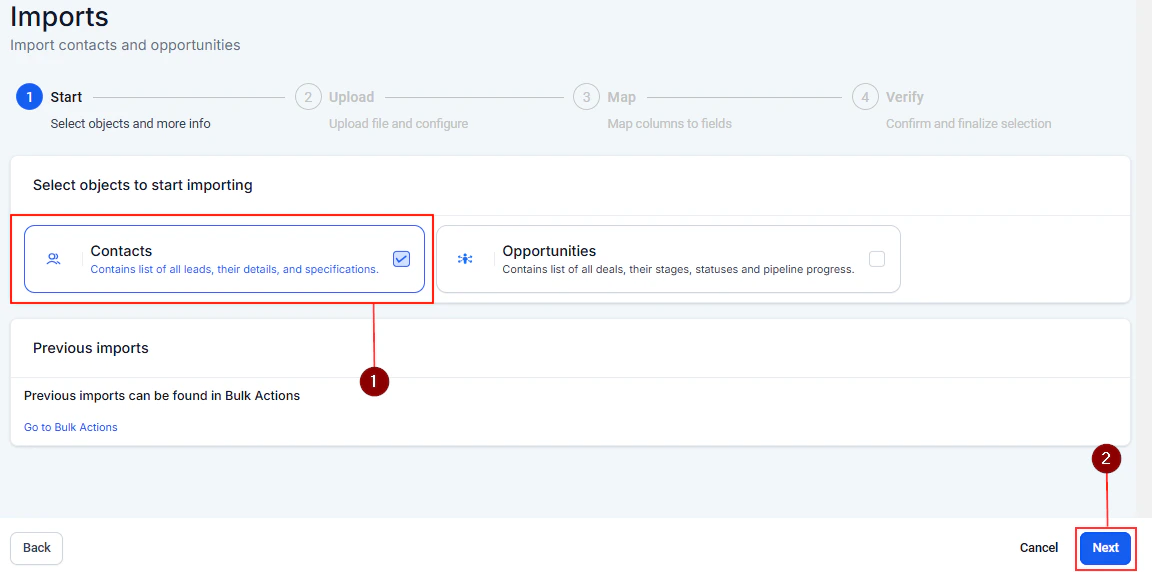
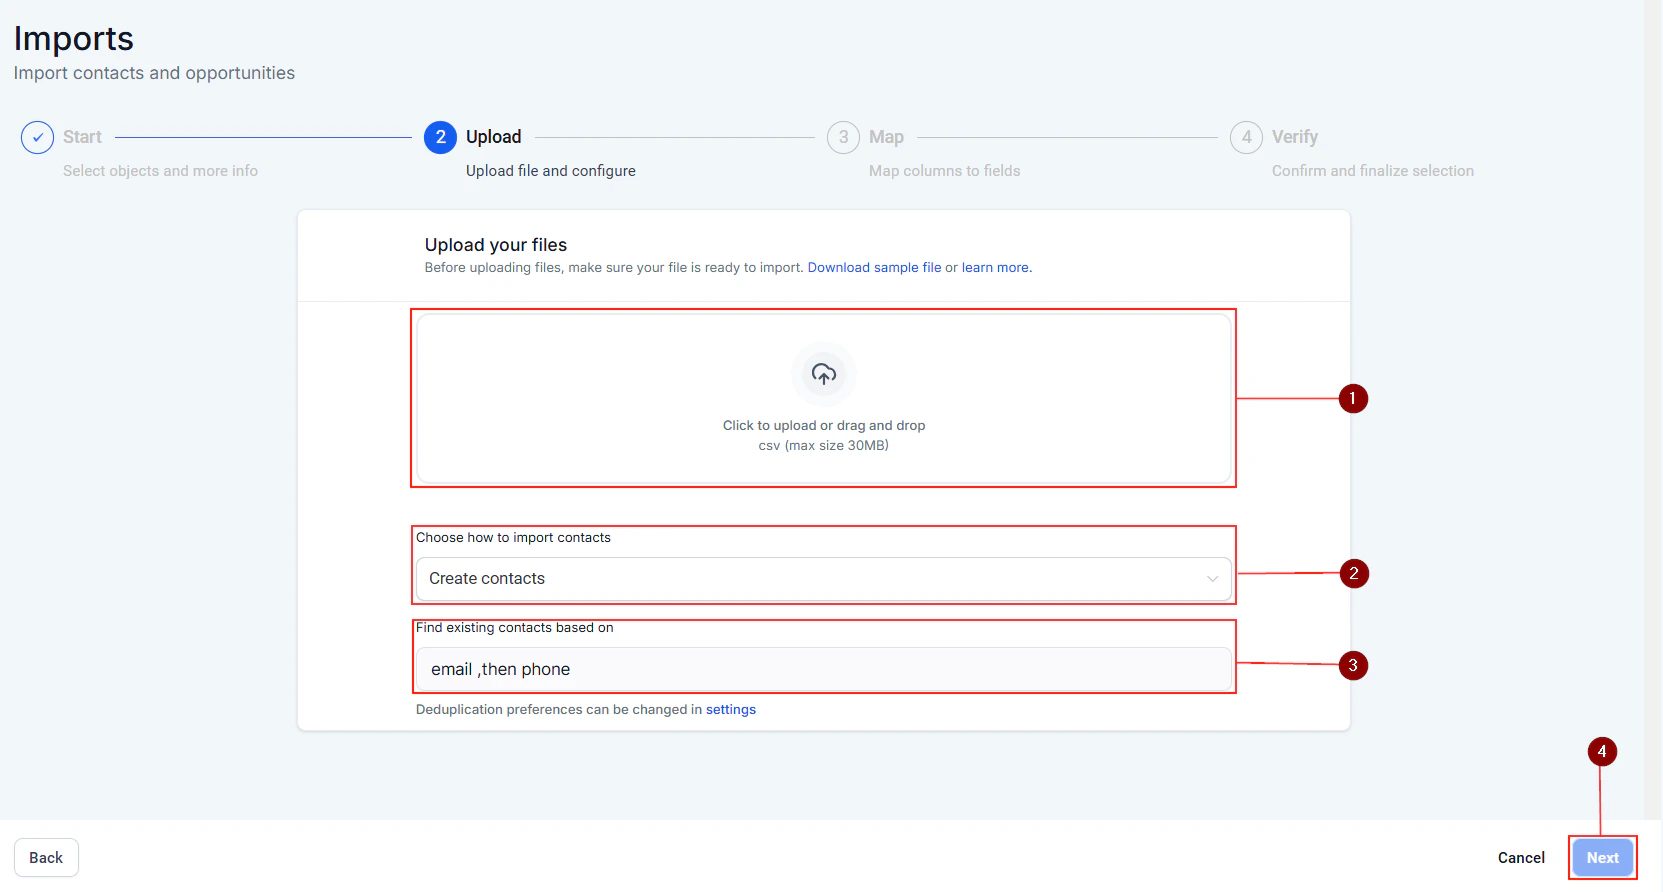
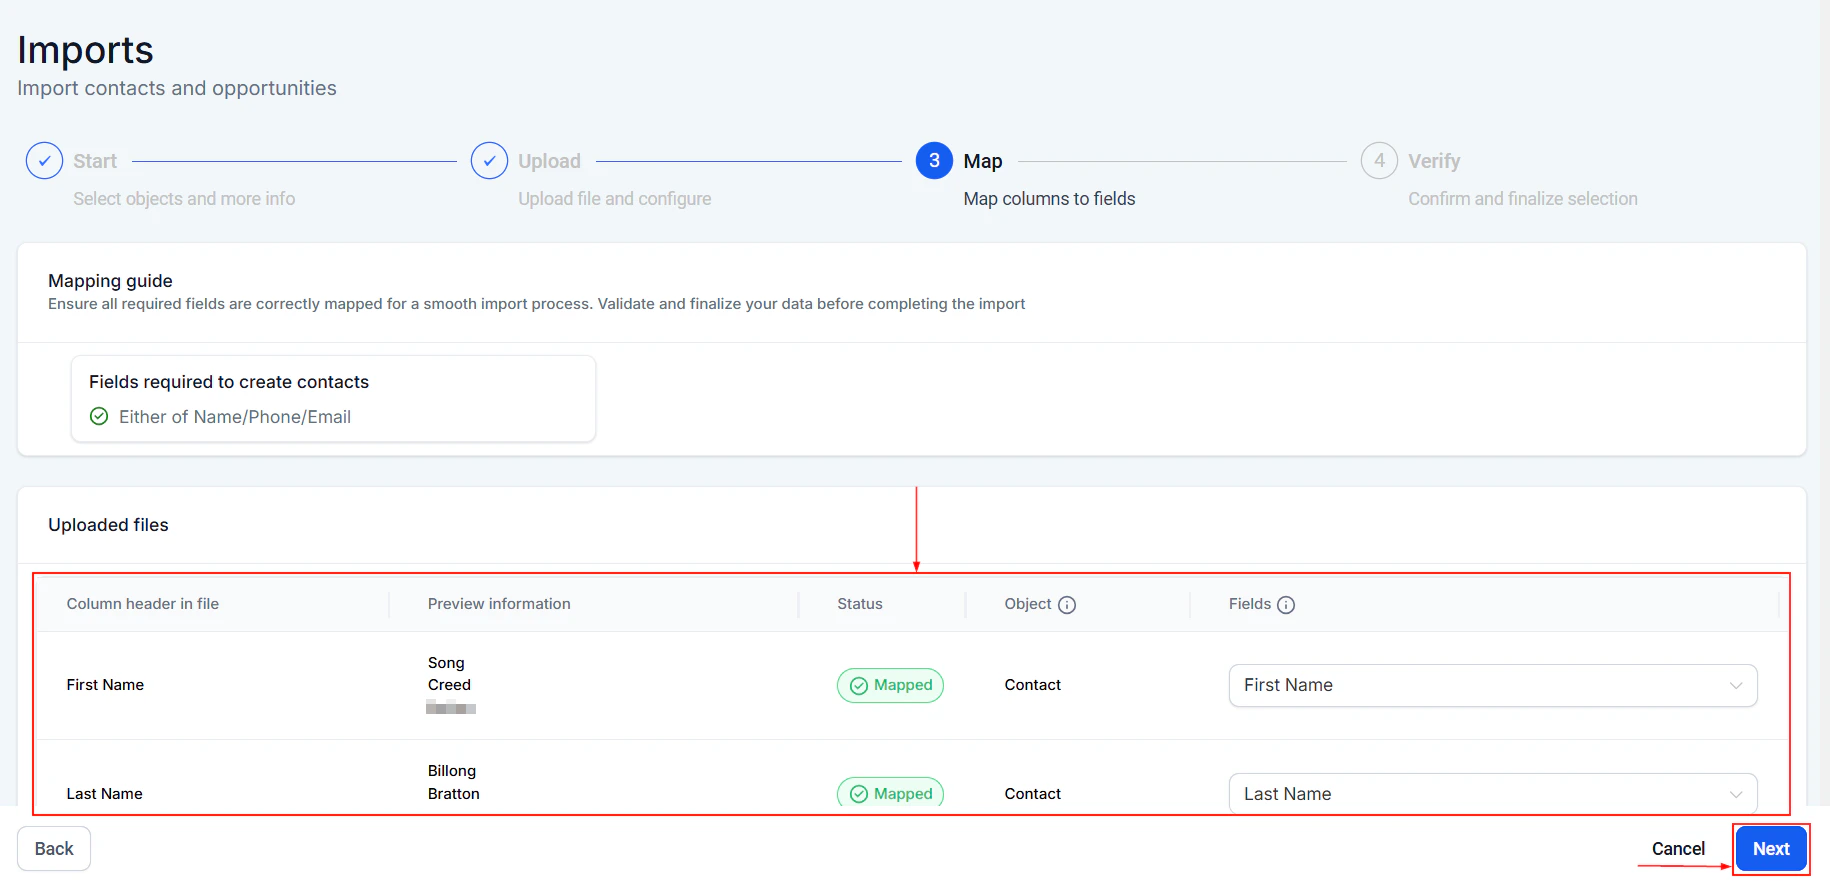
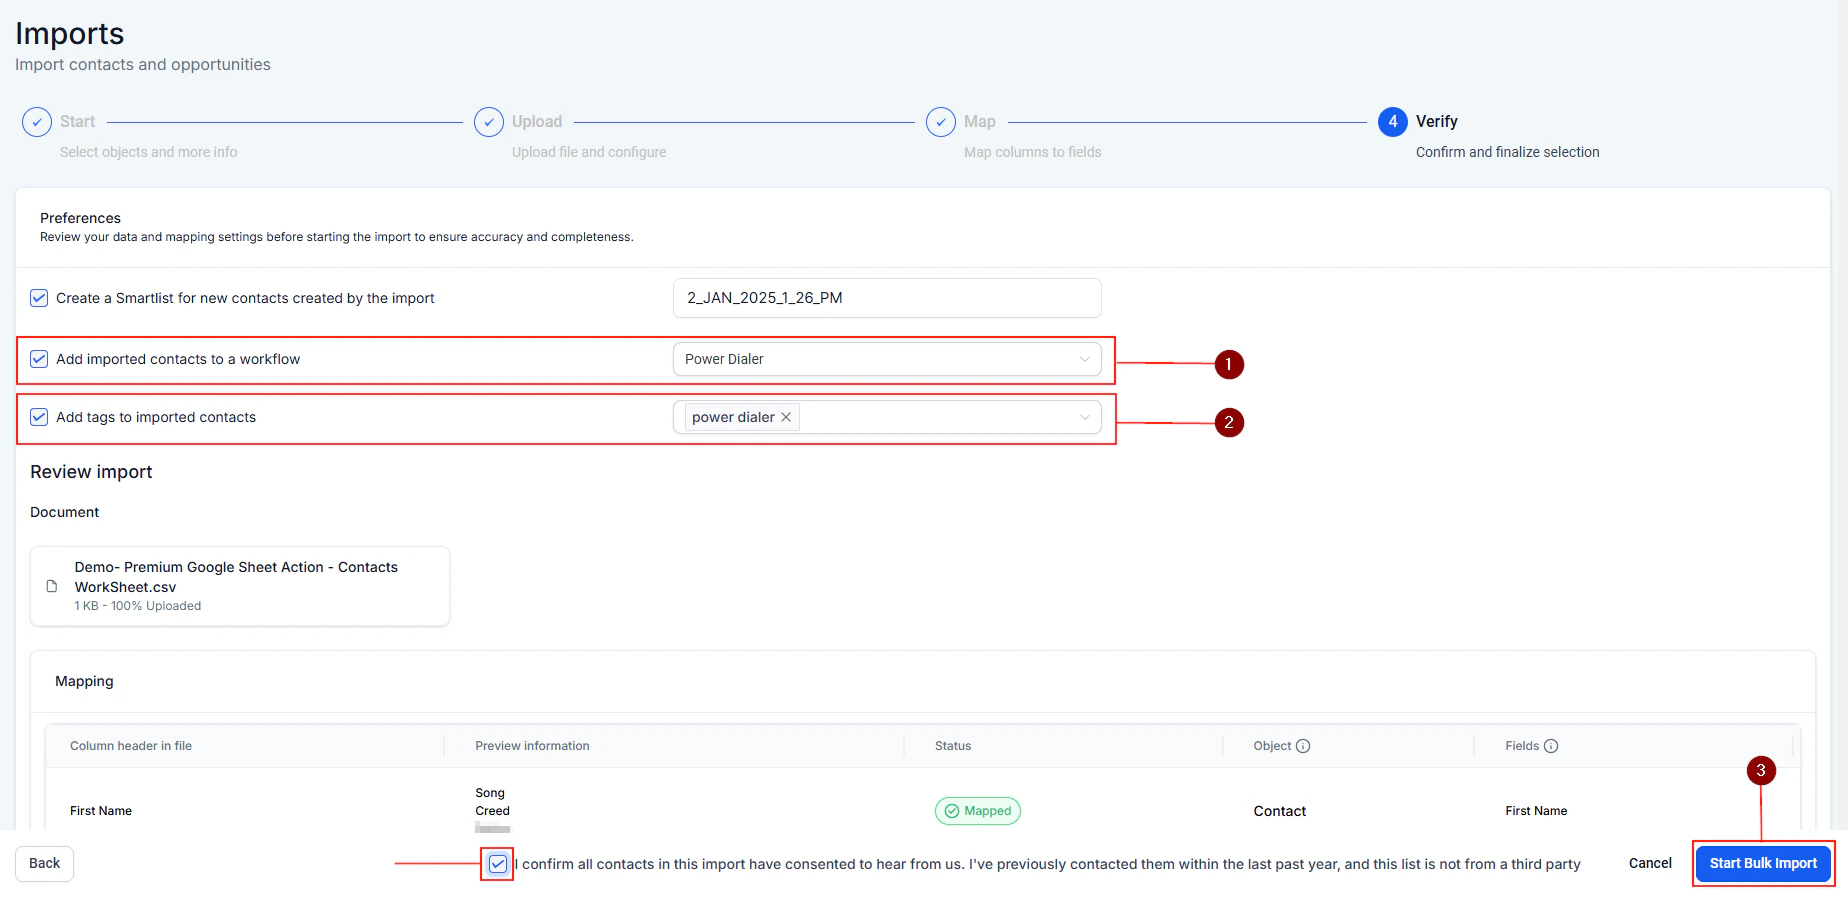
For New Contacts (Importing)
Click on “Import Contacts”.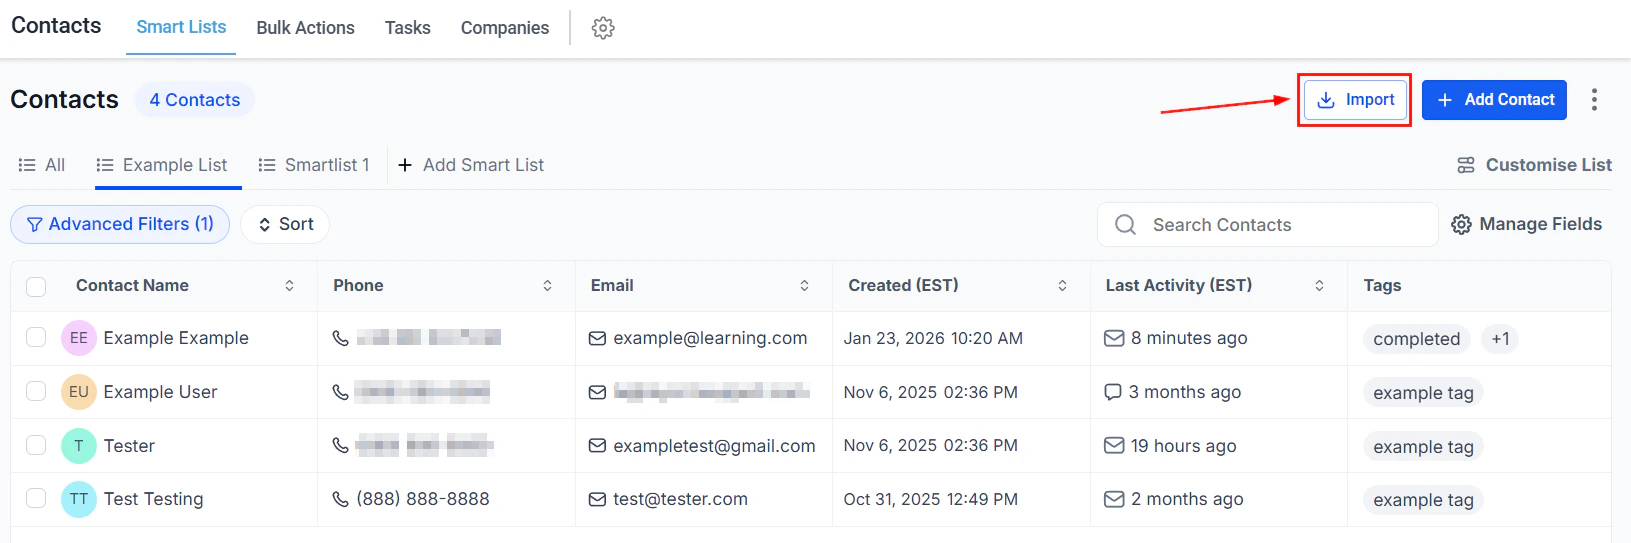
Screenshot
Screenshot
Screenshot
Screenshot
Screenshot
Using the Power Dialer
Once your contacts are added, you can start making calls by navigating to the Power Dialer and clicking ‘Let’s Start’. The system will automatically dial the next contact in your list, providing a seamless calling experience.- During Calls: You can log the outcome of each call (e.g., answered, no answer), which helps in maintaining accurate call reporting and analytics.
- Post-Call Actions: You can schedule follow-ups, add notes, or book appointments directly from the contact’s profile, enhancing lead management and follow-up efficiency.
Troubleshooting and Tips
- Ensure Accurate Tagging: Properly tagging your contacts is crucial for the Power Dialer to function correctly. Double-check your tags if you encounter issues.
- Workflow Activation: Make sure your Power Dialer workflow is published and active.
- Refreshing Contacts: If newly added contacts don’t appear immediately, give it a few moments or refresh the page.
FAQs
Can I customize the time between calls?
Can I customize the time between calls?
How do I access call reports?
How do I access call reports?
Can I listen to recorded calls?
Can I listen to recorded calls?
Marking calls as completed
Managing call statuses efficiently is crucial for maintaining accurate records and streamlining your communication processes. In this guide, we’ll walk you through the steps to set up your system so that calls are automatically marked as completed. By configuring your phone number settings and creating automated workflows, you’ll ensure that your call tracking is precise, saving you time and enhancing your CRM’s functionality.Setting Up Your Phone Number
Before diving into workflows, it’s essential to configure your phone number settings correctly to improve the accuracy of call reporting. Access Phone Numbers: Start by accessing the settings menu in your CRM, then click on the “Phone Numbers” section to view your list of phone lines.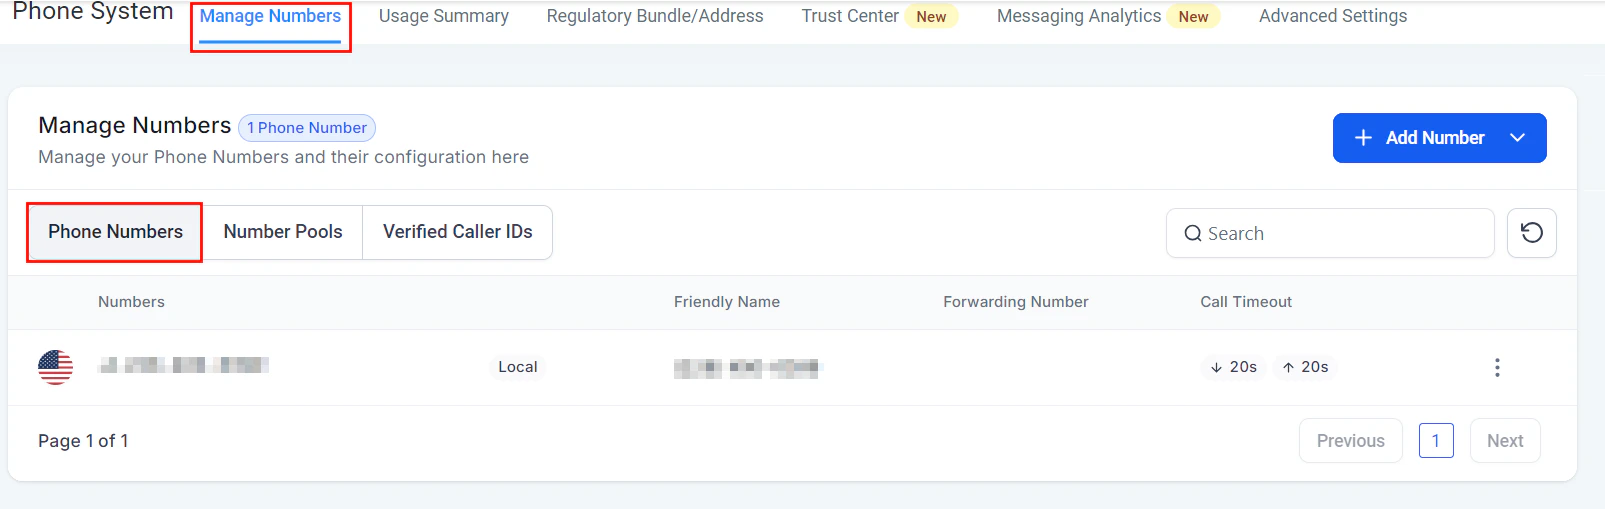
Image
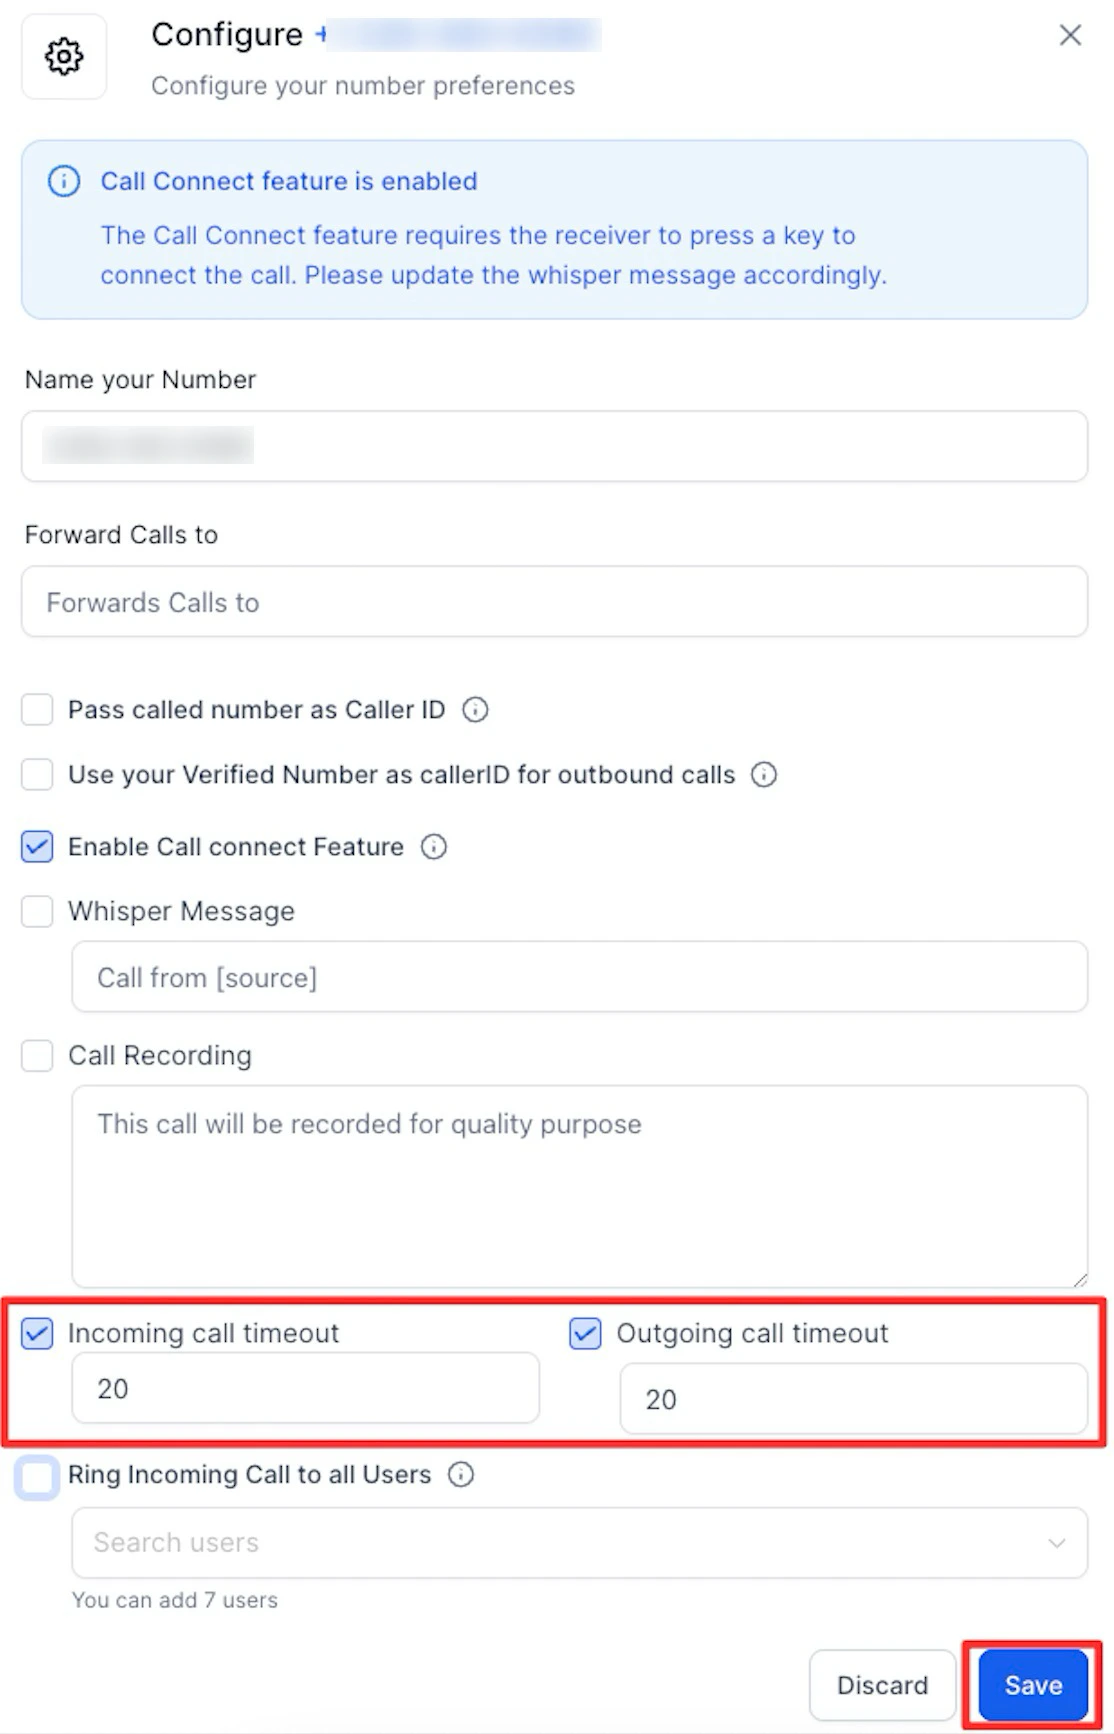
Image
Setting Up Your Workflow
After configuring your phone number settings, the next step involves creating a workflow to automate the process of marking calls as completed.- Go to Automation: In the CRM, navigate to the Automations tab and select “Workflows.”
- Create a New Workflow: Opt for a New, Blank Workflow to start from scratch.
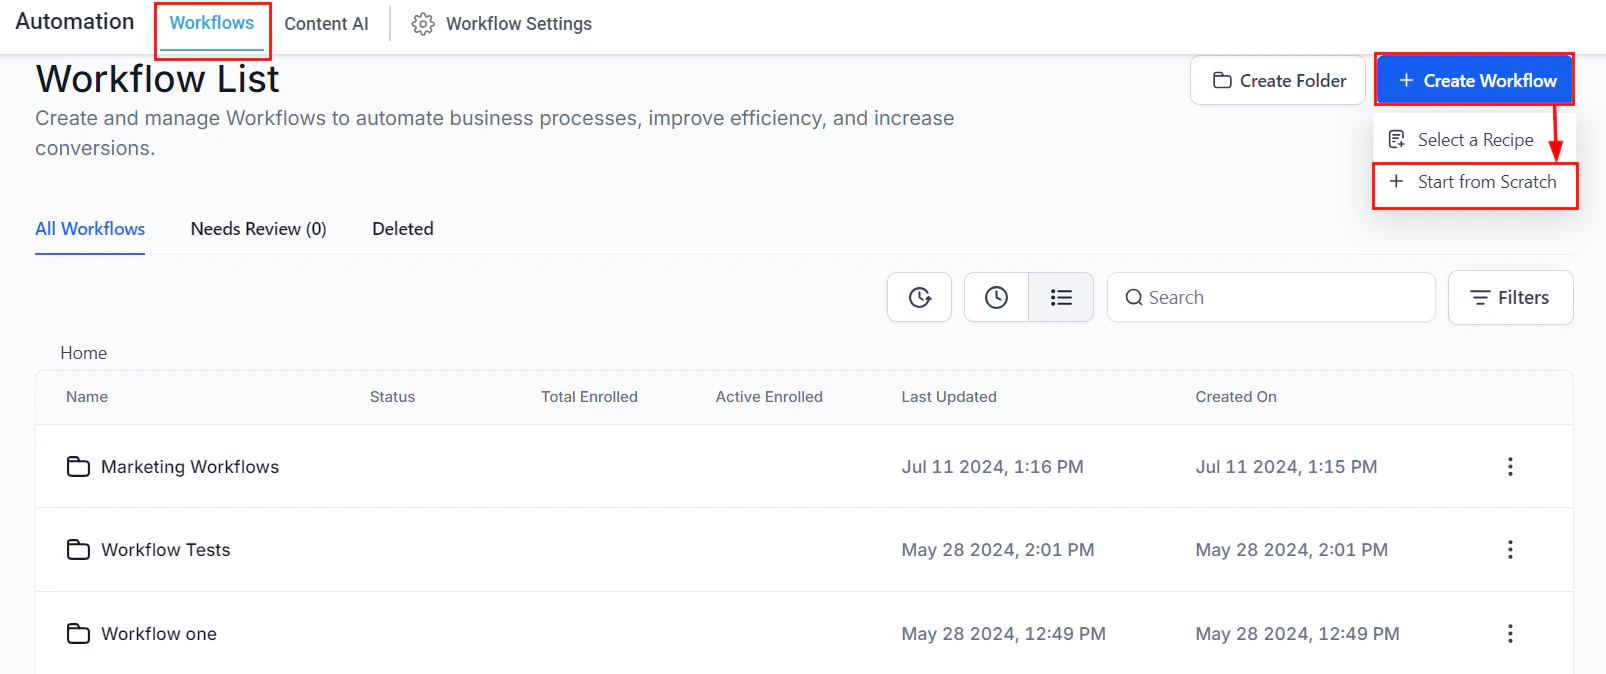
Image
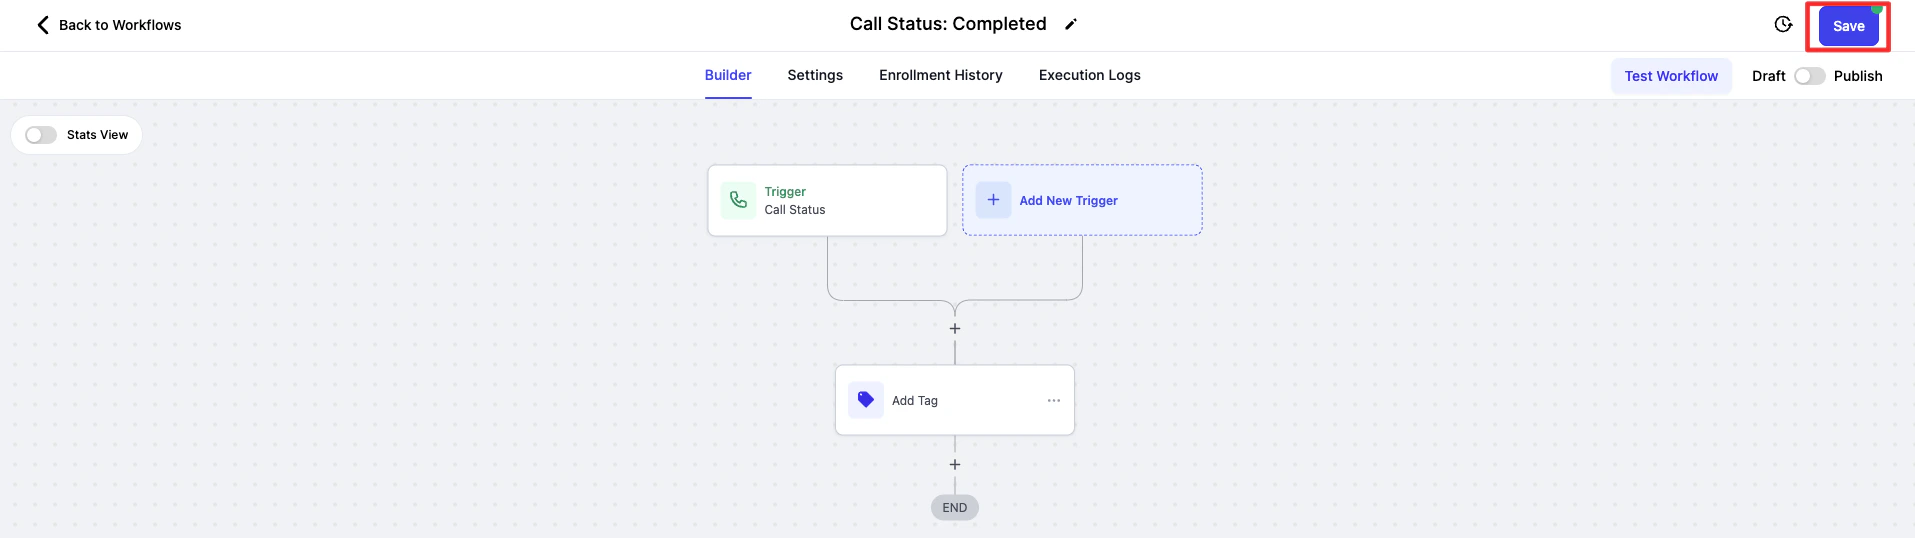
- Name Your Workflow: Give your workflow a descriptive name, such as “Call Status: Completed,” for easy identification.
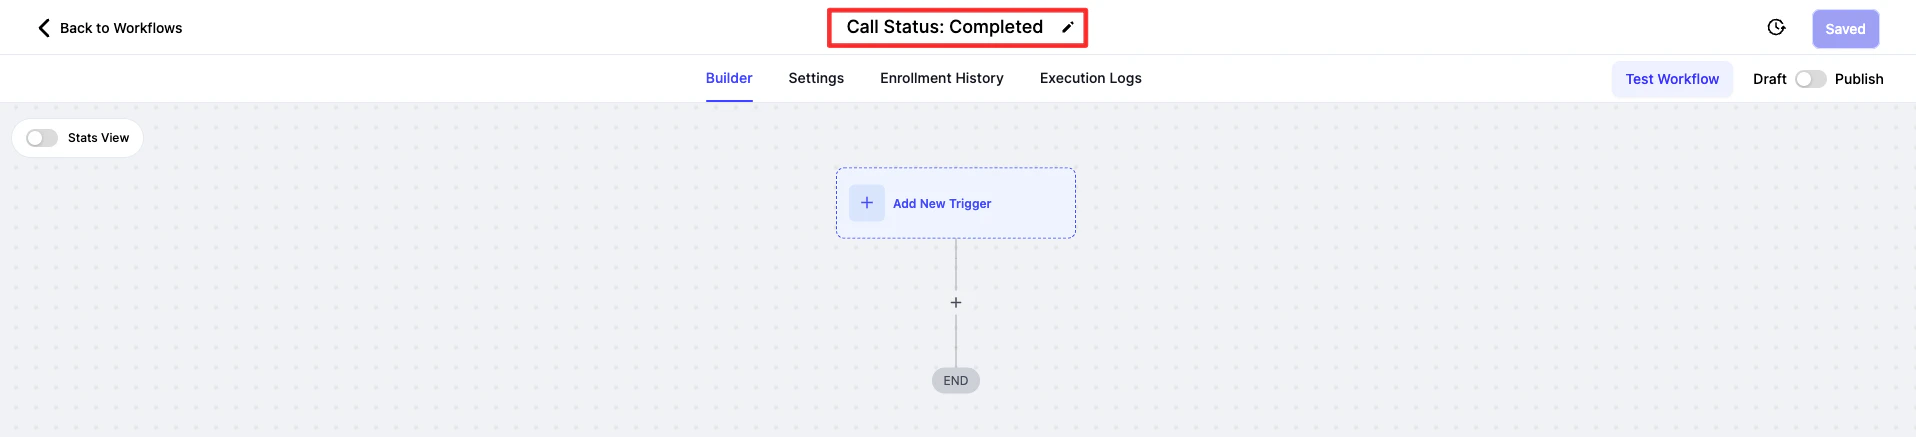
Image
- Add a Call Status Trigger: Incorporate a “Call Status” trigger and apply a filter for the specific call status you’re targeting (e.g., answered calls).

Image
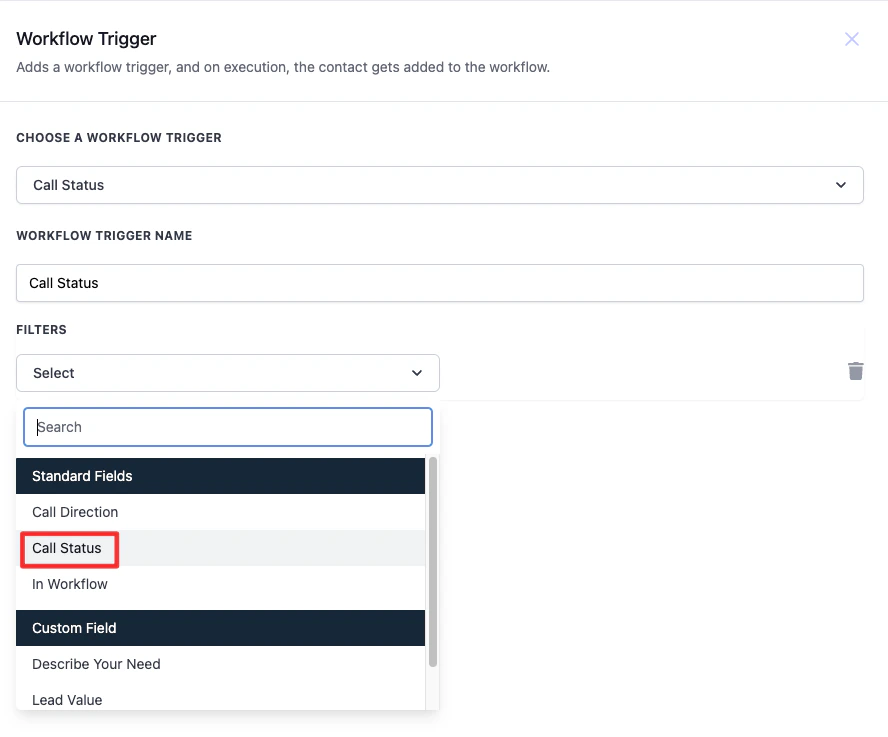
Image
- Use an Add Tag Action: Implement an “Add Tag” action to label the contact with a tag that corresponds to the call status (e.g., “completed”).
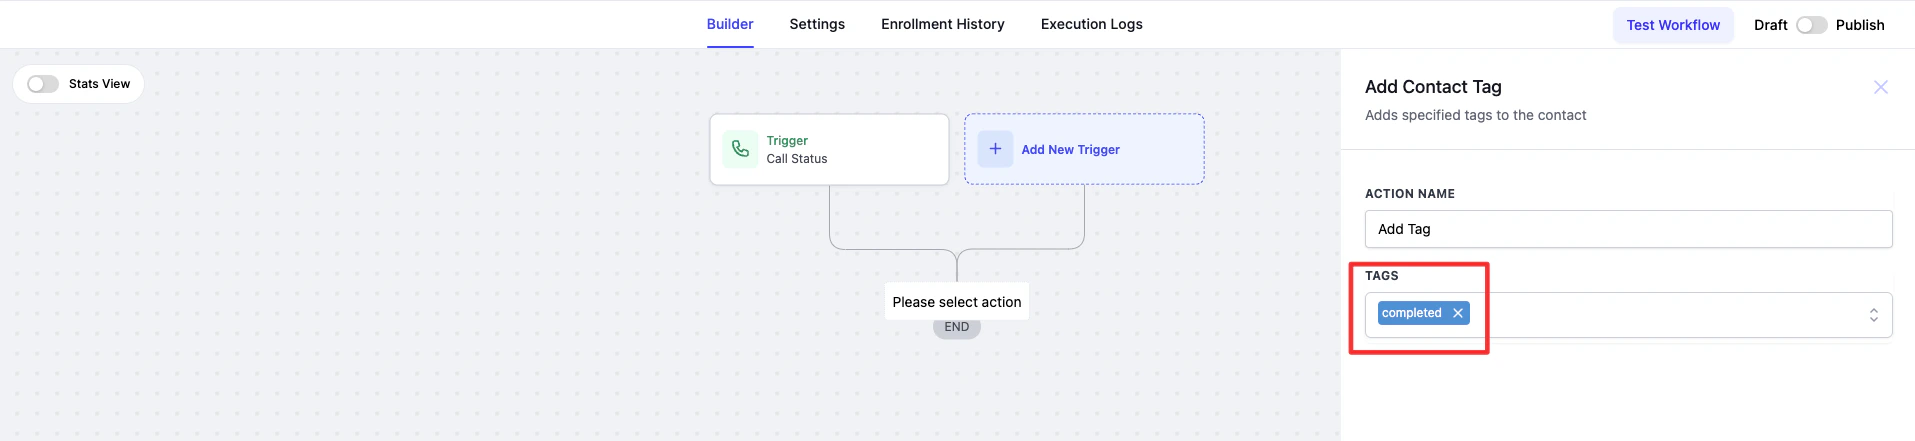
Image
Image
- Pro Tip: To manage multiple call statuses efficiently, consider using the “If/Else” action to create branches within your workflow. This allows you to add different triggers for each call status and streamline the process of marking leads accordingly.
FAQs
What if calls are still being marked as completed when they go to voicemail?
What if calls are still being marked as completed when they go to voicemail?
Can I automate marking calls with other statuses besides completed?
Can I automate marking calls with other statuses besides completed?
Workflow settings
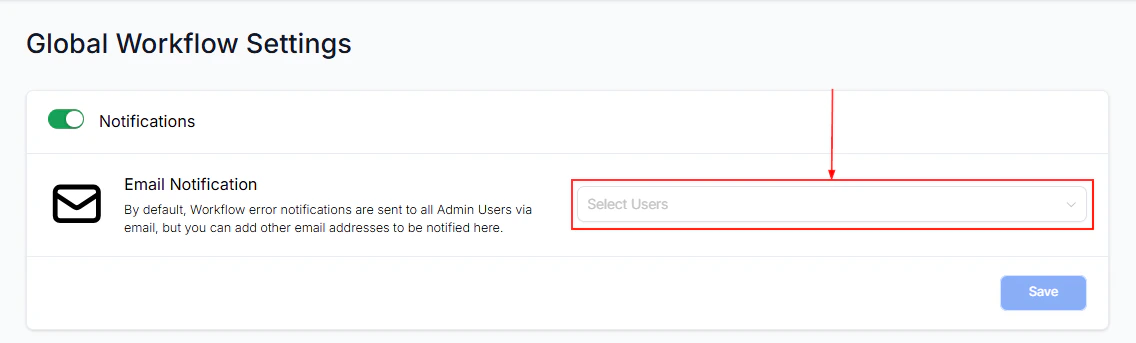
Notifications provide immediate alerts when a workflow encounters errors, allowing you to quickly identify and address the problem. By staying informed about errors as they occur, you can take swift corrective actions, minimizing any potential downtime. This is particularly important in workflows that are critical to customer interactions, sales processes, or other key business operations. By following this guide, you will learn how to leverage email notifications to maintain operational efficiency and minimize the risks associated with workflow disruptions.Accessing Workflow Settings
Begin by navigating to the Automation section from your account Dashboard, and then select the Global Workflow Settings tab located on the upper panel. This will direct you to a detailed settings page where you can configure your email notification preferences.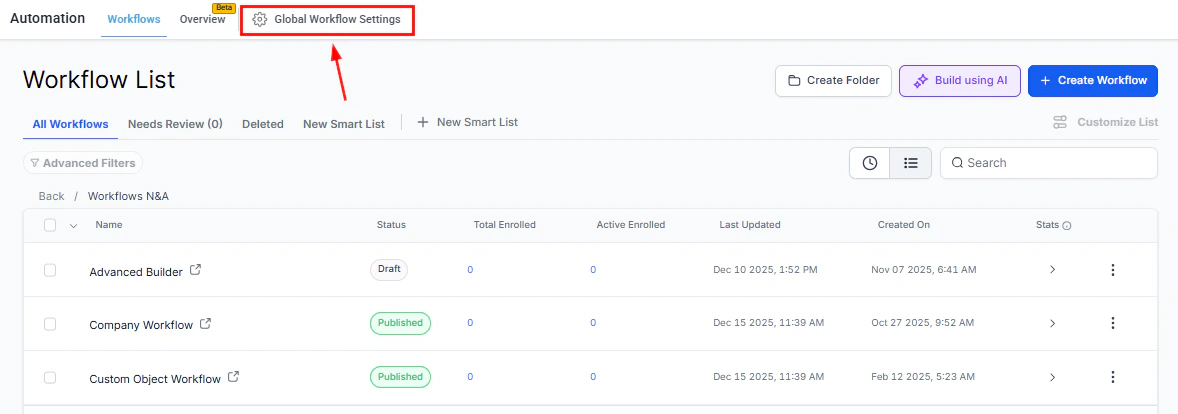
Screenshot
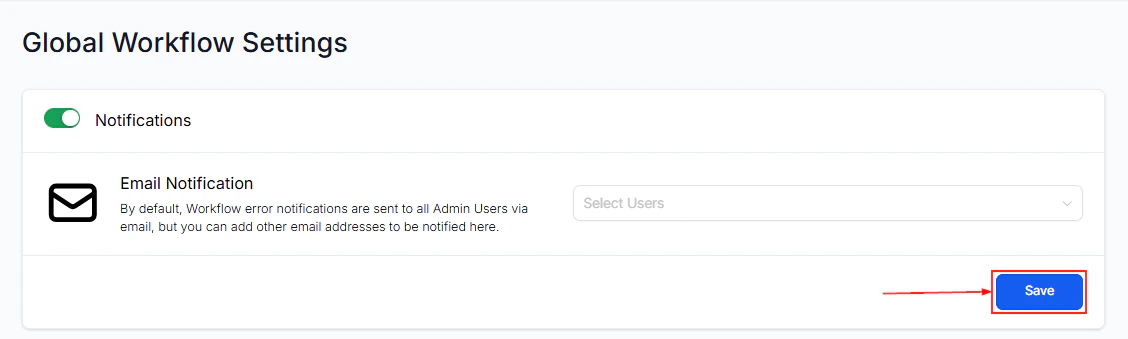
Customizing Notification Preferences
Here, you can manage your email notification preferences. By default, this option is toggled “on,” ensuring that all account administrators receive immediate email notifications when an error occurs within a workflow. This proactive alert system helps you stay informed of any workflow failures, allowing you to take swift action to maintain a consistent and reliable customer experience.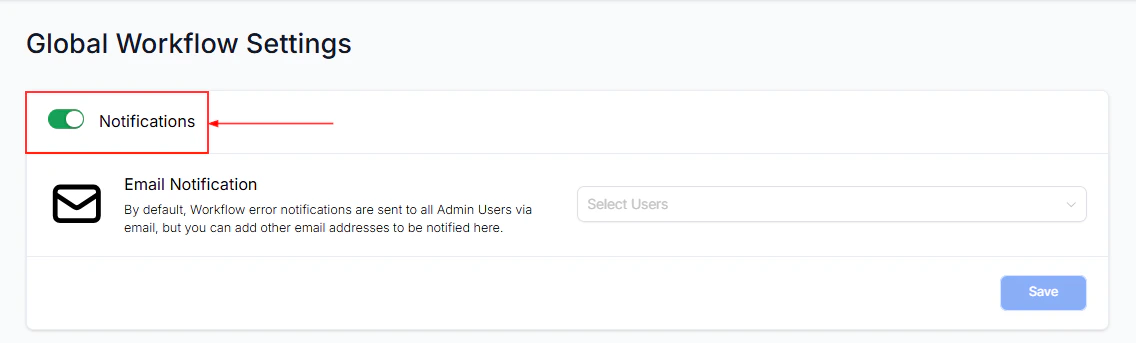
Screenshot
Screenshot
Screenshot
Auto Save
The Auto Save feature makes crafting workflows even easier. When enabled, it retains your changes automatically, so you don’t have to worry about losing any updates you make.
Screenshot
Pause Workflow
The Pause Workflow feature allows you to temporarily stop specific workflows, or all workflows, within a chosen date range. You can also set date ranges to repeat annually, automatically pausing the selected workflows on these dates every year.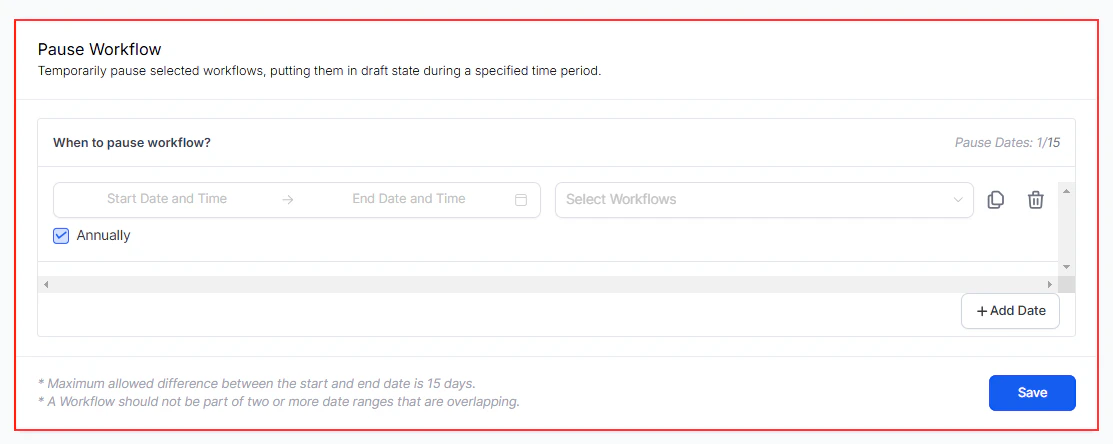
Screenshot
Setting Up Workflow Pausing
In Global Workflow Settings, scroll down to Pause Workflow, choose the Start Date and End Date for the period you want the workflows paused, and then select the workflows you wish to pause from the list. You can choose “All Published Workflows” or individual workflows as needed. Tick the “Annually” checkbox if you want the workflows to pause on these dates every year. Use the Clone or Delete icons to duplicate or remove date ranges as needed. Click the ****Save ****button to apply the changes.Example Use Case
If you want to pause workflows during the holiday season, like from December 25th to January 2nd, to avoid sending communications during that time, simply set the date range, select the workflows, and save.
Screenshot
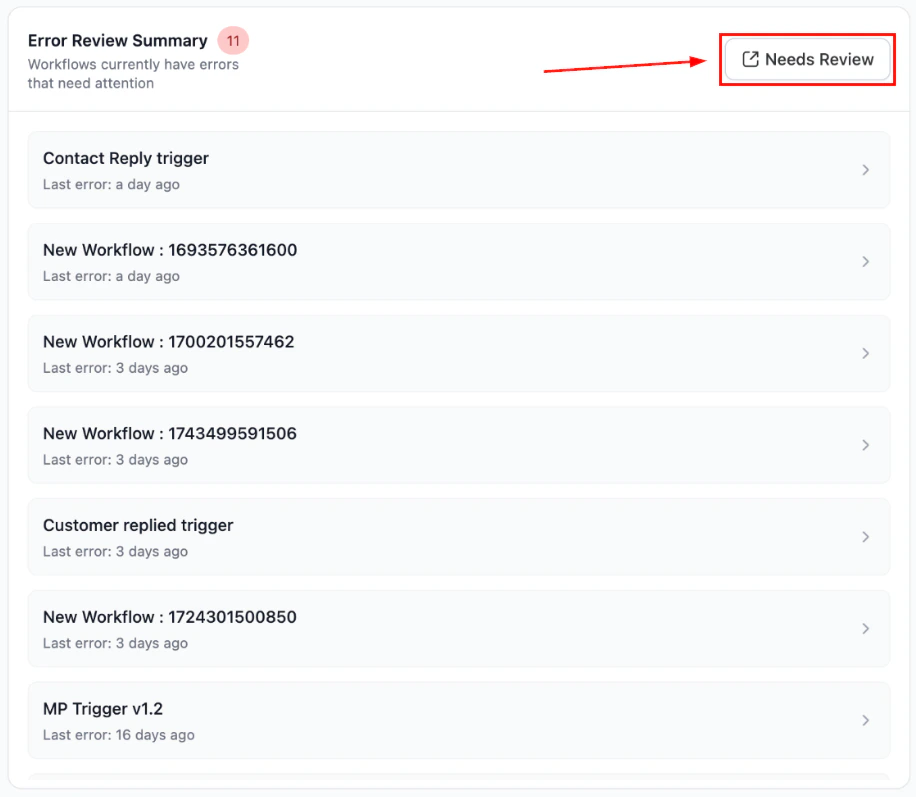
Reviewing Errors
If any errors are detected in your workflows, they will be displayed in the Workflow Needs Review tab. To acknowledge these errors, mark them as read. To view the details of the errors, click on the Workflow Name. This action will redirect you to the Execution logs, where you can examine the specific errors within the workflow. Once reviewed, ensure you mark the errors as read to indicate that they have been addressed.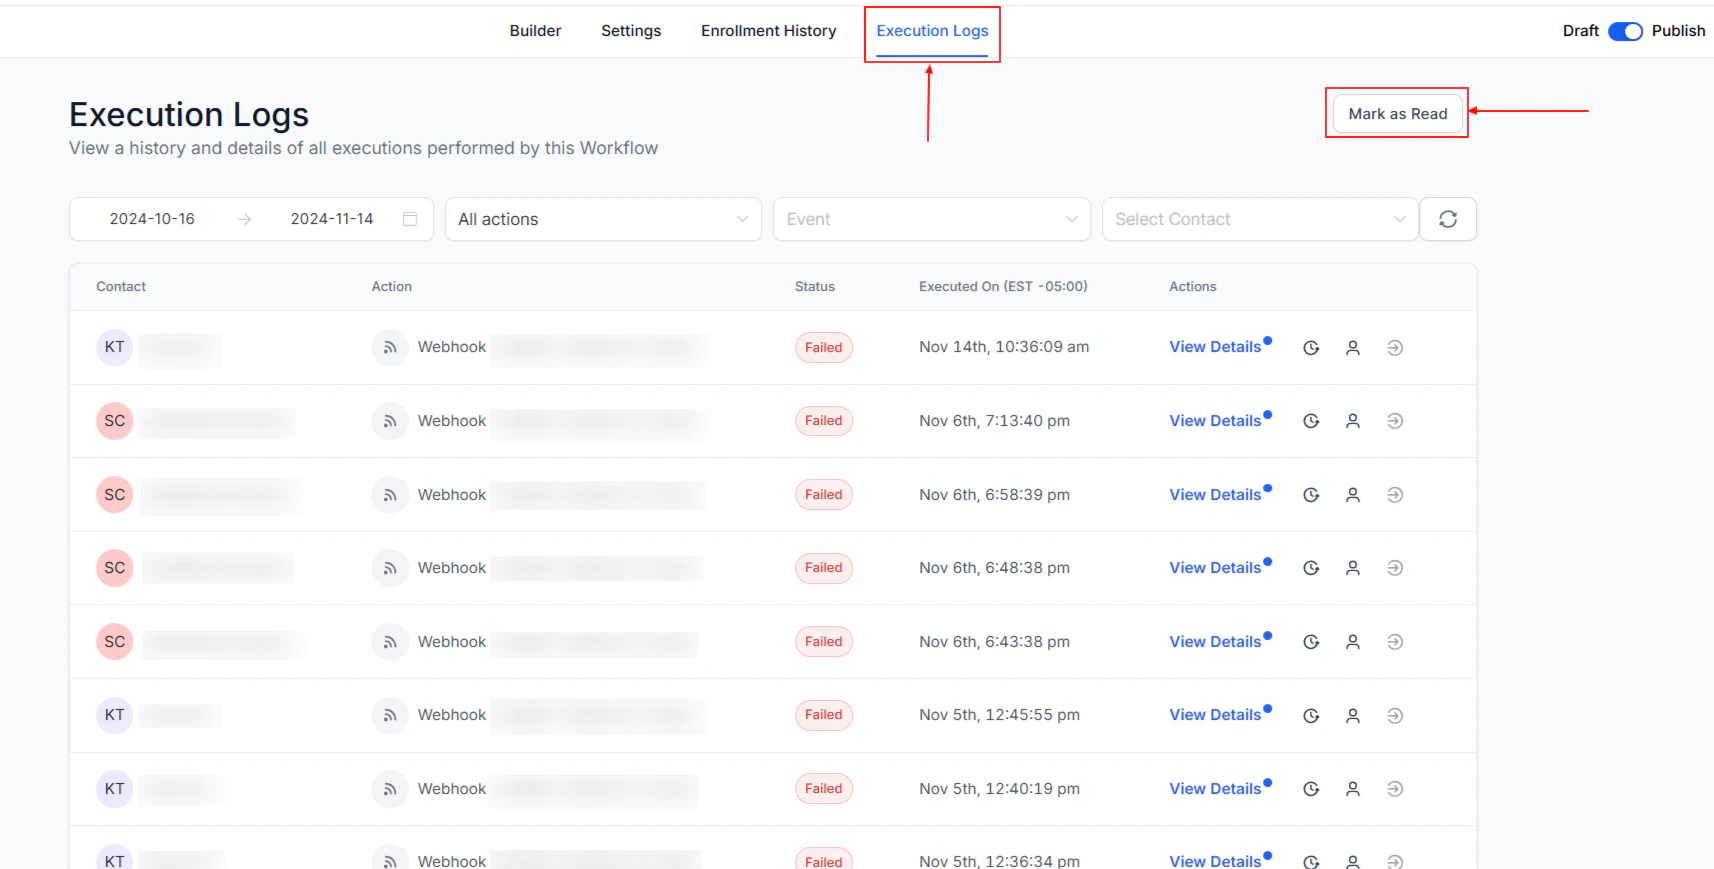
Screenshot
FAQs
How do I pause workflows on specific dates?
How do I pause workflows on specific dates?
Can I set workflows to pause automatically on the same dates every year?
Can I set workflows to pause automatically on the same dates every year?
What is the maximum time limit I can pause workflows?
What is the maximum time limit I can pause workflows?
Can I apply multiple date ranges for pausing workflows?
Can I apply multiple date ranges for pausing workflows?
Who can access the pause feature for workflows?
Who can access the pause feature for workflows?
Settings tab
The settings tab within workflows allows for comprehensive management of communication, contact engagement, conversation tracking, and workflow sequences. It’s essential to review this tab when creating workflows to ensure communications are sent at the right time. Navigate to the workflows section of your account and select a workflow to begin.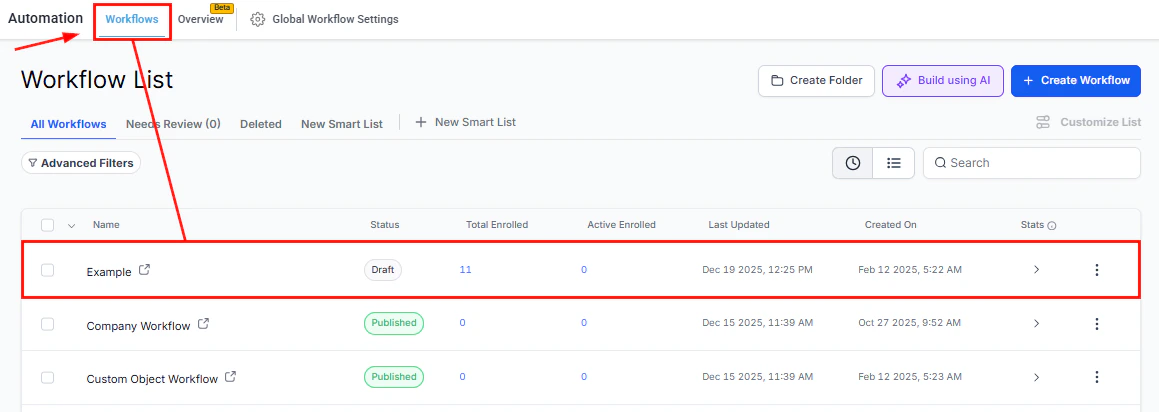
Screenshot
Screenshot
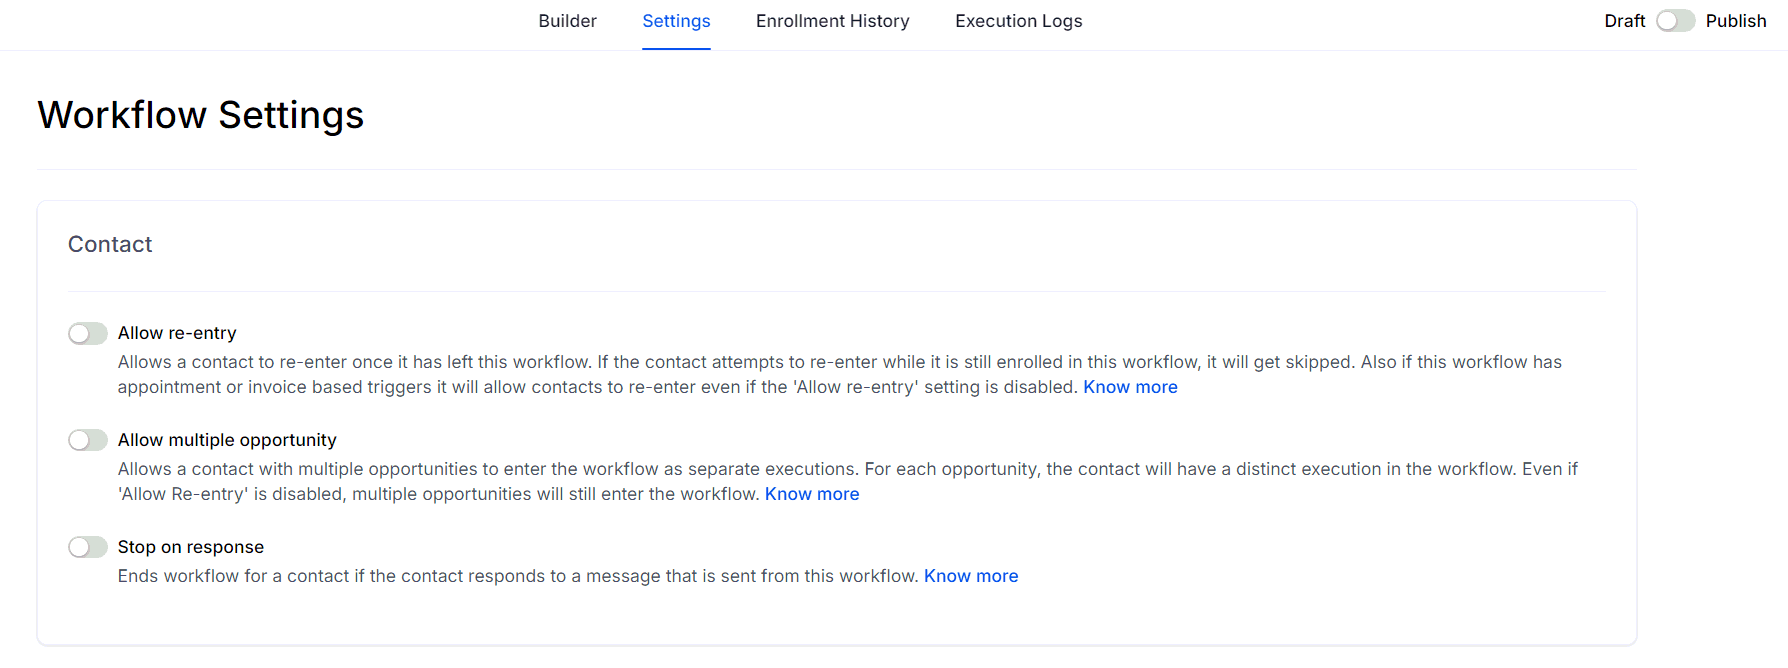
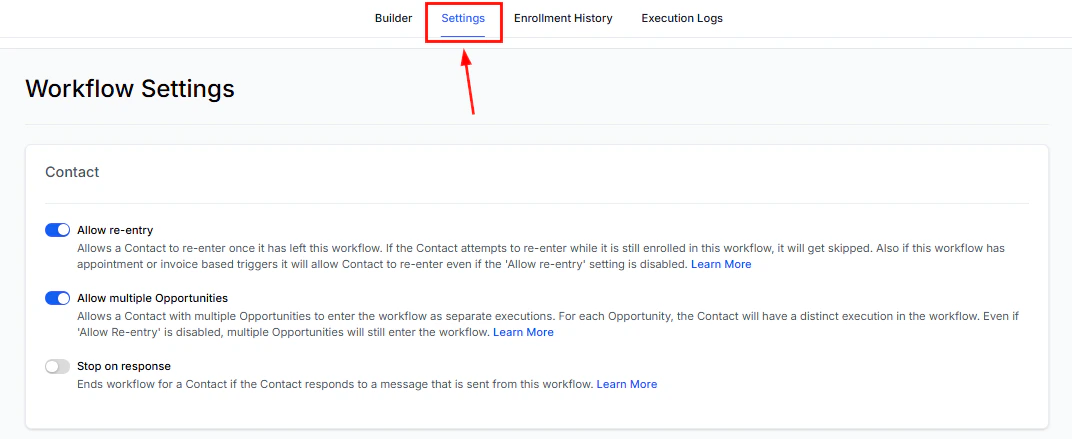
Contact Management
Allow Re-Entry
This setting determines whether a contact can re-enter the workflow after completion or removal. When enabled, contacts may revisit the workflow, provided they are inactive. However, workflows with appointment or invoice-based triggers will accept contacts multiple times regardless of whether “Allow Re-Entry” is activated.
Screenshot
Allow Multiple Opportunity
Enables a contact with multiple opportunities to initiate separate executions within the workflow. Each opportunity triggers a distinct workflow execution for the same contact. Even if ‘Allow Re-entry’ is disabled, all opportunities will continue to be processed individually within the workflow.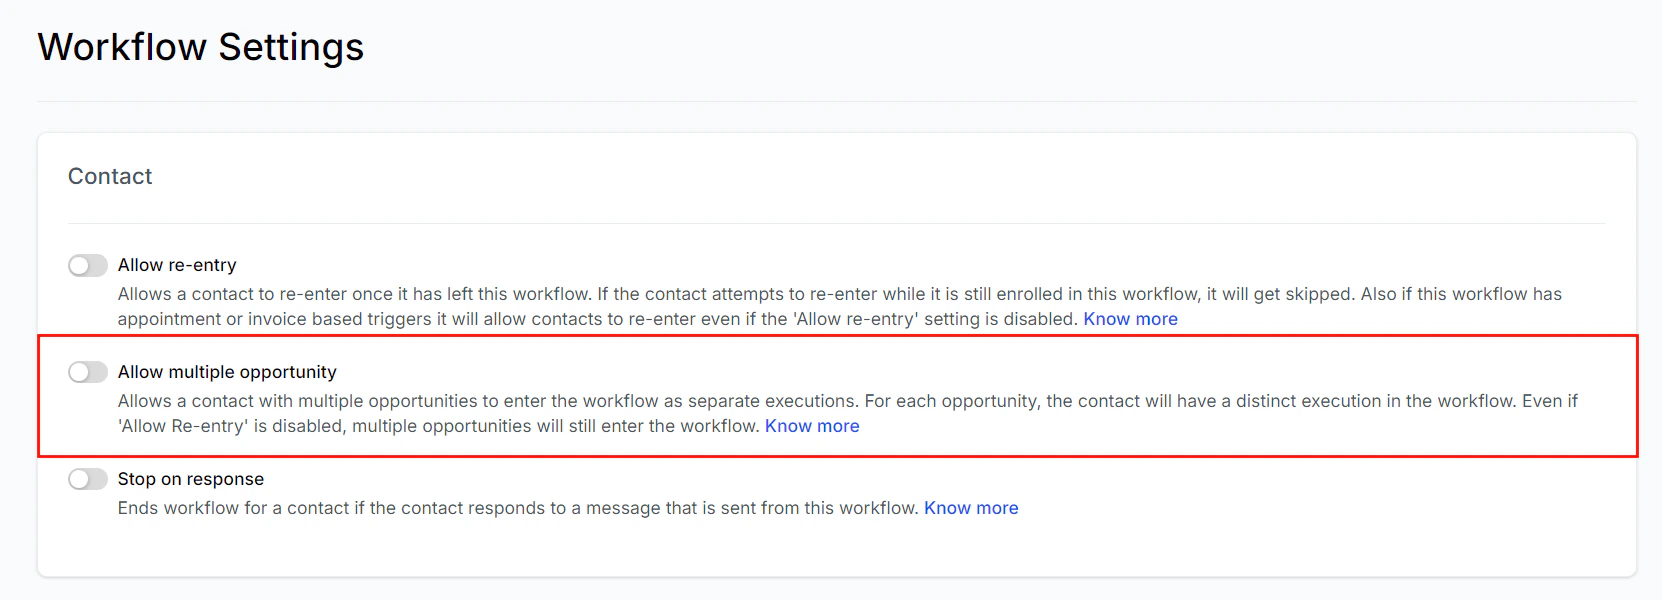
Screenshot
Stop on Response
Enabling this feature automatically ends the workflow for a contact once they respond to any workflow-generated message, giving you full control over the interaction flow.
Screenshot
Communication Management
Timezone
Workflow actions can be set to either the Account Time zone or Contact Time zone. Choosing “Account Timezone” ensures all actions occur according to your business’s time zone, ideal for events scheduled around your business hours. In contrast, selecting “Contact Timezone” ensures actions are executed based on the contact’s local time, which is useful for global audiences.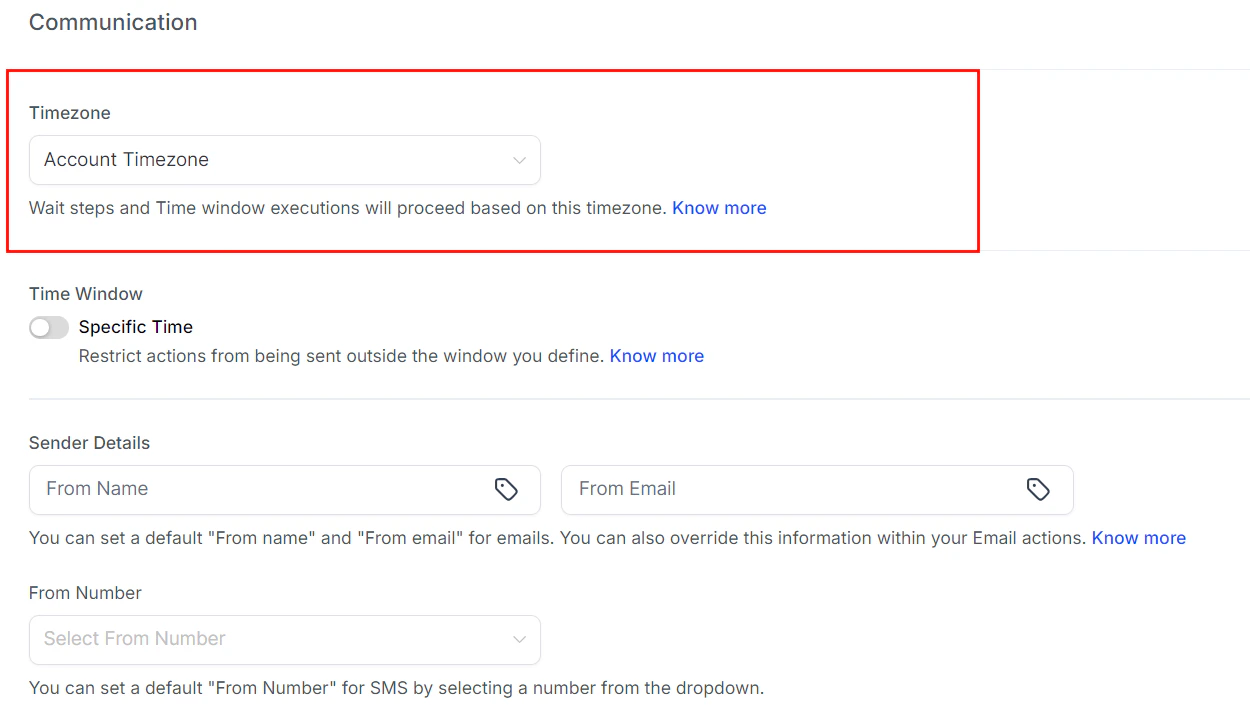
Screenshot
Time Window
The Time Window feature restricts actions to a specified timeframe. If an action is triggered outside of this window, it will be delayed until the next available time window. Disabling this option allows messages to be sent at any time.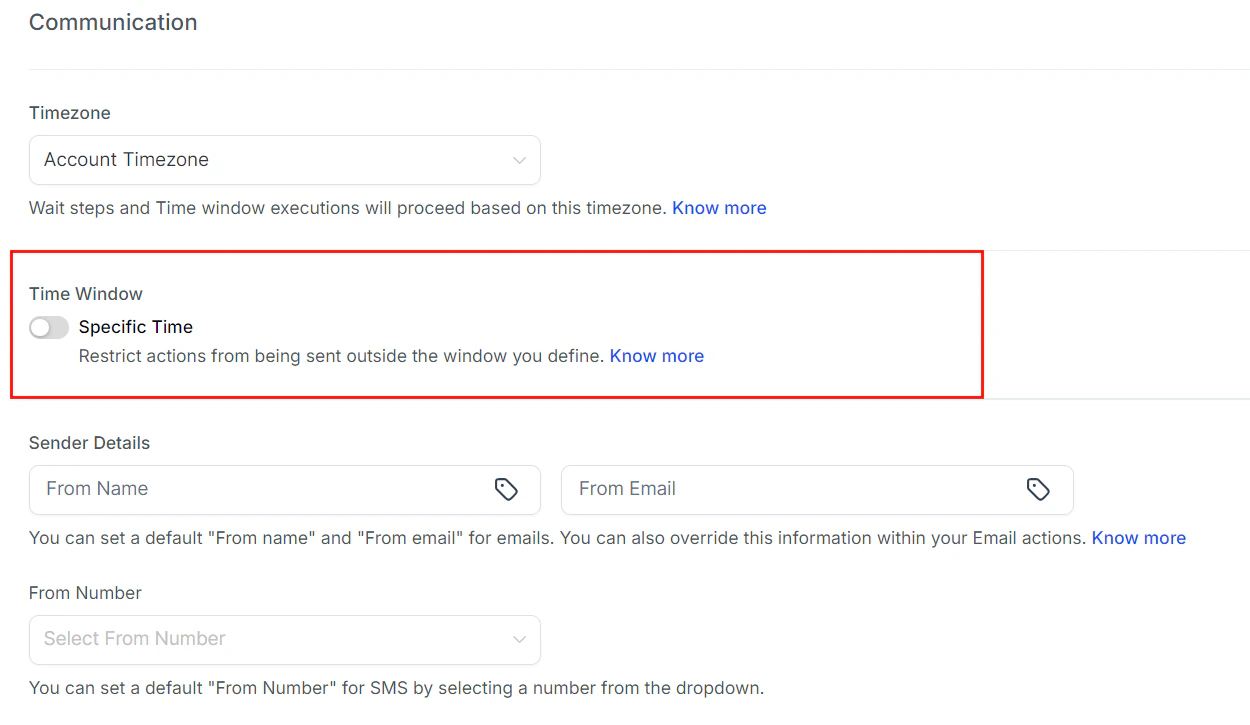
Screenshot
Sender Details
Default sender details (name and email) can be set for outgoing emails, but these can be overridden in individual email actions within the workflow.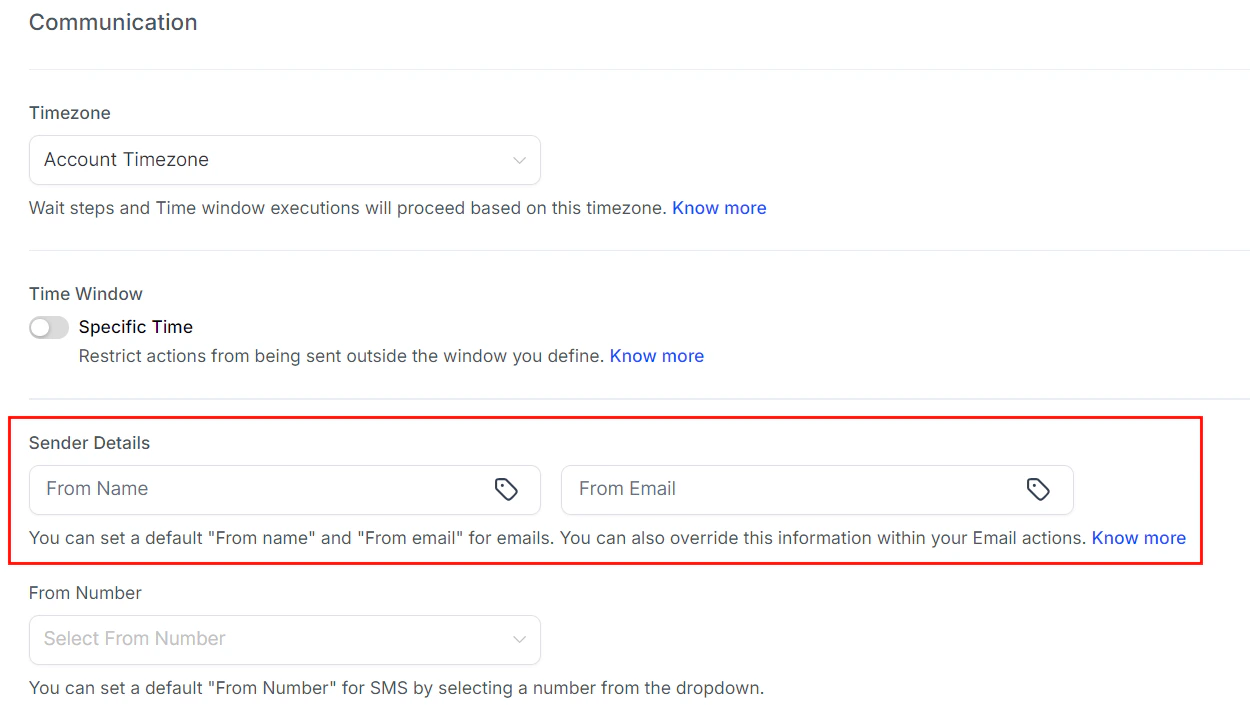
Screenshot
From Number
Specify the phone number in which the SMS communications should originate from.
Screenshot
Conversations - Mark as Read
This setting ensures that automated messages from a workflow are marked as read in the conversation tab. By default, workflow messages appear as unread, but enabling this feature helps keep the conversation tab organized.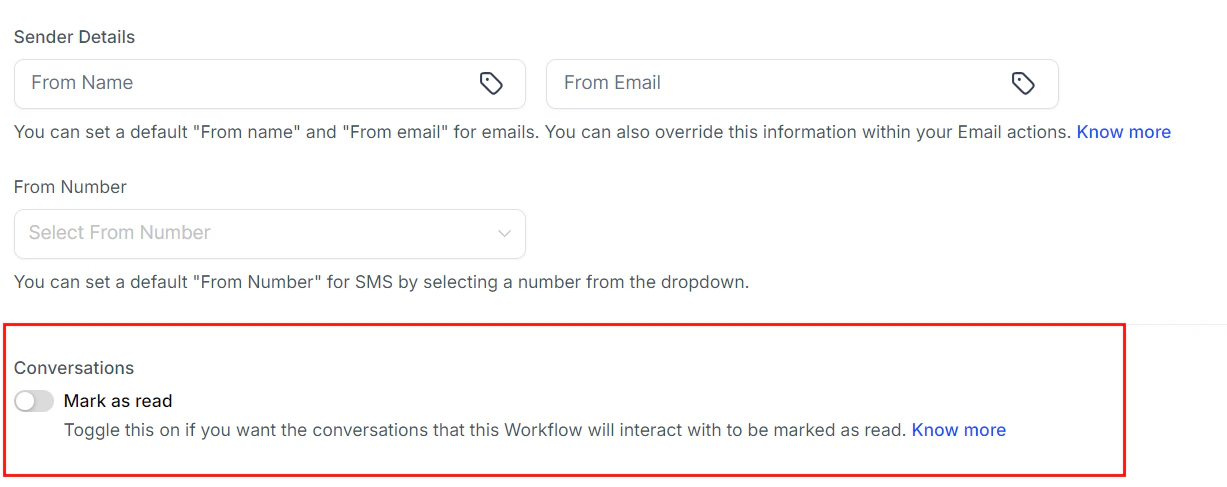
Screenshot
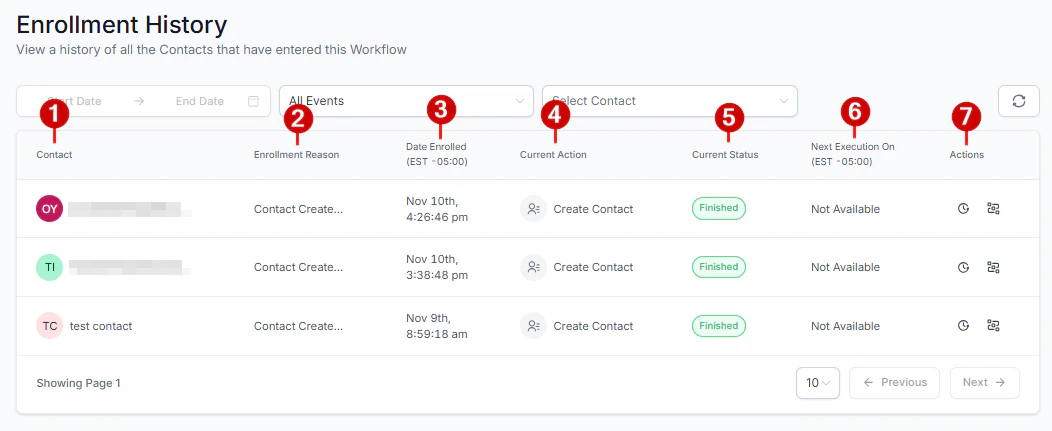
Enrollment history tab
The Enrollment History Tab within workflows provides a list of contacts who have entered the selected workflow. It displays important details, including the contact name, the date each contact began the workflow, and their current status, and allows you to access additional information such as their contact path and execution history. Select a workflow from the Automation tab to get started.
Screenshot
Workflow Title
The title of the workflow is shown at the top center of the page. To rename the title, simply click on it and enter the new name in the provided field.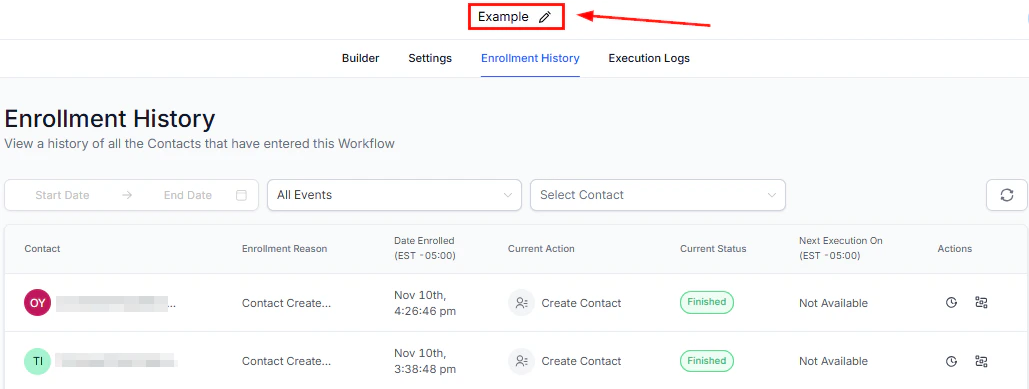
Screenshot
Enrollment History
Beneath the workflow name, click on the Enrollment History option to access detailed information regarding contact enrollment and activity within the workflow.Filter By Date
Easily filter contacts by the date enrolled by selecting a desired time frame from the dropdown menu.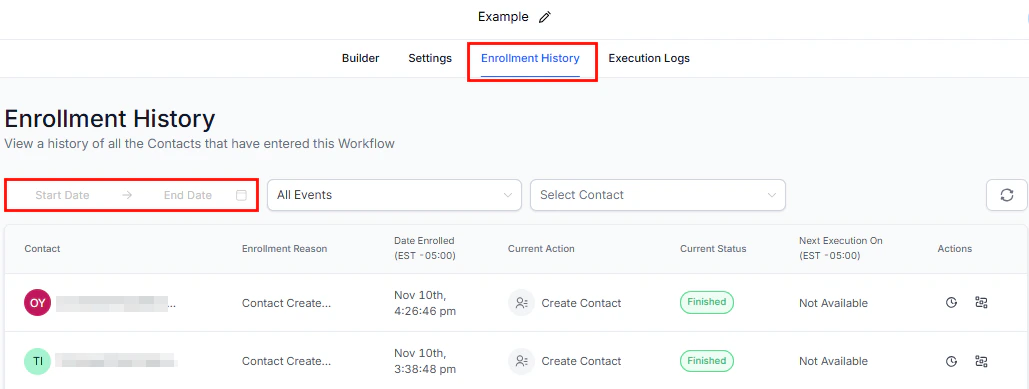
Screenshot
Filter By Status
To view contacts with a certain status, click on the Events dropdown menu and choose the specific status. Utilize the search bar to streamline your search process.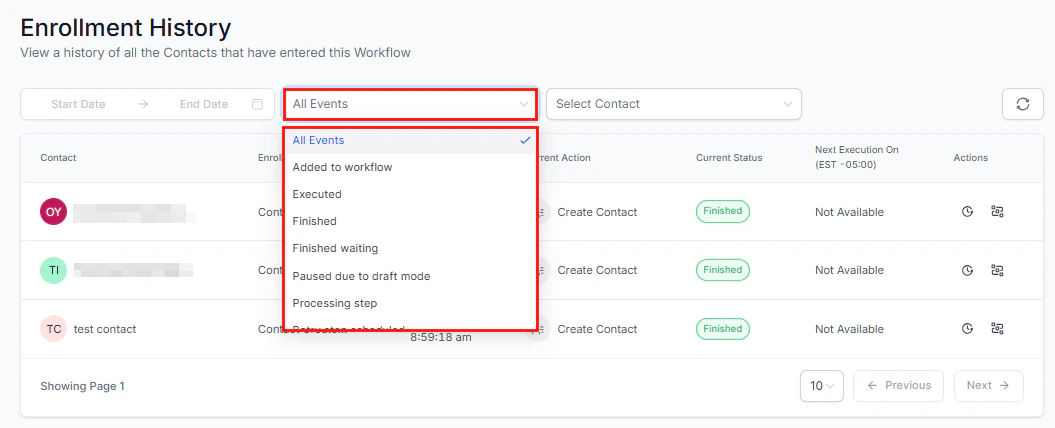
Screenshot
Filter by Contact
If you are navigating a lengthy list of contacts, you can efficiently search for a specific customer by typing their name in the “Select Contact” box on the right.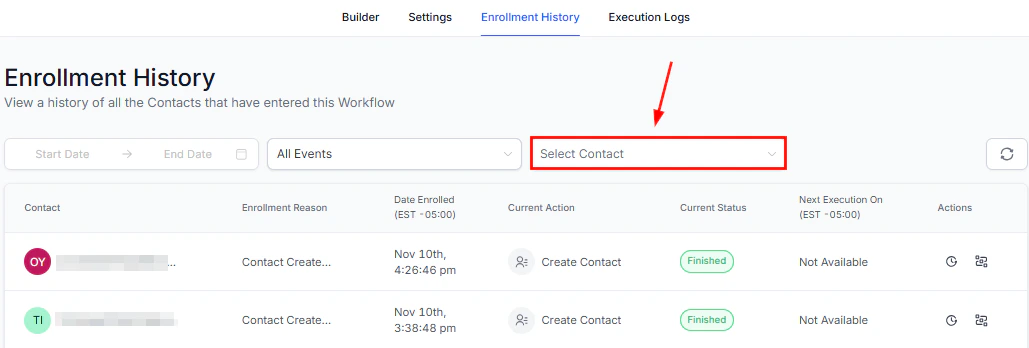
Screenshot
Refresh
Click the refresh icon to update the enrollment history and display the most current data.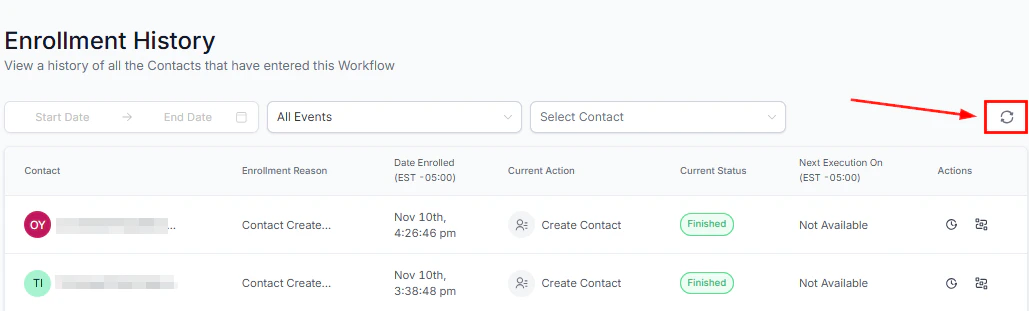
Screenshot
Enrollment History Table
The Enrollment History table offers a detailed list of all data related to actions performed on contacts. This includes:- Names of the contacts added
- The trigger that enrolled the contact in the workflow
- Date and time the contacts entered the workflow
- Current Action being performed on the contacts
- Status of the contacts
- The scheduled date and time for the upcoming action on contacts. Contacts who have completed the workflow will not have data displayed in this field.
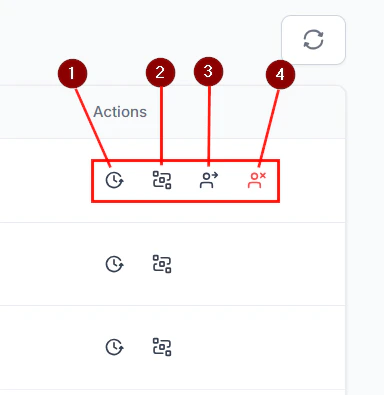
- Actions column
Screenshot
Screenshot
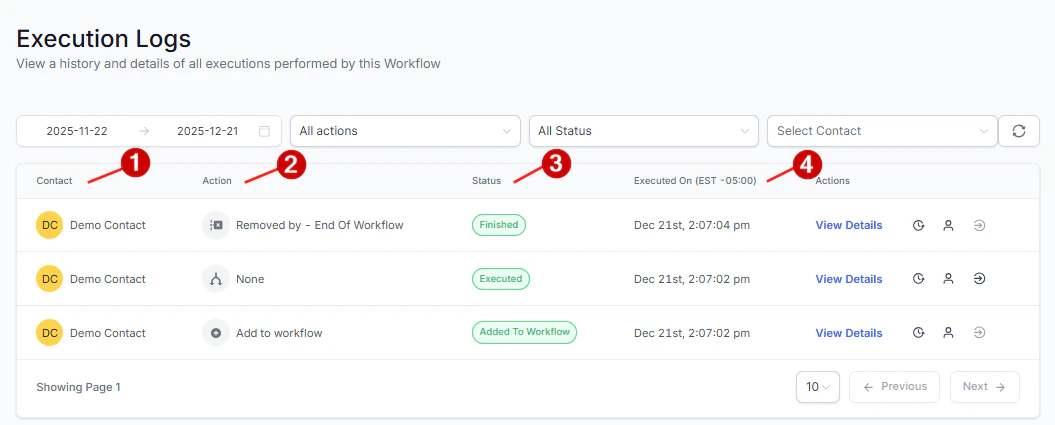
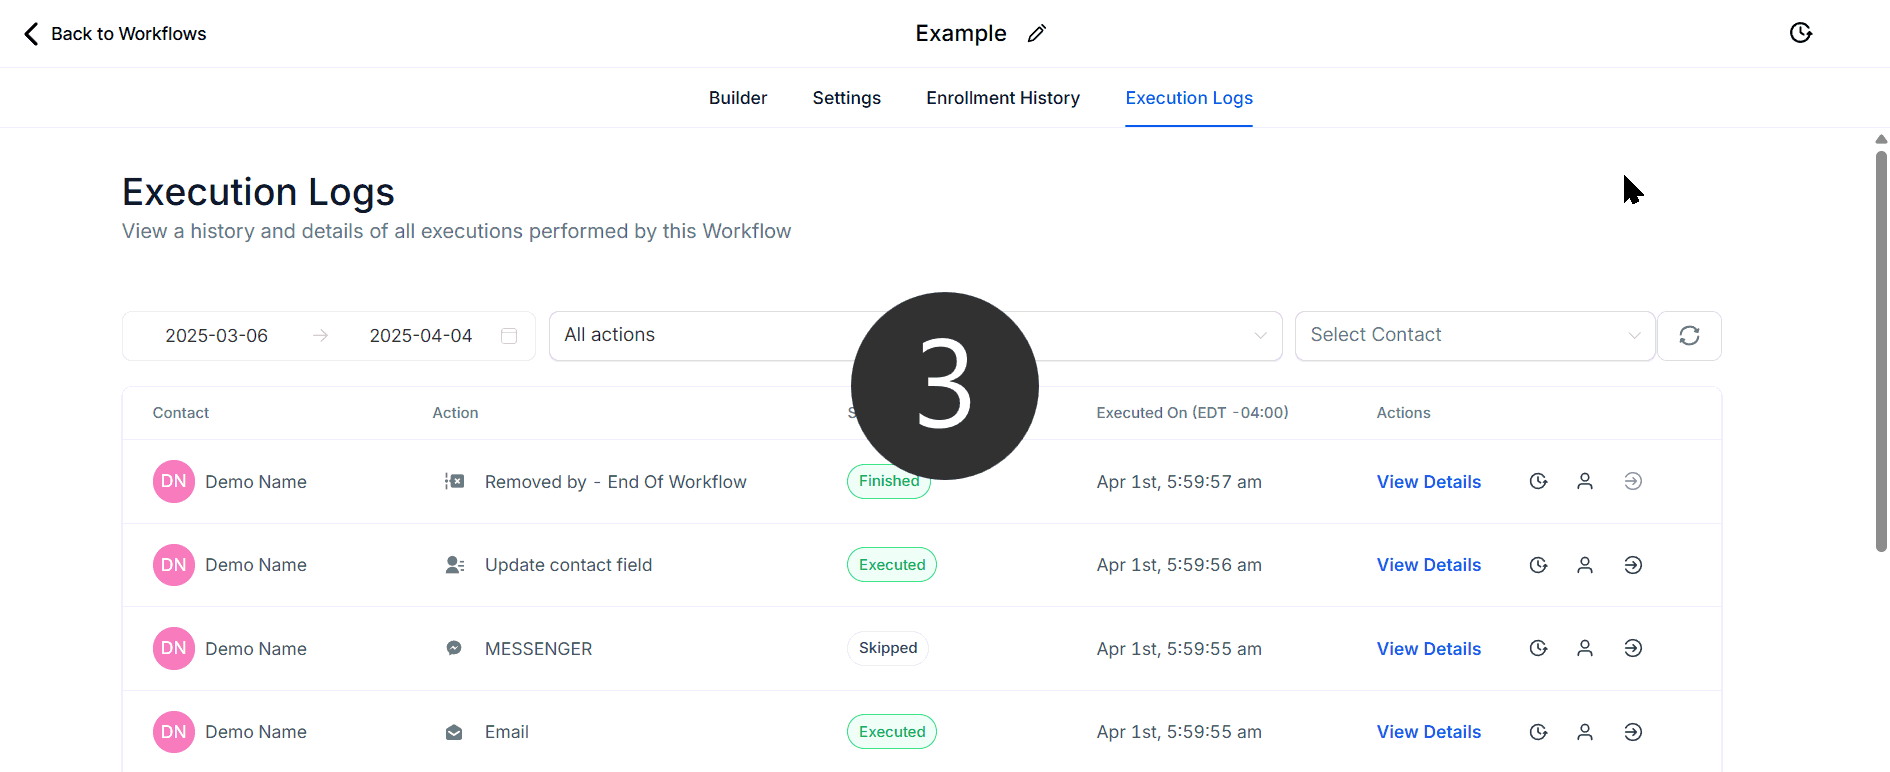
Execution logs tab
The Execution Logs Tab in Workflows provides an overview of every action customers take during the workflow process. By using this tab, you can make sure that your workflow operates effectively and identify any potential issues that may arise during execution. Select a workflow from the Automation tab to get started.
Screenshot
Workflow Title
The title of the workflow is shown at the top center of the page. To rename the title, simply click on it and enter the new name in the provided field.
Screenshot
Execution Logs
Below the workflow title, select the Execution Logs option to get a clear picture of how your contacts are moving through the workflow.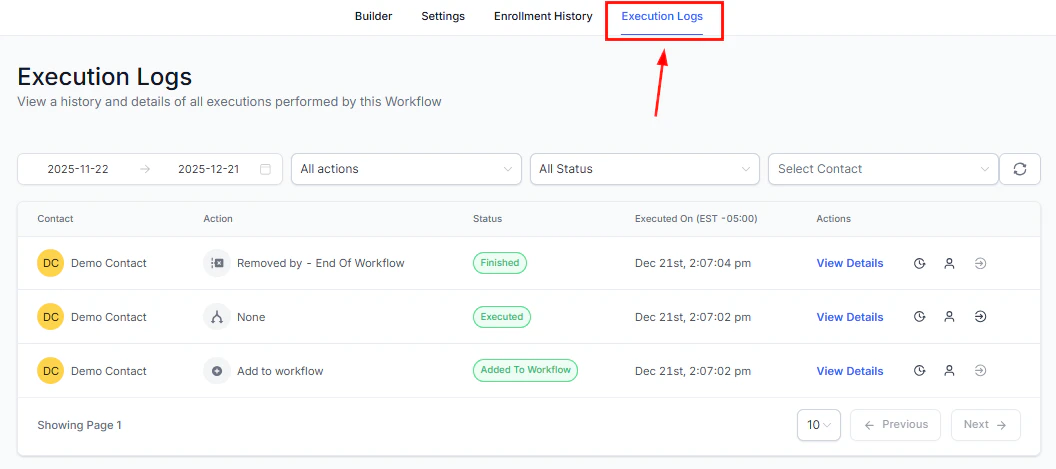
Screenshot
Filter By Date
Easily filter execution logs by their execution date by selecting a desired time frame from the dropdown menu. 📌Note: Execution Logs are available up to last 30 days.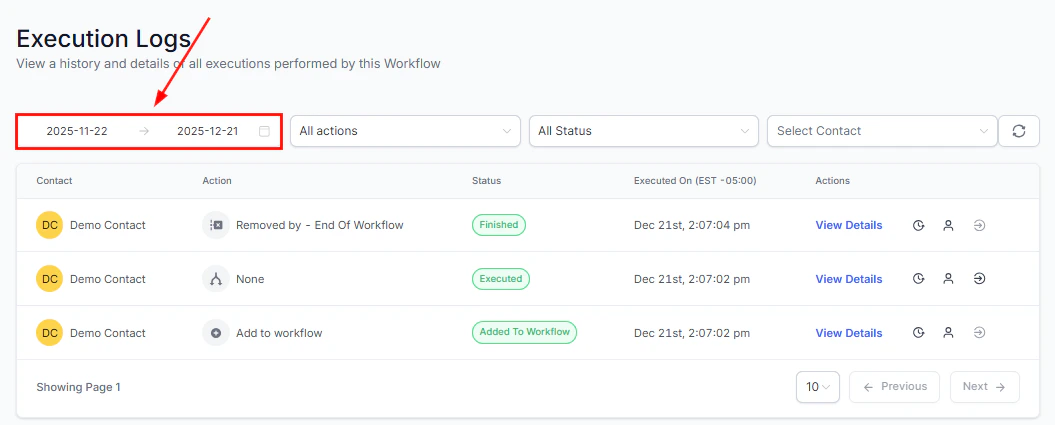
Screenshot
Filter By Action
Use the All Actions filter to view contacts on a specific step. Enter a few characters in the search bar to locate the action easily.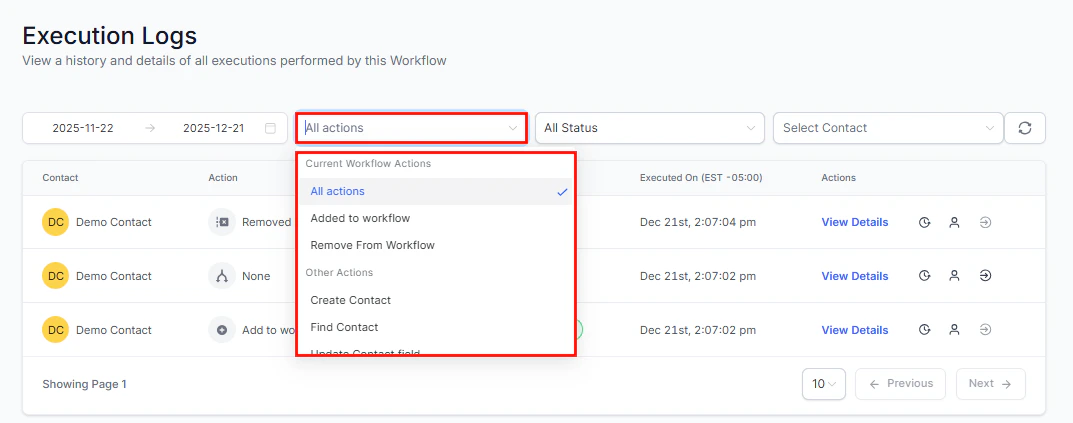
Screenshot
Filter By Status
To view contacts with a certain status, click on the All Status dropdown menu and choose the specific status. Utilize the search bar to streamline your search process.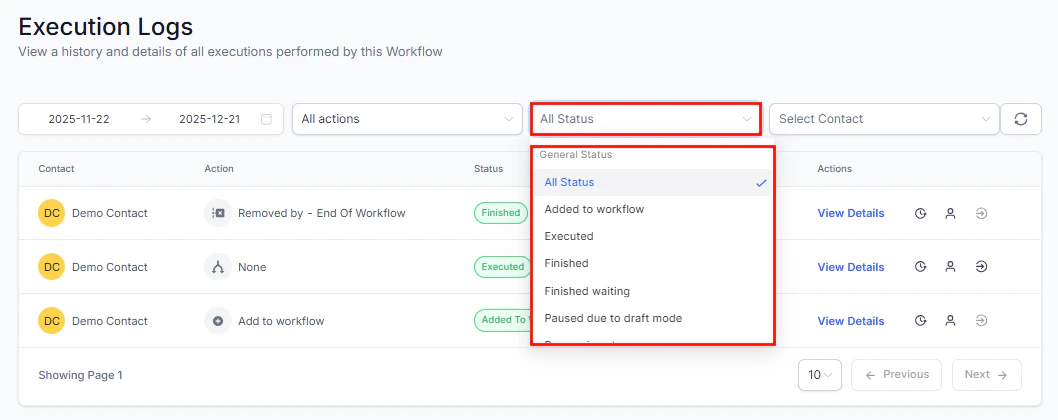
Screenshot
Filter by Contact
If you are navigating a lengthy list of action items, you can efficiently search for a specific customer by typing their name in the “Select Contact” field.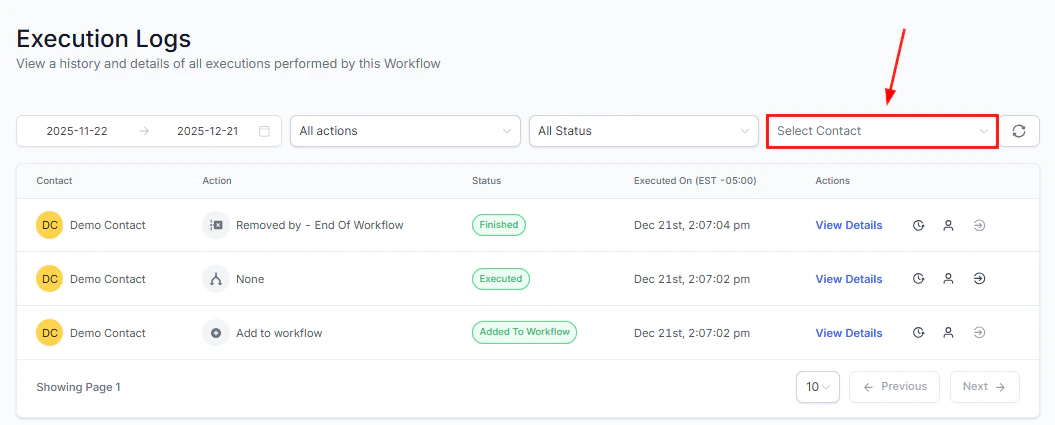
Screenshot
Refresh
Click the refresh icon to display the most current data in your Execution Logs.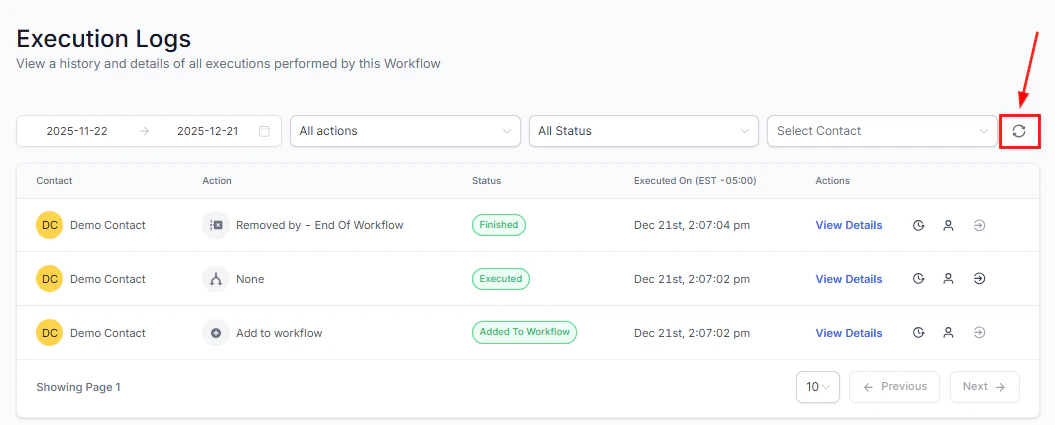
Screenshot
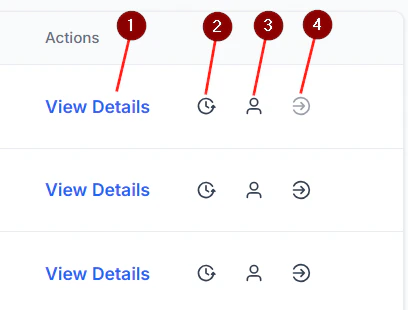
Execution Logs Table
The Execution Logs table offers a detailed list of all data related to actions performed on contacts. This includes:- Name of the contact the action is associated with
- Current Action being performed on the contacts as identified by the chosen action name
- Status of the action
- Date and time the action was executed
Screenshot
Screenshot
Screenshot

Screenshot
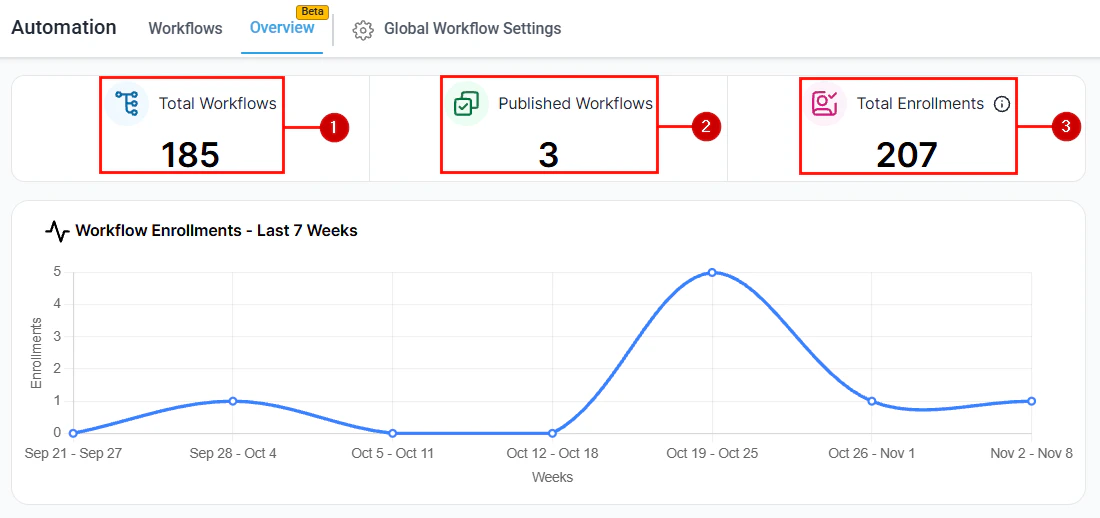
Workflow overview dashboard
The Workflow Overview Dashboard gives you real-time visibility into your automation performance, consolidating all key automation metrics into a single screen. It’s designed to help you understand how your automations are running without manually checking each workflow, so let’s learn how to view it and gain more information on your workflow’s functioning. To access this feature, navigate to the Overview tab inside the Automation section.
Screenshot
Workflows Over Time
In the top line, you will find these three metrics:- Total Workflows: This shows you the total workflows you’ve created inside the system, including deleted ones.
- ****Published Workflows: ****This shows you the total workflows you have published and are actively running.
- Total Enrollments: This section will show you the total users who’ve been enrolled in your workflows across their lifetime.
Screenshot
Workflow Enrollments Graph
The Workflow Enrollments Graph shows enrollment growth or decline over the past seven weeks across all workflows. You can hover over the line to view additional trend data.Error Review Summary
The Error Review Summary allows you to monitor any errors your workflows have encountered; if no errors have been found, this will be empty.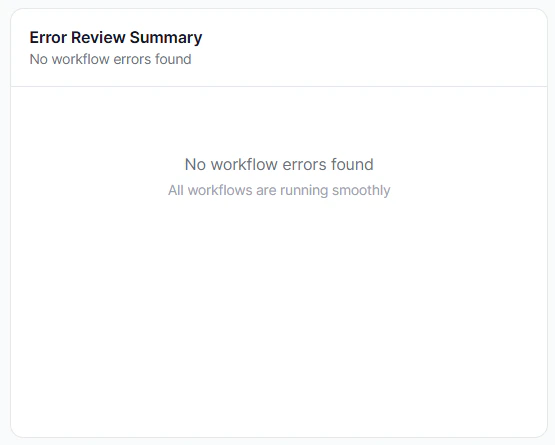
Screenshot
Screenshot
Trigger Analysis Filter
This section provides you with information on Attempted, Matched, and Unmatched Enrollments. You can filter results by:- Trigger Type: To show all results that used the same trigger, regardless of workflow.
- Workflow: To show the results of all enrollments for a specific workflow.
- Contact: This will limit results to attempts of a specific contact.
- Form/Survey: This will limit results to contacts who’ve triggered the workflows using a specific form or survey.

Screenshot

Screenshot