

How goal events work
From the moment a contact enters a workflow, the HoopAI platform listens for the goal condition in the background — regardless of which step the contact is currently on. As soon as the contact triggers the goal event, the platform instantly moves them to the Goal Event action in the workflow. This is different from a standard If/Else condition, which only evaluates when a contact reaches that specific step. Goal Events monitor contacts continuously throughout their entire time in the workflow.Supported goal event types
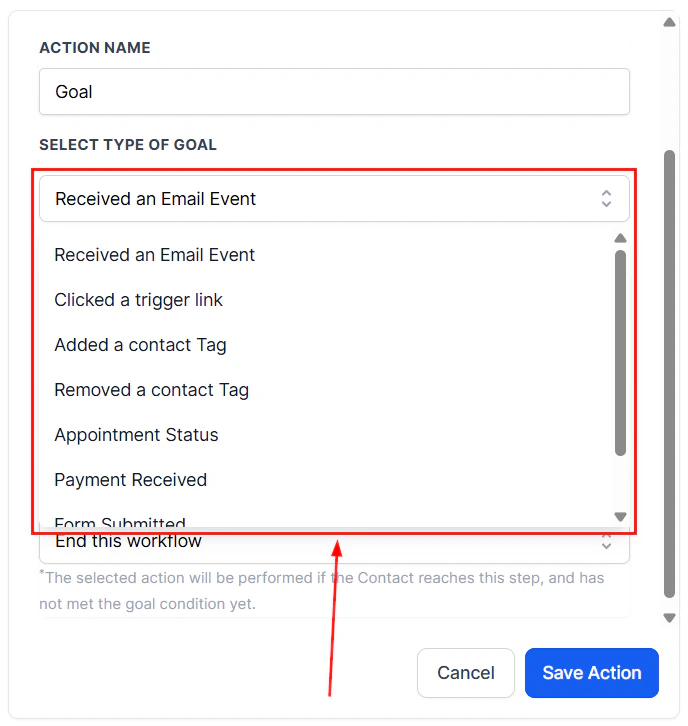
Goal event type dropdown showing available event types
Adding a goal event to a workflow
- Open your workflow in the builder and click the + icon at the point where you want the goal checkpoint to be.
- Under the Internal section of the action list, select Goal Event.
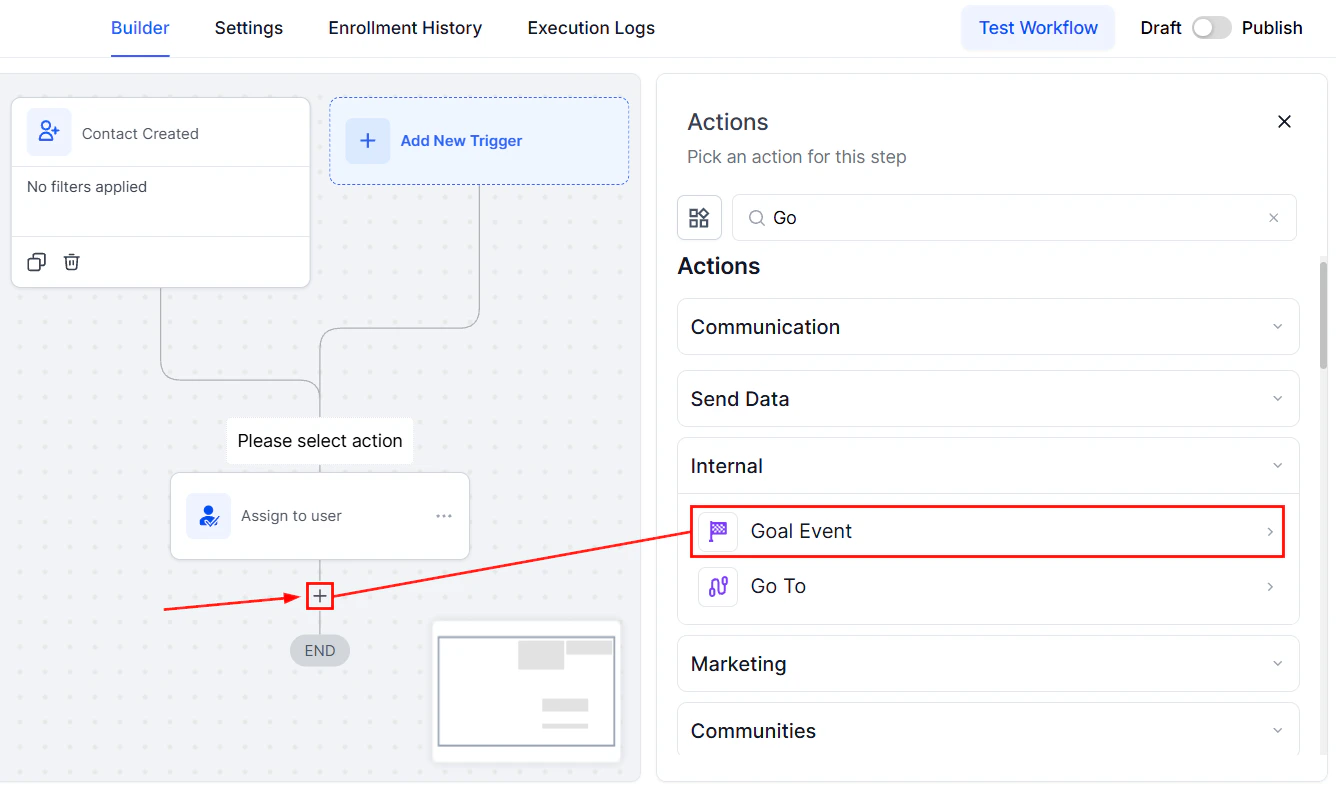
Selecting the Goal Event action from the Internal section of the actions panel
- Give the action a name (e.g., “Goal: Appointment Confirmed”).
- Choose a goal type from the list and configure the specific criteria (e.g., which form, which tag, which appointment calendar).
- Set the behavior for what happens when a contact reaches this step without having completed the goal.
Behavior when a contact reaches the goal step
If a contact progresses through the workflow sequentially and arrives at the Goal Event action without having already met the goal, you have three options:- End this workflow — the contact exits the workflow immediately at that point, regardless of whether the goal was achieved. Use this when you want the workflow to terminate at a natural cutoff point.
- Continue anyway — the contact moves past the goal step and continues to the next action, even if the goal was not met. Useful when the goal is informational but not a hard gate.
- Wait until the goal is met — the contact pauses at the goal step indefinitely until the goal condition is satisfied, then advances. Combine this with a timeout in the Wait step before the goal if you need a fallback.
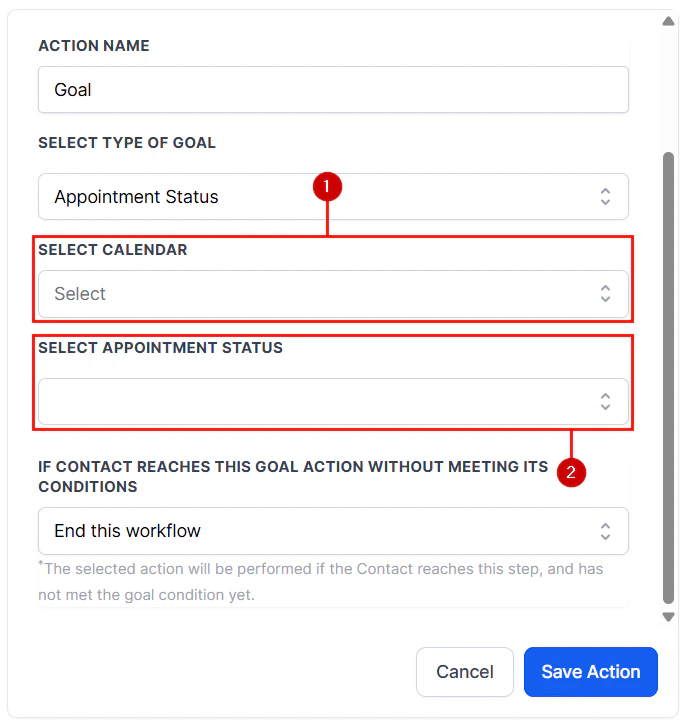
Goal Event configured with appointment status and end-workflow behavior
Combining goal events with other workflow actions
With tags: Set the Goal Event type to “Contact tag added.” When your sales team manually adds a “Converted” tag, the contact is immediately moved to the goal step and exits the nurture workflow. They can then be enrolled in an onboarding workflow triggered by that same tag. With appointments: Set the Goal Event to “Appointment status: Confirmed.” As soon as a contact confirms an appointment, any remaining follow-up steps (reminder emails, push messages) are skipped and the workflow transitions to appointment-specific actions. With payments: Set the Goal Event to “Payment received.” The moment a payment is processed, the contact bypasses any sales nurture steps and moves into a fulfillment or thank-you sequence.Exiting all workflows on goal
Within some Goal Event configurations, you can choose Stop All Workflows as the exit behavior. This removes the contact from every active workflow they are currently enrolled in — not just the one containing the goal. This is appropriate for high-priority events like a purchase or a deal closure, where you want all automated outreach to stop immediately across the board.Best practices
Place goals before redundant steps. If your workflow sends five reminder emails before an appointment, add a Goal Event set to “Appointment confirmed” before the first reminder. Contacts who confirm early will skip the remaining reminders automatically. Use descriptive names. Name your Goal Events clearly, such as “Goal: Form Submitted — Discovery Call” or “Goal: Payment Received.” This makes the workflow builder readable and the execution logs easier to interpret. Avoid too many goals in a single workflow. One or two well-placed goal checkpoints per workflow is the norm. If you find yourself adding many goal events, consider whether the workflow should be split into multiple smaller workflows. Test with the Test Workflow button. After setting up a Goal Event, use a test contact to confirm that the platform correctly detects the goal condition and moves the contact as expected.FAQs
Does the goal monitor fire if the contact completed the event before entering the workflow?
Does the goal monitor fire if the contact completed the event before entering the workflow?
No. The goal listener activates when a contact enters the workflow. Events that occurred before enrollment are not retroactively detected.
Can I have multiple goal events in the same workflow?
Can I have multiple goal events in the same workflow?
Yes. Each Goal Event action monitors independently. A contact is moved to whichever goal step fires first.
What happens to contacts currently waiting at a wait step when a goal fires?
What happens to contacts currently waiting at a wait step when a goal fires?
The contact is immediately removed from the wait step and moved to the Goal Event action. They do not complete the remaining wait duration.
Does Stop All Workflows also remove a contact from campaigns?
Does Stop All Workflows also remove a contact from campaigns?
Stop All Workflows removes the contact from all active workflows but does not affect email campaigns or other systems managed separately from the workflow builder.