

How the integration works
Make connects to HoopAI in two primary ways:- HoopAI as a trigger source — an event in HoopAI (such as a new contact being created or a form being submitted) starts a Make scenario that runs actions in other apps.
- HoopAI as an action target — an event in another app (such as a new row in Google Sheets or a Stripe payment) triggers a Make scenario that creates or updates records in HoopAI.
Connecting HoopAI to Make
Via the native Make module
Make has a dedicated HoopAI module that provides pre-built actions without requiring you to manually construct API requests. To connect:- In Make, create a new scenario.
- Add a HoopAI module as a trigger or action.
- Click Create a connection and enter your HoopAI API key when prompted.
- Select the specific trigger or action from the module list.
Via webhooks (recommended for workflow triggers)
For triggering HoopAI workflows directly from Make, the most reliable method is to use the Inbound Webhook trigger in HoopAI:- In HoopAI, create a workflow and add an Inbound Webhook trigger. Copy the generated URL.
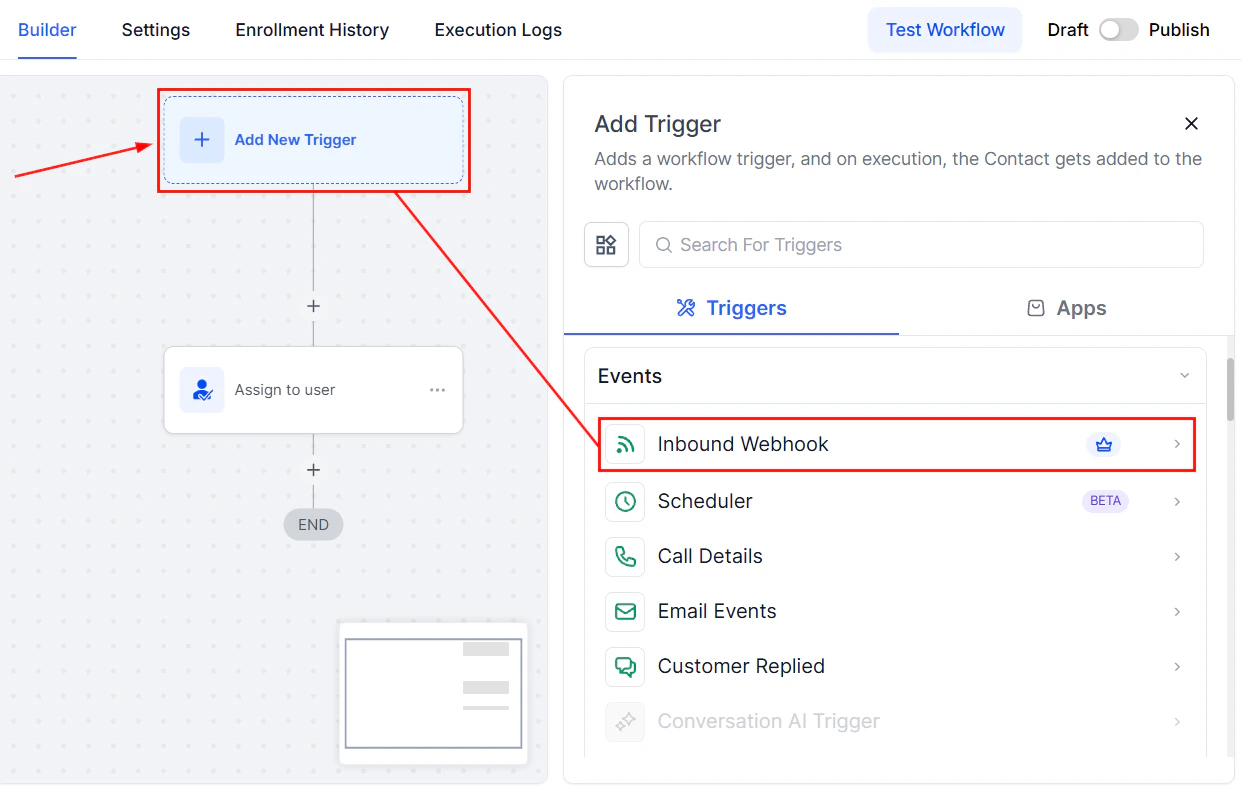
Setting up an Inbound Webhook trigger to receive data from Make
- In Make, add an HTTP > Make a request module (or a Webhooks module) and configure it to POST JSON data to the HoopAI webhook URL.
- Map the fields you want to send from the Make scenario data to the JSON body.
Available HoopAI actions in Make
The native HoopAI module in Make supports the following actions: Contact management:- Create a new contact
- Update an existing contact
- Search for a contact by email or phone
- Add a tag to a contact
- Remove a tag from a contact
- Create a new opportunity
- Update an opportunity’s stage or value
- Create a task assigned to a contact
- Add a note to a contact record
- Add a contact to a campaign
- Use the Make an API Call module to access any HoopAI API endpoint not covered by the native module
Triggering HoopAI workflows from Make
The recommended pattern for starting a HoopAI workflow from a Make scenario:- Set up an Inbound Webhook trigger in the HoopAI workflow (see the Inbound Webhooks article for setup details).
- At the end of your Make scenario — after any data transformation or logic — add an HTTP POST module that sends the contact’s email, phone, and any relevant custom fields to the HoopAI webhook URL.
- The HoopAI workflow receives the data and enrolls the contact automatically.
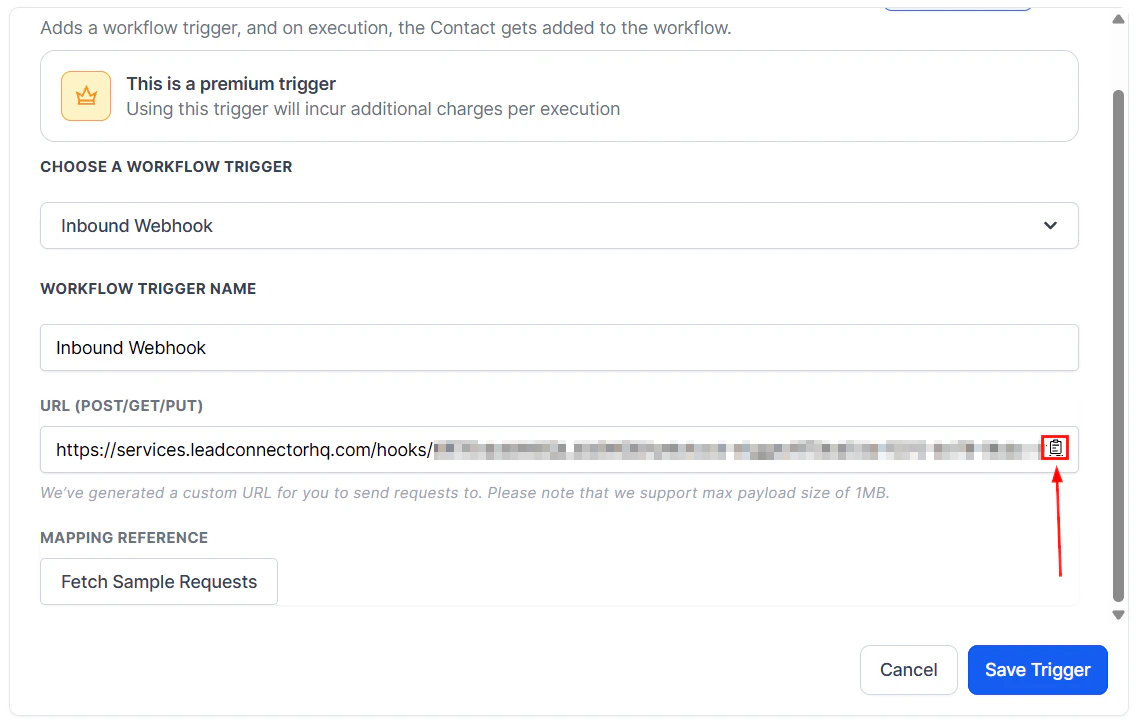
Inbound Webhook configuration with the generated URL for receiving external data
Example scenarios
Stripe payment to HoopAI onboarding workflow:- Make scenario trigger: Stripe “Payment Succeeded” event
- Make action: HTTP POST to HoopAI inbound webhook with customer email, plan name, and payment amount
- HoopAI: Enrolls the contact in an onboarding workflow, adds a “Customer” tag, and updates a custom field with the plan name
- Make scenario trigger: New row added to a Google Sheet
- Make action: HoopAI “Create or Update Contact” module with the row data
- Optional: HoopAI “Add to Campaign” module to enroll the contact
- Make scenario trigger: HoopAI webhook (triggered by a workflow’s Custom Webhook action)
- Make action: Airtable “Create Record” or “Update Record” to sync the contact data
Tips for a reliable integration
Test with real data. Use Make’s built-in scenario testing to run through the full flow with a sample contact before activating the scenario. Verify the HoopAI workflow receives the expected data by checking the enrollment history. Handle errors in Make. Enable error handling routes in your Make scenarios so that failed requests (e.g., an HTTP 4xx from HoopAI) trigger an alert or retry, rather than silently failing. Use filters in Make. Add filter conditions between modules to ensure only the correct records trigger the workflow. For example, filter Stripe payments by a specific product ID to avoid enrolling unrelated purchases. Map contact identifiers consistently. HoopAI uses email or phone as the primary contact identifier. Always include at least one of these in every request to ensure contacts are created or matched correctly.FAQs
Do I need a paid Make plan to connect to HoopAI?
Do I need a paid Make plan to connect to HoopAI?
The native HoopAI module is available on Make’s free plan with operation limits. For high-volume automation or advanced features, a paid Make plan is recommended.
Can Make trigger a HoopAI workflow directly from the native module?
Can Make trigger a HoopAI workflow directly from the native module?
The native module supports adding contacts to campaigns, but the most direct way to trigger a specific workflow is through an Inbound Webhook, which accepts data from any HTTP request including those from Make.
What is the difference between using Make and using Zapier with HoopAI?
What is the difference between using Make and using Zapier with HoopAI?
Both platforms connect HoopAI to external apps. Make offers more complex multi-step logic, data transformation, and conditional routing within a single scenario. Zapier is simpler to set up for straightforward one-trigger-one-action flows. Choose based on the complexity of your integration needs.
Can Make scenarios update existing contacts without creating duplicates?
Can Make scenarios update existing contacts without creating duplicates?
Yes. Use the “Create or Update Contact” logic by first searching for a contact by email or phone, then updating if found or creating if not. The HoopAI API supports upsert patterns for this purpose.