

Screenshot
Create Folder
To keep your workflows organized, start by creating folders. Click the Create Folder button, give your folder a name, and click Create. Your new folder will appear in the workflow list for easy access and organization.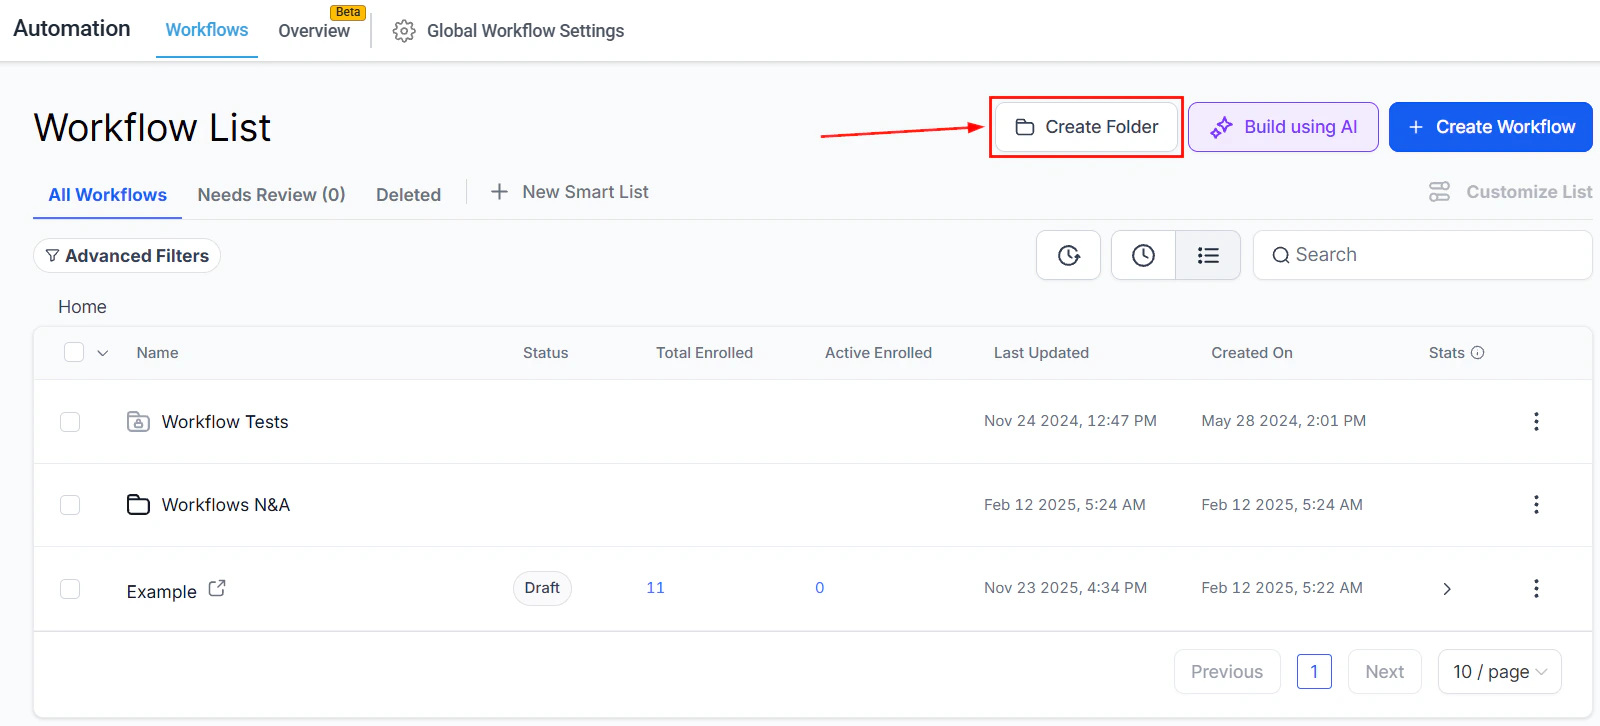
Screenshot
Build using AI
To start a workflow with the help of AI, click the ****Build using AI ****button. This will open the prompting menu for you to chat with the AI and build your workflow.
Screenshot
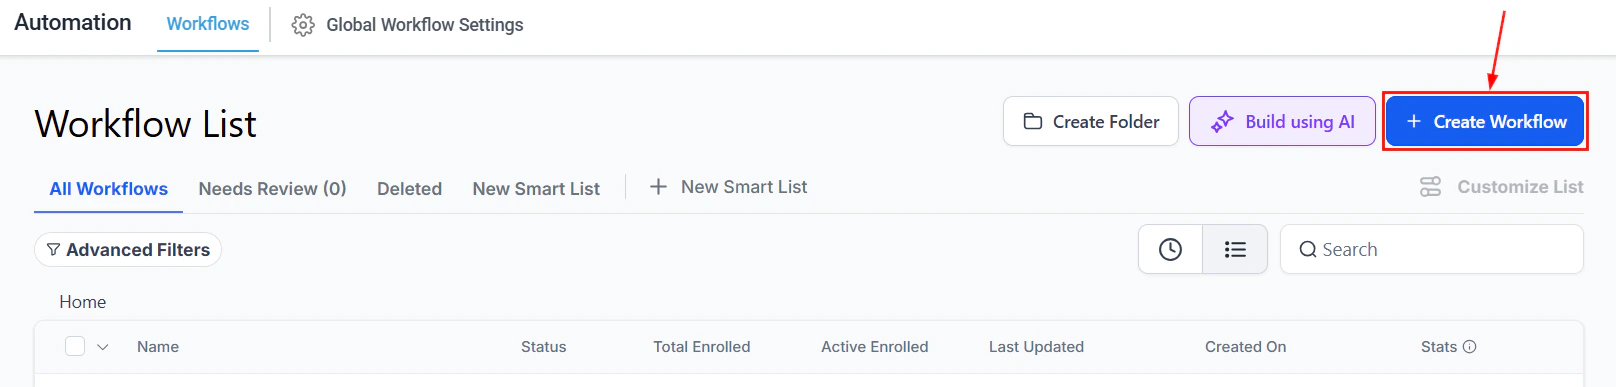
Create Workflow
To begin a new workflow, click the**** +Create Workflow**** button. This initiates the workflow creation process, allowing you to set up automated actions.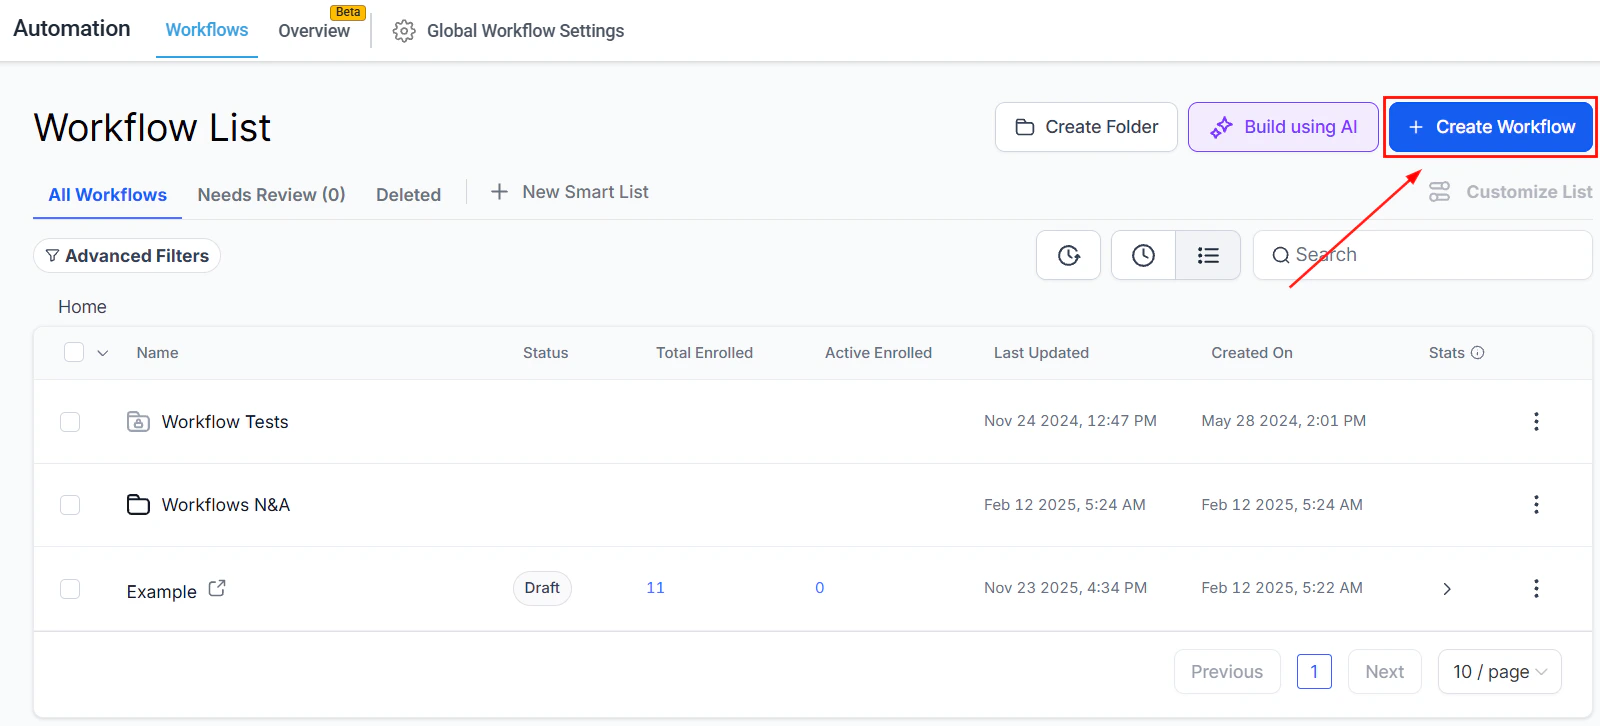
Screenshot
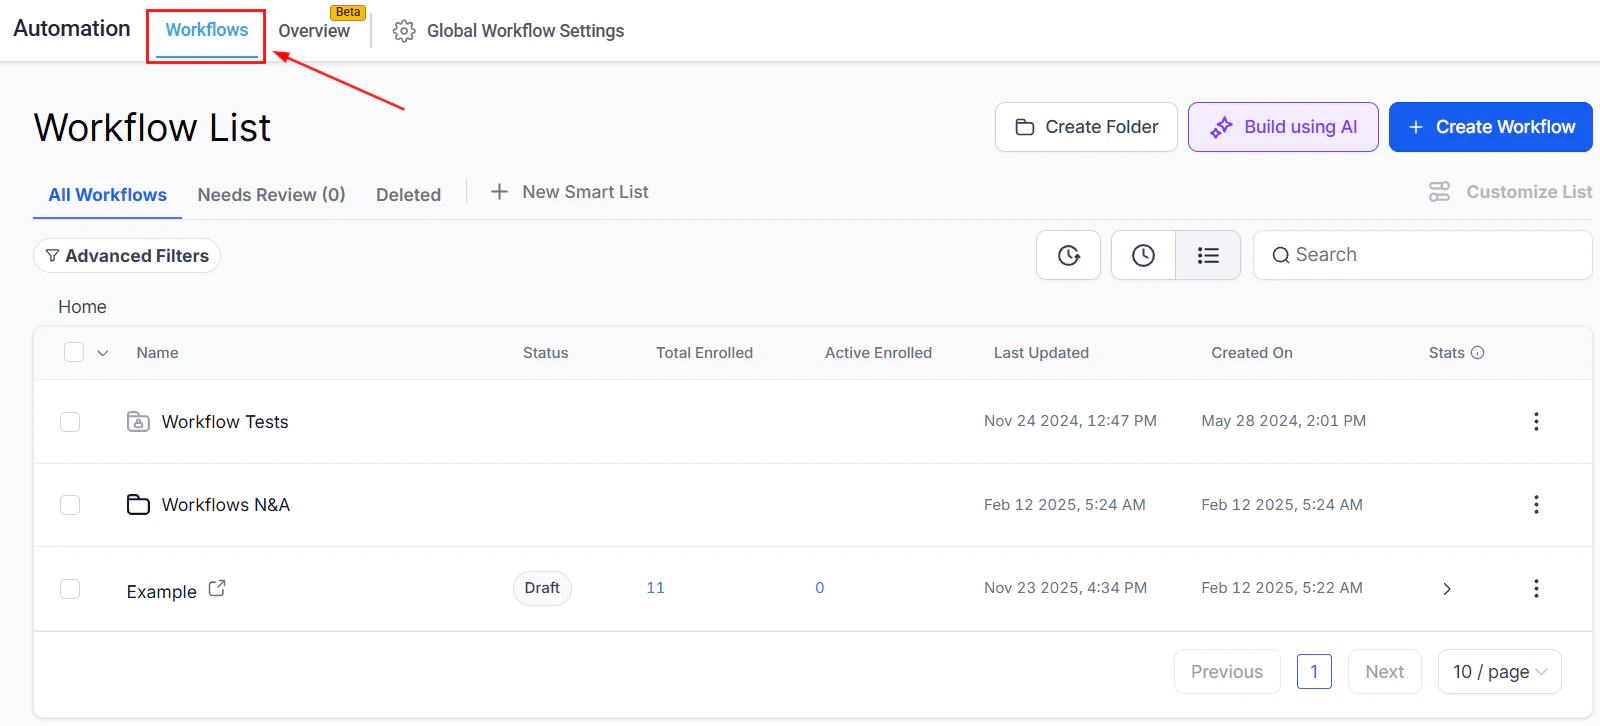
All Workflows
The All Workflows section serves as your homepage within the Workflow area, showing all workflows created by you and your team. Here, you can view, edit, or create new workflows.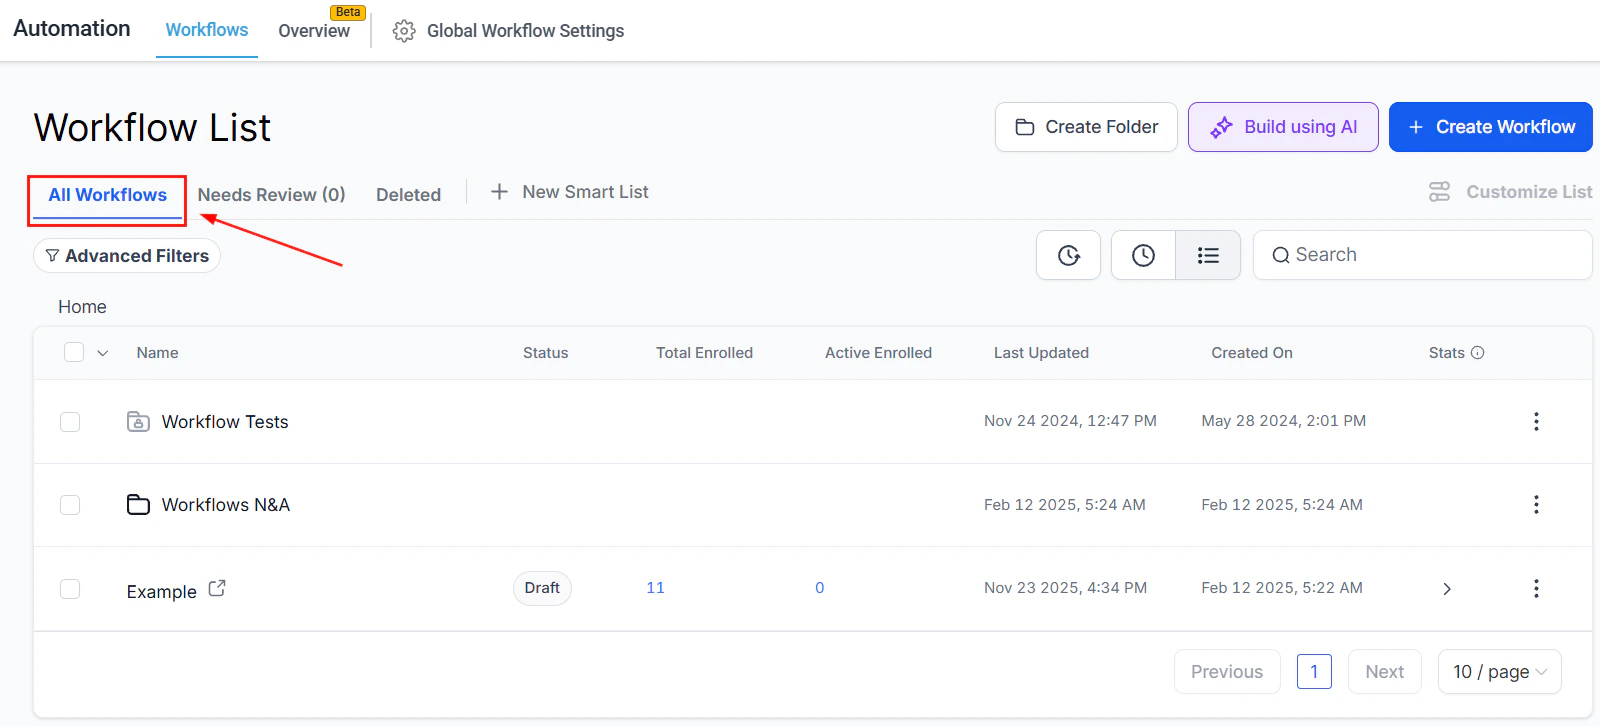
Screenshot
Advanced Filters
Use advanced filters to narrow down workflows based on specific criteria, making locating the ones you need easier without sifting through the entire list.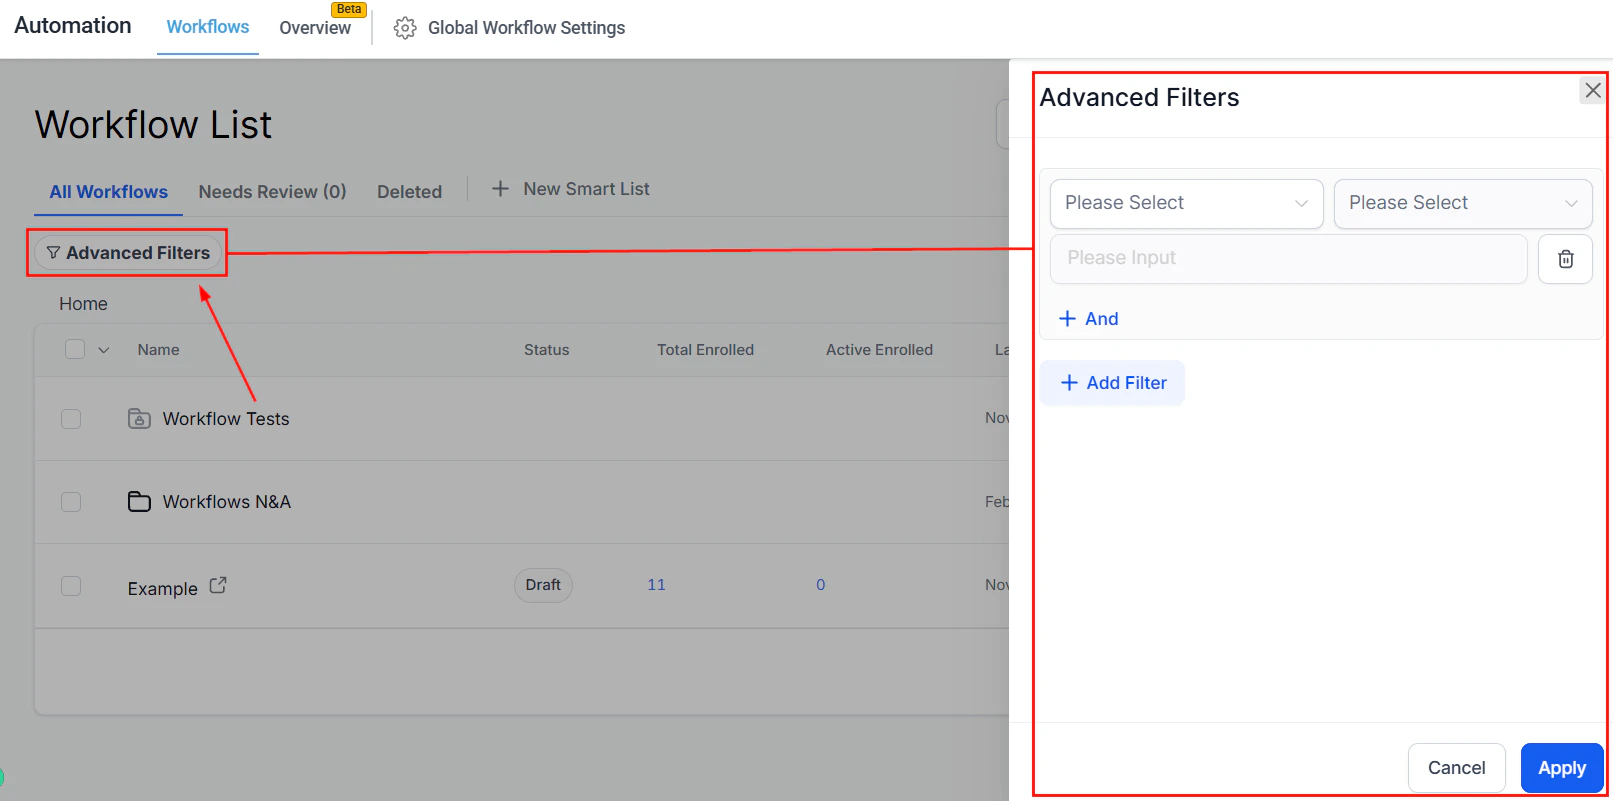
Screenshot
Copy Workflow History
Here you can access and copy-paste workflow histories for reference or re-use, ensuring consistency in actions that have worked for you in the past.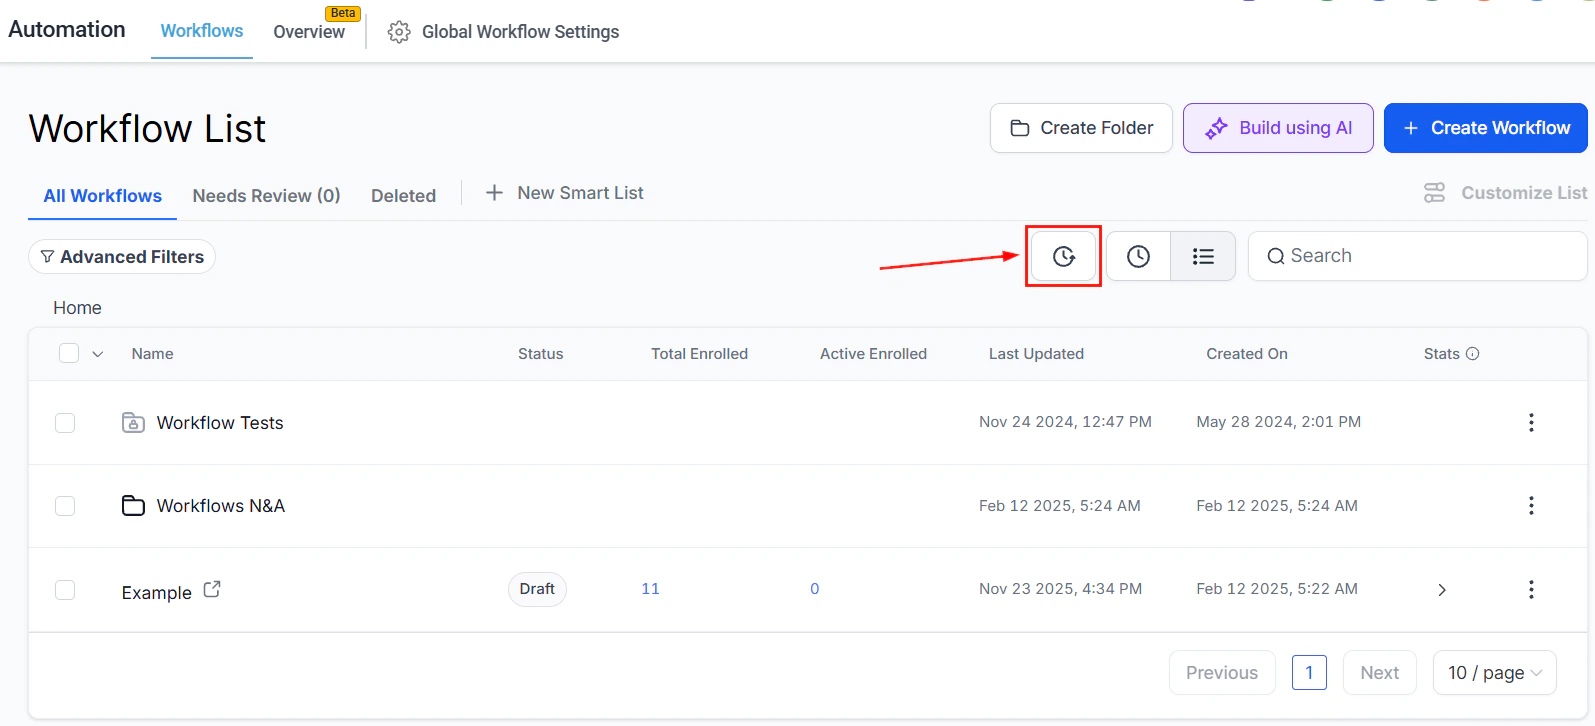
Screenshot
Sort By Recent or List
You can sort your workflow list by the most recent updates or in alphabetical order. The Recent option (clock icon) shows the latest updates at the top, while the List view organizes workflows by folders, followed alphabetically.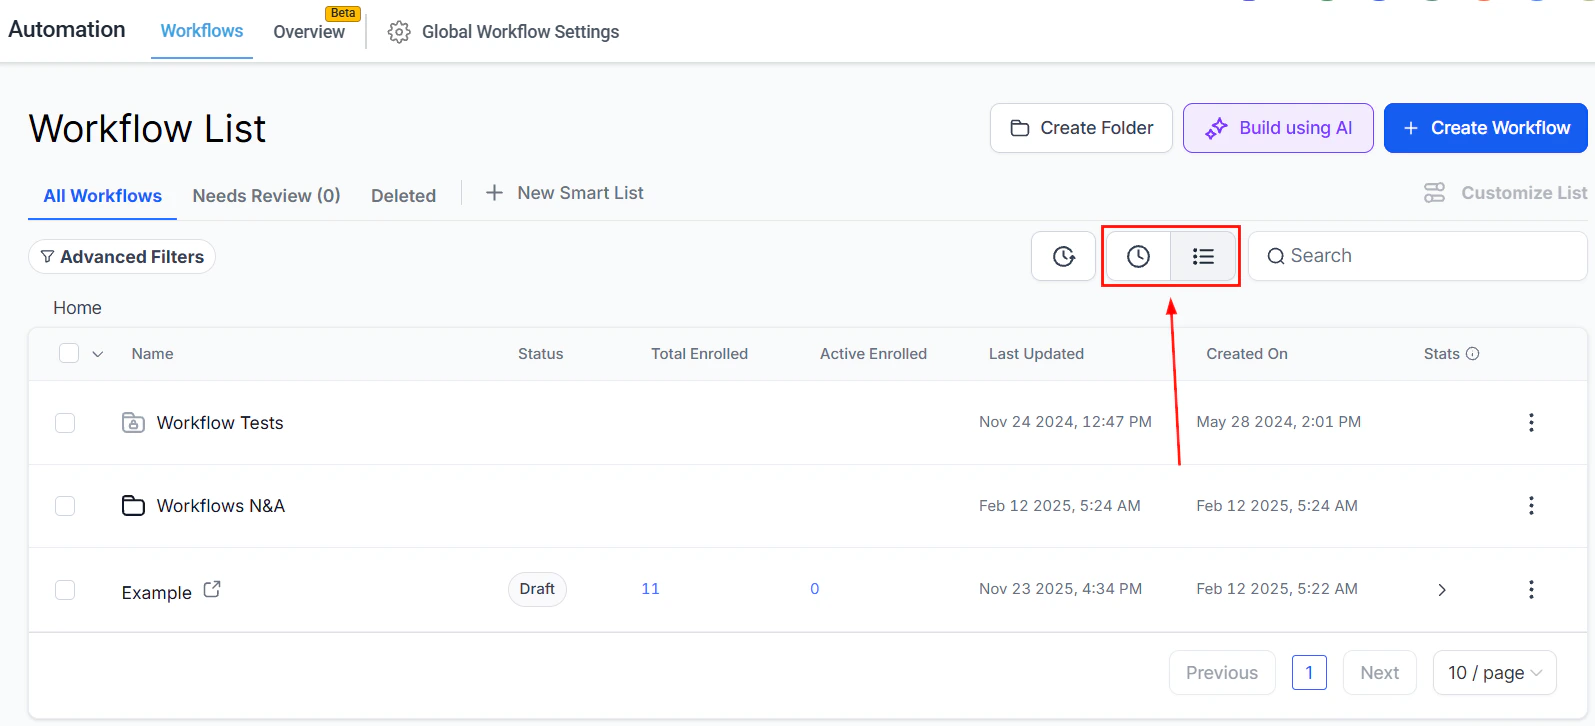
Screenshot
Search Bar
The search bar helps you quickly locate a specific workflow or folder. Type in keywords, and you’ll find relevant workflows without the hassle of scrolling through long lists.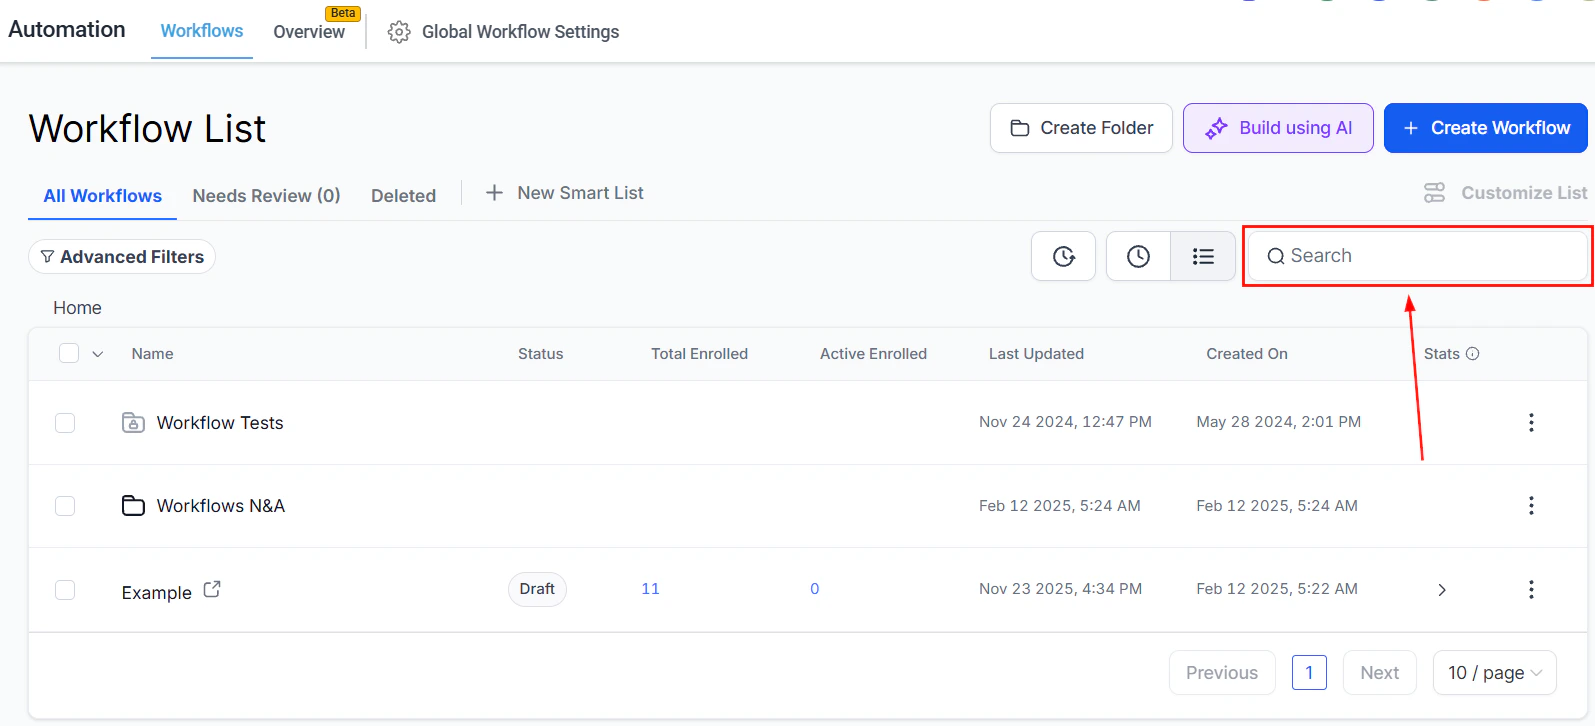
Screenshot
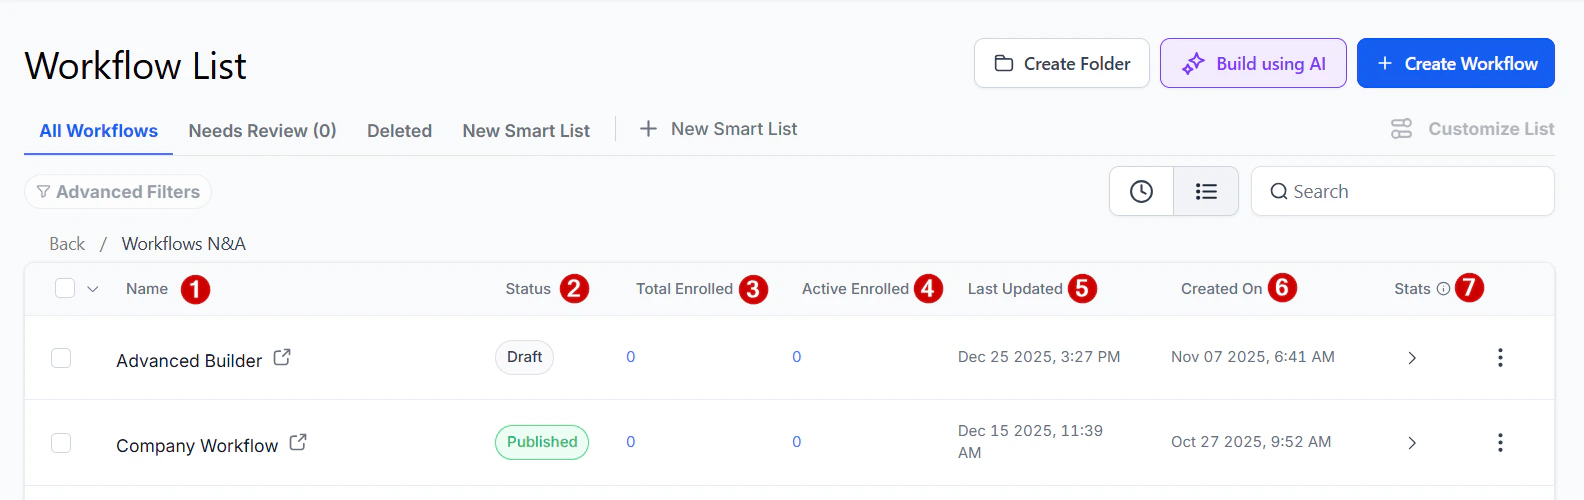
All Workflows List
The**** Name**** field identifies the workflow by name, helping you find them easily.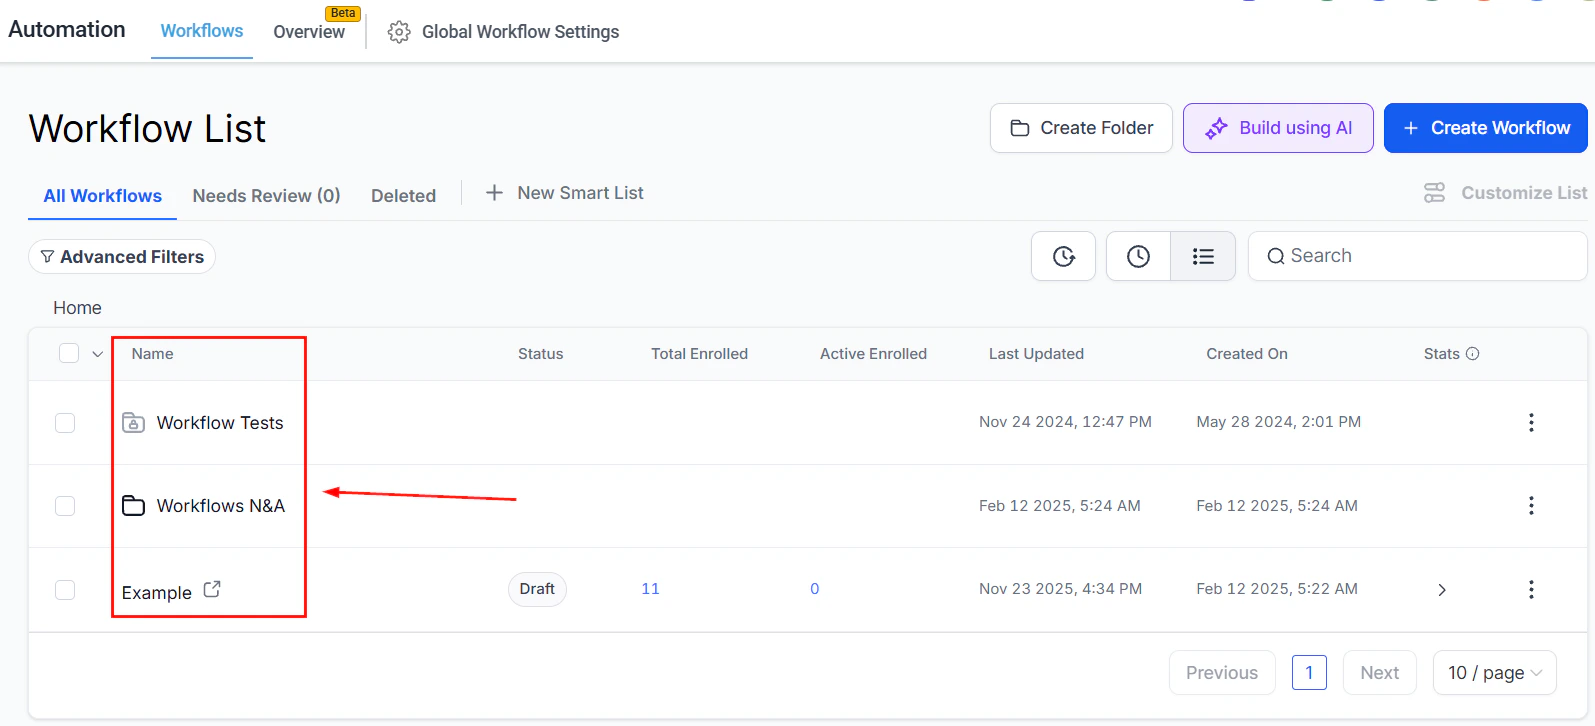
Screenshot
Screenshot
Screenshot
Screenshot
Screenshot
Screenshot
Screenshot
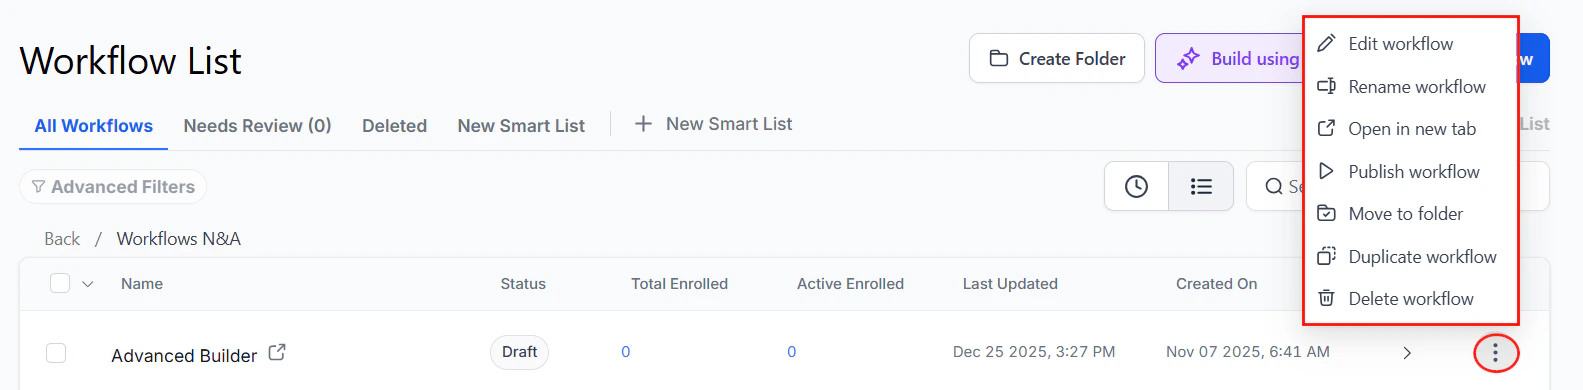
Workflow Actions
The three dots Action menu gives you action items for your workflows, including editing, opening the workflow in a new tab, moving to a folder, duplicating, and deleting.- Edit Workflow: Access your workflow editor by clicking this option.
- Rename Workflow: Quickly rename your workflow by selecting this button.
- Open in New Tab: Click here to open the workflow in a new tab.
- Draft/ Publish Workflow: Switch a Published workflow back to Draft mode or vice versa.
- ****Move to Folder: ****Click to move the workflow to a folder.
- Duplicate Workflow: This button allows you to clone the workflow.
- ****Copy To Account: ****Clicking on this option opens up a window where you can choose the account to want to add this workflow.
- Delete Workflow: This button allows you to delete the workflow.

Screenshot
Bulk Actions
Checking the box next to the workflows will allow you to move them to a folder (1), publish (2), draft (3) or delete them (4).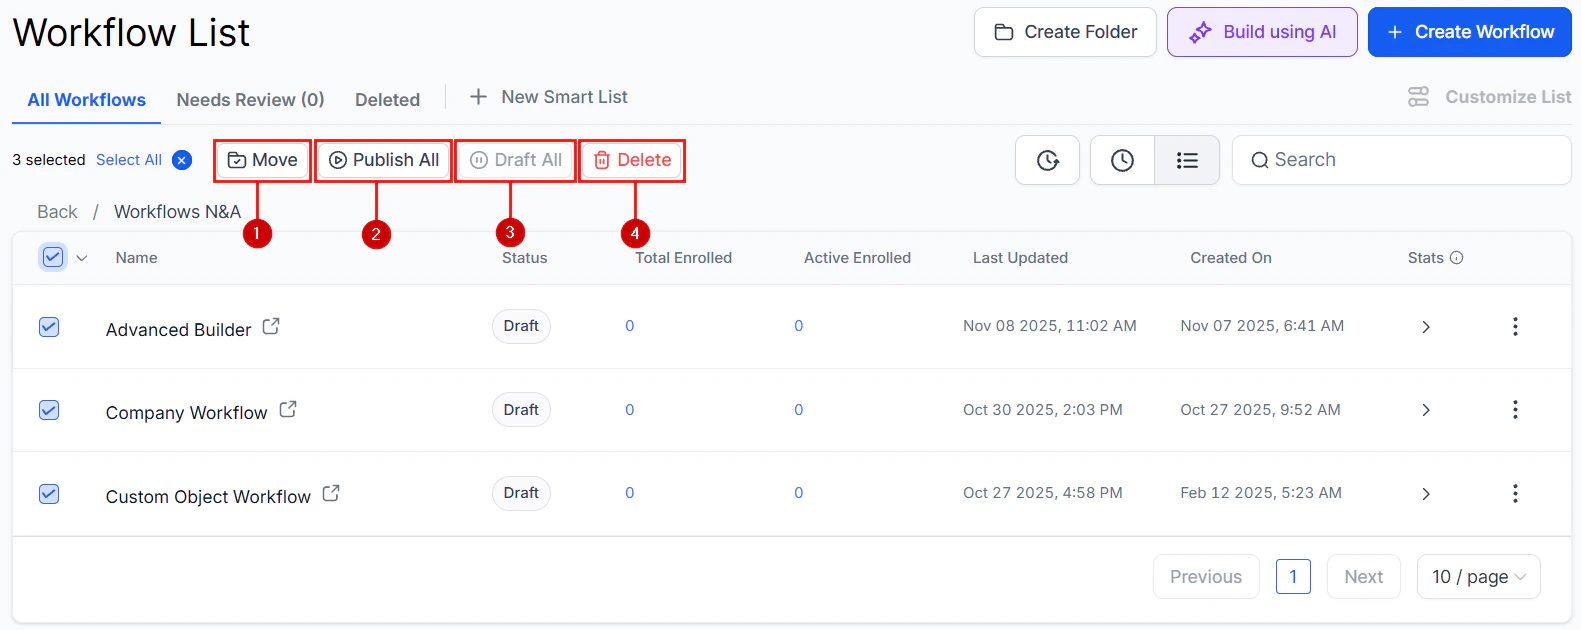
Screenshot
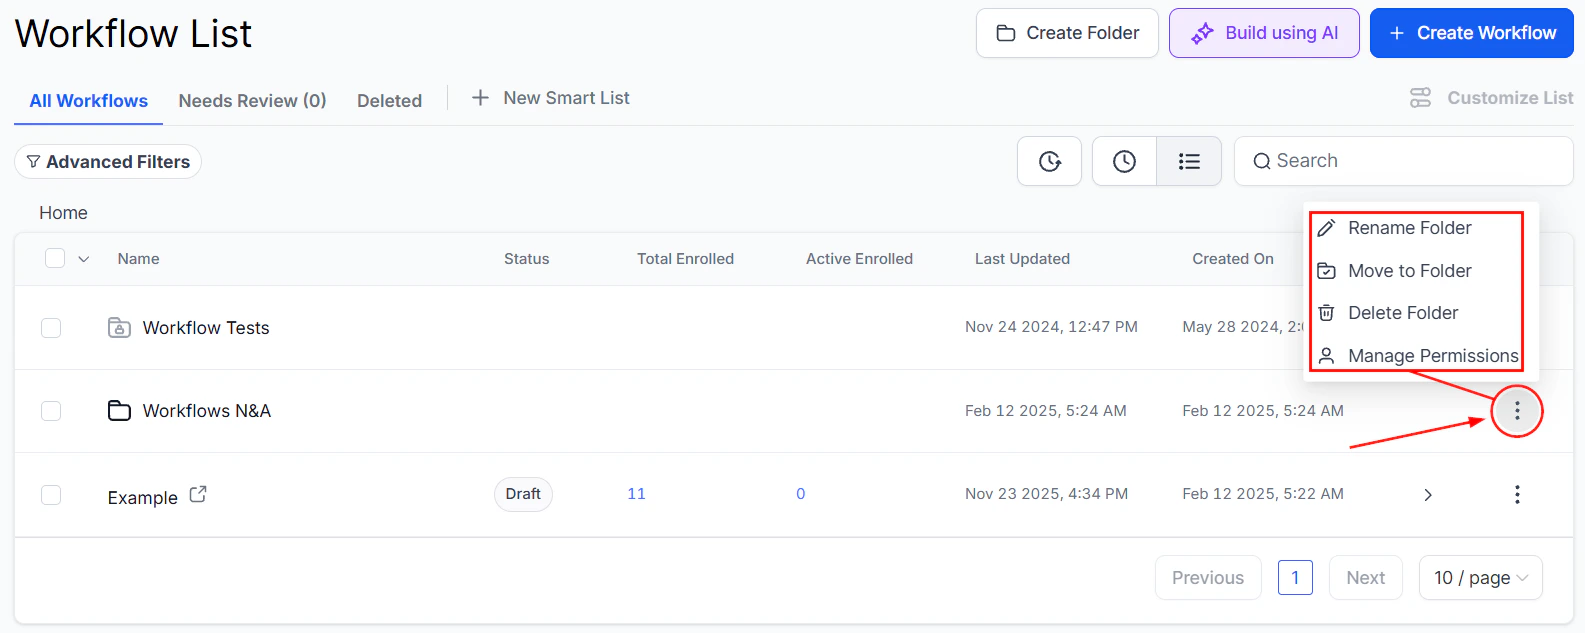
Folder Actions
- Rename Folder allows you to change the name of a workflow folder. Just click the three dots next to the folder you wish to rename.
- Move to Folder lets you relocate the folder within another folder.
- Delete Folder permanently deletes the selected folder.
- ****Manage Permissions ****defines the users who should have access to the workflows contained in the folder.
Screenshot
Needs Review
In this section, you will find workflows that have unresolved errors from the past 30 days.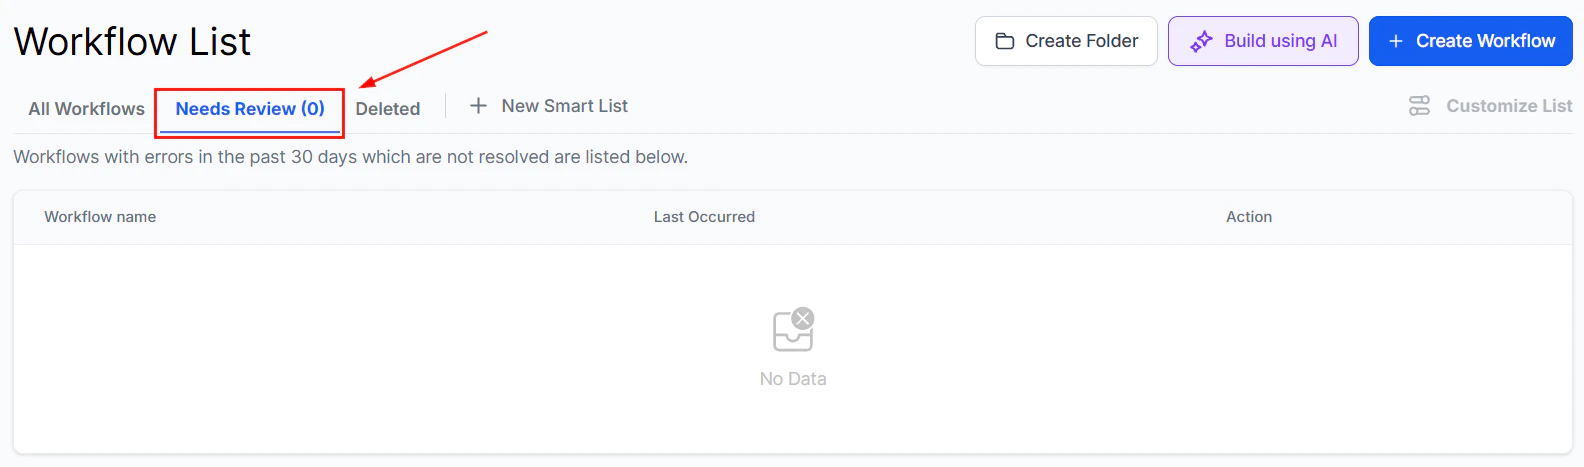
Screenshot
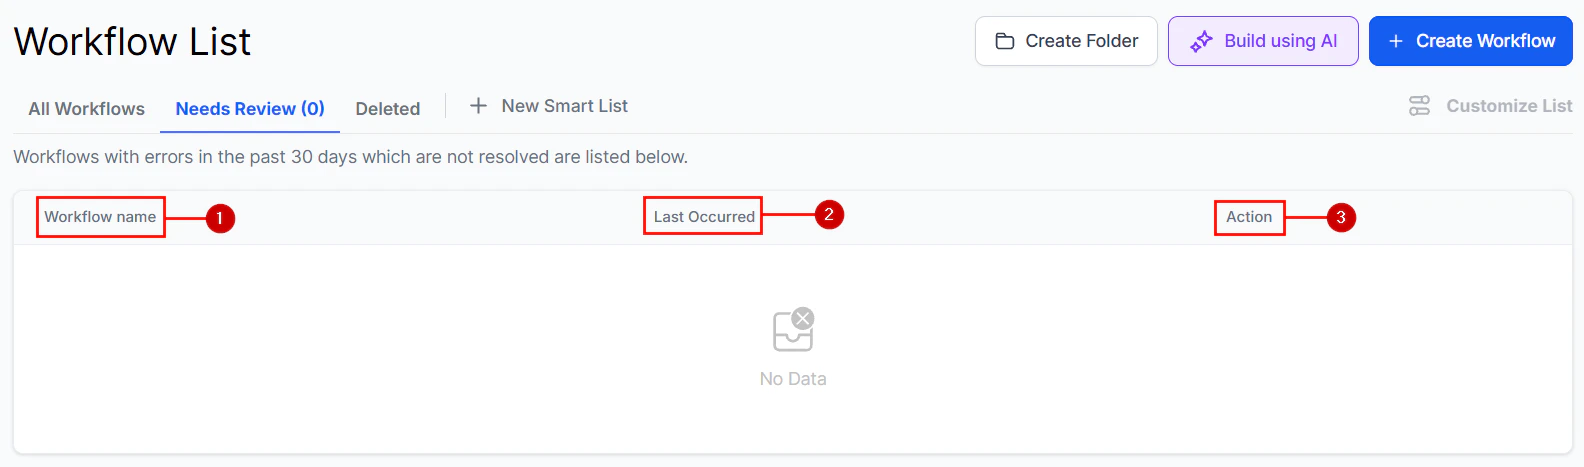
Workflow Needs Review List
- Workflow Name: This column identifies the names of your workflows with errors.
- Last Occurred: Here, you can view the date and time when the error last occurred.
- Action: After you have investigated the errors, mark them as “read” to indicate they have been reviewed.
Screenshot
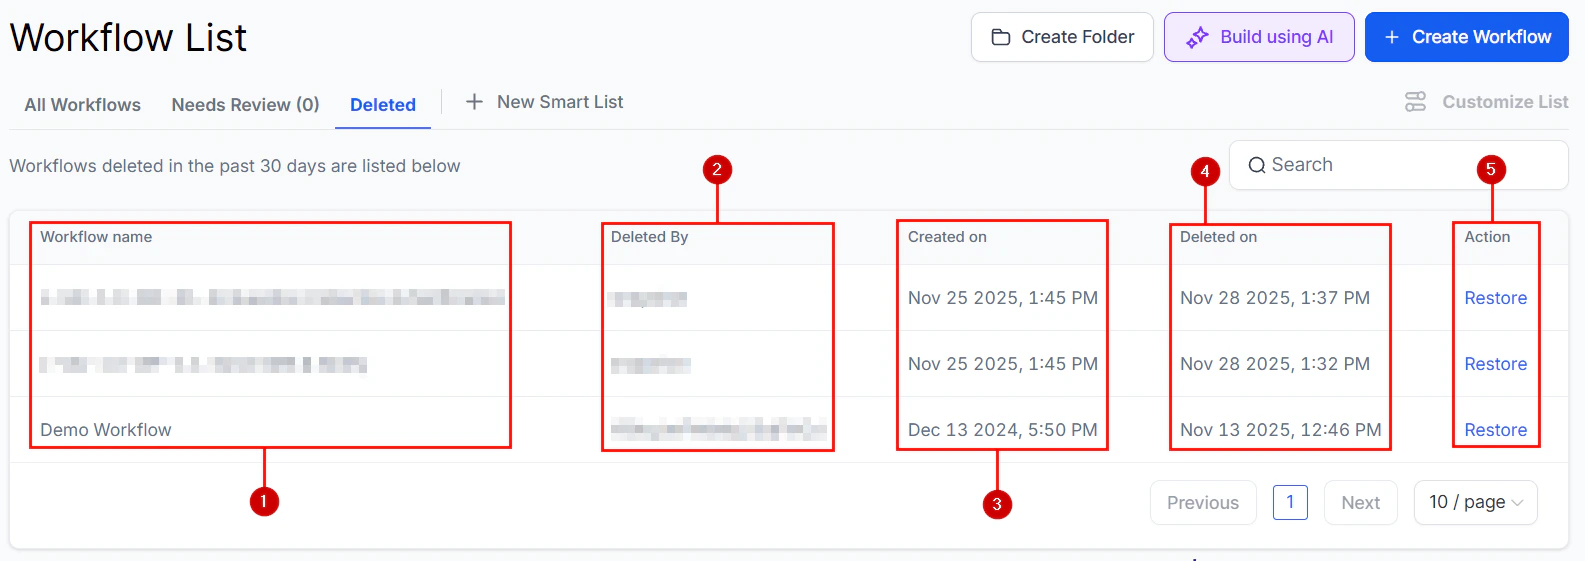
Deleted
Within this section, you can view and restore workflows that have been deleted within the past 30 days.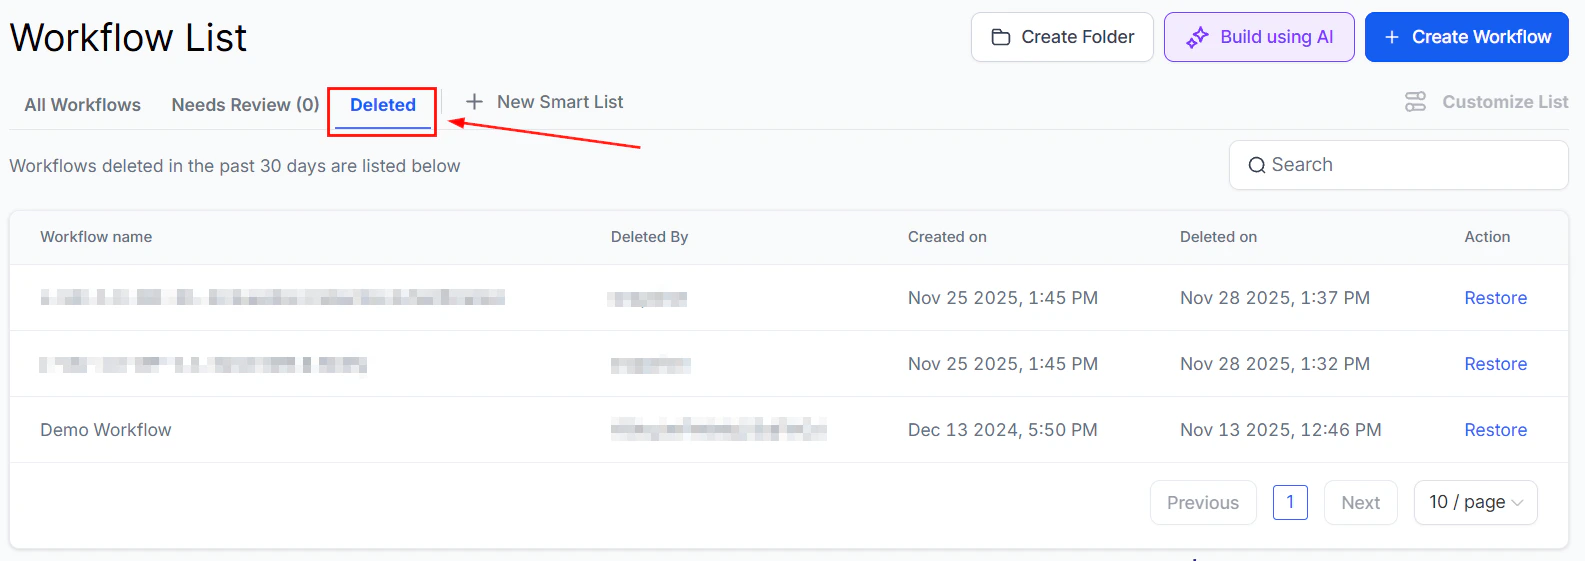
Screenshot
Deleted Workflows List
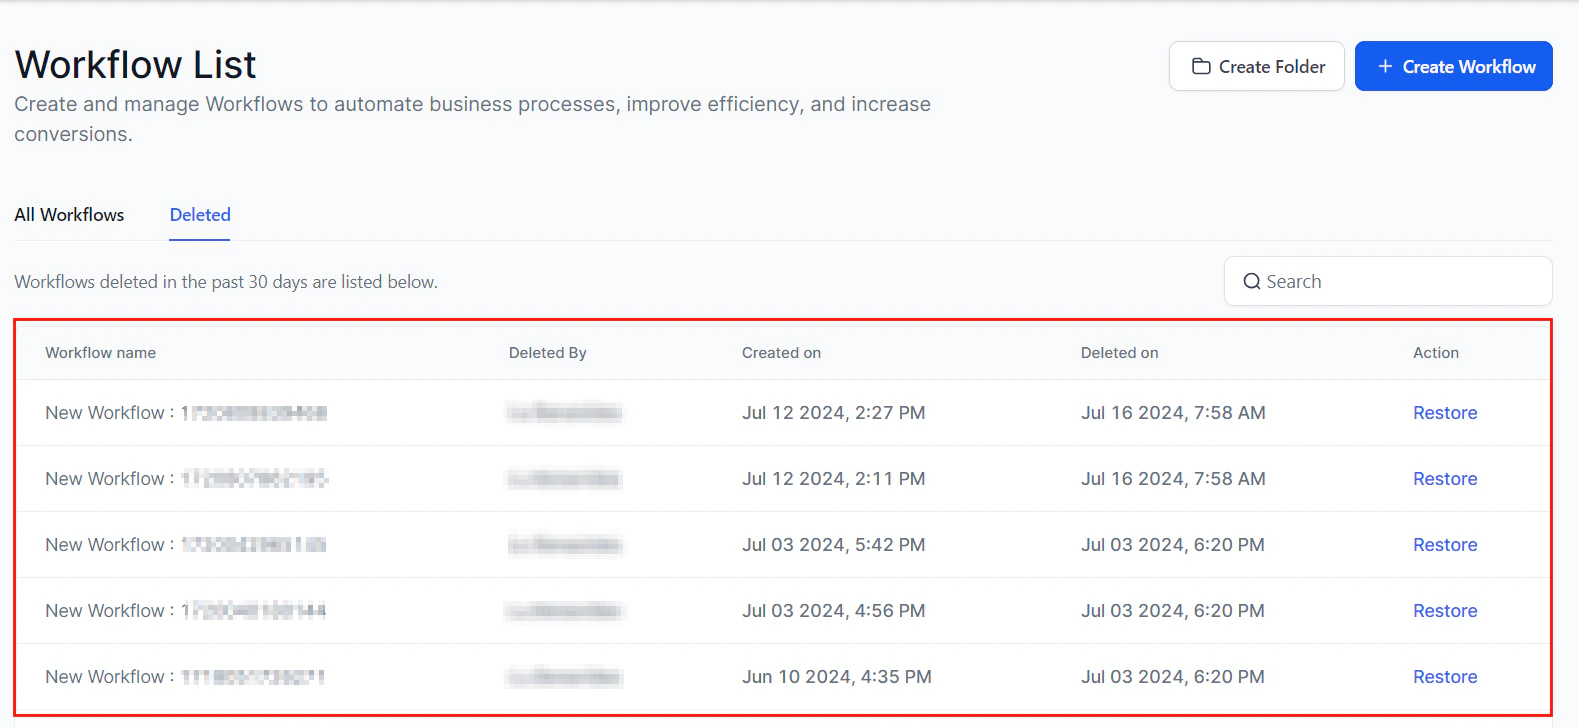
- Workflow Name shows the name assigned to the workflow before it was deleted.
- The**** Deleted By**** field Identifies the user who deleted the workflow.
- The**** Created On**** field displays the date the workflow was initially created.
- The Deleted On field shows the date when the workflow was removed from the system.
- The Action field offers the option to view details of the deleted workflow or restore it to its previous state.
Screenshot
Smart List
Use the Smart List feature to easily manage workflows that meet specific criteria and improve your organization.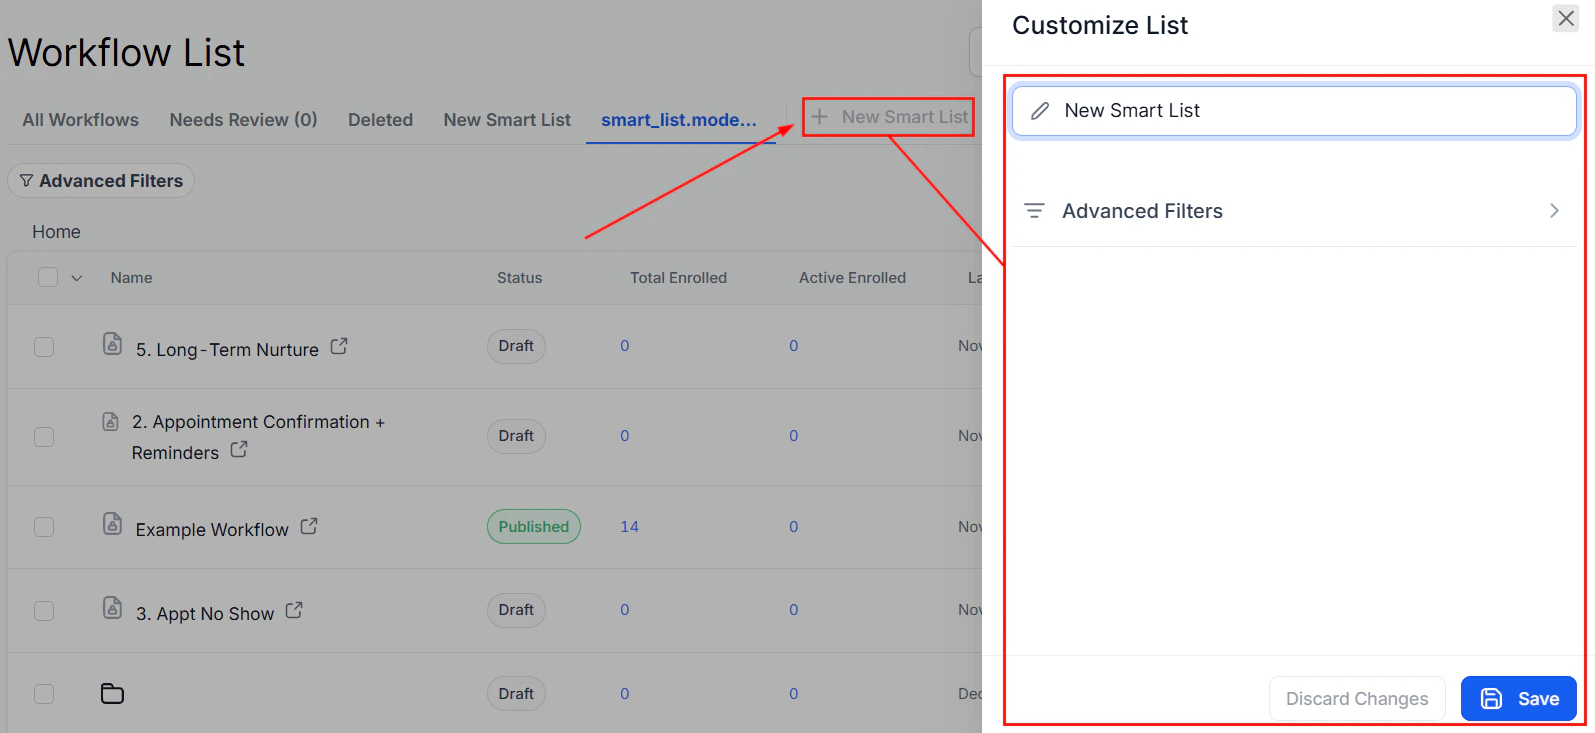
Screenshot
Understanding automation
In your CRM the automation feature is the technology that handles repetitive tasks, such as email marketing, social media posts, and customer interactions, without human intervention. Businesses can automate these tasks based on specific triggers and conditions by setting up workflows or sequences, increasing efficiency and personalization. Here are some key features;Triggers
These are events that initiate an automation, such as a form submission or a specific customer action.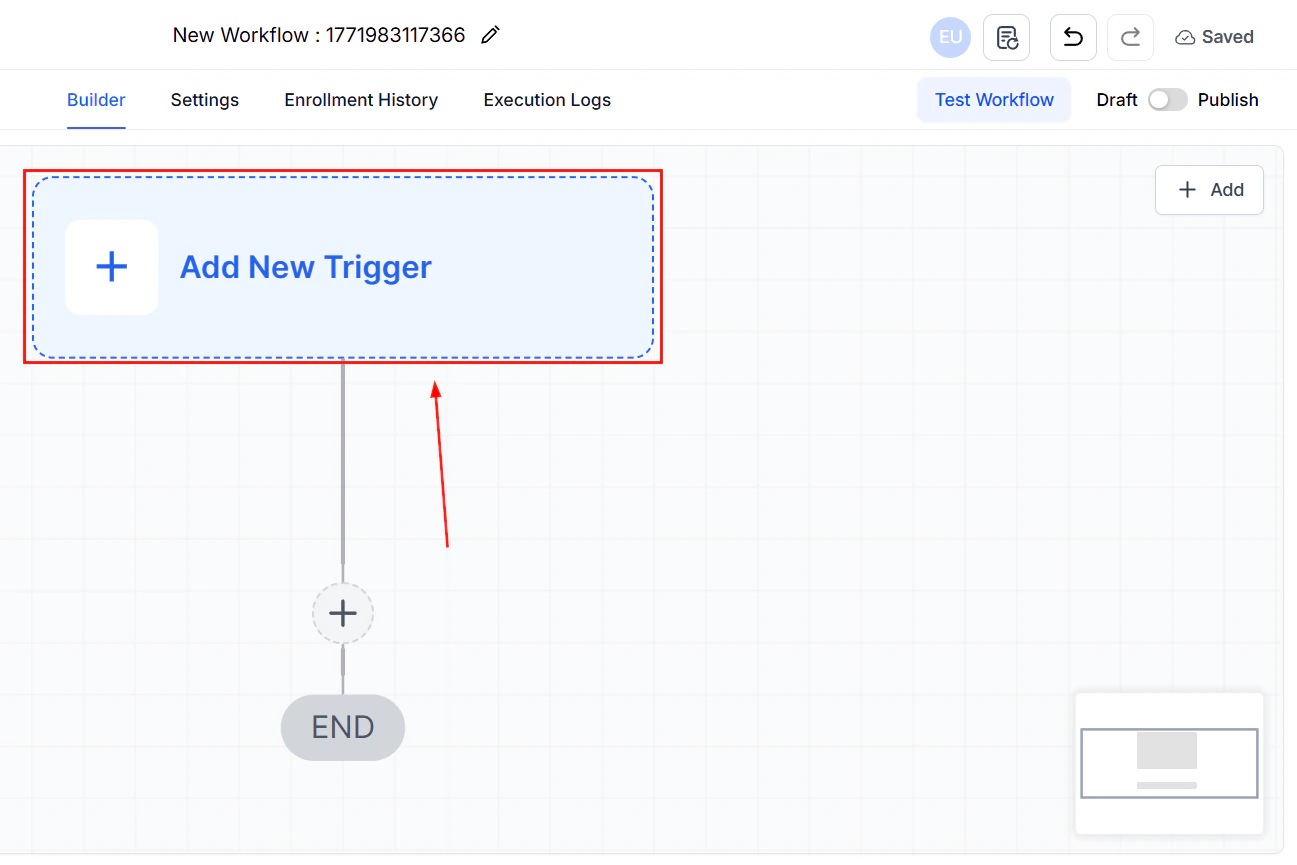
Screenshot
Actions
The tasks are executed once a trigger is activated, including sending emails, updating customer records, or creating tasks.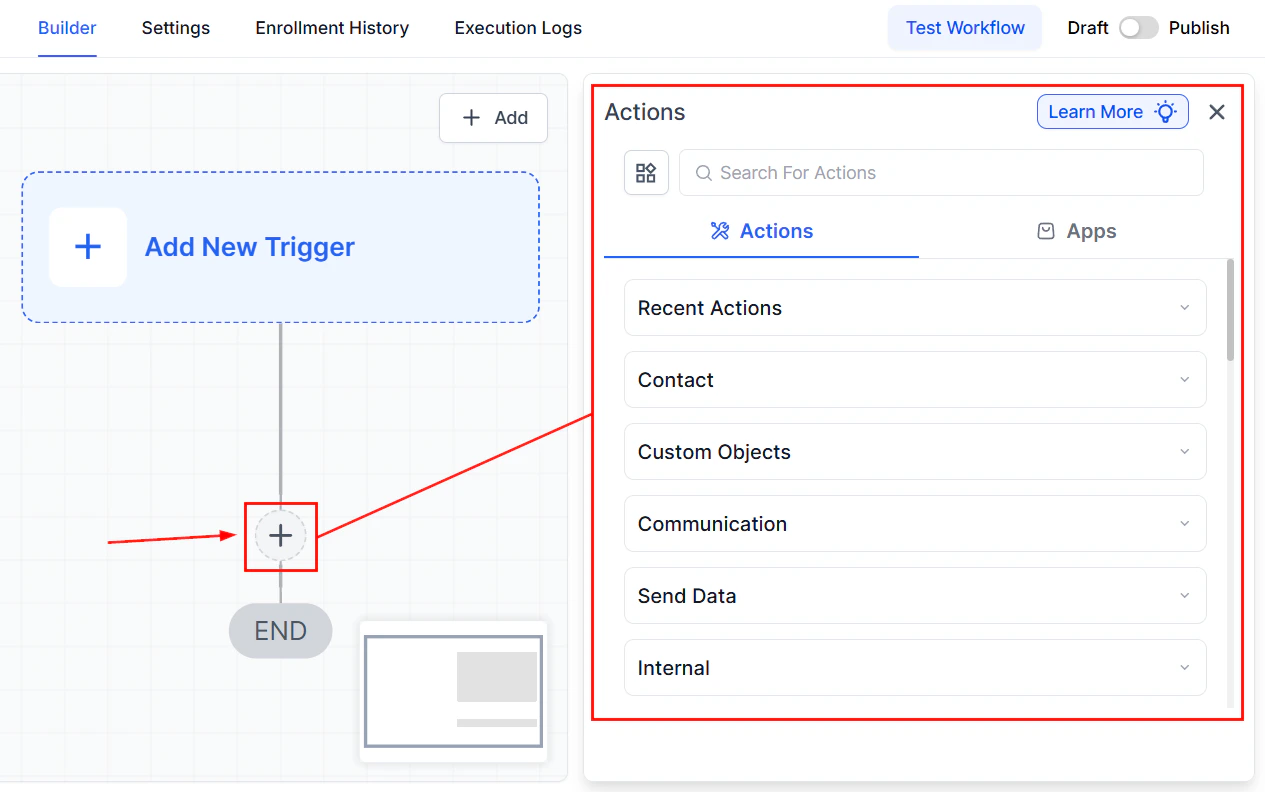
Screenshot
Workflows
These are a series of actions that follow a trigger, designed to achieve a specific outcome, like nurturing leads or onboarding new clients.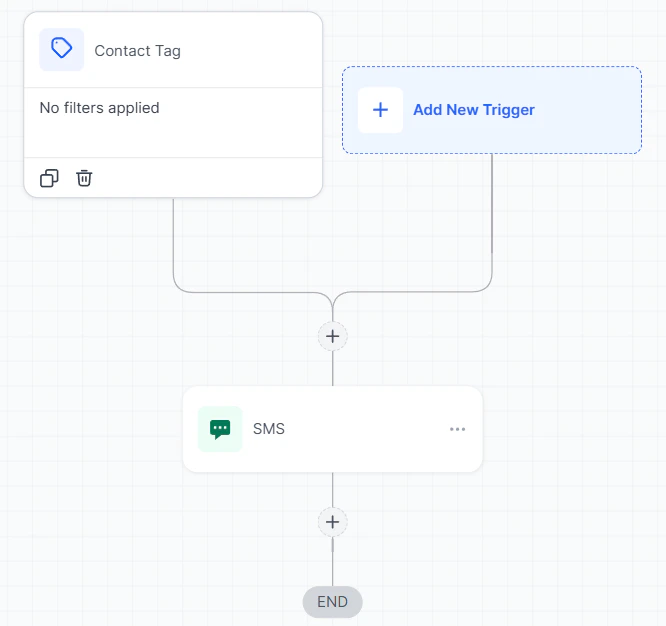
Screenshot
Implementing CRM Automation
To effectively implement CRM automation, follow these steps:- Assess Your Needs: To identify repetitive tasks that could benefit from automation Assess your marketing and sales processes. For example, consider areas like follow-up emails or appointment reminders, which often require consistency but can be time-consuming.
- Define Your Goals: Whether you aim to enhance lead nurturing, streamline customer service, or improve overall operational efficiency, defining clear goals for your automation makes it easier to build, plus having specific objectives will help shape your automation strategy.
- Map Out Workflows: Once your goals are in place, map out workflows that align seamlessly with your customer journey. Each automation should be thoughtfully designed to add value at specific touchpoints, enhancing the overall customer experience.
- Set Up Triggers and Actions: Finally, set up triggers and actions within your CRM system. These triggers should be based on customer behaviors, such as completing a form or making a purchase, with predefined actions like sending a personalized email or assigning a task to a team member.
Practical Examples and Use Cases
- Lead Nurturing: Streamline your sales funnel by automatically sending personalized emails to new leads. These emails can provide valuable content tailored to their interests, helping to build trust and guide them toward making a purchase.
- Customer Onboarding: Ensure a smooth onboarding process for new customers by triggering a series of welcome emails. These can include helpful resources, such as how-to guides or videos, and scheduled check-ins to address any questions or concerns.
- Appointment Scheduling: Reduce missed appointments by sending automated reminders to clients ahead of their scheduled time. This not only improves attendance rates but also enhances customer satisfaction by showing you value their time.
FAQs
What if an automation isn't working as expected?
What if an automation isn't working as expected?
Can I personalize automated emails?
Can I personalize automated emails?
How can I measure the effectiveness of my automation?
How can I measure the effectiveness of my automation?
Creating a new workflow
Workflows are essential tools for managing and automating key processes in your CRM, ensuring efficiency and consistency. At their core, workflows are a sequence of actions triggered by specific events, designed to move leads and customers through various stages of engagement. Whether you’re nurturing leads, onboarding clients, or sending reminders, workflows enable businesses to provide personalized and timely interactions. This guide walks you through building and managing workflows effectively.Key Components of a Workflow
- Triggers: Events that initiate a workflow. For example, a new lead enters the system.
- Actions: Tasks performed when a trigger is activated. These can include sending emails, creating tasks, or updating records.
- Conditions: Criteria that determine the path a workflow follows. For example, if a contact is tagged as a “new lead,” they might receive a different set of emails compared to a “returning customer.”
Screenshot
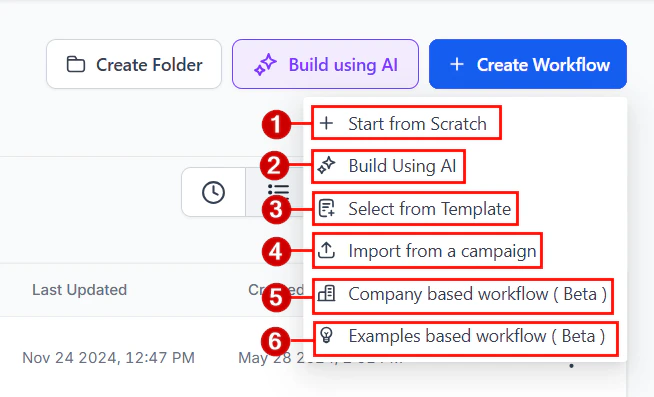
Select an Option to Begin Constructing Your Workflow
Choose how to build your workflow; you have six options.- Start from Scratch: By clicking this option, you will create your workflow from scratch with a fresh, clean slate for your automation, with the ability to add your triggers and actions.
- Build Using AI: Enter suitable prompts to guide the AI tool to create a workflow with suitable actions and triggers.
- Select from Template: Utilize workflow templates to streamline your processes, allowing for quick and efficient setup of automated sequences tailored to your business needs.
- Import from a campaign: This option allows you to select campaigns you have created as a guide to build your new workflow.
- Company-Based Workflow: Click this button to manage changes in company objects.
- Custom Object-Based Workflow: This option lets you create workflows to manage changes in Custom Object associations.
Screenshot
How to Create a Personalized Workflow
Starting from Scratch
Determine what initiates the workflow. In this case, it could be when a customer books an appointment.
Screenshot
Using a Template
Select the template you want to use to get a preview.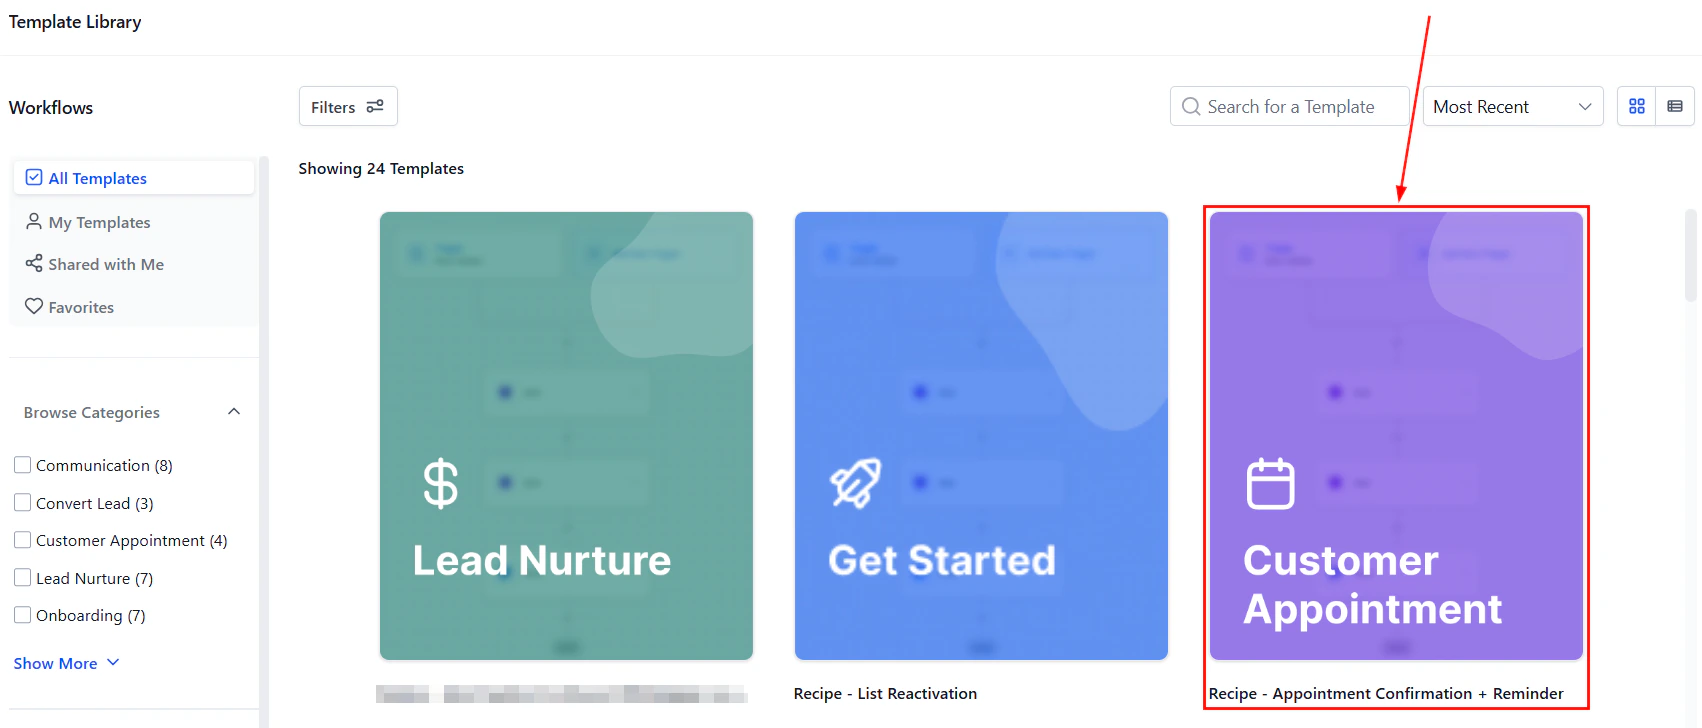
Screenshot
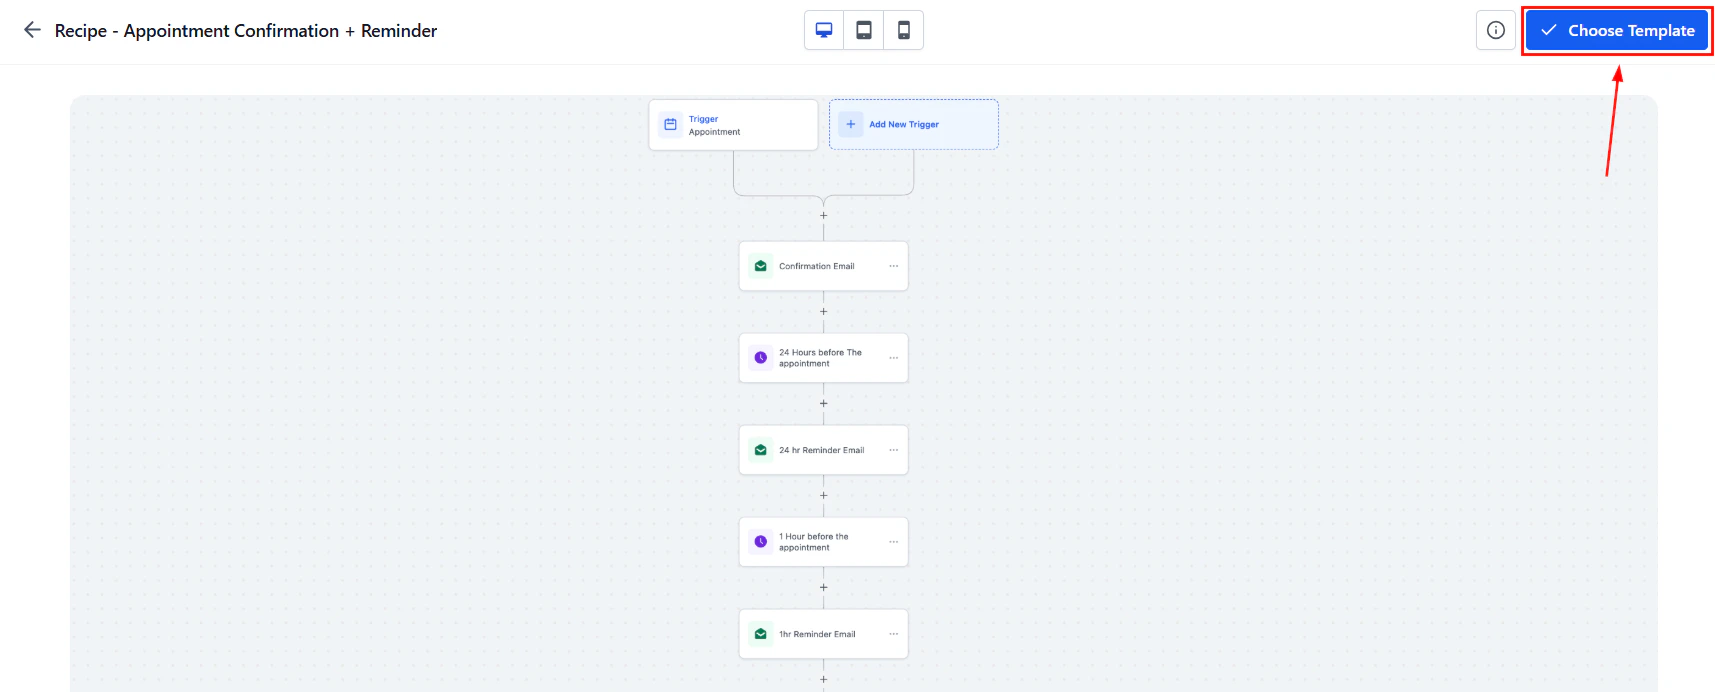
Screenshot
How to Customize a Workflow
Set Conditions
Use conditions to segment customers based on their history. For example, check if the customer has a “first appointment” tag.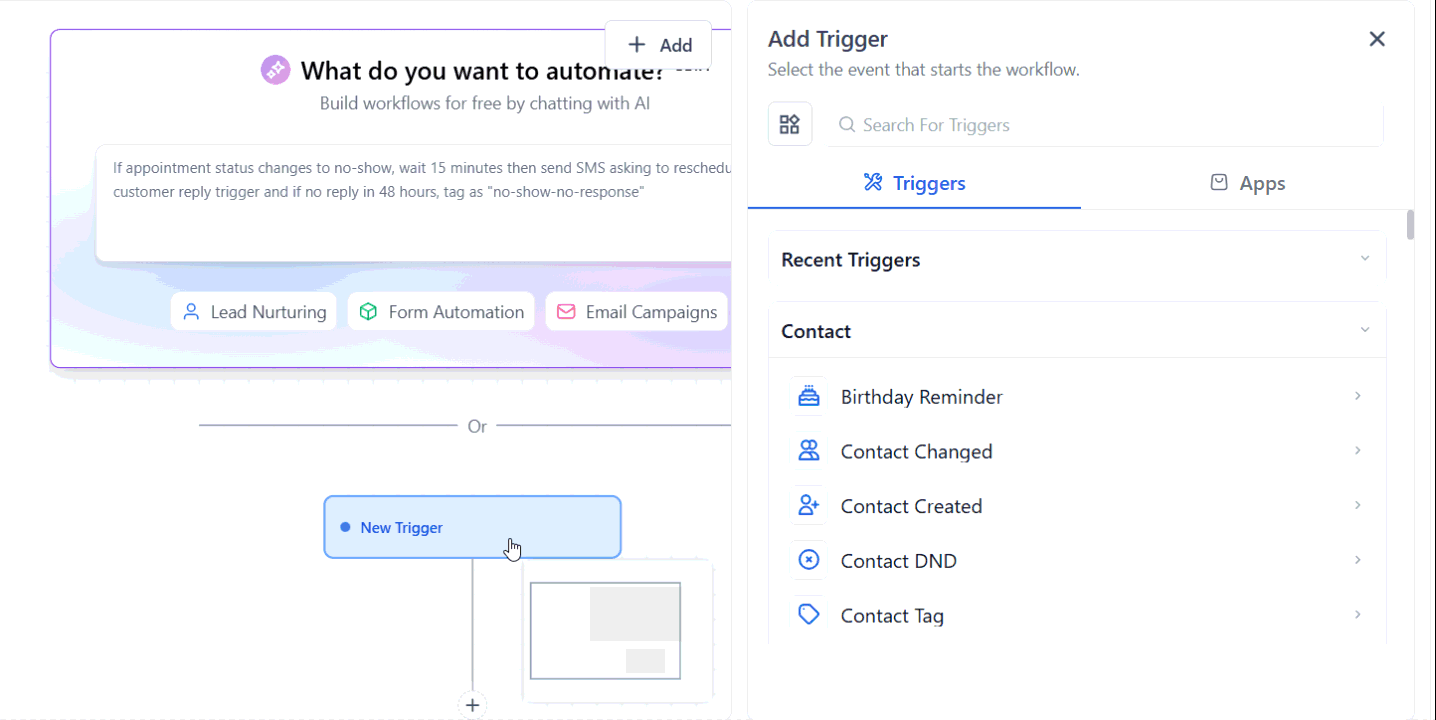
Screenshot
Configure Actions
Based on the conditions, set up different actions. First-time customers receive the formal introduction and Card while returning customers get a straightforward confirmation.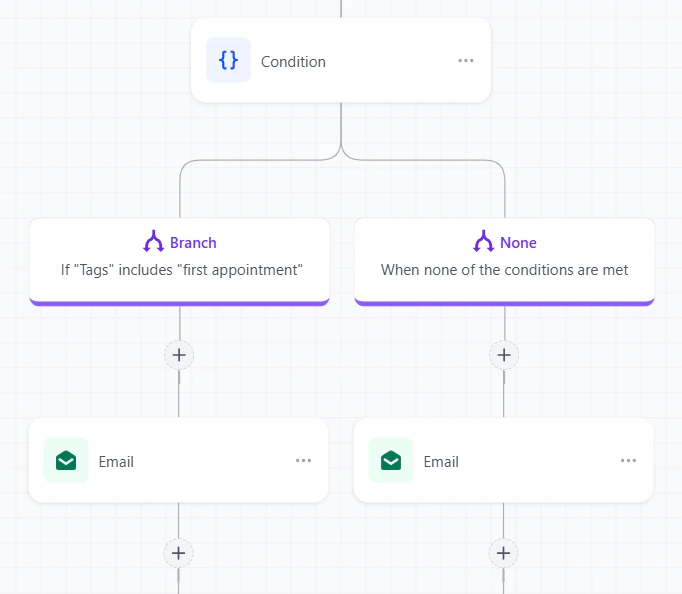
Screenshot
Save and Publish
Publish your workflow, then save it to ensure all updates are accurately reflected.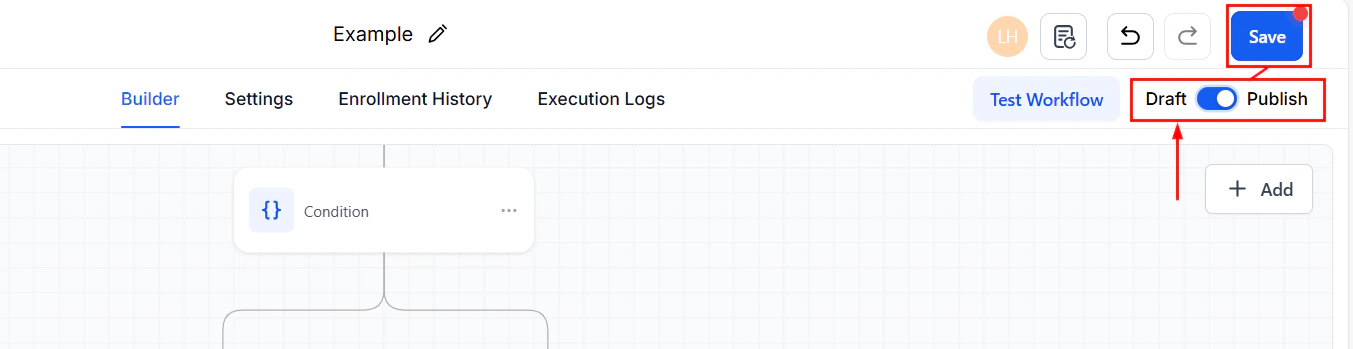
Screenshot
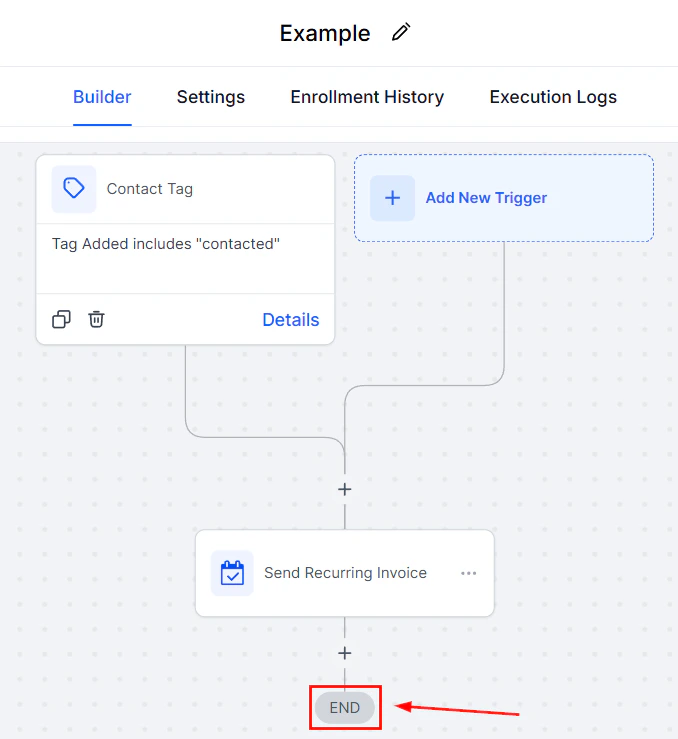
Test and Refine
Always test your workflows to ensure they operate as intended. Make adjustments based on performance and feedback. To ensure several objectives are achieved, you may want to create multiple connected workflows.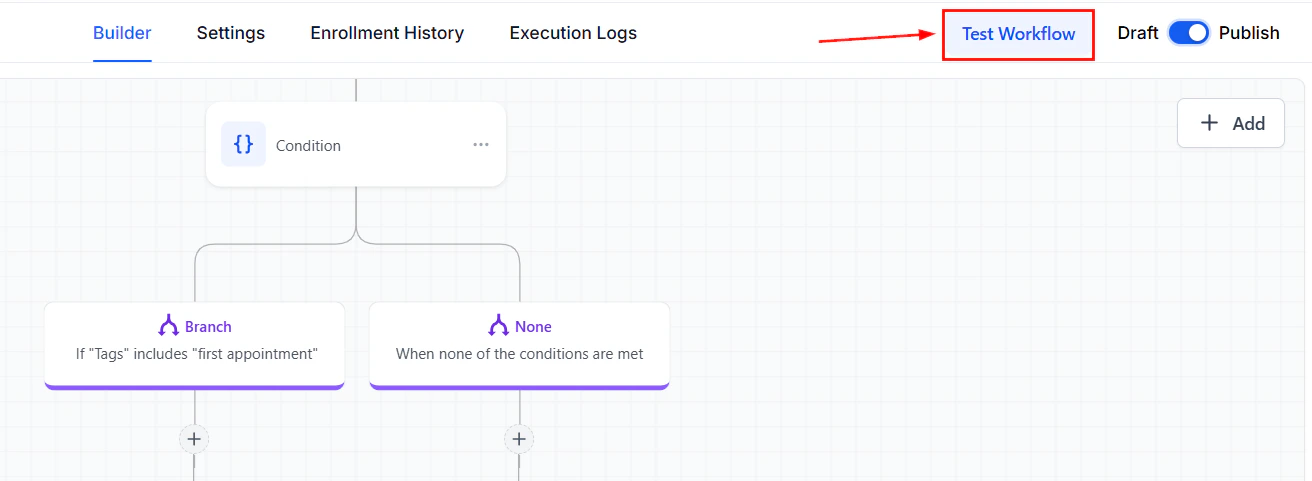
Screenshot
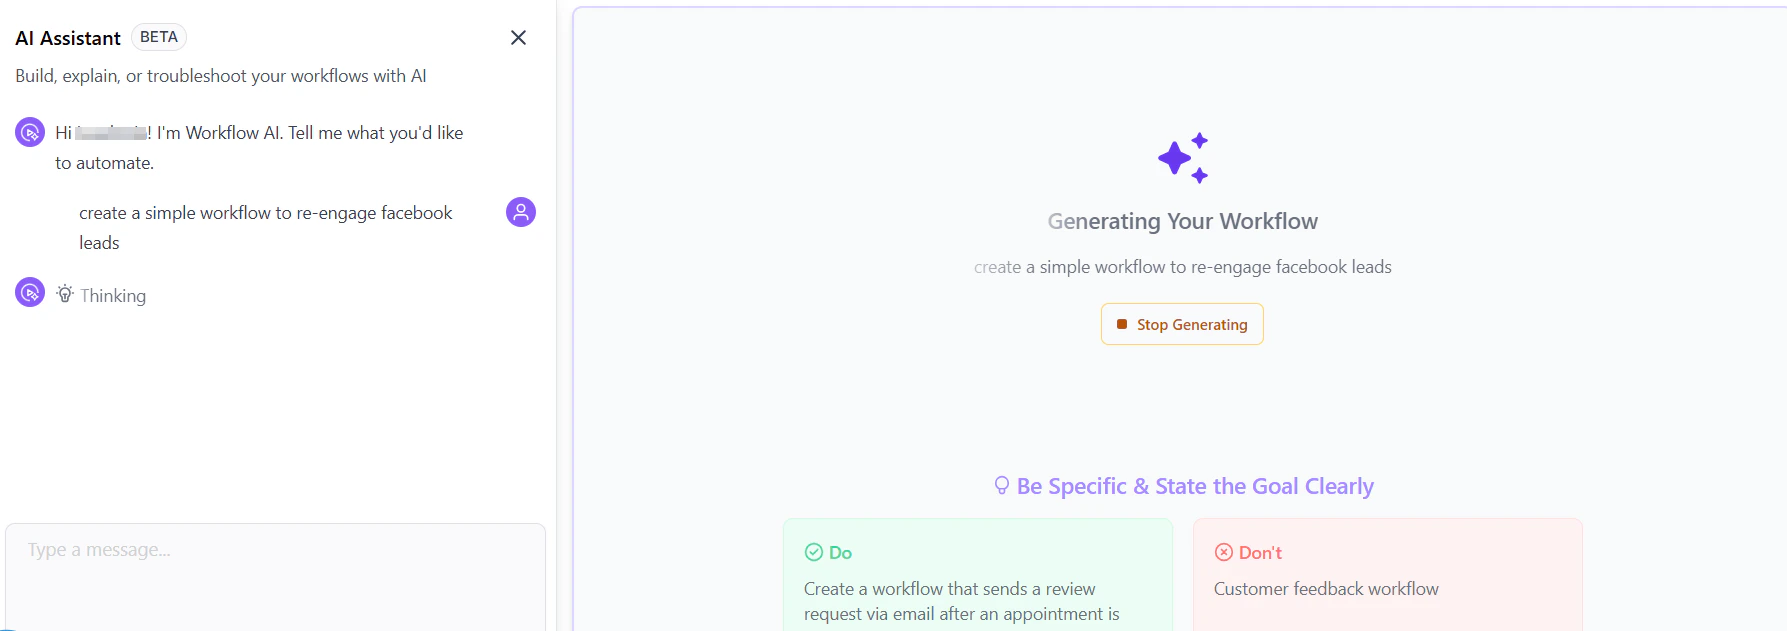
Build Using AI
Outside of the Create Workflow button, you can click the Build using AI button to launch the prompt window.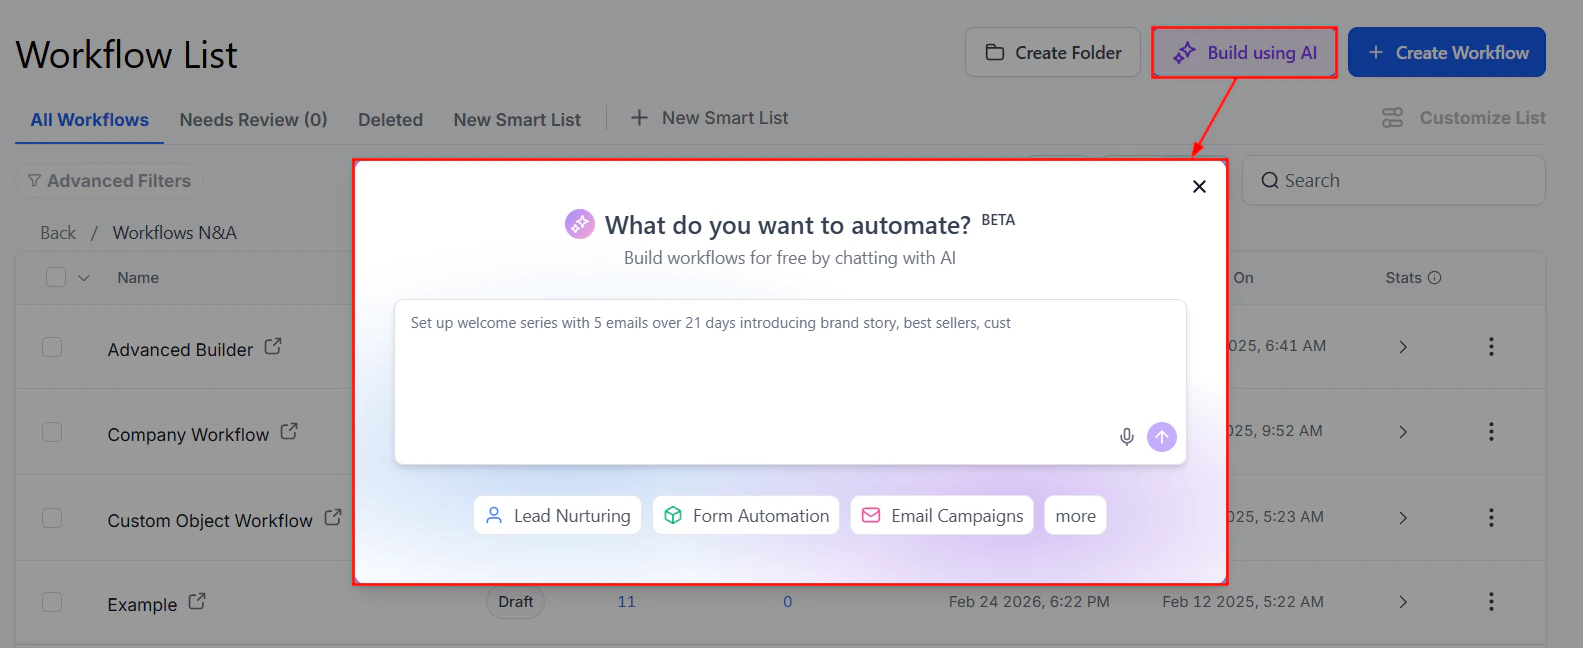
Screenshot
Screenshot
Create Folder
Creating folders can help tremendously with organizing each workflow for the leads that need propelling from one stage to another. Setting up a folder becomes easier with just the click of the New Folder button located on the top right corner of your screen.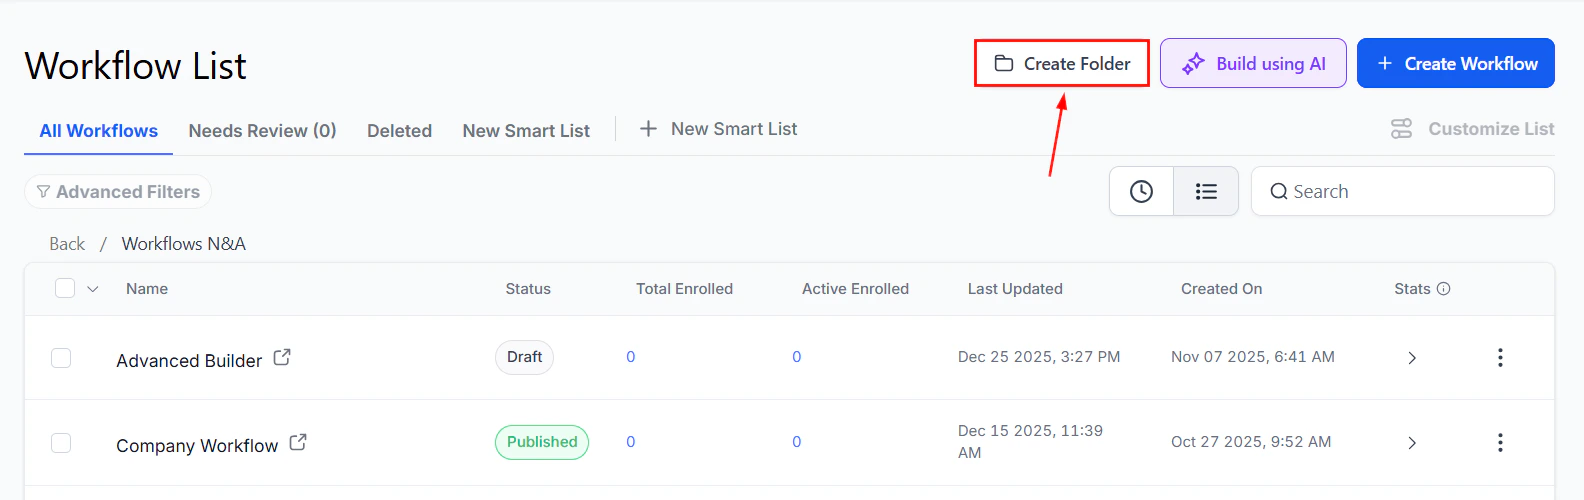
Screenshot
Naming a Folder
Once you click the button, a popup will appear for you to name your new folder. Once you have your new folder name typed in, click the save button to create your new folder.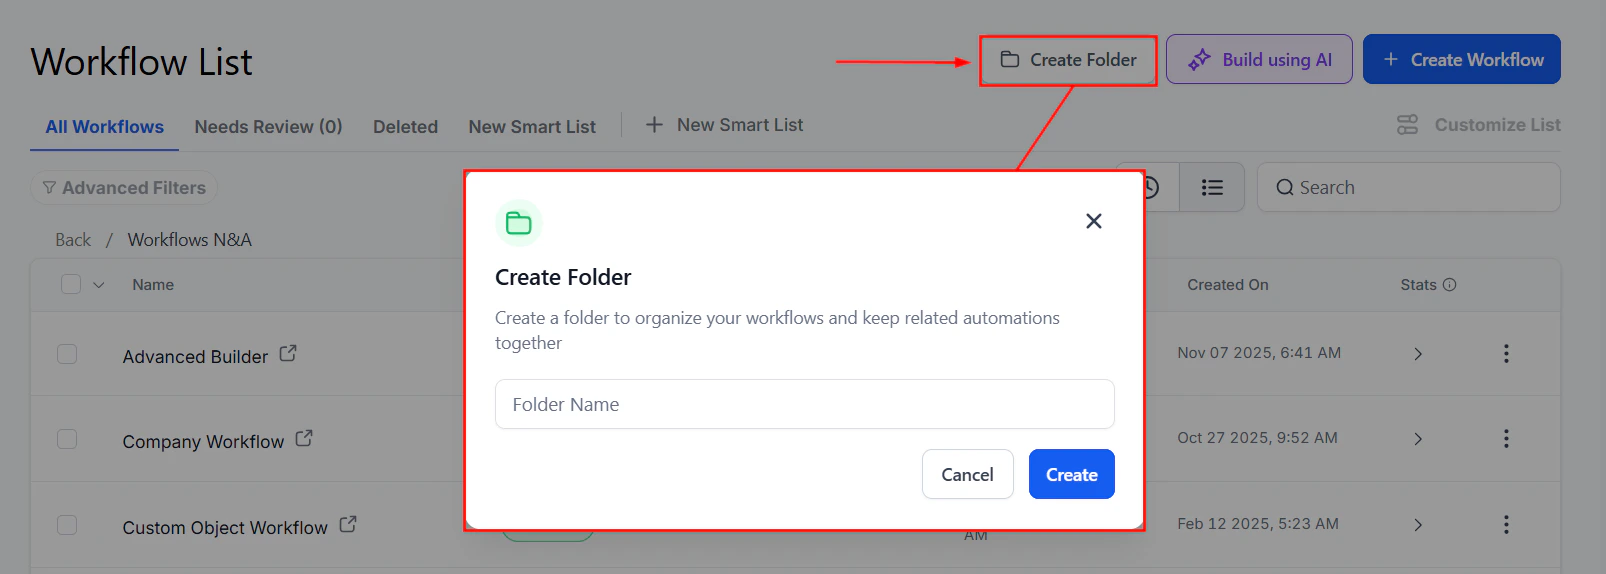
Screenshot
Folder Details
Click on the created folder to be directed to the details of the workflows contained. You will see the:- Name: Displays the title of each workflow, helping you identify them at a glance.
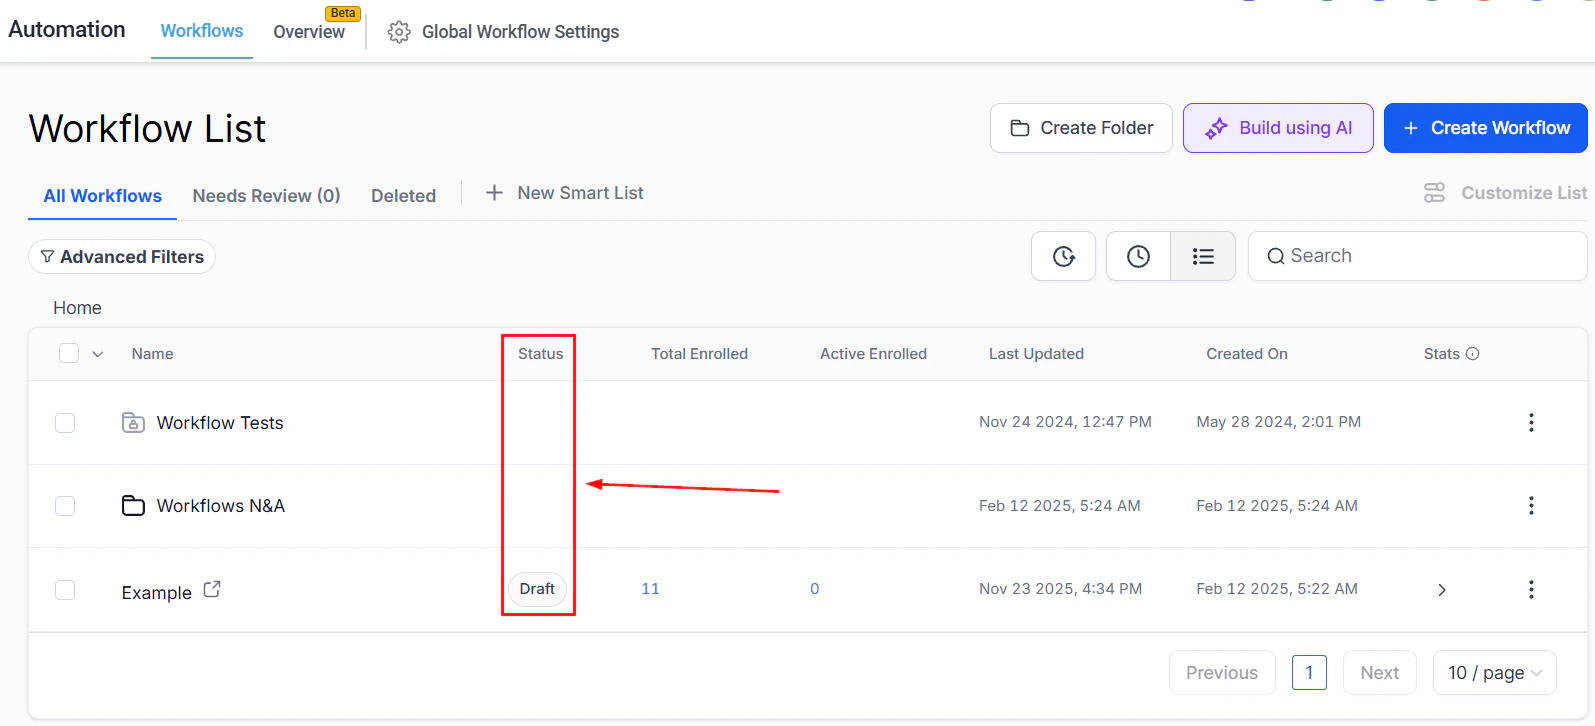
- Status: Indicates whether the workflow is in Draft or Published mode.
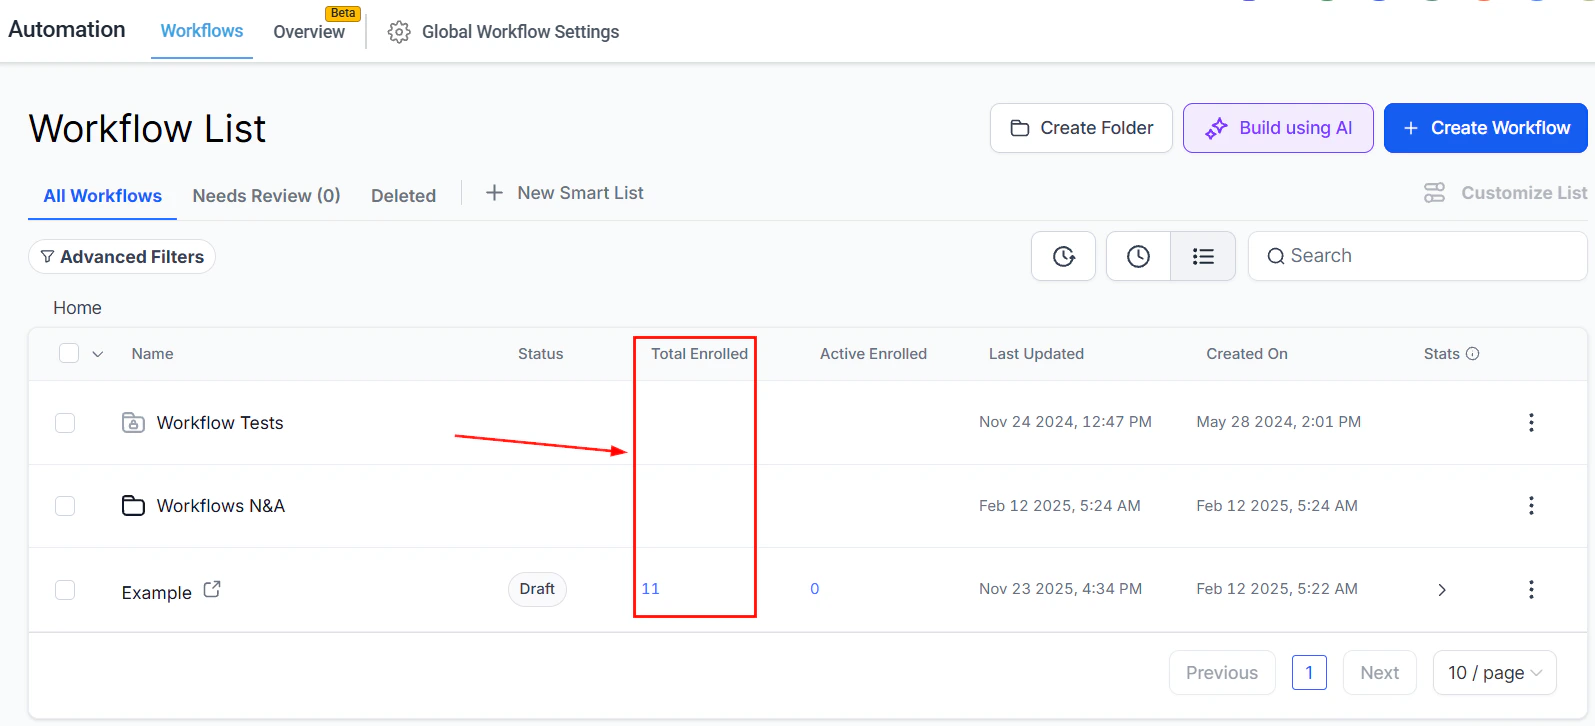
- Total Enrolled: Shows the total number of leads or customers currently enrolled in the workflow.
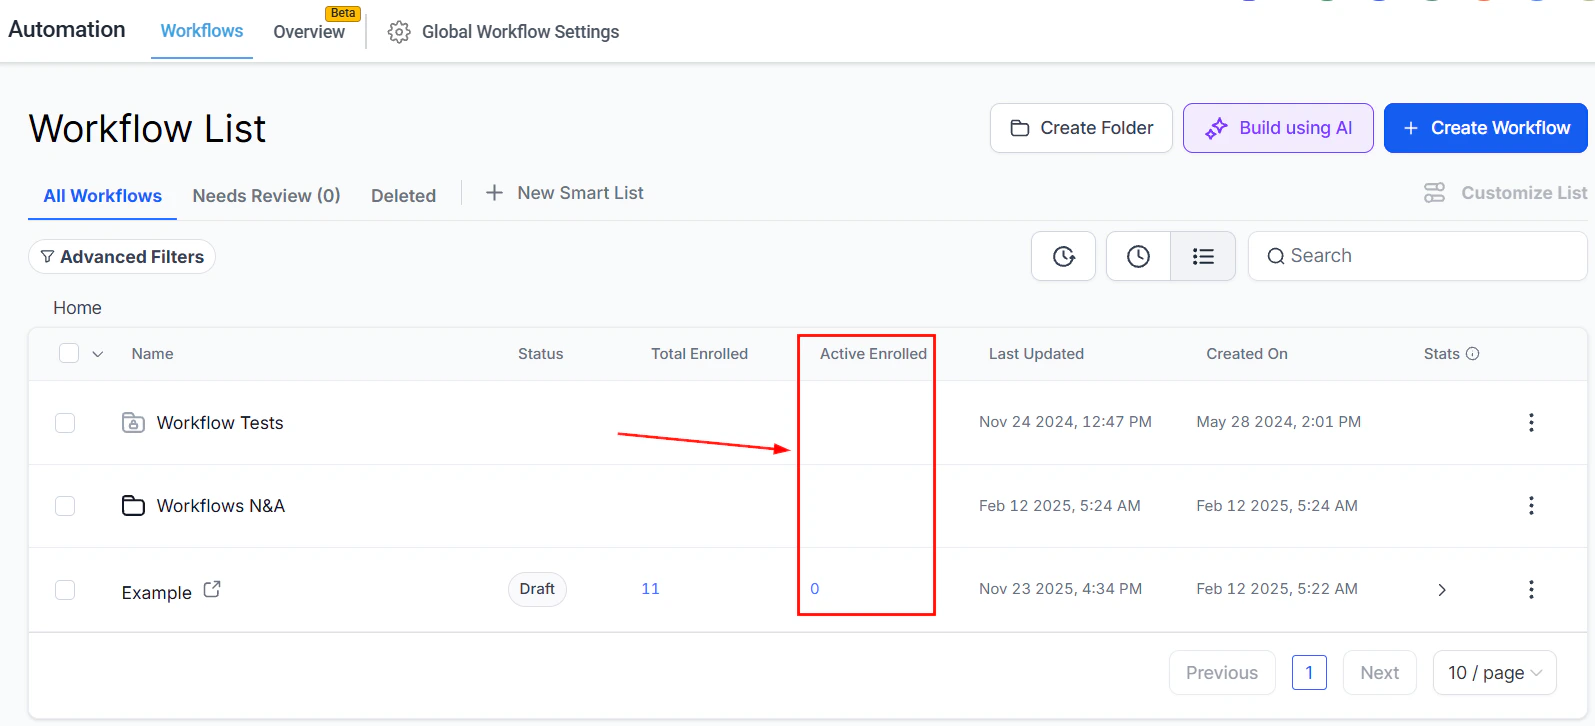
- Active Enrolled: Highlights the number of leads or customers actively moving through the workflow.
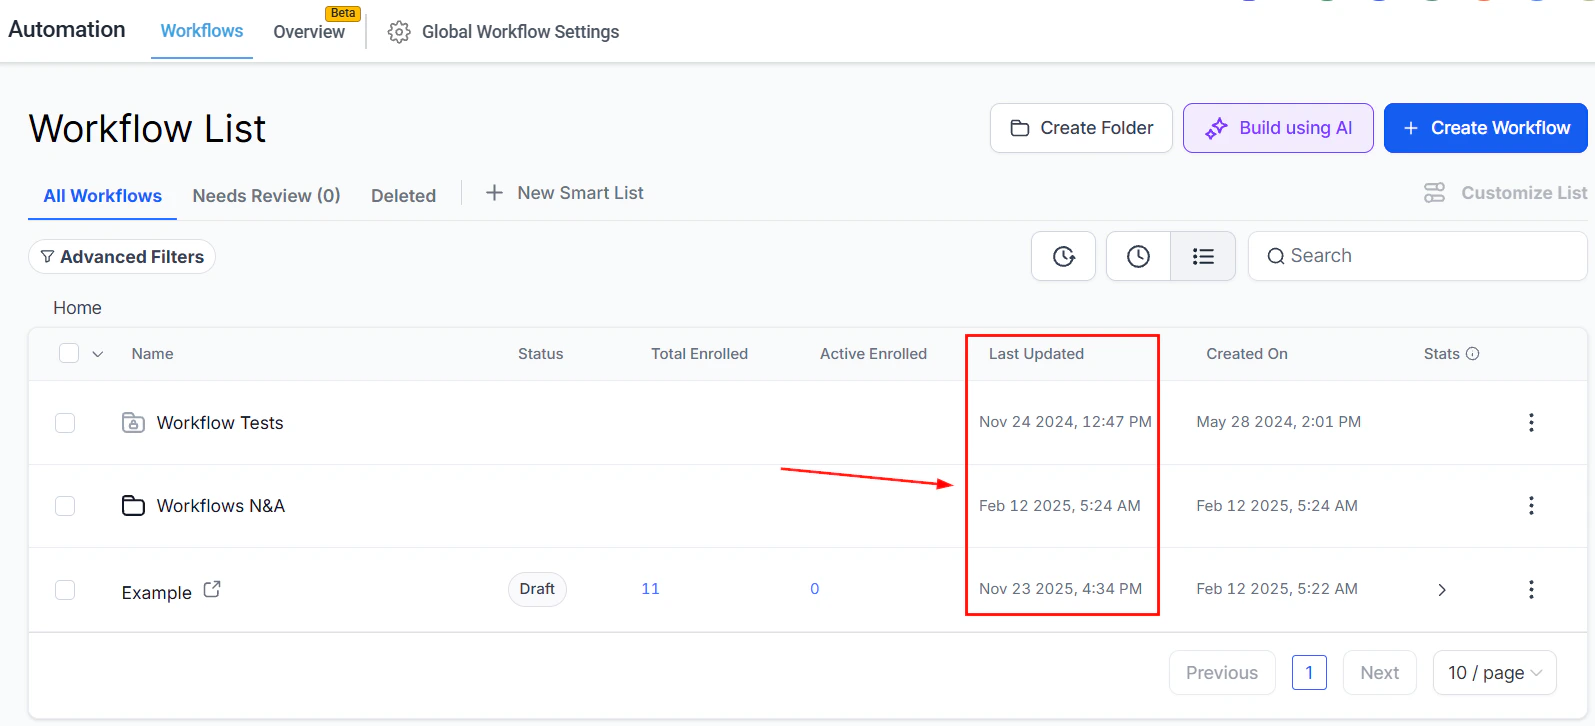
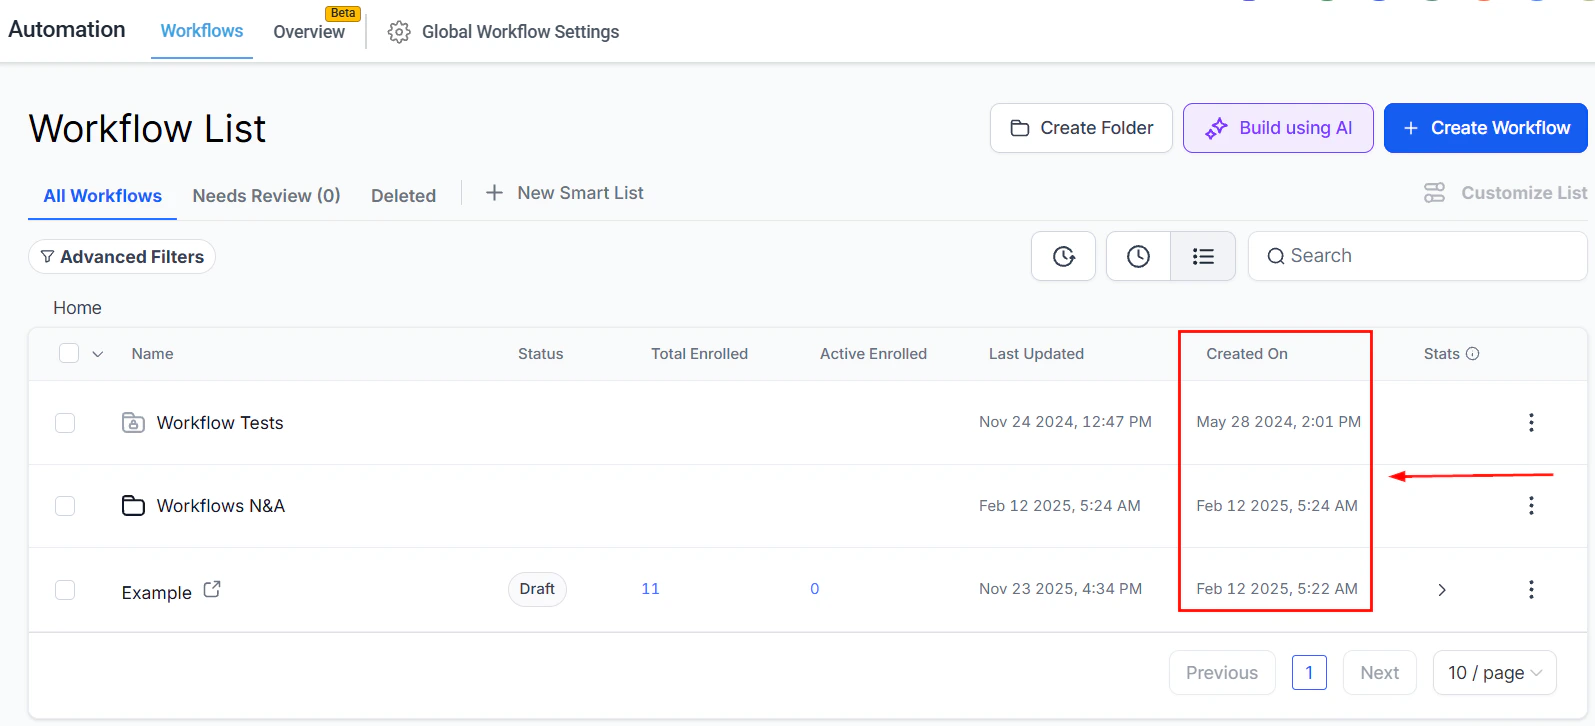
- Last Updated: Keeps track of the most recent changes made to the workflow.
- Created On: Records when the workflow was first created for reference.
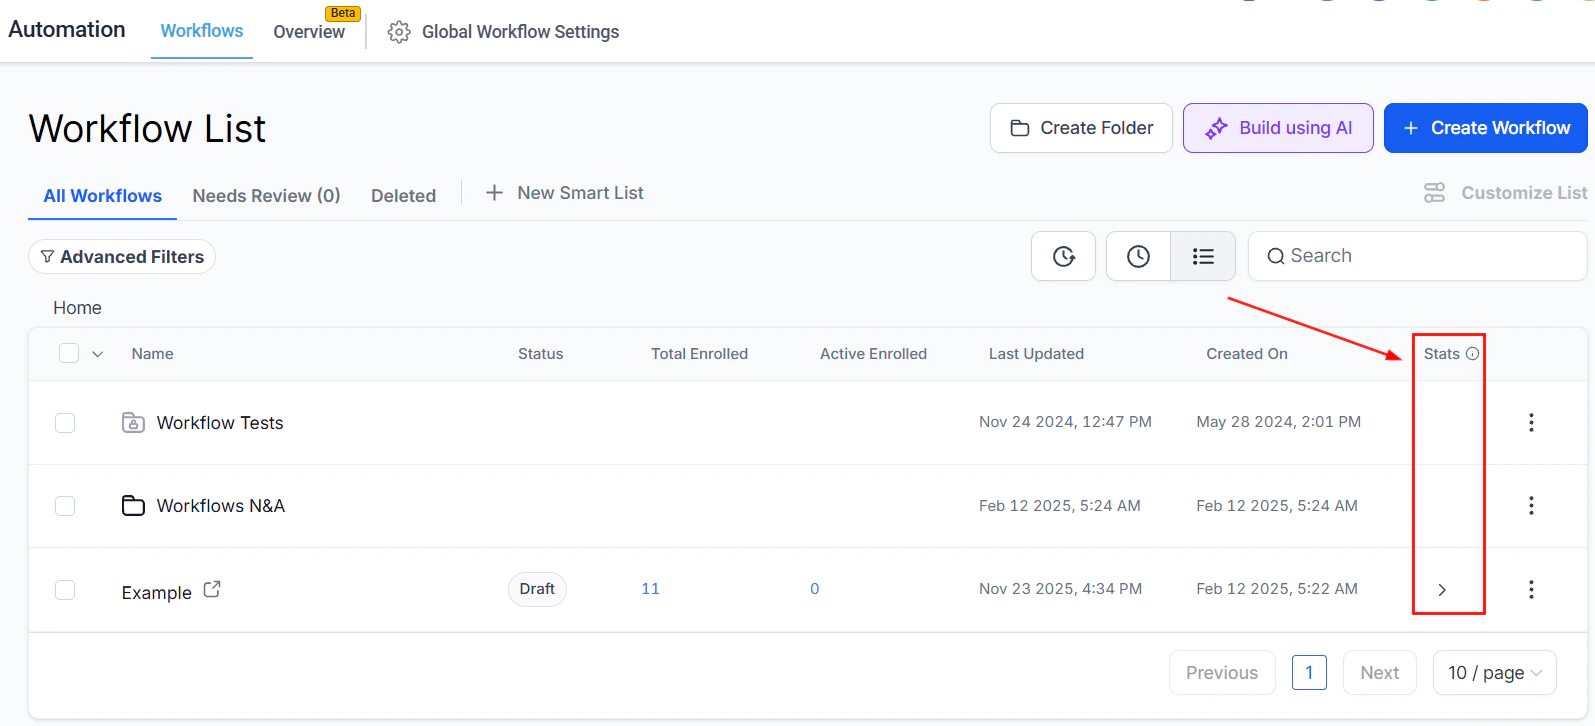
- Stats: Provides a quick summary of workflow performance, including engagement and completion rates.
Screenshot
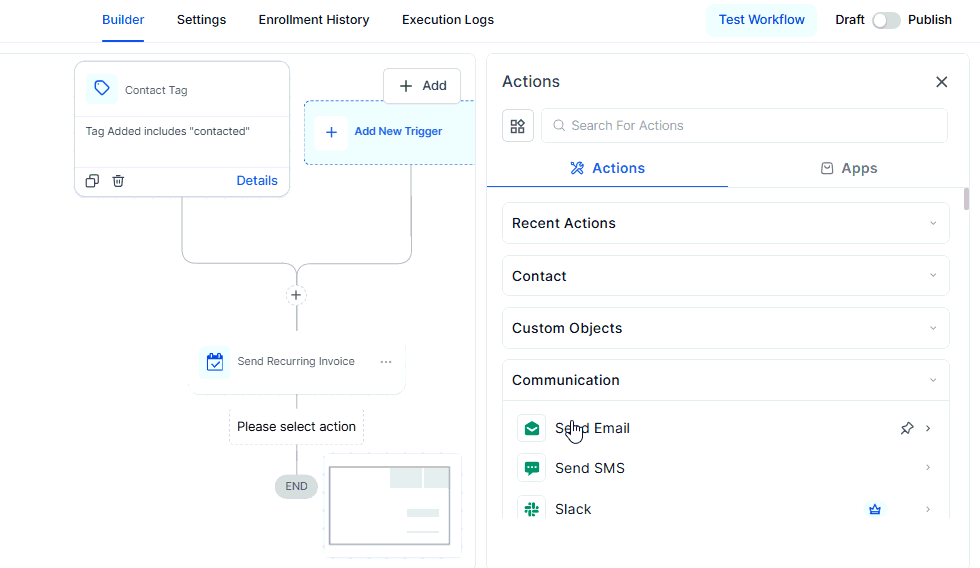
Actions
The actions dropdown beside each workflow allows you to perform a variety of tasks:- Edit Workflow: Access the workflow builder by clicking this option.
- Rename Workflow: Use this button to modify the name of the workflow.
- Open in New Tab: Click here to open the workflow in a new window tab.
- Draft/Publish Workflow: This button allows you to switch a Published workflow back to Draft mode or vice versa.
- Move to Folder: Seamlessly move the workflow to a folder by clicking this option.
- Duplicate Workflow: This button enables you to clone the workflow.
- Delete Workflow: This button provides the option to delete the workflow.
Screenshot
Implementing Personalized Workflows
Creating personalized workflows involves setting conditions that tailor the CRM’s actions based on the customer’s previous interactions with your business. This ensures that the messaging is relevant and timely, enhancing the customer experience.Example Scenario
Imagine you want to send different messages to a customer who is booking an appointment for the first time versus a returning customer. For the first-time customer, you might want to send a more formal introduction and include your contact Card. For a returning customer, a simple confirmation message might suffice.Troubleshooting Tips
- Workflow Not Triggering: Ensure the initial trigger is correctly set up and that there are no conflicting conditions.
- Incorrect Messaging: Double-check your conditions and actions to ensure the right messages are sent to the right segments.
FAQs
Can I use workflows for other processes besides appointments?
Can I use workflows for other processes besides appointments?
How do I know if my workflow is effective?
How do I know if my workflow is effective?
Can workflows integrate with other tools?
Can workflows integrate with other tools?
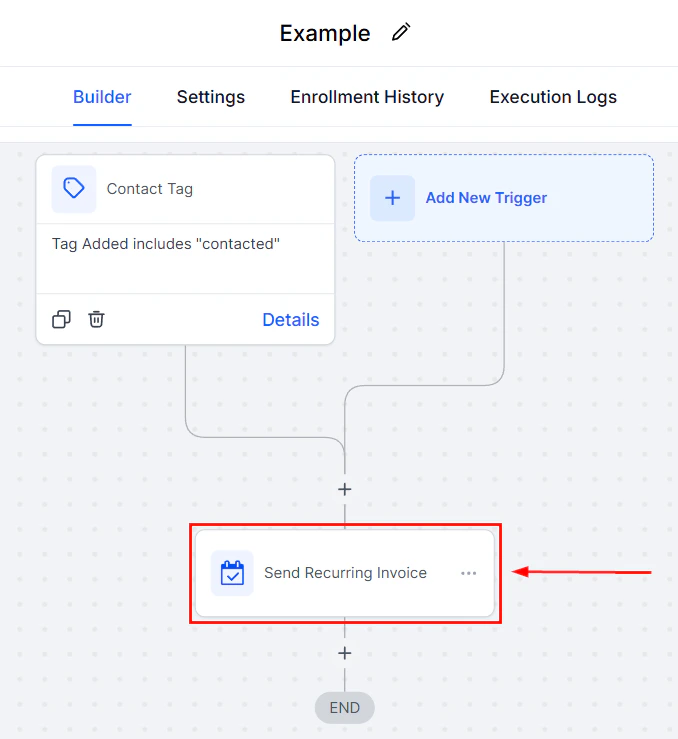
Builder tab overview
Automation is key to efficiency, since it helps you create seamless, automated processes. And the Builder tab is where all that magic is born. Before we begin the creation process, let’s follow along to gain a better understanding of its tools and sections.Workflow Name
At the top of your Workflow Builder page, you’ll find your workflow’s name followed by a pencil icon for editing. We recommend naming your workflows to reflect their purpose, as a clear and concise name helps you identify them at a glance. For example, if the workflow sends a text message to someone who missed a call, you might name it “Missed Call Text-Back.”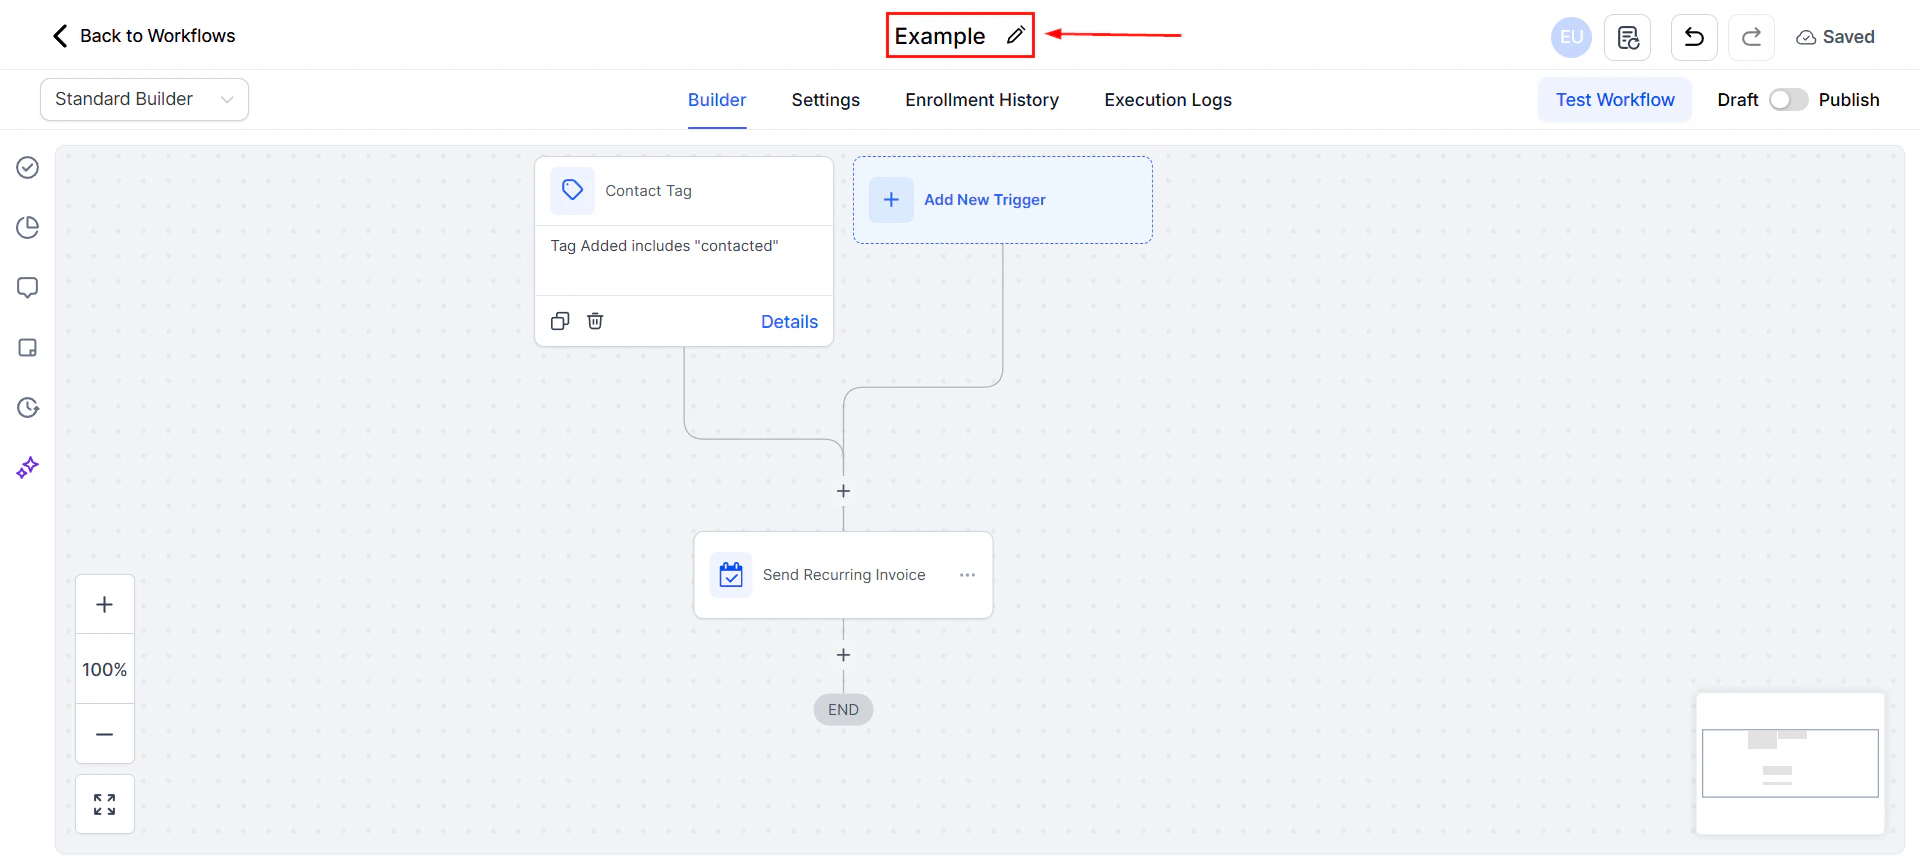
Screenshot
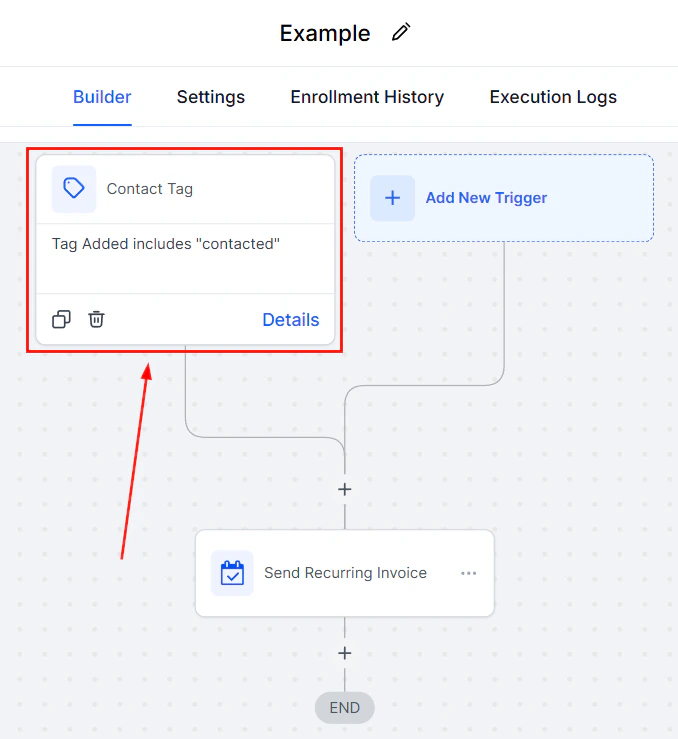
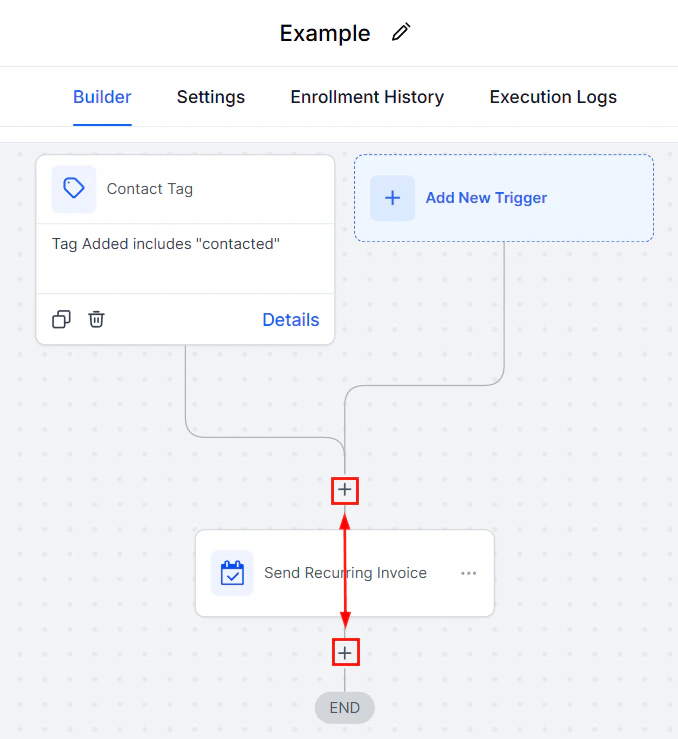
Builder Section
The workflow Builder section allows you to create automated workflows triggered by actions performed that affect your CRM. You can verify you’re in the correct tab by selecting Builder.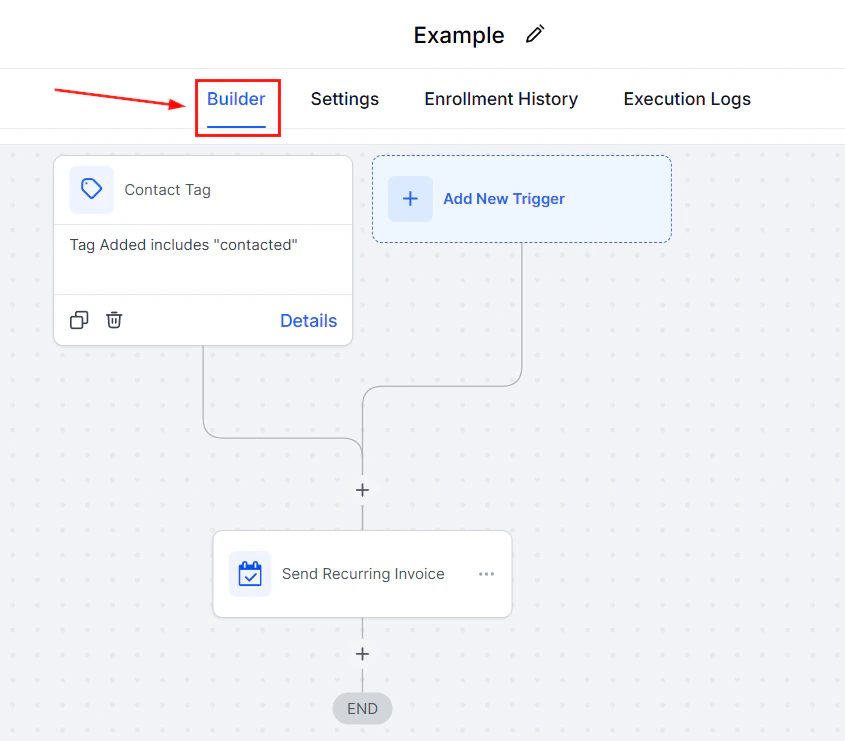
Screenshot
Screenshot
Screenshot
Screenshot
Screenshot
Screenshot
Screenshot
Screenshot
Screenshot
Publishing Options
At the top-right corner of the page, you will find a few options to save, monitor, or change your workflow’s creation process and, once you’re ready, make your workflow active for usage.Test Workflow
Testing ensures your workflow functions as intended before it goes live. To do this, click the “Test Workflow” button, select a contact to test the workflow on, and run the test to simulate how the workflow will operate in a real scenario.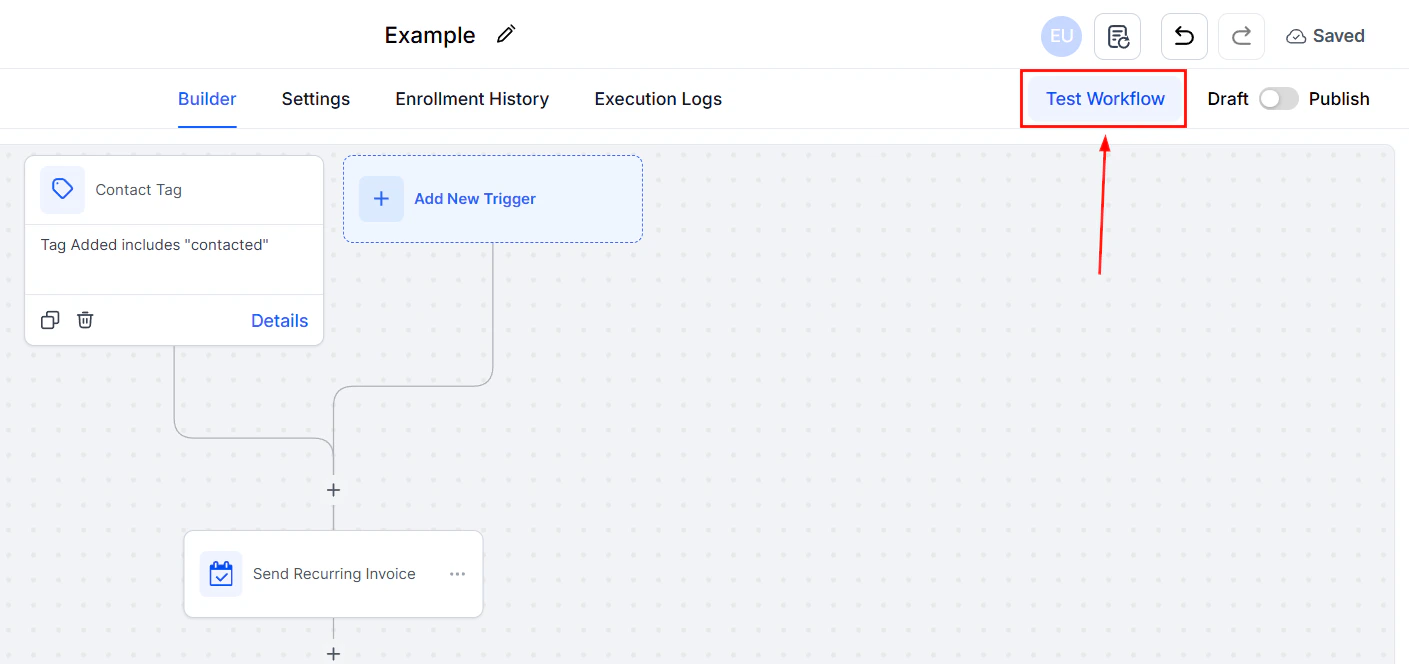
Screenshot
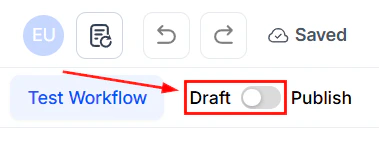
Draft or Publish
Workflows can exist in two states: Draft or Published. “Draft” mode is ideal for creating or editing workflows without activating them, and “Published” mode makes your workflow live and ready to execute tasks. To change this state, use the toggle next to Test Workflow.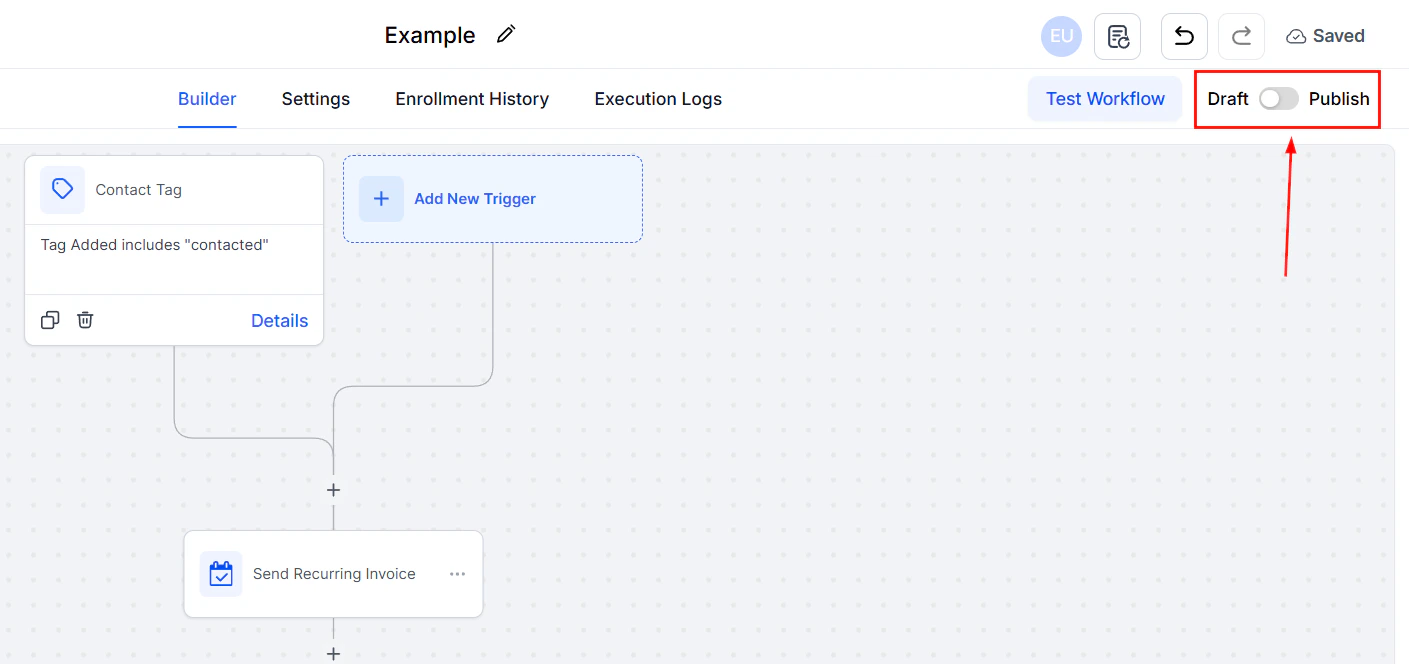
Screenshot
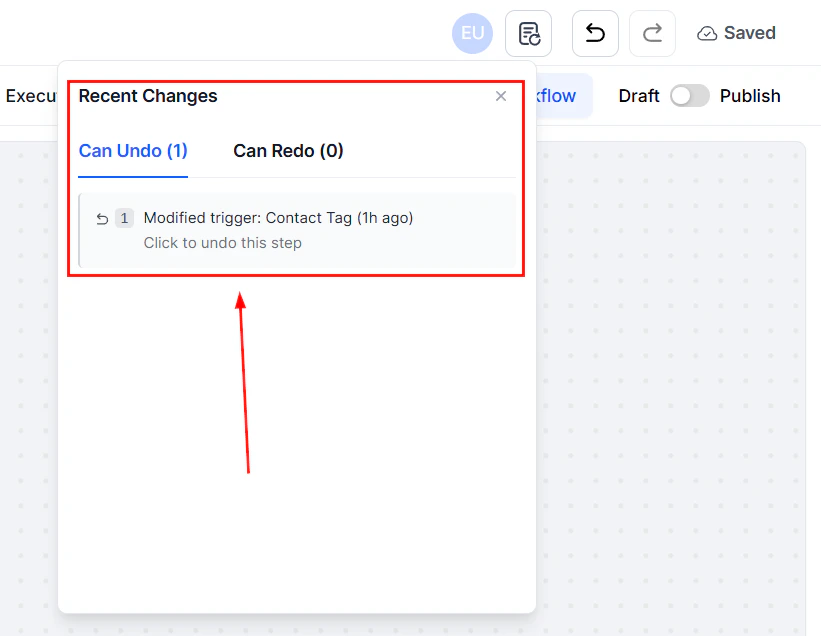
Recent Changes
Every change you make to your workflow is logged and timestamped to ensure an accurate record of updates and help you troubleshoot any issues. To view this log, click the page icon.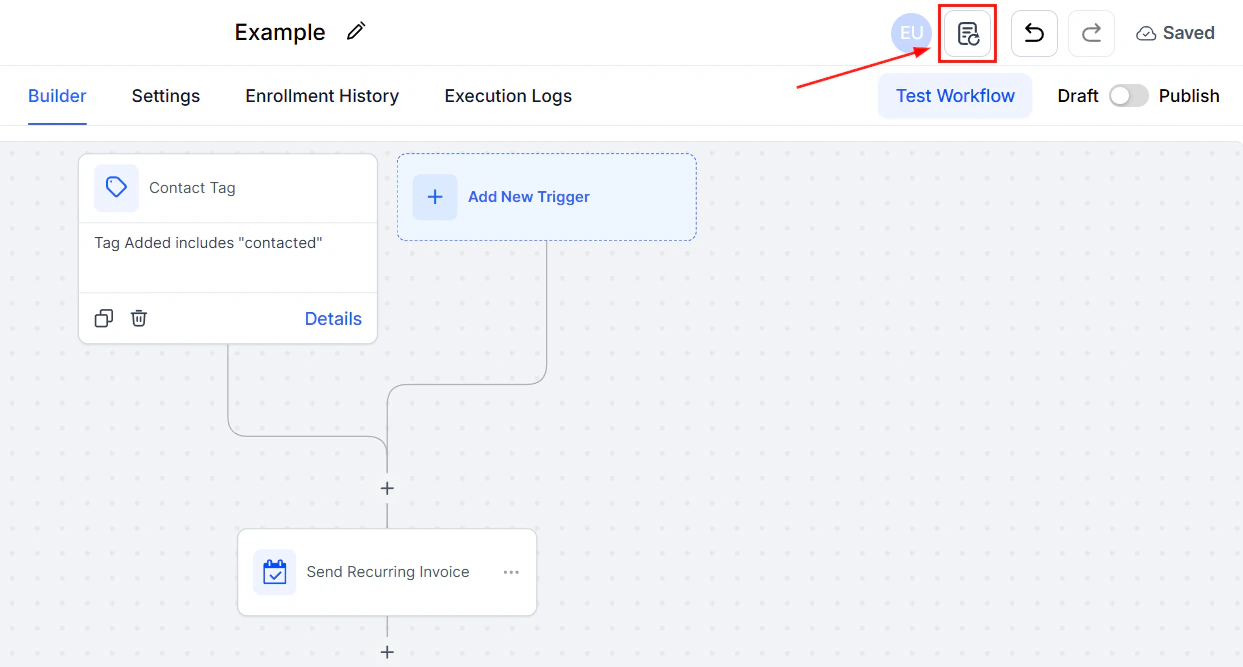
Screenshot
Screenshot

Screenshot
Update and Save
Once you’ve customized the workflow to your needs, click the Save button at the top-right corner of the page. This final step locks in all changes, ensuring your workflow is ready to use.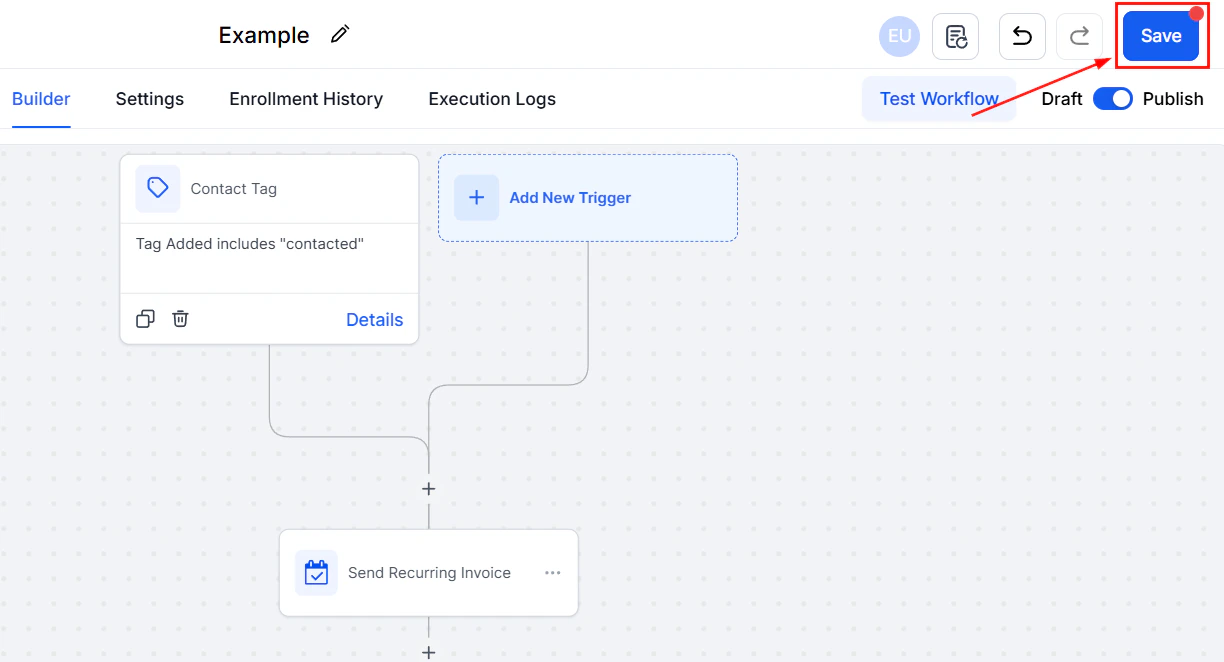
Screenshot
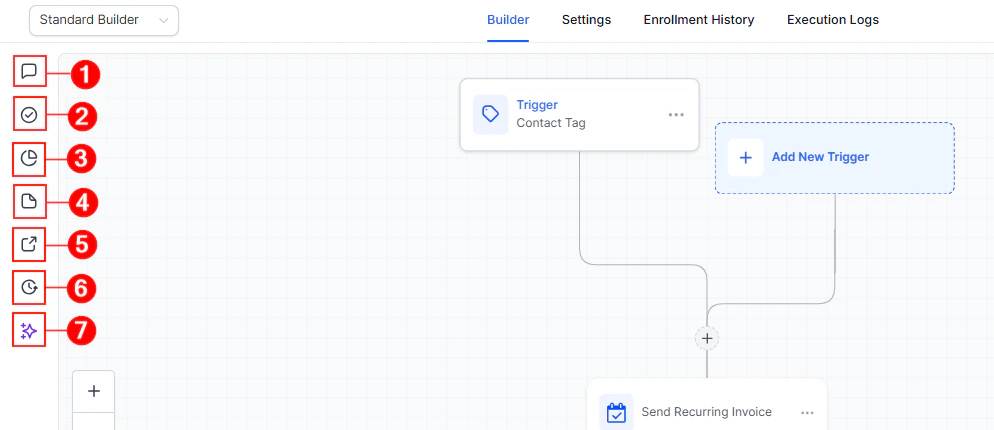
Left-Side Menu
The left side of your workflow builder contains a few quick actions you can perform on your workflow. These actions are:- ****Notes: ****The Notes feature enables you to add quick, contextual information about your workflow. These notes serve as reminders or explanations for specific steps, ensuring clarity when revisiting or sharing workflows with team members.
- ****Troubleshooting: ****Whenever your workflow isn’t performing correctly, you can use this section to check the components for errors and provide solutions.
- ****Stats View: ****After publishing your workflow, use this feature to analyze its performance. View workflow performance stats, including action data from the last 30 days or a custom date range for deeper insights. For a broader date range, click on the specific action to access more in-depth statistics.
- Sticky Notes: Sticky Notes are virtual post-its that you can place directly on the workflow builder. They are used to highlight important points, provide additional context, or outline instructions for specific workflow elements.
- Workflow Switcher: If you ever need to switch or search workflows without leaving your build, use this handy tool.
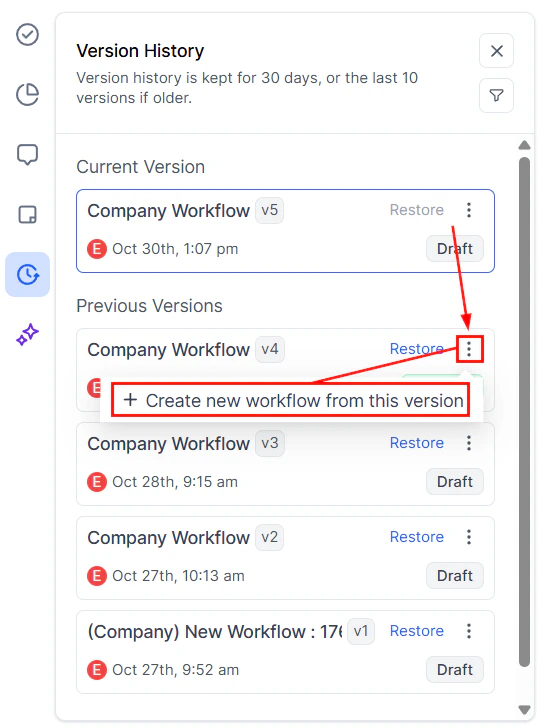
- ****Version History: ****This section allows you to review your previous changes, restore your workflow to an older version, or create a new workflow based on a previous build.
- Workflow AI: Use the Workflow AI to optimize your automation processes further. With intelligent suggestions, Workflow AI can enhance the efficiency and accuracy of your workflows, saving you even more time.
Screenshot
Zoom
Need to focus on a specific part of your workflow? Use the Zoom feature to zoom in or out of the workflow map. This helps you manage complex workflows with ease.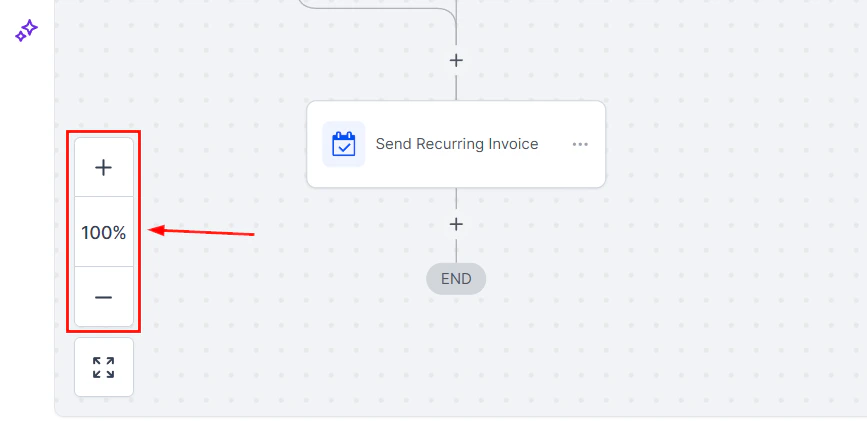
Screenshot
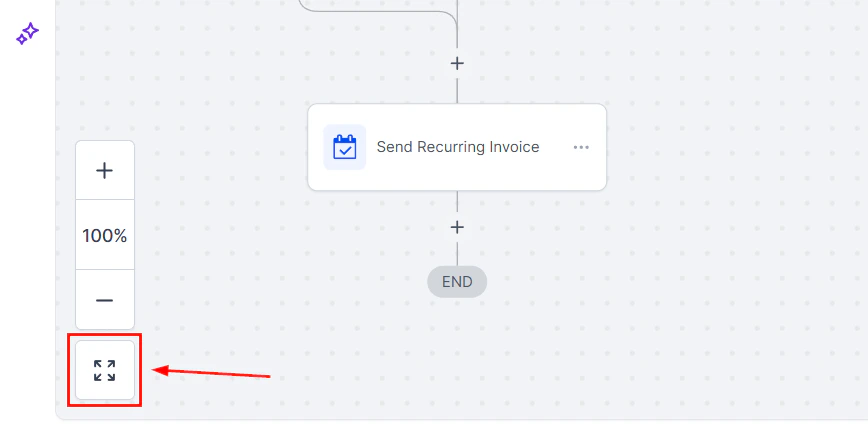
Screenshot
Testing your workflows
Creating workflows in your CRM is essential for streamlining tasks, but how do you ensure they perform as intended before launching them to your entire contact list? Testing is a vital step in the workflow creation process. By simulating live conditions, testing lets you see how your workflows will operate, helping you identify and correct errors before they impact your audience. This guide explains why testing matters and walks you through a straightforward method for conducting accurate workflow tests.Create a Test Contact
To get started, navigate to the**** ‘Contacts’**** section of the CRM, under the Smart Lists tab click on the “+” icon to create a new contact entry for yourself, including any relevant details that your workflow will utilize (e.g., name, phone number).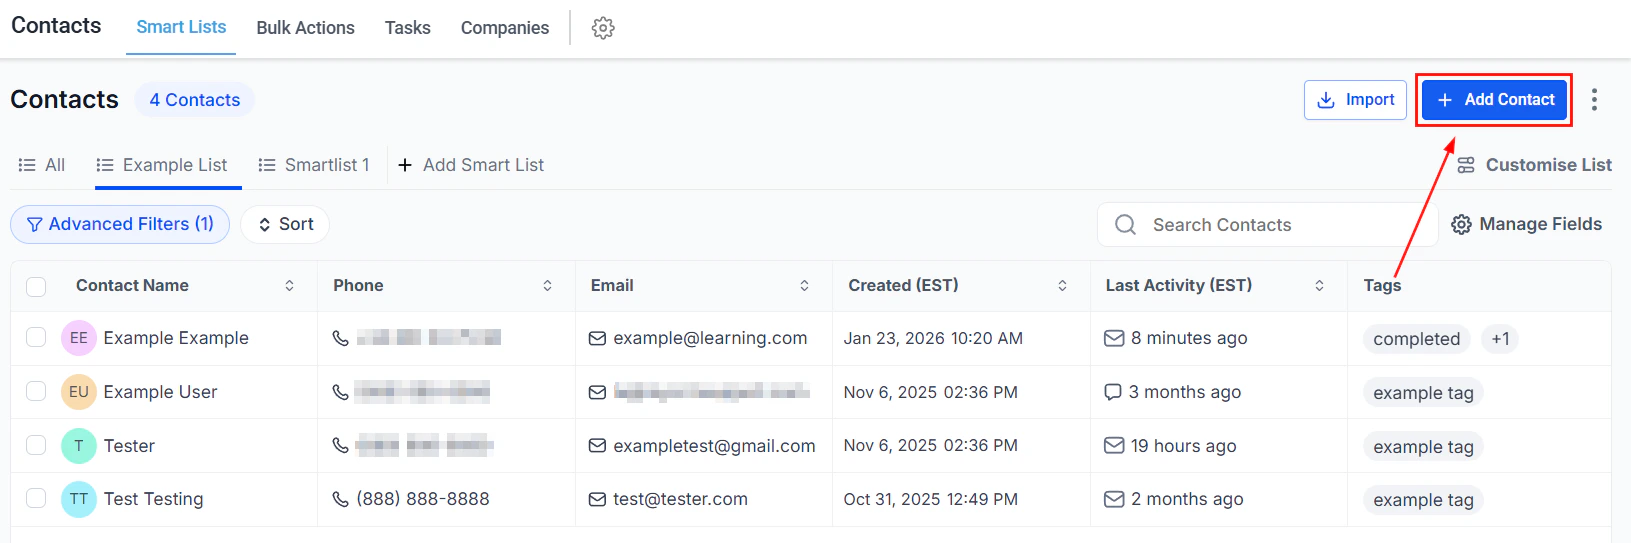
Screenshot
Add Your Test Contact To a Workflow
In the newly created contact, scroll to the “Active workflows” section within your test contact’s profile, click ‘Add’, and select the workflow you wish to test from the dropdown menu. You can either start the workflow immediately by leaving the start time blank or schedule it for a later time by selecting a specific start time. Click**** ‘Add’ ****to officially enroll your test contact into the workflow.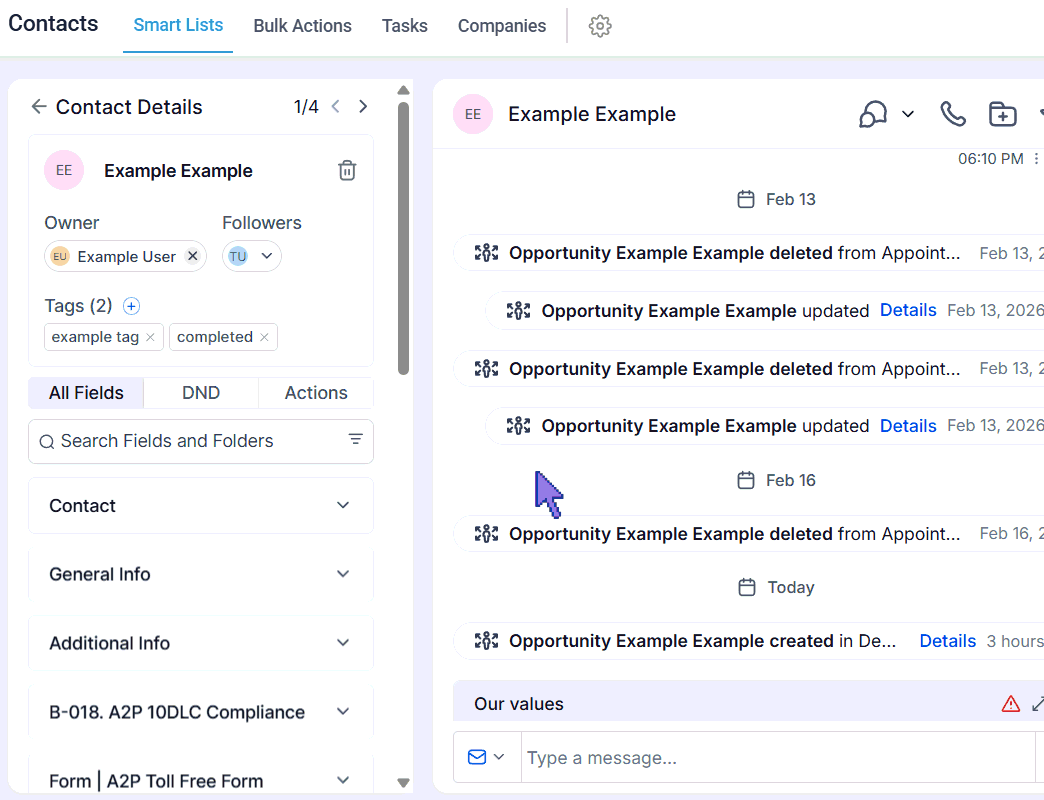
Screenshot
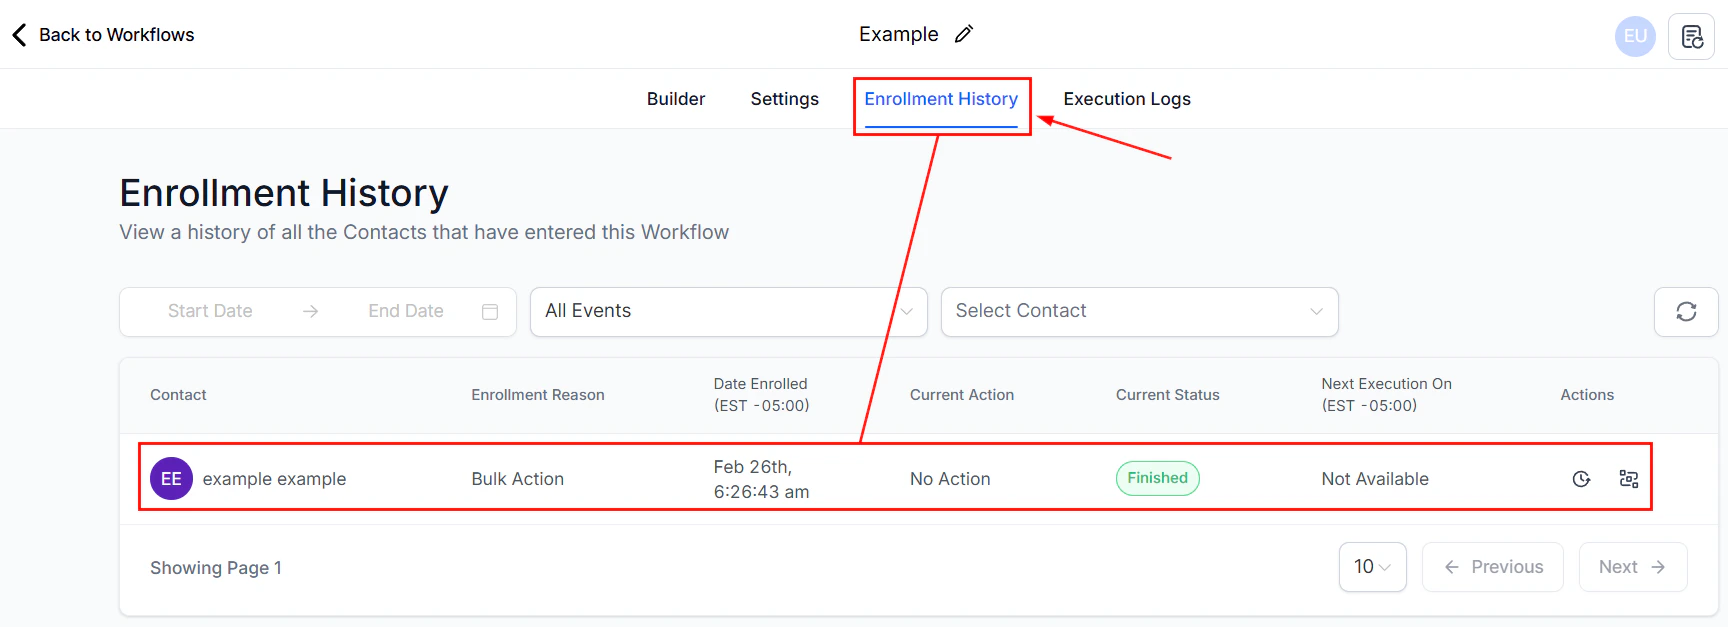
Evaluate The Workflow
Within the workflow you’re testing pay close attention to, personalized Data by checking whether names, dates, or other custom fields populate correctly, as well as Triggers and Actions, by confirming all automated steps occur as expected. This hands-on approach helps you identify and fix potential issues before your workflow goes live.Screenshot
Screenshot
Troubleshooting and FAQs
- Personalized Data Not Populating: Double-check that the test contact’s profile includes all required details for personalization.
- Workflow Not Activating: Ensure the workflow is set to active. The system will prompt you to activate it during testing if it’s inactive.
FAQs
Can I test a workflow without creating a test contact?
Can I test a workflow without creating a test contact?
How do I know if my workflow triggers are working?
How do I know if my workflow triggers are working?
Race conditions
Race conditions occur when two servers attempt to update the status of a contact at nearly the same time. Race conditions commonly occur due to several factors, including multiple triggers being set for the same action, actions being executed simultaneously for a contact, or similar timing of executions within automation for the same contact. These scenarios can cause conflicts or unpredictable behavior in workflows, as the system may attempt to process overlapping actions at the same time, leading to unintended outcomes. Examples:- Utilizing both the Appointment Status and Customer Booked Appointment triggers for identical functions can create conflicts.
- Simultaneous firing of opportunity changes and appointment triggers within the same workflow.
- Adding a contact tag at the same time across multiple workflows.
Identifying Race Conditions
To determine if you’re experiencing a race condition, investigate the workflow execution history/status and timing. Look for:- Duplicate messages.
- Workflow history indicating a different trigger than intended.
- Tags are being added without reflecting in the contact.
- Unexpected behavior due to similar timing in triggers.
Preventing Race Conditions
Implementing the following strategies can help prevent race conditions:Add a Wait Step
Insert a 2-minute wait step before actions that might be affected by race conditions. This allows the system to process actions correctly.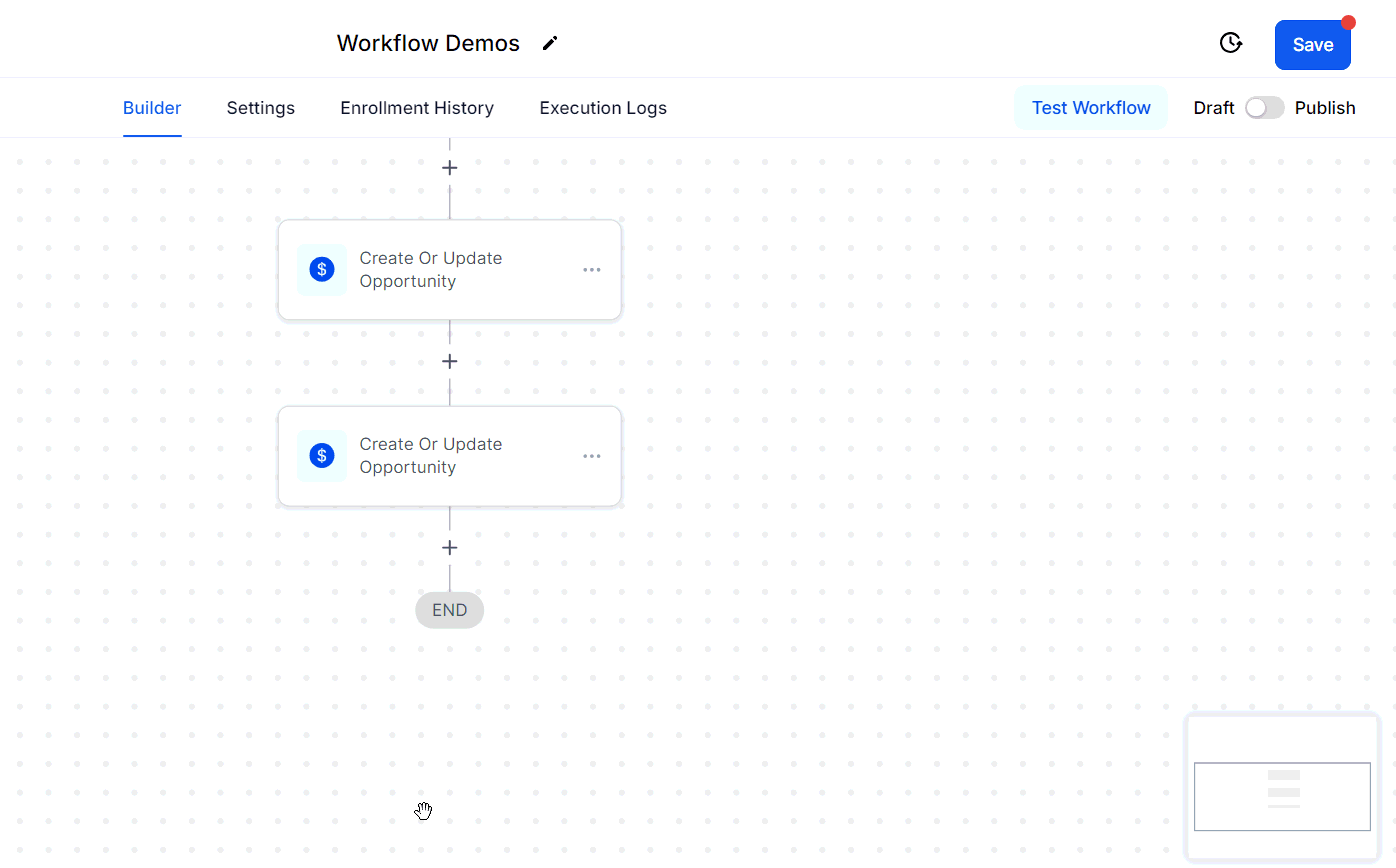
Screenshot
Use Distinct Triggers
Avoid using the same or similar triggers for the same actions across workflows.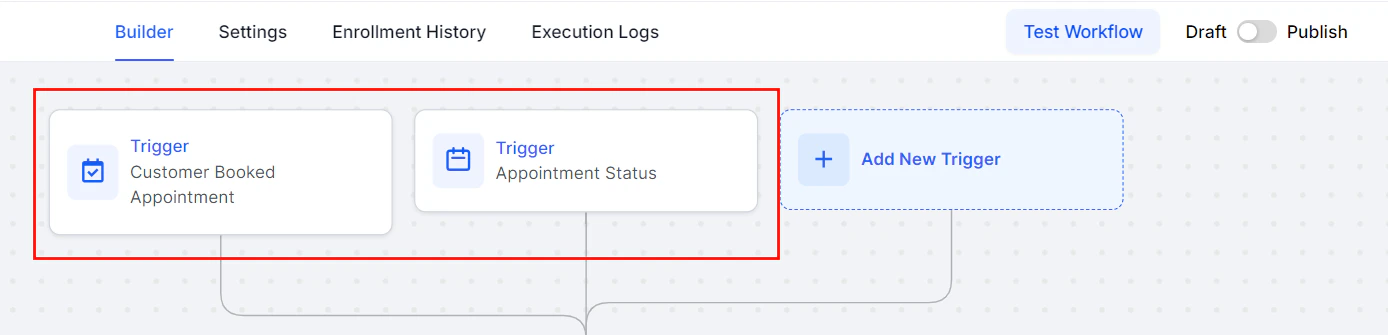
Screenshot
Be Specific with Filters
Tailor your filters to the specific actions a lead might take, reducing the chance of simultaneous trigger firing.Pass Input Trigger Parameters
When adding a contact to another workflow, use the “Pass Input Trigger Parameters” option with the “Add To Workflow” action to ensure data is passed correctly.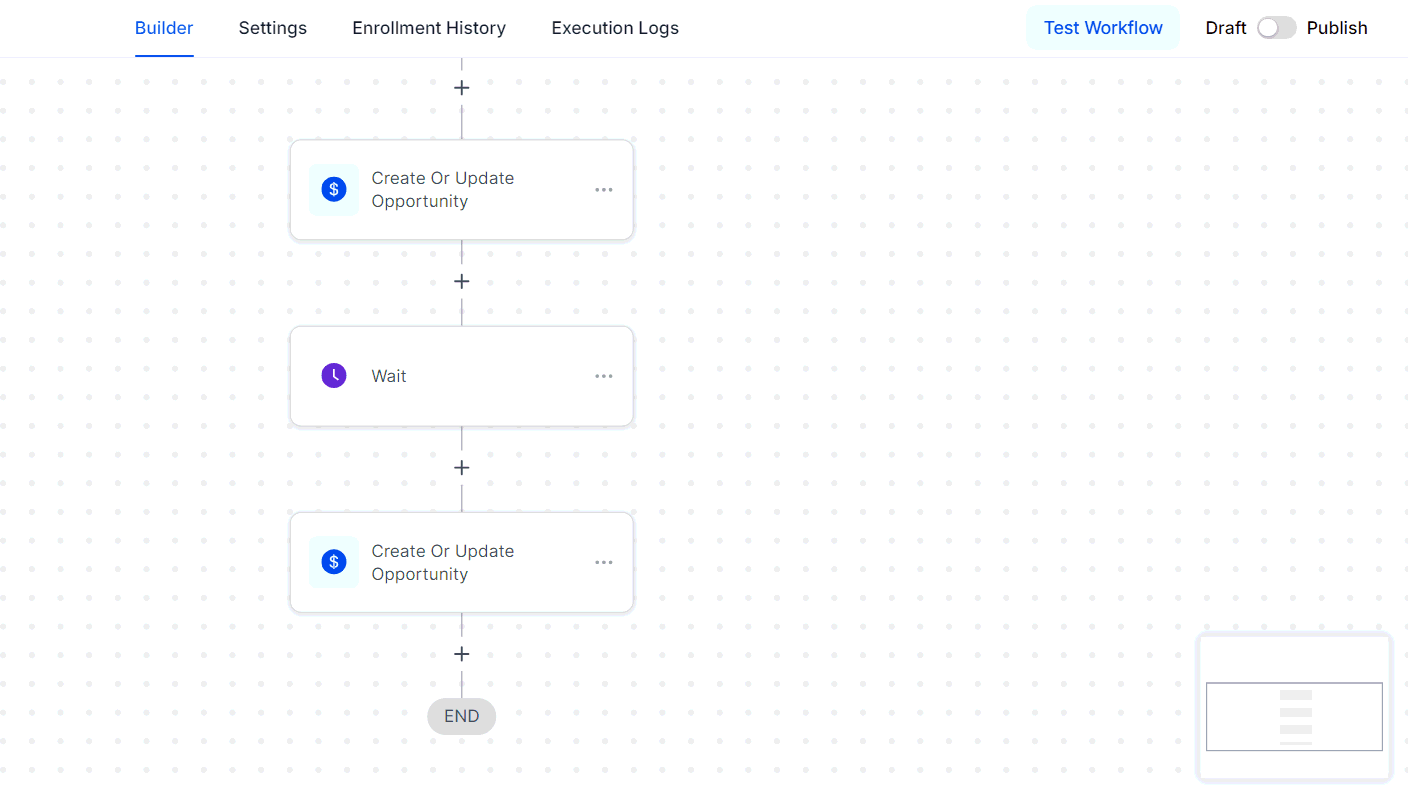
Screenshot
Troubleshooting Tips and Best Practices
If you encounter unexpected behavior, follow these troubleshooting steps:- Check Enrollment History and Execution Logs: This can provide insights into timing and trigger issues.
- Investigate Multiple Workflows: Look for workflows that may fire at the same time due to customer actions.
- Use Unique Trigger-to-Action Implementations: Avoid using multiple workflows for the same actions.
Loop lockouts
In certain workflow scenarios, there exists a risk of inadvertently creating a loop, where two processes continuously trigger each other or a single process repeatedly triggers itself. These loops can lead to performance issues and significant complications. To mitigate this risk, we have implemented a solution known as the Loop Lock feature.How Loop Lock Works
Loop Lock is built to detect and halt unintended loops within Workflows. It automatically activates if five contacts are added to the blacklist within a specified time frame. Contacts are added to this list if they repeatedly enter a workflow within a short period and will remain on the list for a set period. For example, Loop Lock will trigger if a contact is added to a Workflow 50 times in under 30 minutes. Should you encounter this error, rest assured that our Support team is ready to assist. Simply reach out to us, and we will promptly investigate your Workflow to identify and resolve the loop. While loops can disrupt processes, Loop Lock ensures the stability of your workflows. For more advanced insights, we recommend reviewing our article on Understanding and Preventing Race Conditions in Workflows.FAQs
Can I adjust the Loop Lock settings?
Can I adjust the Loop Lock settings?
Troubleshooting Tips
Review Your Workflow Settings- Examine your workflow triggers and actions to ensure that processes are not set up to repeatedly loop contacts.
- Ensure that conditions within the workflow prevent repetitive entries for the same contact, such as time delays or unique triggers.
- If you experience performance issues or receive a Loop Lock error, review the workflow logs to identify the contact or action causing the loop.
Restoring deleted workflows
The Importance of Workflow Restoration
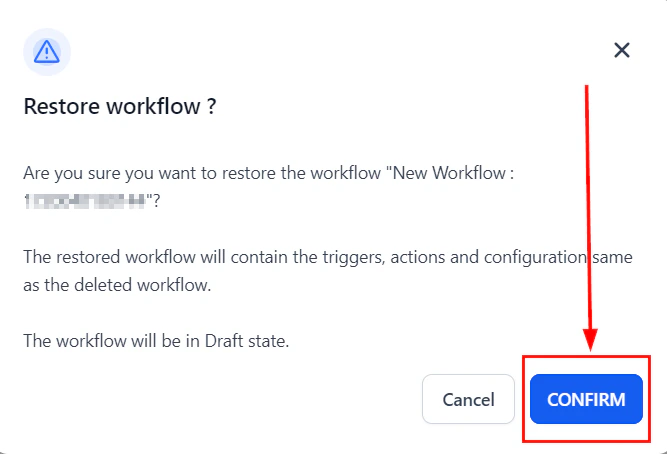
Restoring workflows is crucial for maintaining operational continuity and flexibility. This capability ensures that users can recover critical workflows that may have been accidentally deleted or removed, allowing them to swiftly resume their processes without having to recreate them from scratch. By preserving the integrity of historical data and workflow configurations, this feature minimizes disruptions and enhances overall efficiency in workflow management. 📌Note: The following information will be preserved upon restoration:- Contact information in enrollment history and execution logs.
- Any contacts in wait steps will be removed.
- The workflow will retain its original triggers and actions with the same configuration.
- Contacts present in the workflow at the time of deletion will not be restored.
Permissions
This feature is available exclusively to account administrators.How to Restore Deleted Workflows
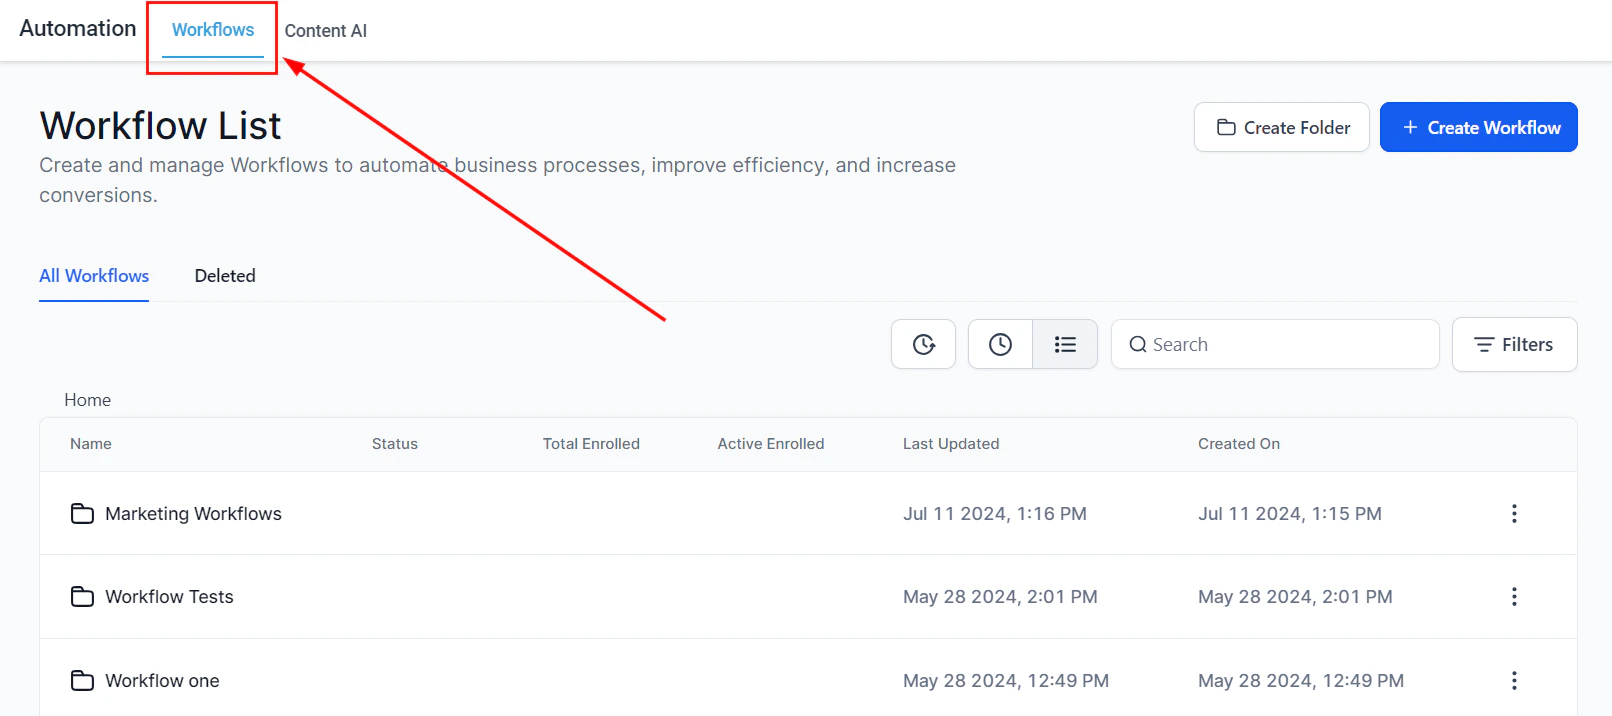
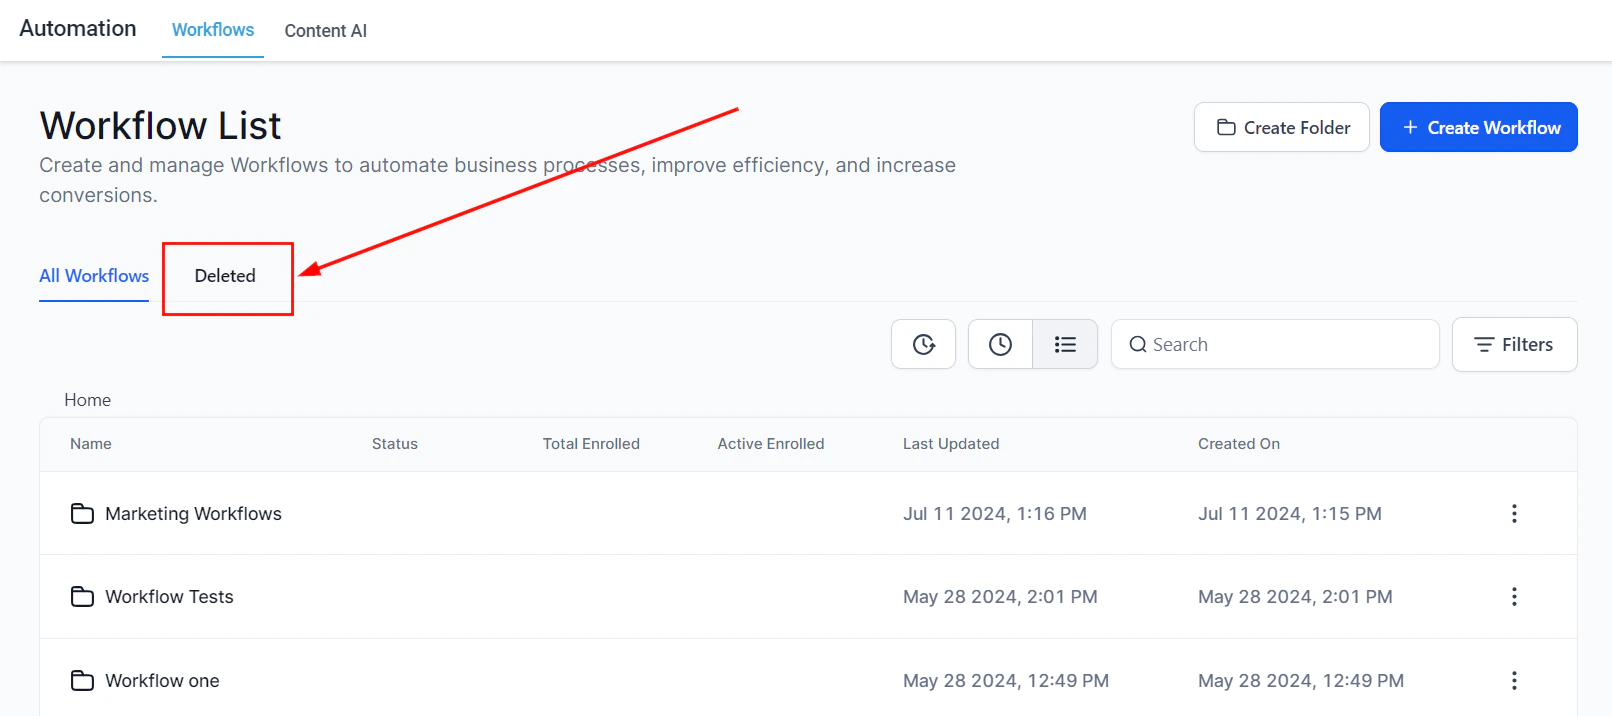
- Navigate to the Workflow List Page from your Account Dashboard.
Image
- Access the Deleted Tab by selecting the “Deleted” button. Workflows deleted in the last 30 days will be listed in this tab.
Image
- Review the list of deleted workflows to identify the one you wish to restore.
Image

Image
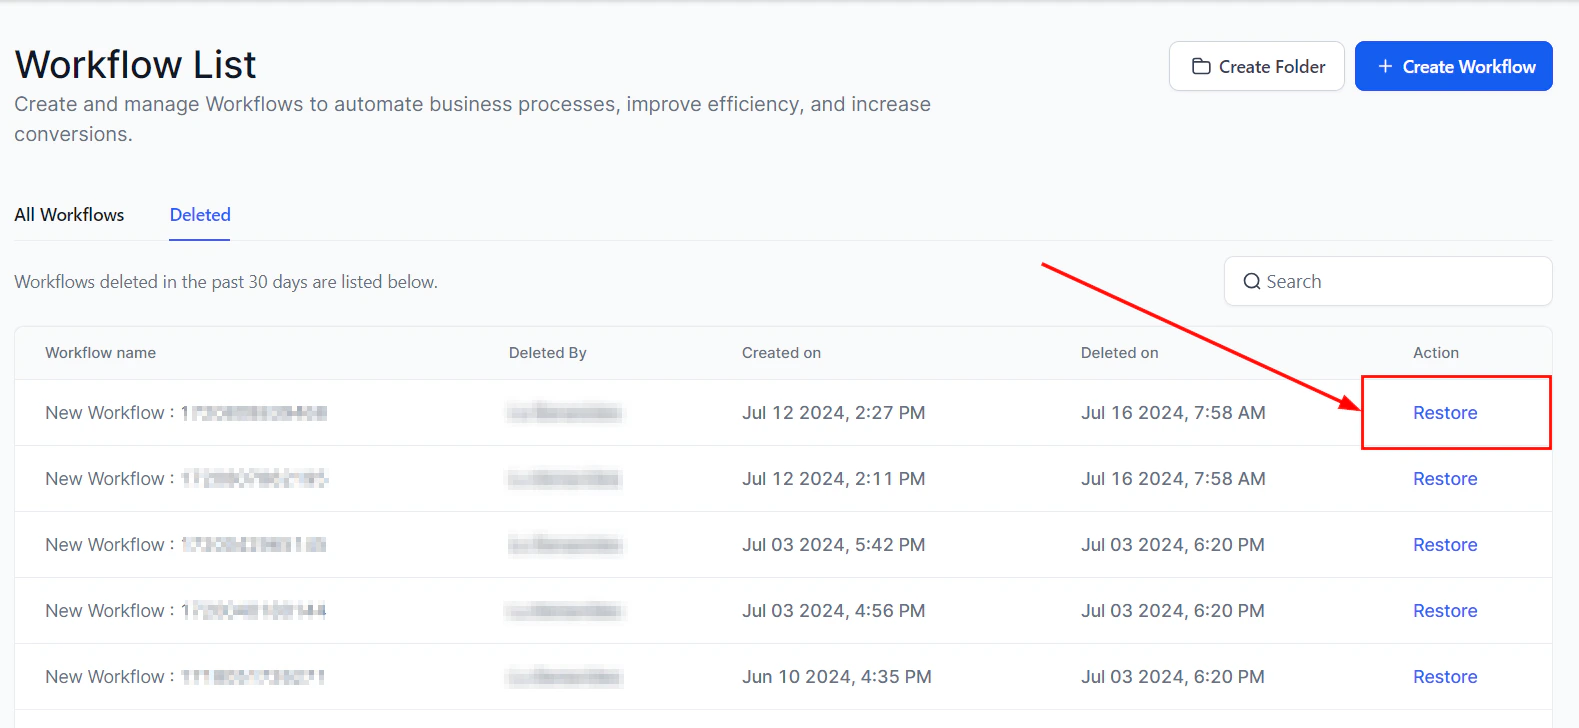
- Once you have identified the workflow, click the “Restore” button corresponding with the workflow, then confirm the action.
Image
Image
FAQs
How long will the deleted workflows be present in the Deleted tab?
How long will the deleted workflows be present in the Deleted tab?
Can I delete the workflow I just restored?
Can I delete the workflow I just restored?
Will my workflow be in a published state after restoring?
Will my workflow be in a published state after restoring?
Troubleshooting Tips
Issue: Restoring a workflow fails- Verify that the workflow is listed in the “Deleted” tab and ensure that you have the necessary admin permissions. If the issue persists, try refreshing the page or contact support.
- Check if the workflow is listed under the “Draft” category. If not, ensure that the restoration process was completed successfully.
Version history
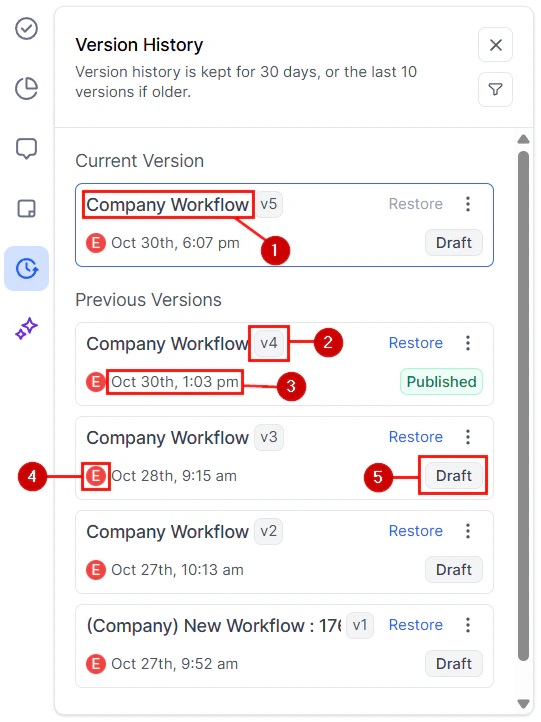
Building and improving your workflows means adding, removing, and changing triggers, actions, and filters. However, this can mean correcting mistakes or reviewing changes. To make this easy, you can access the version history to view detailed version logs with timestamps, editors, and workflow status.Accessing The Version History
Navigate to the Workflow tab inside the Automation section and access the workflow you want to review.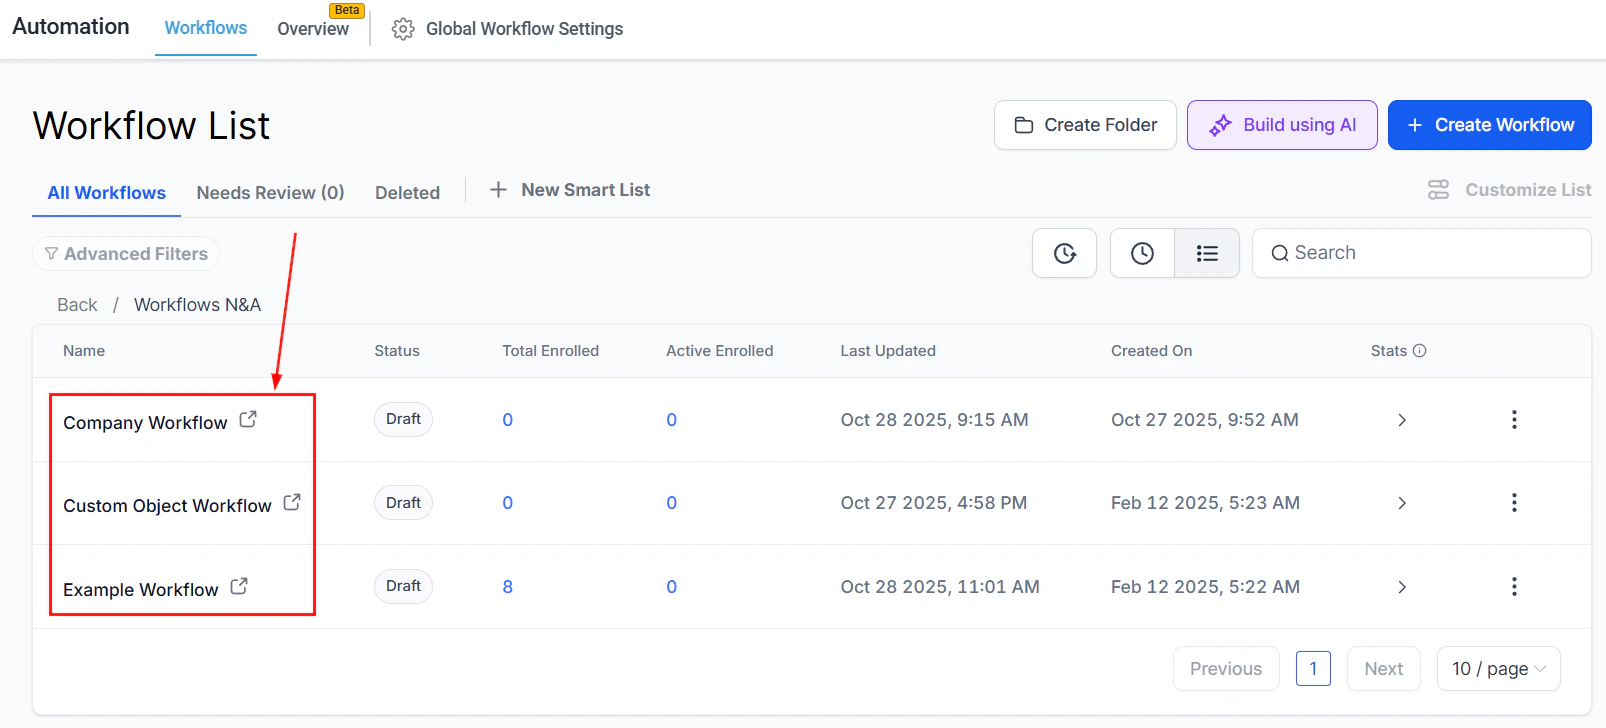
Screenshot

Screenshot
- Workflow name
- Version number (e.g., v12, v13, v14)
- Timestamp
- Editor name
- Status (e.g., Draft, Published)
Screenshot
Screenshot
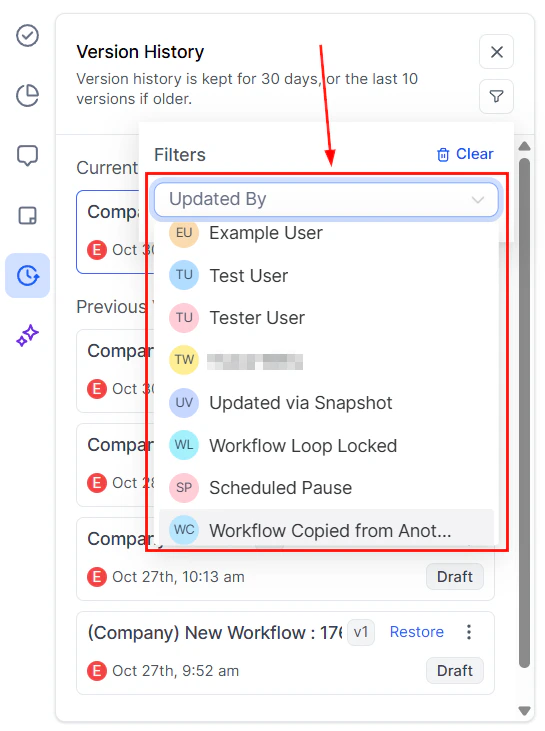
Filtering Results
To find specific results, click the funnel icon.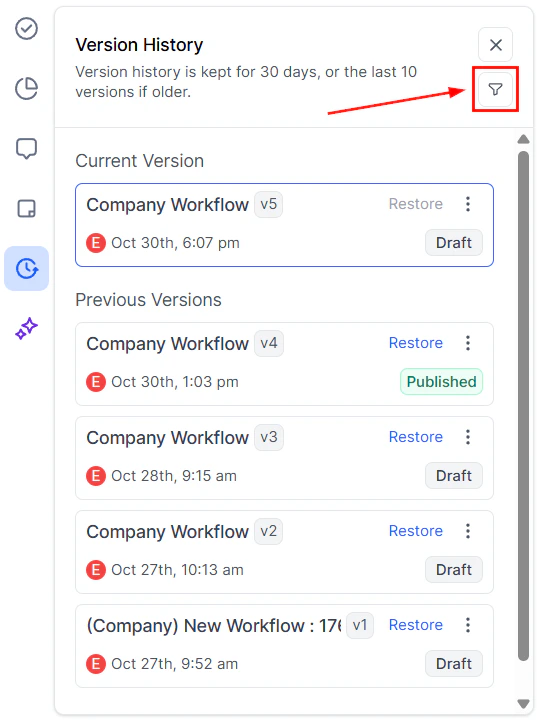
Screenshot
Screenshot
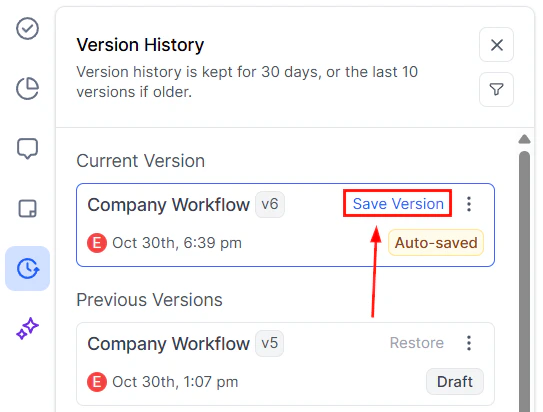
Restoring A Version
If you’ve made changes to your workflow and want to undo them by going back to a previous version, you can do so by clicking the Restore option next to your desired version.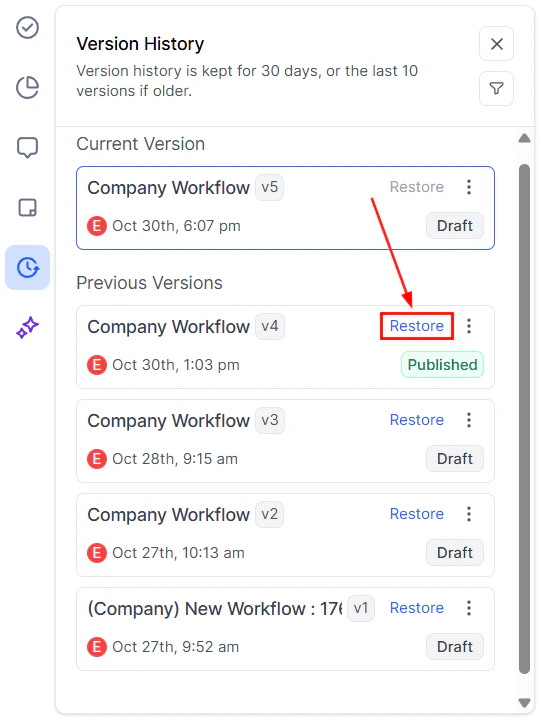
Screenshot
Screenshot
Screenshot
Smart lists
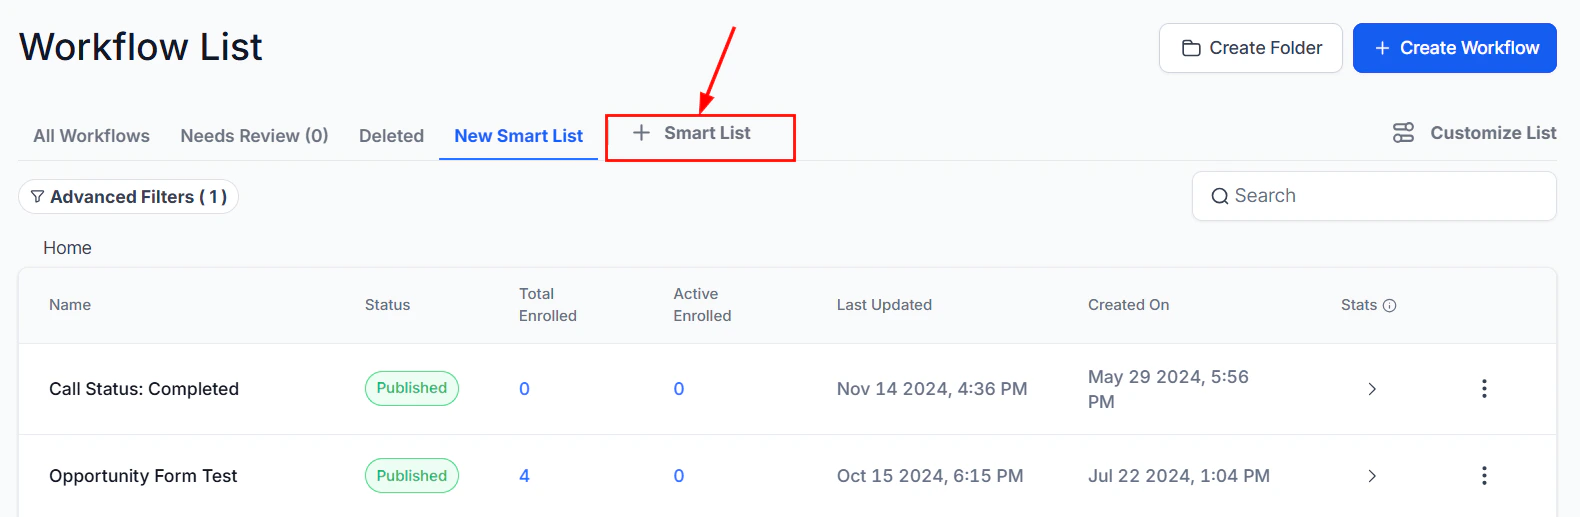
** Efficient workflow management is essential for optimizing business processes. The Smart List feature in Workflows helps you organize your workflows based on specific criteria. By filtering workflows using multiple parameters and saving the results as custom views, these features make it easier to access and manage your workflows with precision.How to Create Smart Lists
Applying Filters
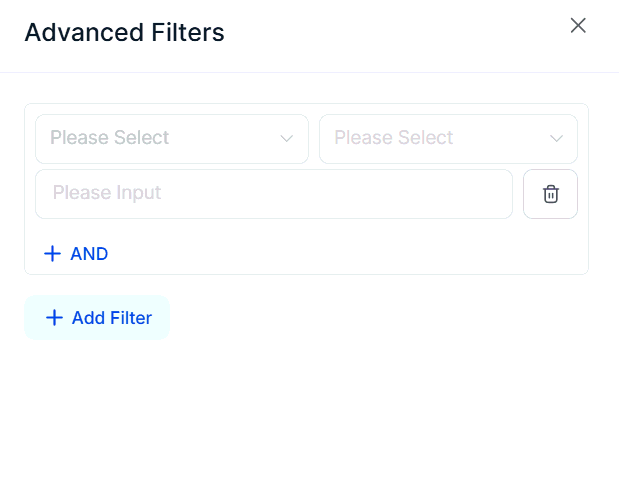
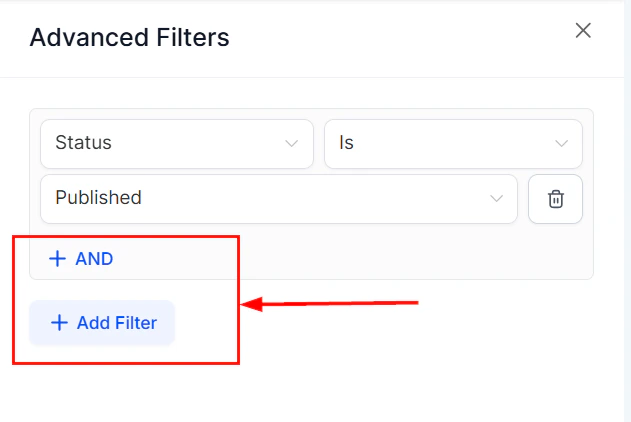
To filter workflows using multiple criteria, follow these steps: Navigate to the Automations tab to view your list of workflows then click on “Advanced Filters” to begin applying filters.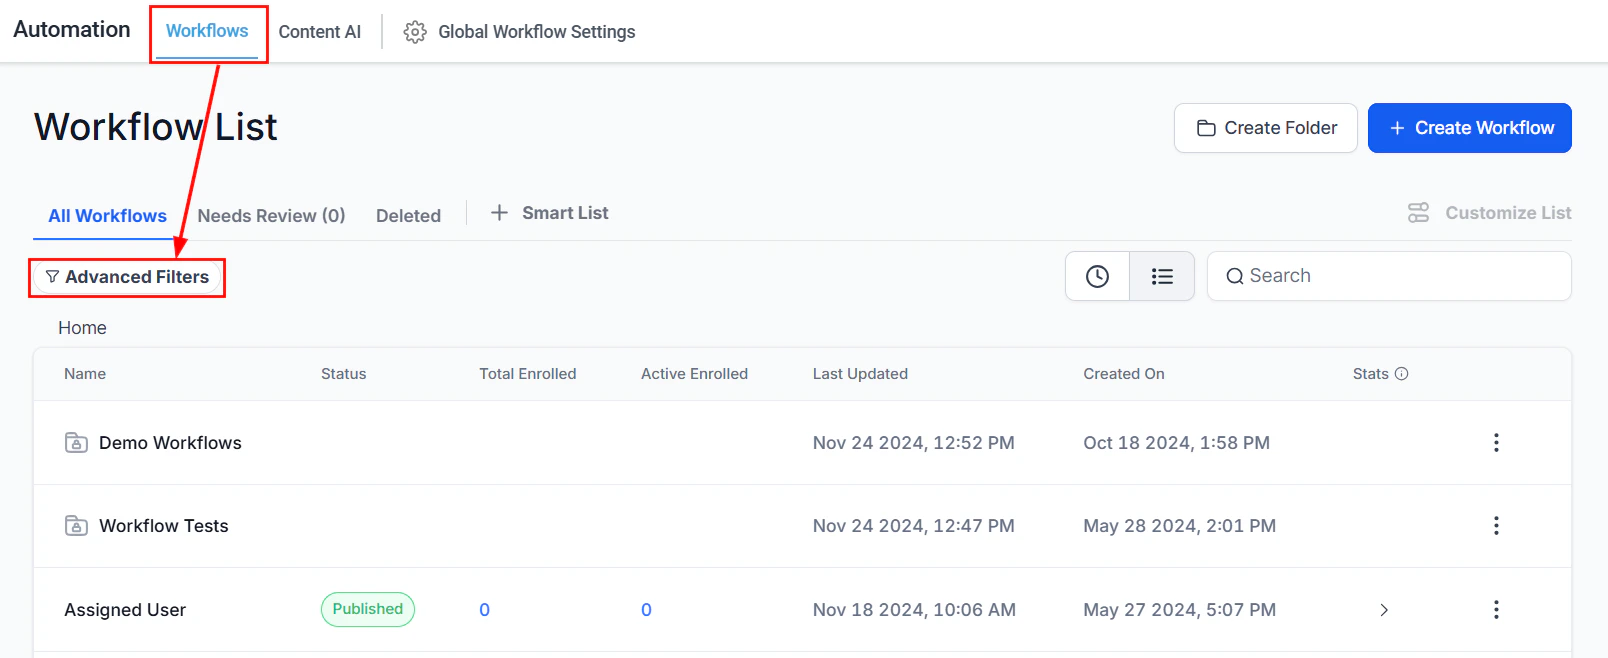
Screenshot
Screenshot
Screenshot
Screenshot
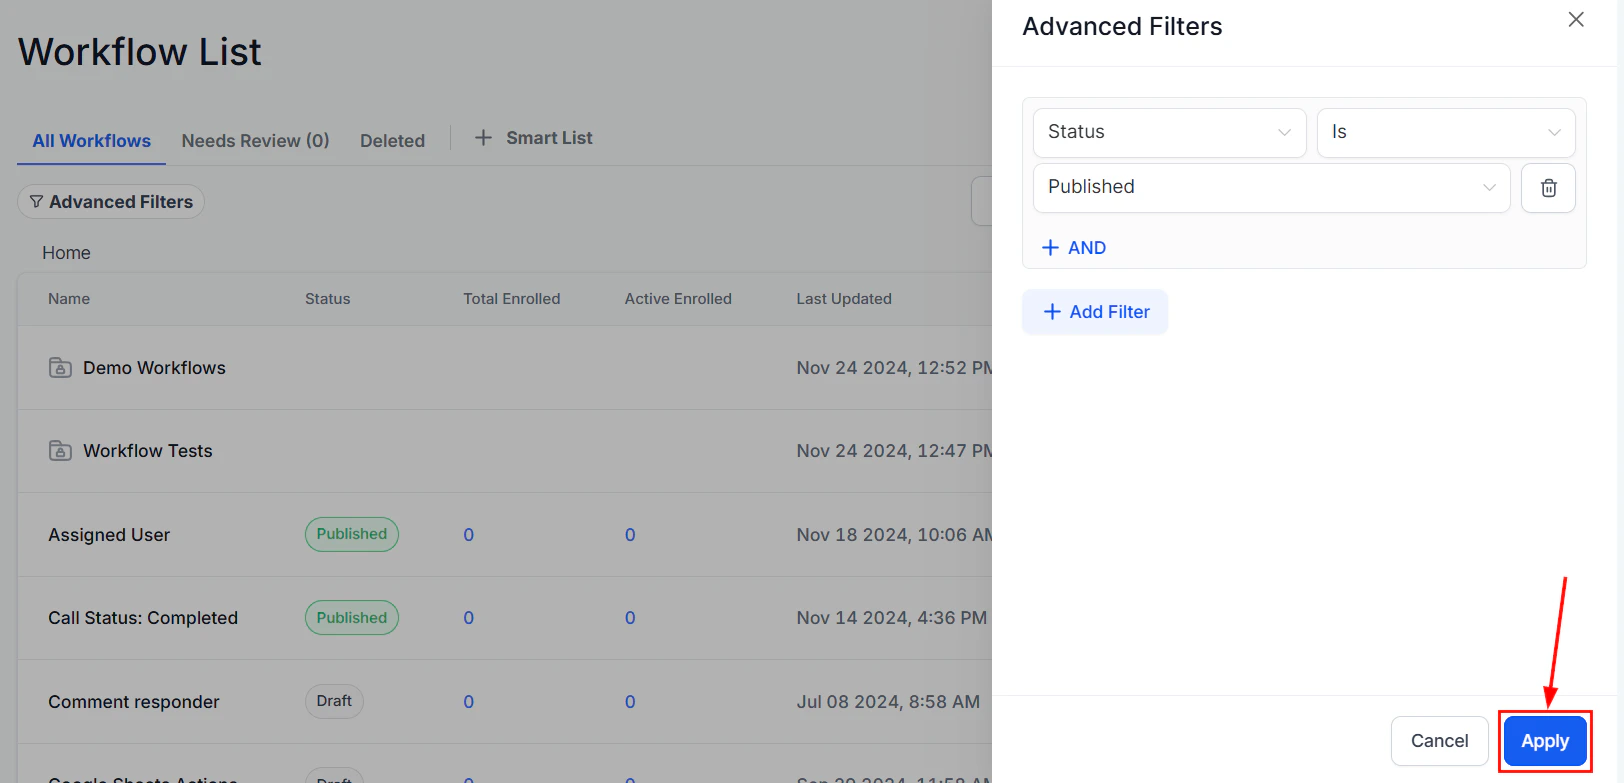
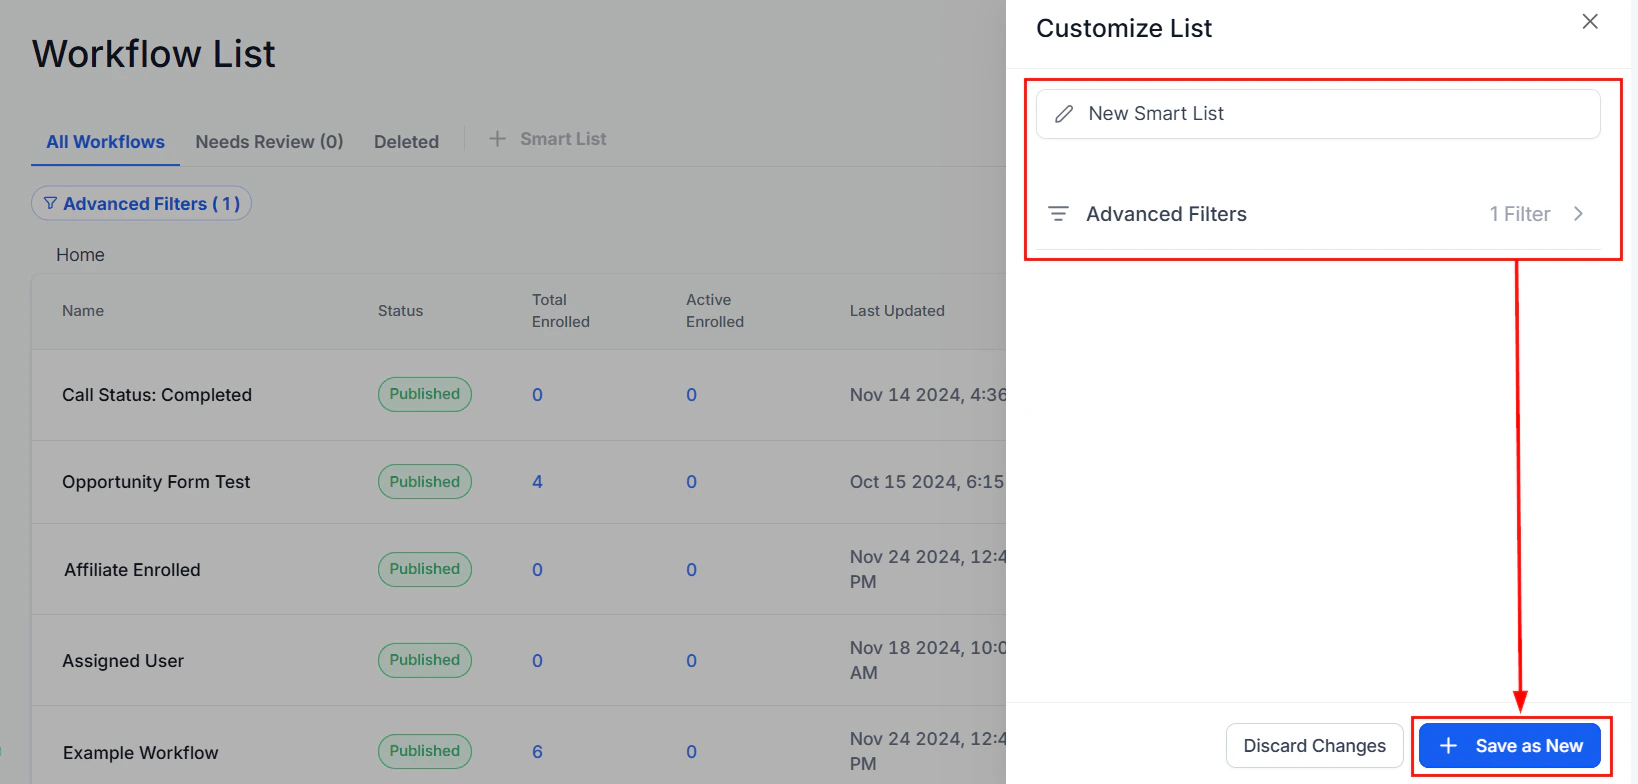
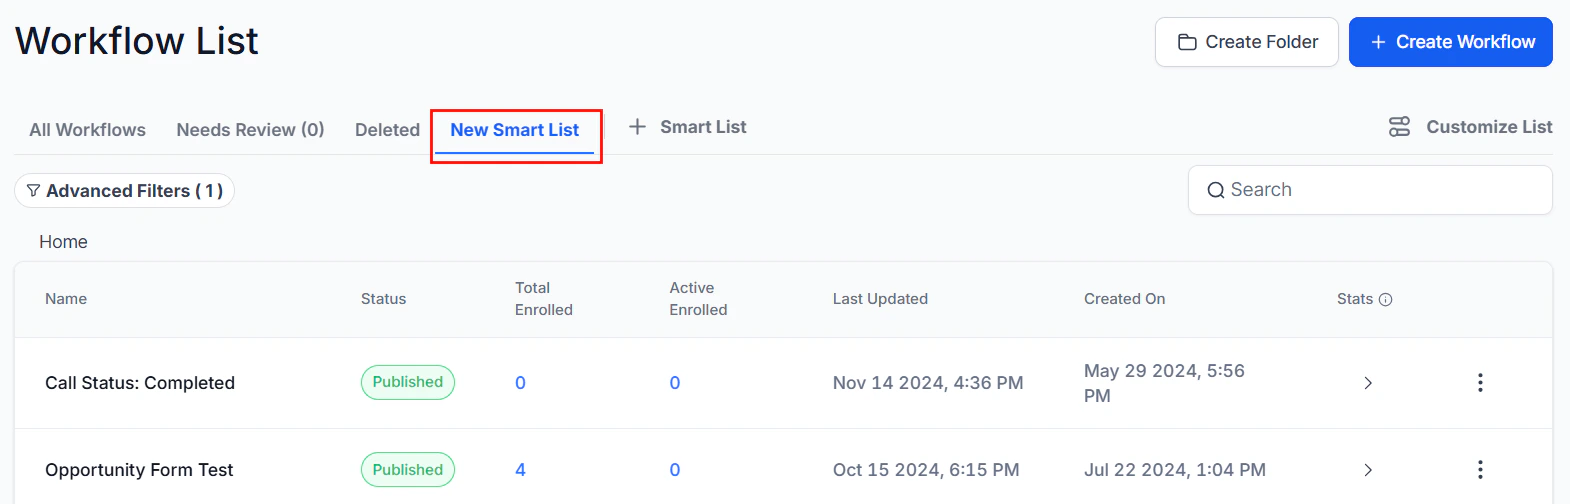
Saving Your Smart List
Once filters are applied, the “Save” button will appear, indicating unsaved changes. Click “Save” and select “Save as New Smart List” to create a new list, or choose “Discard Changes” to reset the filters.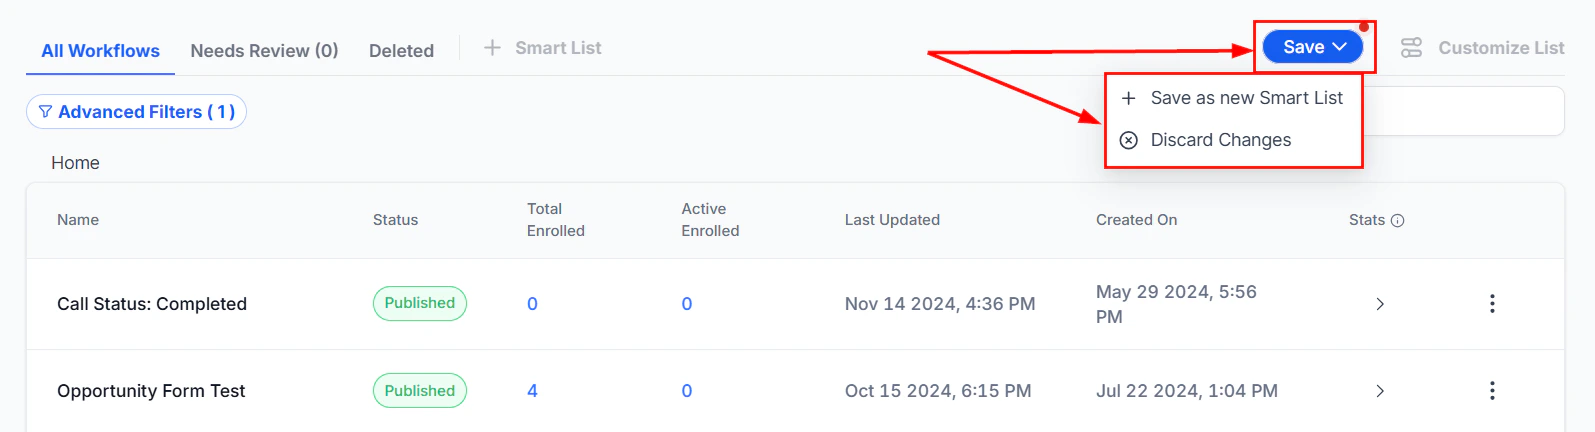
Screenshot
Screenshot
Screenshot
Screenshot
Deleting Smart Lists
To delete a Smart List, click “Customize List” in the upper right-hand corner and select “Delete”. In the confirmation window, confirm your choice to permanently remove the Smart List. Please note that Smart Lists can be recreated if necessary.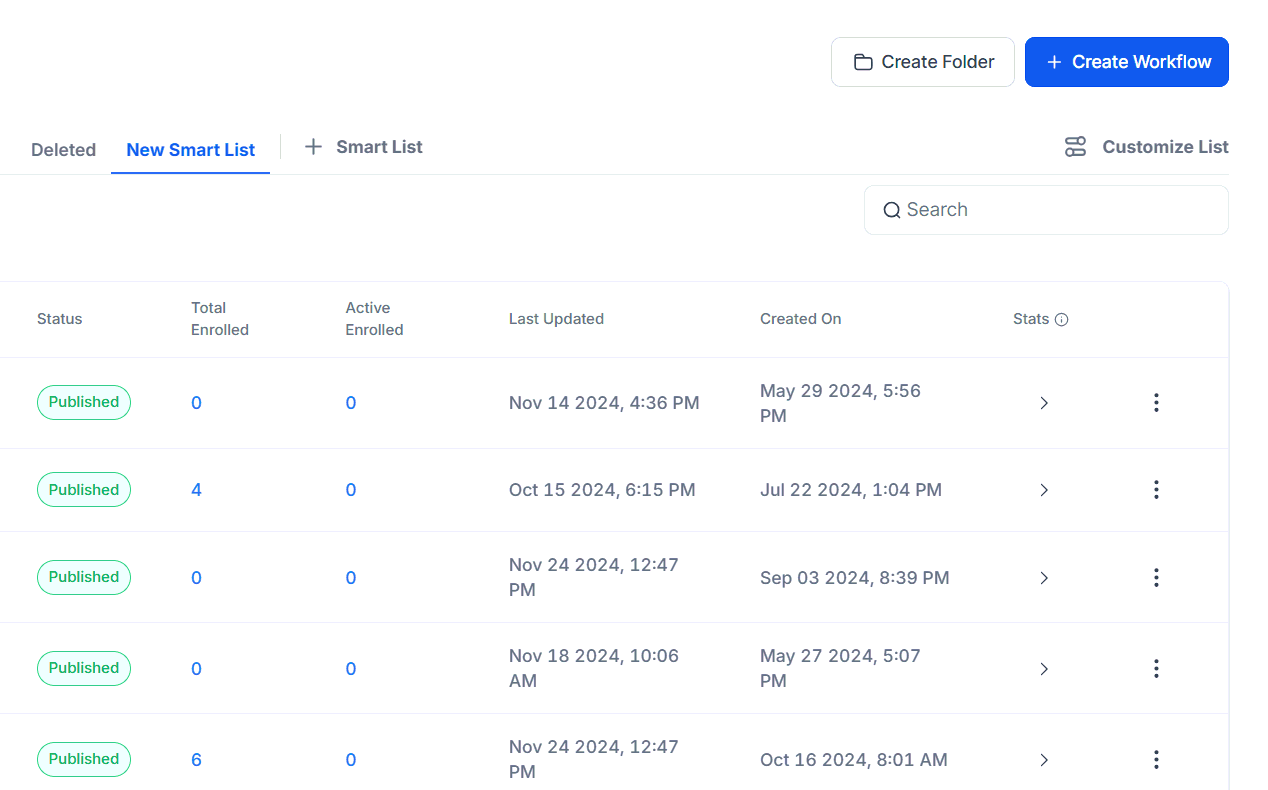
Screenshot
Practical Examples and Use Cases
- Filter Workflows by Action:** View all workflows using the “Email” action.
- Tag-Based Smart Lists: Create a Smart List of workflows using specific tags.
- ****Trigger-Based Smart Lists: ****Create a Smart List of workflows that use the “Customer Replied” trigger.
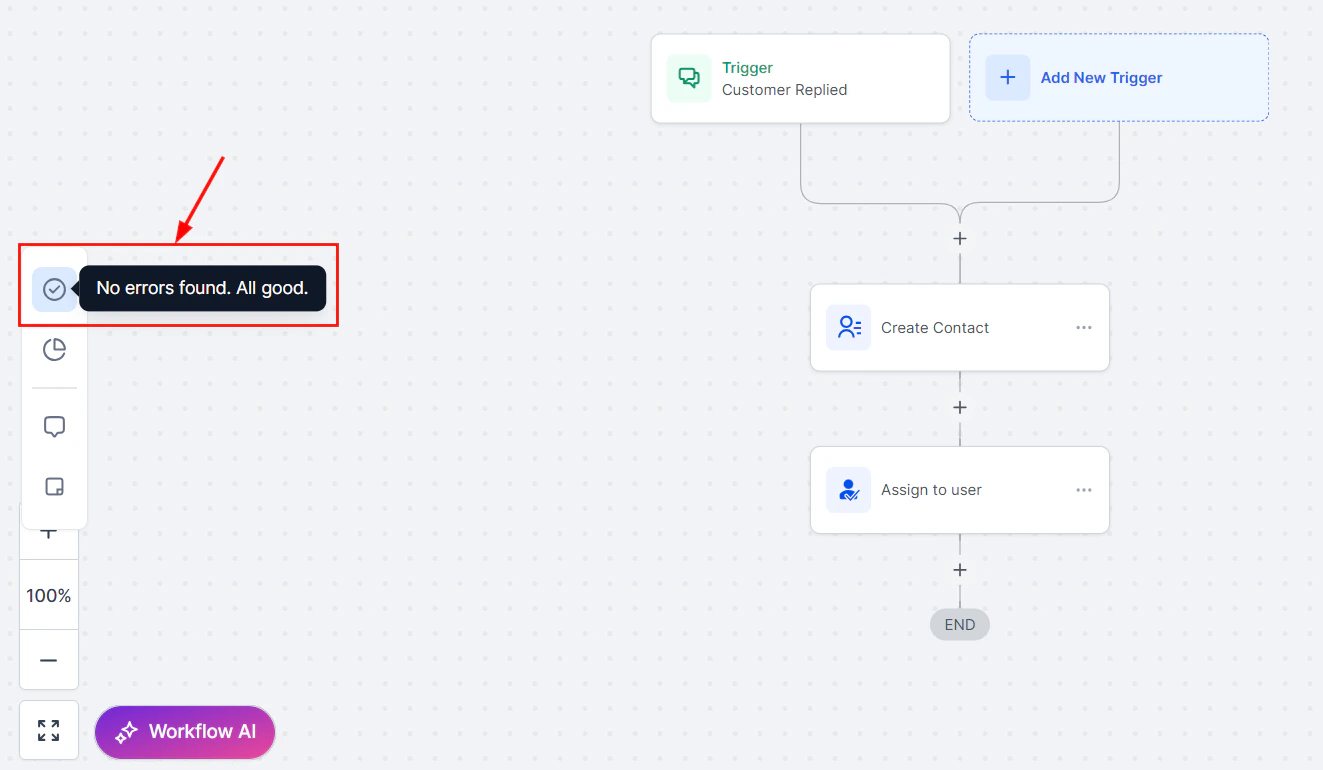
Checking for errors
The Error Highlight and Error Resolution using AI feature is designed to streamline your workflow management by quickly identifying, understanding, and resolving errors. Leveraging advanced AI capabilities, this feature provides visual cues, actionable insights, and clear troubleshooting guidance, all available directly from the Error Tab in the side panel. It ensures that your workflows remain efficient and error-free, enhancing overall productivity.Why This Feature Matters
- Improves Workflow Reliability: Swiftly highlights and assists in resolving errors to ensure your workflows run smoothly without disruption.
- Saves Time: It offers clear explanations and suggested fixes for any detected errors.
- Increases User Confidence: Simplifies troubleshooting of complex workflows, empowering you to resolve issues independently without relying on external support.
Using Error Resolution AI
Errors are indicated in the Workflow Builder with an Error Icon, which appears next to actions and triggers in the bottom-right corner.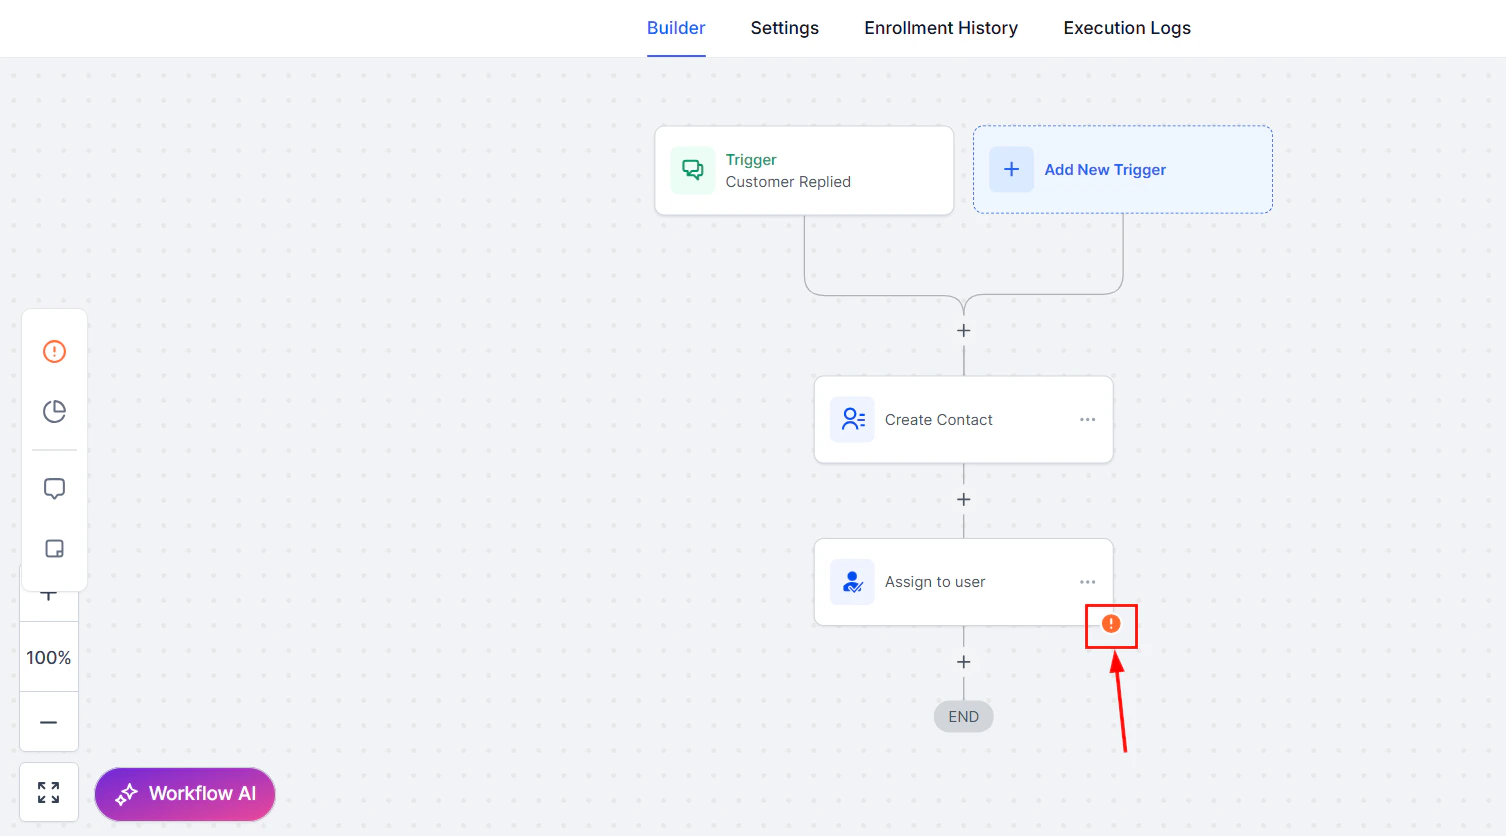
Screenshot
Screenshot
- Integration Issues: Errors related to integrations.
- Missing Mandatory Fields: Errors caused by missing essential data in any action or trigger.
Using the AI Assistant to Resolve Errors
Click the error icon to open the resolution window, then click the ****“****Ask AI to resolve” button next to the relevant error.
Screenshot

Screenshot
Applying Fixes
Apply the suggested fixes directly within the action/trigger sidebar. If the fix involves external integrations, the AI will guide you to the appropriate configuration settings.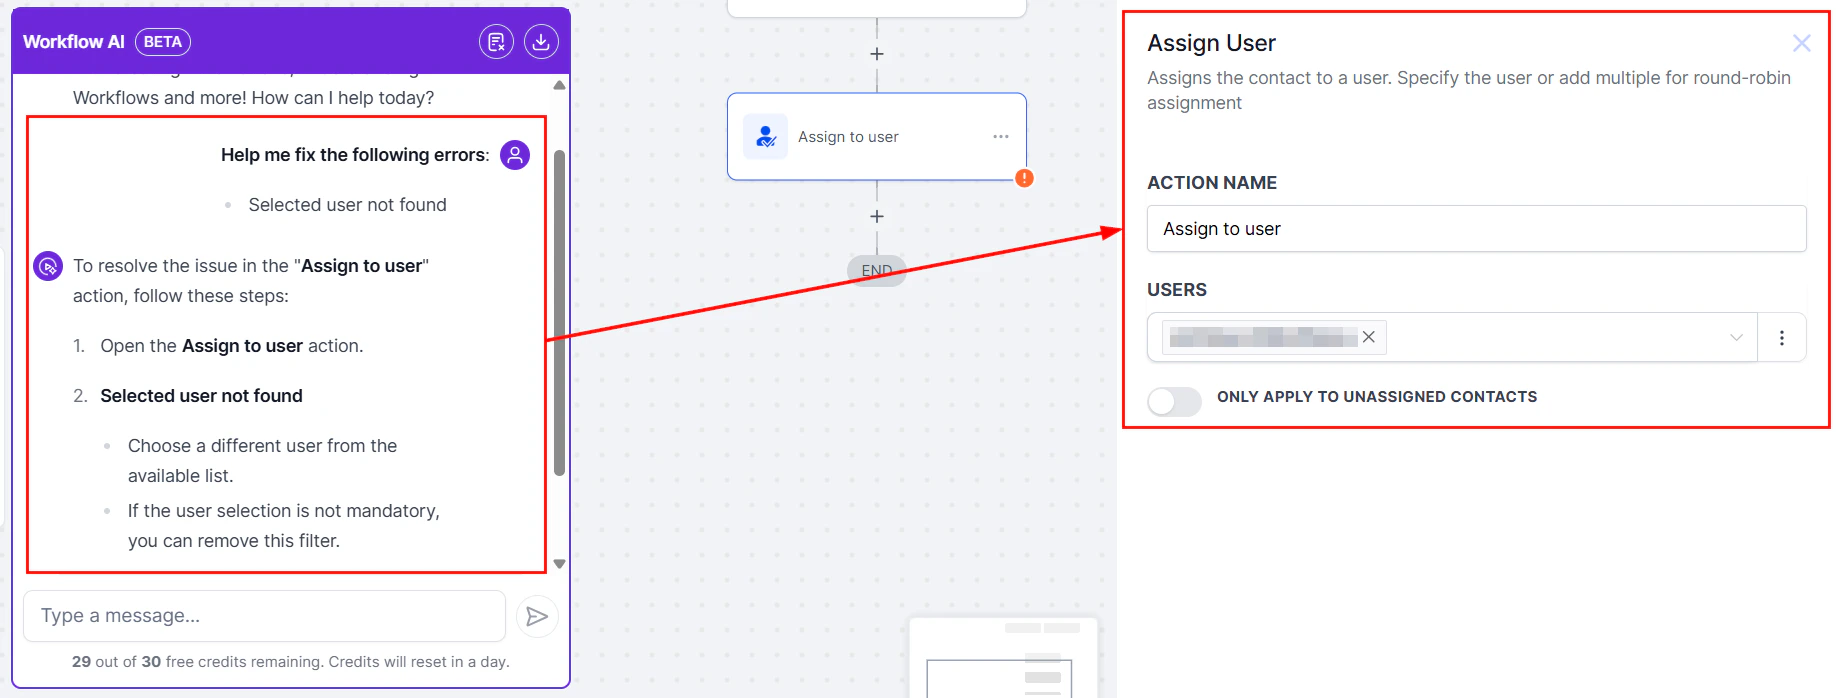
Screenshot
Screenshot
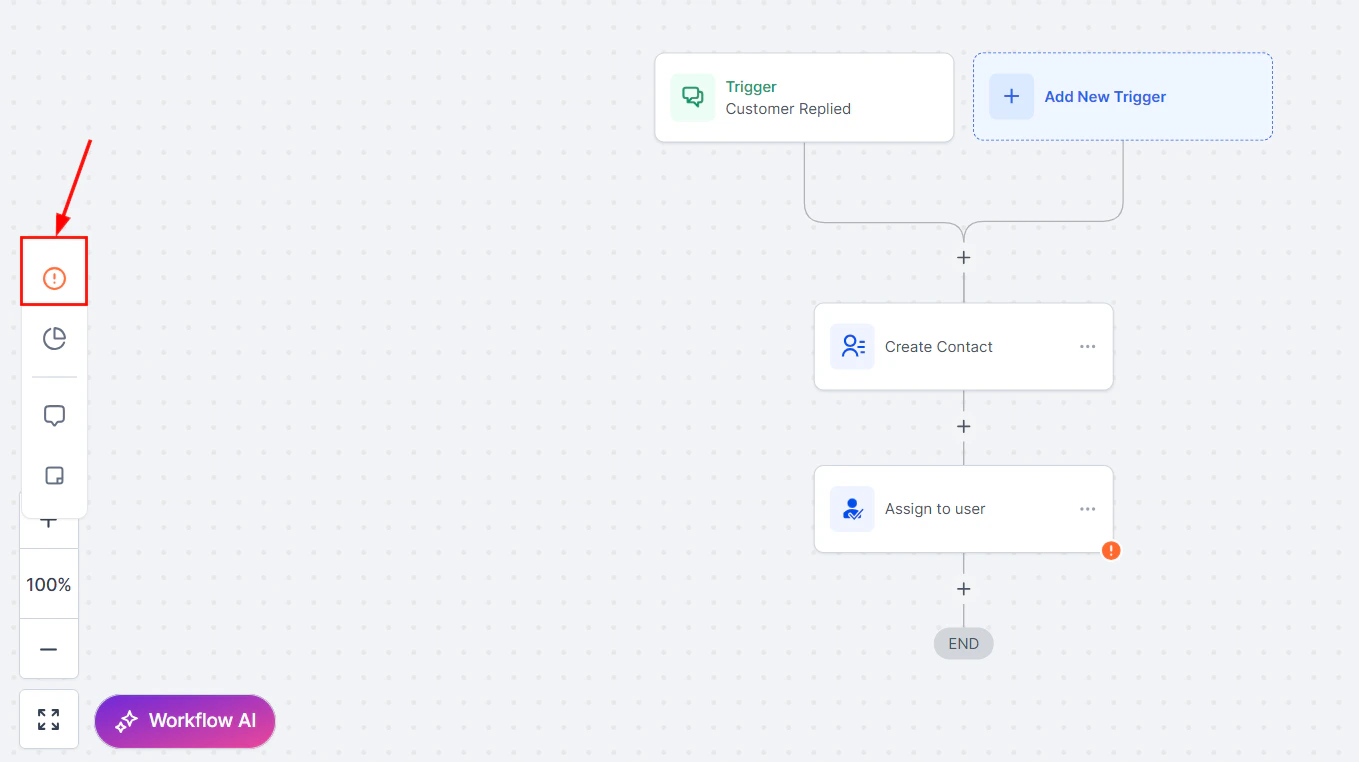
Adjusting Error Tab Visibility
Disable or re-enable the error tab based on your preferences by clicking the eye button in the error panel settings. By doing so, you can remove clutter and utilize your workflow customization options.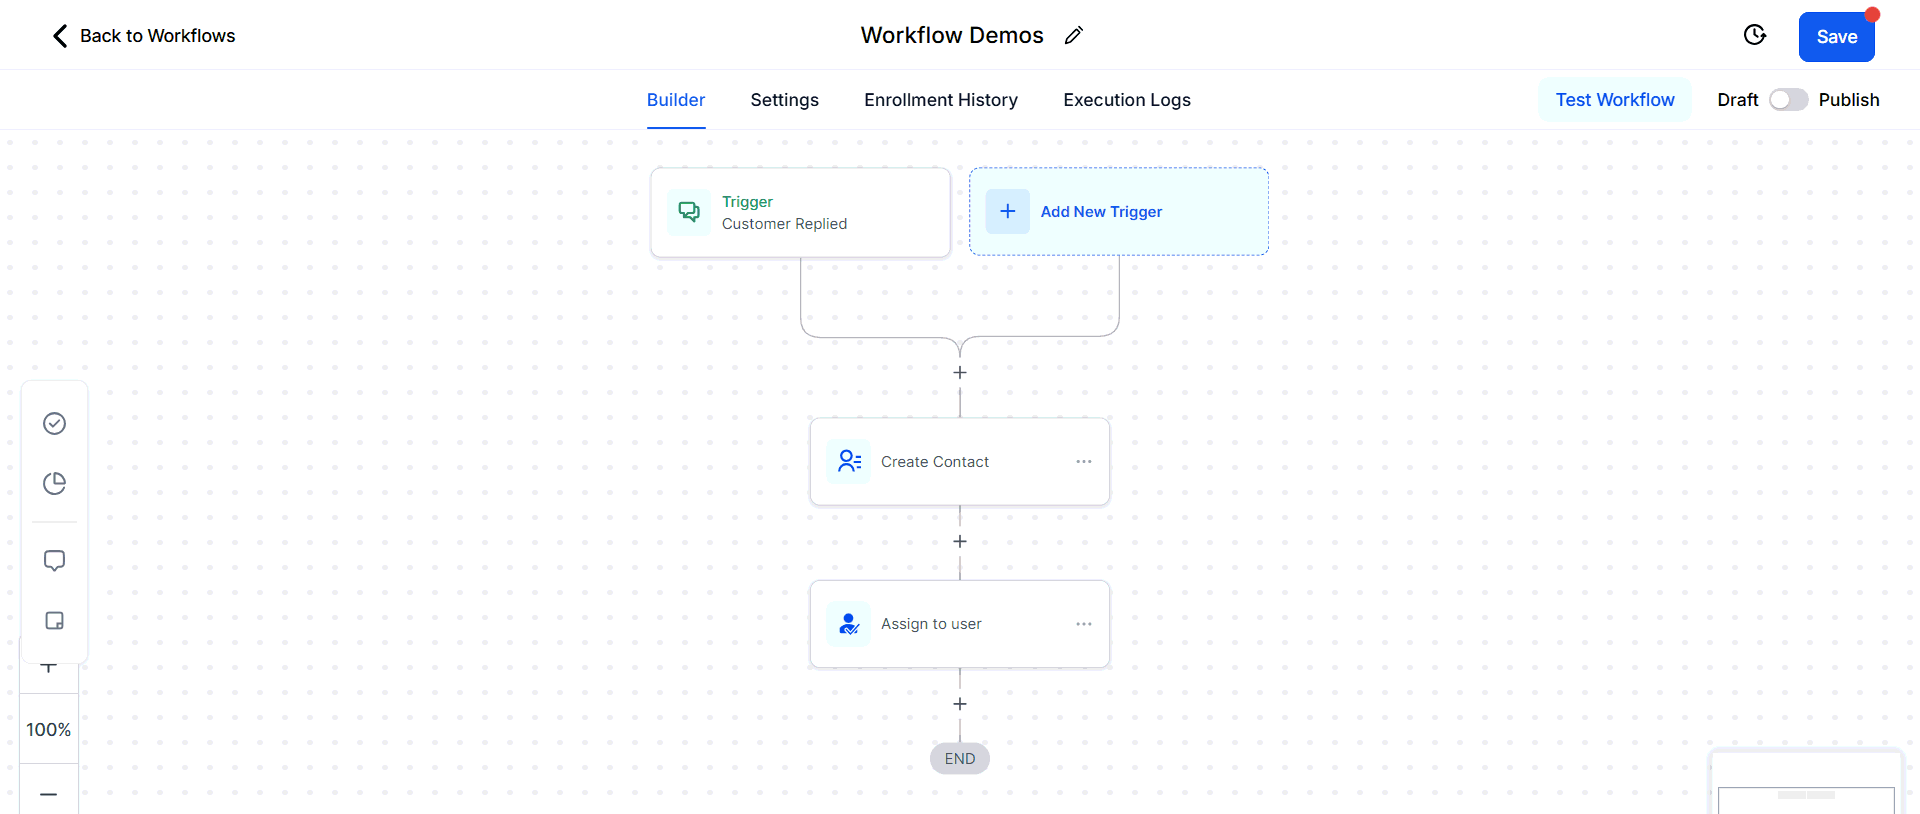
Screenshot
Error Resolution Types
Integration Issues- Error: Integration with Facebook failed due to incorrect authentication.
- Resolution: The AI Assistant prompts you to reconnect or re-authenticate the integration.
- Error: An action is missing required fields (e.g., Appointment Date, Custom Fields, etc.).
- Resolution: The AI Assistant lists the missing fields and offers options to map them.
Can I hide the error icons permanently?
Can I hide the error icons permanently?
Will my published workflow move to Draft if an error is found?
Will my published workflow move to Draft if an error is found?
Workflow notes
In managing and automating tasks, the Workflow Notes feature is essential for ensuring clear communication and smooth task execution within teams. This feature enables users to leave detailed notes and track important information. With Workflow Notes, team members can access critical insights about each task, resulting in fewer misunderstandings and more efficient project outcomes. In this article, we’ll explore how to use Workflow Notes to enhance team collaboration and boost workflow efficiency. Head to the Automation > Workflows section in your account, then select an existing workflow or create a new one to begin.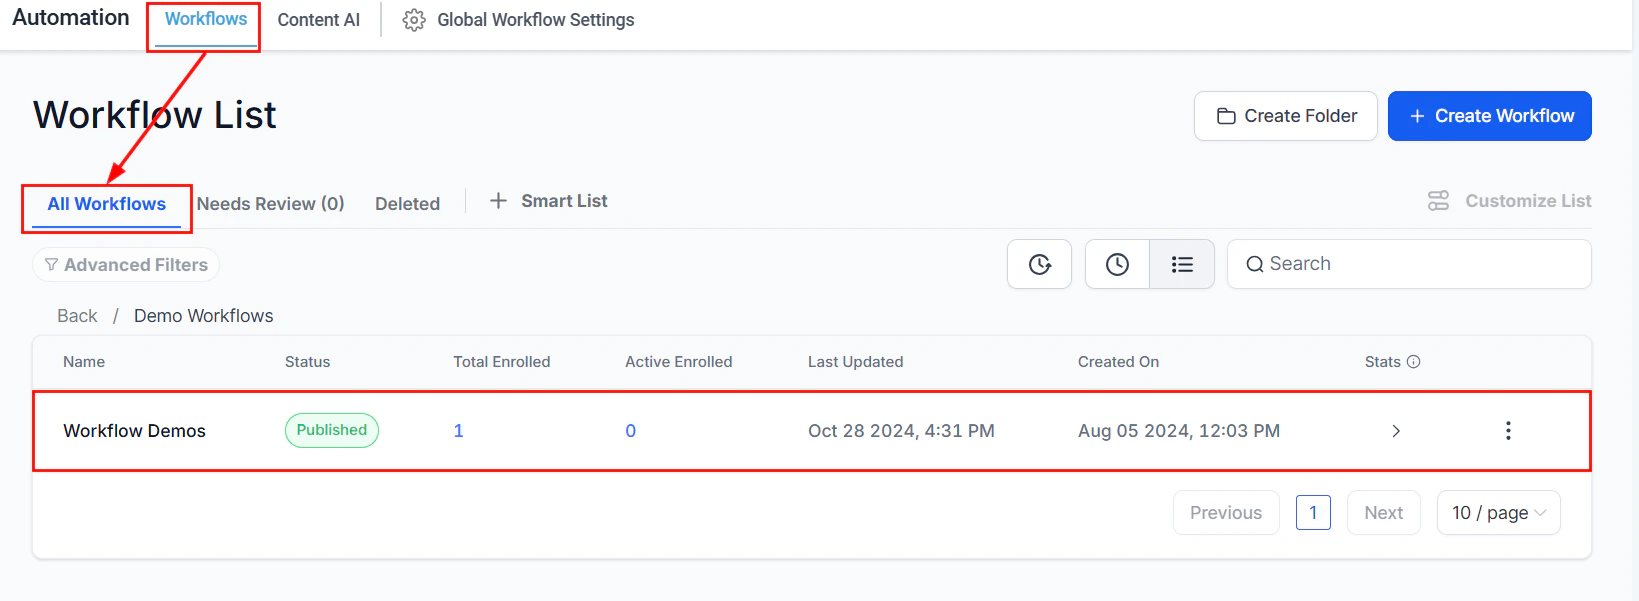
Screenshot
Screenshot
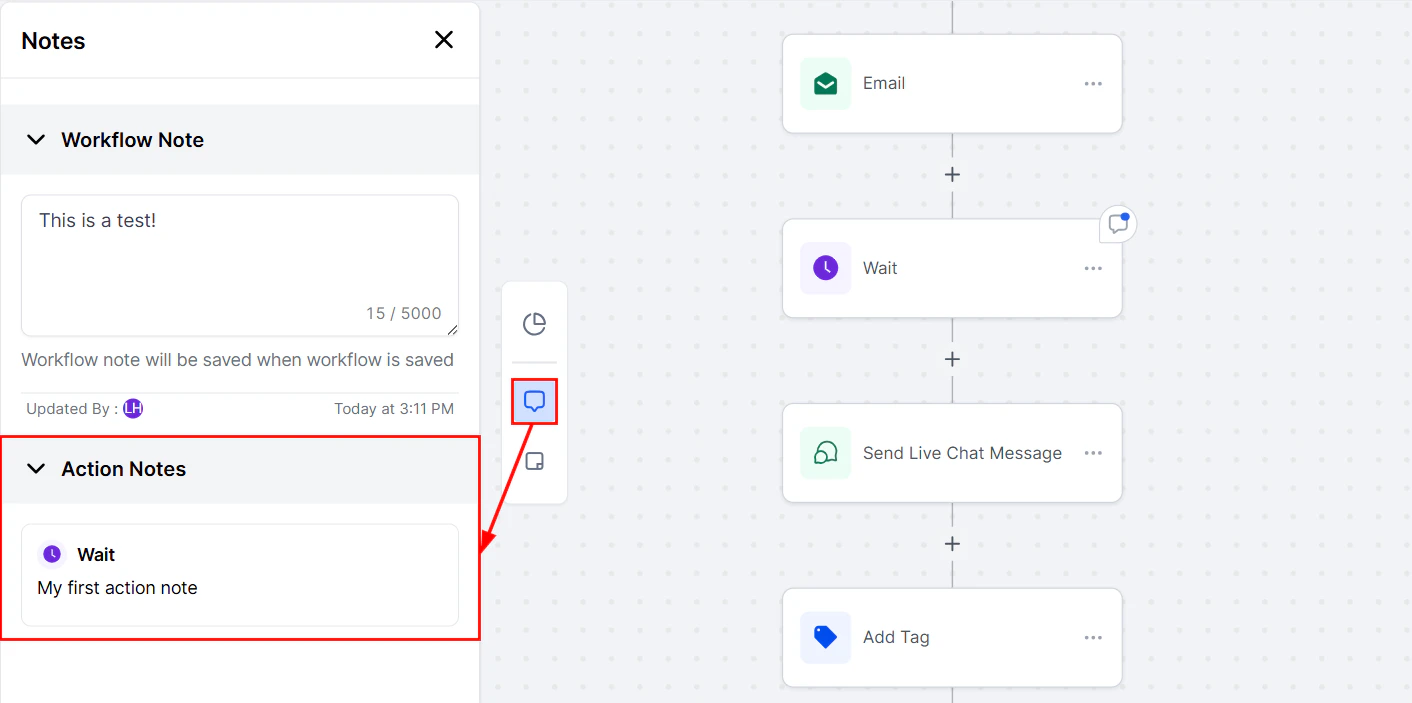
Workflow Notes
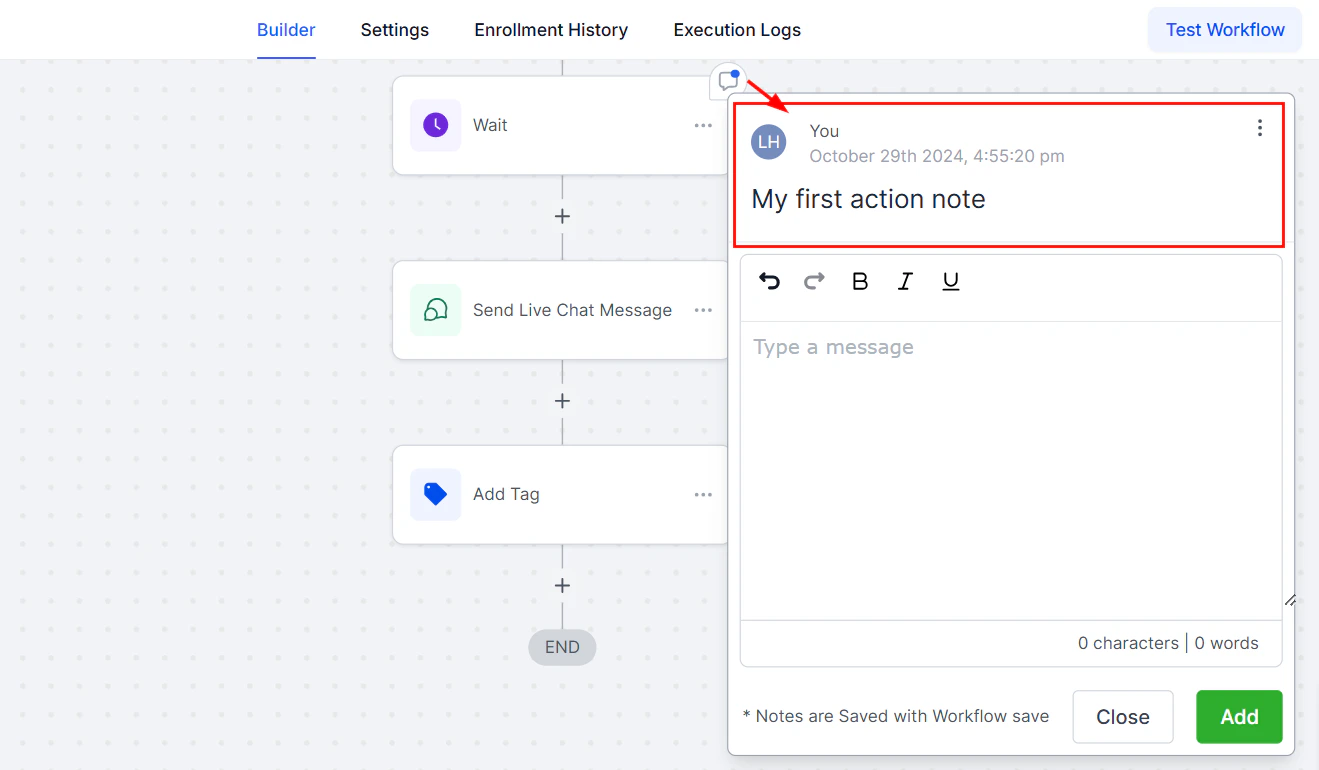
To add a note to your workflow, click the Notes icon and enter the desired text in the Workflow Notes section bearing the 5000-character limit in mind. Once you have completed your entry, confirm the text and save the workflow to retain the note.
Screenshot
Screenshot
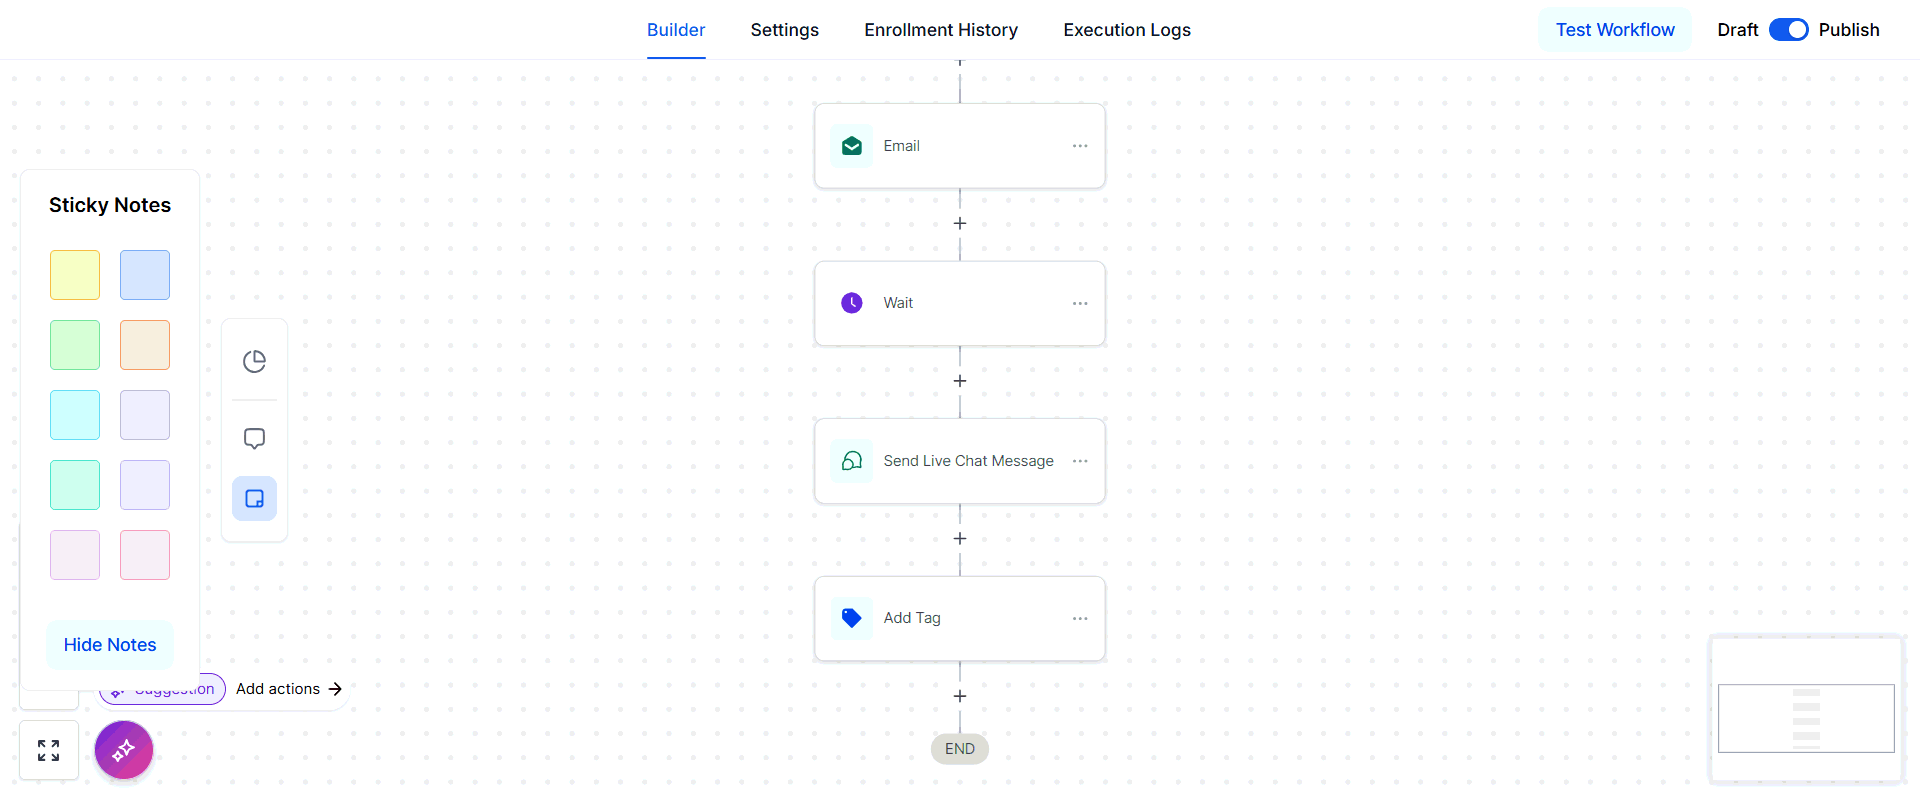
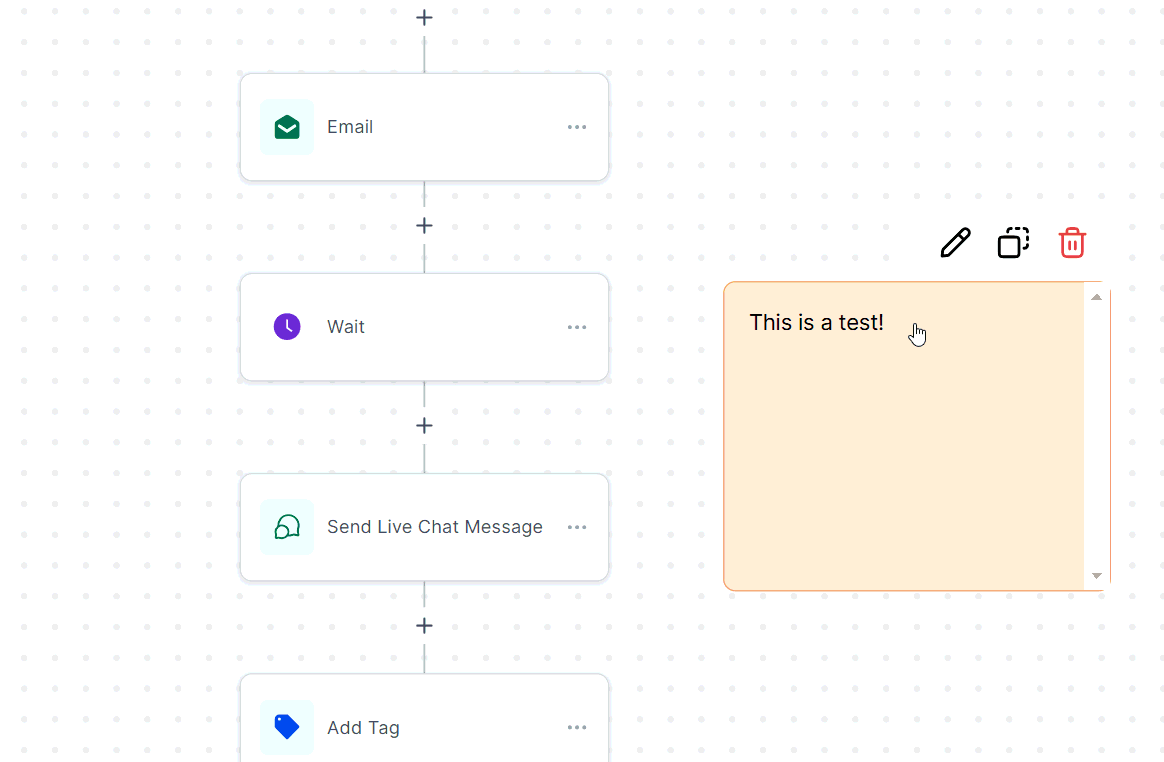
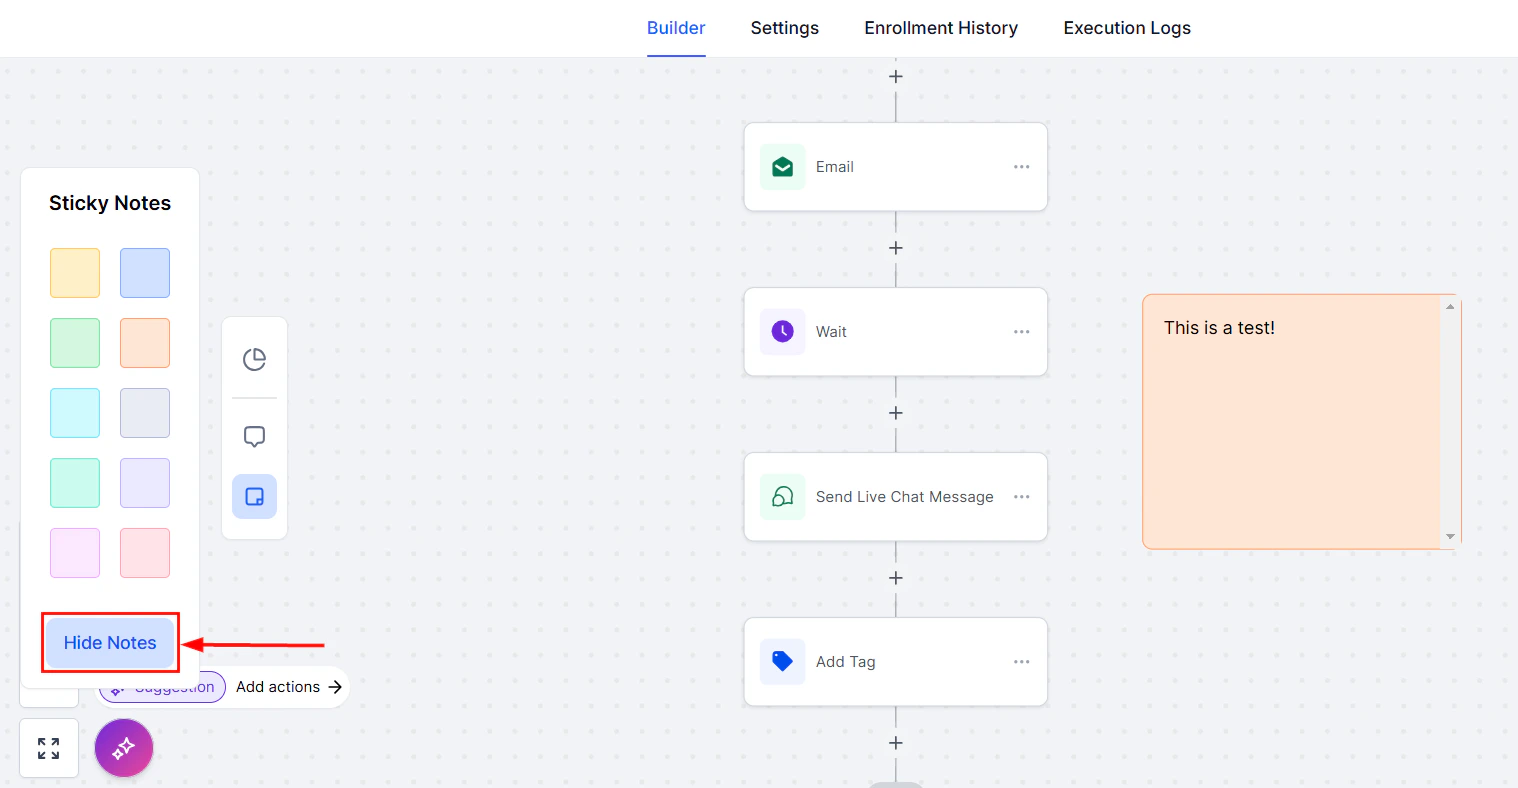
Sticky Notes
To add a Sticky Note to your workflow, click the Sticky Notes icon then choose a color from the color picker.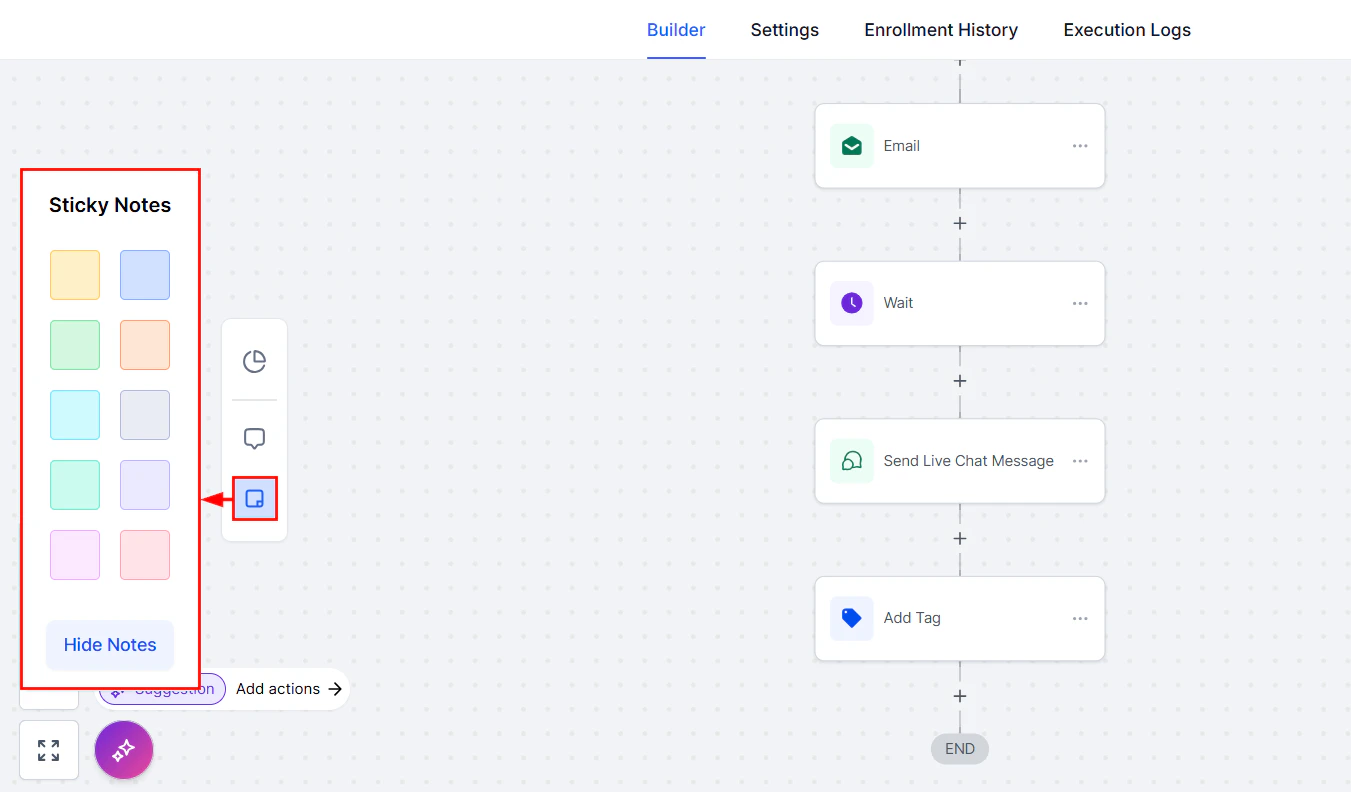
Screenshot
Screenshot
- Editing the sticky note.
- Duplicating the sticky note.
- Discarding the sticky note.

Screenshot
Screenshot
Screenshot
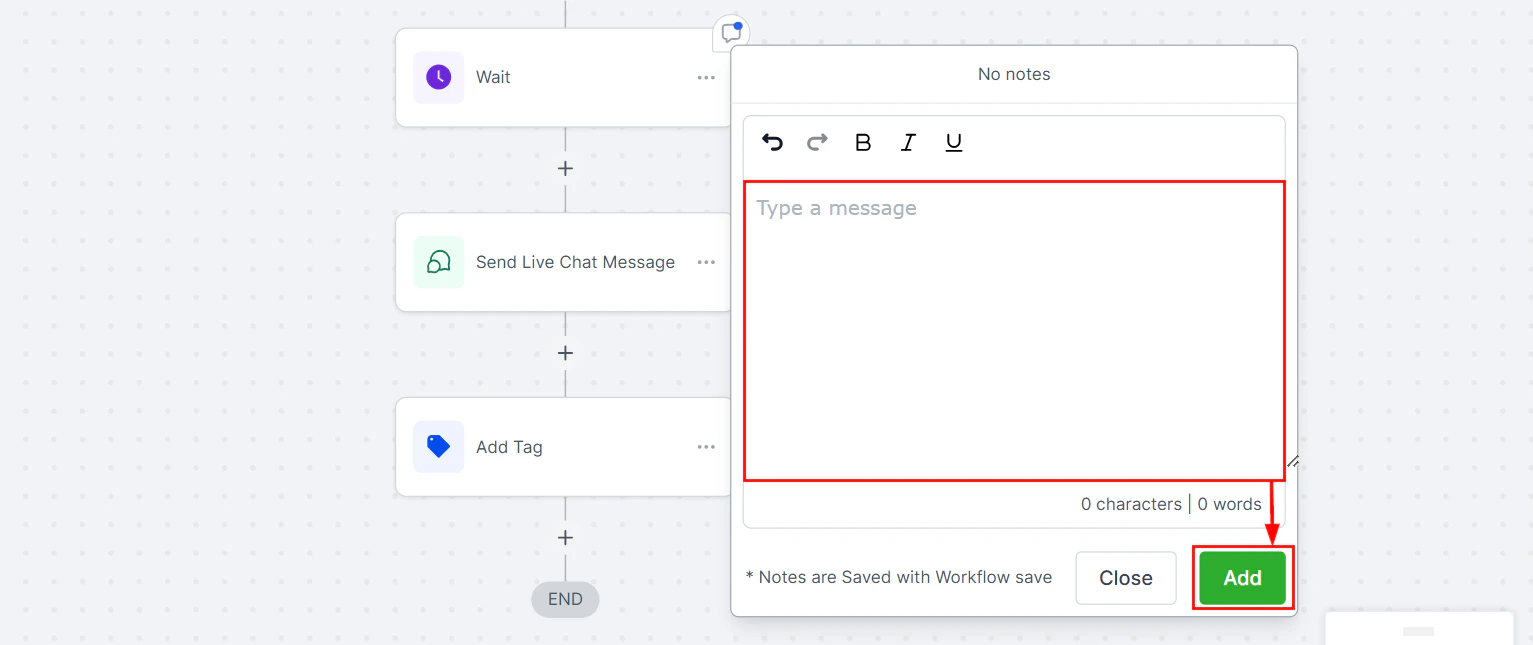
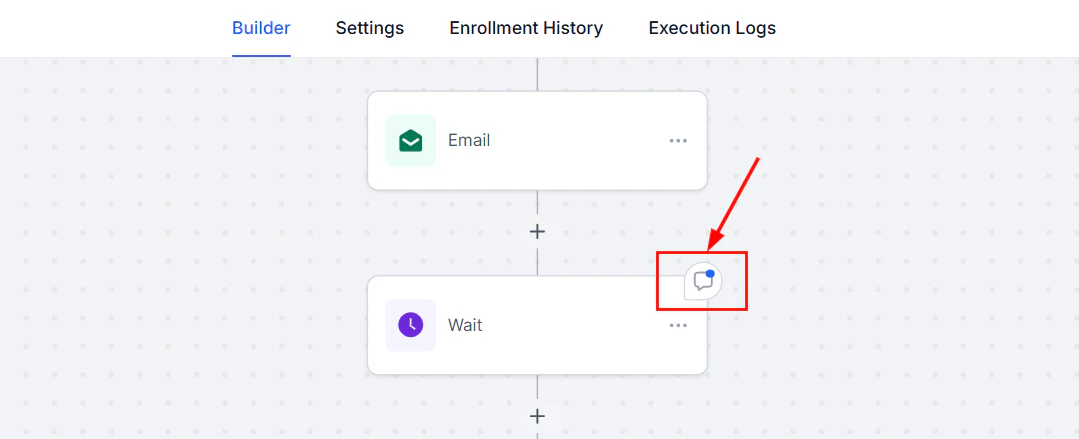
Action Notes
Hover over an action to reveal the notes icon in the top-right corner. Click the icon to add action-specific notes that others can view and build upon.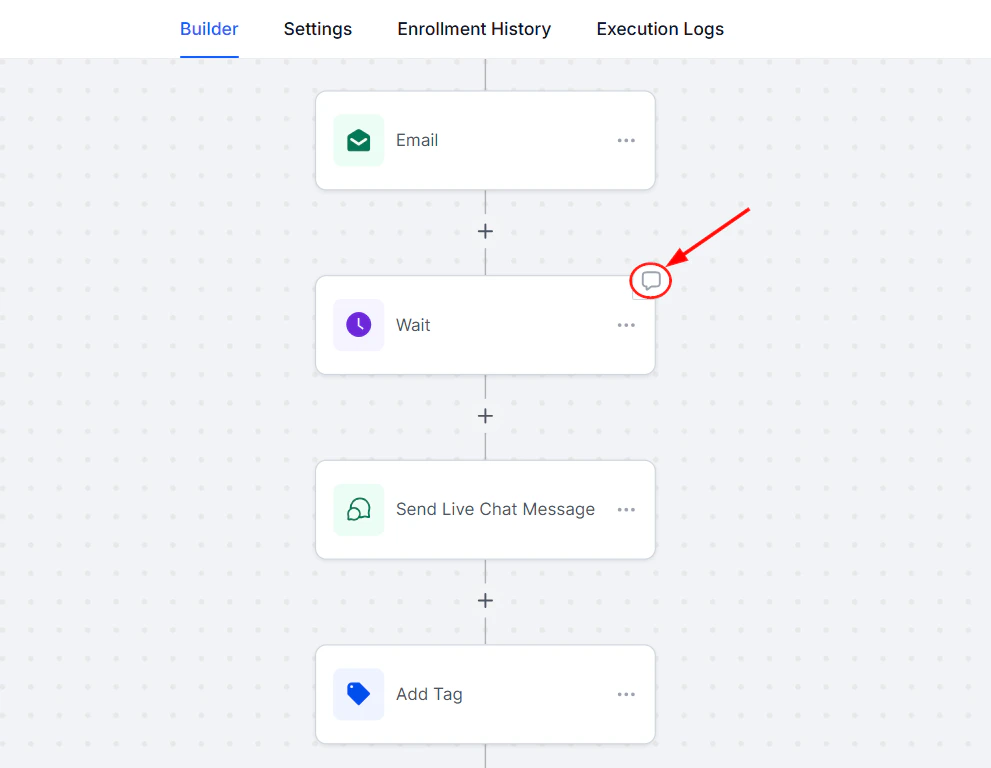
Screenshot
Screenshot
Screenshot
Screenshot
Screenshot
Use Cases
- Utilize Sticky Notes to create color-coded task lists and visual reminders, facilitating easier tracking of workflow progress for team members.
- Incorporate Action-Level Notes to deliver instructions, feedback, or background context specific to each action, thereby ensuring clarity and enhancing collaboration within the team.
Workflow AI assistant
Workflow AI is an assistant designed to support you in building, refining, and managing workflows within the platform. Whether you’re creating new workflows or enhancing existing ones, Workflow AI provides step-by-step guidance, action suggestions, and optimization insights tailored to your objectives. By simply typing your desired outcome, Workflow AI presents a curated list of actions and triggers to help you achieve your goals with ease.Key Features of Workflow AI
- ****Assistance for New Users: ****If you’re new to workflows, Workflow AI provides the guidance you need to get started. Simply type in your objectives, and it will suggest the necessary actions and triggers, while also offering configuration help. The AI assistant can even explain workflows and best practices to you, making the learning curve manageable.
- ****Step-by-Step Setup: ****Workflow AI guides you through each workflow-building step, ensuring you feel confident in every part of the process. You’ll have the information you need to proceed smoothly from one step to the next.
- ****Real-Time Assistance: ****Need clarification or have questions mid-process? You can ask Workflow AI any workflow-related question to get instant answers and best practice tips to support your workflow development.
- ****Add and Configure Actions Easily: ****Workflow AI not only suggests actions like sending reminders or updating statuses but also helps you configure them. Just click on the recommended action, and Workflow AI will guide you through adding and setting it up within your workflow.
How to Use Workflow AI
Navigate to Workflows
Go to the Automation > Workflows section in your account, then select an existing workflow from the list or create a new one from scratch.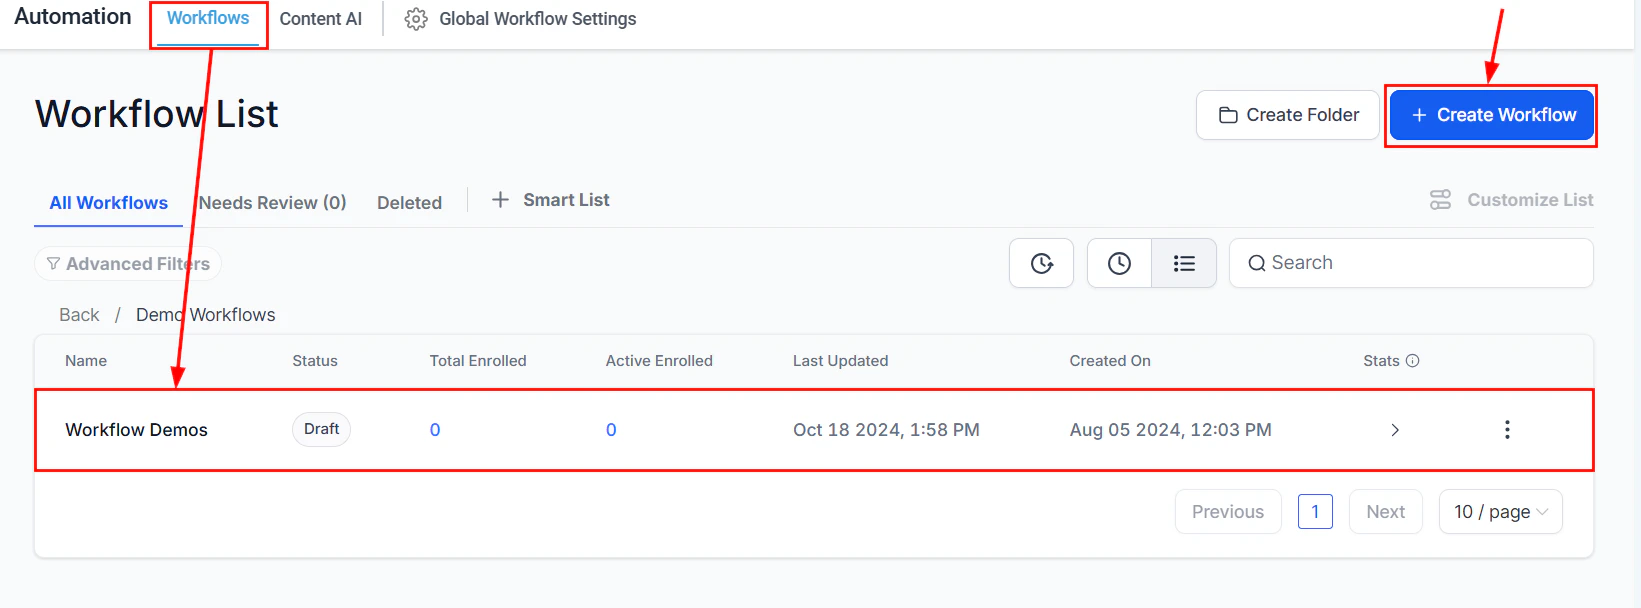
Screenshot
Locate the AI Chat
Locate the Workflow AI chat icon in the bottom left corner of the workflow builder. Clicking it will open the chat box, where you’ll see several prompt cards to start the conversation.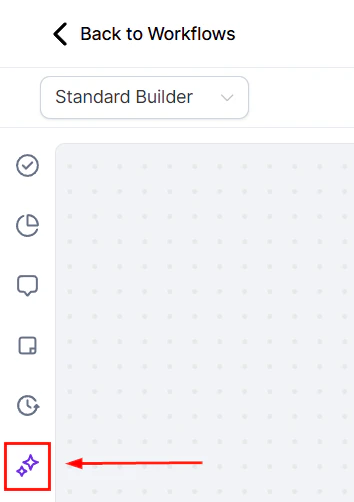
Screenshot
Begin the Conversation
Choose a card or simply start typing your query into the chat box.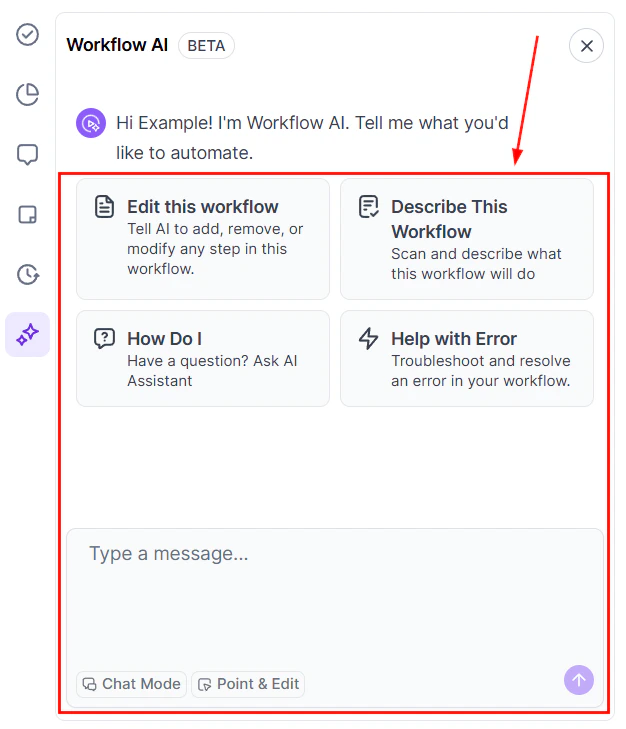
Screenshot
Workflow AI Options
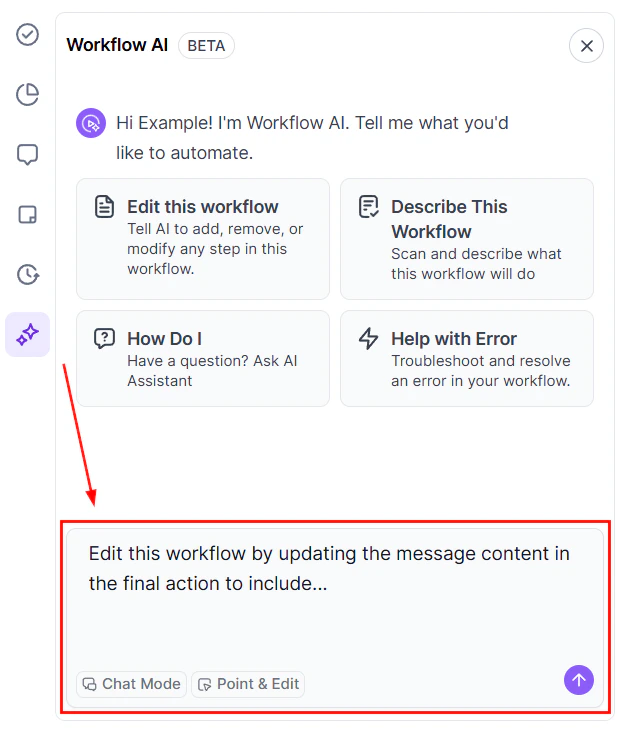
Edit This Workflow
This option will add a prompt so you can instruct the AI helper to modify your workflow.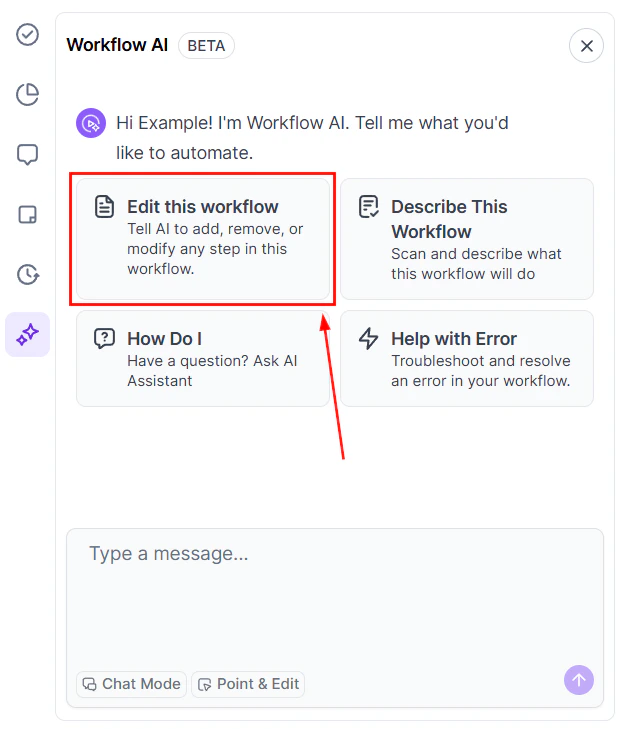
Screenshot
Screenshot
Describe this Workflow
Obtain a breakdown of the workflow name, triggers, actions, and key workflow settings to understand system workflows or workflows other team members have created.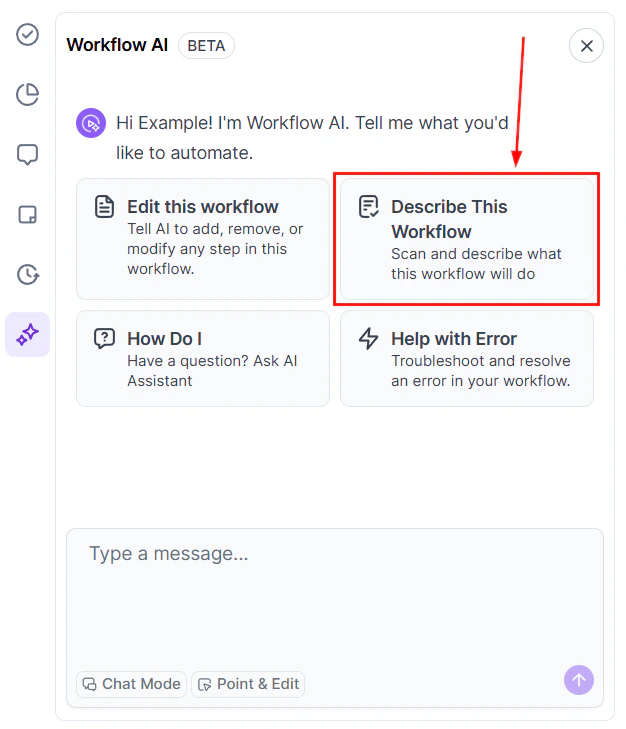
Screenshot
How Do I?
Click the “How Do I” tile to ask a question in the chat box. This allows you to quickly enter the query, resulting in a more efficient interaction.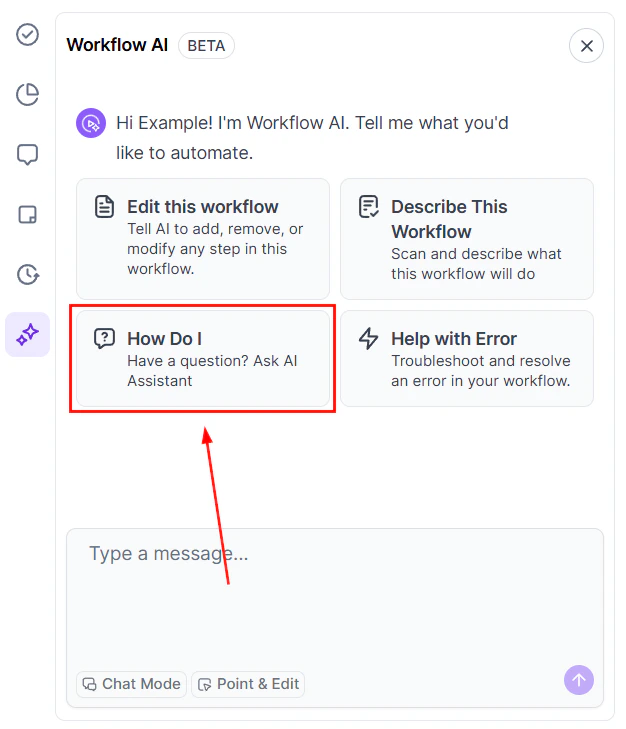
Screenshot
Help with Error
If you’re getting an error message, this option helps you troubleshoot your workflow with the help of AI.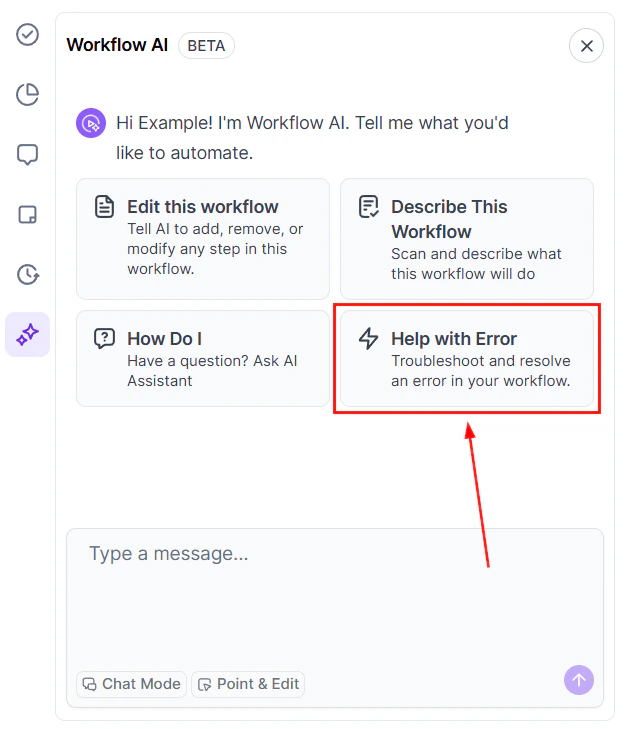
Screenshot
Receive Detailed Explanations and Guidance
As you interact with Workflow AI, it will suggest follow-up questions to deepen your understanding and ensure you’re building an effective workflow.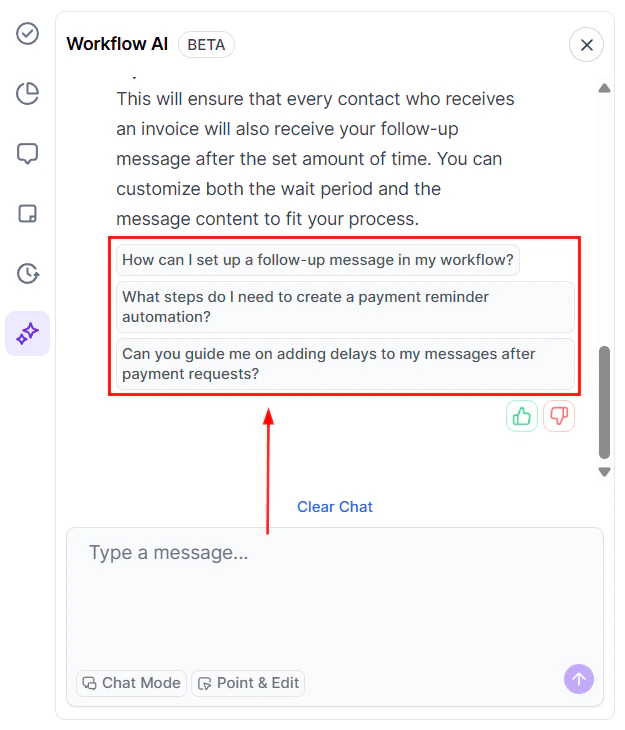
Screenshot
Feedback on Responses
Provide feedback on Workflow AI’s responses to help improve its accuracy and usefulness over time.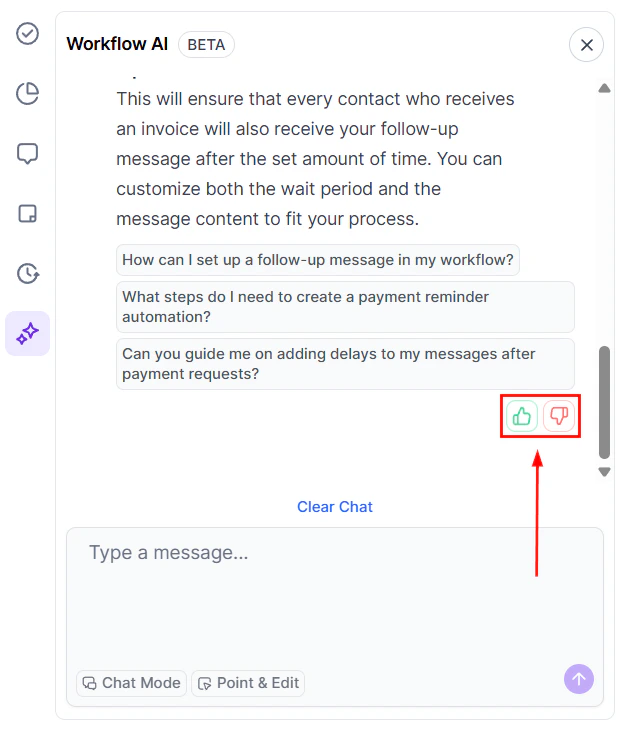
Screenshot
Clear or Export the Chat
Use the “Clear Chat” button to start a new conversation at any time.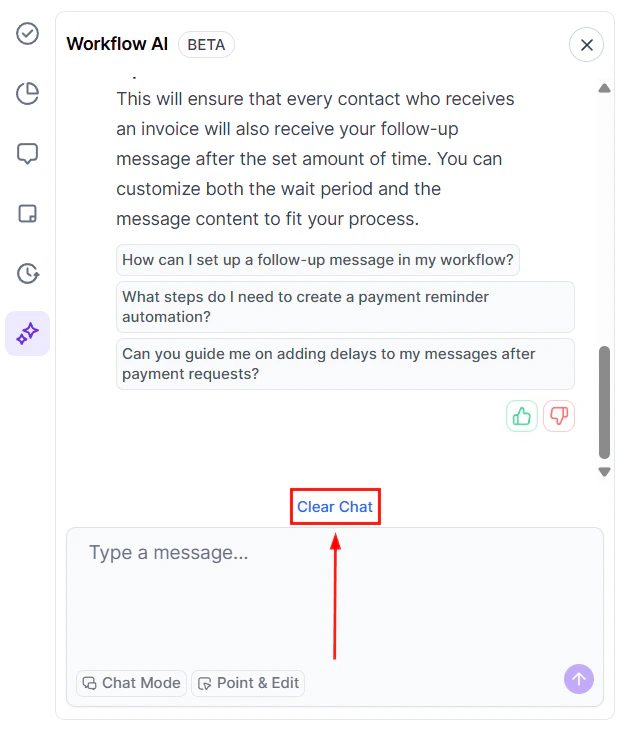
Screenshot
Chat Mode
By selecting the Chat Mode, you can talk and ask questions to the workflow’s AI without making changes to the workflow.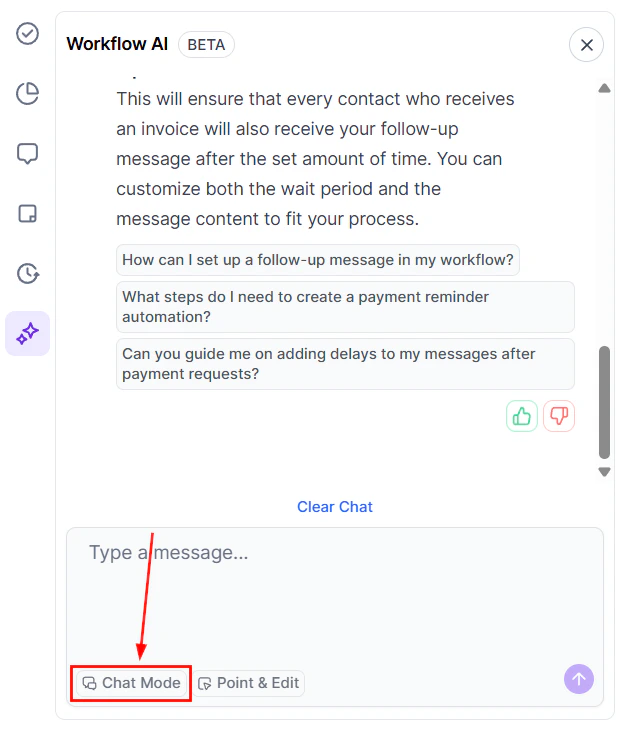
Screenshot
Point & Edit or Ask
This option lets you select multiple triggers and actions for the workflow AI to consider when providing you with insights, suggestions, and information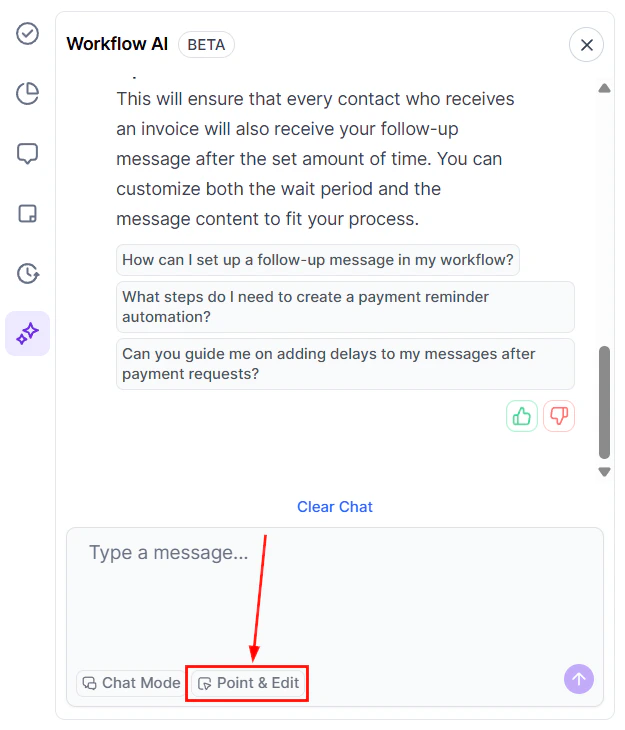
Screenshot
Why should I use Workflow AI?
Why should I use Workflow AI?
Can Workflow AI handle complex workflows?
Can Workflow AI handle complex workflows?
Can I keep a record of my chat with Workflow AI?
Can I keep a record of my chat with Workflow AI?