

Advanced workflow builder overview
The Advanced Builder offers a fully visual, freeform canvas for creating sophisticated automations. It allows you to drag, drop, and connect multiple trigger paths, parallel branches, and complex logic—all within a single view. Designed for flexibility, performance, and collaboration, it gives teams a more intuitive and powerful way to design workflows without altering how they execute.
Advanced Workflow Builder — freeform canvas overview
How To Use It?
Accessing the Advanced Builder
Open any workflow and switch to Advanced Builder from the top-left corner to move seamlessly between Standard and Advanced modes within the same workflow.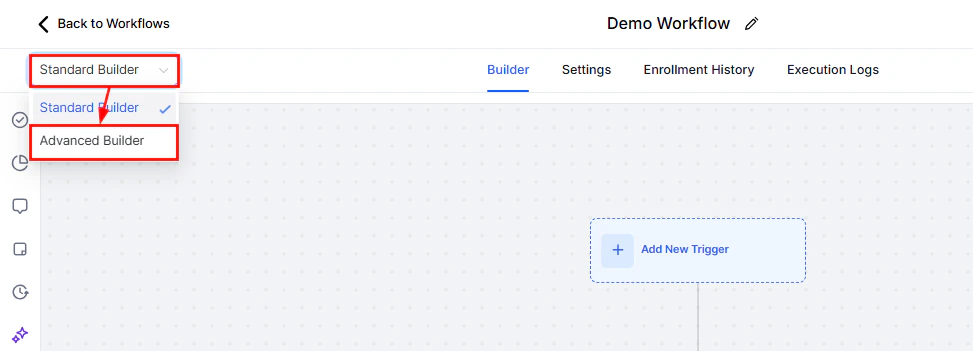
Screenshot
Go-To Connections & Parallel Branches for Triggers
Click the “+Add” button to open the Triggers & Actions panel.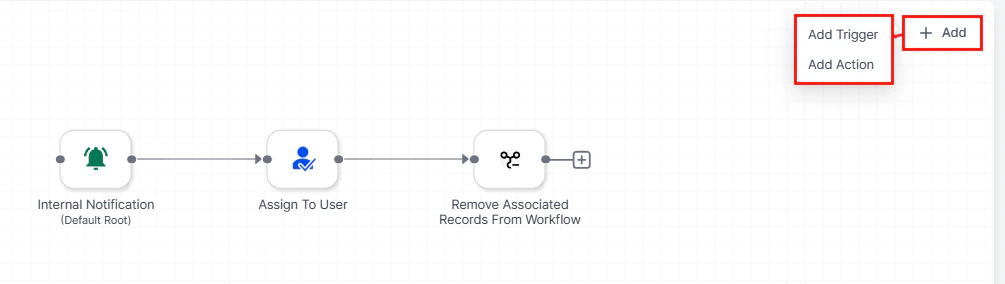
Screenshot
Screenshot
Delinked Nodes (Independent or Parallel Branches)
Build non-linear branches to manage multiple triggers or outcomes within a single canvas by creating isolated clusters of actions and linking each trigger to its starting point via a Go-To connection. Each branch then runs independently within the same workflow context.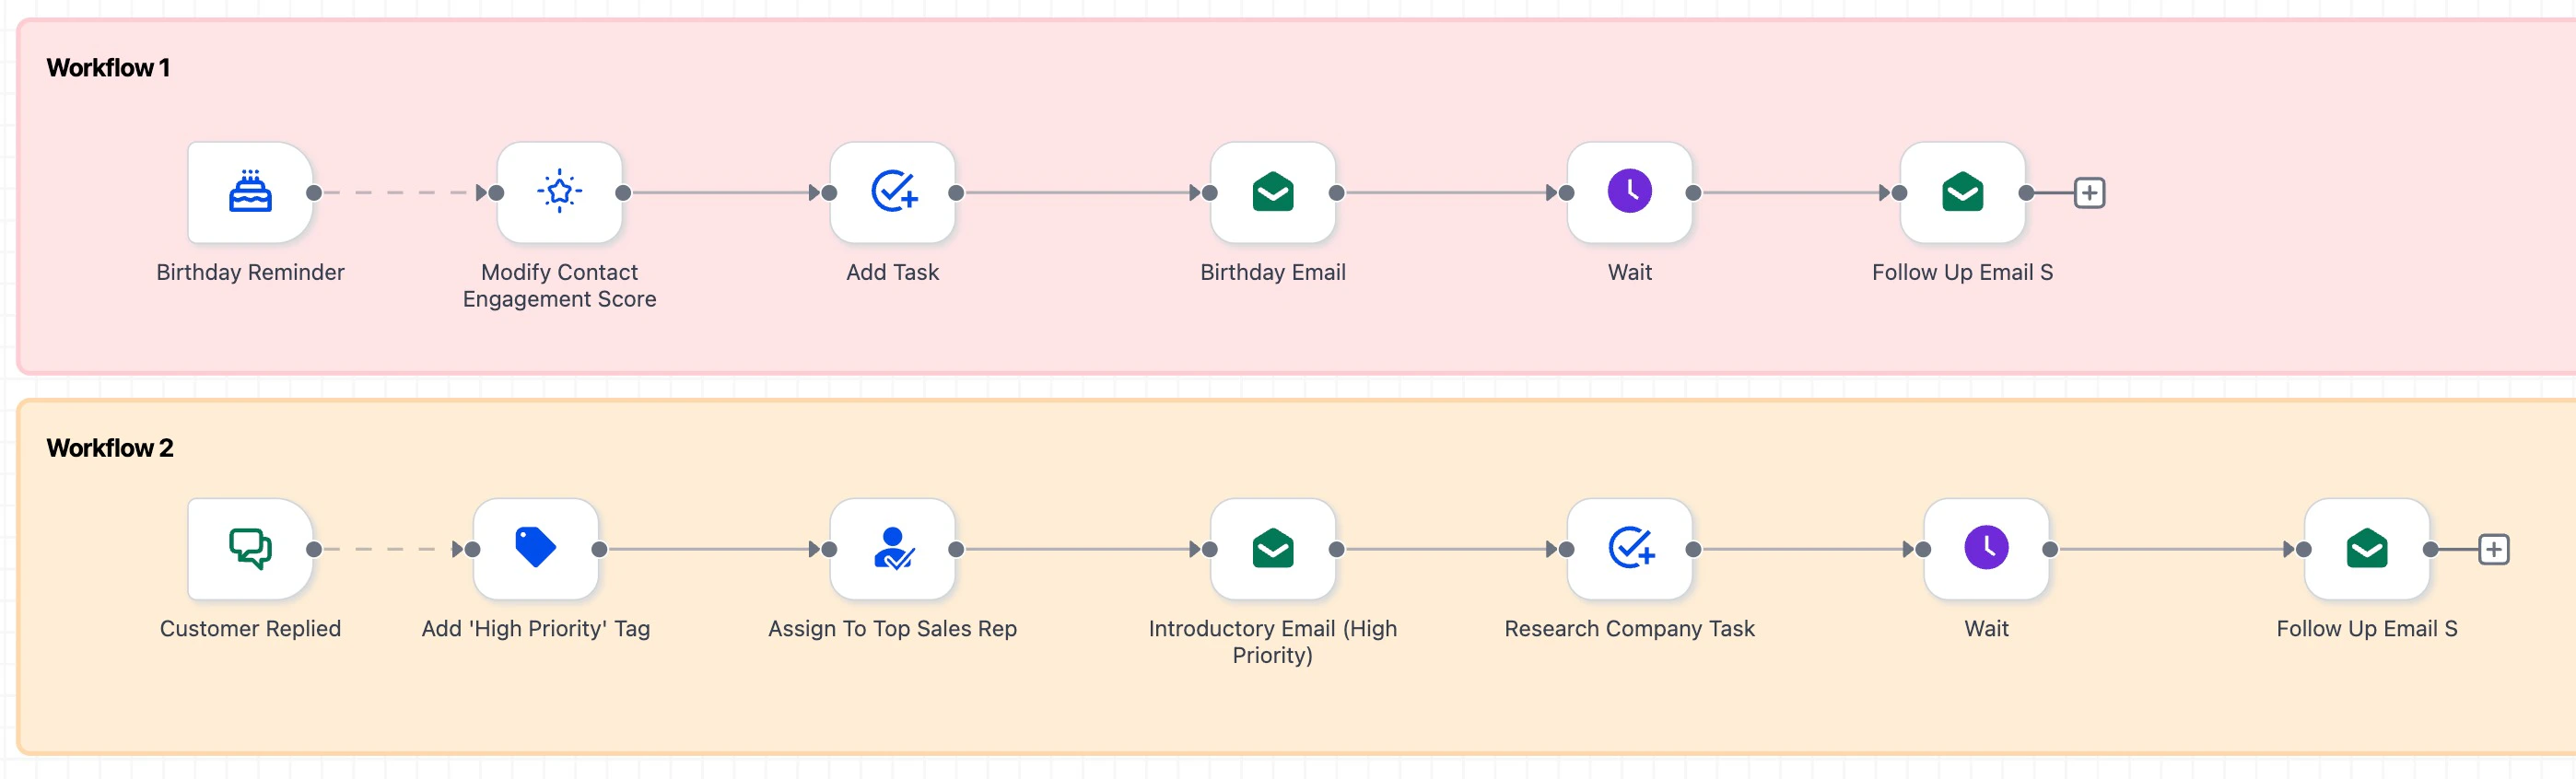
Delinked branch example
Visual Indicators
Adding & Connecting Steps
Click the “+Add” button to open the Triggers & Actions panel, then select the “Add Action” option.Screenshot
Screenshot
Screenshot
Enable / Disable Nodes
Easily test or temporarily remove actions without deleting or rewiring connections.- Disable: Hover over a node → click Pause.
- Enable: Hover again → click Play.
Screenshot
Screenshot
Tidy Up (Auto-Layout)
Use Tidy Up to automatically organize cluttered canvases—especially after major edits or imports—for a cleaner, more readable layout.
Screenshot
Workflow Switcher
Open the Workflow Switcher from the left sidebar. Browse recent workflows or search by name/tag. Click a result to open it in a new tab, while keeping your current canvas open.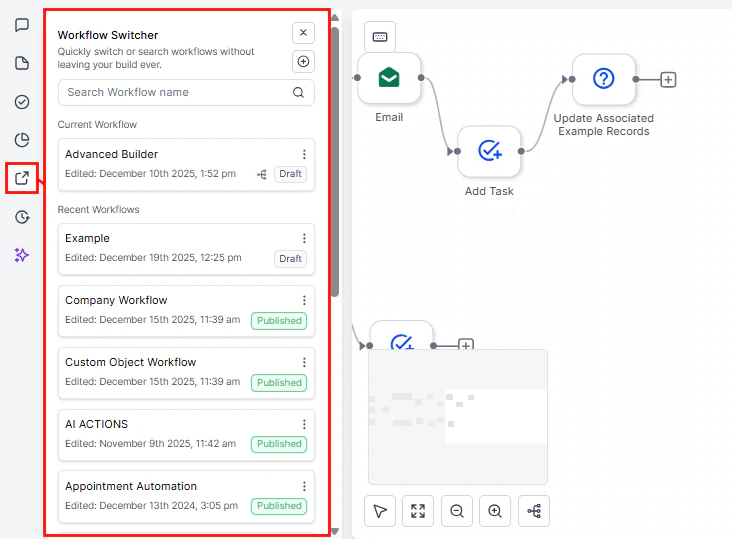
Screenshot

Screenshot
Tips for Efficiency
- Multi-select: Use Ctrl/Cmd + drag to move multiple nodes at once.
- Copy & Paste: Copy (Ctrl/Cmd + C) and Paste (Ctrl/Cmd + V) sections to reuse branches across workflows to replicate proven patterns.**
Screenshot
Notes, Limits & Best Practices
- Single enrollment per contact:** Even with parallel branches, a contact cannot run through multiple branches simultaneously in the same workflow.
- Switching to Standard Builder: Remove Advanced-only elements (Trigger Go-To, Delinked Nodes, Disabled Nodes) before switching to the Standard view.
- Organize early: Use Tidy Up regularly to maintain readability.
- Name clearly: Assign descriptive names to all triggers and actions for clarity in both the canvas and Version History.
Canvas comments
Like Sticky Notes, Comments are a valuable tool for keeping teams aligned on different aspects of a workflow. The key difference is that while Sticky Notes are prominently displayed within the builder, Comments are accessible through the left panel or via the icon above an action. Additionally, each comment is tagged with the user’s initials, allowing team members to easily identify who left the message. Using Comments is straightforward. In the Advanced Workflow Builder, click the Workflow Comments icon on the taskbar to view, add, or manage comments.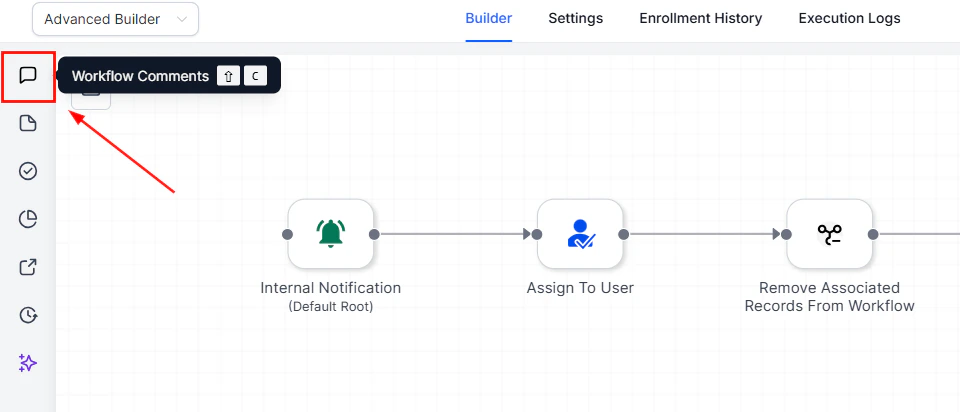
Screenshot
Screenshot
Screenshot
Screenshot
Screenshot
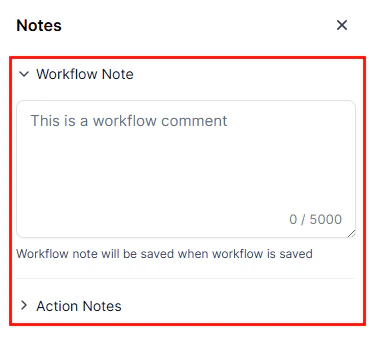
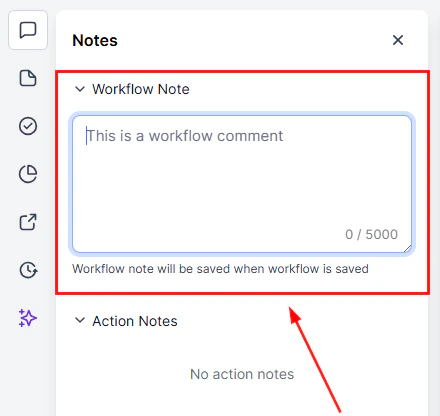
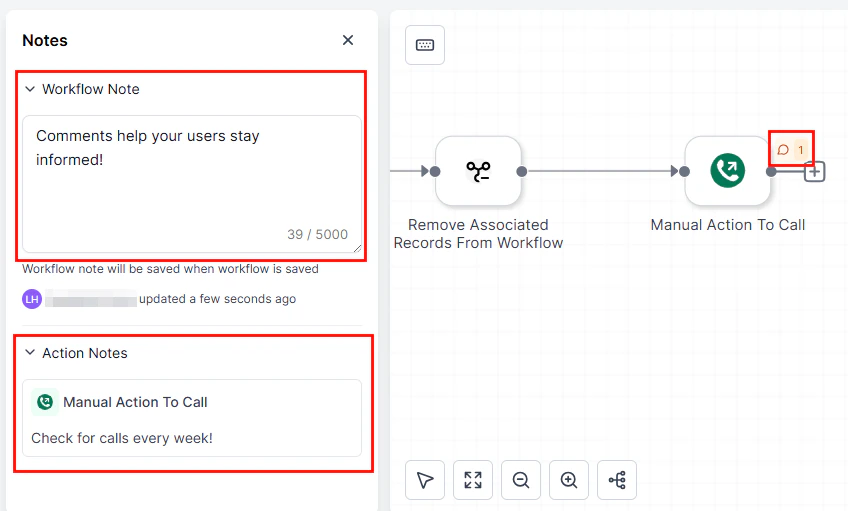
Canvas notes
Whether you’re working in the Standard or Advanced Builder, notes play a vital role in enhancing collaboration and maintaining clarity across complex workflows. They help teams communicate logic, document key decisions, and provide quick context for future reference—all without leaving the canvas. This guide will show you how to access, create, and organize Sticky Notes in the Advanced Builder to make your workflows more transparent, consistent, and easy to manage.Using Sticky Notes
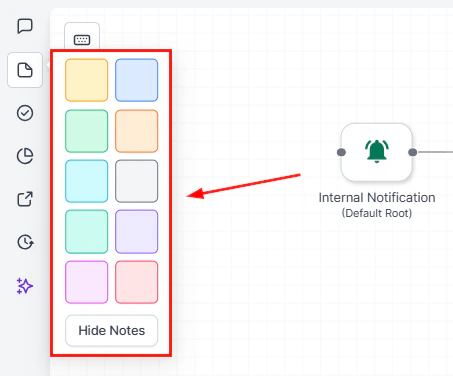
Start by clicking the Sticky Notes icon on the left panel of the Advanced Builder.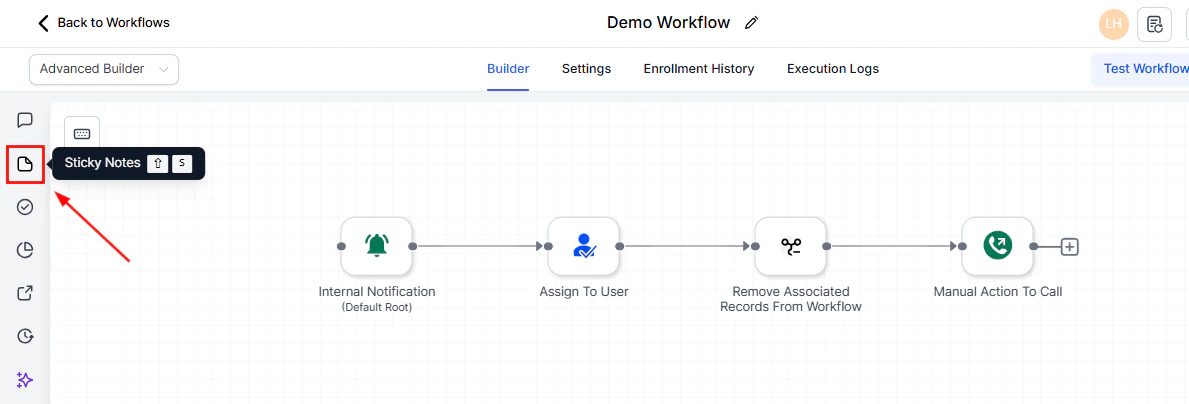
Screenshot
Screenshot
Screenshot
Screenshot
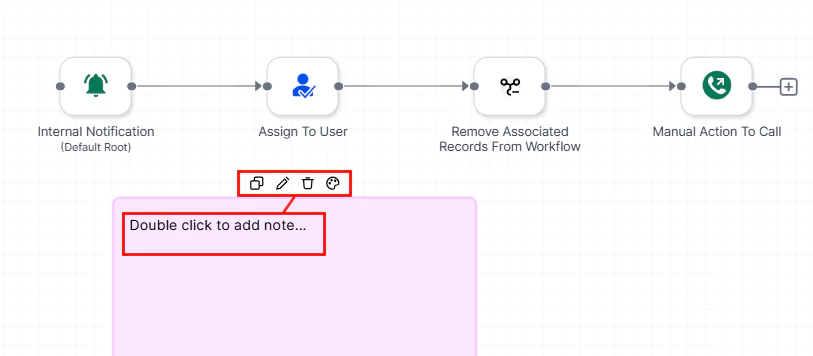
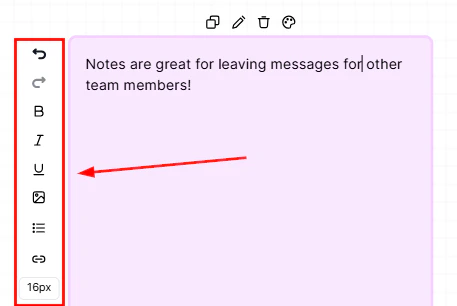
Adding and editing a sticky note on the workflow canvas
Keyboard shortcuts
We all know how useful shortcuts can be. When used effectively, they allow you to complete tasks more efficiently than usual. Within the Workflow Advanced Builder, several shortcuts are available to help you build and navigate your workflow more quickly and precisely. To access them, click the keyboard icon located at the top left of your workflow. A panel will appear at the bottom of the screen, displaying all available shortcuts.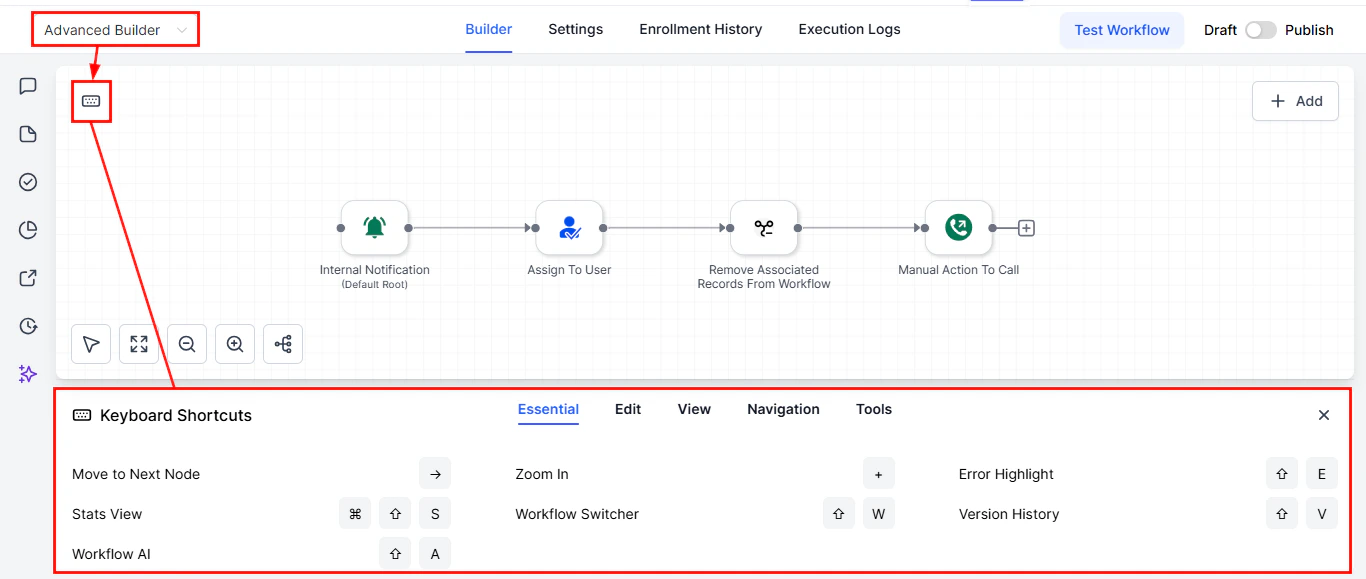
Screenshot
Essential
Here, you’ll find several commonly used actions, including accessing the workflow’s version history, navigating to the next node, and opening the stats view.
Screenshot
Edit
Shortcuts in the Edit tab allow you to modify the placement or inclusion of actions. Within this section, you’ll find commands that allow you to cut, copy, or paste individual nodes or groups of nodes as needed.
Screenshot
View
Use the View tab to adjust the sizing and layout of the Advanced Builder, allowing you to customize your workspace for optimal visibility.
Screenshot
Navigation
Navigate between nodes seamlessly by using the shortcuts available in the Navigation section.
Screenshot
Tools
Leverage the Tools section to save and open panels efficiently, all without leaving your keyboard.
Screenshot
Duplicating conditional branches
Workflows are an essential part of automating processes within your CRM, saving time and improving efficiency. In this guide, we’ll walk you through how to create and personalize workflows by adding conditions, duplicating branches, and customizing your setup to better suit your business needs. Go to the “Workflows” tab, select “Create New Workflow”, and click on “Start from Scratch”.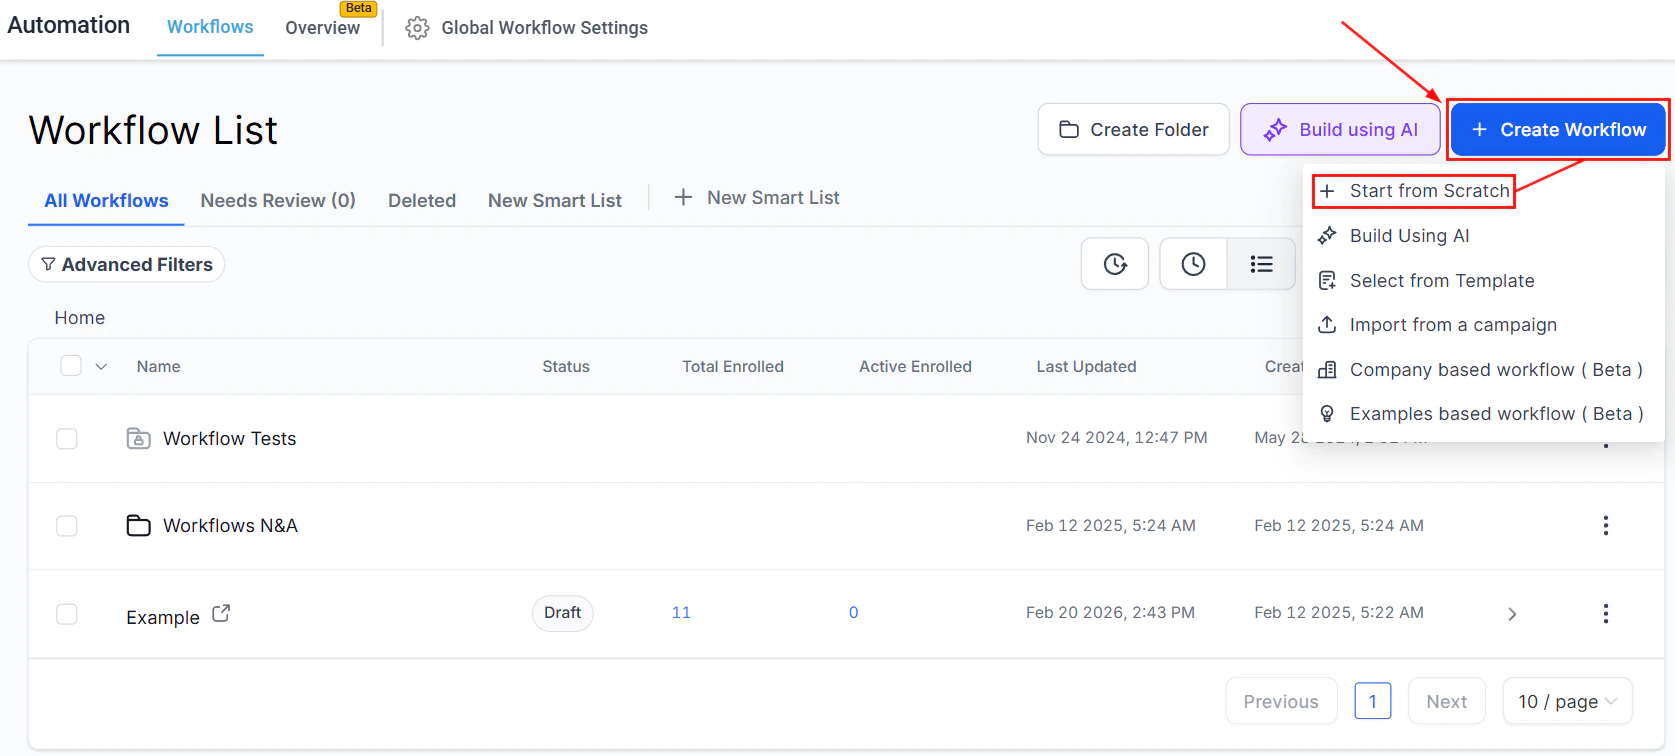
Screenshot
Adding Actions
Click on the ”+” symbol to search and add the If/Else action to your workflow.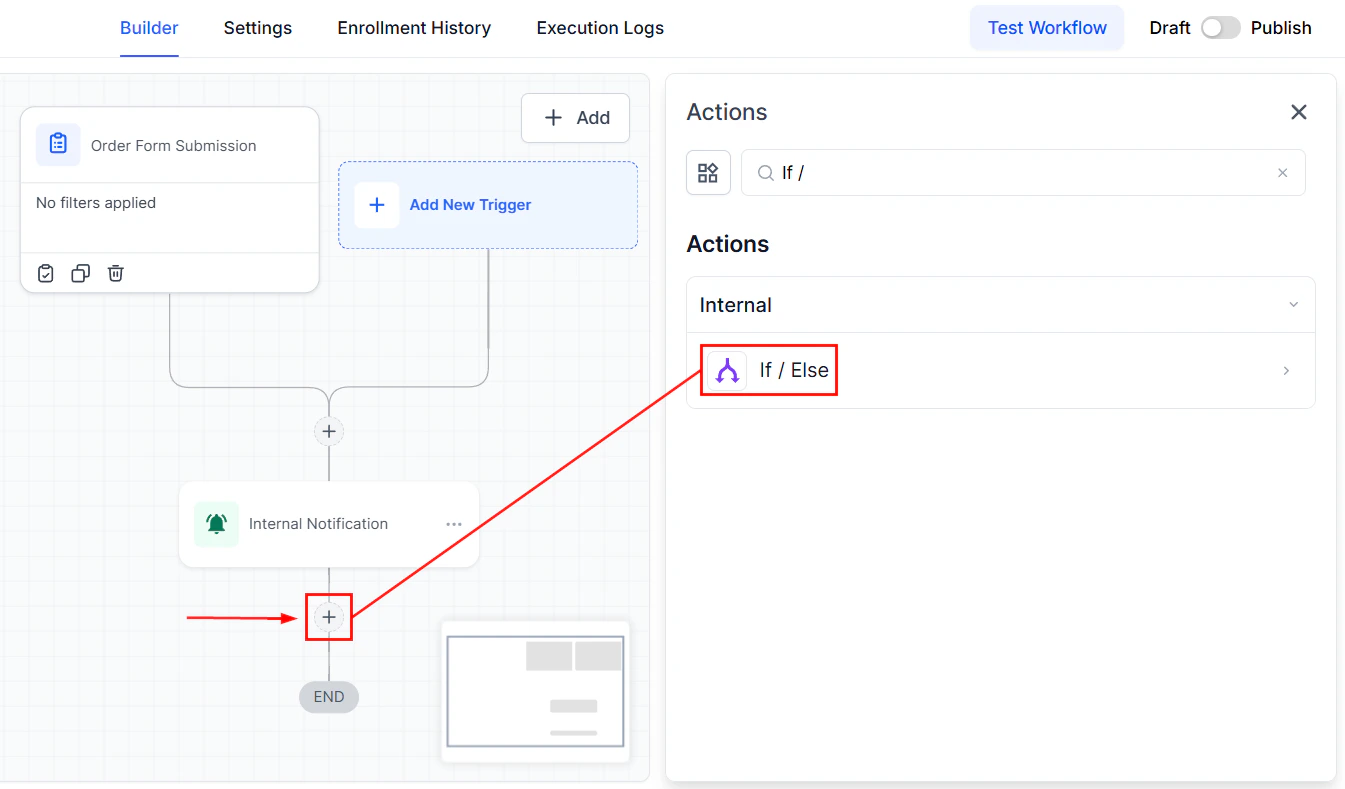
Screenshot
Screenshot
Duplicating Branches
After setting your conditions, click on the three dots menu to find the “Duplicate Branch” option. The duplicated branch will appear next to the original, allowing for easy modification and customization.
Duplicating a conditional branch in the workflow builder
Screenshot
Reordering and Personalizing
Organize your workflow visually by dragging and dropping branches to the desired order.
Screenshot
Screenshot
Finalizing Your Workflow
After duplicating and reordering branches and renaming for clarity, make sure to save your changes. Your workflow is now more tailored to your business needs and ready for implementation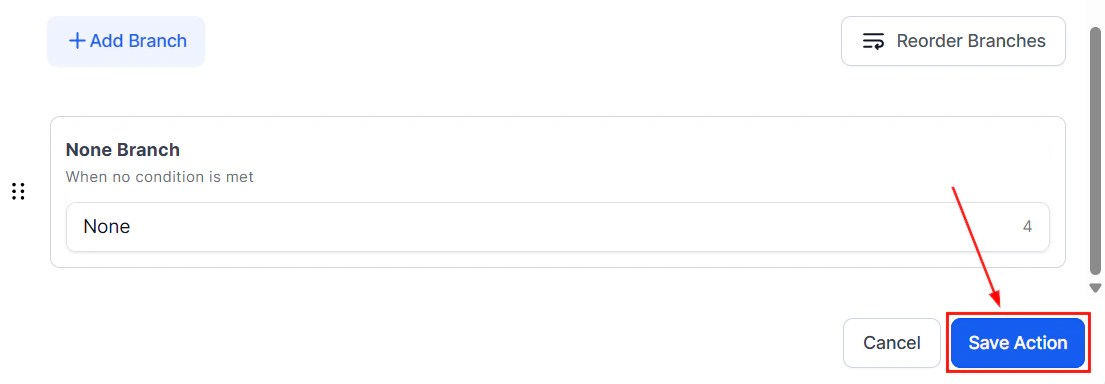
Screenshot
Use Case
For example, in a workflow where tasks are categorized based on specific criteria, duplicating branches for each category and reordering them according to priority ensures that the most important tasks are handled first. Renaming branches for better clarity helps team members quickly understand the purpose of each, making the process more efficient and organized. By following these steps, you can create a highly customized workflow that is tailored to your needs. Whether you’re duplicating branches, reordering them, or renaming them for clarity, these adjustments will help you with your processes and improve team productivity.Troubleshooting tips and FAQs
What if I can't see the option to duplicate a branch?
What if I can't see the option to duplicate a branch?
How many branches can I duplicate?
How many branches can I duplicate?
If/Else action
The If/Else action allows you to separate contacts who trigger a workflow based on conditions you want them to meet. This helps you fine-tune your workflow and automate common actions that your customers perform. Meaning if there’s any point where you want to split a workflow into different paths, this action will allow you to do so. Let’s check how it works!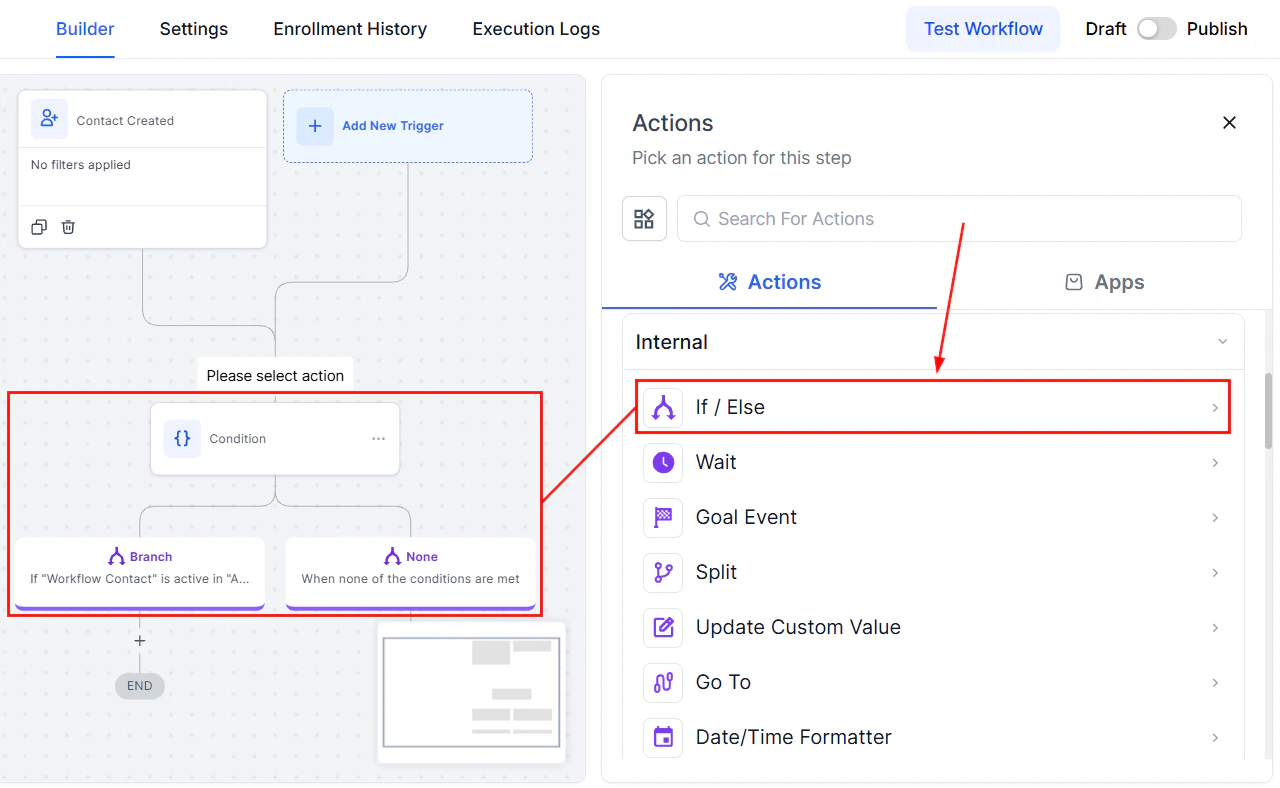
Screenshot
Using Scenario Recipes
Scenario Recipes are prebuilt If/Else action templates to simplify the set-up process; some will have a few requisites you’ll need to add into the workflow for the recipe to function. These will be displayed under its name.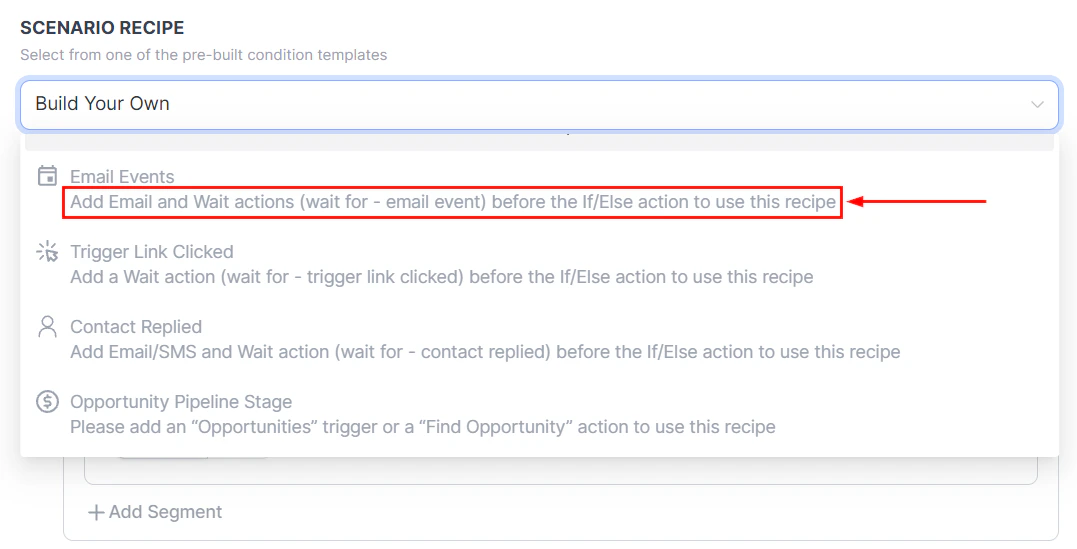
Screenshot
Screenshot
Screenshot
Build Your Own
This blank format allows you to build a conditional action that suits your needs. To use it, start by naming the action for easy identification.
Screenshot
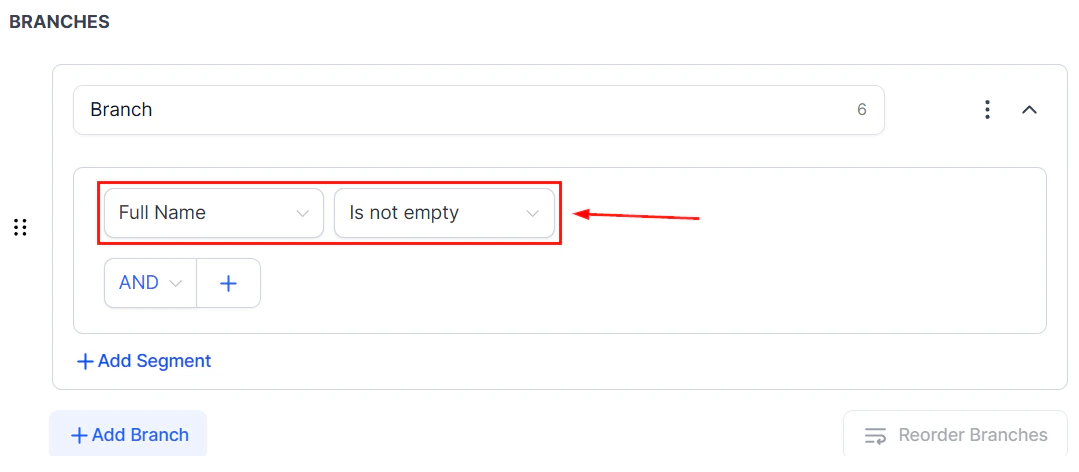
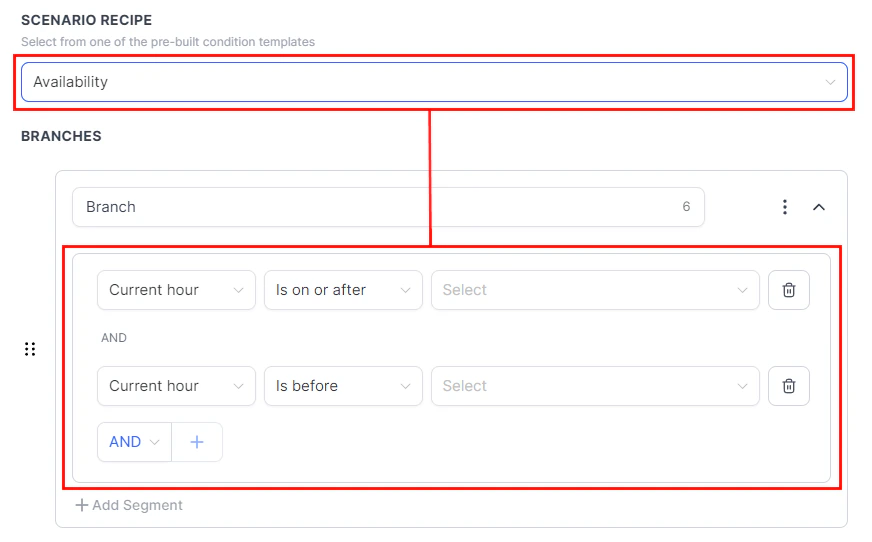
Setting Up a Branch
These will be the conditions the contact needs to meet to qualify for the branch. The available conditions are organized into folders for you to select the specific value or action the contact needs to meet before moving to the next step.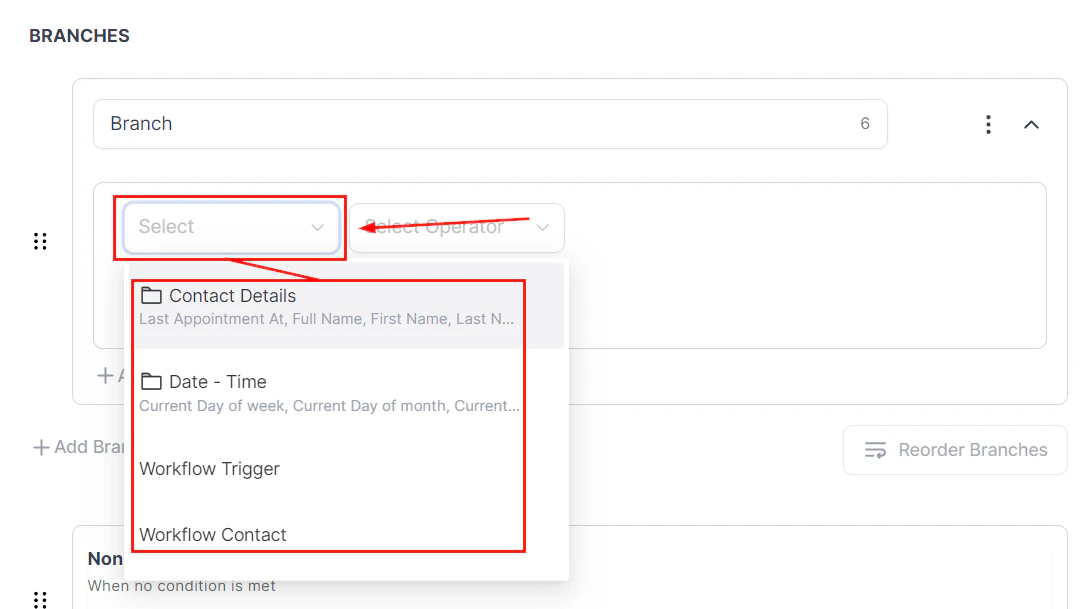
Screenshot
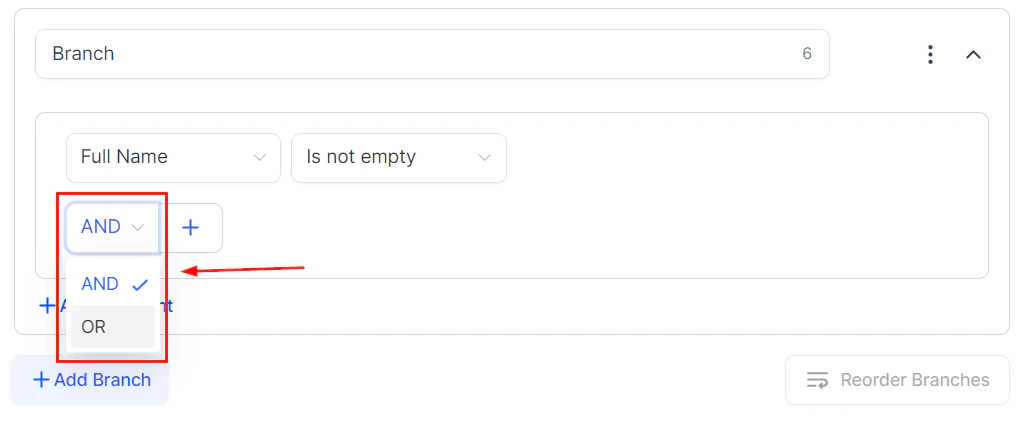
- AND option: When selecting this option, the contact has to meet all conditions added to qualify.
- ****OR option: ****When selecting this option, the contact will qualify for this branch if one of the conditions is met.
Screenshot
Screenshot
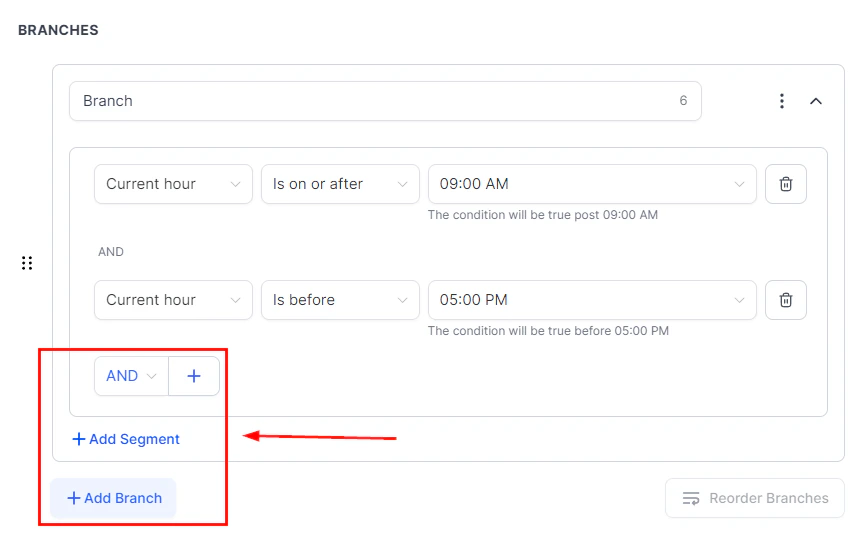
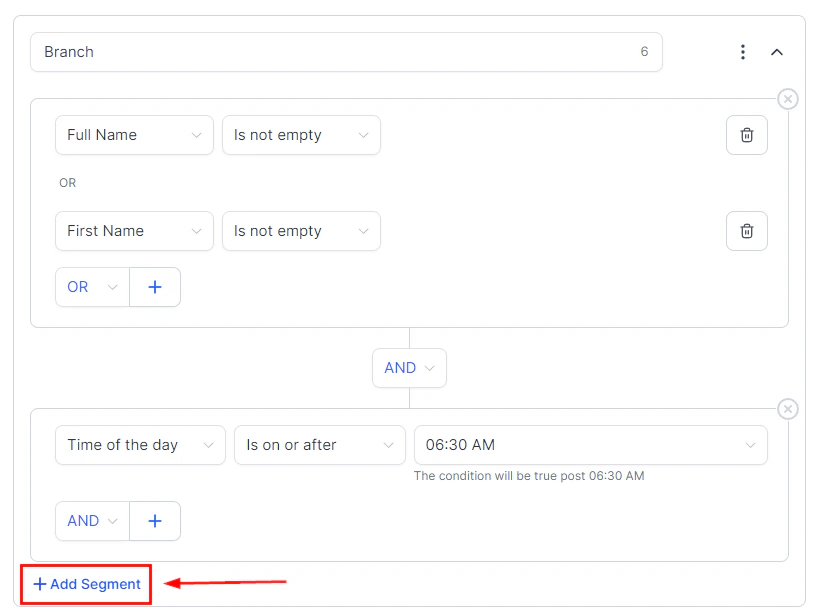
Creating Multiple Branches
You can add up to 10 branches under one If/Else action. To do so, click the +Add Branch button.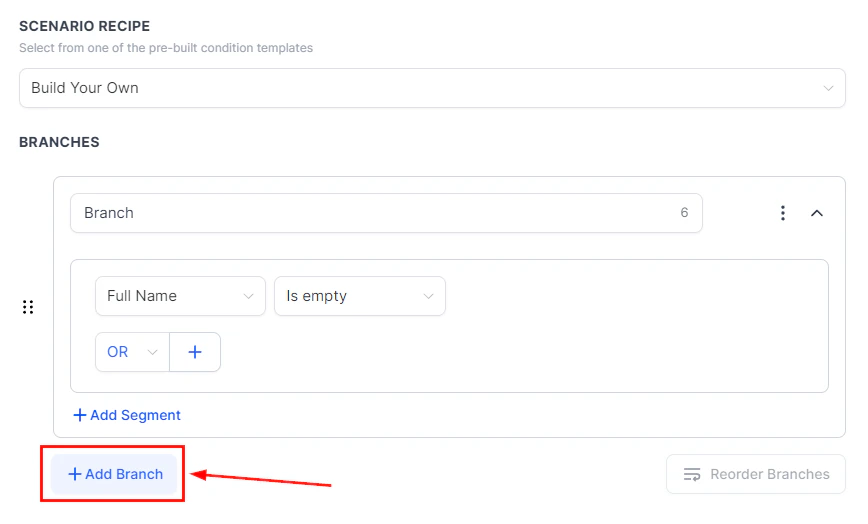
Screenshot
Screenshot
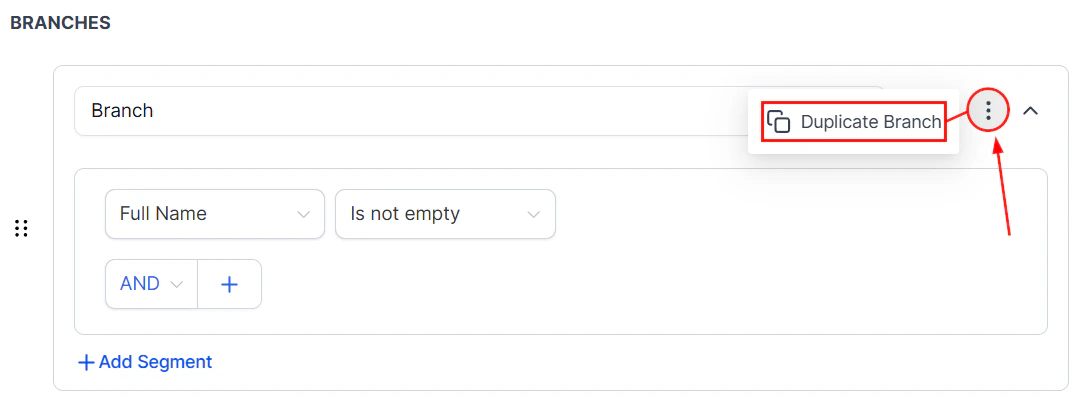
Duplicating Branches
Branches can be duplicated within the same conditional action by clicking the three dots menu on a branch and selecting “Duplicate Branch.”** The duplicate will appear below the original with “(copy)” added to its name. However, different branches need different conditions, or the contacts will be assigned to only the first available branch. Therefore, we recommend using this option as a base to add extra conditions to.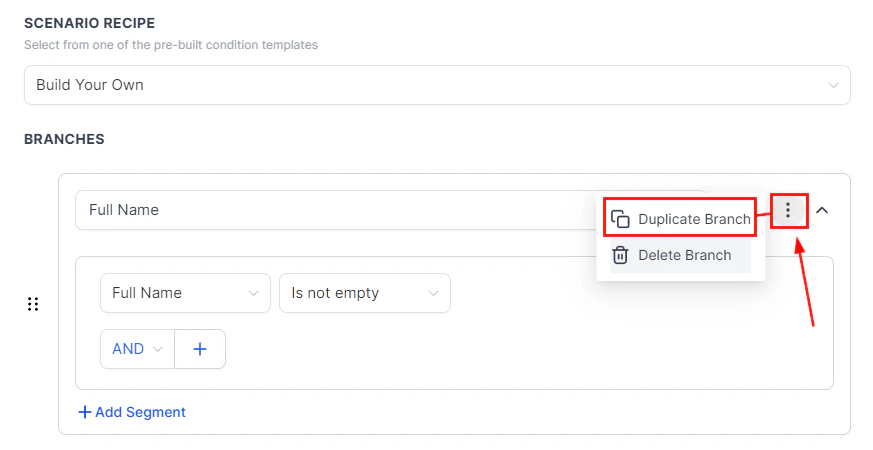
Screenshot
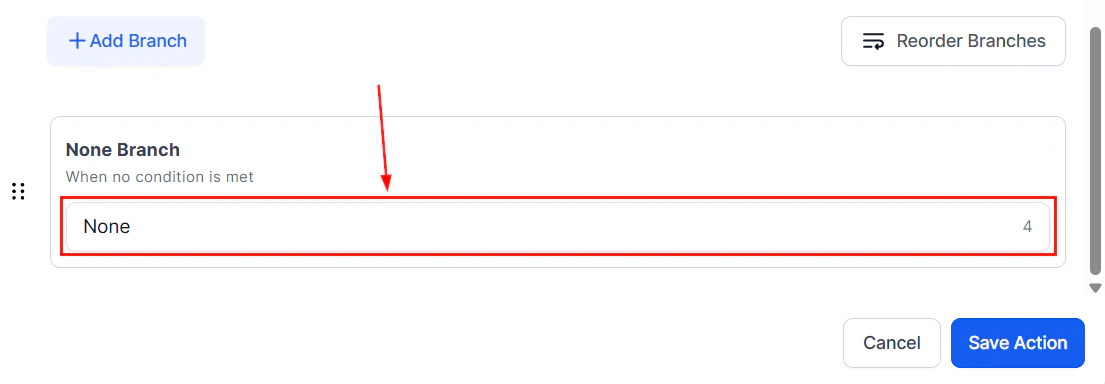
None Branch
In conditional actions, an additional branch will be automatically added to perform a series of tasks if the added conditions fail. This branch is called the “None Branch”. This branch can be renamed but no conditions can be added to it, and it will always be the last branch.
Screenshot

Screenshot
Adding Follow-up Actions
After setting up your branches, you can add actions for each branch, including adding other If/Else actions.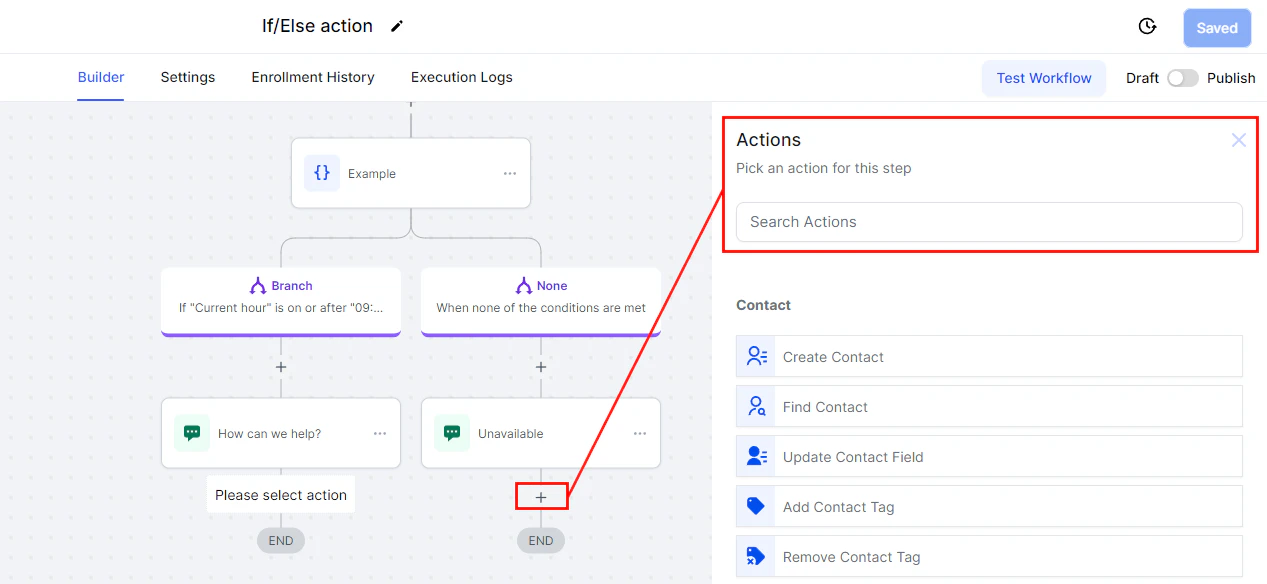
Screenshot
Math operation action
The Math Operation action makes the system seamlessly handle any calculations needed by adding them to a workflow where they can be used to maintain score metrics or total fields. For example, this function can be used to give scores to leads based on their responses and activities in a marketing campaign.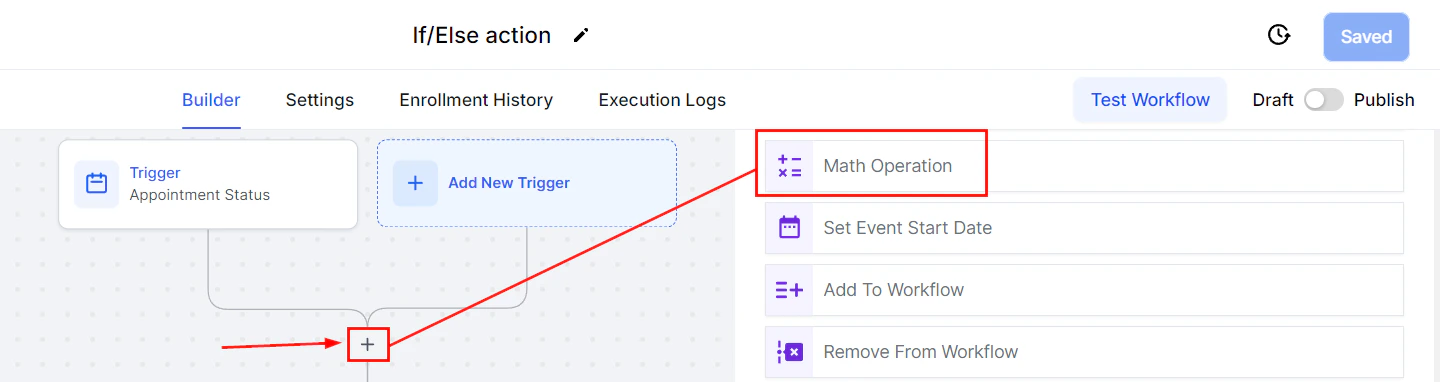
Screenshot
Setting it Up
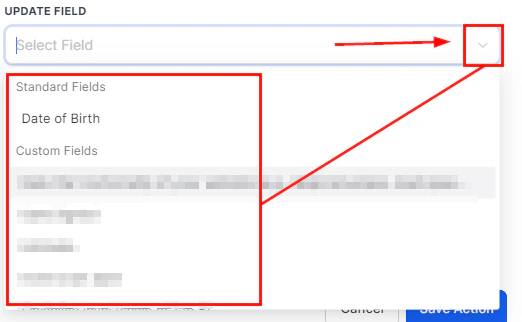
Select the field you want to apply the Math Operation on, this can be any numeric field in the system including dates and custom values.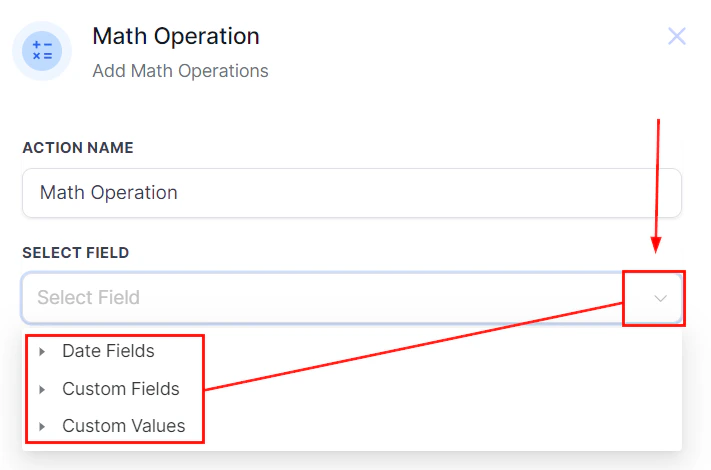
Screenshot
Screenshot
Screenshot
Screenshot
Screenshot
Date Fields
For date fields, the operations will be limited to Adding or Subtracting, once the operator is selected enter the total days, months, and/or years.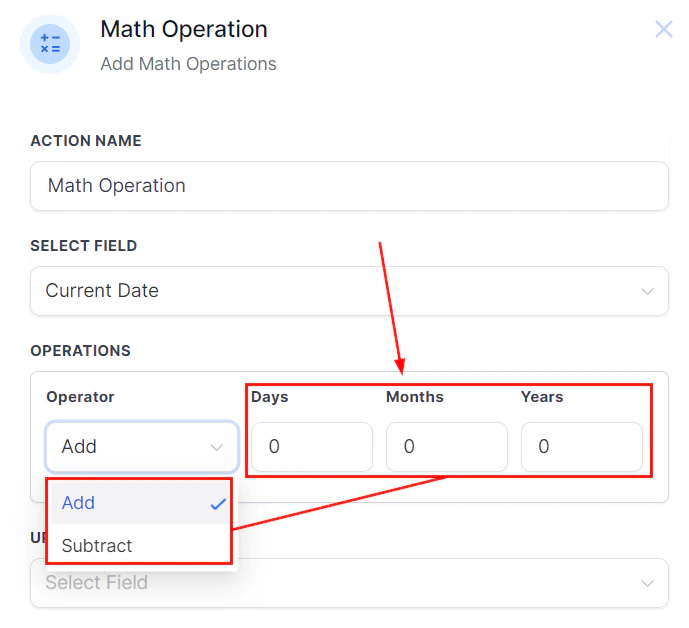
Screenshot
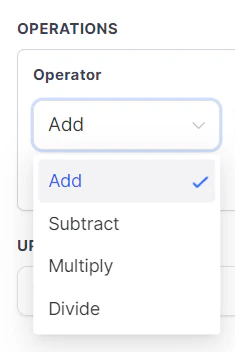
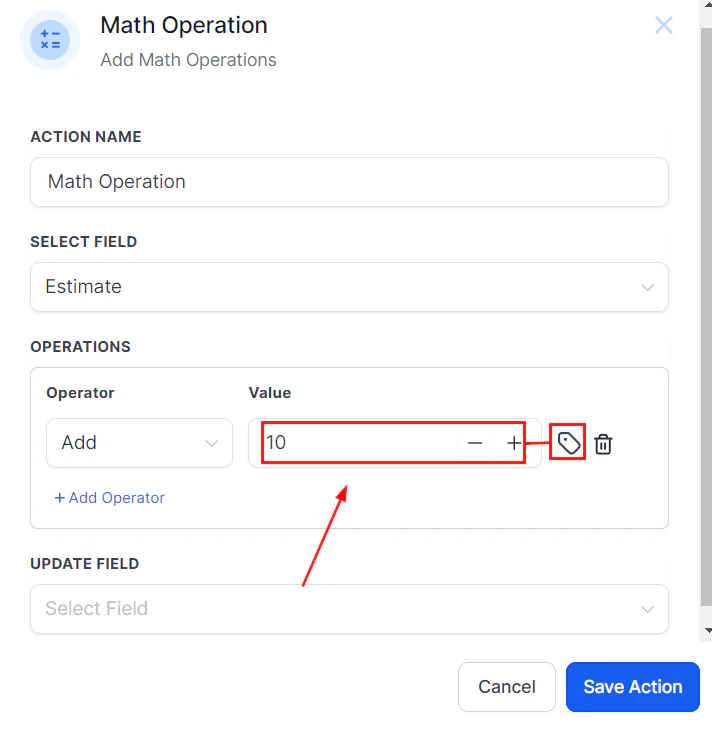
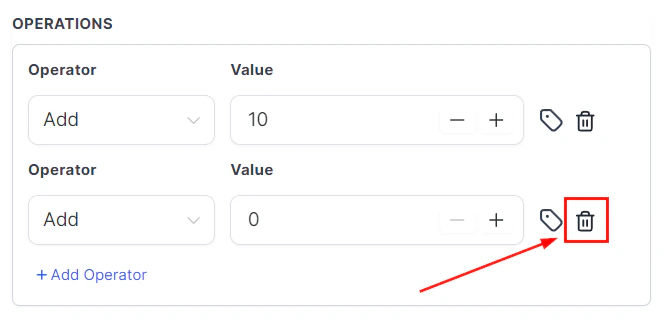
Number Fields
For Numerics fields you can Add, Subtract, Multiply, or Divide as well as add multiple operations for the system to run.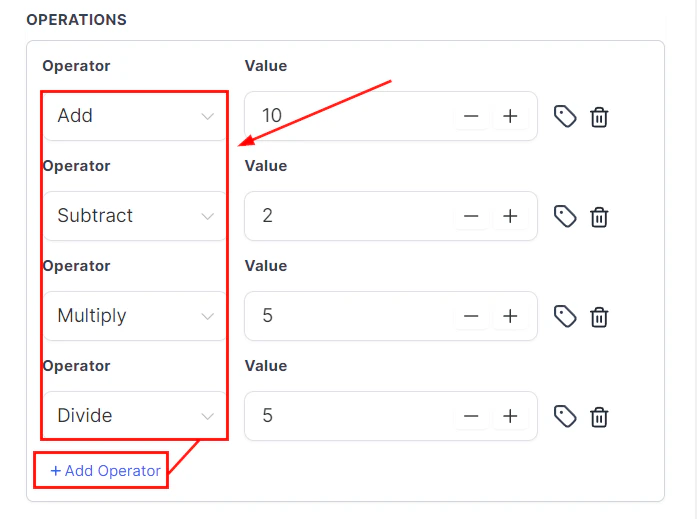
Screenshot
Screenshot
Goal event action
The Goal Event feature automatically advances contacts to the next step in the workflow once they meet the goal conditions specified by the user. This can occur regardless of the contact’s position in the workflow. This workflow action is great for ending a stream of workflow actions once a customer has met your goal, such as completing a Purchase.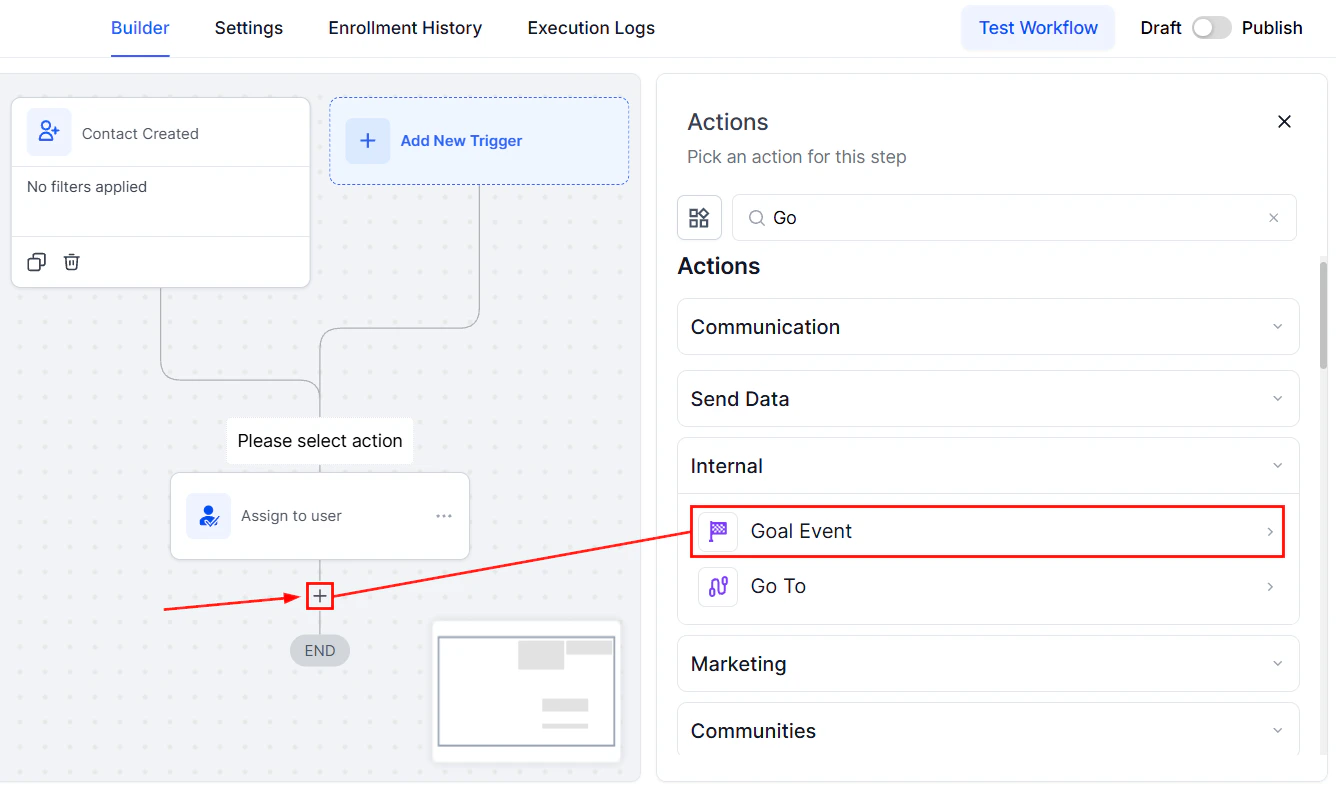
Screenshot
Action Name
The user can customize the name of the Goal Event according to the objective or leave it as the original conventional name.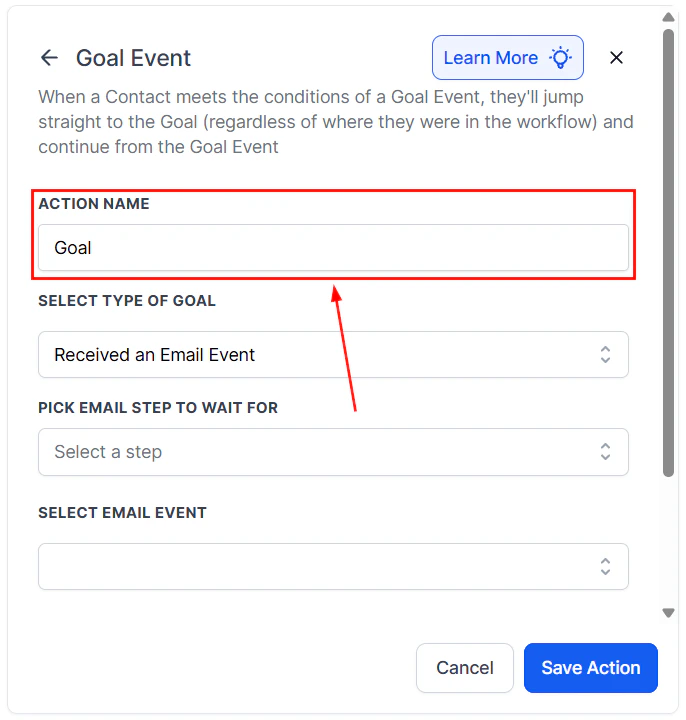
Screenshot
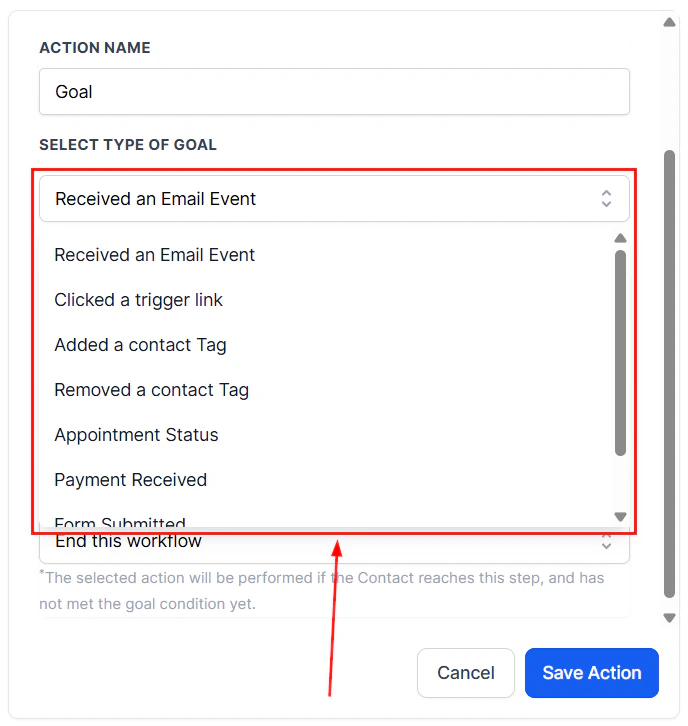
Select the type of Goal
Goal Events can be chosen to establish a contact Goal for a workflow. Once a contact joins the workflow, the system starts monitoring the specified Goal Event to occur regardless of the current step of the contact.- ****Received an Email Event: ****The Email event enables the system to pull prospects into the workflow, irrespective of their current step, when certain conditions relating to the email event occur. Users can select the specific email event they want the system to recognize, such as email opened or unsubscribed.
- Clicked a Trigger Link: Once the prospect clicks on a trigger link, they will be pulled into the workflow regardless of where they are in the step.
- ****Added a Contact Tag: ****When a specific tag is added to a contact, the system triggers the goal and moves the contact to the next step of the workflow.
- ****Removed a Contact Tag: ****If a tag is removed from a contact, it serves as the goal condition, advancing the contact through the workflow.
- Appointment Status: When a specific appointment status is updated (e.g., booked, canceled, or no-show), the system recognizes this as the goal and takes appropriate action based on the workflow setup.
- Payment Received: When a payment is successfully processed, the system triggers the goal, allowing the contact to advance in the workflow or initiate subsequent automated actions as defined in the setup.
- Form Submitted: When a contact submits a designated form, the system recognizes this submission as the goal condition and moves the contact to the next relevant step in the workflow.
- Document Status: When the status of a document changes (e.g., sent, viewed, signed, or declined), the system identifies this update as the goal event and progresses the contact through the workflow accordingly.
Screenshot
Pick The Event To Wait For
Users can select the step for the email, trigger link, tag, or form interaction event using the Pick email/Select step to wait for the option.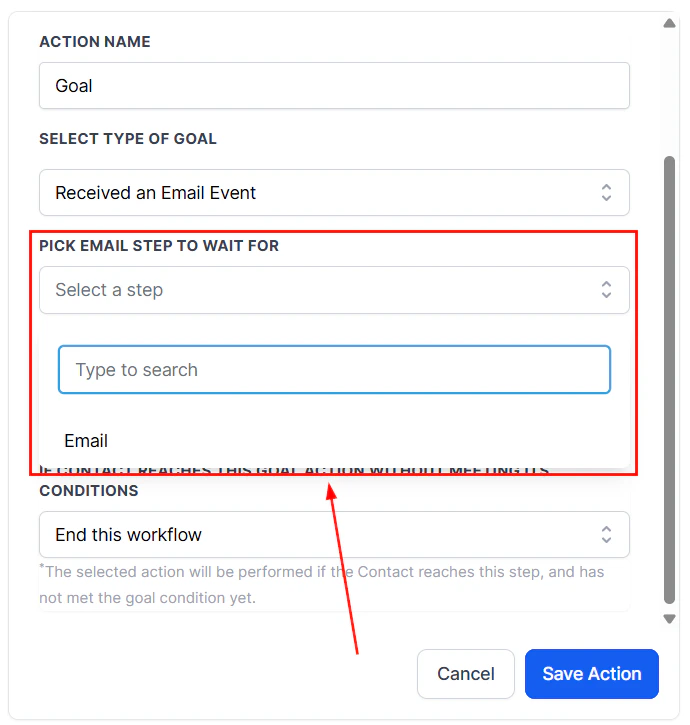
Screenshot
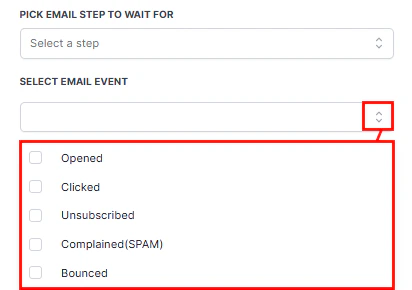
Selecting Email Event
From the options below, you can select the email event depending on your objective. From the checkboxes, you can select one or more events as per your goal.- ****Opened: ****Use this to activate the goal event after the email is opened.
- Clicked: Use this when you need the goal event after the prospect has clicked on the link.
- ****Unsubscribed: ****Use this when you have several goal actions after the prospect clicks on the unsubscribe link.
- Complained: This is used to perform the actions when the client has marked your email as spam, and you have already created the actions to be performed in such events.
- Bounced: In case one of your emails was bounced, you will have the ability to remove such emails from the list.**
Screenshot
Appointment Status
For the Appointment Status option, select the calendar (1) you want the appointment to be from, then select your desired status (2).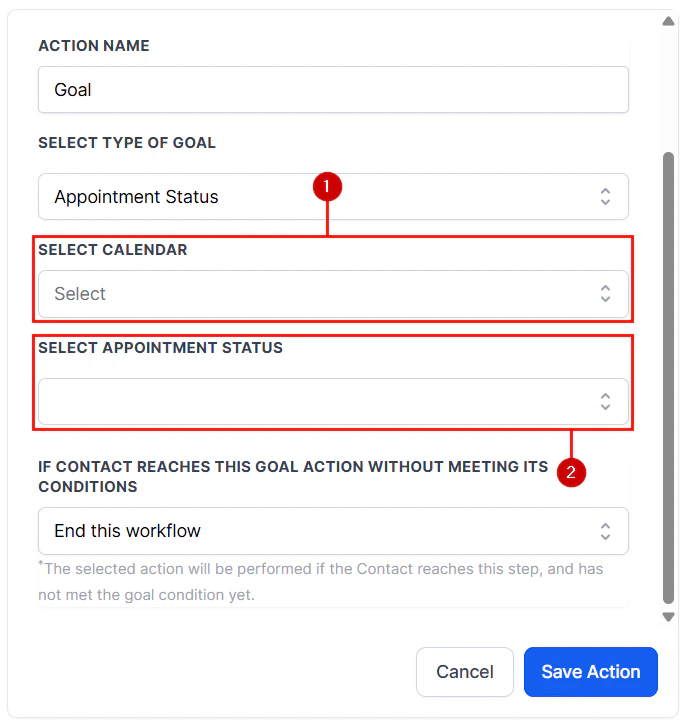
Screenshot
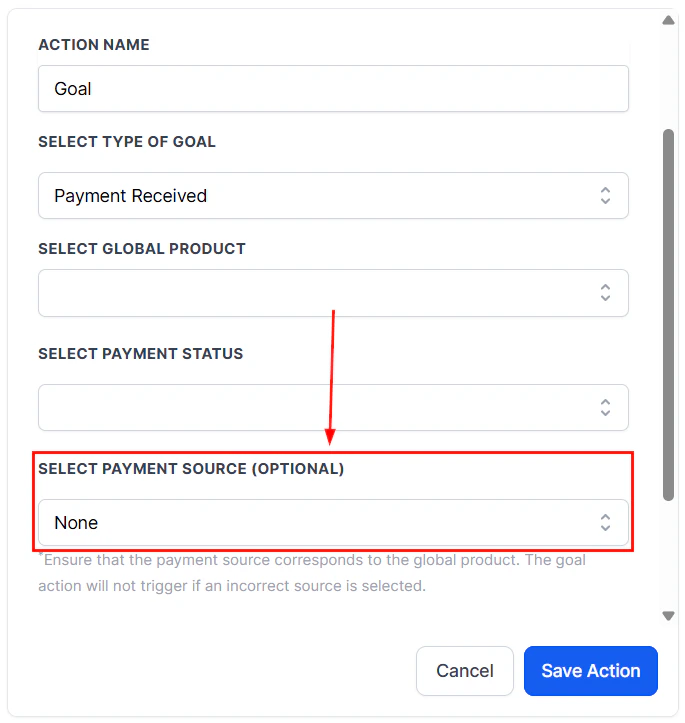
Payment Received
For the Payment Received option, select the Global product (1) you want the payment to be for, then select your desired status (2).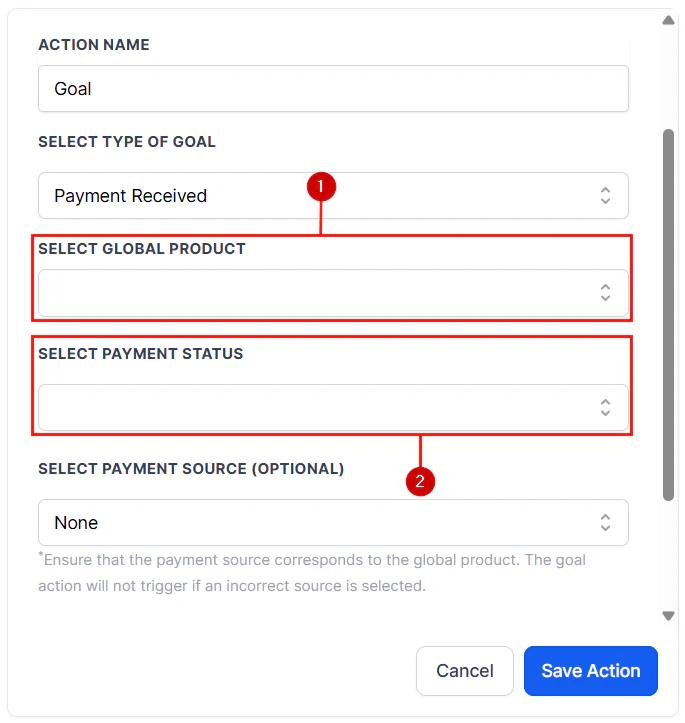
Screenshot
Screenshot
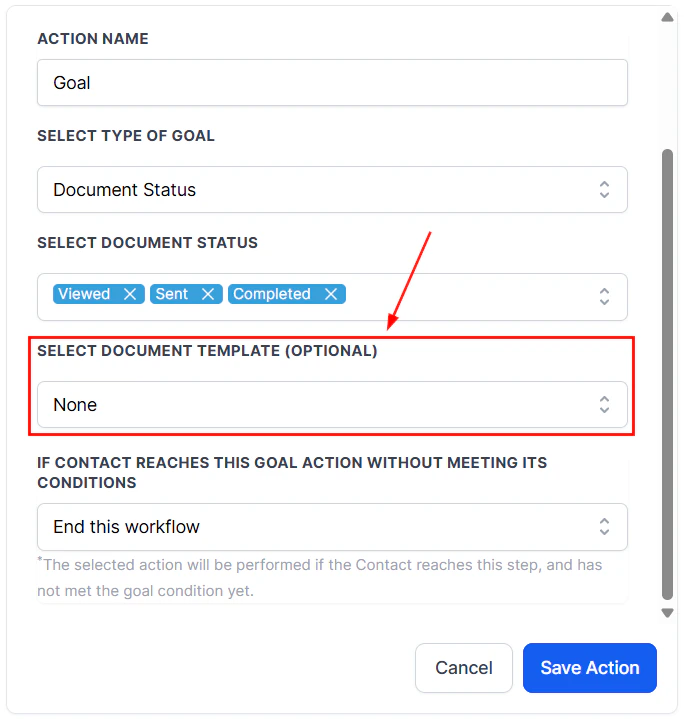
Document Status
For the Document Status option, open the dropdown menu and select the statuses you want to trigger this action.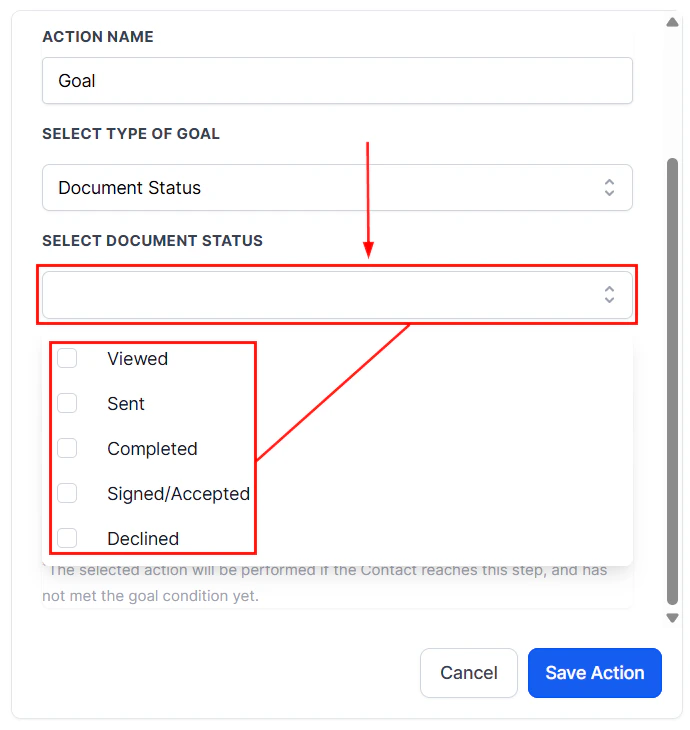
Screenshot
Screenshot
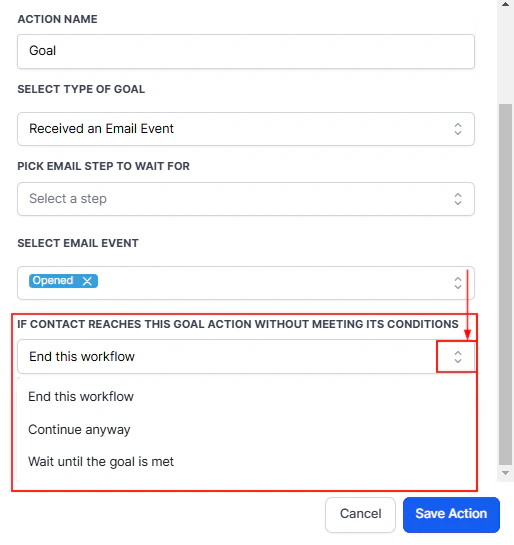
Action When The Contact Reaches the Goal Without Meeting Its Conditions
If the Goal event was not reached by the time the contact reaches the goal action in your automation, there will be 3 options to select from:- **End this workflow: ****This allows you to end the workflow even if the contact has not met the goal condition yet.
- ****Continue Anyway: ****If you need the system to perform several actions when the contact has not met the goal condition, you can use this
- Wait until the Goal is met: With this option, you can let the system wait until the goal conditions are met.
Screenshot
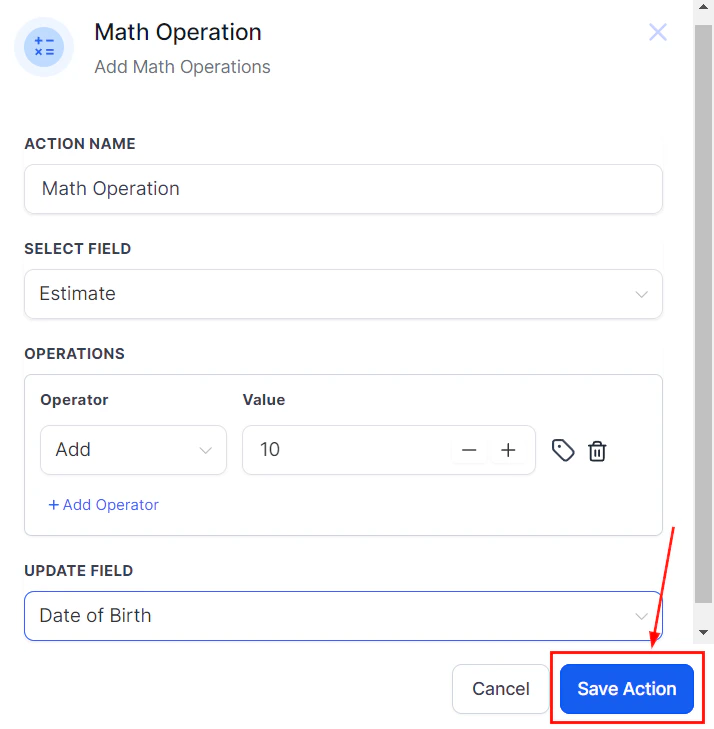
Save Actions
Click the Save Action button to save the changes you have made in your goal event.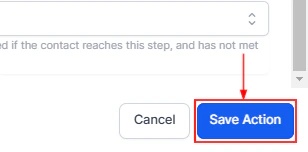
Screenshot
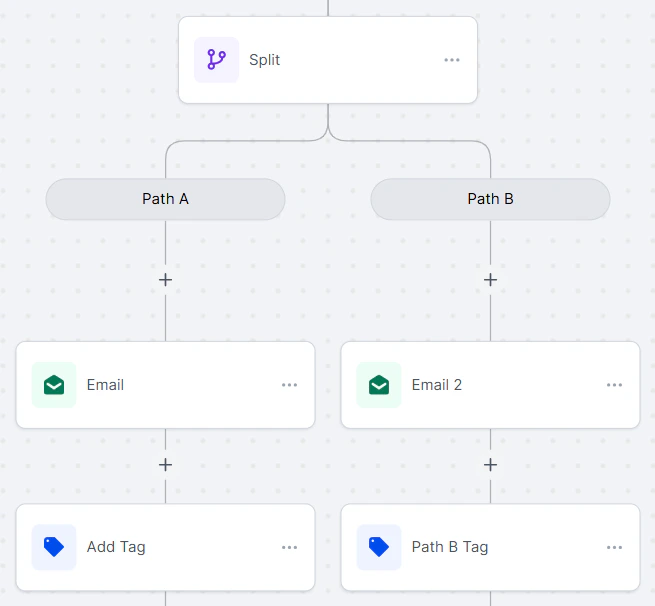
Split action
Split Testing, also known as A/B testing, allows you to compare different versions of your email campaigns to determine which one performs better. Let’s learn how to use it!Adding the Split Action
Navigate to the desired workflow in the Automation > Workflows section of your account or create a new workflow with the relevant trigger(s), then select the “Split” action from the actions list.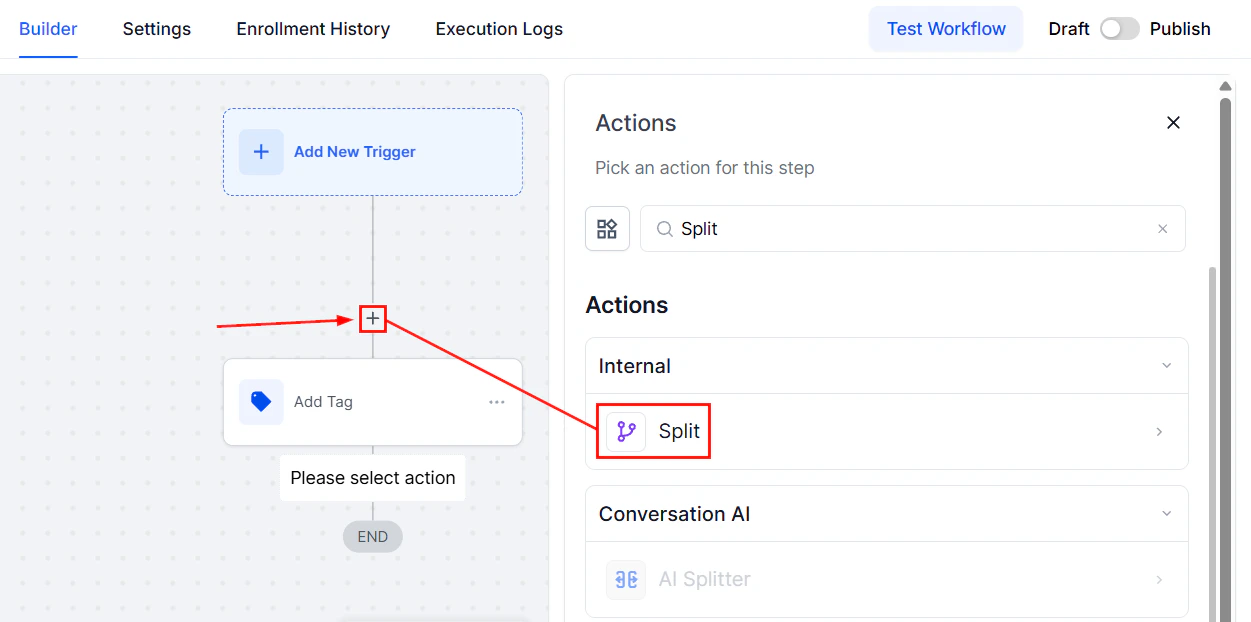
Screenshot
Action Name
Rename the action to reflect its intended purpose.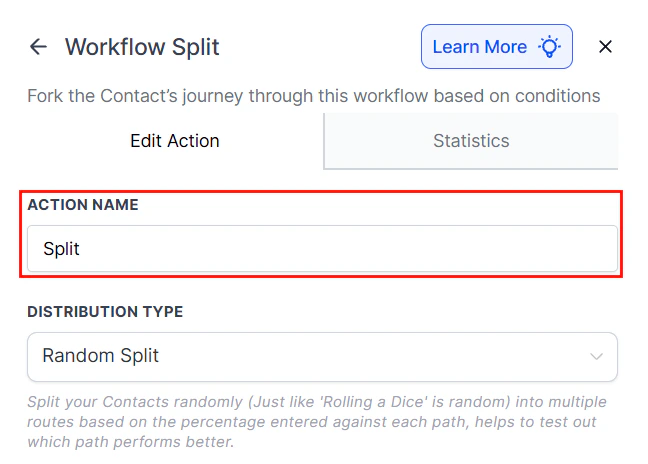
Screenshot
Distribution Type
Select the desired method for distributing contacts from the dropdown menu. Currently, Random Split is the only available option, with additional distribution methods to be introduced in future updates.
Screenshot
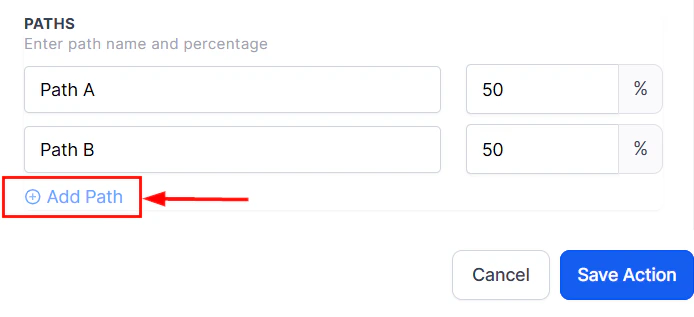
Paths
Rename “Path A” and “Path B” to reflect your test variations and set the distribution percentage for each path.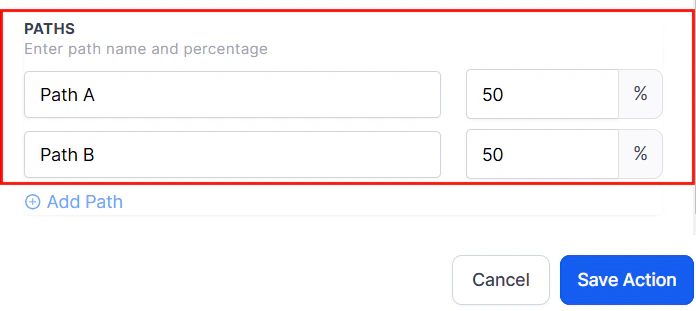
Screenshot
Screenshot
Screenshot
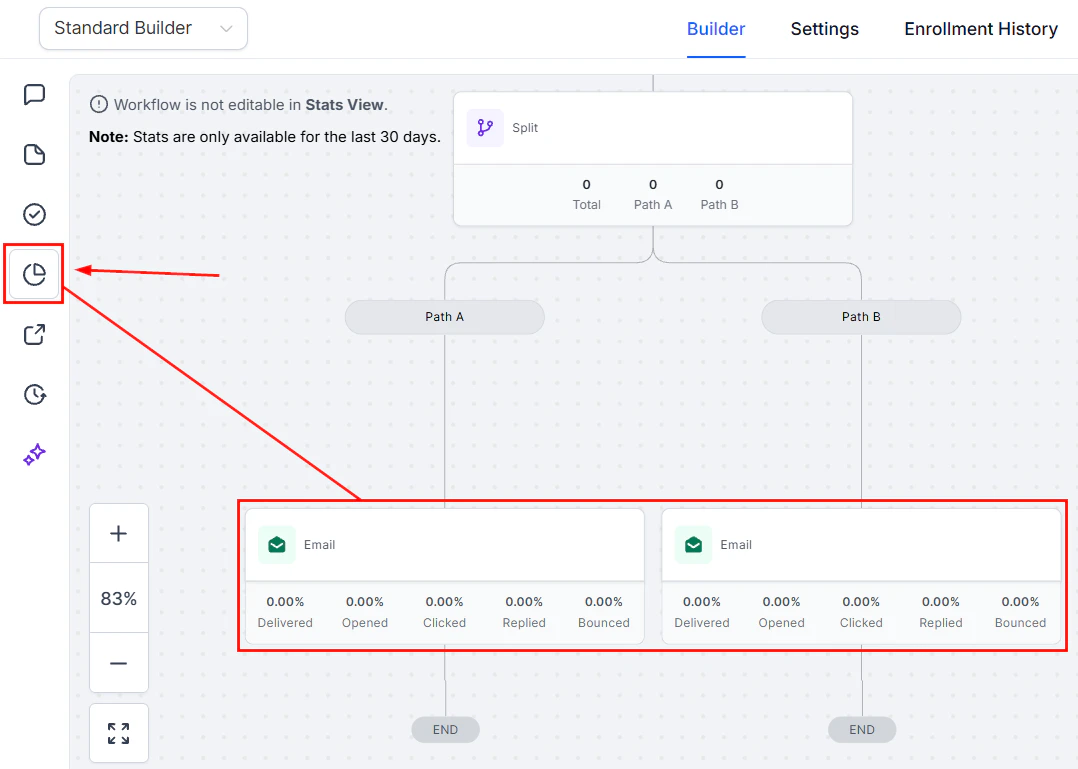
Statistics
Check the Statistics of the action by navigating to the Statistics tab to see the distribution of contacts across paths.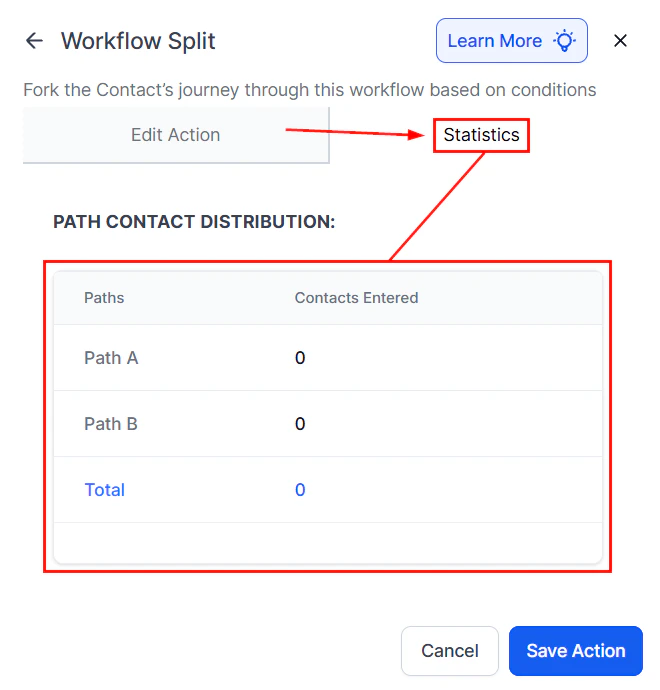
Screenshot
Screenshot
- Enhance Campaign Optimization: Test variations of subject lines, email content, or Calls to Action (CTAs) to find the most effective approach.
- Save Time: Eliminate the need for external tools and streamline your marketing processes.
- Make Informed Decisions: Access real-time statistics to guide your marketing strategy, ensuring that every decision is data-driven.
Practical Example
Imagine you own an e-commerce store and can’t decide between two email subject lines.- Solution: Use the Split action to divide your mailing list, sending 75% the Path A email and 25% the Path B email.
- Outcome: Track key metrics such as website visits and purchase rates for each path. After analyzing the results, you will know which subject line performs better, allowing you to apply this insight to future campaigns.
Frequently Asked Questions
What if the total percentage for all paths doesn't equal 100%?
What if the total percentage for all paths doesn't equal 100%?
Can I change the paths after the workflow has started?
Can I change the paths after the workflow has started?
Workflow AI assistant
Workflow AI is an assistant designed to support you in building, refining, and managing workflows within the platform. Whether you’re creating new workflows or enhancing existing ones, Workflow AI provides step-by-step guidance, action suggestions, and optimization insights tailored to your objectives. By simply typing your desired outcome, Workflow AI presents a curated list of actions and triggers to help you achieve your goals with ease.Key Features of Workflow AI
- ****Assistance for New Users: ****If you’re new to workflows, Workflow AI provides the guidance you need to get started. Simply type in your objectives, and it will suggest the necessary actions and triggers, while also offering configuration help. The AI assistant can even explain workflows and best practices to you, making the learning curve manageable.
- ****Step-by-Step Setup: ****Workflow AI guides you through each workflow-building step, ensuring you feel confident in every part of the process. You’ll have the information you need to proceed smoothly from one step to the next.
- ****Real-Time Assistance: ****Need clarification or have questions mid-process? You can ask Workflow AI any workflow-related question to get instant answers and best practice tips to support your workflow development.
- ****Add and Configure Actions Easily: ****Workflow AI not only suggests actions like sending reminders or updating statuses but also helps you configure them. Just click on the recommended action, and Workflow AI will guide you through adding and setting it up within your workflow.
How to Use Workflow AI
Navigate to Workflows
Go to the Automation > Workflows section in your account, then select an existing workflow from the list or create a new one from scratch.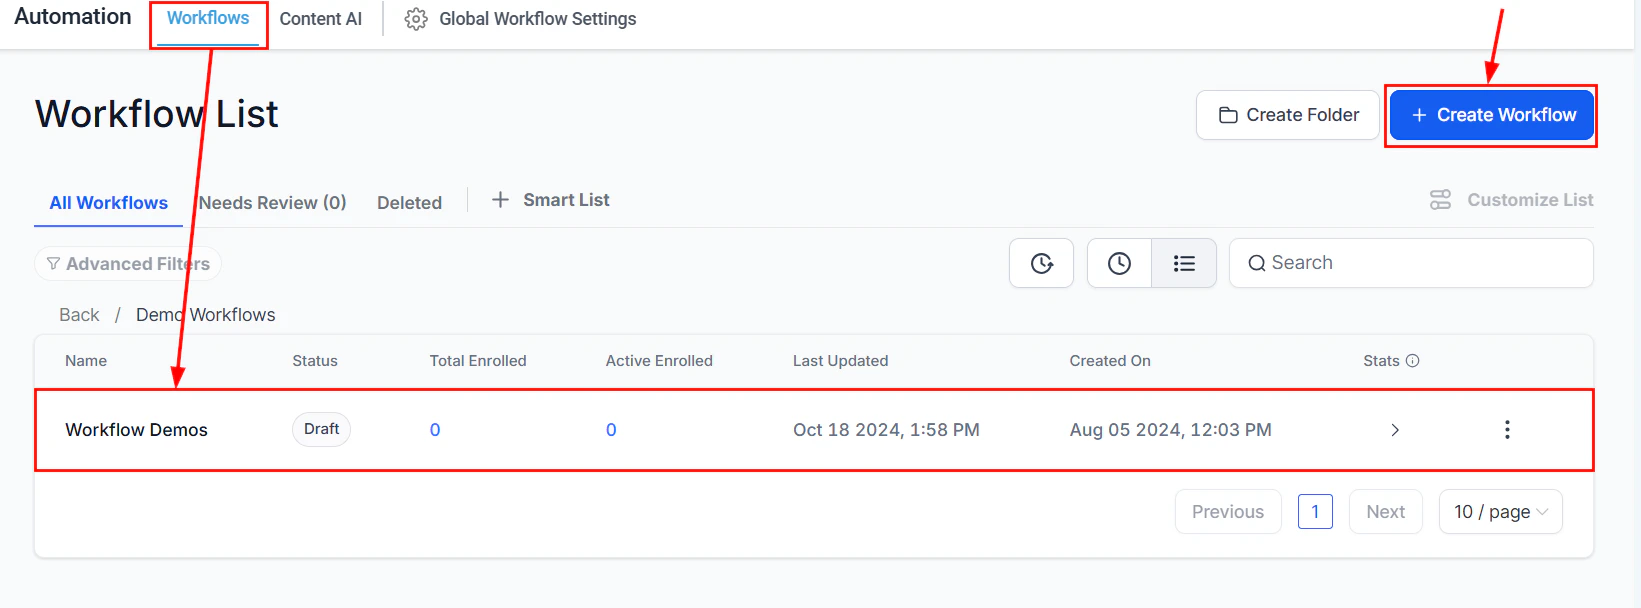
Screenshot
Locate the AI Chat
Locate the Workflow AI chat icon in the bottom left corner of the workflow builder. Clicking it will open the chat box, where you’ll see several prompt cards to start the conversation.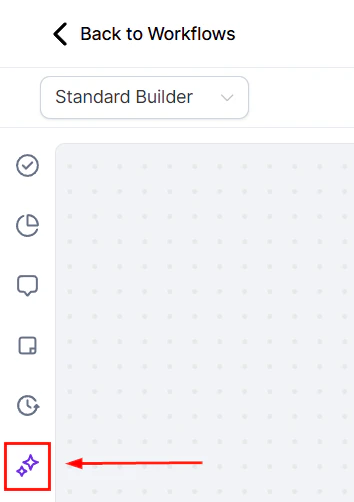
Screenshot
Begin the Conversation
Choose a card or simply start typing your query into the chat box.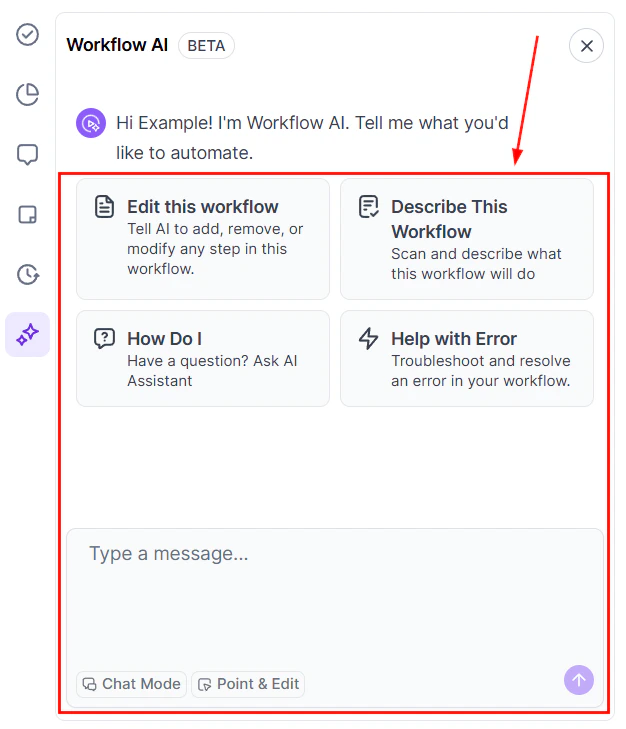
Screenshot
Workflow AI Options
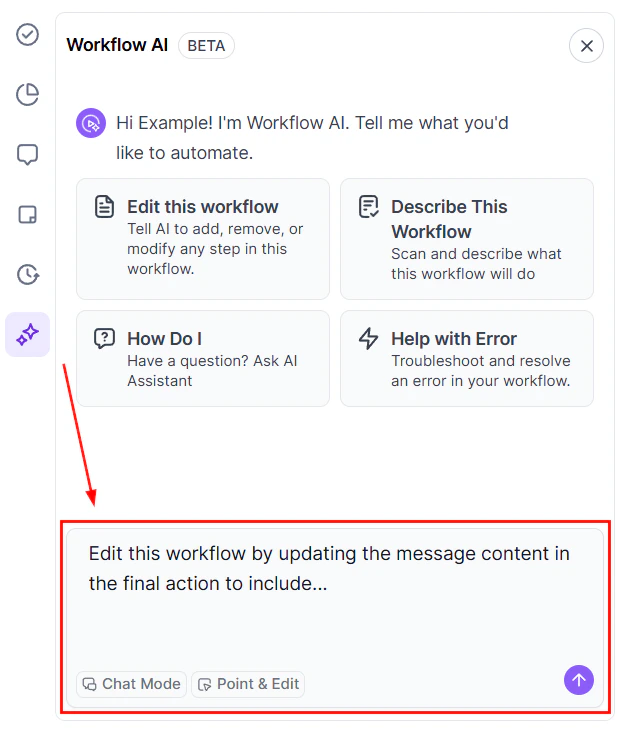
Edit This Workflow
This option will add a prompt so you can instruct the AI helper to modify your workflow.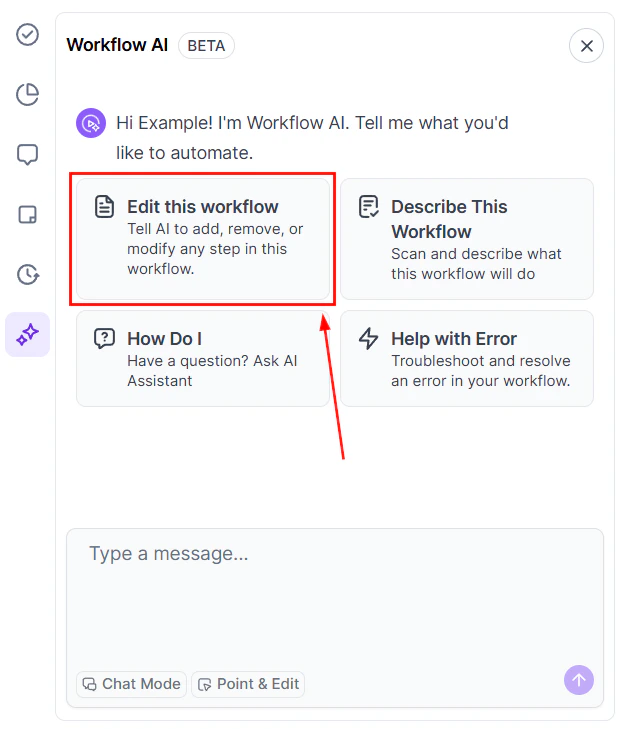
Screenshot
Screenshot
Describe this Workflow
Obtain a breakdown of the workflow name, triggers, actions, and key workflow settings to understand system workflows or workflows other team members have created.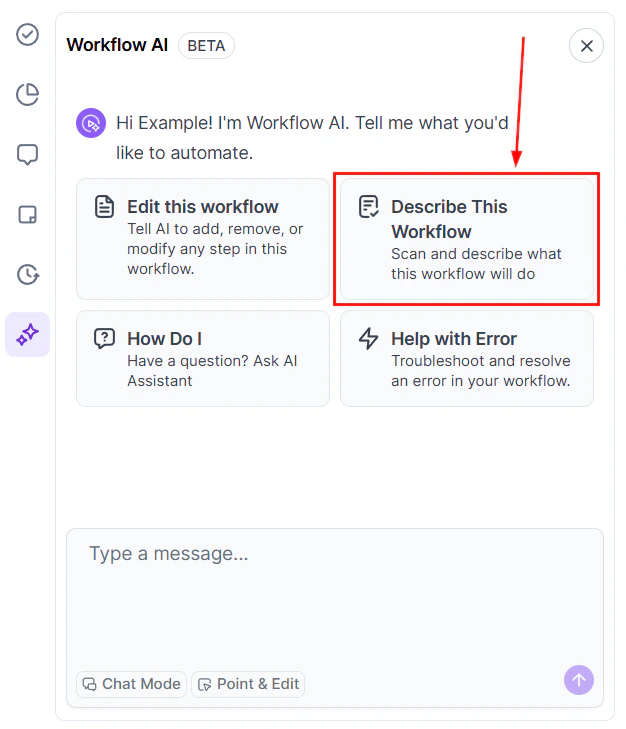
Screenshot
How Do I?
Click the “How Do I” tile to ask a question in the chat box. This allows you to quickly enter the query, resulting in a more efficient interaction.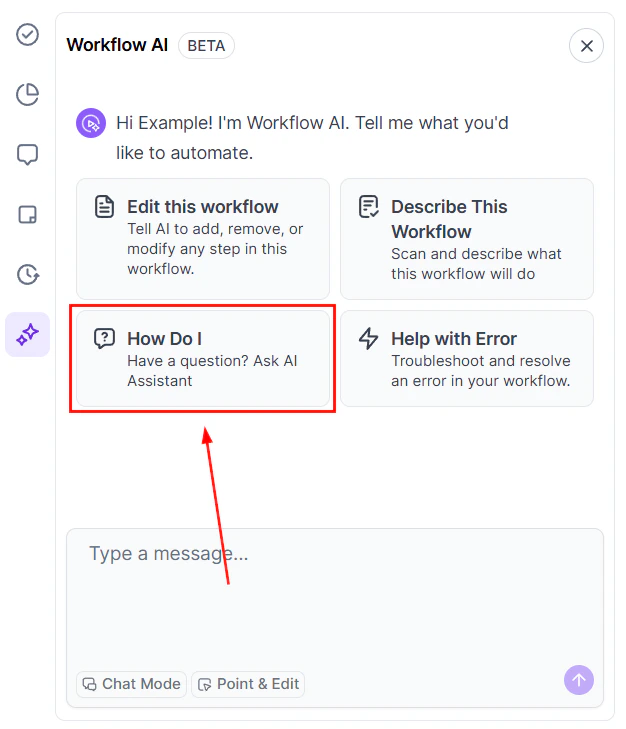
Screenshot
Help with Error
If you’re getting an error message, this option helps you troubleshoot your workflow with the help of AI.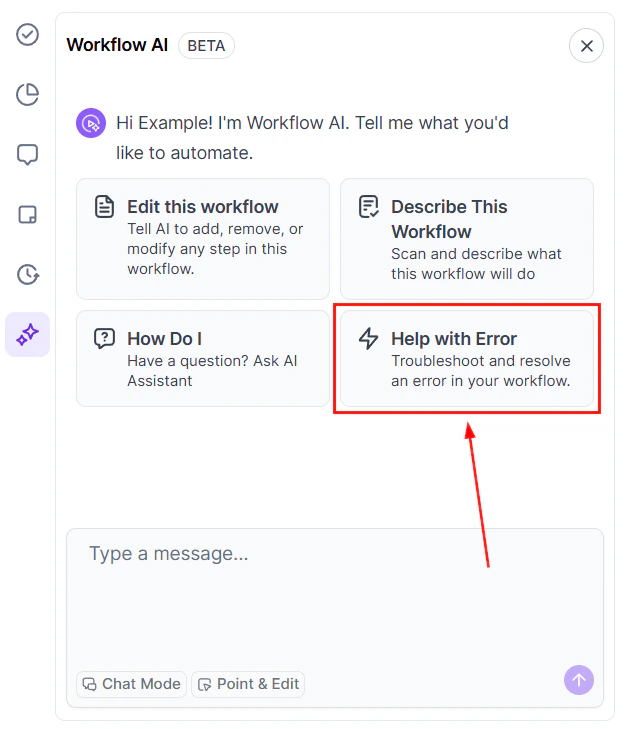
Screenshot
Receive Detailed Explanations and Guidance
As you interact with Workflow AI, it will suggest follow-up questions to deepen your understanding and ensure you’re building an effective workflow.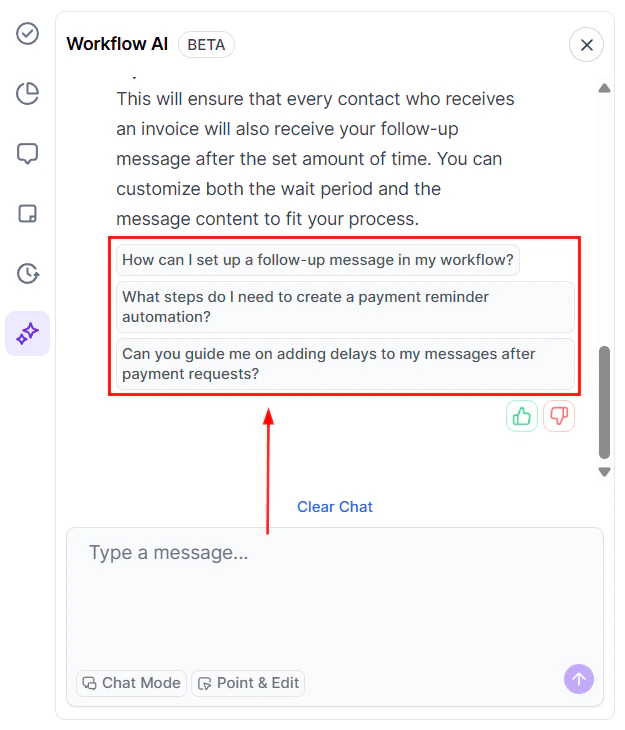
Screenshot
Feedback on Responses
Provide feedback on Workflow AI’s responses to help improve its accuracy and usefulness over time.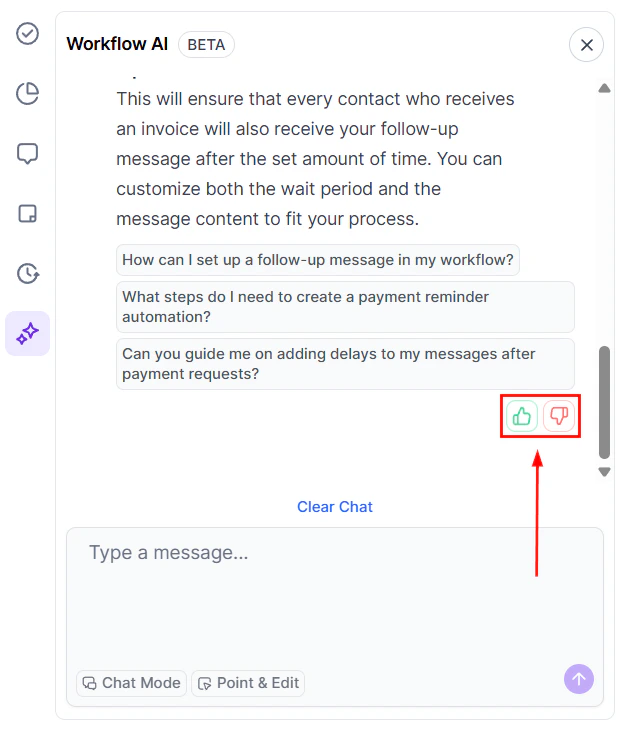
Screenshot
Clear or Export the Chat
Use the “Clear Chat” button to start a new conversation at any time.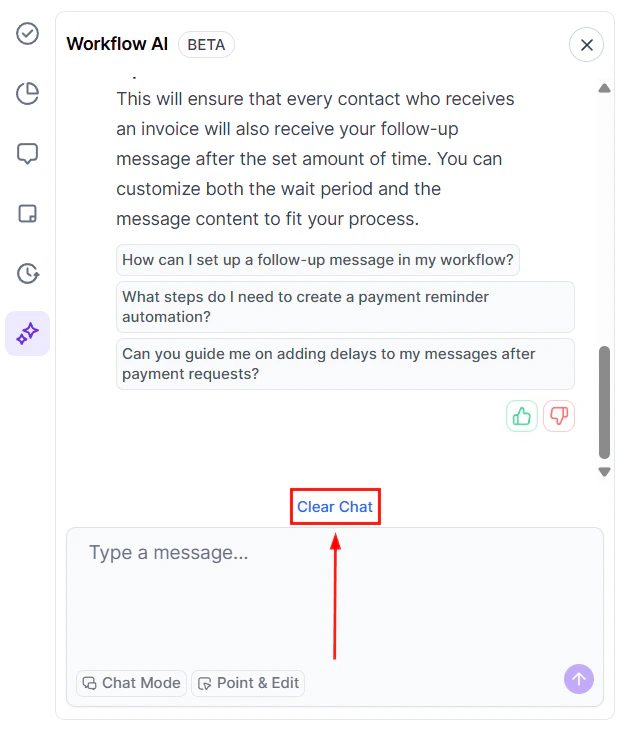
Screenshot
Chat Mode
By selecting the Chat Mode, you can talk and ask questions to the workflow’s AI without making changes to the workflow.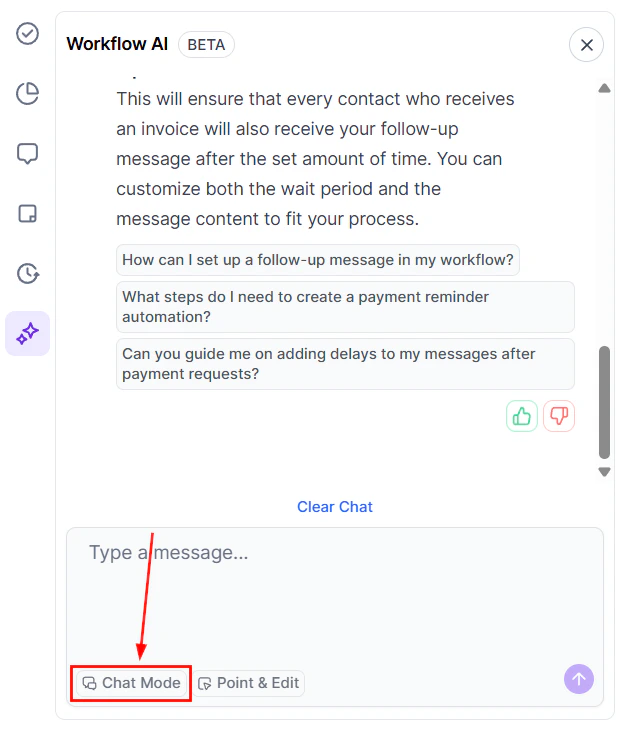
Screenshot
Point & Edit or Ask
This option lets you select multiple triggers and actions for the workflow AI to consider when providing you with insights, suggestions, and information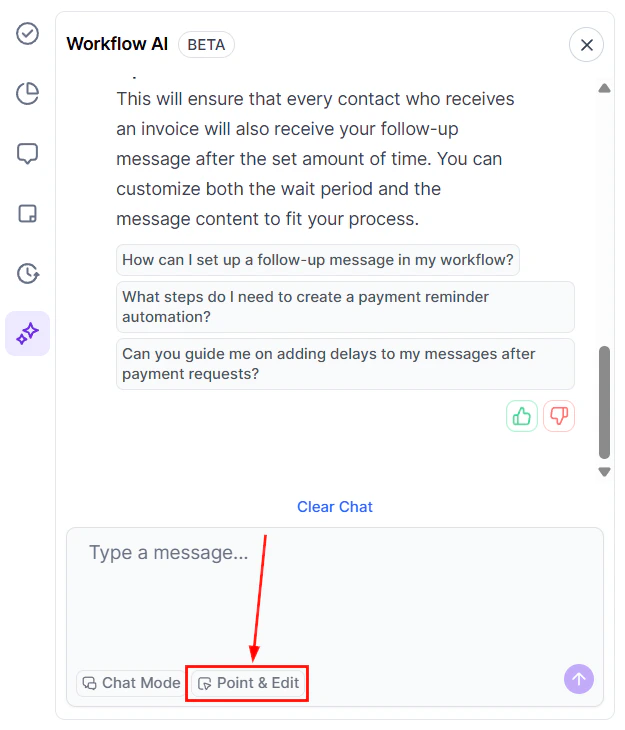
Screenshot
Why should I use Workflow AI?
Why should I use Workflow AI?
Can Workflow AI handle complex workflows?
Can Workflow AI handle complex workflows?
Can I keep a record of my chat with Workflow AI?
Can I keep a record of my chat with Workflow AI?