> ## Documentation Index
> Fetch the complete documentation index at: https://help.hoopai.com/llms.txt
> Use this file to discover all available pages before exploring further.
# Email Services
> Configure dedicated email domains, SMTP providers, Mailgun, DNS records, deliverability tools, and email compliance settings in the HoopAI Platform.
The Email Services section is where you configure how outbound emails are sent from your account. You can set up dedicated sending domains, connect third-party SMTP providers, manage DNS records, monitor deliverability, and ensure compliance with Google and Yahoo's sender requirements.
Navigate to **Settings > Email Services** to get started.
## Domain configuration overview
The Domain Configuration tab lets you customize email domain settings, manage default domains, and optimize email delivery.
**To access:** Go to **Settings > Email Services**, then click the **Dedicated Domain and IP** tab.
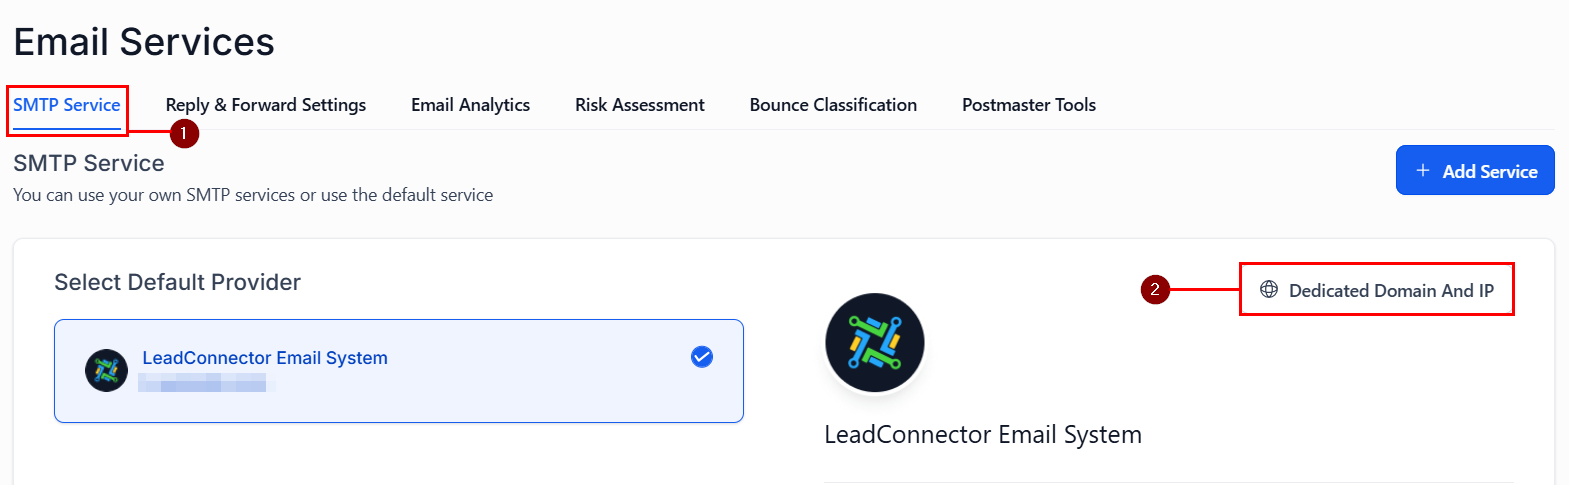 A dedicated domain improves your sender reputation and ensures emails are delivered reliably. Setting up a dedicated domain involves adding DNS records to your domain registrar.
**Steps:**
1. Navigate to **Settings > Email Services**.
2. Click **Add Domain** or **Dedicated Domain and IP**.
3. Enter your domain name (e.g., `mail.yourbusiness.com`).
4. Copy the provided DNS records (DKIM, SPF, DMARC) and add them to your domain's DNS settings.
5. Return to the platform and click **Verify** to confirm the DNS records are live.
DNS changes can take up to 48 hours to propagate. If verification fails, wait a few hours and try again.
You can connect multiple sending domains to your account. This is useful if you send emails for multiple brands or sub-brands from the same account.
1. Go to **Settings > Email Services**.
2. Click **Add Domain** for each additional domain.
3. Complete DNS verification for each domain.
New sending domains need to be gradually warmed up to build a positive sender reputation. The platform supports fixed-stage email domain warmup, automatically throttling send volume for new domains.
Monitor warmup progress in the **Domain Configuration** tab.
Enable SSL for tracked email links to ensure all tracking URLs use HTTPS. This is required for Google and Yahoo compliance and improves deliverability.
Toggle **SSL for Email Links** in the Domain Configuration settings.
***
## Connecting SMTP providers
Mailgun is a popular transactional email service. Connect it to your account for reliable bulk email delivery.
In **Settings > Email Services**, click **Add Service**.
A dedicated domain improves your sender reputation and ensures emails are delivered reliably. Setting up a dedicated domain involves adding DNS records to your domain registrar.
**Steps:**
1. Navigate to **Settings > Email Services**.
2. Click **Add Domain** or **Dedicated Domain and IP**.
3. Enter your domain name (e.g., `mail.yourbusiness.com`).
4. Copy the provided DNS records (DKIM, SPF, DMARC) and add them to your domain's DNS settings.
5. Return to the platform and click **Verify** to confirm the DNS records are live.
DNS changes can take up to 48 hours to propagate. If verification fails, wait a few hours and try again.
You can connect multiple sending domains to your account. This is useful if you send emails for multiple brands or sub-brands from the same account.
1. Go to **Settings > Email Services**.
2. Click **Add Domain** for each additional domain.
3. Complete DNS verification for each domain.
New sending domains need to be gradually warmed up to build a positive sender reputation. The platform supports fixed-stage email domain warmup, automatically throttling send volume for new domains.
Monitor warmup progress in the **Domain Configuration** tab.
Enable SSL for tracked email links to ensure all tracking URLs use HTTPS. This is required for Google and Yahoo compliance and improves deliverability.
Toggle **SSL for Email Links** in the Domain Configuration settings.
***
## Connecting SMTP providers
Mailgun is a popular transactional email service. Connect it to your account for reliable bulk email delivery.
In **Settings > Email Services**, click **Add Service**.
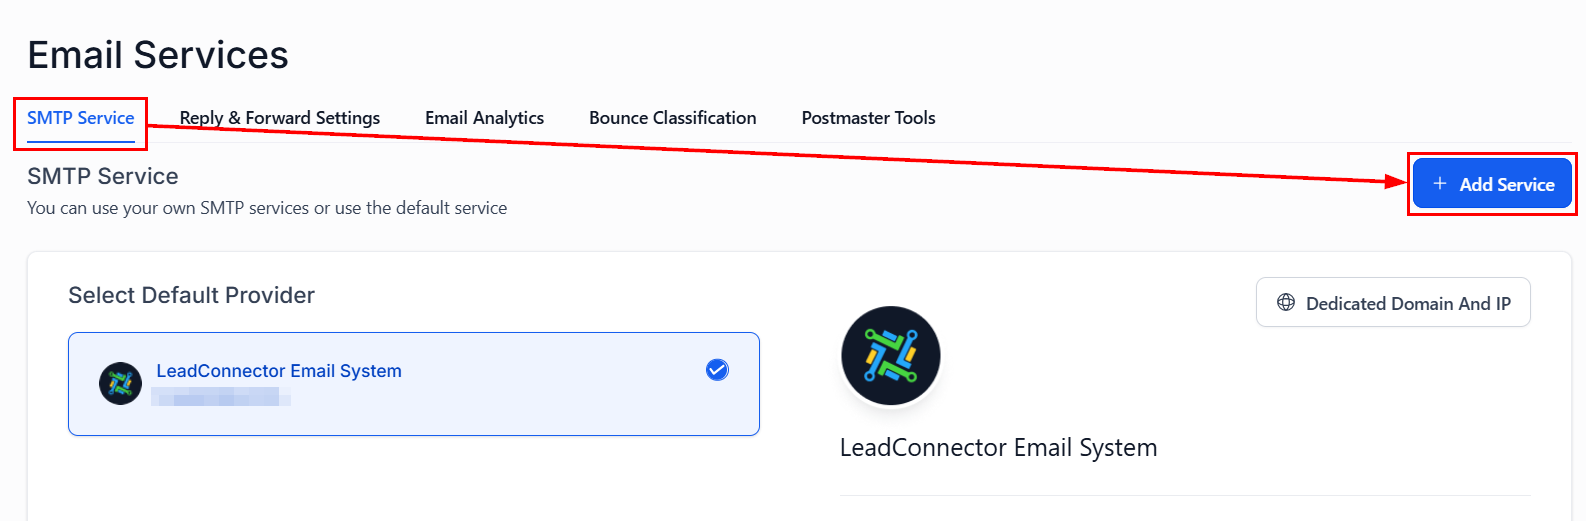 Choose **Mailgun** from the provider list.
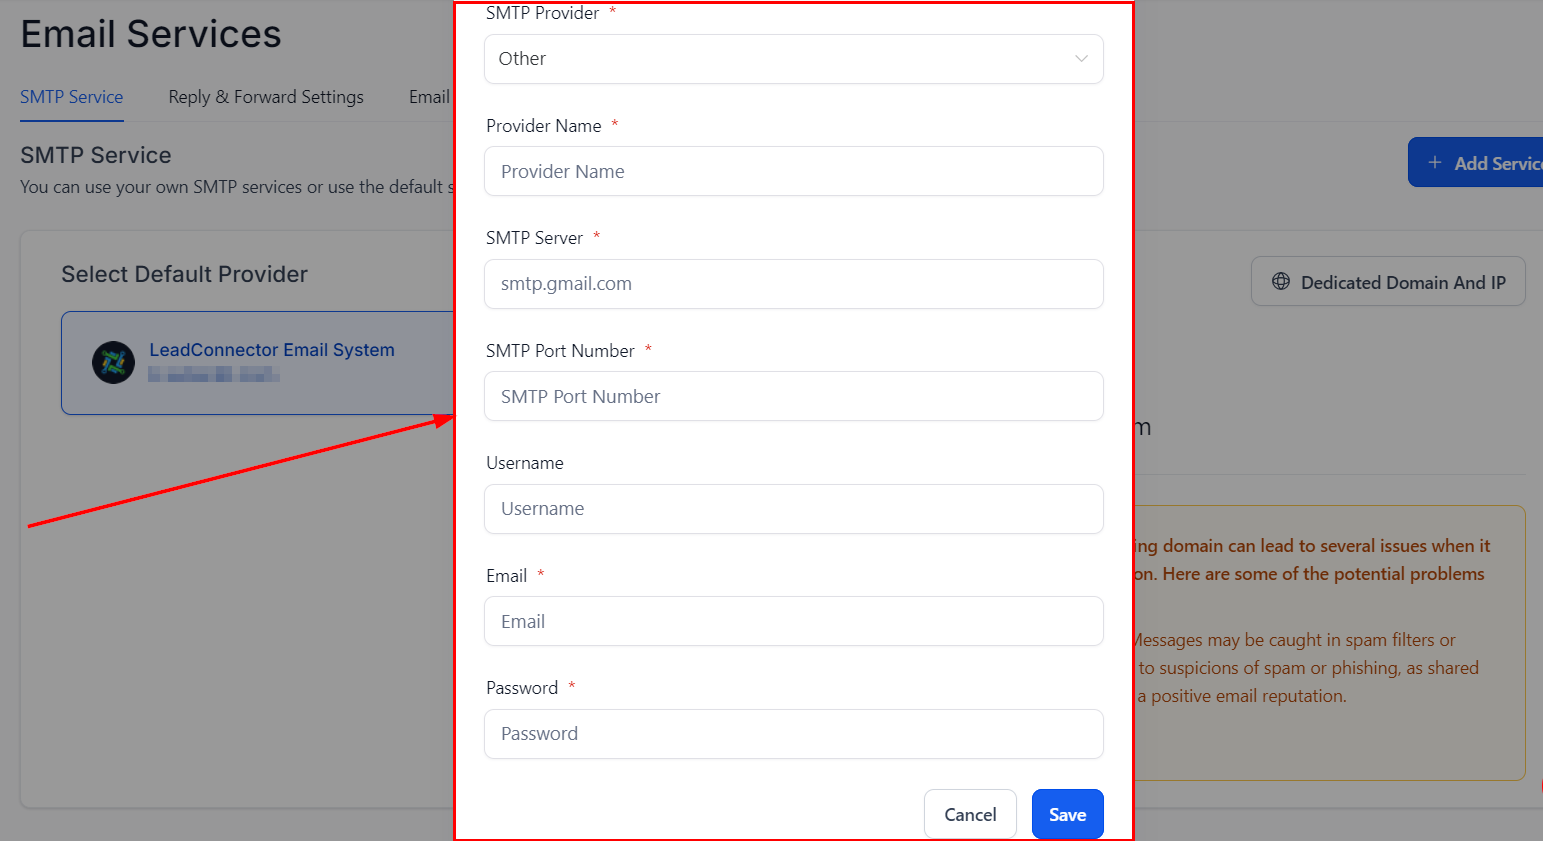 Enter your Mailgun API key and domain. These are found in your Mailgun account dashboard.
Add the required DNS records (SPF, DKIM) to your domain registrar. For Namecheap users, see the guide for adding Mailgun records to Namecheap.
Click **Verify** to confirm the connection is working, then **Save**.
Connect SendGrid by selecting it from the **Add Service** menu and entering your SendGrid API key and verified sender domain.
Connect your Google Workspace account to send emails using your business Gmail address as the SMTP sender.
1. Go to **Settings > Email Services > Add Service**.
2. Select **Google**.
3. Sign in with your Google Workspace account and grant permissions.
4. The Gmail SMTP connection is established automatically.
To connect any SMTP provider not listed (e.g., Zoho, Amazon SES, custom SMTP):
1. Click **Add Service** and select **Other**.
2. Enter your SMTP host, port, username, and password.
3. Test the connection and save.
Common SMTP ports:
* Port 587 (TLS/STARTTLS) — recommended
* Port 465 (SSL) — older standard
* Port 25 — not recommended (often blocked)
You can create SMTP credentials within the platform to use the platform's own email infrastructure:
1. Go to **Settings > Email Services**.
2. Click **Create SMTP Credentials**.
3. Use the generated host, port, username, and password in your external application.
***
## Deliverability tools
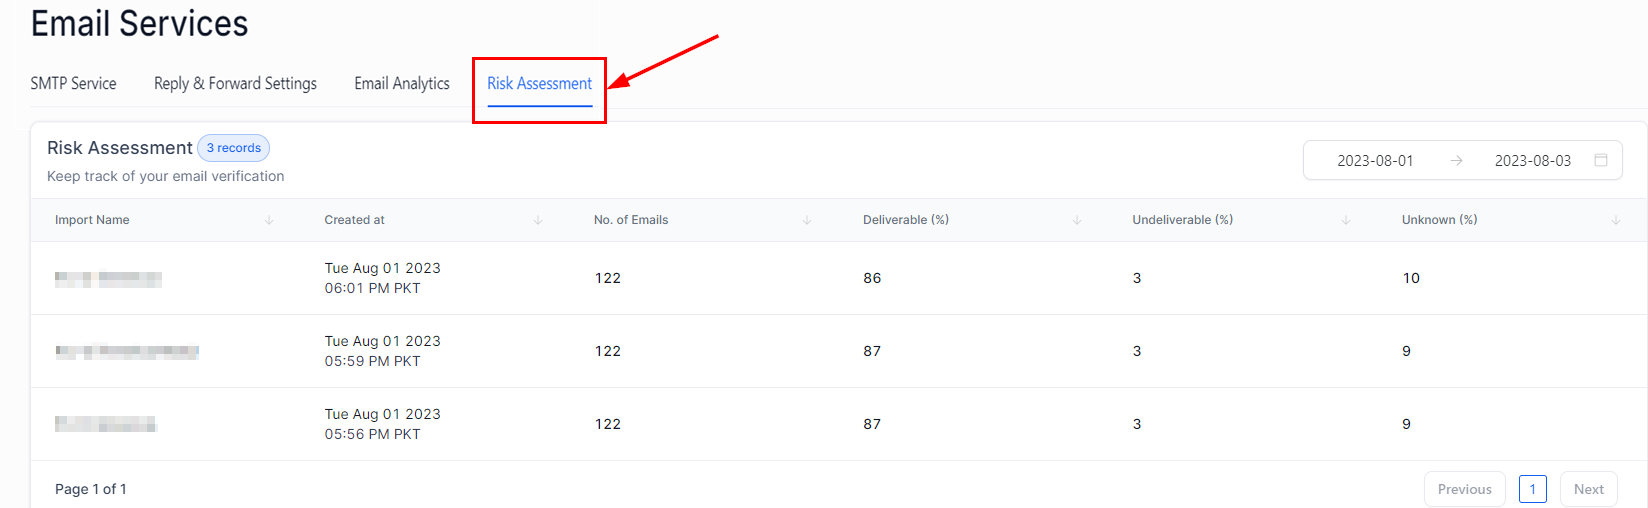
The Risk Assessment feature analyzes your imported contact list using bulk email verification. It categorizes email addresses into:
* **Deliverable** — valid, active email addresses
* **Undeliverable** — addresses that will bounce
* **Catch-all** — domains that accept all email (quality unknown)
* **Unknown** — addresses that could not be verified
Each category is further segmented by risk level: High, Medium, Low, and Unknown. Use this to clean your list before launching campaigns.
Enter your Mailgun API key and domain. These are found in your Mailgun account dashboard.
Add the required DNS records (SPF, DKIM) to your domain registrar. For Namecheap users, see the guide for adding Mailgun records to Namecheap.
Click **Verify** to confirm the connection is working, then **Save**.
Connect SendGrid by selecting it from the **Add Service** menu and entering your SendGrid API key and verified sender domain.
Connect your Google Workspace account to send emails using your business Gmail address as the SMTP sender.
1. Go to **Settings > Email Services > Add Service**.
2. Select **Google**.
3. Sign in with your Google Workspace account and grant permissions.
4. The Gmail SMTP connection is established automatically.
To connect any SMTP provider not listed (e.g., Zoho, Amazon SES, custom SMTP):
1. Click **Add Service** and select **Other**.
2. Enter your SMTP host, port, username, and password.
3. Test the connection and save.
Common SMTP ports:
* Port 587 (TLS/STARTTLS) — recommended
* Port 465 (SSL) — older standard
* Port 25 — not recommended (often blocked)
You can create SMTP credentials within the platform to use the platform's own email infrastructure:
1. Go to **Settings > Email Services**.
2. Click **Create SMTP Credentials**.
3. Use the generated host, port, username, and password in your external application.
***
## Deliverability tools
The Risk Assessment feature analyzes your imported contact list using bulk email verification. It categorizes email addresses into:
* **Deliverable** — valid, active email addresses
* **Undeliverable** — addresses that will bounce
* **Catch-all** — domains that accept all email (quality unknown)
* **Unknown** — addresses that could not be verified
Each category is further segmented by risk level: High, Medium, Low, and Unknown. Use this to clean your list before launching campaigns.
 The platform automatically classifies email bounces as hard bounces (permanent delivery failures) or soft bounces (temporary failures). Hard-bounced addresses are suppressed from future sends automatically.
Control whether open tracking and click tracking are enabled for outgoing emails. Go to **Settings > Email Services** and toggle **Email Tracking** on or off.
Disabling tracking improves deliverability for some recipients, particularly those using strict privacy filters.
Connect Google Postmaster Tools to monitor your domain reputation and spam rate for emails delivered to Gmail inboxes. Access this from the **Deliverability** section of Email Services.
Connect Microsoft's Smart Network Data Services (SNDS) tool to monitor email reputation for Outlook/Hotmail recipients.
***
## Google and Yahoo sender compliance
In 2024, Google and Yahoo introduced strict requirements for bulk email senders:
1. **Email authentication** — SPF, DKIM, and DMARC records must be configured for your sending domain
2. **One-click unsubscribe** — all marketing emails must include a one-click unsubscribe option
3. **Low spam rates** — maintain a spam rate below 0.10% (keep below 0.30% to avoid blocking)
The platform helps you meet these requirements through dedicated domain setup, automatic unsubscribe handling, and bounce management.
Failing to meet Google and Yahoo's requirements can result in your emails being sent to spam or blocked entirely. Ensure your sending domain has valid SPF, DKIM, and DMARC records before sending bulk campaigns.
***
## Cloudflare DNS configuration
If your domain uses Cloudflare as a DNS provider, ensure that DNS records for your email domain (DKIM, SPF, DMARC, MX) are set to **DNS only** (not proxied/orange cloud). Proxying email DNS records through Cloudflare can break email delivery.
***
## Related articles
* [Business profile](/settings/business-profile)
* [Trust center](/settings/trust-center)
* [Marketing — email marketing](/marketing/email-marketing)
* [Domains and URL redirects](/settings/domains-url-redirects)
The platform automatically classifies email bounces as hard bounces (permanent delivery failures) or soft bounces (temporary failures). Hard-bounced addresses are suppressed from future sends automatically.
Control whether open tracking and click tracking are enabled for outgoing emails. Go to **Settings > Email Services** and toggle **Email Tracking** on or off.
Disabling tracking improves deliverability for some recipients, particularly those using strict privacy filters.
Connect Google Postmaster Tools to monitor your domain reputation and spam rate for emails delivered to Gmail inboxes. Access this from the **Deliverability** section of Email Services.
Connect Microsoft's Smart Network Data Services (SNDS) tool to monitor email reputation for Outlook/Hotmail recipients.
***
## Google and Yahoo sender compliance
In 2024, Google and Yahoo introduced strict requirements for bulk email senders:
1. **Email authentication** — SPF, DKIM, and DMARC records must be configured for your sending domain
2. **One-click unsubscribe** — all marketing emails must include a one-click unsubscribe option
3. **Low spam rates** — maintain a spam rate below 0.10% (keep below 0.30% to avoid blocking)
The platform helps you meet these requirements through dedicated domain setup, automatic unsubscribe handling, and bounce management.
Failing to meet Google and Yahoo's requirements can result in your emails being sent to spam or blocked entirely. Ensure your sending domain has valid SPF, DKIM, and DMARC records before sending bulk campaigns.
***
## Cloudflare DNS configuration
If your domain uses Cloudflare as a DNS provider, ensure that DNS records for your email domain (DKIM, SPF, DMARC, MX) are set to **DNS only** (not proxied/orange cloud). Proxying email DNS records through Cloudflare can break email delivery.
***
## Related articles
* [Business profile](/settings/business-profile)
* [Trust center](/settings/trust-center)
* [Marketing — email marketing](/marketing/email-marketing)
* [Domains and URL redirects](/settings/domains-url-redirects)