> ## Documentation Index
> Fetch the complete documentation index at: https://help.hoopai.com/llms.txt
> Use this file to discover all available pages before exploring further.
# Invoices and estimates — billing management in HoopAI
> Create, send, and manage invoices and estimates in HoopAI — including recurring billing, payment plans, late fees, and automated reminders.
The Invoices & Estimates section lets you bill contacts directly from the HoopAI Platform. You can issue one-time or recurring invoices, set up payment plans, schedule automated reminders, and accept payments via Stripe, ACH, or manual methods.
 To collect online payments you must have a payment gateway connected. Go to **Payments → Payment Integrations** to connect Stripe or another processor. Without Stripe Connect, you can still send invoices but must record payments manually.
## Invoices overview
The invoices dashboard gives you a real-time view of your billing pipeline:
| Status | Description |
| -------------------- | ------------------------------- |
| **Draft** | Invoices saved but not yet sent |
| **Due** | Sent invoices awaiting payment |
| **Received** | Invoices that have been paid |
| **Unpaid / Overdue** | Invoices past their due date |
The dashboard supports multi-currency display — invoice amounts in other currencies are converted to your account's base currency in real time before being summed.
### Filtering and searching
Use the **Filter** dropdown to narrow invoices by:
* **Invoice status** — All, Draft, Sent, Overdue, Payment Processing, Paid, or Partially Paid
* **Payment mode** — Live or Test
Use the **Search bar** to find invoices by invoice number, name, or customer name.
### Invoice table columns
* **Name** — The label you assigned to the invoice
* **Invoice number** — System-generated reference number
* **Customer details** — Contact name and information
* **Issue date** — When the invoice was created
* **Amount** — Total invoice value
* **Status** — Current payment status
### Actions menu
Click the three-dot menu on any invoice to:
* **Edit** — Modify a draft invoice (drafts only)
* **Copy link** — Share a direct payment link with the customer
* **View recurring template** — Open the recurring invoice setup
* **Download** — Save the invoice as a PDF
* **Void** — Mark as non-collectible
* **Clone** — Duplicate the invoice
* **Convert to template** — Save as a reusable template
* **Record payment** — Mark as paid once payment is received
***
## Creating a new invoice
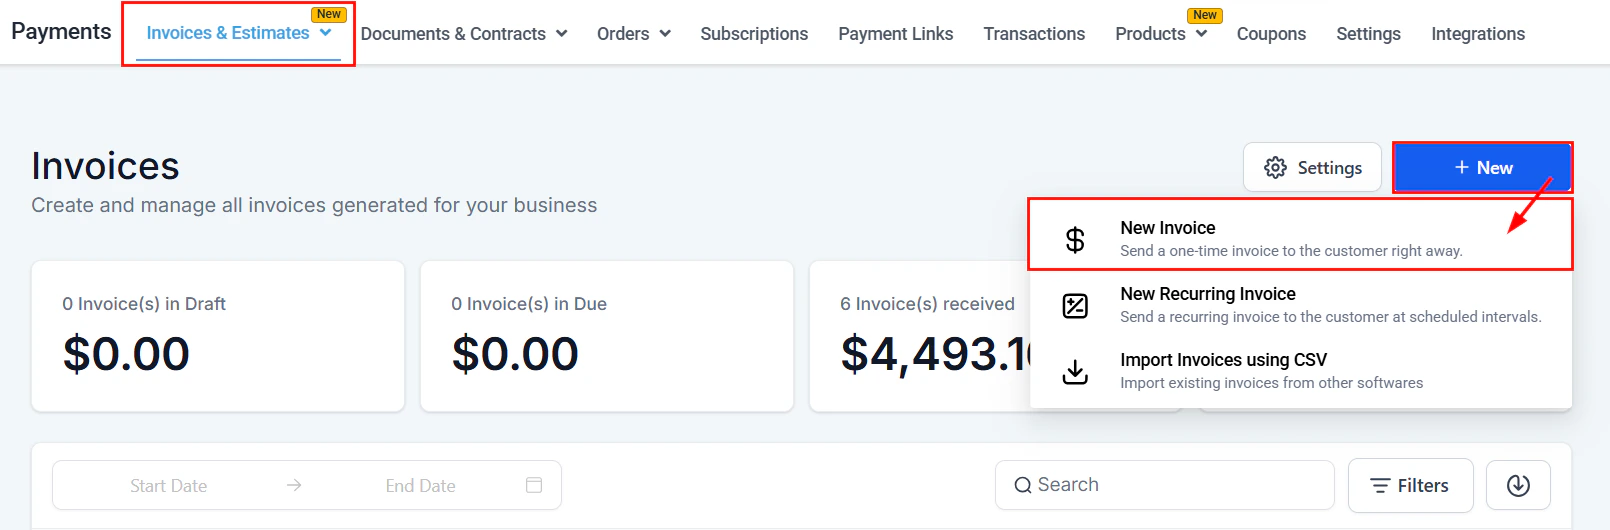
Go to **Payments → Invoices & Estimates**, click **+ New**, then select **New Invoice**.
To collect online payments you must have a payment gateway connected. Go to **Payments → Payment Integrations** to connect Stripe or another processor. Without Stripe Connect, you can still send invoices but must record payments manually.
## Invoices overview
The invoices dashboard gives you a real-time view of your billing pipeline:
| Status | Description |
| -------------------- | ------------------------------- |
| **Draft** | Invoices saved but not yet sent |
| **Due** | Sent invoices awaiting payment |
| **Received** | Invoices that have been paid |
| **Unpaid / Overdue** | Invoices past their due date |
The dashboard supports multi-currency display — invoice amounts in other currencies are converted to your account's base currency in real time before being summed.
### Filtering and searching
Use the **Filter** dropdown to narrow invoices by:
* **Invoice status** — All, Draft, Sent, Overdue, Payment Processing, Paid, or Partially Paid
* **Payment mode** — Live or Test
Use the **Search bar** to find invoices by invoice number, name, or customer name.
### Invoice table columns
* **Name** — The label you assigned to the invoice
* **Invoice number** — System-generated reference number
* **Customer details** — Contact name and information
* **Issue date** — When the invoice was created
* **Amount** — Total invoice value
* **Status** — Current payment status
### Actions menu
Click the three-dot menu on any invoice to:
* **Edit** — Modify a draft invoice (drafts only)
* **Copy link** — Share a direct payment link with the customer
* **View recurring template** — Open the recurring invoice setup
* **Download** — Save the invoice as a PDF
* **Void** — Mark as non-collectible
* **Clone** — Duplicate the invoice
* **Convert to template** — Save as a reusable template
* **Record payment** — Mark as paid once payment is received
***
## Creating a new invoice
Go to **Payments → Invoices & Estimates**, click **+ New**, then select **New Invoice**.
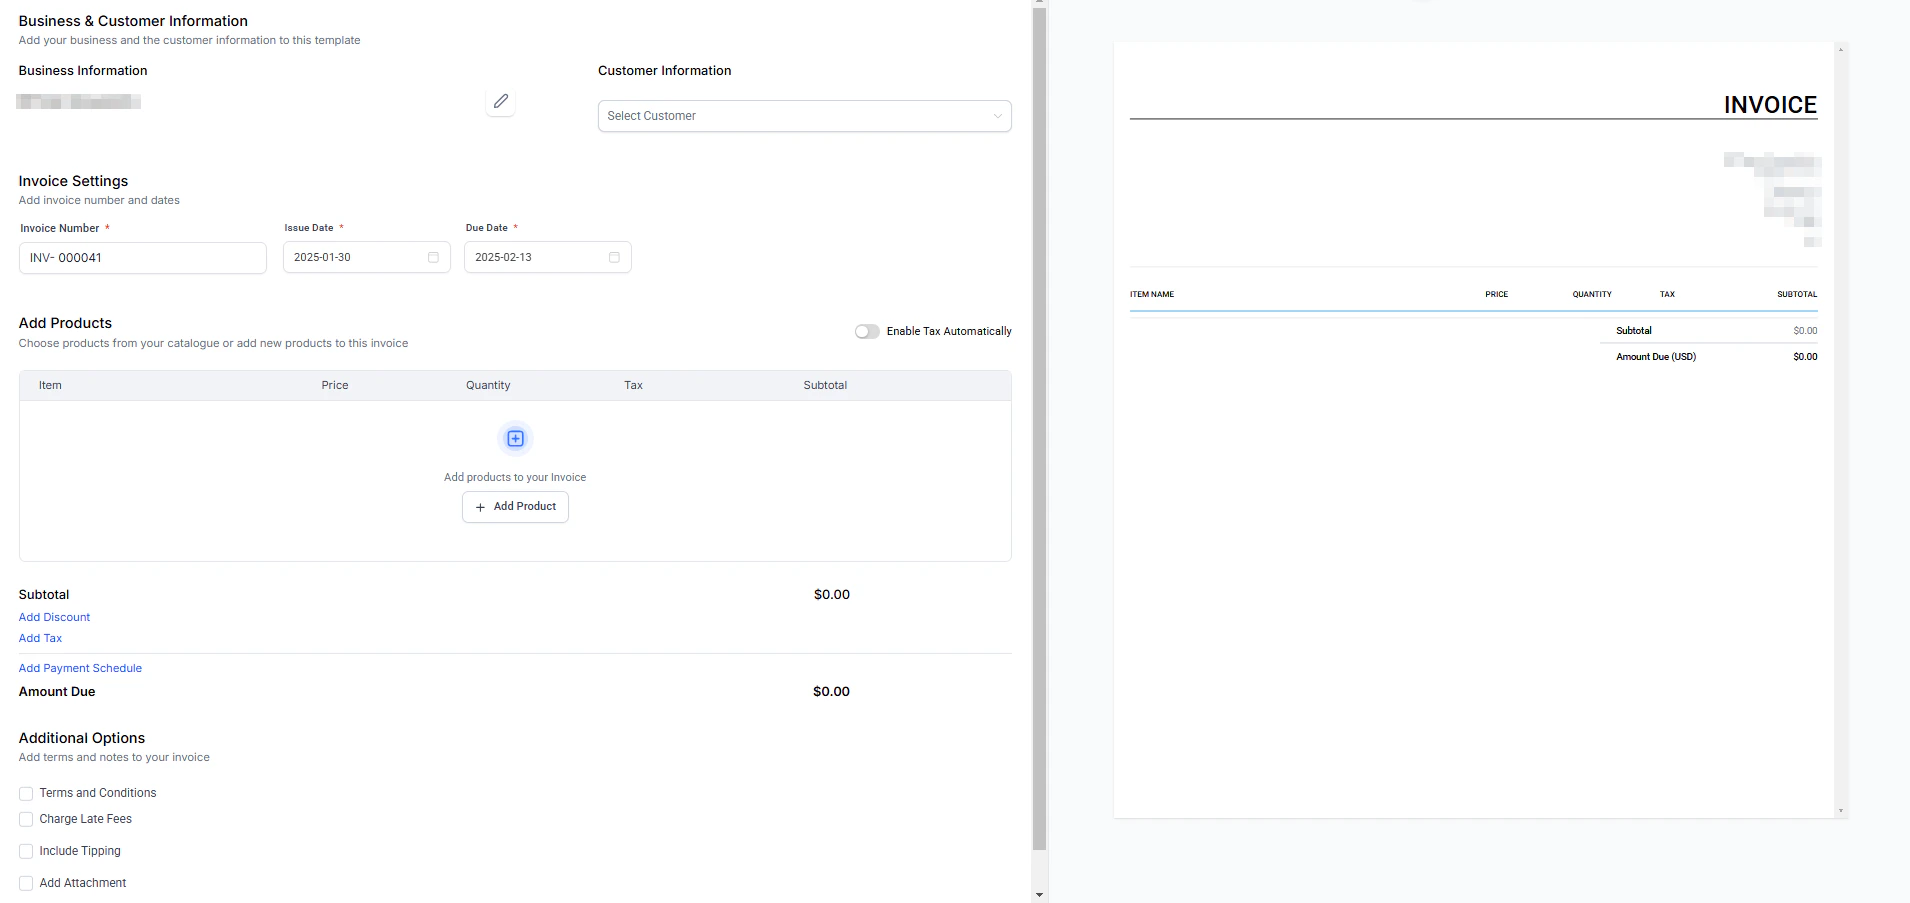 Give the invoice a descriptive name — this appears in your invoice list for easy identification.
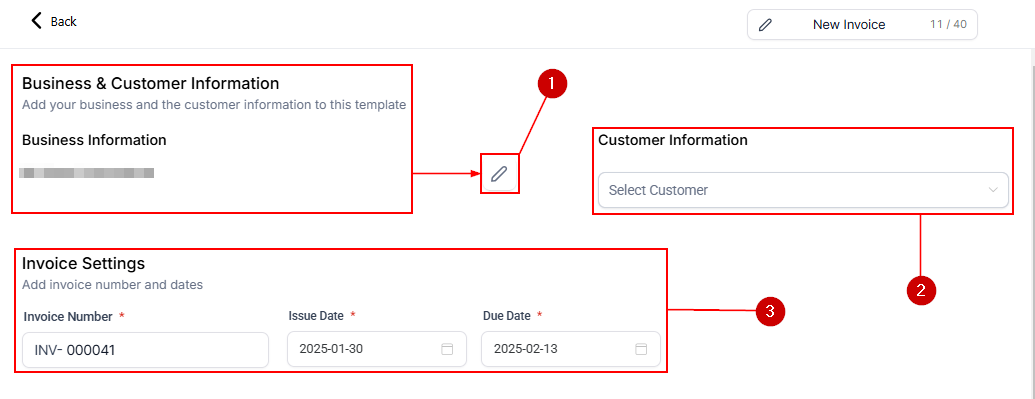
* Click the pencil icon to populate your business details from your CRM settings.
* Use the **Select customer** dropdown to attach a contact. You can add, edit, or clear the customer at any time.
* Set the **Invoice number**, **Issue date**, and **Due date**.
Click **+ Add more products** to select from your product catalog. Once added:
* Edit the price or quantity inline
* Add taxes per line item
* Add additional line items using the **+** icon
* The subtotal updates automatically
From the subtotal area, add a **discount** (percentage or fixed amount) or apply a **tax** (per item, automatically, or to the subtotal).
* **Terms & conditions** — outline payment terms, deadlines, and liability
* **Charge late fees** — set a flat or percentage fee with a grace period and maximum cap
* **Include tipping** — let customers add a gratuity
* **Add attachment** — attach up to 10 files (20 MB total)
Use the **Preview** option to review the invoice before sending. Then click **Send**, choose email or SMS, and confirm.
The right-hand panel updates in real time as you make changes on the left, giving you a live preview while you build.
***
## Payment plans
Payment plans let you split an invoice into multiple installments — ideal for higher-ticket items or clients who need billing flexibility.
Give the invoice a descriptive name — this appears in your invoice list for easy identification.
* Click the pencil icon to populate your business details from your CRM settings.
* Use the **Select customer** dropdown to attach a contact. You can add, edit, or clear the customer at any time.
* Set the **Invoice number**, **Issue date**, and **Due date**.
Click **+ Add more products** to select from your product catalog. Once added:
* Edit the price or quantity inline
* Add taxes per line item
* Add additional line items using the **+** icon
* The subtotal updates automatically
From the subtotal area, add a **discount** (percentage or fixed amount) or apply a **tax** (per item, automatically, or to the subtotal).
* **Terms & conditions** — outline payment terms, deadlines, and liability
* **Charge late fees** — set a flat or percentage fee with a grace period and maximum cap
* **Include tipping** — let customers add a gratuity
* **Add attachment** — attach up to 10 files (20 MB total)
Use the **Preview** option to review the invoice before sending. Then click **Send**, choose email or SMS, and confirm.
The right-hand panel updates in real time as you make changes on the left, giving you a live preview while you build.
***
## Payment plans
Payment plans let you split an invoice into multiple installments — ideal for higher-ticket items or clients who need billing flexibility.
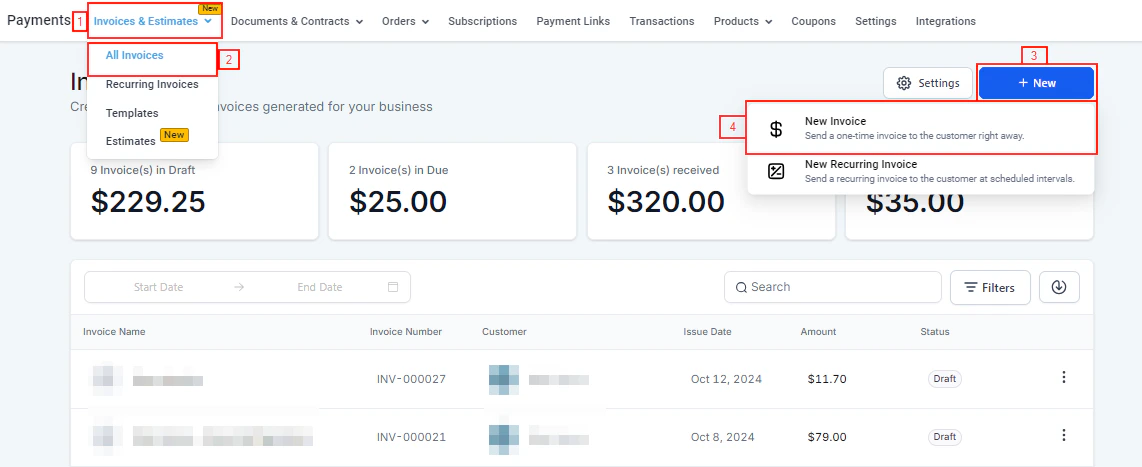 Create a new invoice with a product and set the **Due date** (the payment schedule cannot extend beyond this date).
Click **Add payment schedule**. In the dialog:
* Choose **Percentage** or **Fixed amount**
* Set the amount and date for each installment
* Click **Add payment** for additional installments
* Ensure the total equals 100% (percentage) or the full invoice amount (fixed)
Toggle **Enable autopayment** to automatically charge the customer's card on each due date. Choose between their customer card, a saved card, or a new card.
Click **Send**, select channels, and confirm. The customer will see each installment with its due date and can pay one at a time or select multiple.
Set the invoice's overall **Due date** before configuring individual payment dates — the system will reject payment dates that fall after the invoice due date.
***
## Recurring invoices
Recurring invoices automate billing for subscription-based products or services. The system generates and sends invoices on a schedule without manual intervention.
Create a new invoice with a product and set the **Due date** (the payment schedule cannot extend beyond this date).
Click **Add payment schedule**. In the dialog:
* Choose **Percentage** or **Fixed amount**
* Set the amount and date for each installment
* Click **Add payment** for additional installments
* Ensure the total equals 100% (percentage) or the full invoice amount (fixed)
Toggle **Enable autopayment** to automatically charge the customer's card on each due date. Choose between their customer card, a saved card, or a new card.
Click **Send**, select channels, and confirm. The customer will see each installment with its due date and can pay one at a time or select multiple.
Set the invoice's overall **Due date** before configuring individual payment dates — the system will reject payment dates that fall after the invoice due date.
***
## Recurring invoices
Recurring invoices automate billing for subscription-based products or services. The system generates and sends invoices on a schedule without manual intervention.
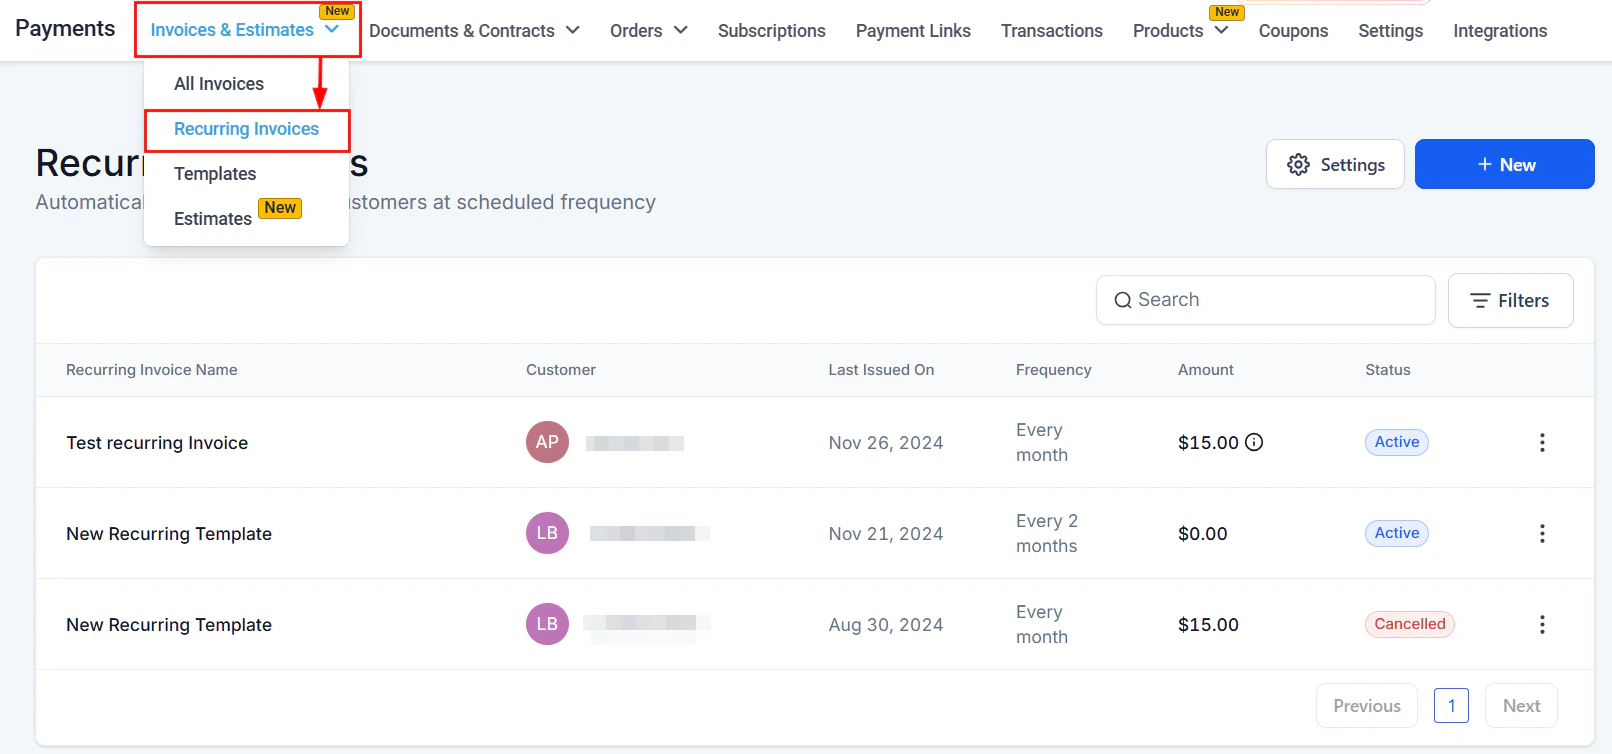 Navigate to **Payments → Invoices & Estimates → Recurring Invoices** to manage them.
### Recurring invoice columns
| Column | Description |
| ---------------------- | ------------------------------------------------------------ |
| Recurring invoice name | The assigned name |
| Customer | Customer first and last name |
| Last issued on | Date the most recent invoice was generated |
| Frequency | How often the invoice is sent (daily, weekly, monthly, etc.) |
| Amount | Invoice total |
| Status | Active or cancelled |
### Recurring invoice actions
* **View history** — See a full audit trail of every invoice sent under this template
* **View** — Open the recurring invoice details
* **End** — Stop future invoices from being generated
* **Delete** — Permanently remove (only if no invoices have been sent yet)
* **Clone** — Duplicate the recurring setup
* **Convert to template** — Save as a reusable template
### Auto-payment for recurring invoices
Go to **Recurring Invoices**, click the three-dot menu on an existing invoice, and select **View** — or create a new one.
Click the three-dot menu in the upper-right of the Invoice Builder and select **Manage auto payment**. Toggle the switch on.
* **Customer card** — uses the card the customer paid with originally
* **Saved card** — uses any card saved to the contact
* **New card** — enter new card details
Click **Update** to apply. The system will automatically charge on each due date.
Both the account user and the customer are notified by email. The system retries twice more, 24 hours apart. If all three attempts fail, the customer must pay the invoice manually.
Open the Invoice Builder for the recurring template, click the three-dot menu, select **Manage auto payment**, and toggle the switch off.
The customer is notified in advance — the number of days is set in the recurring invoice settings.
***
## Invoice reminders
Stop chasing payments manually. Set up automated email and SMS reminders for unpaid invoices.
Navigate to **Payments → Invoices & Estimates → Recurring Invoices** to manage them.
### Recurring invoice columns
| Column | Description |
| ---------------------- | ------------------------------------------------------------ |
| Recurring invoice name | The assigned name |
| Customer | Customer first and last name |
| Last issued on | Date the most recent invoice was generated |
| Frequency | How often the invoice is sent (daily, weekly, monthly, etc.) |
| Amount | Invoice total |
| Status | Active or cancelled |
### Recurring invoice actions
* **View history** — See a full audit trail of every invoice sent under this template
* **View** — Open the recurring invoice details
* **End** — Stop future invoices from being generated
* **Delete** — Permanently remove (only if no invoices have been sent yet)
* **Clone** — Duplicate the recurring setup
* **Convert to template** — Save as a reusable template
### Auto-payment for recurring invoices
Go to **Recurring Invoices**, click the three-dot menu on an existing invoice, and select **View** — or create a new one.
Click the three-dot menu in the upper-right of the Invoice Builder and select **Manage auto payment**. Toggle the switch on.
* **Customer card** — uses the card the customer paid with originally
* **Saved card** — uses any card saved to the contact
* **New card** — enter new card details
Click **Update** to apply. The system will automatically charge on each due date.
Both the account user and the customer are notified by email. The system retries twice more, 24 hours apart. If all three attempts fail, the customer must pay the invoice manually.
Open the Invoice Builder for the recurring template, click the three-dot menu, select **Manage auto payment**, and toggle the switch off.
The customer is notified in advance — the number of days is set in the recurring invoice settings.
***
## Invoice reminders
Stop chasing payments manually. Set up automated email and SMS reminders for unpaid invoices.
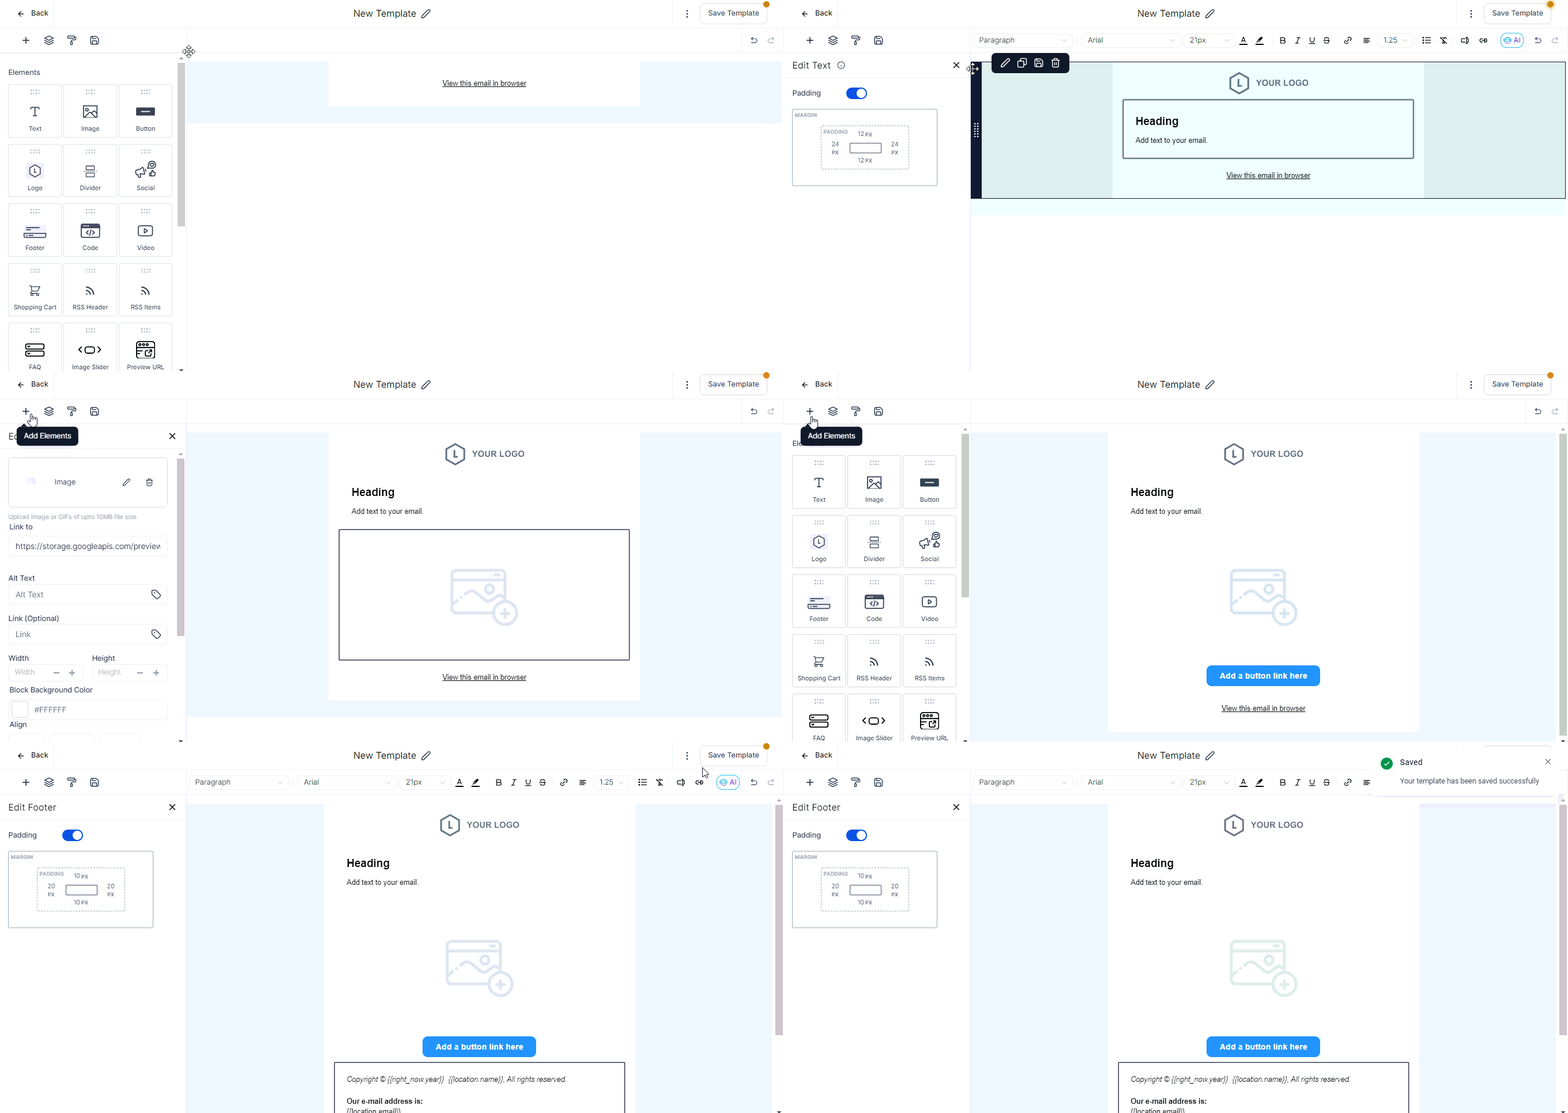 Go to **Payments → Invoices & Estimates** and click the **gear icon** to open Settings, then select **Reminder settings**.
For each reminder:
* Enter a **Reminder name** for internal reference
* Select an **Email template** and **SMS template** (or create new ones via Preview)
* Set the **Reminder frequency** — how many days between sends
* Set **Max reminders** — the total number of times the reminder sends
* Optionally restrict sends to your **Business hours** and choose the time zone (business or customer)
Click **Add another reminder** to create multiple reminder sequences. Toggle any reminder off to pause it without deleting it.
Click **Save**. Reminders will now send automatically to all contacts with unpaid one-time or recurring invoices that do not have autopayment or a payment schedule.
Accounts configured after March 20, 2025 have three default reminders. You can enable or disable any of them and customize the templates.
***
## Taxes on invoices
First set up your tax rates at **Payments → Payment Settings → Taxes**.
In the invoice editor, click **Enable tax**. Choose from:
* **Automatically** — applies the correct rate to all line items
* **Per item** — select a tax rate for each product individually
* **To subtotal** — apply one rate to the entire invoice total
The invoice preview shows a tax breakdown with the name, rate, and Tax ID for each applied tax.
***
## Late fees
In the invoice editor, scroll to **Additional options** and toggle on **Charge late fees**.
Set:
* **Fee type** — flat currency amount or percentage of the invoice
* **Frequency** — how often the late fee accrues
* **Grace period** — days after the due date before the first fee applies
* **Maximum** — a cap on total late fees charged
***
## ACH debit payments
ACH debit allows customers to pay invoices directly from their bank account. This requires Stripe Connect to be active on your account.
When ACH is enabled, customers see a bank account option on their invoice payment page. They enter their routing and account numbers, and funds are pulled directly.
ACH payments typically take 3–5 business days to clear, unlike card payments which process immediately.
***
## Recording manual payments
If you receive payment outside the platform (cash, check, bank transfer), record it to keep your invoice records accurate.
From the invoice list, click the three-dot menu and select **Record payment** — or use the button inside the invoice editor.
Select **Cash**, **Card**, **Check**, or **Other** (for bank transfers and other methods).
Type the exact amount received and add any internal notes. Click **Save**.
Manual payment recording without Stripe Connect is only available for one-time invoices. No automated email or SMS confirmation is sent to the customer.
***
## Estimates overview
Estimates let you send a quote to a contact before committing to a formal invoice. Contacts can approve or decline the estimate, and approved estimates can be converted to invoices.
The Estimates section shares the same interface as Invoices under **Payments → Invoices & Estimates**.
### Key estimate features
* **Include payment plans** — add installment schedules directly to an estimate so customers understand the billing structure before approving
* **Approval workflow** — customers receive the estimate by email or SMS and can approve it online
* **Convert to invoice** — once approved, convert the estimate to a live invoice with one click
### CC and BCC on invoice emails
You can add CC and BCC recipients when sending invoices via email. This is useful for keeping your accounting team or manager in the loop on every billing communication without giving them platform access.
***
## Invoice templates and workflow automation
Go to **Payments → Invoices & Estimates** and click the **gear icon** to open Settings, then select **Reminder settings**.
For each reminder:
* Enter a **Reminder name** for internal reference
* Select an **Email template** and **SMS template** (or create new ones via Preview)
* Set the **Reminder frequency** — how many days between sends
* Set **Max reminders** — the total number of times the reminder sends
* Optionally restrict sends to your **Business hours** and choose the time zone (business or customer)
Click **Add another reminder** to create multiple reminder sequences. Toggle any reminder off to pause it without deleting it.
Click **Save**. Reminders will now send automatically to all contacts with unpaid one-time or recurring invoices that do not have autopayment or a payment schedule.
Accounts configured after March 20, 2025 have three default reminders. You can enable or disable any of them and customize the templates.
***
## Taxes on invoices
First set up your tax rates at **Payments → Payment Settings → Taxes**.
In the invoice editor, click **Enable tax**. Choose from:
* **Automatically** — applies the correct rate to all line items
* **Per item** — select a tax rate for each product individually
* **To subtotal** — apply one rate to the entire invoice total
The invoice preview shows a tax breakdown with the name, rate, and Tax ID for each applied tax.
***
## Late fees
In the invoice editor, scroll to **Additional options** and toggle on **Charge late fees**.
Set:
* **Fee type** — flat currency amount or percentage of the invoice
* **Frequency** — how often the late fee accrues
* **Grace period** — days after the due date before the first fee applies
* **Maximum** — a cap on total late fees charged
***
## ACH debit payments
ACH debit allows customers to pay invoices directly from their bank account. This requires Stripe Connect to be active on your account.
When ACH is enabled, customers see a bank account option on their invoice payment page. They enter their routing and account numbers, and funds are pulled directly.
ACH payments typically take 3–5 business days to clear, unlike card payments which process immediately.
***
## Recording manual payments
If you receive payment outside the platform (cash, check, bank transfer), record it to keep your invoice records accurate.
From the invoice list, click the three-dot menu and select **Record payment** — or use the button inside the invoice editor.
Select **Cash**, **Card**, **Check**, or **Other** (for bank transfers and other methods).
Type the exact amount received and add any internal notes. Click **Save**.
Manual payment recording without Stripe Connect is only available for one-time invoices. No automated email or SMS confirmation is sent to the customer.
***
## Estimates overview
Estimates let you send a quote to a contact before committing to a formal invoice. Contacts can approve or decline the estimate, and approved estimates can be converted to invoices.
The Estimates section shares the same interface as Invoices under **Payments → Invoices & Estimates**.
### Key estimate features
* **Include payment plans** — add installment schedules directly to an estimate so customers understand the billing structure before approving
* **Approval workflow** — customers receive the estimate by email or SMS and can approve it online
* **Convert to invoice** — once approved, convert the estimate to a live invoice with one click
### CC and BCC on invoice emails
You can add CC and BCC recipients when sending invoices via email. This is useful for keeping your accounting team or manager in the loop on every billing communication without giving them platform access.
***
## Invoice templates and workflow automation
You can save any invoice as a reusable template and trigger it automatically through workflows.
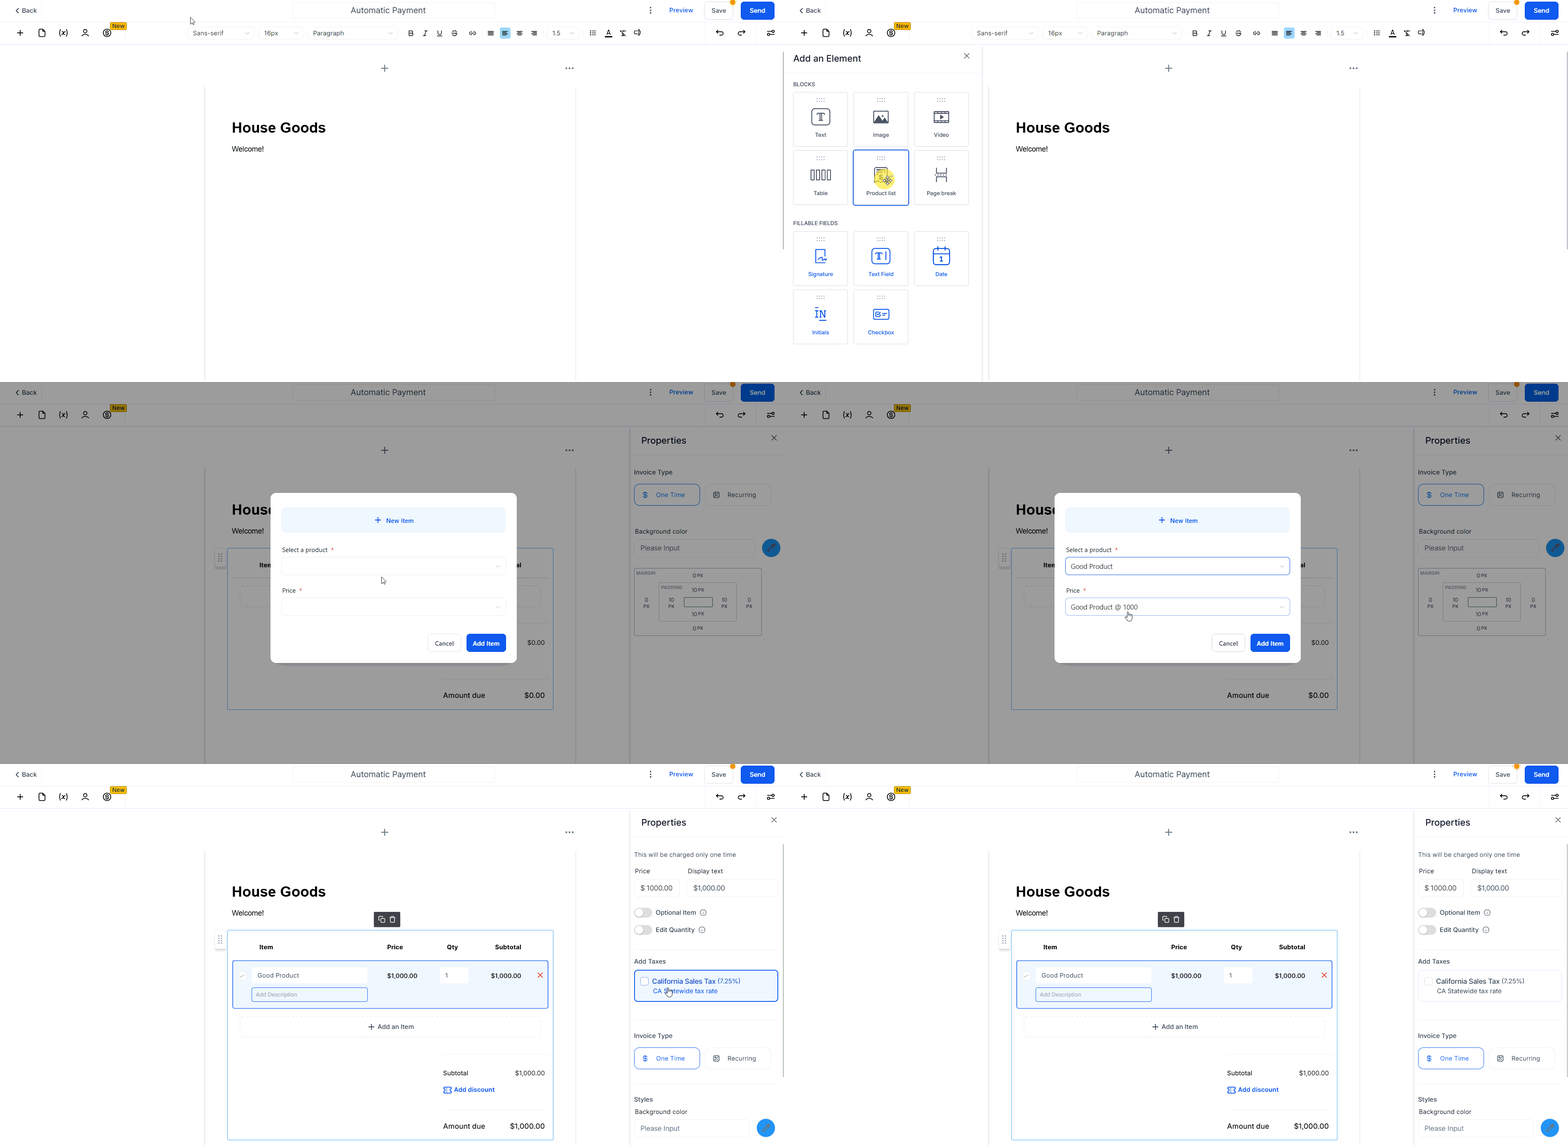
Build an invoice with all your standard fields filled in. Click the three-dot menu in the upper-right of the invoice editor and select **Convert to Template**. Give the template a name and save it.
In **Automation → Workflows**, add the **Send Invoice** action and select your saved template from the dropdown. Configure the trigger — for example, after a form submission, when an opportunity moves to a specific stage, or when a tag is added to a contact.
Enable the **Automatic Invoice Creation** toggle in your invoice settings to have the platform generate a new invoice whenever a triggering event occurs (such as a product purchase or appointment completion).
 ***
## Product description capability
Each line item in an invoice supports an extended description field. This is useful for providing customers with detailed explanations of the work or products being billed.
In the invoice editor, click below the product name in any line item to expand the description field. Type your detailed description — it will appear on the customer-facing invoice beneath the product name.
***
## Opportunity custom values in invoices
Insert **Opportunity Custom Values** into the **Terms** and **Notes** fields of invoices and estimates. This allows dynamic data — such as deal names, close dates, or opportunity values — to appear on the document without manual typing.
***
## Product description capability
Each line item in an invoice supports an extended description field. This is useful for providing customers with detailed explanations of the work or products being billed.
In the invoice editor, click below the product name in any line item to expand the description field. Type your detailed description — it will appear on the customer-facing invoice beneath the product name.
***
## Opportunity custom values in invoices
Insert **Opportunity Custom Values** into the **Terms** and **Notes** fields of invoices and estimates. This allows dynamic data — such as deal names, close dates, or opportunity values — to appear on the document without manual typing.
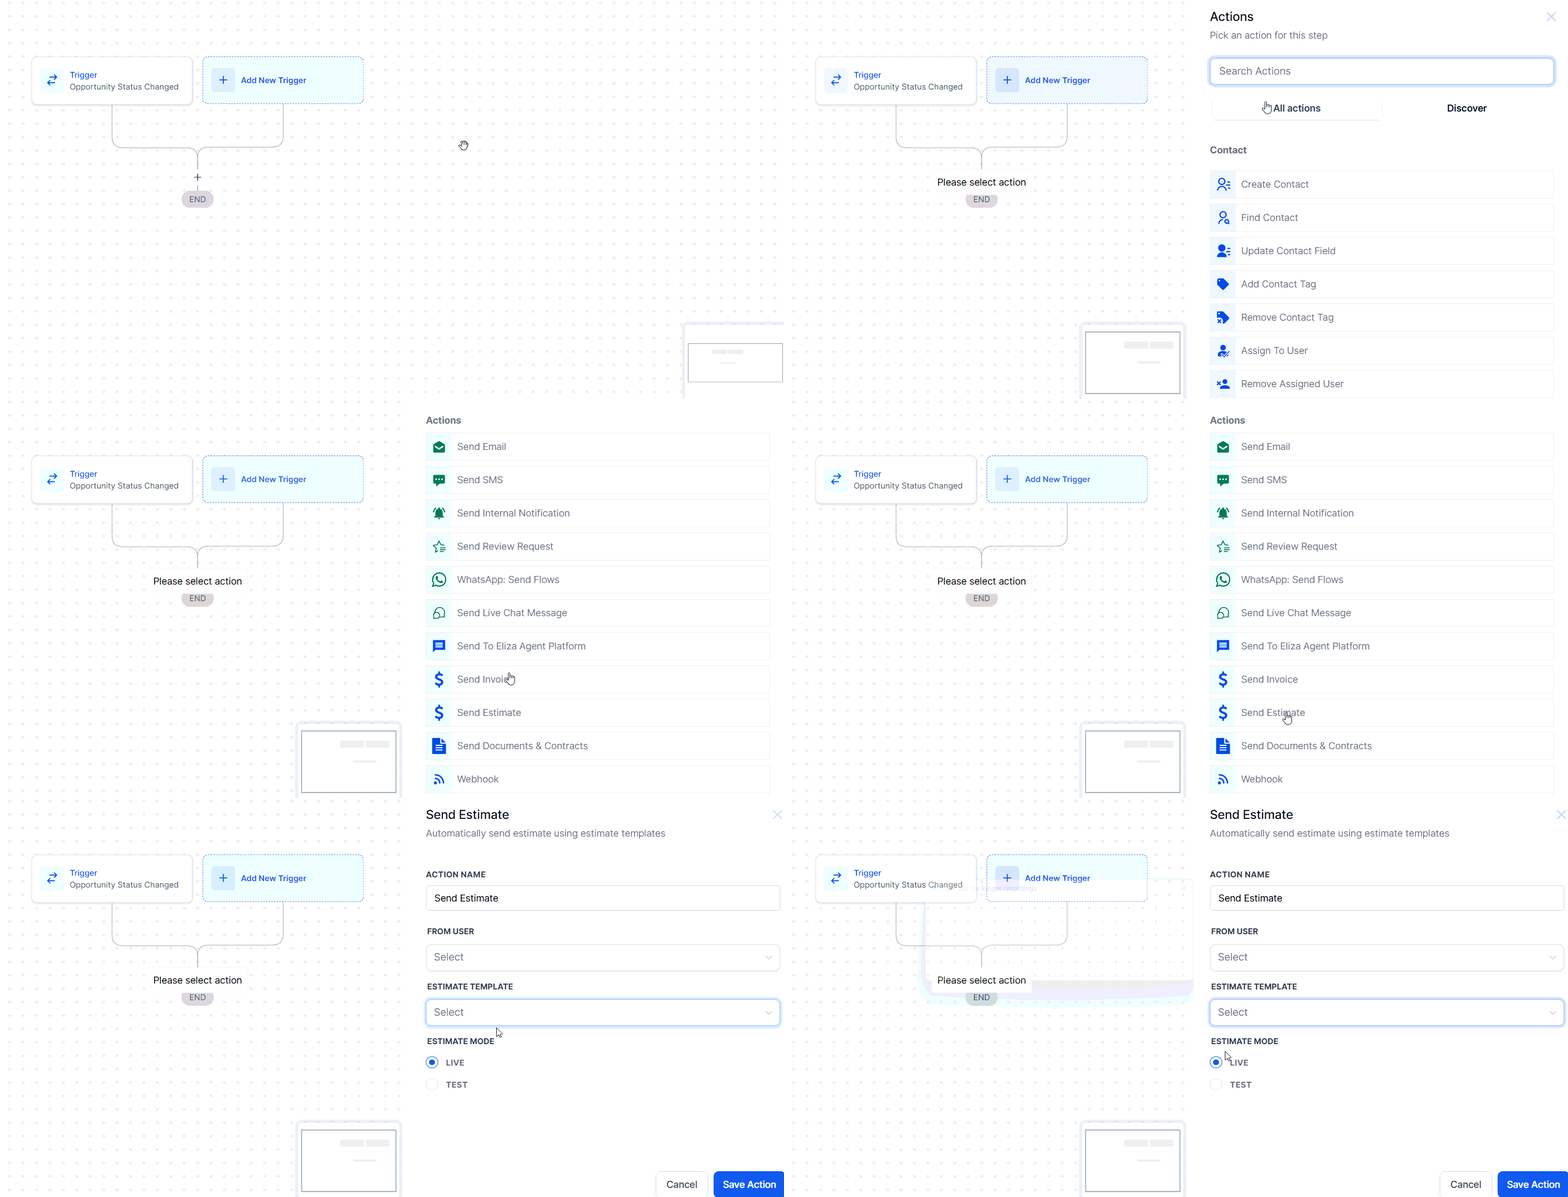 Use the `{}` custom value picker within the Terms or Notes text field to insert any opportunity variable.
***
## Customizing the invoice layout
Go to **Payments → Invoices & Estimates → Settings** and click **Invoice Layout** (or the **Customize Layout** option in the invoice editor's three-dot menu).
From this screen you can:
* Reposition your logo
* Show or hide columns (quantity, unit price, tax)
* Edit footer content and payment instructions
* Adjust color scheme and branding
Save your changes and use the **Preview** button to see how the layout looks before sending.
Use the `{}` custom value picker within the Terms or Notes text field to insert any opportunity variable.
***
## Customizing the invoice layout
Go to **Payments → Invoices & Estimates → Settings** and click **Invoice Layout** (or the **Customize Layout** option in the invoice editor's three-dot menu).
From this screen you can:
* Reposition your logo
* Show or hide columns (quantity, unit price, tax)
* Edit footer content and payment instructions
* Adjust color scheme and branding
Save your changes and use the **Preview** button to see how the layout looks before sending.
 ***
## Importing invoices via CSV
Format your file with the required columns: customer name, customer email, product name, amount, issue date, due date, and status. Save as a `.csv` file.
In the **All Invoices** tab, click the **Import** button, upload your CSV, and map each column to the corresponding invoice field.
After import, review the resulting invoices in the list to confirm all data was imported correctly.
***
## Frequently asked questions
You can only edit invoices that are saved as **Draft** and have a future due date. Once sent, invoices cannot be modified — clone them and send a revised copy instead.
The dashboard converts all invoice amounts to your account's base currency in real time using current exchange rates. This ensures that summary totals (Draft, Due, Received, Overdue) are accurate even when invoices are issued in multiple currencies.
Yes. Without Stripe Connect, you can create and send invoices but must record all payments manually. ACH debit, card charging, and autopayment are not available.
Go to **Payments → Invoices & Estimates** and use the **Import** option to upload a CSV file with your invoice data.
Yes — use the **Customize invoice layout** option in your invoice settings to adjust the visual presentation of your invoices.
Yes. When sending an invoice, expand the recipient area to add CC and BCC addresses. If the contact has secondary emails configured, they appear in the dropdown for easy selection. CC and BCC are not available for SMS delivery.
Go to **Invoices & Estimates → Settings → Reminder settings**. Add reminders with custom email and SMS templates, specify the frequency and maximum number of sends, and optionally restrict sends to business hours.
Customers can pay by card (Visa, Mastercard, Amex), ACH bank transfer, or Apple Pay / Google Pay — depending on which payment gateways you have connected and enabled. Without Stripe Connect only manual payment recording is available.
Yes. Click the three-dot menu on the invoice and select **Void**. This marks the invoice as non-collectible and removes it from the due/overdue totals. Voided invoices remain in your records but cannot be edited or paid.
In the invoice editor, scroll to **Additional options** and use the **Add attachment** option. You can attach up to 10 files with a combined size limit of 20 MB. Attached files are included in the invoice email sent to the customer.
***
## Importing invoices via CSV
Format your file with the required columns: customer name, customer email, product name, amount, issue date, due date, and status. Save as a `.csv` file.
In the **All Invoices** tab, click the **Import** button, upload your CSV, and map each column to the corresponding invoice field.
After import, review the resulting invoices in the list to confirm all data was imported correctly.
***
## Frequently asked questions
You can only edit invoices that are saved as **Draft** and have a future due date. Once sent, invoices cannot be modified — clone them and send a revised copy instead.
The dashboard converts all invoice amounts to your account's base currency in real time using current exchange rates. This ensures that summary totals (Draft, Due, Received, Overdue) are accurate even when invoices are issued in multiple currencies.
Yes. Without Stripe Connect, you can create and send invoices but must record all payments manually. ACH debit, card charging, and autopayment are not available.
Go to **Payments → Invoices & Estimates** and use the **Import** option to upload a CSV file with your invoice data.
Yes — use the **Customize invoice layout** option in your invoice settings to adjust the visual presentation of your invoices.
Yes. When sending an invoice, expand the recipient area to add CC and BCC addresses. If the contact has secondary emails configured, they appear in the dropdown for easy selection. CC and BCC are not available for SMS delivery.
Go to **Invoices & Estimates → Settings → Reminder settings**. Add reminders with custom email and SMS templates, specify the frequency and maximum number of sends, and optionally restrict sends to business hours.
Customers can pay by card (Visa, Mastercard, Amex), ACH bank transfer, or Apple Pay / Google Pay — depending on which payment gateways you have connected and enabled. Without Stripe Connect only manual payment recording is available.
Yes. Click the three-dot menu on the invoice and select **Void**. This marks the invoice as non-collectible and removes it from the due/overdue totals. Voided invoices remain in your records but cannot be edited or paid.
In the invoice editor, scroll to **Additional options** and use the **Add attachment** option. You can attach up to 10 files with a combined size limit of 20 MB. Attached files are included in the invoice email sent to the customer.