> ## Documentation Index
> Fetch the complete documentation index at: https://help.hoopai.com/llms.txt
> Use this file to discover all available pages before exploring further.
# Managing opportunities
> Create, sort, filter, customize, and track opportunities through your sales pipeline in the HoopAI Platform.
Once your pipelines are set up, you can create and manage individual opportunities to track deals through your sales process.
## Creating an opportunity
From the Opportunities section, click the **"+ Add Opportunity"** button.
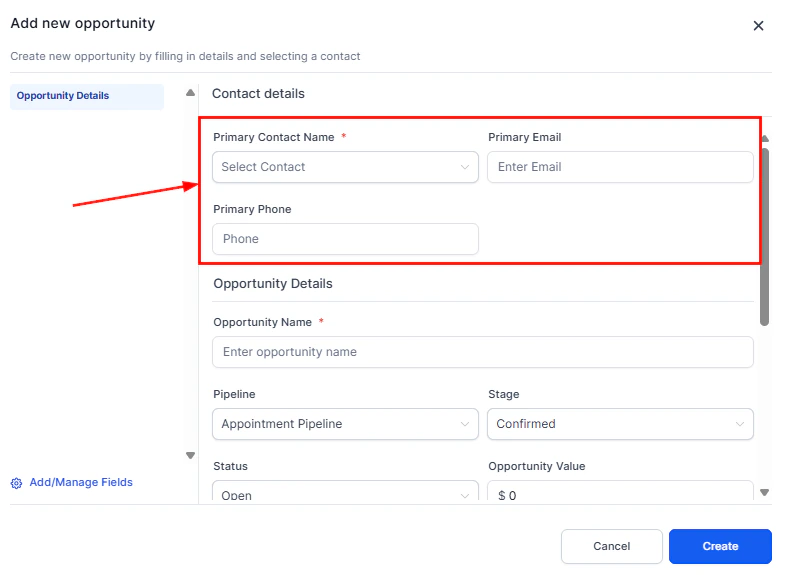
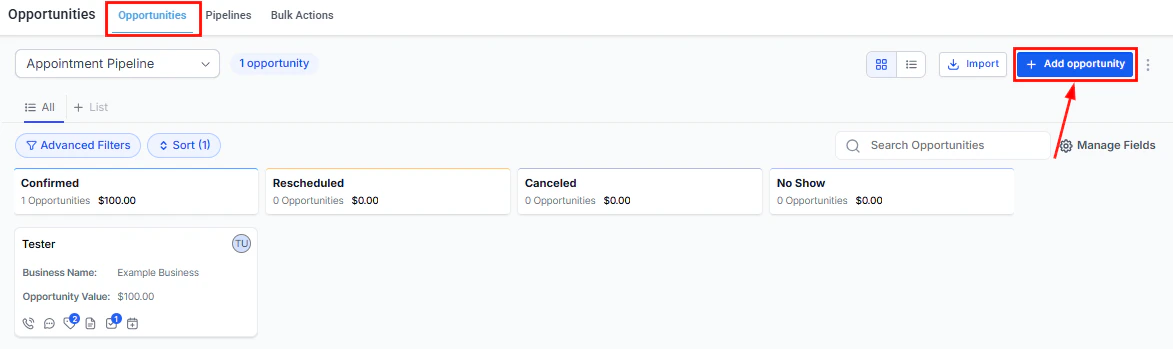 Complete the opportunity form with the core fields:
* **Contact** — the person or company associated with this deal
* **Pipeline** — which pipeline this opportunity belongs to
* **Stage** — the current stage in your sales process
* **Opportunity value** — the estimated deal value
* **Close date** — the expected close date
* **Assigned to** — the team member responsible
Complete the opportunity form with the core fields:
* **Contact** — the person or company associated with this deal
* **Pipeline** — which pipeline this opportunity belongs to
* **Stage** — the current stage in your sales process
* **Opportunity value** — the estimated deal value
* **Close date** — the expected close date
* **Assigned to** — the team member responsible
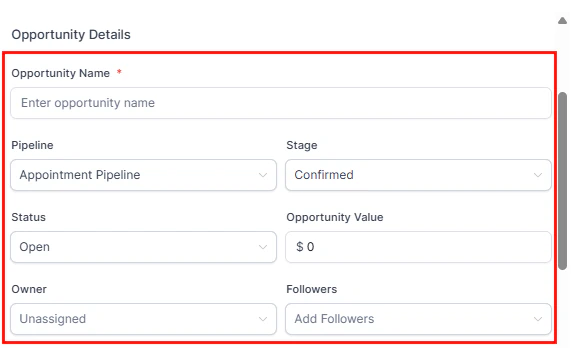
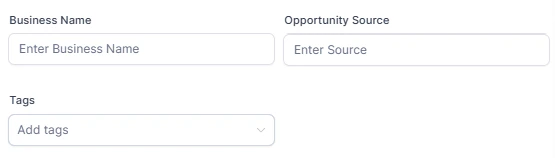
 Add additional information:
* **Opportunity name** — displayed on the card in the board view
* **Source** — where this lead came from
* **Tags** — apply relevant tags for segmentation
Add additional information:
* **Opportunity name** — displayed on the card in the board view
* **Source** — where this lead came from
* **Tags** — apply relevant tags for segmentation
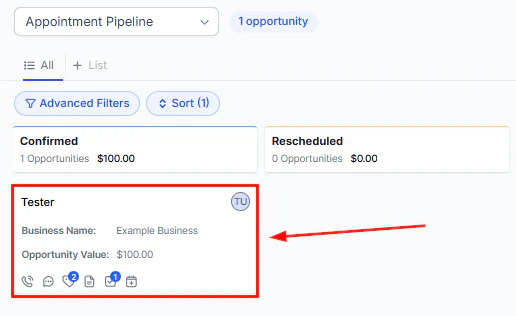
 Review the opportunity card preview, then click **Save** to create the opportunity. It will appear on the board in the selected stage.
 ***
## Adding appointments and tasks to an opportunity
You can link appointments and tasks directly to an opportunity:
***
## Adding appointments and tasks to an opportunity
You can link appointments and tasks directly to an opportunity:
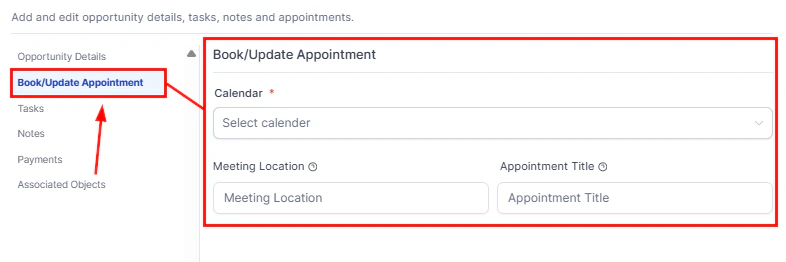 1. Open the opportunity detail panel
2. Click **+ Add Appointment** or **+ Add Task**
3. Fill in the details and save
***
## Opportunity management view
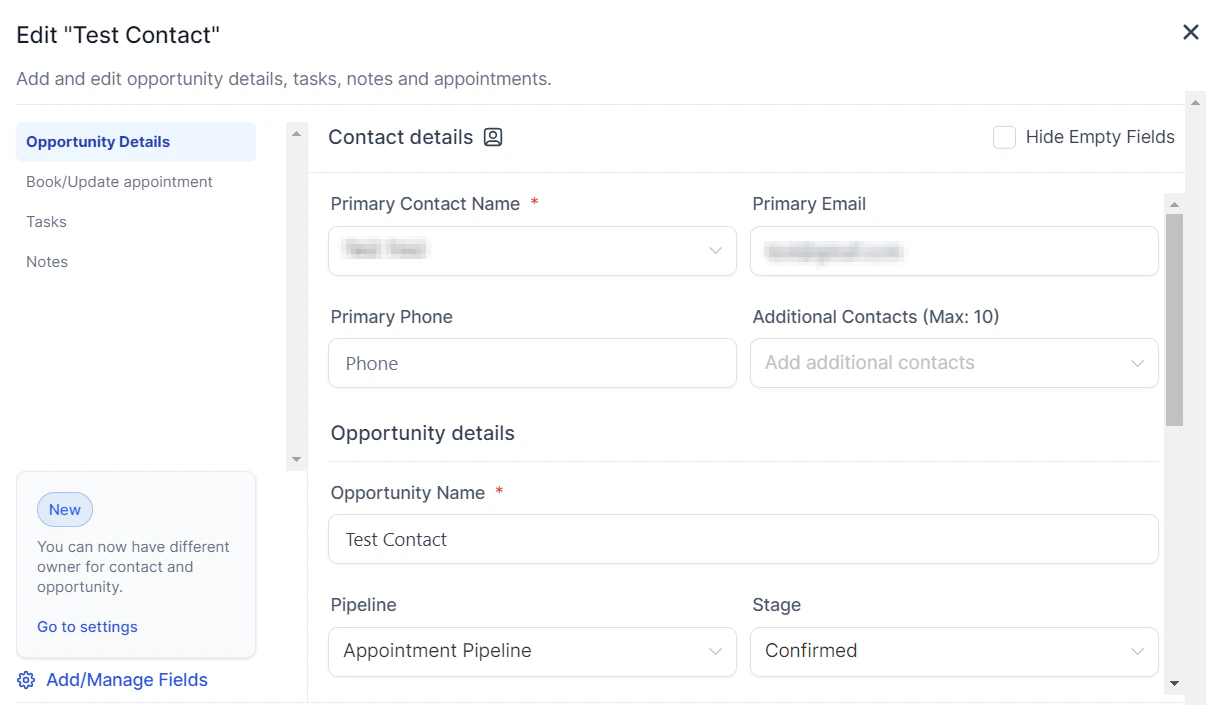
The opportunity management view shows the full detail of an opportunity including all associated data.
1. Open the opportunity detail panel
2. Click **+ Add Appointment** or **+ Add Task**
3. Fill in the details and save
***
## Opportunity management view
The opportunity management view shows the full detail of an opportunity including all associated data.
 ### Opportunity ID
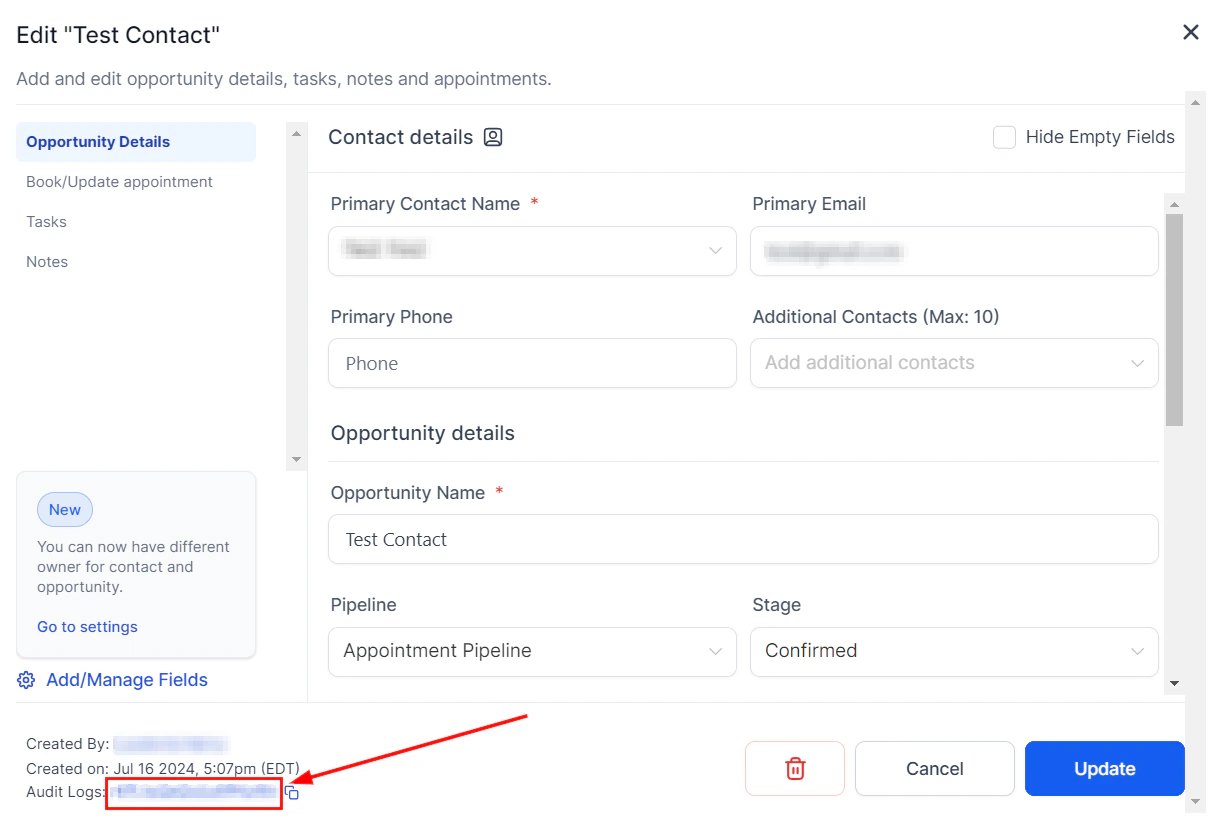
Every opportunity has a unique Opportunity ID for tracking and reference.
### Opportunity ID
Every opportunity has a unique Opportunity ID for tracking and reference.
 ### Restoring deleted opportunities
To recover a deleted opportunity:
Navigate to **Opportunities > Opportunity Settings**.
Click the **Deleted Opportunities** tab to see recently deleted records.
### Restoring deleted opportunities
To recover a deleted opportunity:
Navigate to **Opportunities > Opportunity Settings**.
Click the **Deleted Opportunities** tab to see recently deleted records.
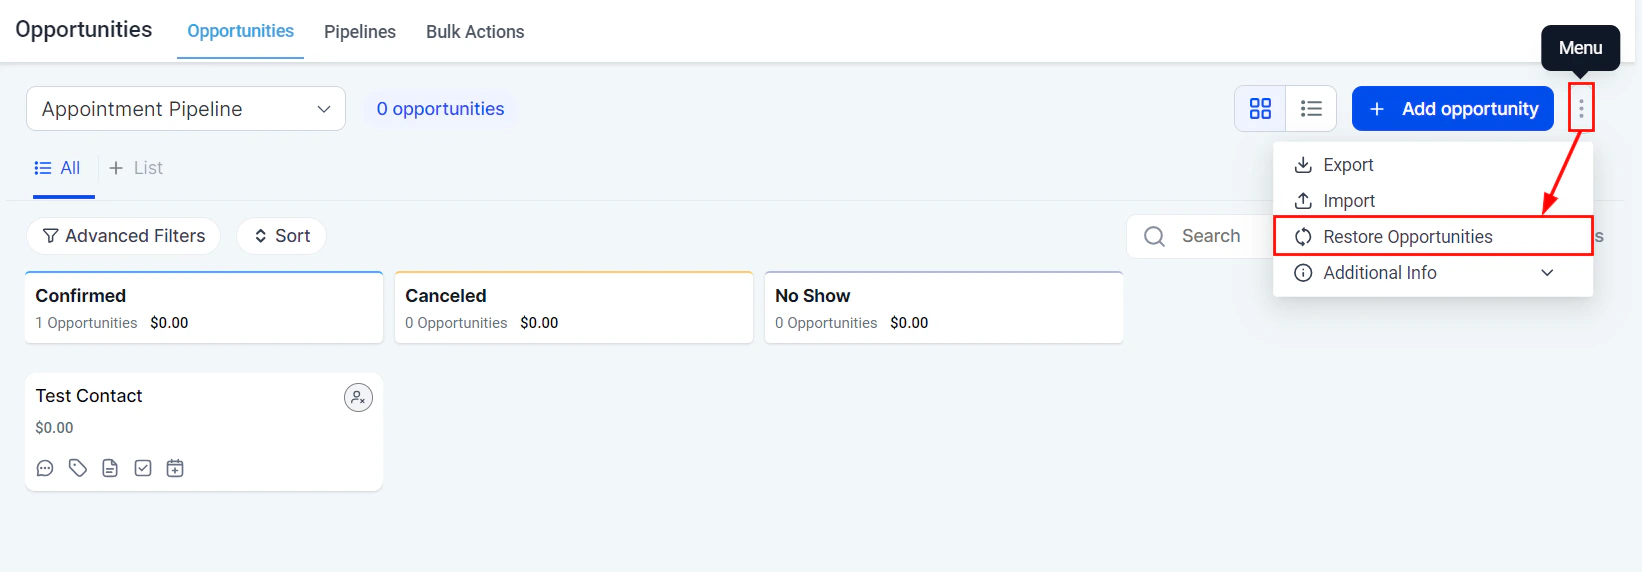 Check the opportunities to recover and click **Restore**.
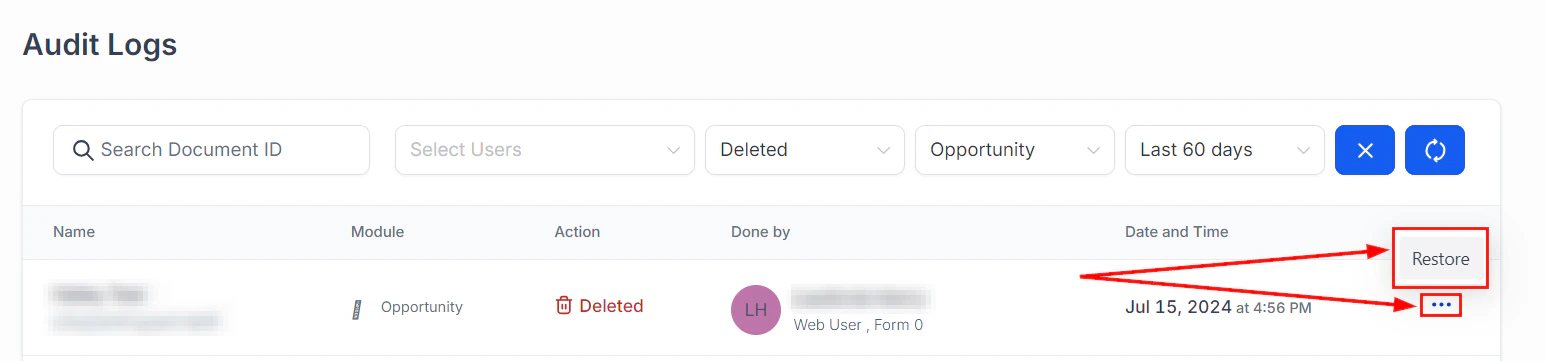
### Audit logs
All changes to an opportunity are logged in the audit trail.
Check the opportunities to recover and click **Restore**.
### Audit logs
All changes to an opportunity are logged in the audit trail.
 ***
## List view
Switch to **List View** using the view toggle at the top of the Opportunities section.
***
## List view
Switch to **List View** using the view toggle at the top of the Opportunities section.
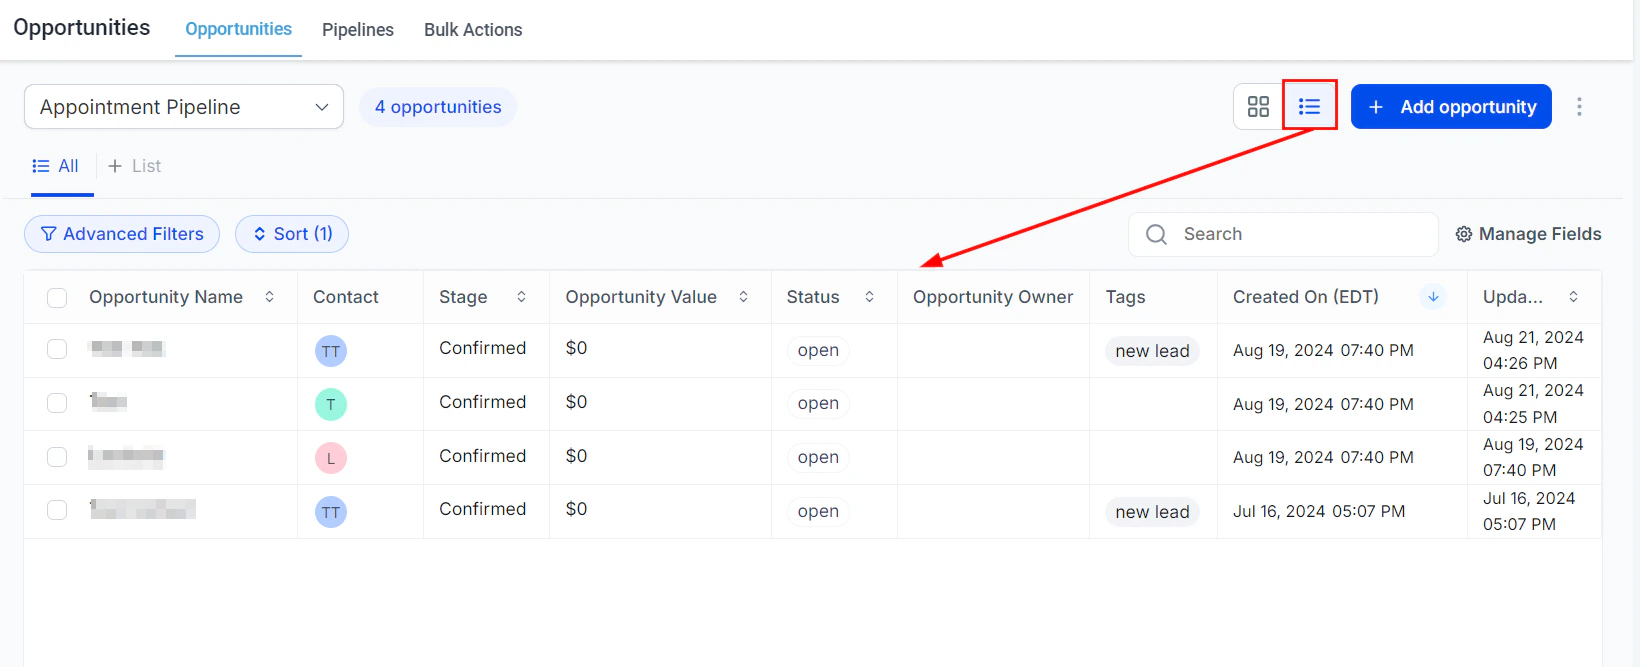 In list view you can:
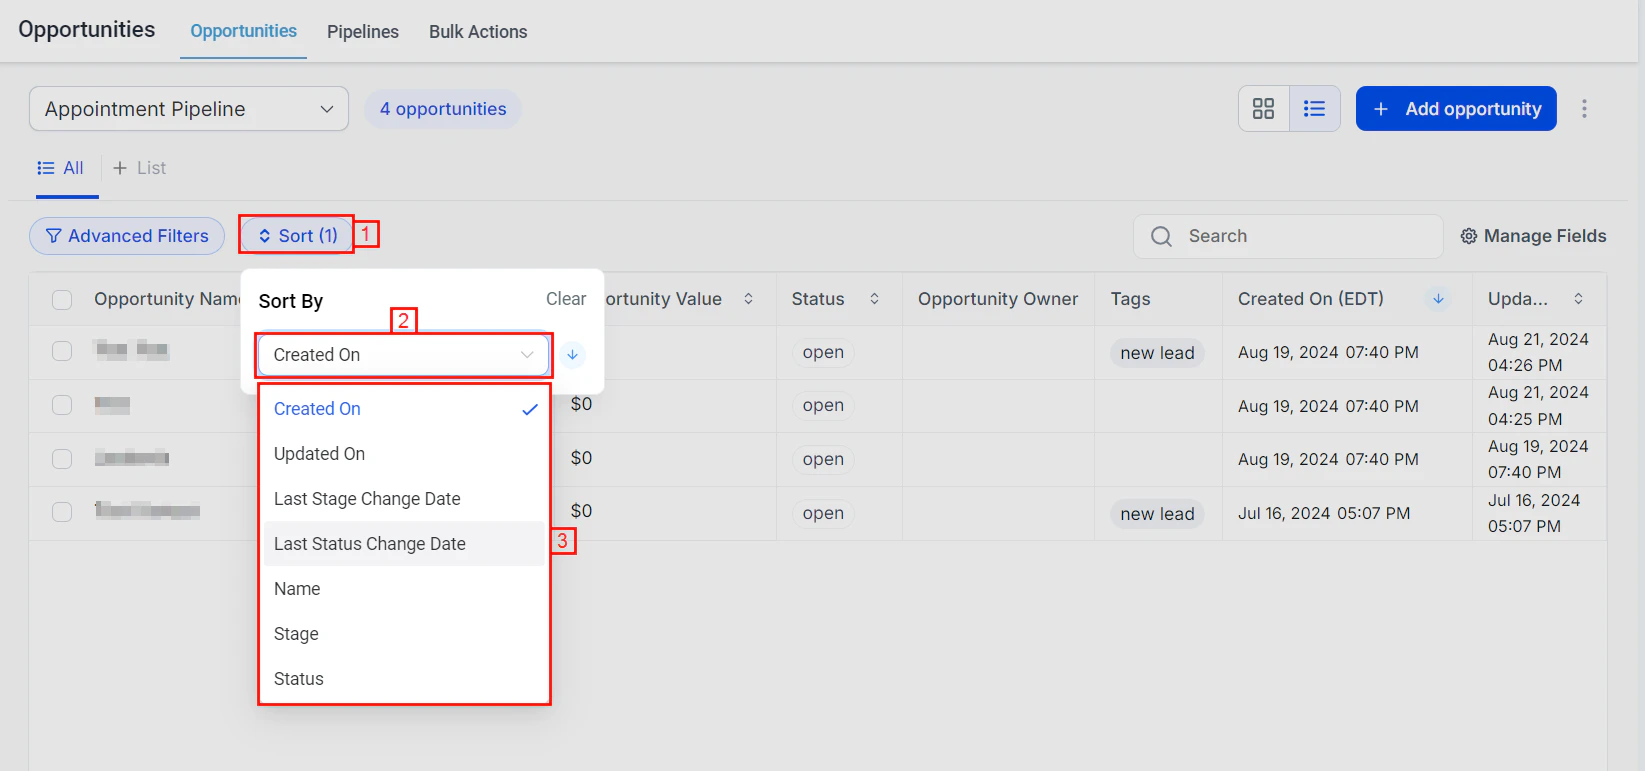
* Sort by any column (value, close date, stage, etc.)
In list view you can:
* Sort by any column (value, close date, stage, etc.)
 * Select and bulk-edit multiple opportunities
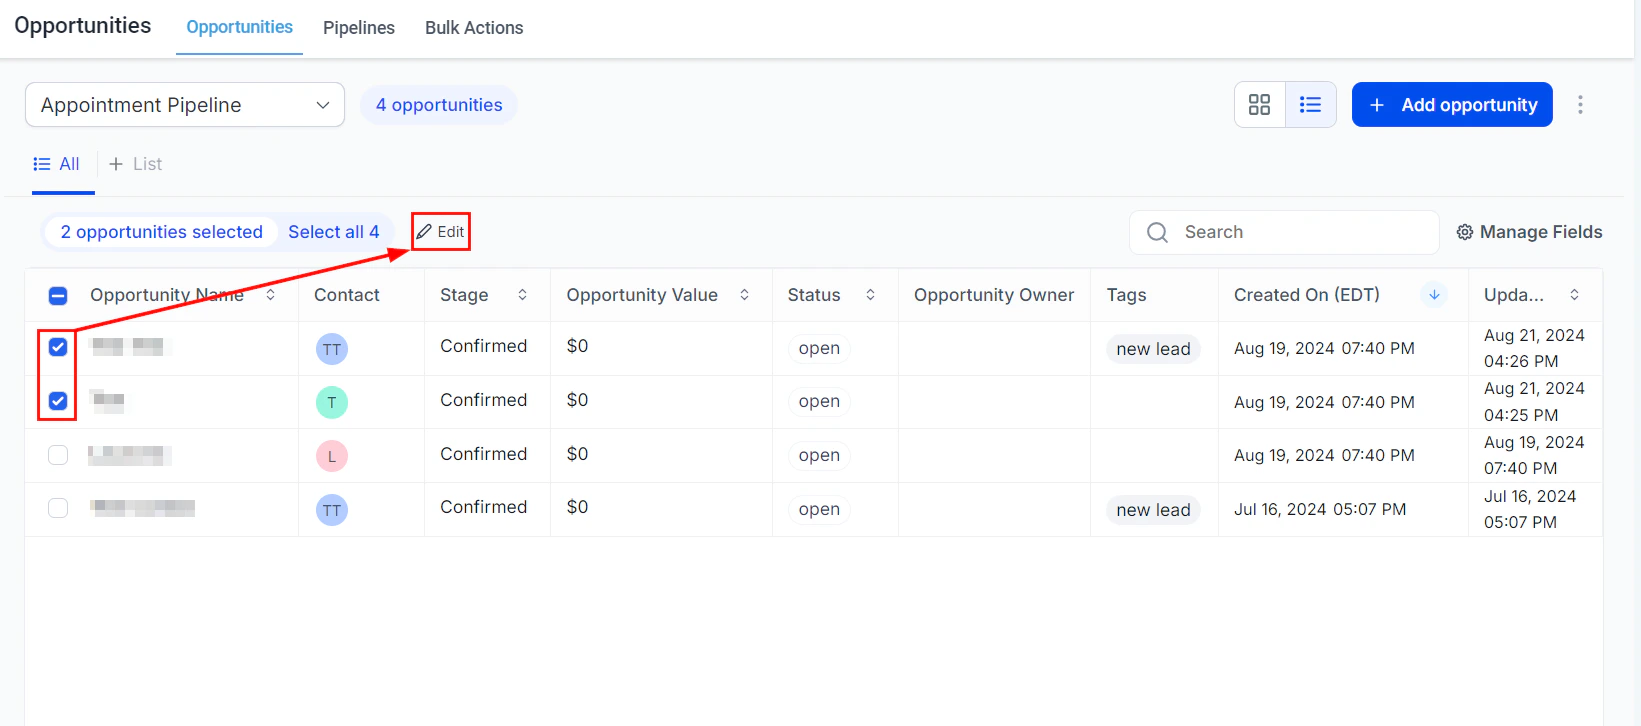 * Export the filtered list as a CSV file
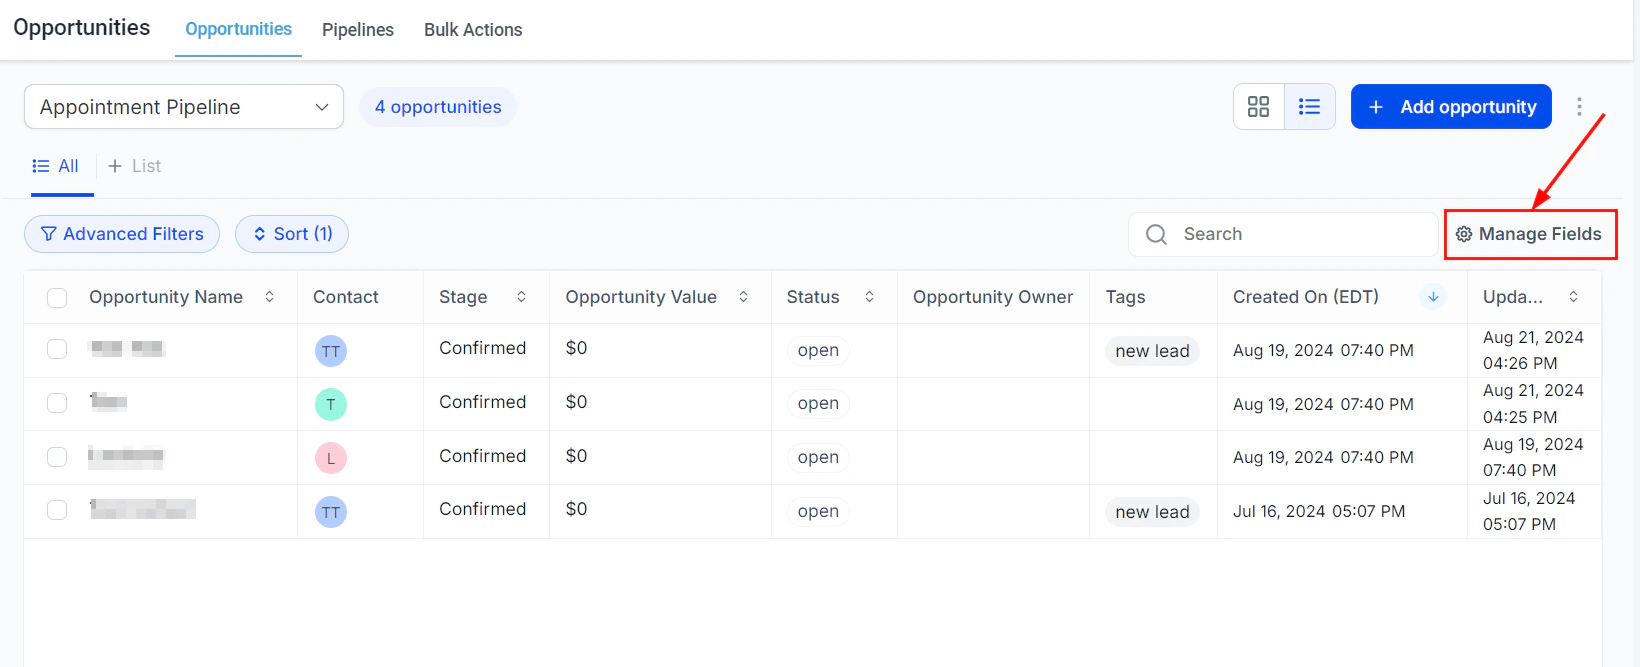
* Manage visible columns
* Export the filtered list as a CSV file
* Manage visible columns
 ***
## Sorting and filtering opportunities
Use the filter toolbar to narrow down the opportunities visible on your board or list view:
* Filter by **pipeline**
* Filter by **stage**
* Filter by **assigned user**
* Filter by **date range** (created, close date, last activity)
* Filter by **opportunity value** range
* Filter by **tags** (including smart tags)
* Filter by **status** (Open, Won, Lost, Abandoned)
***
## Sorting and filtering opportunities
Use the filter toolbar to narrow down the opportunities visible on your board or list view:
* Filter by **pipeline**
* Filter by **stage**
* Filter by **assigned user**
* Filter by **date range** (created, close date, last activity)
* Filter by **opportunity value** range
* Filter by **tags** (including smart tags)
* Filter by **status** (Open, Won, Lost, Abandoned)
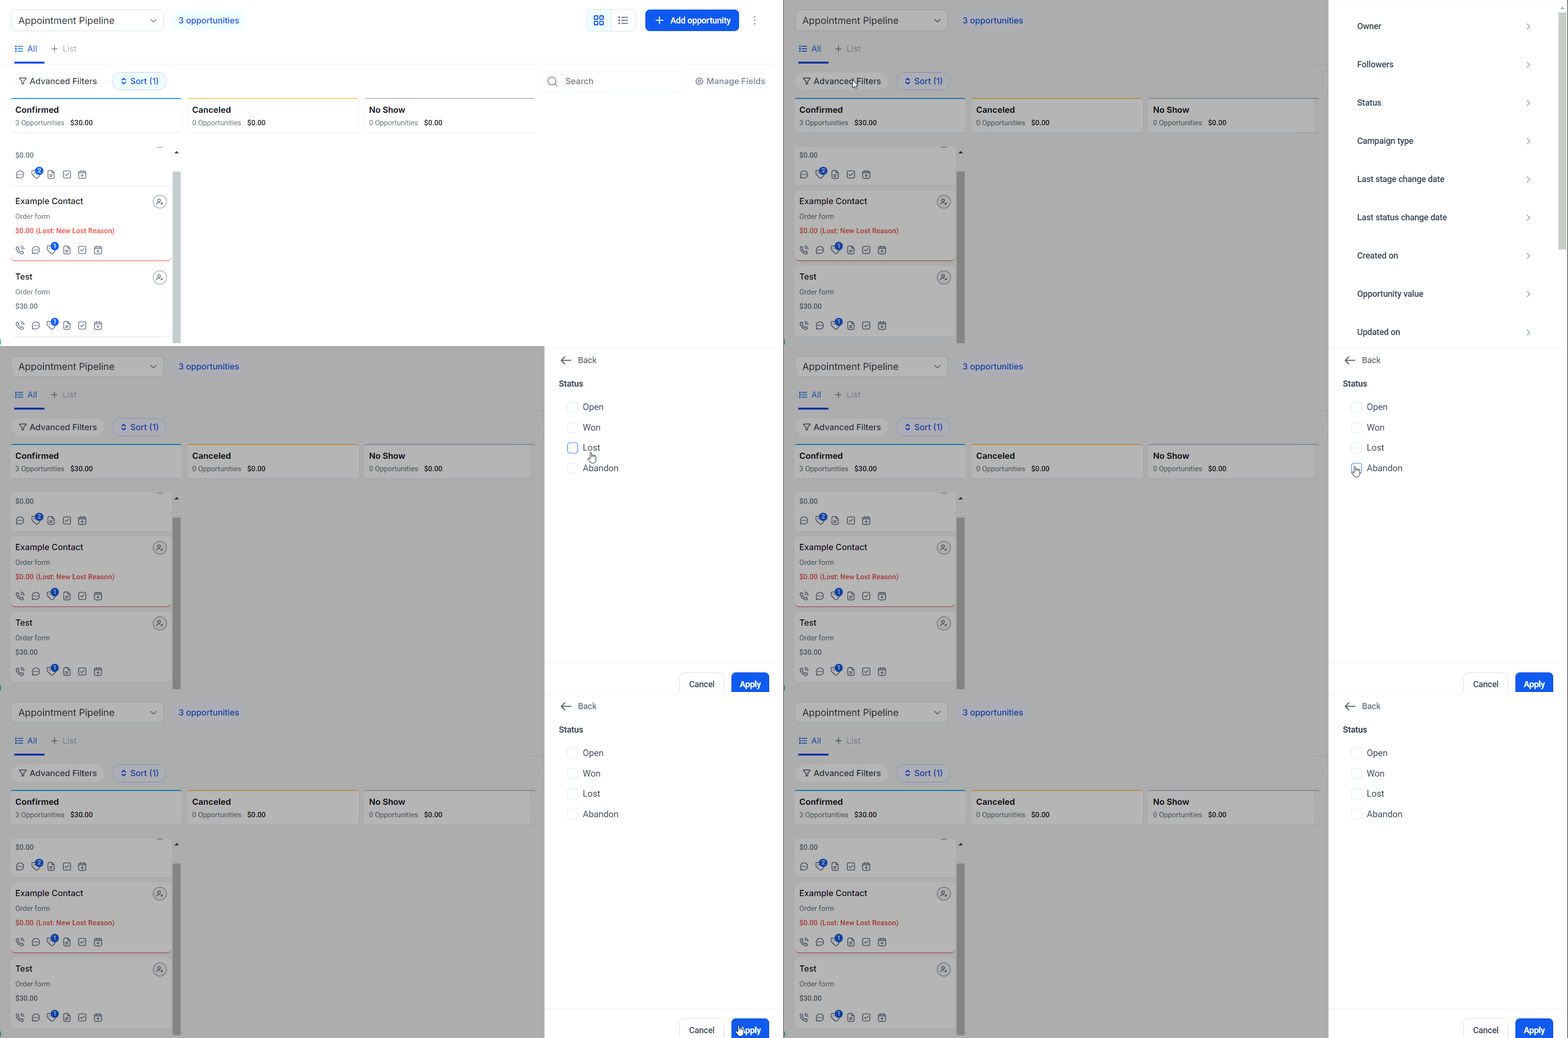 Save frequently used filter combinations for quick access.
***
## Customizing opportunity cards
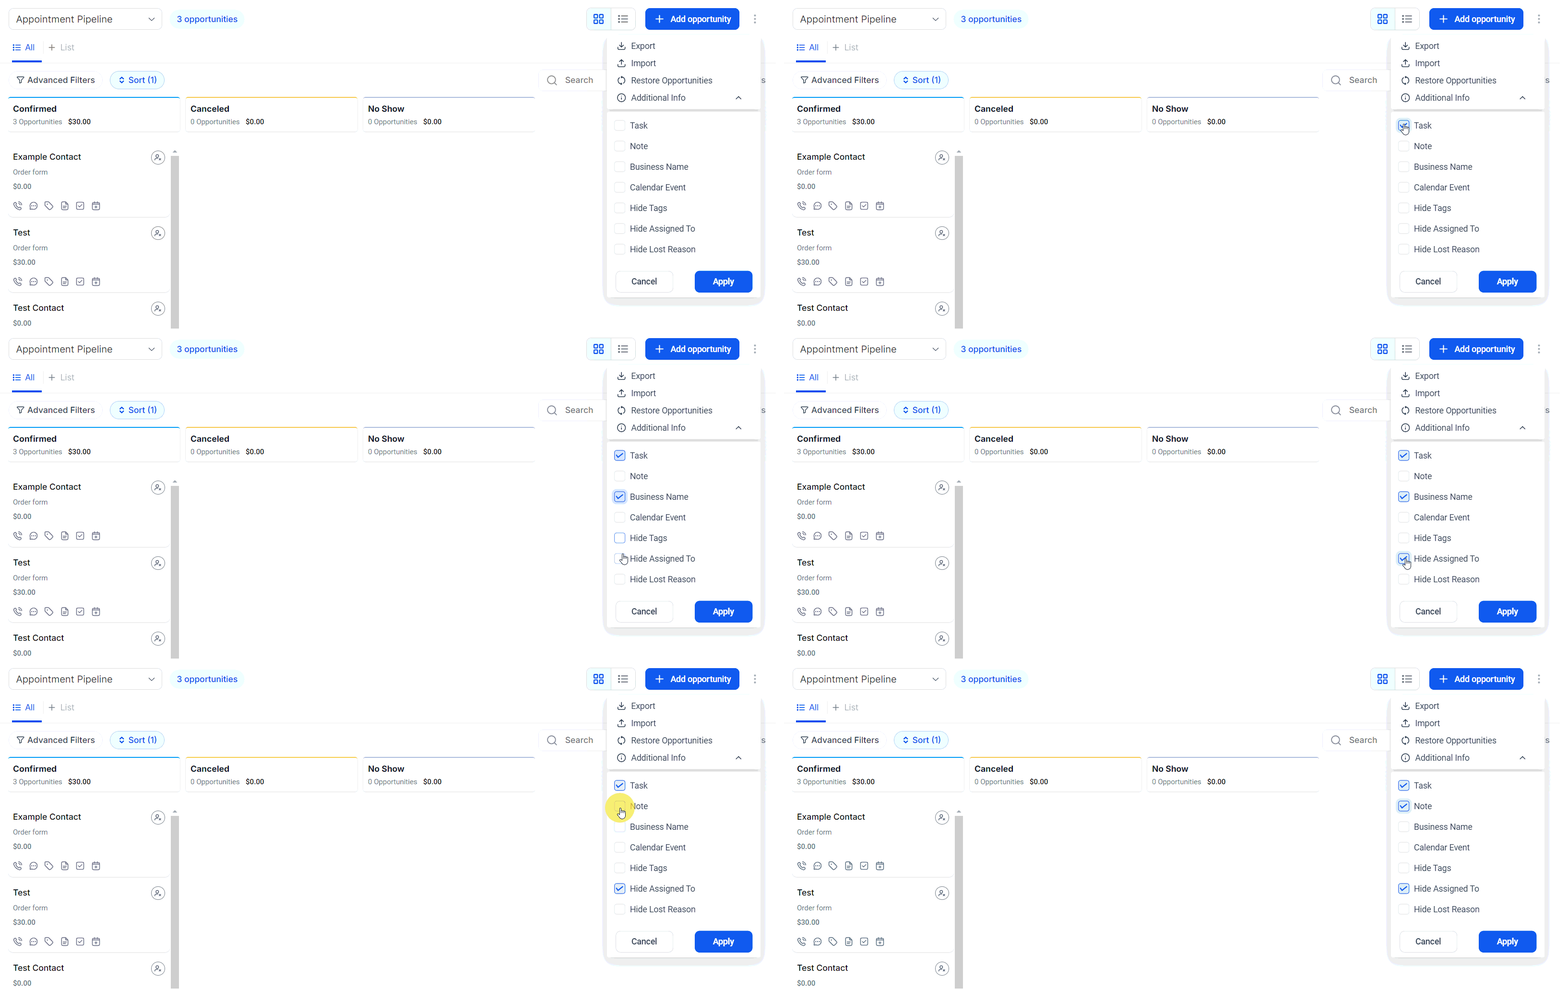
You can control which fields appear on opportunity cards in the board view:
Click the **Settings** or **Customize Cards** option in the Opportunities toolbar.
Choose which data fields to display on each card — such as value, close date, assigned user, or custom fields.
Save frequently used filter combinations for quick access.
***
## Customizing opportunity cards
You can control which fields appear on opportunity cards in the board view:
Click the **Settings** or **Customize Cards** option in the Opportunities toolbar.
Choose which data fields to display on each card — such as value, close date, assigned user, or custom fields.
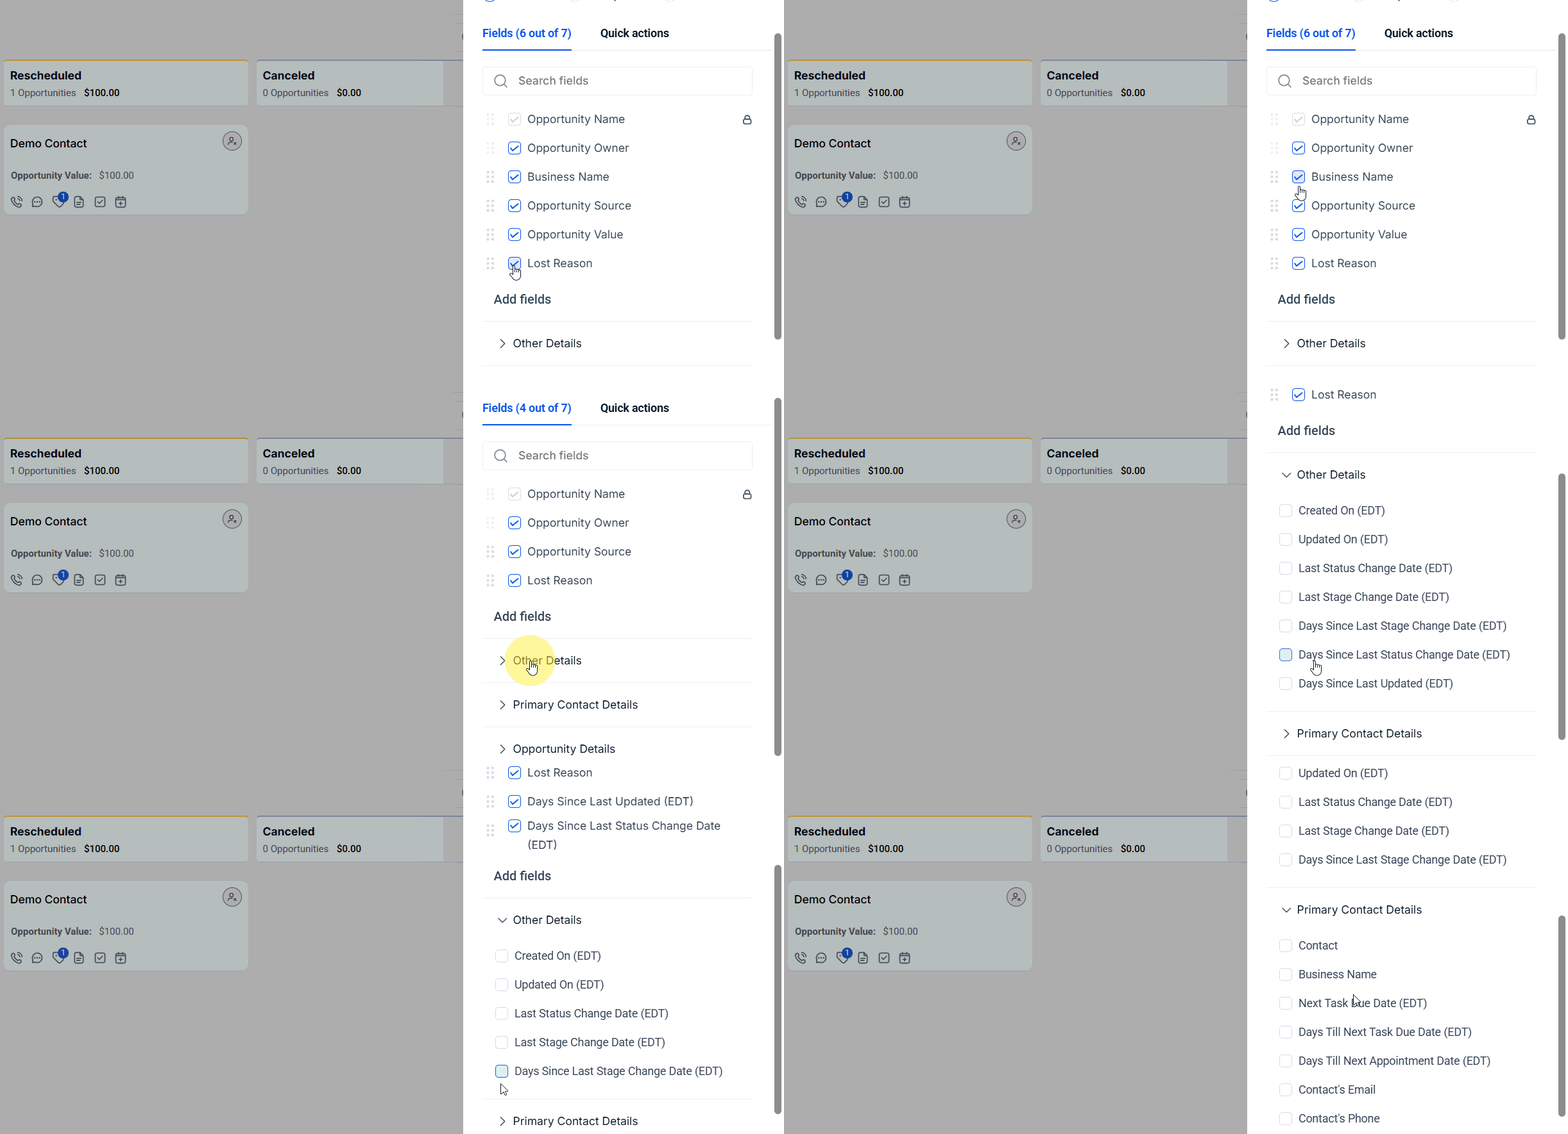 Click **Save** to apply the card layout.
You can also show additional detail directly on a card by enabling the **Show Additional Information** option, which surfaces secondary fields without opening the full detail panel.
Click **Save** to apply the card layout.
You can also show additional detail directly on a card by enabling the **Show Additional Information** option, which surfaces secondary fields without opening the full detail panel.
 ***
## Sending an invoice or estimate from an opportunity
You can generate and send invoices or estimates directly from an opportunity record:
Click on an opportunity card to open it.
In the opportunity details panel, click **"Send Invoice"** or **"Send Estimate"**.
Complete the invoice or estimate form — line items, amounts, due date, and send options.
Click **Send** to deliver the invoice or estimate to the contact.
***
## Opportunity value tracking
The **Opportunity Value** field records the estimated monetary value of a deal. Values appear on opportunity cards (board view), in list view columns, and roll up into pipeline totals visible at the top of each stage column.
Use value data to:
* Prioritize high-value deals for follow-up
* Report on total pipeline value by stage
* Build dashboard widgets showing weighted or total pipeline revenue
***
## Lost reasons
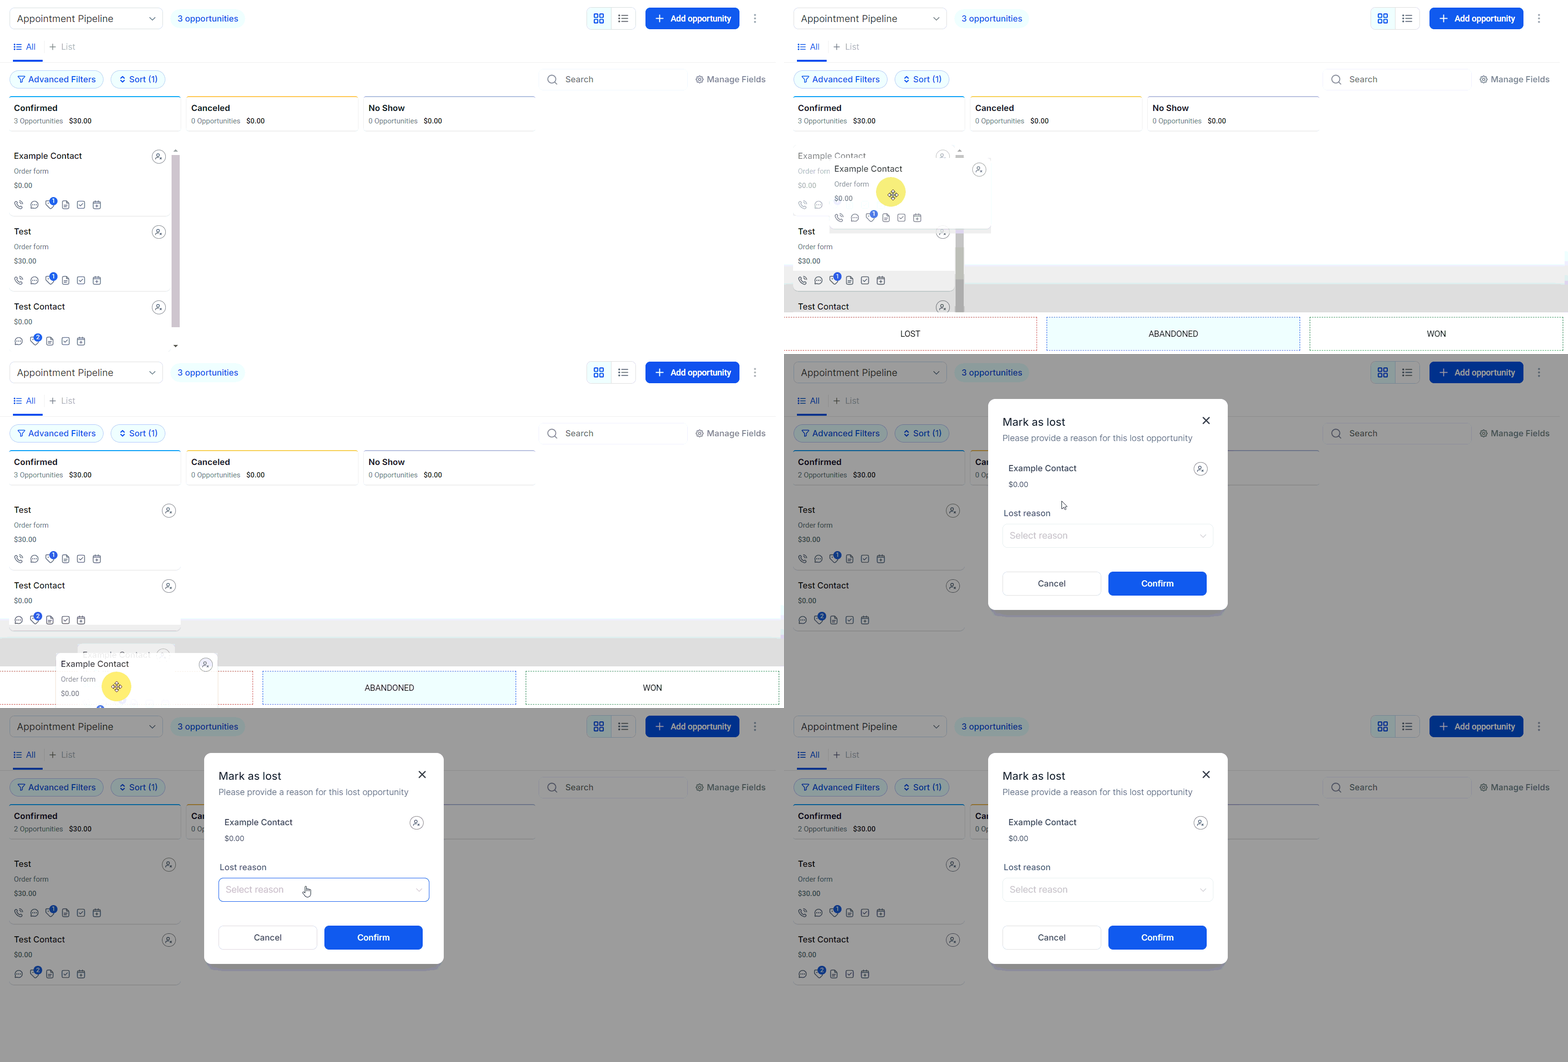
When marking an opportunity as lost, Hoop prompts you to select a **Lost Reason**. These reasons are customizable and help you track why deals are not closing — enabling you to identify patterns and improve your sales approach over time.
***
## Sending an invoice or estimate from an opportunity
You can generate and send invoices or estimates directly from an opportunity record:
Click on an opportunity card to open it.
In the opportunity details panel, click **"Send Invoice"** or **"Send Estimate"**.
Complete the invoice or estimate form — line items, amounts, due date, and send options.
Click **Send** to deliver the invoice or estimate to the contact.
***
## Opportunity value tracking
The **Opportunity Value** field records the estimated monetary value of a deal. Values appear on opportunity cards (board view), in list view columns, and roll up into pipeline totals visible at the top of each stage column.
Use value data to:
* Prioritize high-value deals for follow-up
* Report on total pipeline value by stage
* Build dashboard widgets showing weighted or total pipeline revenue
***
## Lost reasons
When marking an opportunity as lost, Hoop prompts you to select a **Lost Reason**. These reasons are customizable and help you track why deals are not closing — enabling you to identify patterns and improve your sales approach over time.
 ### Configuring lost reasons
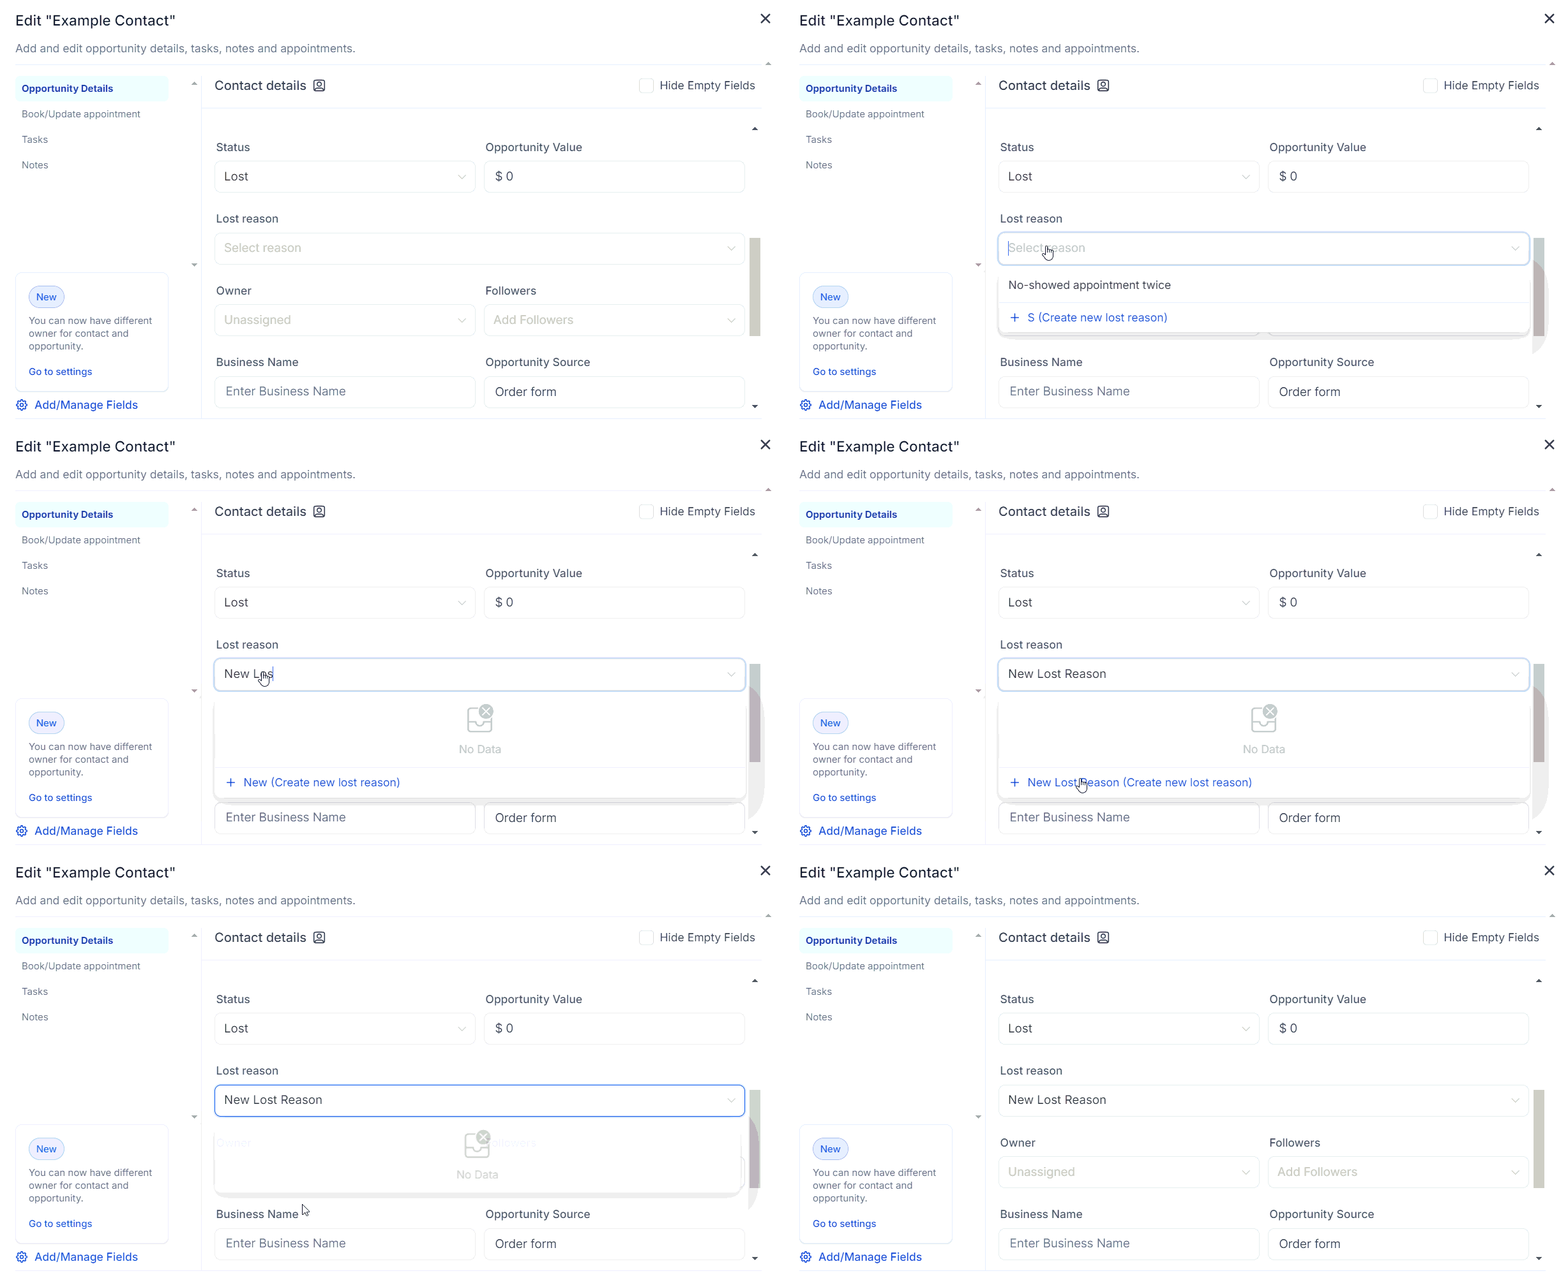
Go to **Opportunities > Opportunity Settings > Lost Reasons** to add, edit, or remove the options that appear when closing a deal as lost.
***
## Decoupling owners for contacts and opportunities
By default, the owner assigned to an opportunity can be different from the owner of the associated contact. This decoupled ownership model allows:
* A **contact owner** (e.g., the account manager) to maintain the overall relationship
* An **opportunity owner** (e.g., a sales rep) to manage a specific deal through the pipeline
When a new opportunity is created, the opportunity owner defaults to the contact owner but can be changed independently. Changing the opportunity owner does not change the contact owner, and vice versa.
**When to decouple owners:**
* Your account manager differs from the salesperson working the deal
* Different team members handle different pipelines for the same contact
* A contact has multiple active opportunities assigned to different reps
Workflow filters and smart list filters can reference both contact owner and opportunity owner independently, allowing you to build automations and segments based on either ownership context.
***
## Maximizing your sales pipeline
Review your pipeline regularly by filtering for stale opportunities (no activity in 14+ days). Use bulk actions to update stages, reassign ownership, or trigger automations to re-engage contacts.
Best practices for pipeline health:
* **Set close dates** on every opportunity so you can filter by urgency
* **Use smart tags** to automatically flag high-value or at-risk deals
* **Track lost reasons** consistently to spot trends
* **Automate follow-ups** using the Automations section to trigger actions based on stage changes
***
## FAQs
Double-check the filter criteria and operators used. Ensure that the conditions set are not contradictory or too narrow. Try clearing all filters and re-applying them one at a time to identify the conflicting condition.
Yes. In list view, click **Manage Fields** (or the columns icon) to choose which fields appear as columns. You can also resize and reorder columns to suit your workflow.
Yes. In list view, click any column header to sort by that field. All features available in board view — including advanced filters and search — are also available in list view.
The Opportunity ID is located at the bottom left of the opportunity detail panel. Clicking on it redirects you to the audit logs for that specific opportunity.
Audit logs record every change made to an opportunity, including who made the change and when. You can filter audit logs by change type to find specific updates quickly.
Open the opportunity card, locate the **Owners** section in the detail panel, and select the team member from the dropdown. Tasks can also be created and assigned to any team member regardless of lead ownership.
### Configuring lost reasons
Go to **Opportunities > Opportunity Settings > Lost Reasons** to add, edit, or remove the options that appear when closing a deal as lost.
***
## Decoupling owners for contacts and opportunities
By default, the owner assigned to an opportunity can be different from the owner of the associated contact. This decoupled ownership model allows:
* A **contact owner** (e.g., the account manager) to maintain the overall relationship
* An **opportunity owner** (e.g., a sales rep) to manage a specific deal through the pipeline
When a new opportunity is created, the opportunity owner defaults to the contact owner but can be changed independently. Changing the opportunity owner does not change the contact owner, and vice versa.
**When to decouple owners:**
* Your account manager differs from the salesperson working the deal
* Different team members handle different pipelines for the same contact
* A contact has multiple active opportunities assigned to different reps
Workflow filters and smart list filters can reference both contact owner and opportunity owner independently, allowing you to build automations and segments based on either ownership context.
***
## Maximizing your sales pipeline
Review your pipeline regularly by filtering for stale opportunities (no activity in 14+ days). Use bulk actions to update stages, reassign ownership, or trigger automations to re-engage contacts.
Best practices for pipeline health:
* **Set close dates** on every opportunity so you can filter by urgency
* **Use smart tags** to automatically flag high-value or at-risk deals
* **Track lost reasons** consistently to spot trends
* **Automate follow-ups** using the Automations section to trigger actions based on stage changes
***
## FAQs
Double-check the filter criteria and operators used. Ensure that the conditions set are not contradictory or too narrow. Try clearing all filters and re-applying them one at a time to identify the conflicting condition.
Yes. In list view, click **Manage Fields** (or the columns icon) to choose which fields appear as columns. You can also resize and reorder columns to suit your workflow.
Yes. In list view, click any column header to sort by that field. All features available in board view — including advanced filters and search — are also available in list view.
The Opportunity ID is located at the bottom left of the opportunity detail panel. Clicking on it redirects you to the audit logs for that specific opportunity.
Audit logs record every change made to an opportunity, including who made the change and when. You can filter audit logs by change type to find specific updates quickly.
Open the opportunity card, locate the **Owners** section in the detail panel, and select the team member from the dropdown. Tasks can also be created and assigned to any team member regardless of lead ownership.