> ## Documentation Index
> Fetch the complete documentation index at: https://help.hoopai.com/llms.txt
> Use this file to discover all available pages before exploring further.
# List view
> Switch to list view to see opportunities in a sortable table, manage visible columns, apply advanced filters, and bulk-edit deals efficiently.
List view displays your opportunities as rows in a table rather than cards on a kanban board. It is especially useful when you have a large number of deals, need to compare values across many records at once, or want to sort and filter with precision before taking bulk actions.
## Switching to list view
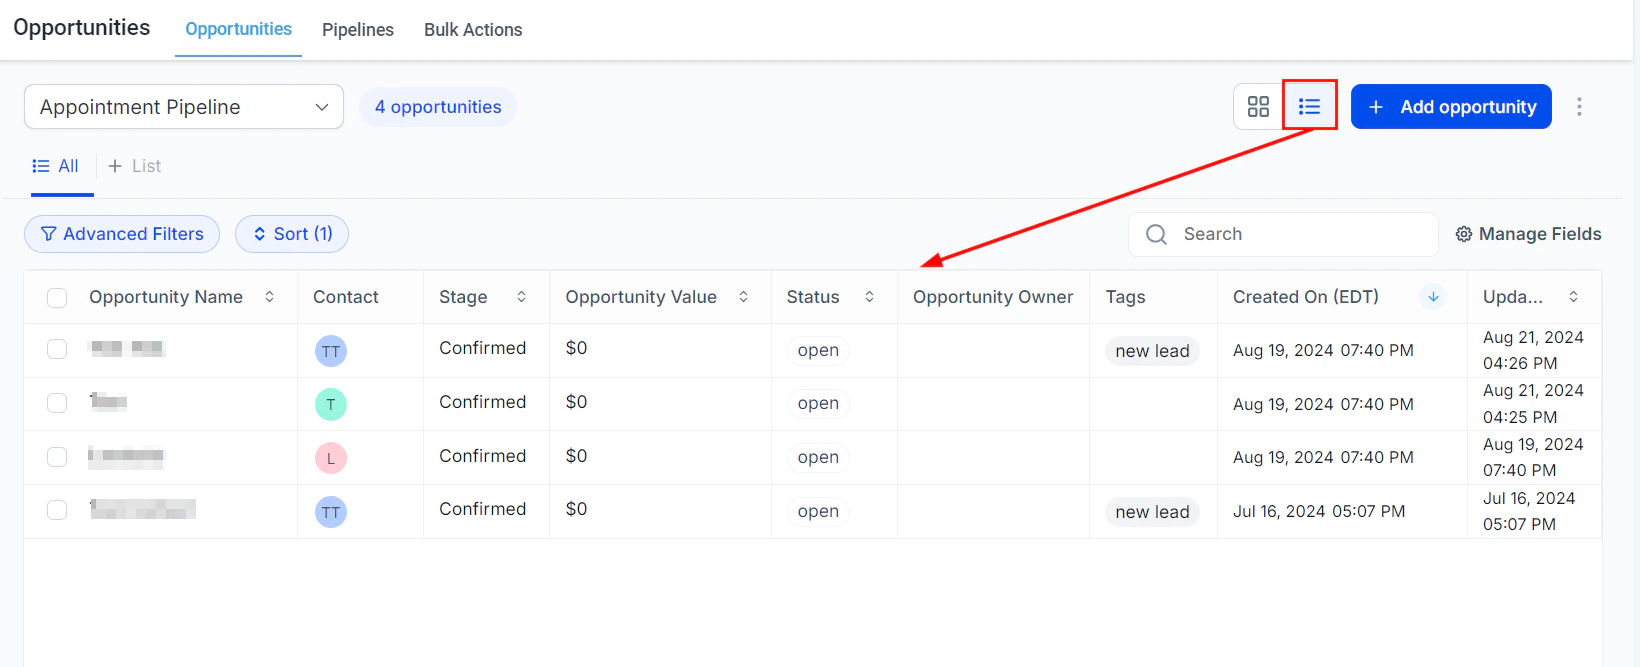
Click the **List** view icon in the view toggle at the top right of the Opportunities section. The board remembers your last-used view, so list view will be the default next time you open Opportunities until you switch back.
 ***
## Reading the table
Each row in list view represents a single opportunity. Columns display the fields you have chosen to show (see [Managing columns](#managing-columns) below). Standard columns include:
| Column | Description |
| -------------------- | --------------------------------------------------------- |
| **Opportunity name** | The deal name; click to open the opportunity detail panel |
| **Contact** | The primary contact linked to this opportunity |
| **Pipeline** | The pipeline this deal belongs to |
| **Stage** | Current pipeline stage |
| **Status** | Open, Won, Lost, or Abandoned |
| **Value** | Estimated deal value |
| **Close date** | Expected date the deal will close |
| **Assigned to** | The team member who owns this deal |
| **Last activity** | Date of the most recent change or interaction |
| **Created** | Date the opportunity was created |
***
## Sorting
Click any column header to sort the table by that field in ascending order. Click the same header again to reverse the sort to descending. An arrow indicator shows the active sort column and direction.
***
## Reading the table
Each row in list view represents a single opportunity. Columns display the fields you have chosen to show (see [Managing columns](#managing-columns) below). Standard columns include:
| Column | Description |
| -------------------- | --------------------------------------------------------- |
| **Opportunity name** | The deal name; click to open the opportunity detail panel |
| **Contact** | The primary contact linked to this opportunity |
| **Pipeline** | The pipeline this deal belongs to |
| **Stage** | Current pipeline stage |
| **Status** | Open, Won, Lost, or Abandoned |
| **Value** | Estimated deal value |
| **Close date** | Expected date the deal will close |
| **Assigned to** | The team member who owns this deal |
| **Last activity** | Date of the most recent change or interaction |
| **Created** | Date the opportunity was created |
***
## Sorting
Click any column header to sort the table by that field in ascending order. Click the same header again to reverse the sort to descending. An arrow indicator shows the active sort column and direction.
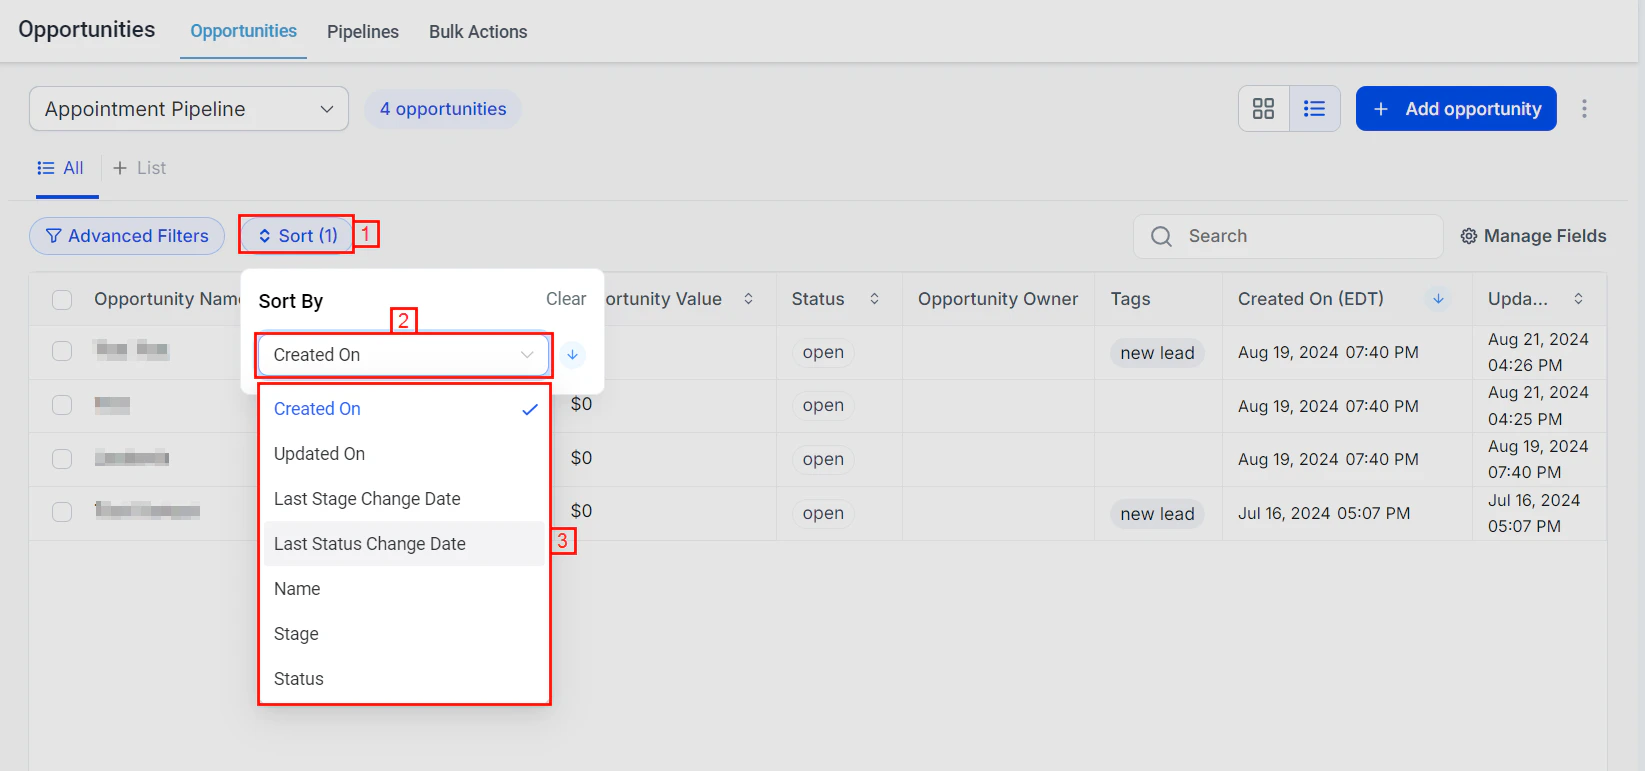 You can sort by:
* Opportunity value (highest to lowest, or lowest to highest)
* Close date (soonest or farthest away)
* Stage (alphabetical)
* Last activity (most or least recently active)
* Created date
* Contact name
* Any custom field column you have added
Sort by **Close date ascending** to surface deals closing soonest and prioritize your follow-up accordingly.
***
## Filtering
Use the filter toolbar above the table to narrow down which opportunities appear. All the same filters available on the kanban board apply in list view:
* **Pipeline** — filter to a specific pipeline (you can view multiple pipelines at once in list view)
* **Stage** — show only opportunities in selected stages
* **Status** — Open, Won, Lost, Abandoned, or any combination
* **Assigned user** — filter to a specific team member's deals
* **Date range** — filter by created date, close date, or last activity date
* **Opportunity value** — filter to a numeric range
* **Tags** — include or exclude specific tags
* **Lead source** — filter by origin
* **Custom fields** — filter by any custom field value
Combine multiple filters to create precise views. For example, filter to **Open** status + **Close date this month** + **Value over \$5,000** to see your highest-priority deals closing soon.
### Saving filter presets
After configuring a useful filter combination, save it as a preset so you can re-apply it with one click:
1. Apply your filters
2. Click **Save Filter** (or the bookmark icon)
3. Name the preset and save
Saved presets appear in the filter menu and are personal to your user account.
***
## Managing columns
You control which fields appear as columns in list view and in what order.
Click the **Manage Fields** button (or the columns icon) at the top right of the list view table.
Check the fields you want to show. Available fields include all standard opportunity fields, custom fields you have created, and key contact information fields (contact name, email, phone).
Drag fields up or down in the column manager to change their left-to-right order in the table.
Click **Apply** to update the table. Your column layout is saved per user.
You can also resize columns directly in the table by dragging the column border left or right.
***
## Inline stage changes
In list view you can change an opportunity's stage without opening the full detail panel:
1. Locate the opportunity row
2. Click the **Stage** cell — a dropdown appears
3. Select the new stage from the list
The row updates immediately. This makes it fast to process a batch of opportunities that need to advance to the next stage.
***
## Bulk actions in list view
List view is the most efficient place to perform bulk edits because you can see all opportunities at once and select precisely the ones you need.
Check the checkbox on the left side of each row you want to include. Click the checkbox in the column header to select all visible rows. Use filters first to narrow down the set.
Once records are selected, the bulk actions toolbar appears above the table showing available operations.
You can sort by:
* Opportunity value (highest to lowest, or lowest to highest)
* Close date (soonest or farthest away)
* Stage (alphabetical)
* Last activity (most or least recently active)
* Created date
* Contact name
* Any custom field column you have added
Sort by **Close date ascending** to surface deals closing soonest and prioritize your follow-up accordingly.
***
## Filtering
Use the filter toolbar above the table to narrow down which opportunities appear. All the same filters available on the kanban board apply in list view:
* **Pipeline** — filter to a specific pipeline (you can view multiple pipelines at once in list view)
* **Stage** — show only opportunities in selected stages
* **Status** — Open, Won, Lost, Abandoned, or any combination
* **Assigned user** — filter to a specific team member's deals
* **Date range** — filter by created date, close date, or last activity date
* **Opportunity value** — filter to a numeric range
* **Tags** — include or exclude specific tags
* **Lead source** — filter by origin
* **Custom fields** — filter by any custom field value
Combine multiple filters to create precise views. For example, filter to **Open** status + **Close date this month** + **Value over \$5,000** to see your highest-priority deals closing soon.
### Saving filter presets
After configuring a useful filter combination, save it as a preset so you can re-apply it with one click:
1. Apply your filters
2. Click **Save Filter** (or the bookmark icon)
3. Name the preset and save
Saved presets appear in the filter menu and are personal to your user account.
***
## Managing columns
You control which fields appear as columns in list view and in what order.
Click the **Manage Fields** button (or the columns icon) at the top right of the list view table.
Check the fields you want to show. Available fields include all standard opportunity fields, custom fields you have created, and key contact information fields (contact name, email, phone).
Drag fields up or down in the column manager to change their left-to-right order in the table.
Click **Apply** to update the table. Your column layout is saved per user.
You can also resize columns directly in the table by dragging the column border left or right.
***
## Inline stage changes
In list view you can change an opportunity's stage without opening the full detail panel:
1. Locate the opportunity row
2. Click the **Stage** cell — a dropdown appears
3. Select the new stage from the list
The row updates immediately. This makes it fast to process a batch of opportunities that need to advance to the next stage.
***
## Bulk actions in list view
List view is the most efficient place to perform bulk edits because you can see all opportunities at once and select precisely the ones you need.
Check the checkbox on the left side of each row you want to include. Click the checkbox in the column header to select all visible rows. Use filters first to narrow down the set.
Once records are selected, the bulk actions toolbar appears above the table showing available operations.
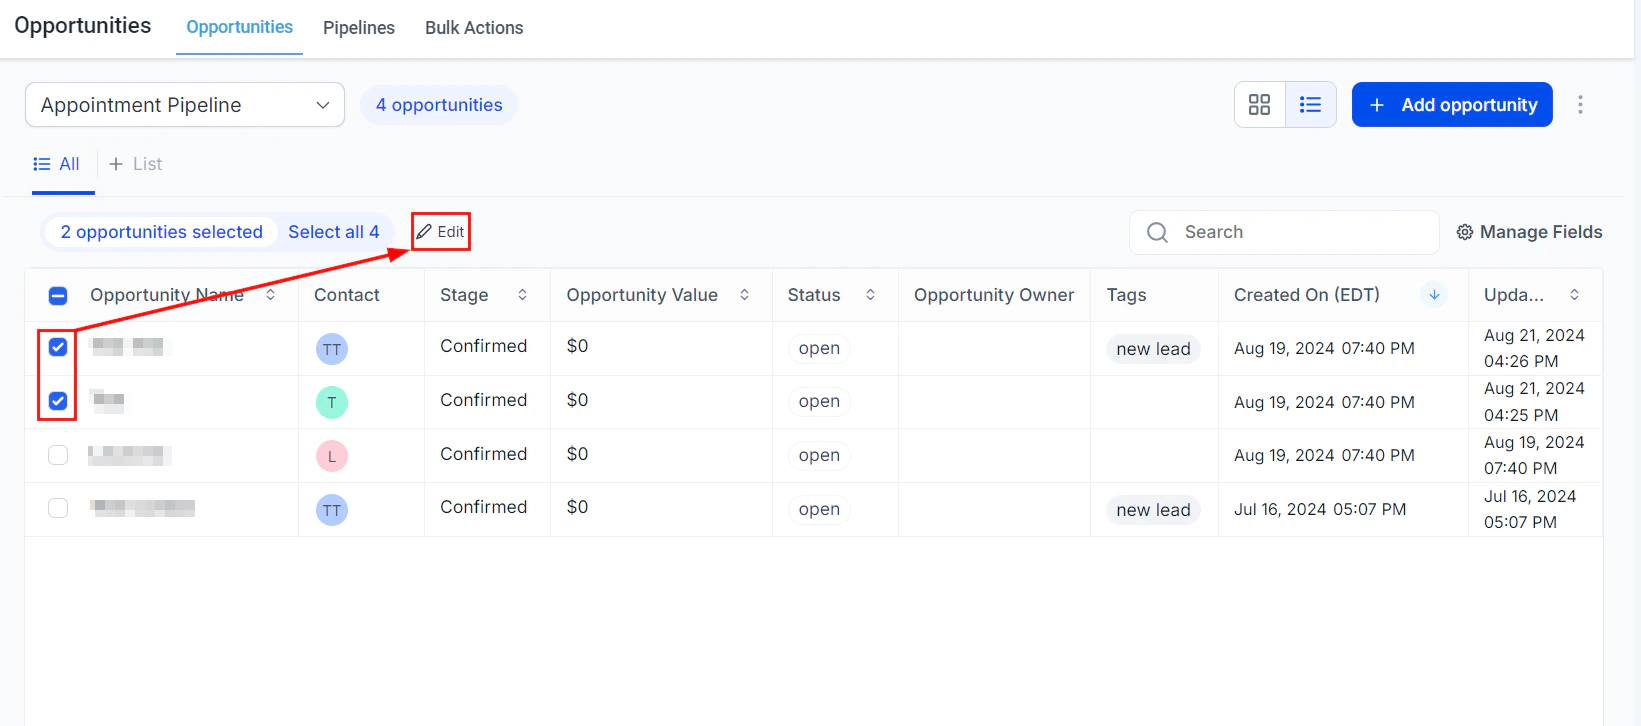 Available bulk actions include:
* **Edit** — update stage, owner, close date, tags, value, or custom fields across all selected opportunities
* **Delete** — permanently remove selected opportunities (requires confirmation)
* **Export** — download selected opportunities as a CSV file
Configure the action, click **Apply**, and confirm if prompted.
***
## Exporting from list view
To export your current filtered view as a CSV file:
1. Apply any filters you need to target the right set of opportunities
2. Click the three-dot menu (or **Export** button) in the top-right corner
3. Select **Export Opportunities**
4. The file downloads to your browser's default download folder
The export includes all opportunity fields — including custom fields — regardless of which columns are currently visible in the table.
Exports are limited to your current filter selection. If no filters are active, all opportunities in the selected pipeline(s) are exported.
***
## Viewing multiple pipelines
Unlike the kanban board (which shows one pipeline at a time), list view can display opportunities across multiple pipelines simultaneously. Use the pipeline filter to select multiple pipelines, or clear the pipeline filter to see all pipelines at once. The **Pipeline** column shows which pipeline each deal belongs to.
***
## FAQs
The table supports single-column sorting at a time. To effectively multi-sort, apply filters to narrow the data first, then sort by the most important column.
Yes. Column selections, column widths, and saved filter presets are stored per user. They persist between sessions so you see the same layout every time you return to list view.
Yes. Click the Stage cell on any row to open an inline dropdown and select a new stage without opening the full detail panel.
Yes. All custom field values are included in the exported CSV as additional columns, regardless of whether those columns are visible in your current table layout.
By default, list view shows all pipelines unless you filter to a specific one. Use the pipeline filter in the filter toolbar to limit the view to a single pipeline if needed.
Bulk edits cannot be undone automatically. Review your selection and the changes carefully before confirming. To recover deleted opportunities, go to Opportunity Settings > Deleted Opportunities.
Available bulk actions include:
* **Edit** — update stage, owner, close date, tags, value, or custom fields across all selected opportunities
* **Delete** — permanently remove selected opportunities (requires confirmation)
* **Export** — download selected opportunities as a CSV file
Configure the action, click **Apply**, and confirm if prompted.
***
## Exporting from list view
To export your current filtered view as a CSV file:
1. Apply any filters you need to target the right set of opportunities
2. Click the three-dot menu (or **Export** button) in the top-right corner
3. Select **Export Opportunities**
4. The file downloads to your browser's default download folder
The export includes all opportunity fields — including custom fields — regardless of which columns are currently visible in the table.
Exports are limited to your current filter selection. If no filters are active, all opportunities in the selected pipeline(s) are exported.
***
## Viewing multiple pipelines
Unlike the kanban board (which shows one pipeline at a time), list view can display opportunities across multiple pipelines simultaneously. Use the pipeline filter to select multiple pipelines, or clear the pipeline filter to see all pipelines at once. The **Pipeline** column shows which pipeline each deal belongs to.
***
## FAQs
The table supports single-column sorting at a time. To effectively multi-sort, apply filters to narrow the data first, then sort by the most important column.
Yes. Column selections, column widths, and saved filter presets are stored per user. They persist between sessions so you see the same layout every time you return to list view.
Yes. Click the Stage cell on any row to open an inline dropdown and select a new stage without opening the full detail panel.
Yes. All custom field values are included in the exported CSV as additional columns, regardless of whether those columns are visible in your current table layout.
By default, list view shows all pipelines unless you filter to a specific one. Use the pipeline filter in the filter toolbar to limit the view to a single pipeline if needed.
Bulk edits cannot be undone automatically. Review your selection and the changes carefully before confirming. To recover deleted opportunities, go to Opportunity Settings > Deleted Opportunities.