> ## Documentation Index
> Fetch the complete documentation index at: https://help.hoopai.com/llms.txt
> Use this file to discover all available pages before exploring further.
# Course Builder
> Build structured online courses with sections, lessons, video, files, quizzes, and rich content in the HoopAI platform.
The course builder is the interface where you construct every layer of your course — from top-level structure down to individual lesson content. It supports a wide range of content types, gives you full control over lesson sequencing and completion criteria, and lets you publish or save as a draft at any point.
## Course structure overview
Every course follows a three-level hierarchy:
```
Course
└── Module (Section)
└── Lesson
```
* **Course** — the top-level container with a title, description, and thumbnail (e.g. "Social Media Strategy Masterclass")
* **Module** — a themed chapter or week within the course (e.g. "Module 3: Instagram Growth")
* **Lesson** — a single piece of content inside a module (e.g. "Lesson 2: Choosing the right hashtags")
You can create as many modules and lessons as your course requires. There is no hard limit on either.
***
 ## Opening the course builder
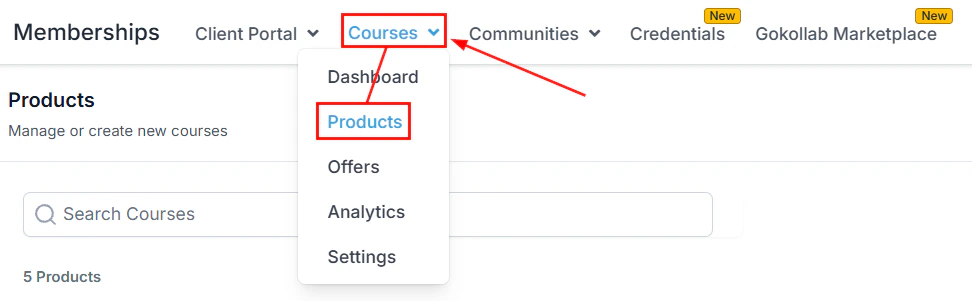
Go to **Memberships and Communities > Courses** in the left sidebar. Click the **Products** tab to see all courses.
Click **+ New Course** to start from scratch, or click the name of an existing course to open it in the builder.
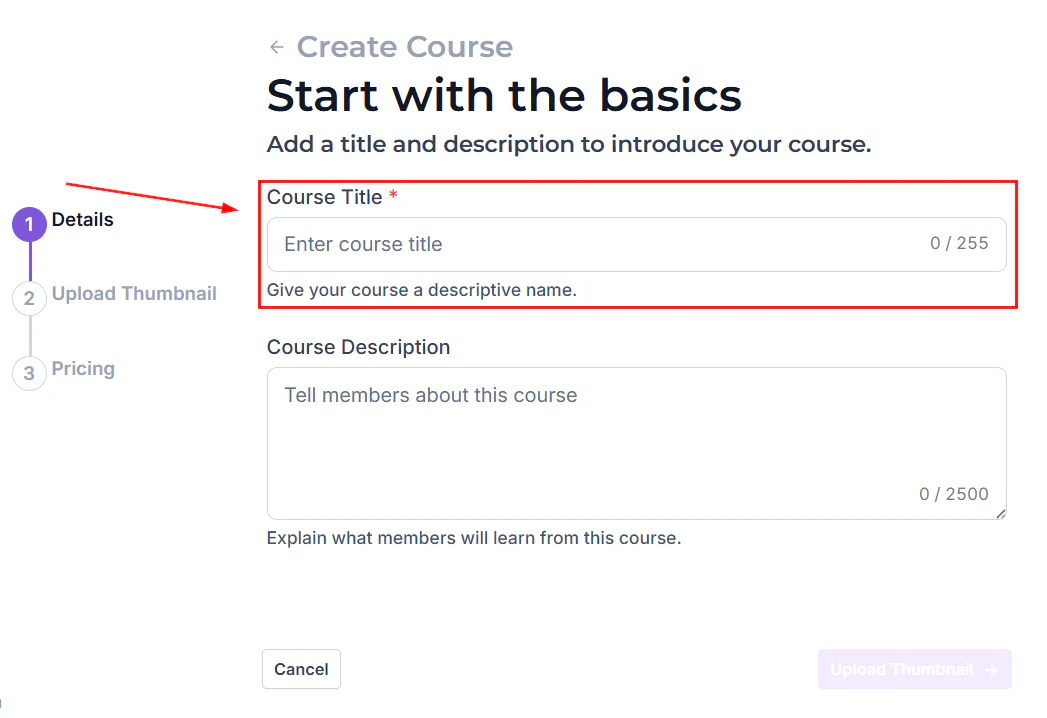
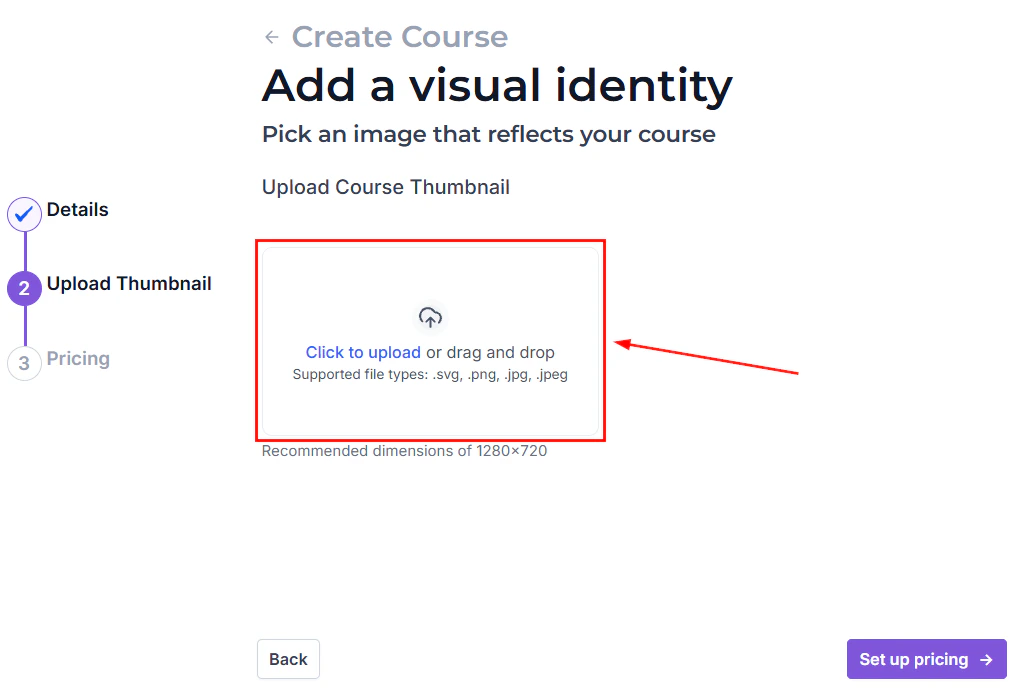
Fill in the course title, description, and upload a thumbnail image. The thumbnail appears on the course card in the member portal and on the GoKollab marketplace if you list the course there. Click **Save** to proceed to the builder canvas.
***
## Adding modules
Modules organize lessons into logical sections or weeks.
1. In the course builder sidebar, click **+ Add Module**.
2. Enter the module title (e.g. "Week 1: Foundations").
3. Optionally add a short module description that members see before entering the module.
4. Drag and drop modules to reorder them at any time.
Name modules in a way that signals progress: "Week 1", "Part 2", or "Module 3" gives members a clear sense of where they are in the journey.
***
## Opening the course builder
Go to **Memberships and Communities > Courses** in the left sidebar. Click the **Products** tab to see all courses.
Click **+ New Course** to start from scratch, or click the name of an existing course to open it in the builder.
Fill in the course title, description, and upload a thumbnail image. The thumbnail appears on the course card in the member portal and on the GoKollab marketplace if you list the course there. Click **Save** to proceed to the builder canvas.
***
## Adding modules
Modules organize lessons into logical sections or weeks.
1. In the course builder sidebar, click **+ Add Module**.
2. Enter the module title (e.g. "Week 1: Foundations").
3. Optionally add a short module description that members see before entering the module.
4. Drag and drop modules to reorder them at any time.
Name modules in a way that signals progress: "Week 1", "Part 2", or "Module 3" gives members a clear sense of where they are in the journey.
***
 ## Adding lessons
Inside each module, click **+ Add Lesson** to create a new lesson. Enter the lesson title and then choose the content type.
### Lesson content types
| Content type | Description | Best used for |
| ------------ | ----------------------------------------------------------------- | ------------------------------------------------------- |
| Video | Upload a video file or embed from YouTube, Vimeo, or Wistia | Main teaching content, walkthroughs, presentations |
| Text | Rich-text editor with headings, bullet points, images, and embeds | Written guides, transcripts, reference material |
| Audio | Upload an MP3 or other audio file | Podcast-style lessons, meditation tracks, audio courses |
| PDF / File | Attach a downloadable PDF, worksheet, or resource | Workbooks, templates, slide decks |
| Quiz | Create a knowledge check at the end of a module | Comprehension checks, certification prerequisites |
You can combine content types within a single lesson — for example, a video at the top followed by a text summary and a downloadable PDF worksheet.
***
## Video lessons
When you select **Video** as the content type, you have two options:
**Upload directly** — drag and drop your video file into the upload area. The platform hosts and streams the video securely. Supported formats include MP4, MOV, and AVI.
**Embed from an external platform** — paste a URL from YouTube, Vimeo, or Wistia. The video is embedded and plays inside the lesson page without the member leaving the portal.
### Video settings
* **Lesson thumbnail** — choose a specific frame from the video to use as the lesson preview thumbnail, or upload a custom image.
* **Closed captions** — upload an SRT caption file or enable automatic caption generation for the video.
* **Download** — enable or disable the ability for members to download the original video file. This setting is found in **Membership Settings > Builder Settings**.
* **Completion percentage** — set the percentage of the video a member must watch before the lesson is marked complete (e.g. 80%).
***
## Adding lessons
Inside each module, click **+ Add Lesson** to create a new lesson. Enter the lesson title and then choose the content type.
### Lesson content types
| Content type | Description | Best used for |
| ------------ | ----------------------------------------------------------------- | ------------------------------------------------------- |
| Video | Upload a video file or embed from YouTube, Vimeo, or Wistia | Main teaching content, walkthroughs, presentations |
| Text | Rich-text editor with headings, bullet points, images, and embeds | Written guides, transcripts, reference material |
| Audio | Upload an MP3 or other audio file | Podcast-style lessons, meditation tracks, audio courses |
| PDF / File | Attach a downloadable PDF, worksheet, or resource | Workbooks, templates, slide decks |
| Quiz | Create a knowledge check at the end of a module | Comprehension checks, certification prerequisites |
You can combine content types within a single lesson — for example, a video at the top followed by a text summary and a downloadable PDF worksheet.
***
## Video lessons
When you select **Video** as the content type, you have two options:
**Upload directly** — drag and drop your video file into the upload area. The platform hosts and streams the video securely. Supported formats include MP4, MOV, and AVI.
**Embed from an external platform** — paste a URL from YouTube, Vimeo, or Wistia. The video is embedded and plays inside the lesson page without the member leaving the portal.
### Video settings
* **Lesson thumbnail** — choose a specific frame from the video to use as the lesson preview thumbnail, or upload a custom image.
* **Closed captions** — upload an SRT caption file or enable automatic caption generation for the video.
* **Download** — enable or disable the ability for members to download the original video file. This setting is found in **Membership Settings > Builder Settings**.
* **Completion percentage** — set the percentage of the video a member must watch before the lesson is marked complete (e.g. 80%).
***
 ## Quiz lessons
Quizzes assess a member's understanding before they move on.
Inside a module, click **+ Add Lesson** and select **Quiz** as the content type.
Click **+ Add Question**. Choose from three question types:
* **Multiple choice** — one or more correct answers from a list of options
* **True / False** — a binary correct or incorrect response
* **Short answer** — a free-text response (not auto-graded; reviewed manually)
Enter the minimum percentage required to pass the quiz (e.g. 70%). Members who fall below this score are shown a failure message and can optionally retake the quiz.
Choose whether to allow unlimited retakes, limit retakes to a set number, or prevent retakes entirely. You can also choose to lock subsequent lessons until the member passes the quiz.
***
## Lesson completion criteria
For each lesson, you decide how it is marked complete:
| Completion method | How it works |
| ---------------------- | -------------------------------------------------------------------------------------------------- |
| Manual | The member clicks a **Mark as Complete** button at the end of the lesson |
| Video watch percentage | The lesson is automatically marked complete after the member watches a set percentage of the video |
| Quiz passed | The lesson is only marked complete after the member achieves a passing quiz score |
Setting quiz-based or video-based completion prevents members from skipping through content without engaging with it.
***
## Reordering content
Drag and drop modules and lessons to change their order at any time. The new order takes effect immediately for members — they will see the updated sequence on their next portal visit.
***
## Lesson visibility settings
Each lesson can be set to:
* **Published** — visible to enrolled members
* **Draft** — hidden from members while you finish building it
* **Drip scheduled** — hidden until a specific day after enrollment or a fixed calendar date (see [Drip Content](/memberships-and-communities/drip-content))
***
## Publishing a course
When the course is ready:
1. Click **Publish** in the top-right corner of the builder.
2. The course status changes from **Draft** to **Published**.
3. The course now appears in the member portal for any member who has been granted access via the appropriate offer.
## Quiz lessons
Quizzes assess a member's understanding before they move on.
Inside a module, click **+ Add Lesson** and select **Quiz** as the content type.
Click **+ Add Question**. Choose from three question types:
* **Multiple choice** — one or more correct answers from a list of options
* **True / False** — a binary correct or incorrect response
* **Short answer** — a free-text response (not auto-graded; reviewed manually)
Enter the minimum percentage required to pass the quiz (e.g. 70%). Members who fall below this score are shown a failure message and can optionally retake the quiz.
Choose whether to allow unlimited retakes, limit retakes to a set number, or prevent retakes entirely. You can also choose to lock subsequent lessons until the member passes the quiz.
***
## Lesson completion criteria
For each lesson, you decide how it is marked complete:
| Completion method | How it works |
| ---------------------- | -------------------------------------------------------------------------------------------------- |
| Manual | The member clicks a **Mark as Complete** button at the end of the lesson |
| Video watch percentage | The lesson is automatically marked complete after the member watches a set percentage of the video |
| Quiz passed | The lesson is only marked complete after the member achieves a passing quiz score |
Setting quiz-based or video-based completion prevents members from skipping through content without engaging with it.
***
## Reordering content
Drag and drop modules and lessons to change their order at any time. The new order takes effect immediately for members — they will see the updated sequence on their next portal visit.
***
## Lesson visibility settings
Each lesson can be set to:
* **Published** — visible to enrolled members
* **Draft** — hidden from members while you finish building it
* **Drip scheduled** — hidden until a specific day after enrollment or a fixed calendar date (see [Drip Content](/memberships-and-communities/drip-content))
***
## Publishing a course
When the course is ready:
1. Click **Publish** in the top-right corner of the builder.
2. The course status changes from **Draft** to **Published**.
3. The course now appears in the member portal for any member who has been granted access via the appropriate offer.
 To take a course back to draft (e.g. for a major revision), click the status indicator and select **Unpublish**. Members who are already enrolled will retain their progress, but the course will no longer be visible in their portal until you republish it.
***
## Course settings
Inside each course, the **Settings** panel lets you configure:
* **Course title and description** — edit the public-facing details
* **Thumbnail** — replace the cover image shown on the course card
* **Instructor** — add the instructor's name and bio displayed on the course page
* **Completion actions** — define what happens when a member completes all lessons (e.g. redirect to a custom page, trigger an automation)
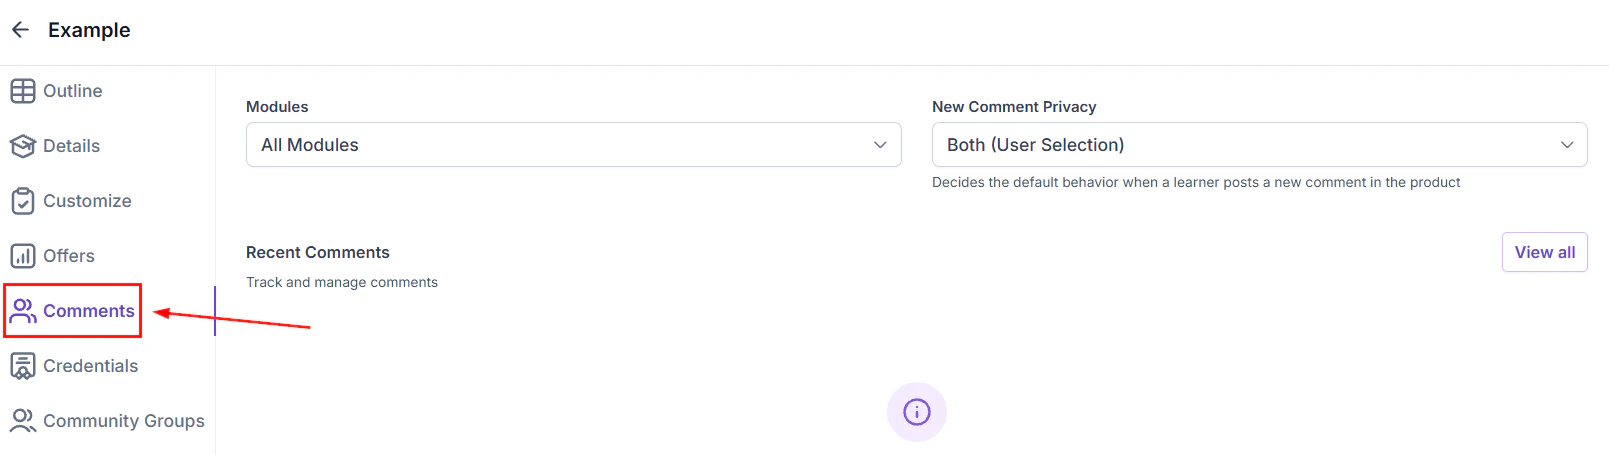
* **Comments** — enable or disable lesson-level comments for member discussion
***
## Frequently asked questions
Yes. The lesson editor supports multiple content blocks in sequence. You can combine a video embed, a text explanation, and a downloadable PDF worksheet all within one lesson page. Add each content block using the editor toolbar and arrange them in the order you want members to experience them.
File size and length limits depend on your HoopAI plan. For large video libraries, using an external host (YouTube unlisted, Vimeo, or Wistia) and embedding the URL is an efficient alternative to direct uploading.
Yes. Set each lesson's completion criteria to **Quiz passed** and configure the quiz to lock subsequent lessons until the member passes. This enforces sequential progression through the module.
Yes. Right-click or use the lesson's options menu to duplicate the lesson. The duplicate appears in the same module; drag it to the destination module.
When uploading a video lesson, you can attach an SRT subtitle file in the video settings. The captions appear as an overlay on the video player. Automatic caption generation (where available) produces captions directly from the audio without requiring a separate file.
Unpublishing hides the course from the member portal, but enrolled members retain their progress data. When you republish, they can continue from where they left off. Unpublishing does not revoke offer access — the course simply becomes invisible until it is published again.
To take a course back to draft (e.g. for a major revision), click the status indicator and select **Unpublish**. Members who are already enrolled will retain their progress, but the course will no longer be visible in their portal until you republish it.
***
## Course settings
Inside each course, the **Settings** panel lets you configure:
* **Course title and description** — edit the public-facing details
* **Thumbnail** — replace the cover image shown on the course card
* **Instructor** — add the instructor's name and bio displayed on the course page
* **Completion actions** — define what happens when a member completes all lessons (e.g. redirect to a custom page, trigger an automation)
* **Comments** — enable or disable lesson-level comments for member discussion
***
## Frequently asked questions
Yes. The lesson editor supports multiple content blocks in sequence. You can combine a video embed, a text explanation, and a downloadable PDF worksheet all within one lesson page. Add each content block using the editor toolbar and arrange them in the order you want members to experience them.
File size and length limits depend on your HoopAI plan. For large video libraries, using an external host (YouTube unlisted, Vimeo, or Wistia) and embedding the URL is an efficient alternative to direct uploading.
Yes. Set each lesson's completion criteria to **Quiz passed** and configure the quiz to lock subsequent lessons until the member passes. This enforces sequential progression through the module.
Yes. Right-click or use the lesson's options menu to duplicate the lesson. The duplicate appears in the same module; drag it to the destination module.
When uploading a video lesson, you can attach an SRT subtitle file in the video settings. The captions appear as an overlay on the video player. Automatic caption generation (where available) produces captions directly from the audio without requiring a separate file.
Unpublishing hides the course from the member portal, but enrolled members retain their progress data. When you republish, they can continue from where they left off. Unpublishing does not revoke offer access — the course simply becomes invisible until it is published again.