> ## Documentation Index
> Fetch the complete documentation index at: https://help.hoopai.com/llms.txt
> Use this file to discover all available pages before exploring further.
# Social planner features
> Bulk CSV scheduling, hashtag groups, RSS auto-posting, recurring posts, evergreen category queues, image editor, and watermarks in the Social Planner.
The Social Planner includes a full set of content management and automation features to keep your social media presence active without constant manual effort. Navigate to **Marketing > Social Planner** to access these tools.
## Bulk scheduling via CSV
Upload a CSV or XLSX file to schedule up to 90 posts at once — including platform-specific post types, watermarks, hashtags, and more.
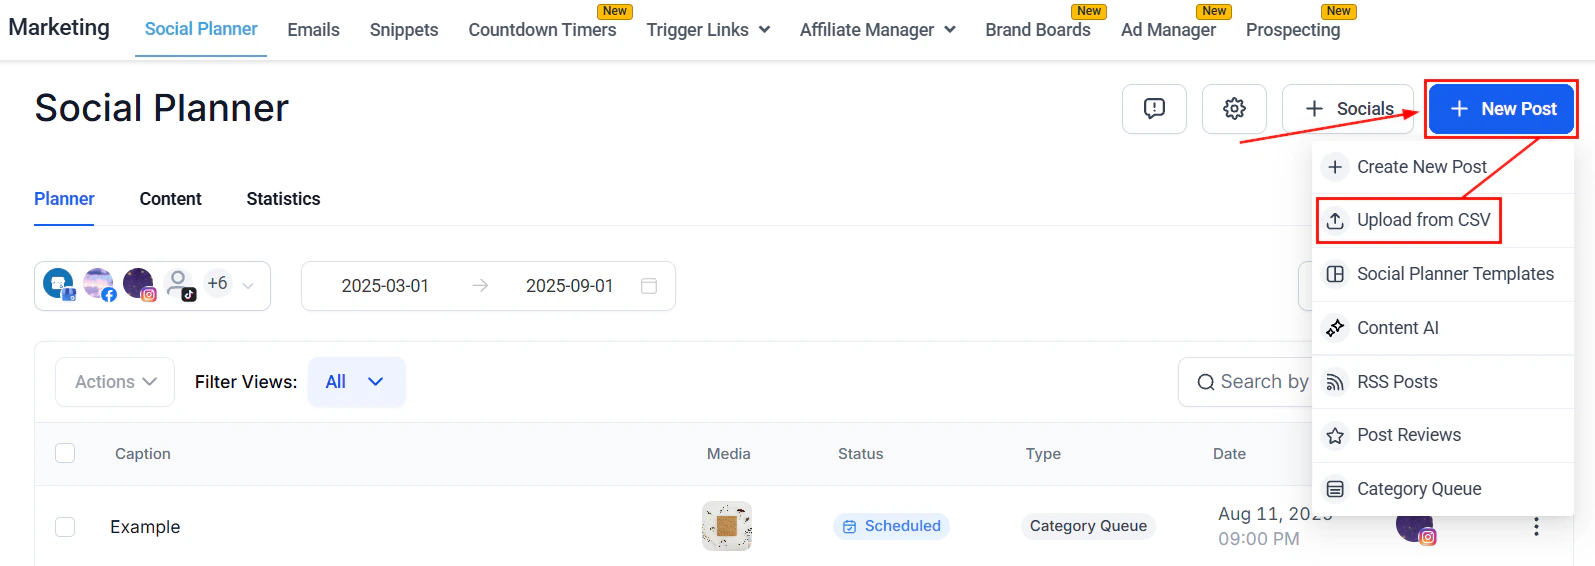
In the Social Planner, click **+ New Post** and select **Upload from CSV**.
Select the upload format that matches your needs:
* **Basic Format** — supports date, content, OG meta URL, image links, video links, and GIFs
* **Advanced Format** — adds platform-specific post types (Story, Reel, Shorts), watermarking, tags, categories, follow-up comments, and extended options for GMB, YouTube, TikTok, LinkedIn, and Pinterest
Download the sample CSV or XLSX file and review the formatting tips before building your own file. The sample shows the exact column structure required.
Click to upload your file or drag and drop it into the upload area. A maximum of 90 posts can be included per file.
Choose which connected social accounts will receive the posts. You can also submit posts for approval before scheduling by checking the approval checkbox and selecting an approver.
After upload, any posts with errors appear in a separate tab. Fix each error by following the on-screen guidance, then click **Save**. Once all errors are resolved, proceed to schedule.
 Before uploading a bulk CSV, review the prerequisites article **"Prerequisites for Bulk CSV Scheduling in Social Planner"** to ensure your file is formatted correctly and your accounts have the necessary permissions.
***
## Hashtag groups
Create and save groups of up to 30 hashtags to apply consistently across posts, keeping your content strategy organized and efficient.
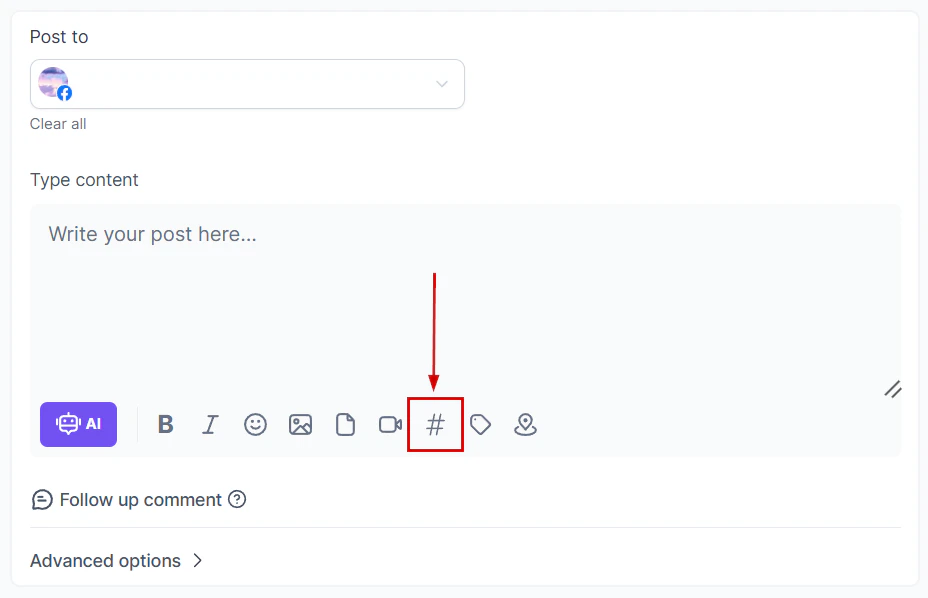
Create a new post (**+ New Post > Create New Post**), then click the **#** symbol in the post composer to open the hashtag panel.
In the pop-up, enter a distinctive name for the group, then type each hashtag and press **Enter** to add it. You can add multiple hashtags up to the 30-per-post limit.
Click **Save and Apply** to save the group and add the hashtags to your current post.
When creating future posts, click the **#** symbol, select your saved hashtag group from the dropdown, and click **Apply**.
Before uploading a bulk CSV, review the prerequisites article **"Prerequisites for Bulk CSV Scheduling in Social Planner"** to ensure your file is formatted correctly and your accounts have the necessary permissions.
***
## Hashtag groups
Create and save groups of up to 30 hashtags to apply consistently across posts, keeping your content strategy organized and efficient.
Create a new post (**+ New Post > Create New Post**), then click the **#** symbol in the post composer to open the hashtag panel.
In the pop-up, enter a distinctive name for the group, then type each hashtag and press **Enter** to add it. You can add multiple hashtags up to the 30-per-post limit.
Click **Save and Apply** to save the group and add the hashtags to your current post.
When creating future posts, click the **#** symbol, select your saved hashtag group from the dropdown, and click **Apply**.
 Name hashtag groups descriptively (e.g., "Real Estate — Listings" or "Fitness — Motivational") so they are easy to identify when creating posts quickly.
***
## RSS auto-posting
Automatically publish content from any RSS feed to your connected social accounts — ideal for blogs, news sites, and content-heavy businesses.
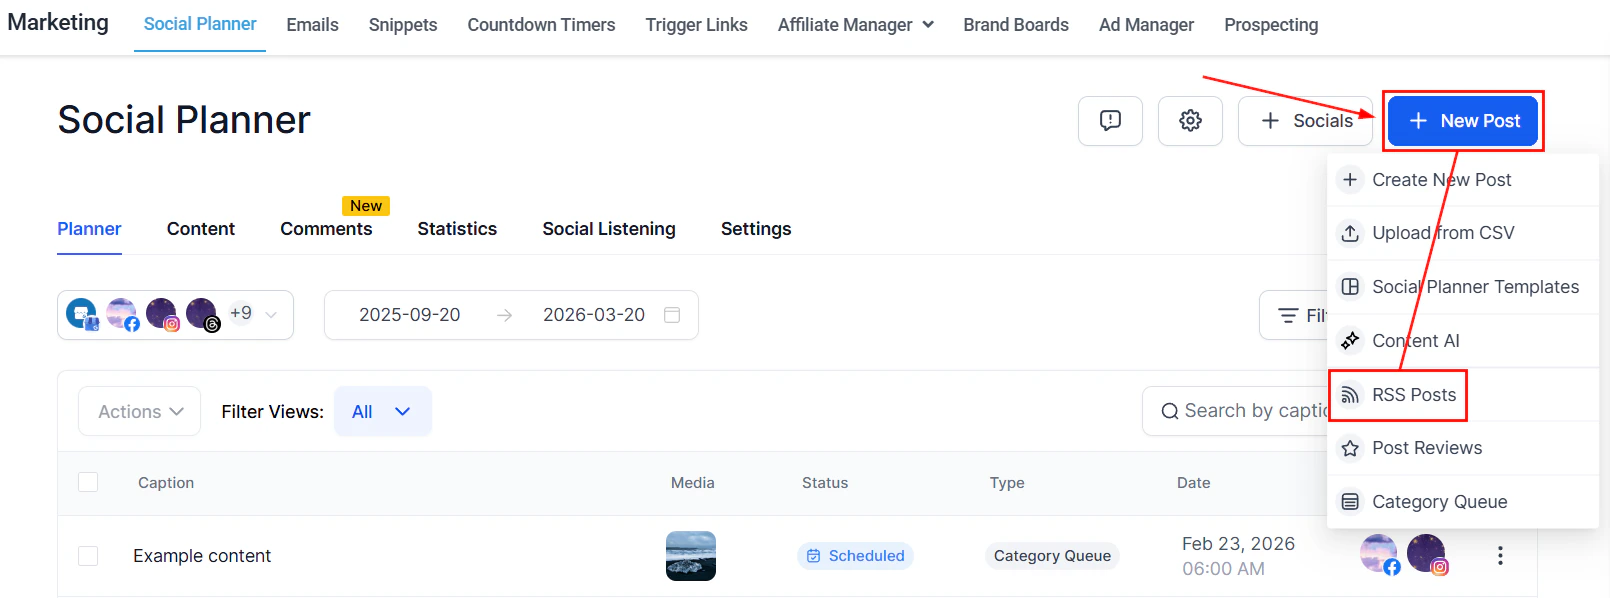
In the Social Planner, click **+ New Post** and select **RSS Post**.
Paste the URL of the RSS feed. Common formats:
* WordPress: add `/feed` to the end of the site URL
* Tumblr: add `/rss` to the URL
* Blogger: add `feeds/posts/default` to the URL
* Medium: insert `/feed/` before the publication name
* YouTube: paste the channel URL into your RSS reader
Choose which connected platforms will receive the posts.
* **End with** — add custom text, hashtags, or links appended to each post
* **Frequency** — set how often the feed is checked (from every 5 minutes to once a day)
* **Posts per update** — choose 1–5 posts to generate per feed check
* **Initial RSS posts sync** — check to fetch future posts automatically; uncheck to sync older posts instead
* **Post content** — toggle to include the RSS item description along with the title
Review the item preview, then click **Create Post** to save and activate RSS auto-posting.
Name hashtag groups descriptively (e.g., "Real Estate — Listings" or "Fitness — Motivational") so they are easy to identify when creating posts quickly.
***
## RSS auto-posting
Automatically publish content from any RSS feed to your connected social accounts — ideal for blogs, news sites, and content-heavy businesses.
In the Social Planner, click **+ New Post** and select **RSS Post**.
Paste the URL of the RSS feed. Common formats:
* WordPress: add `/feed` to the end of the site URL
* Tumblr: add `/rss` to the URL
* Blogger: add `feeds/posts/default` to the URL
* Medium: insert `/feed/` before the publication name
* YouTube: paste the channel URL into your RSS reader
Choose which connected platforms will receive the posts.
* **End with** — add custom text, hashtags, or links appended to each post
* **Frequency** — set how often the feed is checked (from every 5 minutes to once a day)
* **Posts per update** — choose 1–5 posts to generate per feed check
* **Initial RSS posts sync** — check to fetch future posts automatically; uncheck to sync older posts instead
* **Post content** — toggle to include the RSS item description along with the title
Review the item preview, then click **Create Post** to save and activate RSS auto-posting.
 ***
## Recurring posts
Schedule posts to repeat automatically at your preferred frequency — daily, weekly, monthly, or yearly — without recreating them each time.
In the Social Planner, click **+ New Post > Create New Post**. Select your social accounts and compose your content.
Instead of selecting a one-time schedule, choose the **Recurring Post** option.
Set:
* **Frequency** — daily, weekly, monthly, or yearly
* **Time** — when the post goes live
* **Date range** — the period over which the post repeats
* For weekly: specify the day of the week
* For monthly: select the day of the month
* For yearly: select the month and day
Click the schedule button to activate the recurring post.
**Editing recurring posts:**
* In the **List** or **Calendar** view, click the three dots next to a post to edit a single instance without affecting others
* In the **Content** view, click the three dots on any post in the series to edit all instances at once
Follow each platform's guidelines on automated and recurring posts. Posting content that appears repetitive to platform algorithms may reduce reach or trigger content flags.
***
## Evergreen content and category queues
Category queues let you organize posts into themed buckets that automatically cycle and republish, keeping your profiles active without constant content creation.
### Why use category queues
* Repurpose older content automatically, extending its lifespan
* Maintain consistent posting cadence during busy periods
* Reinforce brand messaging by cycling key content
* Algorithms that favor recent content will treat recycled posts as new
### Creating categories
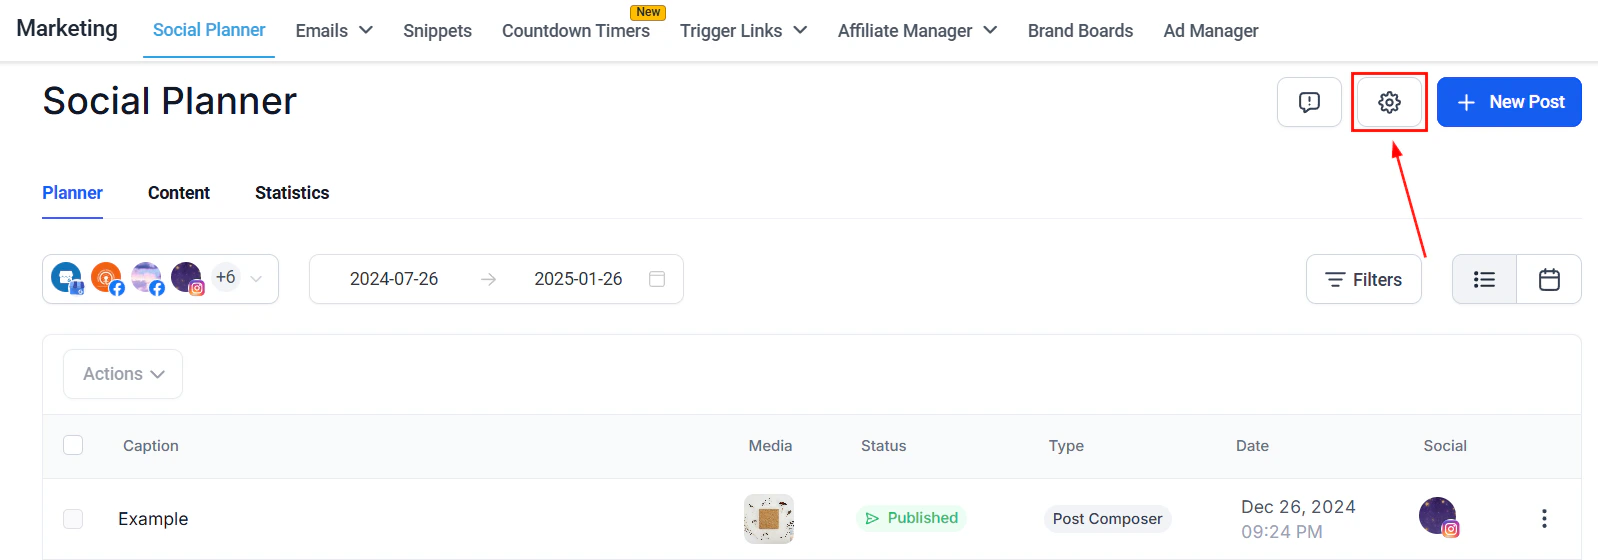
In the Social Planner, click the **gear icon** to open settings.
Go to the **Categories** tab and click **Add New Category**.
Enter a name for your category, pick a color for easy identification, then click **Add**.
***
## Recurring posts
Schedule posts to repeat automatically at your preferred frequency — daily, weekly, monthly, or yearly — without recreating them each time.
In the Social Planner, click **+ New Post > Create New Post**. Select your social accounts and compose your content.
Instead of selecting a one-time schedule, choose the **Recurring Post** option.
Set:
* **Frequency** — daily, weekly, monthly, or yearly
* **Time** — when the post goes live
* **Date range** — the period over which the post repeats
* For weekly: specify the day of the week
* For monthly: select the day of the month
* For yearly: select the month and day
Click the schedule button to activate the recurring post.
**Editing recurring posts:**
* In the **List** or **Calendar** view, click the three dots next to a post to edit a single instance without affecting others
* In the **Content** view, click the three dots on any post in the series to edit all instances at once
Follow each platform's guidelines on automated and recurring posts. Posting content that appears repetitive to platform algorithms may reduce reach or trigger content flags.
***
## Evergreen content and category queues
Category queues let you organize posts into themed buckets that automatically cycle and republish, keeping your profiles active without constant content creation.
### Why use category queues
* Repurpose older content automatically, extending its lifespan
* Maintain consistent posting cadence during busy periods
* Reinforce brand messaging by cycling key content
* Algorithms that favor recent content will treat recycled posts as new
### Creating categories
In the Social Planner, click the **gear icon** to open settings.
Go to the **Categories** tab and click **Add New Category**.
Enter a name for your category, pick a color for easy identification, then click **Add**.
 ### Adding posts to categories
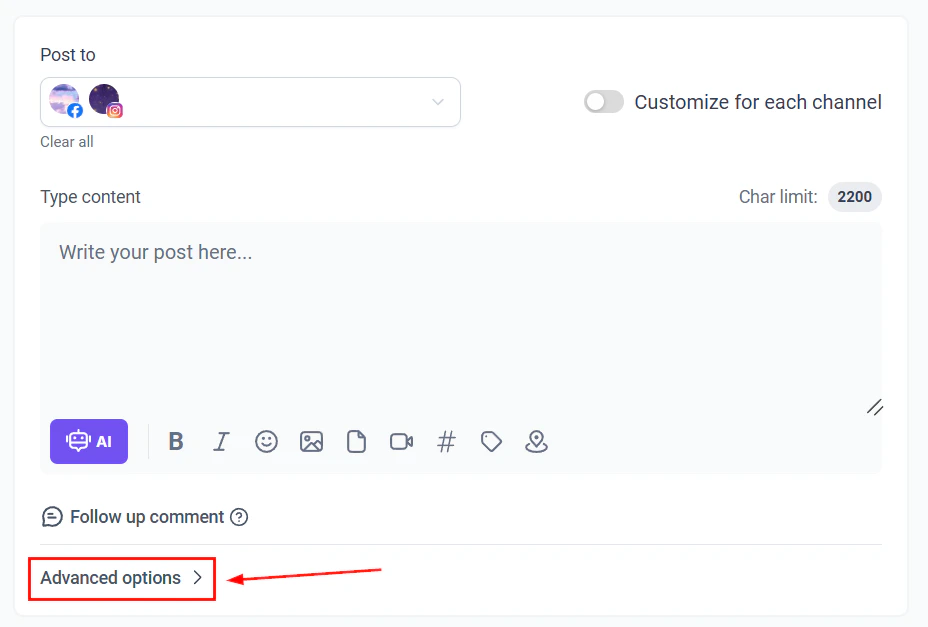
When creating or editing any post, scroll to **Advanced Options** and select the category to assign the post. Only one category can be selected per post.
Alternatively, click **Add to Queue** in the post builder, select a category from the dropdown, and click **Add to Queue**.
### Running a category queue
In the Social Planner, click **+ New Post** and select **Category Queue**.
Choose a category from the dropdown. If you need a new one, enter a name and click **(Create new category)**.
* **Future Posts Queuing** — automatically adds new posts assigned to this category to the queue
* **Prioritize New Content** — places newly added posts at the front of the queue so they publish first
Select the days you want the queue to post, then set the times. Click the **+** icon to add multiple posting times per day.
Review and reorder posts by dragging and dropping them. Add post variations with the **+** button. Click **Queue Post** to activate.
### Adding posts to categories
When creating or editing any post, scroll to **Advanced Options** and select the category to assign the post. Only one category can be selected per post.
Alternatively, click **Add to Queue** in the post builder, select a category from the dropdown, and click **Add to Queue**.
### Running a category queue
In the Social Planner, click **+ New Post** and select **Category Queue**.
Choose a category from the dropdown. If you need a new one, enter a name and click **(Create new category)**.
* **Future Posts Queuing** — automatically adds new posts assigned to this category to the queue
* **Prioritize New Content** — places newly added posts at the front of the queue so they publish first
Select the days you want the queue to post, then set the times. Click the **+** icon to add multiple posting times per day.
Review and reorder posts by dragging and dropping them. Add post variations with the **+** button. Click **Queue Post** to activate.
 You can pause or reactivate category queues at any time — useful for pausing promotional content during off-seasons while keeping other content types running.
***
## Image editor
Edit images directly within the Social Planner before publishing — no external tools needed.
### Accessing the image editor
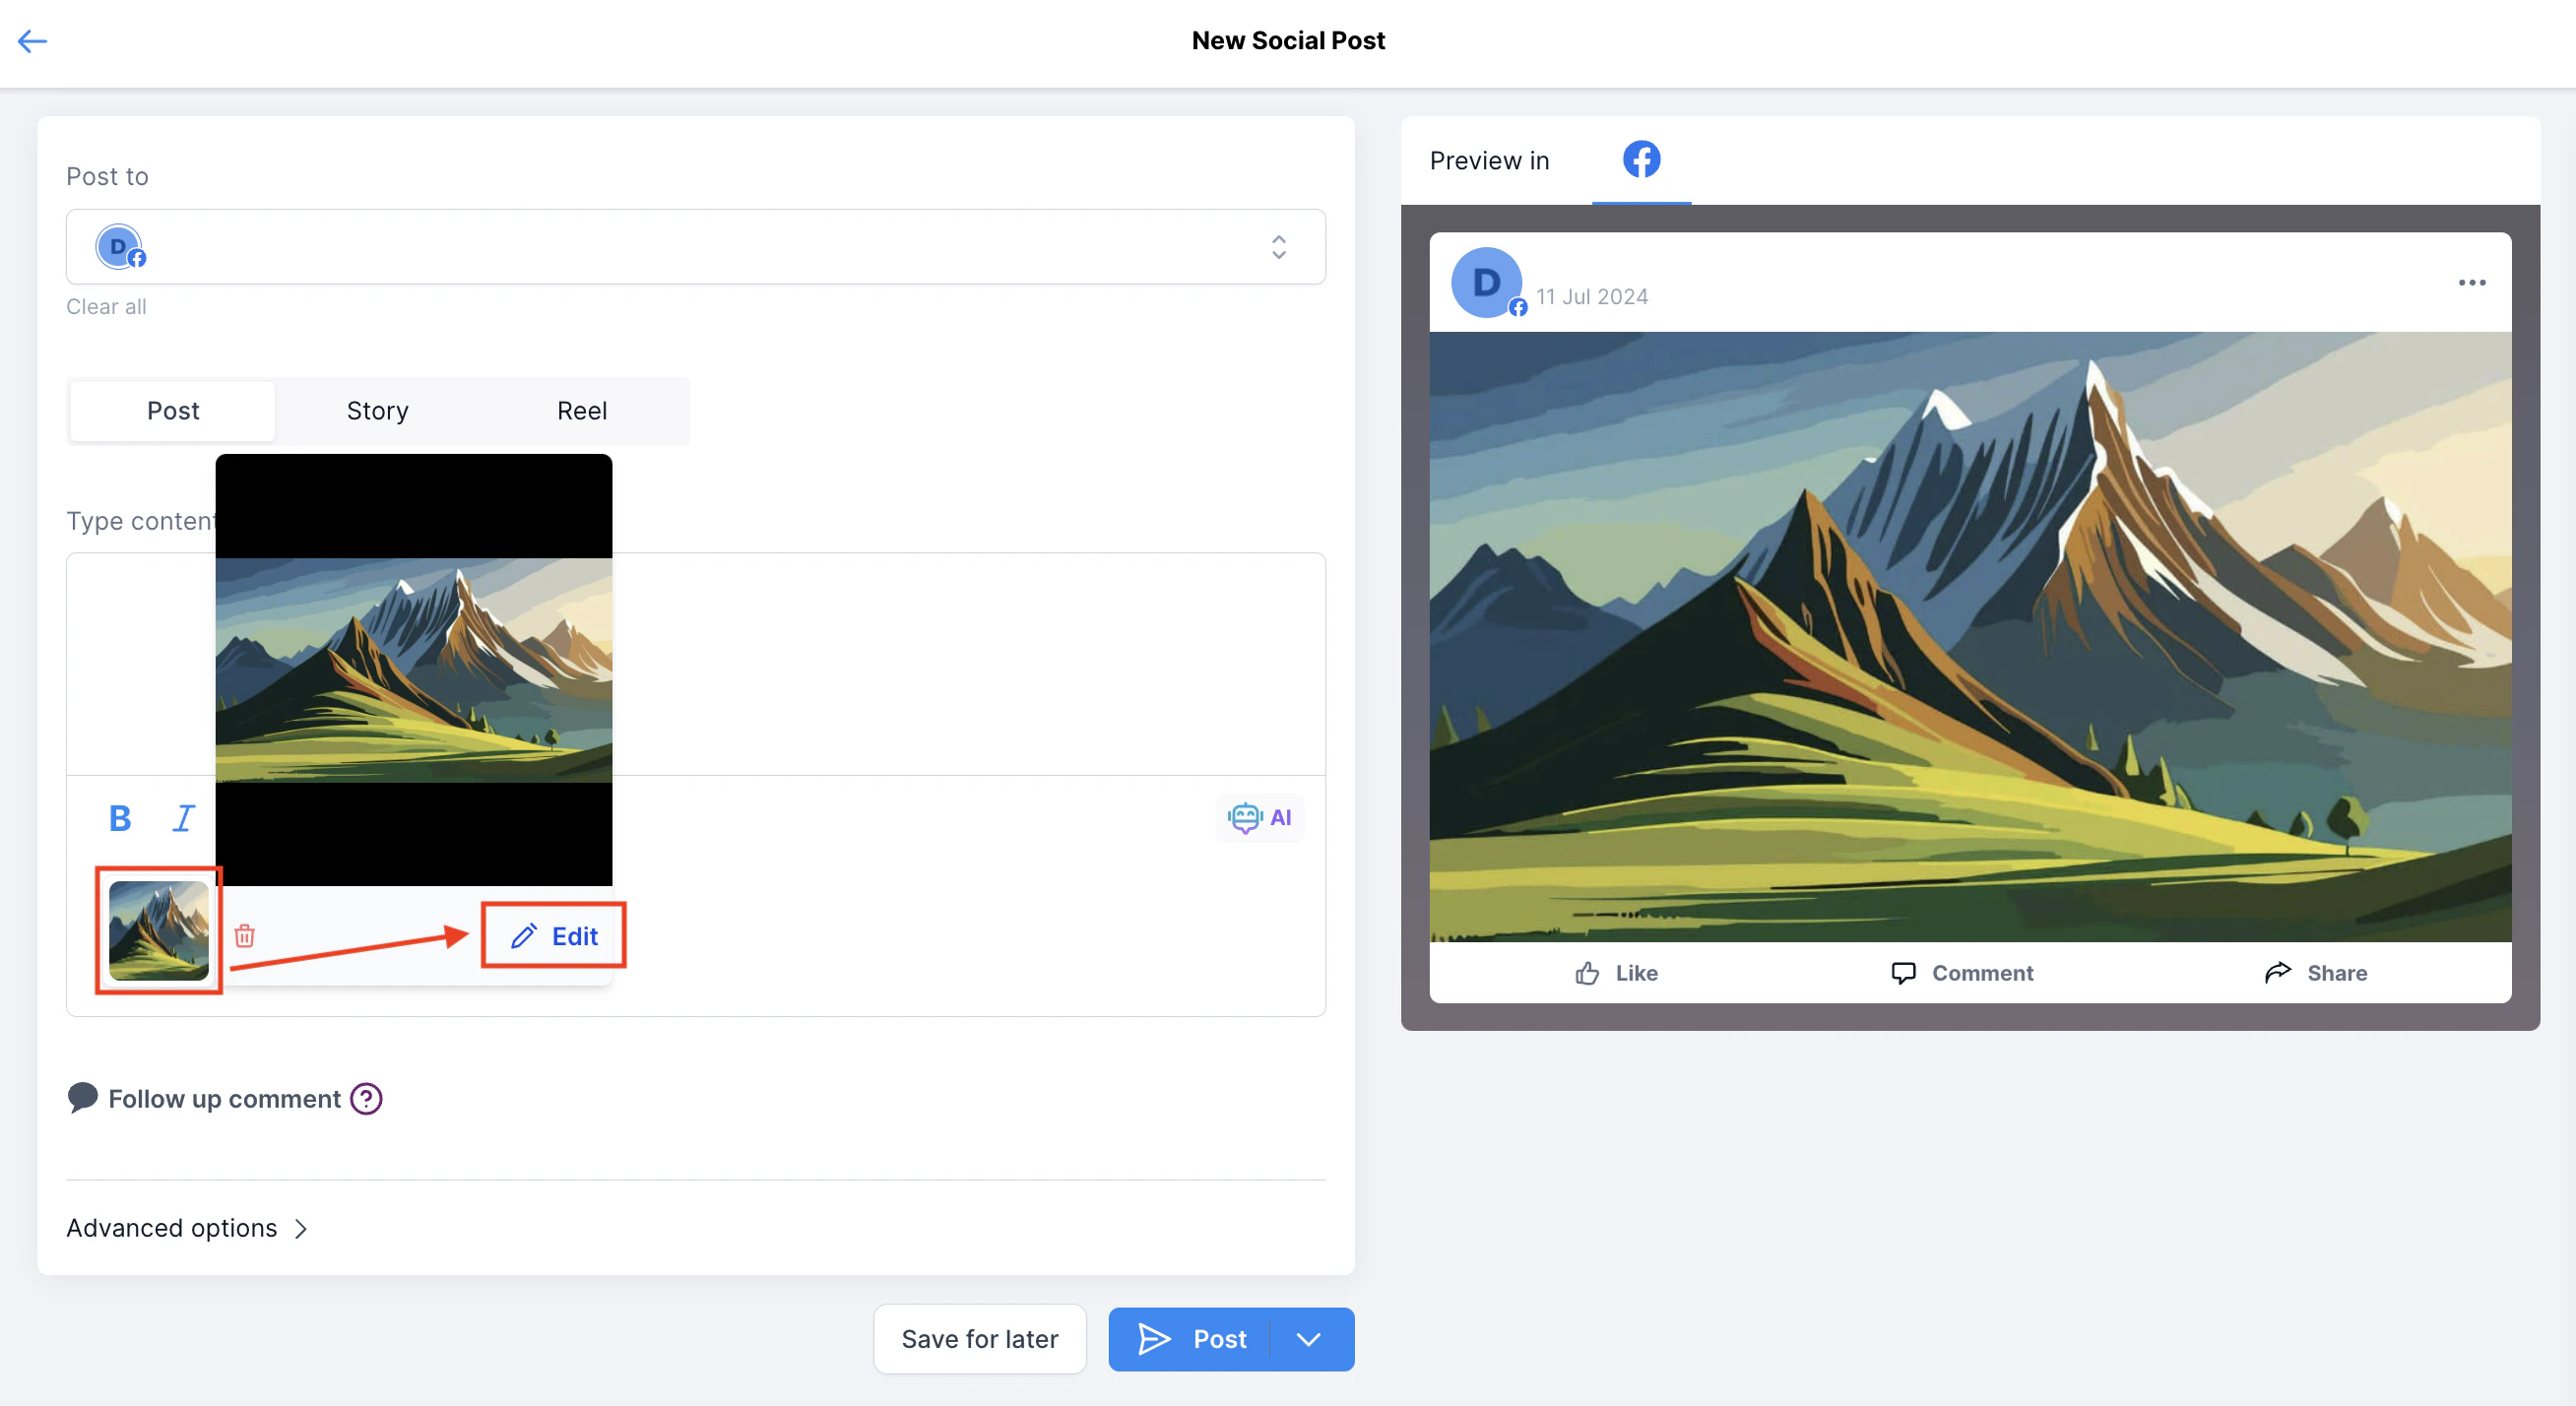
Create a new post and add your image, then click the **mini image thumbnail** in the bottom-left of the composer. Select **Edit** to open the image editor.
### Editing tools
Crop your image with preset ratios for Instagram, Facebook, Twitter (X), and LinkedIn, or use a custom ratio. Flip horizontally or vertically, and rotate clockwise or counterclockwise. Click **Apply** to confirm.
Choose from 5 filter categories, each with a dropdown of presets. A preview shows how each filter looks on your image before applying.
Drag sliders to adjust brightness, contrast, saturation, and blur.
Click **+ New Text** to add a text box. Double-click the text box to customize font family, size, alignment, color, background color, and line spacing.
Add stickers from categorized dropdowns. Adjust sticker opacity and color.
Draw on your image using the brush tool. Adjust brush hardness, size, and color before drawing.
Use the undo and redo buttons in the top-right to step back through edits.
You can pause or reactivate category queues at any time — useful for pausing promotional content during off-seasons while keeping other content types running.
***
## Image editor
Edit images directly within the Social Planner before publishing — no external tools needed.
### Accessing the image editor
Create a new post and add your image, then click the **mini image thumbnail** in the bottom-left of the composer. Select **Edit** to open the image editor.
### Editing tools
Crop your image with preset ratios for Instagram, Facebook, Twitter (X), and LinkedIn, or use a custom ratio. Flip horizontally or vertically, and rotate clockwise or counterclockwise. Click **Apply** to confirm.
Choose from 5 filter categories, each with a dropdown of presets. A preview shows how each filter looks on your image before applying.
Drag sliders to adjust brightness, contrast, saturation, and blur.
Click **+ New Text** to add a text box. Double-click the text box to customize font family, size, alignment, color, background color, and line spacing.
Add stickers from categorized dropdowns. Adjust sticker opacity and color.
Draw on your image using the brush tool. Adjust brush hardness, size, and color before drawing.
Use the undo and redo buttons in the top-right to step back through edits.
 Save your changes before returning to the post composer.
***
## Watermarks
Automatically apply a branded watermark to images in your posts to protect content and reinforce brand identity.
**Benefits of watermarks:**
* Protects content from being shared without attribution
* Increases brand awareness on every post
* Establishes consistent brand recognition across platforms
### Creating a watermark
Go to **Marketing > Social Planner** and click the **gear icon** to open settings.
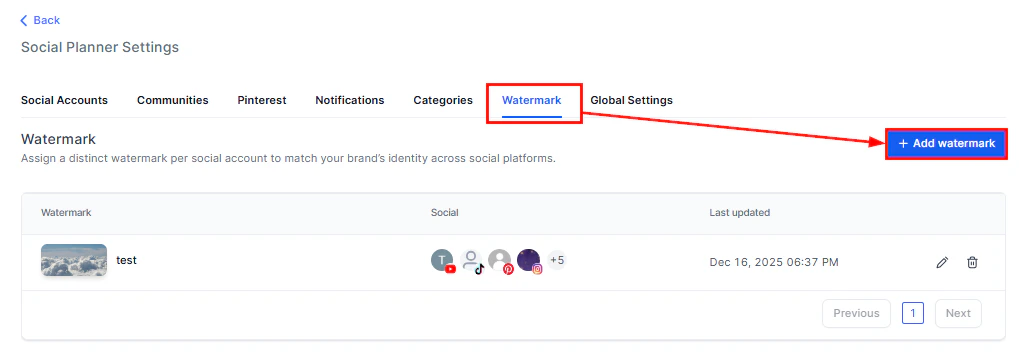
Click **Watermark**, then **+ Add Watermark**.
Give the watermark a name, then upload your watermark image. For best results, use a 200×200 pixel image.
* **Alignment** — choose left, right, center, top, or bottom
* **Opacity** — adjust visibility from subtle to prominent
* **Scale** — resize to fit images proportionally
* **Auto Padding** — enable to keep the watermark away from the image edges
Choose which connected accounts the watermark applies to, then click **Create**.
Save your changes before returning to the post composer.
***
## Watermarks
Automatically apply a branded watermark to images in your posts to protect content and reinforce brand identity.
**Benefits of watermarks:**
* Protects content from being shared without attribution
* Increases brand awareness on every post
* Establishes consistent brand recognition across platforms
### Creating a watermark
Go to **Marketing > Social Planner** and click the **gear icon** to open settings.
Click **Watermark**, then **+ Add Watermark**.
Give the watermark a name, then upload your watermark image. For best results, use a 200×200 pixel image.
* **Alignment** — choose left, right, center, top, or bottom
* **Opacity** — adjust visibility from subtle to prominent
* **Scale** — resize to fit images proportionally
* **Auto Padding** — enable to keep the watermark away from the image edges
Choose which connected accounts the watermark applies to, then click **Create**.
 ### Applying watermarks to posts
When creating a post, go to **Advanced Options** and toggle the watermark feature on. The watermark you configured will be applied automatically to the post's images.
Ensure the watermark feature is toggled on in **Advanced Options** of your post. Also verify that the watermark's opacity and scale are set to visible values in settings.
The platform supports one active watermark at a time. You can change the watermark in settings, but it applies to all future posts until changed again.
Watermarks are currently available for image posts. Check the Social Planner for the current list of supported platforms when creating a post.
***
## Post approval workflow
Route posts through a review process before they go live, ensuring quality control for your team.
**How it works:**
1. When creating or bulk uploading a post, check the **Submit for approval** option and select an approver
2. The approver receives a notification to review the post
3. They can approve (the post is scheduled) or reject (the post is returned for edits)
4. Only approved posts are published
The Post Approval Flow is especially useful for teams that require internal review before publishing — approvers can review and approve posts without needing full platform access.
***
## Content AI
Use the built-in AI writing assistant to generate or refine post copy directly in the Social Planner composer.
**Accessing Content AI:**
* In the post composer, click **Edit with Ask AI**
* Provide a natural language instruction (e.g., "Make this more engaging", "Shorten to two sentences", "Rewrite for LinkedIn")
* The AI generates a revised version that you can accept, modify, or discard
Content AI respects your existing copy and applies targeted edits rather than replacing everything, preserving your brand voice while improving the text.
***
## Frequently asked questions
You can include up to 90 posts per CSV or XLSX file. For larger batches, split your content across multiple files and upload them sequentially.
The Basic format supports date, content, URL, image links, video links, and GIFs — suitable for straightforward text and image posts. The Advanced format adds platform-specific post types (Stories, Reels, Shorts), watermarking, tags, categories, follow-up comments, and extended options for GMB, YouTube, TikTok, LinkedIn, and Pinterest.
Yes. When creating a post in the Social Planner, choose the Recurring Post option instead of a one-time schedule. Set the frequency (daily, weekly, monthly, or yearly), the time, and the date range over which the post should repeat.
Failed posts display a color-coded error message in the Social Planner. Click the error to see the specific issue. Fix the error and re-queue or reschedule the post. The queue continues with other posts in the category while the failed post is resolved.
Currently the platform supports one active watermark per account. To use a different watermark for a different client, update the watermark in settings before creating those posts. Future posts will use the updated watermark until it is changed again.
RSS auto-posting fetches content from an external feed URL and posts it automatically — content is dynamically sourced from outside the platform. Category queues work with posts you create and store inside the Social Planner, cycling through them on your schedule. Both can automate posting, but RSS is for external content and queues are for your own evergreen content library.
Yes. In the post composer, click Edit with Ask AI and describe the post you want (for example, "Write a LinkedIn post about our new product launch, professional tone, 3 sentences"). Content AI will generate a draft that you can accept, modify, or discard.
***
## Best time to post
The Social Planner can suggest optimal posting times based on historical engagement data from your connected accounts.
### How it works
1. The platform analyzes when your followers are most active and when your posts have historically received the most engagement
2. Suggested times appear when you create a new post — look for the **Best Time** indicator next to the time selector
3. Select a suggested time to schedule your post at the optimal window
Best time to post suggestions improve over time as the platform collects more data. Post consistently for at least 2-4 weeks before relying heavily on the suggestions.
### Per-platform optimization
Different platforms have different peak times. The best time suggestions are calculated per connected account, so your Instagram optimal time may differ from your LinkedIn optimal time. When posting to multiple platforms, consider using platform-specific scheduling to optimize each one independently.
***
## Category queues (advanced)
Beyond the basic category queue setup covered above, advanced queue management includes:
* **Pause and resume** — pause a category queue during holidays or off-seasons without deleting the posts. Resume when ready.
* **Queue reordering** — drag and drop posts within the queue to change their publishing order
* **Post variations** — add multiple versions of a post within the queue. The platform cycles through variations to keep content fresh.
* **Queue analytics** — view engagement metrics for posts published through queues to identify which categories and content types perform best
***
## Link shortener
The Social Planner includes a built-in link shortener for tracking click performance on links in your posts.
### Using the link shortener
1. When composing a post, paste your destination URL
2. Click the **Shorten Link** option (or toggle auto-shortening in settings)
3. The platform generates a shortened link using your configured tracking domain
4. Click data for shortened links appears in your post analytics
### Custom tracking domain
For branded short links, configure a custom tracking domain:
1. Go to **Settings > Domains > URL Redirects**
2. Add a subdomain (e.g., `go.yourdomain.com`) and point it to the platform
3. Enable the custom domain for social planner link shortening in **Social Planner > Settings**
Using your own domain for shortened links avoids carrier and platform filtering that sometimes affects generic shortener domains (bit.ly, tinyurl).
***
## Content approval flow (advanced)
The approval workflow supports multi-level approvals for teams:
### Setting up approval rules
1. Go to **Social Planner > Settings > Approval**
2. Configure:
* **Who requires approval** — all users, specific roles, or specific team members
* **Who can approve** — account admins, designated approvers, or specific users
* **Notification method** — email, in-app, or both
### Approval process
1. A team member creates a post and checks **Submit for Approval**
2. The designated approver receives a notification
3. The approver reviews the post and either:
* **Approves** — the post is scheduled for the selected date and time
* **Rejects** — the post is returned to the creator with feedback notes
* **Edits and approves** — the approver can make changes before approving
4. The creator is notified of the decision
For content requiring stakeholder sign-off, set a designated reviewer as the approver. This gives them final approval on posts without requiring full access to the Social Planner.
### Applying watermarks to posts
When creating a post, go to **Advanced Options** and toggle the watermark feature on. The watermark you configured will be applied automatically to the post's images.
Ensure the watermark feature is toggled on in **Advanced Options** of your post. Also verify that the watermark's opacity and scale are set to visible values in settings.
The platform supports one active watermark at a time. You can change the watermark in settings, but it applies to all future posts until changed again.
Watermarks are currently available for image posts. Check the Social Planner for the current list of supported platforms when creating a post.
***
## Post approval workflow
Route posts through a review process before they go live, ensuring quality control for your team.
**How it works:**
1. When creating or bulk uploading a post, check the **Submit for approval** option and select an approver
2. The approver receives a notification to review the post
3. They can approve (the post is scheduled) or reject (the post is returned for edits)
4. Only approved posts are published
The Post Approval Flow is especially useful for teams that require internal review before publishing — approvers can review and approve posts without needing full platform access.
***
## Content AI
Use the built-in AI writing assistant to generate or refine post copy directly in the Social Planner composer.
**Accessing Content AI:**
* In the post composer, click **Edit with Ask AI**
* Provide a natural language instruction (e.g., "Make this more engaging", "Shorten to two sentences", "Rewrite for LinkedIn")
* The AI generates a revised version that you can accept, modify, or discard
Content AI respects your existing copy and applies targeted edits rather than replacing everything, preserving your brand voice while improving the text.
***
## Frequently asked questions
You can include up to 90 posts per CSV or XLSX file. For larger batches, split your content across multiple files and upload them sequentially.
The Basic format supports date, content, URL, image links, video links, and GIFs — suitable for straightforward text and image posts. The Advanced format adds platform-specific post types (Stories, Reels, Shorts), watermarking, tags, categories, follow-up comments, and extended options for GMB, YouTube, TikTok, LinkedIn, and Pinterest.
Yes. When creating a post in the Social Planner, choose the Recurring Post option instead of a one-time schedule. Set the frequency (daily, weekly, monthly, or yearly), the time, and the date range over which the post should repeat.
Failed posts display a color-coded error message in the Social Planner. Click the error to see the specific issue. Fix the error and re-queue or reschedule the post. The queue continues with other posts in the category while the failed post is resolved.
Currently the platform supports one active watermark per account. To use a different watermark for a different client, update the watermark in settings before creating those posts. Future posts will use the updated watermark until it is changed again.
RSS auto-posting fetches content from an external feed URL and posts it automatically — content is dynamically sourced from outside the platform. Category queues work with posts you create and store inside the Social Planner, cycling through them on your schedule. Both can automate posting, but RSS is for external content and queues are for your own evergreen content library.
Yes. In the post composer, click Edit with Ask AI and describe the post you want (for example, "Write a LinkedIn post about our new product launch, professional tone, 3 sentences"). Content AI will generate a draft that you can accept, modify, or discard.
***
## Best time to post
The Social Planner can suggest optimal posting times based on historical engagement data from your connected accounts.
### How it works
1. The platform analyzes when your followers are most active and when your posts have historically received the most engagement
2. Suggested times appear when you create a new post — look for the **Best Time** indicator next to the time selector
3. Select a suggested time to schedule your post at the optimal window
Best time to post suggestions improve over time as the platform collects more data. Post consistently for at least 2-4 weeks before relying heavily on the suggestions.
### Per-platform optimization
Different platforms have different peak times. The best time suggestions are calculated per connected account, so your Instagram optimal time may differ from your LinkedIn optimal time. When posting to multiple platforms, consider using platform-specific scheduling to optimize each one independently.
***
## Category queues (advanced)
Beyond the basic category queue setup covered above, advanced queue management includes:
* **Pause and resume** — pause a category queue during holidays or off-seasons without deleting the posts. Resume when ready.
* **Queue reordering** — drag and drop posts within the queue to change their publishing order
* **Post variations** — add multiple versions of a post within the queue. The platform cycles through variations to keep content fresh.
* **Queue analytics** — view engagement metrics for posts published through queues to identify which categories and content types perform best
***
## Link shortener
The Social Planner includes a built-in link shortener for tracking click performance on links in your posts.
### Using the link shortener
1. When composing a post, paste your destination URL
2. Click the **Shorten Link** option (or toggle auto-shortening in settings)
3. The platform generates a shortened link using your configured tracking domain
4. Click data for shortened links appears in your post analytics
### Custom tracking domain
For branded short links, configure a custom tracking domain:
1. Go to **Settings > Domains > URL Redirects**
2. Add a subdomain (e.g., `go.yourdomain.com`) and point it to the platform
3. Enable the custom domain for social planner link shortening in **Social Planner > Settings**
Using your own domain for shortened links avoids carrier and platform filtering that sometimes affects generic shortener domains (bit.ly, tinyurl).
***
## Content approval flow (advanced)
The approval workflow supports multi-level approvals for teams:
### Setting up approval rules
1. Go to **Social Planner > Settings > Approval**
2. Configure:
* **Who requires approval** — all users, specific roles, or specific team members
* **Who can approve** — account admins, designated approvers, or specific users
* **Notification method** — email, in-app, or both
### Approval process
1. A team member creates a post and checks **Submit for Approval**
2. The designated approver receives a notification
3. The approver reviews the post and either:
* **Approves** — the post is scheduled for the selected date and time
* **Rejects** — the post is returned to the creator with feedback notes
* **Edits and approves** — the approver can make changes before approving
4. The creator is notified of the decision
For content requiring stakeholder sign-off, set a designated reviewer as the approver. This gives them final approval on posts without requiring full access to the Social Planner.