> ## Documentation Index
> Fetch the complete documentation index at: https://help.hoopai.com/llms.txt
> Use this file to discover all available pages before exploring further.
# Dedicated email domain
> Set up a dedicated sending domain for all outbound email to build a private sender reputation, improve deliverability, and brand your email headers.
A dedicated email domain (also called a dedicated sending domain) is a subdomain configured exclusively for sending email from the HoopAI platform. Instead of sharing sending infrastructure with other users, your emails have their own sender reputation tied to your brand — giving you full control over your deliverability outcomes.
## Why use a dedicated sending domain
Your domain reputation is isolated from all other senders. Good sending habits build a strong reputation that belongs entirely to your brand.
Recipients and email clients see your domain — not a shared platform domain — in the From address and authentication headers.
You configure and own the SPF, DKIM, and DMARC records for the subdomain, giving inbox providers the strongest possible verification signal.
A dedicated domain with proper authentication and a warm sending history significantly improves inbox placement rates compared to shared infrastructure.
***
## Choosing a subdomain
Use a subdomain of your primary business domain rather than your root domain. This keeps your email sending reputation separate from your website, so a deliverability issue with email does not affect other domain-linked services.
**Recommended subdomain formats:**
* `mail.yourdomain.com`
* `emails.yourdomain.com`
* `send.yourdomain.com`
* `no-reply.yourdomain.com`
You can set up multiple subdomains for different sending purposes — for example, one for marketing campaigns and another for transactional emails like receipts and appointment confirmations.
Do not use a subdomain that is also used for your website, app, or other services. A dedicated subdomain ensures that DNS changes for email do not accidentally affect other systems.
***
## Setting up your dedicated domain
Navigate to **Settings > Email Services** and click the **Dedicated Domain and IP** tab.
Click **+ Add Domain** and enter the subdomain you have chosen (e.g., `mail.yourdomain.com`).
The platform will display your required DNS records and offer two setup options:
**Auto-configuration (recommended):** The platform detects your DNS provider (Cloudflare, GoDaddy, Namecheap, etc.) and configures the records automatically. Authorize the connection and the records are added for you.
**Manual configuration:** If your DNS provider is not supported for auto-configuration, copy each record from the platform and add them manually in your DNS provider's control panel.
The platform will provide the following record types:
| Record | Purpose |
| ----------------------- | ------------------------------------------------------------- |
| **MX** | Receives bounce notifications and replies |
| **SPF (TXT)** | Authorizes the platform's servers to send from your subdomain |
| **DKIM (CNAME or TXT)** | Adds a cryptographic signature to each outgoing email |
| **DMARC (TXT)** | Sets the policy for emails that fail SPF or DKIM |
| **Tracking CNAME** | Enables click and open tracking under your domain |
After adding the DNS records, return to the platform and click **Verify**. The platform checks each record and marks them as verified once they are detected. DNS propagation can take up to 24–48 hours.
Once all records are verified, set the dedicated domain as your default email sending service. Navigate to **Settings > Email Services** and select the domain as the default.
***
 ## DNS records explained
### SPF (Sender Policy Framework)
SPF authorizes the platform's sending servers to send email on behalf of your subdomain. The record is a TXT entry on the subdomain itself. Only the authorized servers listed in the SPF record will pass SPF checks — all others will fail.
### DKIM (DomainKeys Identified Mail)
DKIM attaches a cryptographic signature to every outgoing email. The receiving server uses a public key (published in your DNS) to verify the signature was created by an authorized sender and that the message was not modified in transit. The platform generates your DKIM key pair and provides the DNS record to publish.
### DMARC (Domain-based Message Authentication)
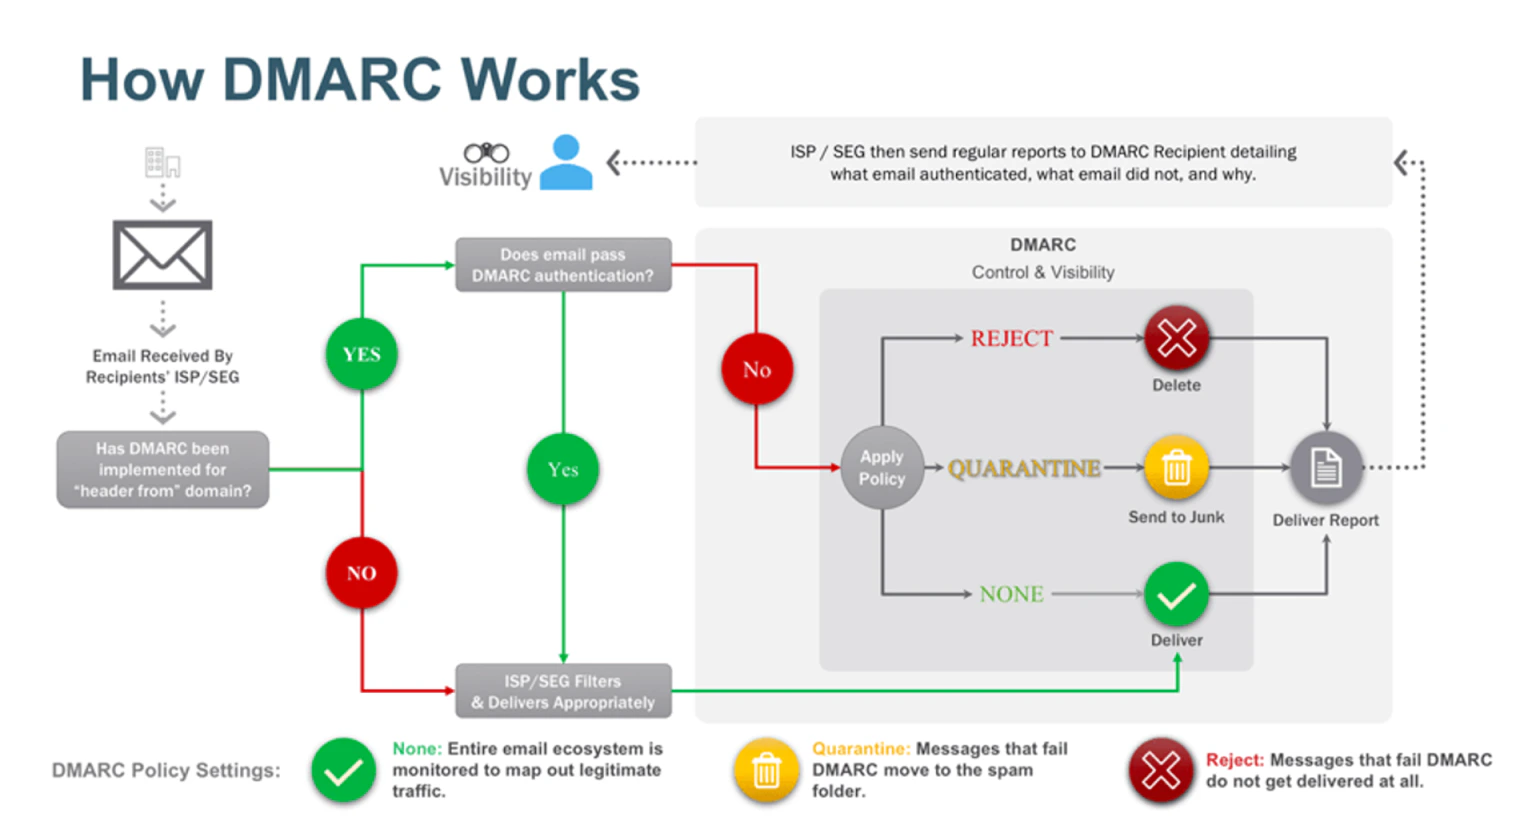
DMARC tells receiving mail servers what to do when an email fails SPF or DKIM checks. It also provides reporting so you can monitor authentication failures.
**Recommended DMARC policy progression:**
| Phase | Policy | Description |
| ---------------- | -------------- | ----------------------------------------------------------------------- |
| Start | `p=none` | Monitoring mode — no messages are rejected; reports are generated |
| 30–60 days | `p=quarantine` | Failed messages go to spam; monitor reports before moving to next phase |
| After validation | `p=reject` | Failed messages are rejected at the server level |
If your root domain already has a DMARC record, you do not need to add a separate one for the subdomain unless you want a different policy. Subdomain DMARC policies can inherit from the root domain or be set independently with `sp=` tags.
### MX record
The MX record for your sending subdomain points bounce notifications and auto-replies back to the platform's bounce processing servers. This is required for accurate bounce tracking in your campaign statistics.
***
## SSL certificate
Once your dedicated domain is verified, an SSL certificate is automatically provisioned. This enables secure email headers and HTTPS for tracking pixels and click-redirect URLs, which some email clients and security gateways require.
***
## Domain warm-up
A newly configured sending domain has no historical reputation with inbox providers. Sending large volumes immediately from a new domain results in poor inbox placement because providers have no data to trust the domain on.
**Warm-up approach:**
* Start with small daily sends (100–500 emails per day)
* Gradually increase volume over 4–6 weeks
* Send exclusively to your most engaged contacts first (recent openers and clickers)
* Monitor bounce rates, spam complaint rates, and open rates closely throughout the warm-up period
**Staged warm-up guidelines:**
| Week | Daily send volume |
| ---- | ------------------------- |
| 1 | Up to 500 |
| 2 | Up to 1,000 |
| 3 | Up to 2,500 |
| 4 | Up to 5,000 |
| 5+ | Scale based on engagement |
Use the batch scheduling feature to control daily volume precisely during the warm-up period.
***
## Monitoring domain health
Once your dedicated domain is active, monitor its reputation using:
**Google Postmaster Tools** — Connect your domain to see Gmail-specific metrics including spam rate, domain reputation (Bad / Low / Medium / High), and IP reputation. Accessible from **Settings > Email Services**.
**Microsoft SNDS** — Connect Microsoft's Smart Network Data Services to monitor your sending IP's reputation as seen by Outlook and Hotmail. Also available from email service settings.
Both tools provide early warning of deliverability problems before they result in widespread inbox rejection.
***
## Multiple subdomains
You can add multiple dedicated sending domains to one account — for example:
* `marketing.yourdomain.com` for promotional campaigns
* `transactions.yourdomain.com` for receipts, confirmations, and notifications
When sending a campaign or configuring a workflow email step, select the appropriate sending domain for that message type. Keeping transactional and marketing email on separate subdomains ensures that a promotional deliverability issue does not affect time-sensitive transactional mail.
***
## Frequently asked questions
Gmail and Outlook connections are best for low-volume, conversational email that appears in contact conversation threads. For broadcast campaigns and automated marketing email, a dedicated sending domain is strongly recommended. It gives you full reputation control and better inbox placement at scale.
DNS propagation typically takes between a few minutes and 48 hours. If verification fails immediately after adding records, wait a few hours and try again. Check that you entered the exact record values provided by the platform — any extra spaces or punctuation will cause verification to fail.
Technically yes, but it is not recommended. Using the root domain for email sending adds email-specific DNS records to your main domain and risks affecting your website if there is a conflict. A dedicated subdomain keeps email records separate from your primary domain's DNS.
Yes, even if your root domain has a strong reputation. The sending subdomain is a new entity with no history of its own. Inbox providers evaluate each subdomain independently. Warm up the new subdomain before migrating your full volume.
Start with `p=none` to enable monitoring without blocking any messages. Review the DMARC reports over 4–6 weeks to confirm all legitimate sending sources are authenticated correctly. Then move to `p=quarantine`, and finally to `p=reject` once you are confident all legitimate sends are passing authentication.
Yes. For high-volume senders who want to isolate their reputation at the IP level in addition to the domain level, a dedicated IP can be configured. Contact support to discuss dedicated IP options for your account.
## DNS records explained
### SPF (Sender Policy Framework)
SPF authorizes the platform's sending servers to send email on behalf of your subdomain. The record is a TXT entry on the subdomain itself. Only the authorized servers listed in the SPF record will pass SPF checks — all others will fail.
### DKIM (DomainKeys Identified Mail)
DKIM attaches a cryptographic signature to every outgoing email. The receiving server uses a public key (published in your DNS) to verify the signature was created by an authorized sender and that the message was not modified in transit. The platform generates your DKIM key pair and provides the DNS record to publish.
### DMARC (Domain-based Message Authentication)
DMARC tells receiving mail servers what to do when an email fails SPF or DKIM checks. It also provides reporting so you can monitor authentication failures.
**Recommended DMARC policy progression:**
| Phase | Policy | Description |
| ---------------- | -------------- | ----------------------------------------------------------------------- |
| Start | `p=none` | Monitoring mode — no messages are rejected; reports are generated |
| 30–60 days | `p=quarantine` | Failed messages go to spam; monitor reports before moving to next phase |
| After validation | `p=reject` | Failed messages are rejected at the server level |
If your root domain already has a DMARC record, you do not need to add a separate one for the subdomain unless you want a different policy. Subdomain DMARC policies can inherit from the root domain or be set independently with `sp=` tags.
### MX record
The MX record for your sending subdomain points bounce notifications and auto-replies back to the platform's bounce processing servers. This is required for accurate bounce tracking in your campaign statistics.
***
## SSL certificate
Once your dedicated domain is verified, an SSL certificate is automatically provisioned. This enables secure email headers and HTTPS for tracking pixels and click-redirect URLs, which some email clients and security gateways require.
***
## Domain warm-up
A newly configured sending domain has no historical reputation with inbox providers. Sending large volumes immediately from a new domain results in poor inbox placement because providers have no data to trust the domain on.
**Warm-up approach:**
* Start with small daily sends (100–500 emails per day)
* Gradually increase volume over 4–6 weeks
* Send exclusively to your most engaged contacts first (recent openers and clickers)
* Monitor bounce rates, spam complaint rates, and open rates closely throughout the warm-up period
**Staged warm-up guidelines:**
| Week | Daily send volume |
| ---- | ------------------------- |
| 1 | Up to 500 |
| 2 | Up to 1,000 |
| 3 | Up to 2,500 |
| 4 | Up to 5,000 |
| 5+ | Scale based on engagement |
Use the batch scheduling feature to control daily volume precisely during the warm-up period.
***
## Monitoring domain health
Once your dedicated domain is active, monitor its reputation using:
**Google Postmaster Tools** — Connect your domain to see Gmail-specific metrics including spam rate, domain reputation (Bad / Low / Medium / High), and IP reputation. Accessible from **Settings > Email Services**.
**Microsoft SNDS** — Connect Microsoft's Smart Network Data Services to monitor your sending IP's reputation as seen by Outlook and Hotmail. Also available from email service settings.
Both tools provide early warning of deliverability problems before they result in widespread inbox rejection.
***
## Multiple subdomains
You can add multiple dedicated sending domains to one account — for example:
* `marketing.yourdomain.com` for promotional campaigns
* `transactions.yourdomain.com` for receipts, confirmations, and notifications
When sending a campaign or configuring a workflow email step, select the appropriate sending domain for that message type. Keeping transactional and marketing email on separate subdomains ensures that a promotional deliverability issue does not affect time-sensitive transactional mail.
***
## Frequently asked questions
Gmail and Outlook connections are best for low-volume, conversational email that appears in contact conversation threads. For broadcast campaigns and automated marketing email, a dedicated sending domain is strongly recommended. It gives you full reputation control and better inbox placement at scale.
DNS propagation typically takes between a few minutes and 48 hours. If verification fails immediately after adding records, wait a few hours and try again. Check that you entered the exact record values provided by the platform — any extra spaces or punctuation will cause verification to fail.
Technically yes, but it is not recommended. Using the root domain for email sending adds email-specific DNS records to your main domain and risks affecting your website if there is a conflict. A dedicated subdomain keeps email records separate from your primary domain's DNS.
Yes, even if your root domain has a strong reputation. The sending subdomain is a new entity with no history of its own. Inbox providers evaluate each subdomain independently. Warm up the new subdomain before migrating your full volume.
Start with `p=none` to enable monitoring without blocking any messages. Review the DMARC reports over 4–6 weeks to confirm all legitimate sending sources are authenticated correctly. Then move to `p=quarantine`, and finally to `p=reject` once you are confident all legitimate sends are passing authentication.
Yes. For high-volume senders who want to isolate their reputation at the IP level in addition to the domain level, a dedicated IP can be configured. Contact support to discuss dedicated IP options for your account.