> ## Documentation Index
> Fetch the complete documentation index at: https://help.hoopai.com/llms.txt
> Use this file to discover all available pages before exploring further.
# Managing dashboards
> Create, clone, pin, set as default, configure permissions, and organize multiple dashboards in the HoopAI Platform.
The HoopAI Platform supports multiple custom dashboards, giving you the flexibility to create distinct views for different teams, goals, or time periods. This guide covers everything you need to manage your dashboards effectively.
## Creating a new dashboard
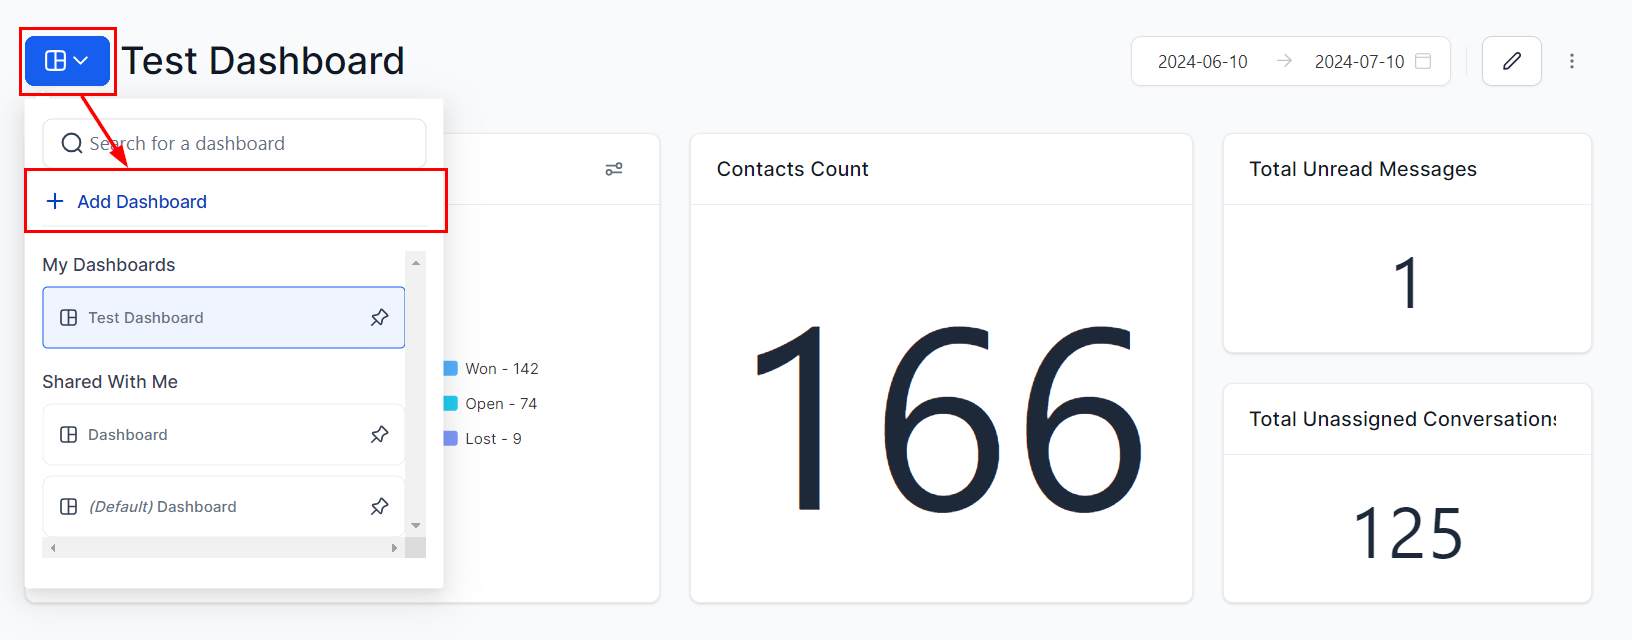 In the Dashboard section, click the **Add a Dashboard** button.
Select one of three options:
* **Create from blank dashboard** — start with a clean slate
* **From template library** — choose a pre-made template from the shared library or your own saved templates
* **Clone existing dashboard** — duplicate an existing dashboard including all its widgets and layout
Enter a name for the dashboard and set visibility permissions (view and edit access). Toggle the **Private Dashboard** option if needed. Click **Confirm** to proceed.
Select pre-configured widgets based on your goals, or click **"Add a widget manually"** to build from scratch. Click **Confirm & Add** to continue.
In the Dashboard section, click the **Add a Dashboard** button.
Select one of three options:
* **Create from blank dashboard** — start with a clean slate
* **From template library** — choose a pre-made template from the shared library or your own saved templates
* **Clone existing dashboard** — duplicate an existing dashboard including all its widgets and layout
Enter a name for the dashboard and set visibility permissions (view and edit access). Toggle the **Private Dashboard** option if needed. Click **Confirm** to proceed.
Select pre-configured widgets based on your goals, or click **"Add a widget manually"** to build from scratch. Click **Confirm & Add** to continue.
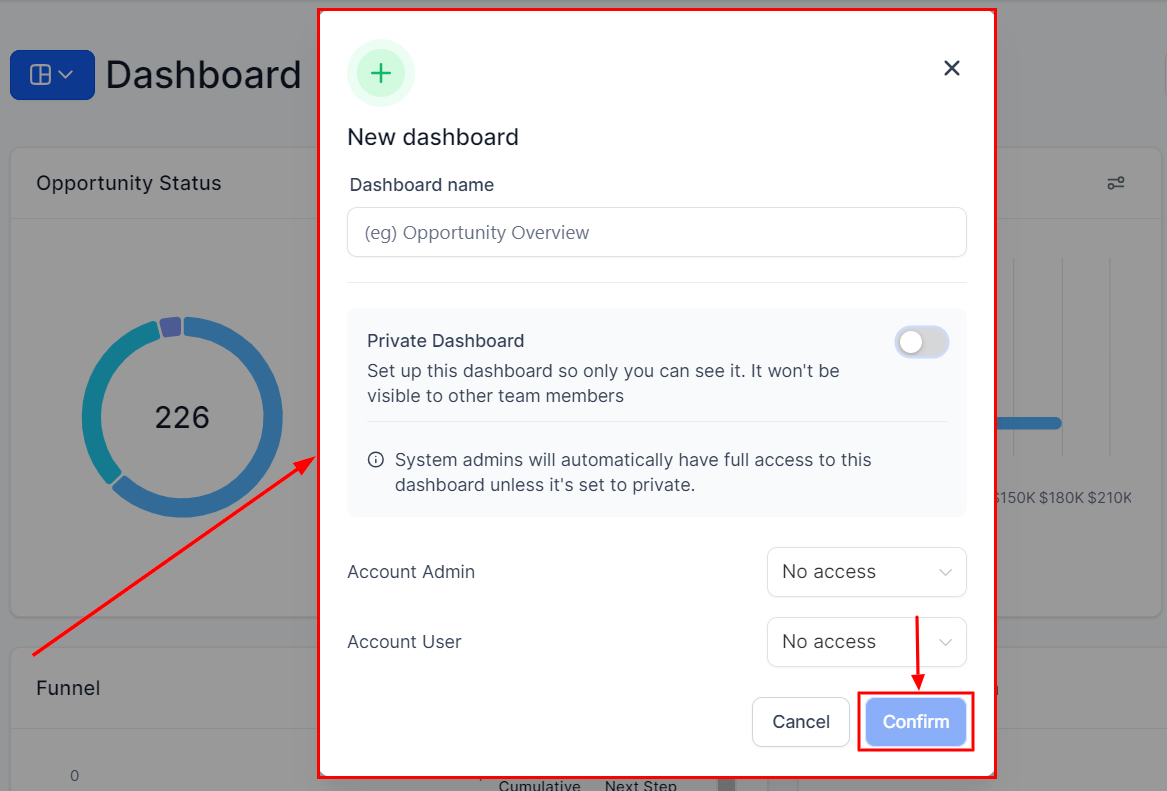 Arrange and resize widgets as needed, then click **Save Changes** to finalize the layout.
***
## Setting a default dashboard
The default dashboard is the first view all users see when they log into the platform. Any user with Full dashboard access can set a default dashboard.
Click the blue button to highlight the dashboard you want to set as default.
Click the **three dots** in the top-right corner and select **"Set as default dashboard"**.
Confirm the change in the dialog that appears.
Arrange and resize widgets as needed, then click **Save Changes** to finalize the layout.
***
## Setting a default dashboard
The default dashboard is the first view all users see when they log into the platform. Any user with Full dashboard access can set a default dashboard.
Click the blue button to highlight the dashboard you want to set as default.
Click the **three dots** in the top-right corner and select **"Set as default dashboard"**.
Confirm the change in the dialog that appears.
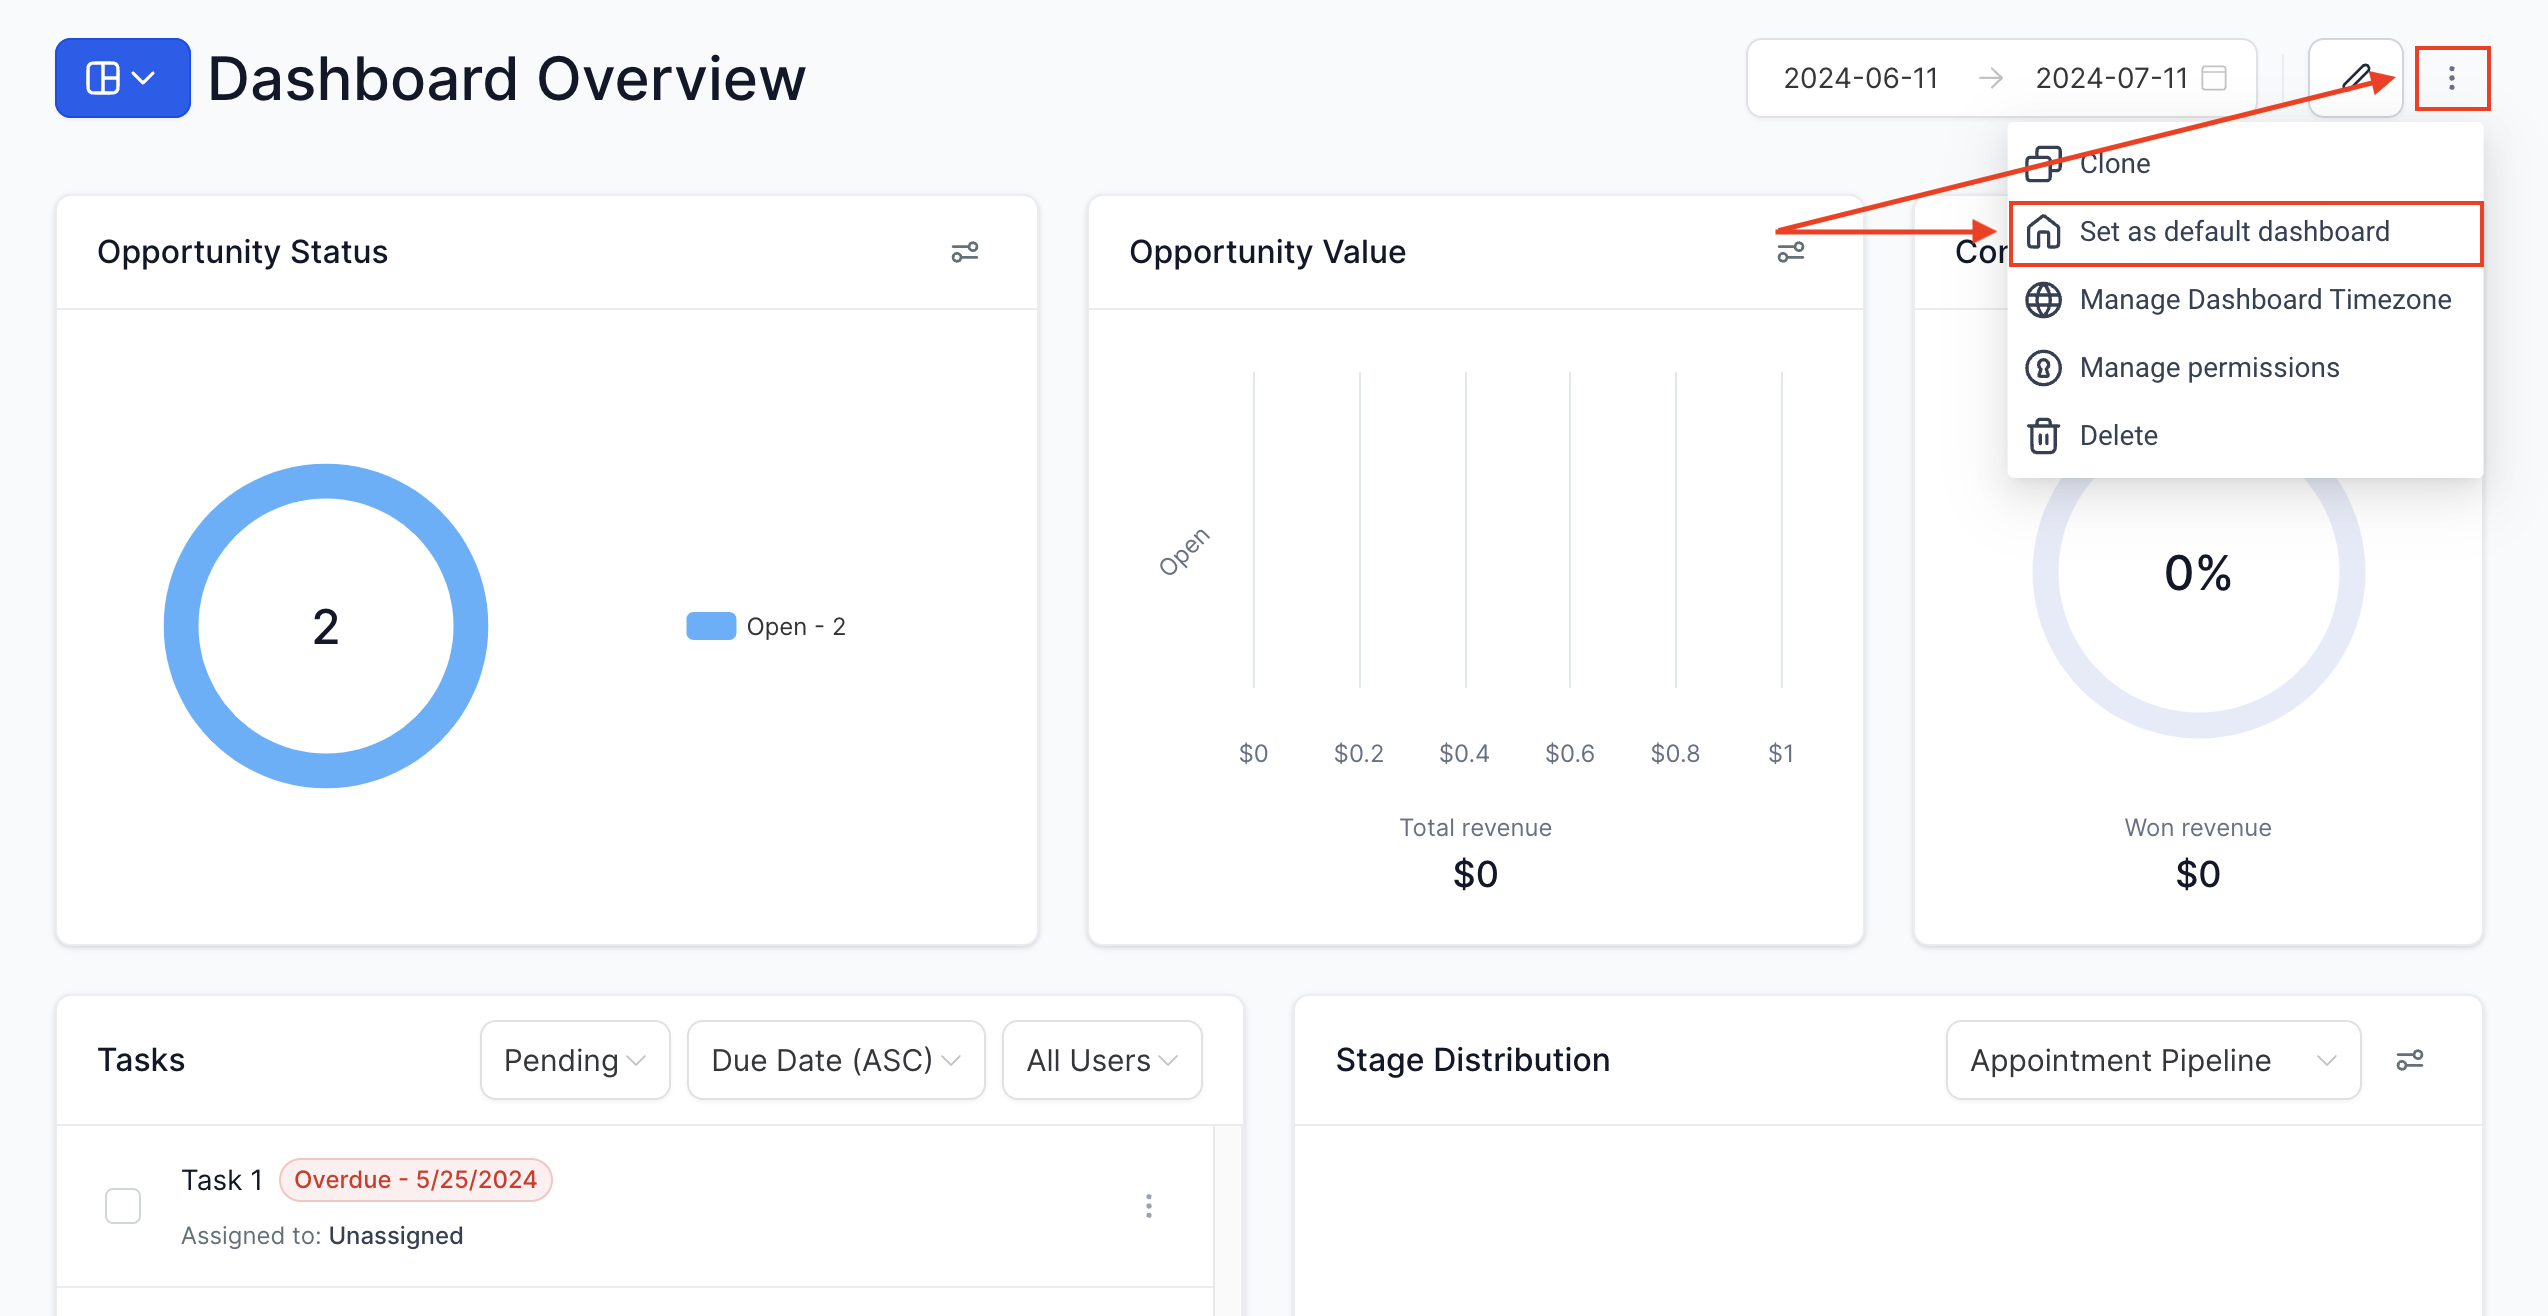 Only account admins with Full dashboard access can set a default dashboard. All user roles must have permission to view the dashboard before it can be set as the default. You cannot delete the current default dashboard until another dashboard has been set as default.
***
## Dashboard permissions
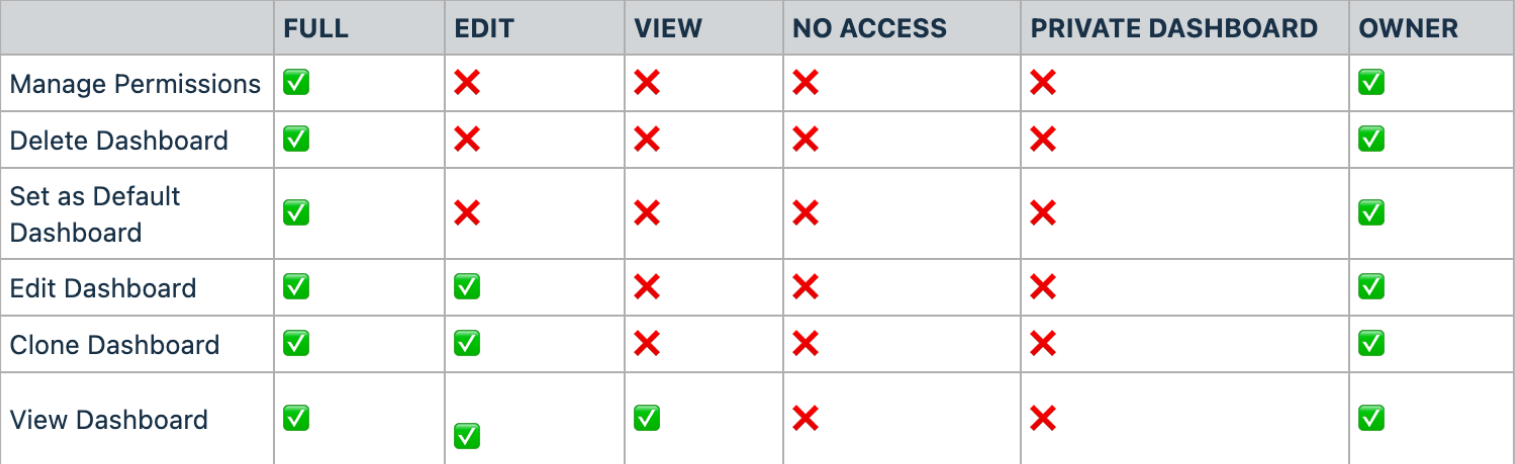
Hoop offers four permission levels for dashboards:
| Level | Capabilities |
| ------------- | ------------------------------------------------ |
| **Full** | Create, edit, share, and delete dashboards |
| **Edit** | Edit a dashboard and its widgets — cannot delete |
| **View** | Read-only access |
| **No Access** | Restricted — dashboard not visible |
### Setting permissions when creating a dashboard
During the dashboard creation process, toggle the **Private Dashboard** option if needed, and assign permission levels to individual users before clicking Confirm.
### Updating permissions on an existing dashboard
Click the **three dots** at the top-right corner of the dashboard and select **"Manage Permissions"**.
Only account admins with Full dashboard access can set a default dashboard. All user roles must have permission to view the dashboard before it can be set as the default. You cannot delete the current default dashboard until another dashboard has been set as default.
***
## Dashboard permissions
Hoop offers four permission levels for dashboards:
| Level | Capabilities |
| ------------- | ------------------------------------------------ |
| **Full** | Create, edit, share, and delete dashboards |
| **Edit** | Edit a dashboard and its widgets — cannot delete |
| **View** | Read-only access |
| **No Access** | Restricted — dashboard not visible |
### Setting permissions when creating a dashboard
During the dashboard creation process, toggle the **Private Dashboard** option if needed, and assign permission levels to individual users before clicking Confirm.
### Updating permissions on an existing dashboard
Click the **three dots** at the top-right corner of the dashboard and select **"Manage Permissions"**.
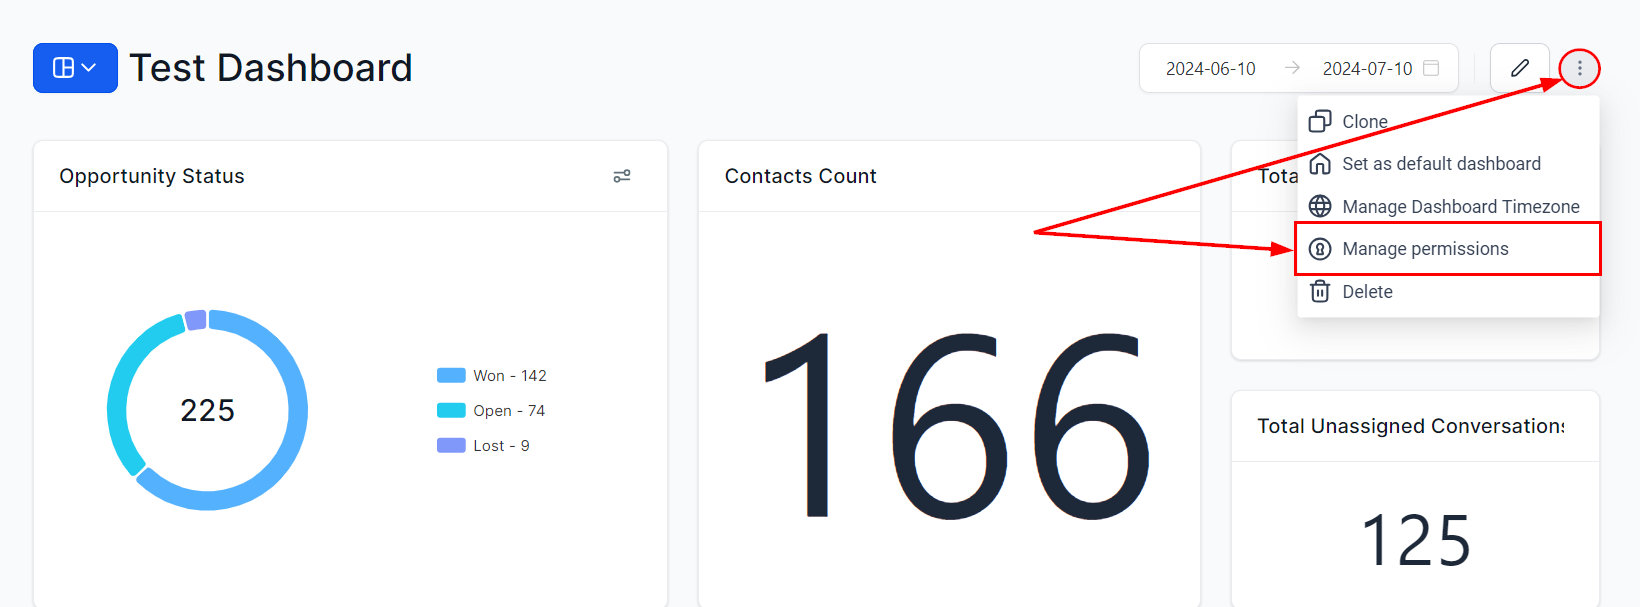 Toggle **Private Dashboard** if needed, then set the desired permission level for each user.
 Click **Save** to apply the updated permissions.
Permissions are automatically adjusted based on role hierarchy. Lower-level roles cannot have higher access than higher-level roles.
***
## Pinning dashboards
Pin your most important dashboards for quick personal access. Pinned dashboards are personal favorites that appear in the dashboard switcher. They differ from the **default dashboard**, which is the shared landing page for all users when they log in.
***
## Renaming a dashboard
Click the **three dots** in the top-right corner of the dashboard and select **"Edit"** or **"Rename"**.
Type the new dashboard name in the field provided.
Click **Save** (or press Enter) to apply the new name.
***
## Cloning dashboards
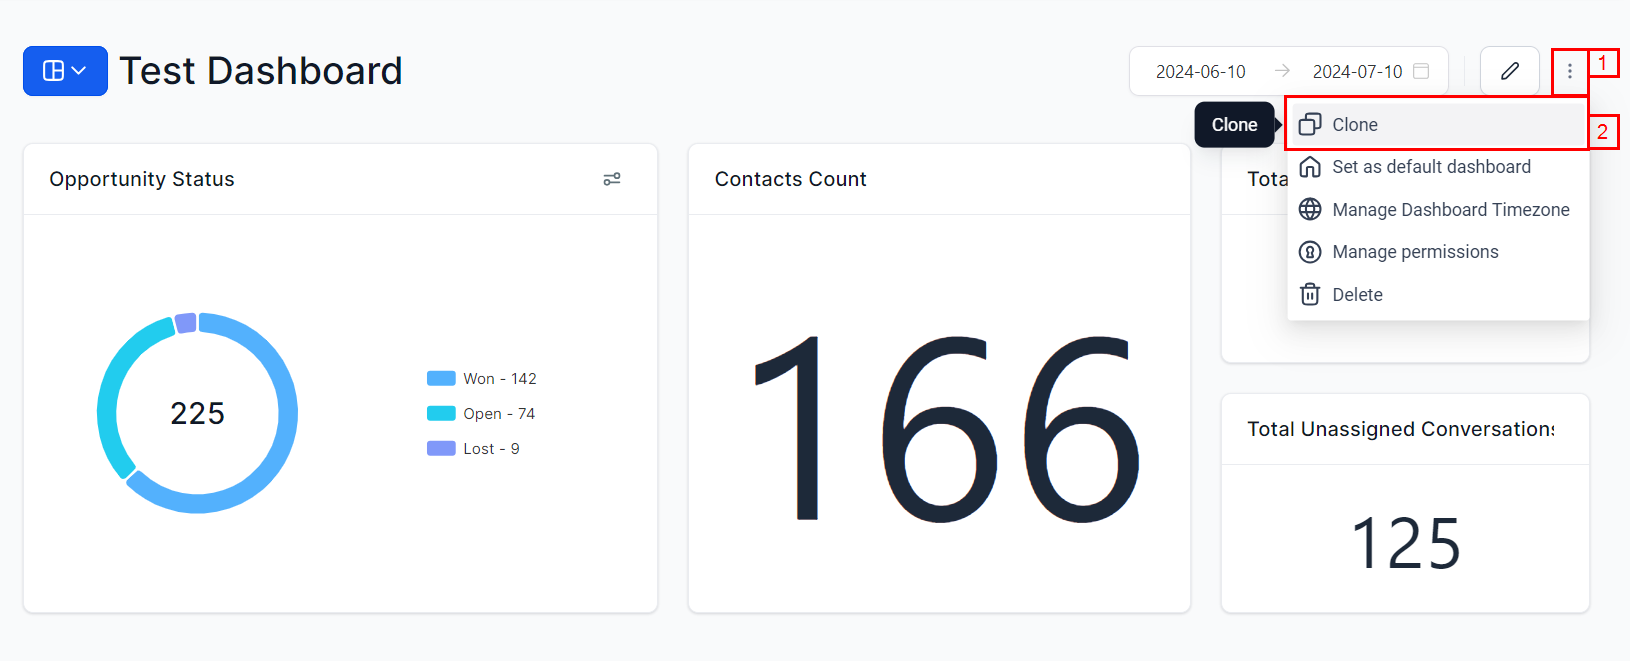
Users with Full or View-only access can clone (duplicate) an existing dashboard. Cloning retains the original layout, widget configuration, and custom theme colors, saving you setup time.
Click **Save** to apply the updated permissions.
Permissions are automatically adjusted based on role hierarchy. Lower-level roles cannot have higher access than higher-level roles.
***
## Pinning dashboards
Pin your most important dashboards for quick personal access. Pinned dashboards are personal favorites that appear in the dashboard switcher. They differ from the **default dashboard**, which is the shared landing page for all users when they log in.
***
## Renaming a dashboard
Click the **three dots** in the top-right corner of the dashboard and select **"Edit"** or **"Rename"**.
Type the new dashboard name in the field provided.
Click **Save** (or press Enter) to apply the new name.
***
## Cloning dashboards
Users with Full or View-only access can clone (duplicate) an existing dashboard. Cloning retains the original layout, widget configuration, and custom theme colors, saving you setup time.
 ***
## Sharing dashboards
Sharing a dashboard means granting other users access to view or edit it. This is managed through dashboard permissions.
Click the **three dots** at the top-right corner of the dashboard and select **"Manage Permissions"**.
Set the permission level (**Full**, **Edit**, **View**, or **No Access**) for each user or role you want to share the dashboard with.
Click **Save** to apply the sharing settings.
To share a dashboard with your entire team, set the default permission level to **View** for all users, then grant **Edit** or **Full** access to specific individuals who need to make changes.
***
## Deleting dashboards
Dashboard owners can delete dashboards that are no longer needed. You cannot delete the current default dashboard — set another dashboard as default first.
***
## Exporting data
Click any data point within a chart or widget to view detailed records in the Granular Insights view. Use the **export icon** to download records as a CSV file.
Do not switch or close the tab during an active export. Granular Insights is not currently supported for widgets dependent on third-party platforms such as Facebook and Google.
***
## Time zone synchronization
Dashboard data can be synchronized with your local time zone for accurate reporting.
From the main dashboard, click the **three dots** menu and select **"Manage Dashboard Time Zone"**. You can switch between your location's time zone and your personal time zone. The selected time zone applies to all dashboards you view.
***
## Dashboard AI summary
The AI Summary feature generates a natural-language overview of your dashboard's key metrics and trends. Instead of interpreting charts manually, the AI analyzes your widgets and provides actionable insights in plain language.
To generate an AI summary:
1. Open the dashboard you want to summarize
2. Click the **AI Summary** button (sparkle icon) in the top toolbar
3. The AI analyzes all visible widgets and generates a summary highlighting key trends, notable changes, and areas that may need attention
AI Summary is available on dashboards with at least three widgets containing data. The summary refreshes each time you click the button, reflecting the latest data.
***
## Frequently asked questions
Yes. Users with Full and View-only access can duplicate dashboards for easy modification. The cloned dashboard retains all widget configurations and the custom theme.
The primary dashboard is the default interface displayed upon logging in. It provides an overview of key metrics and data relevant to your operations. You can change it by selecting a different dashboard and choosing "Set as default dashboard."
Deleted dashboards are permanently removed. You cannot delete the current default dashboard — set another as default first.
Use the pin option in the dashboard options menu to mark important dashboards for quick personal access. Pinned dashboards appear in the dashboard switcher for fast navigation.
Ensure the data source for the widget is correctly configured. Verify there is relevant data available for the selected widget criteria and date range.
***
## Sharing dashboards
Sharing a dashboard means granting other users access to view or edit it. This is managed through dashboard permissions.
Click the **three dots** at the top-right corner of the dashboard and select **"Manage Permissions"**.
Set the permission level (**Full**, **Edit**, **View**, or **No Access**) for each user or role you want to share the dashboard with.
Click **Save** to apply the sharing settings.
To share a dashboard with your entire team, set the default permission level to **View** for all users, then grant **Edit** or **Full** access to specific individuals who need to make changes.
***
## Deleting dashboards
Dashboard owners can delete dashboards that are no longer needed. You cannot delete the current default dashboard — set another dashboard as default first.
***
## Exporting data
Click any data point within a chart or widget to view detailed records in the Granular Insights view. Use the **export icon** to download records as a CSV file.
Do not switch or close the tab during an active export. Granular Insights is not currently supported for widgets dependent on third-party platforms such as Facebook and Google.
***
## Time zone synchronization
Dashboard data can be synchronized with your local time zone for accurate reporting.
From the main dashboard, click the **three dots** menu and select **"Manage Dashboard Time Zone"**. You can switch between your location's time zone and your personal time zone. The selected time zone applies to all dashboards you view.
***
## Dashboard AI summary
The AI Summary feature generates a natural-language overview of your dashboard's key metrics and trends. Instead of interpreting charts manually, the AI analyzes your widgets and provides actionable insights in plain language.
To generate an AI summary:
1. Open the dashboard you want to summarize
2. Click the **AI Summary** button (sparkle icon) in the top toolbar
3. The AI analyzes all visible widgets and generates a summary highlighting key trends, notable changes, and areas that may need attention
AI Summary is available on dashboards with at least three widgets containing data. The summary refreshes each time you click the button, reflecting the latest data.
***
## Frequently asked questions
Yes. Users with Full and View-only access can duplicate dashboards for easy modification. The cloned dashboard retains all widget configurations and the custom theme.
The primary dashboard is the default interface displayed upon logging in. It provides an overview of key metrics and data relevant to your operations. You can change it by selecting a different dashboard and choosing "Set as default dashboard."
Deleted dashboards are permanently removed. You cannot delete the current default dashboard — set another as default first.
Use the pin option in the dashboard options menu to mark important dashboards for quick personal access. Pinned dashboards appear in the dashboard switcher for fast navigation.
Ensure the data source for the widget is correctly configured. Verify there is relevant data available for the selected widget criteria and date range.