> ## Documentation Index
> Fetch the complete documentation index at: https://help.hoopai.com/llms.txt
> Use this file to discover all available pages before exploring further.
# Appointment widget
> Add appointment tracking widgets to your dashboard to monitor upcoming meetings, booking trends, and appointment statuses by team member or calendar.
Appointment widgets give you a real-time view of your booking activity directly on the dashboard. Whether you need to track total upcoming appointments, monitor confirmation rates, or analyze appointment trends over time, the appointment widget category offers a range of chart types and configuration options to surface the scheduling data that matters most to your team.
## Available appointment widget types
The HoopAI platform includes several pre-built appointment widget types under the **Appointments** category:
| Widget type | What it shows |
| ---------------------------- | ----------------------------------------------------------------------------- |
| **Total appointments** | Count of all appointments within the selected date range |
| **Appointments by status** | Breakdown of appointments by status — confirmed, cancelled, showed, no-showed |
| **Appointments by assignee** | Count of appointments grouped by the team member they are assigned to |
| **Appointments over time** | Trend line or bar chart showing appointment volume across the date range |
| **Confirmed appointments** | Count of appointments with a Confirmed status within the period |
## Adding an appointment widget
Navigate to your dashboard and click the **pencil icon** to enter edit mode.
Click **"Add Widget"** in the top-right corner to open the widget selection panel.
Click the **Appointments** tab in the widget panel to browse available appointment widgets.
Click the widget type that matches your reporting need. The widget is added to your dashboard and can be repositioned in the layout.
Click the **three dots** on the newly added widget and select **Edit** to open the configuration panel.
## Configuring an appointment widget
The **Configure** tab contains the primary settings for each appointment widget:
### Title
Enter a descriptive name for the widget. For example: "Confirmed Appointments — This Month" or "Weekly Bookings by Rep."
### Metrics
Select the metric to measure. For appointment widgets, common options include:
* **Count** — total number of appointments
* **Sum** — if tracking a numeric custom field associated with appointments
### Group by / View by
For donut or bar chart widgets, choose how to group the data — by assignee, by status, by calendar, or by another available dimension.
### Date range
By default, the widget uses the dashboard's global time frame. To lock the widget to a specific period regardless of the global selector, set a **Date Range Override** in the Configure tab.
### Calendar filter
If your account has multiple appointment calendars (for example, separate calendars per service type or per team), you can filter the widget to show data from a specific calendar. This is done through the **Conditions** tab.
## Filtering appointment widgets
Use the **Conditions** tab to narrow appointment data to specific subsets:
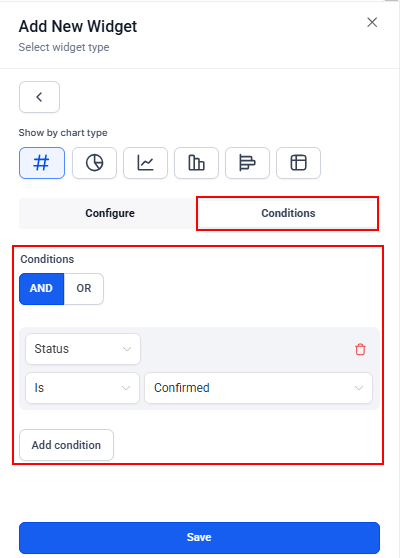 Add a condition for **Appointment Status** and select one or more statuses: Confirmed, Cancelled, Showed, No-Show, or New. For example, create a dedicated "No-Show Rate" widget by filtering to only show No-Show appointments and placing it next to a Total Appointments widget.
Add a **User** condition and select a specific team member, or use "Logged in User" so each person automatically sees only their own appointment data when they view the dashboard.
Add a **Calendar** condition and select the calendar or calendars you want to include. This is useful when you have separate calendars for different service types and want a dedicated widget for each.
Use the **Appointment Type** condition to segment widgets by the type of appointment (such as discovery call, demo, or follow-up).
## Supported chart types for appointments
Appointment widgets support all standard chart formats:
* **Numeric** — single large number ideal for KPI tiles
* **Donut** — shows distribution across groups such as statuses or assignees
* **Line chart** — shows booking trends over time
* **Bar chart** — compares appointment counts across a dimension such as assignee or calendar
* **Horizontal bar** — alternative orientation for bar comparisons
* **Table** — lists individual appointment records with columns such as contact name, date, status, and assignee
Use a **Table** chart type to create a live appointment list widget on your dashboard. This gives your reception or scheduling team a running view of today's appointments without leaving the dashboard page.
## Adding appointment widgets from the reporting section
You can also add appointment widgets to your dashboard directly from the **Appointment Report** tab in the Reporting section:
1. Navigate to **Reporting** and open the **Appointment Report** tab
2. Look for the **grid icon** in the report view
3. Click it and select the dashboard you want to send the widget to
4. The widget is added to the bottom of the selected dashboard where you can reposition it in edit mode
## Frequently asked questions
Check the date range — if the global time frame selector is set to a period with no appointments, the widget will be empty. Also verify that any conditions applied in the Conditions tab are not too restrictive. If you have filtered by a specific calendar, confirm that calendar has appointments in the selected period.
Yes. Set the date range to a future period (such as "next 7 days") using a custom date range override on the widget. The widget will then show appointments scheduled within that future window.
Create two separate numeric widgets: one filtered to all appointments (Total Appointments) and one filtered to Cancelled status only. Place them side by side so you can compare the count. For a percentage view, use a Custom Metric to divide cancelled appointments by total appointments.
Yes. Clicking on a data point in most appointment widgets opens the Granular Insights view, which lists the individual appointment records that make up that data point. You can review details or export the list as a CSV from that view.
Add a condition for **Appointment Status** and select one or more statuses: Confirmed, Cancelled, Showed, No-Show, or New. For example, create a dedicated "No-Show Rate" widget by filtering to only show No-Show appointments and placing it next to a Total Appointments widget.
Add a **User** condition and select a specific team member, or use "Logged in User" so each person automatically sees only their own appointment data when they view the dashboard.
Add a **Calendar** condition and select the calendar or calendars you want to include. This is useful when you have separate calendars for different service types and want a dedicated widget for each.
Use the **Appointment Type** condition to segment widgets by the type of appointment (such as discovery call, demo, or follow-up).
## Supported chart types for appointments
Appointment widgets support all standard chart formats:
* **Numeric** — single large number ideal for KPI tiles
* **Donut** — shows distribution across groups such as statuses or assignees
* **Line chart** — shows booking trends over time
* **Bar chart** — compares appointment counts across a dimension such as assignee or calendar
* **Horizontal bar** — alternative orientation for bar comparisons
* **Table** — lists individual appointment records with columns such as contact name, date, status, and assignee
Use a **Table** chart type to create a live appointment list widget on your dashboard. This gives your reception or scheduling team a running view of today's appointments without leaving the dashboard page.
## Adding appointment widgets from the reporting section
You can also add appointment widgets to your dashboard directly from the **Appointment Report** tab in the Reporting section:
1. Navigate to **Reporting** and open the **Appointment Report** tab
2. Look for the **grid icon** in the report view
3. Click it and select the dashboard you want to send the widget to
4. The widget is added to the bottom of the selected dashboard where you can reposition it in edit mode
## Frequently asked questions
Check the date range — if the global time frame selector is set to a period with no appointments, the widget will be empty. Also verify that any conditions applied in the Conditions tab are not too restrictive. If you have filtered by a specific calendar, confirm that calendar has appointments in the selected period.
Yes. Set the date range to a future period (such as "next 7 days") using a custom date range override on the widget. The widget will then show appointments scheduled within that future window.
Create two separate numeric widgets: one filtered to all appointments (Total Appointments) and one filtered to Cancelled status only. Place them side by side so you can compare the count. For a percentage view, use a Custom Metric to divide cancelled appointments by total appointments.
Yes. Clicking on a data point in most appointment widgets opens the Granular Insights view, which lists the individual appointment records that make up that data point. You can review details or export the list as a CSV from that view.