> ## Documentation Index
> Fetch the complete documentation index at: https://help.hoopai.com/llms.txt
> Use this file to discover all available pages before exploring further.
# Message templates
> Create and manage reusable SMS, email, and WhatsApp message templates for consistent, fast replies in the HoopAI platform.
Message templates in the HoopAI platform — called **Snippets** for SMS and email, and **WhatsApp Templates** for WhatsApp — let your team insert pre-written messages into any conversation with a single click. Templates save time, ensure brand consistency, and can include dynamic personalization fields so every message still feels tailored to the individual.
## Types of templates
| Template type | Channel | Approval required |
| ----------------- | ----------------------------- | ------------------- |
| Text snippet | SMS, Instagram, Facebook, GMB | No |
| Email snippet | Email | No |
| WhatsApp template | WhatsApp | Yes (Meta approval) |
***
## Text snippets (SMS and social channels)
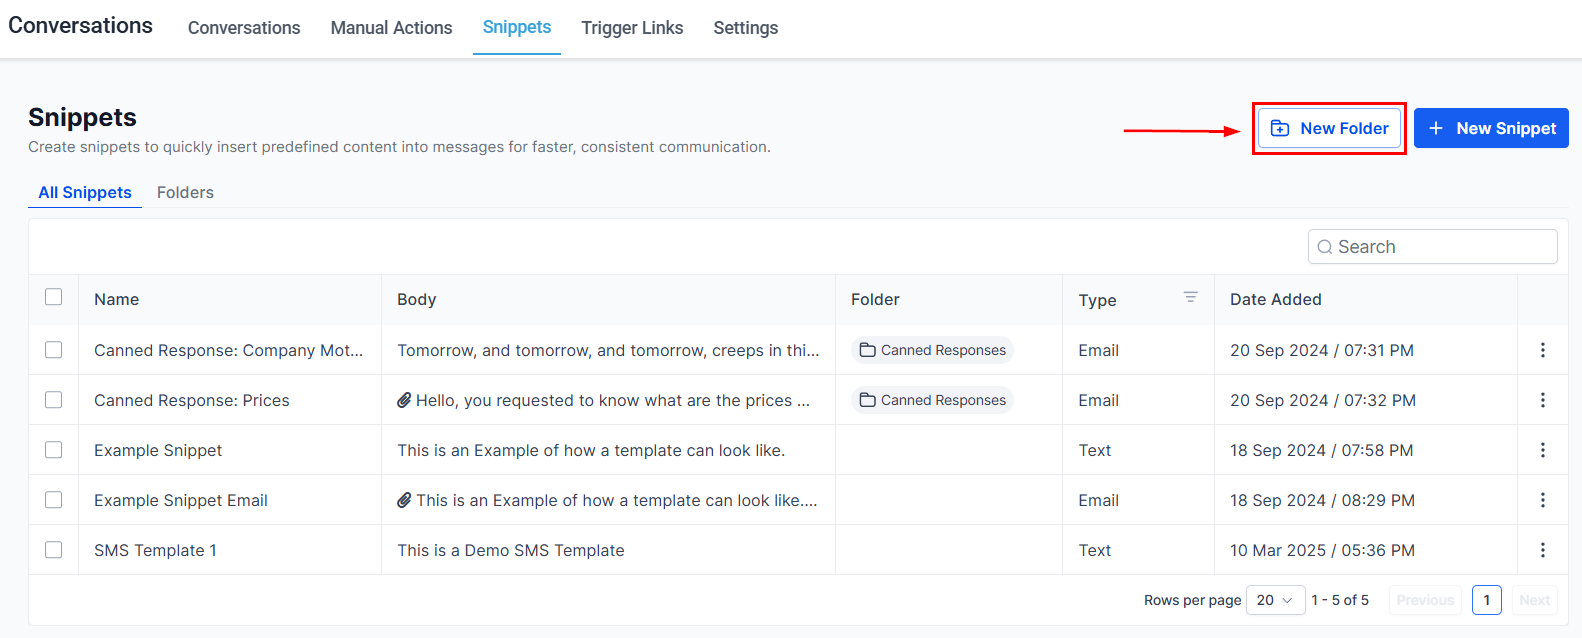 Text snippets are short-form templates for SMS, Instagram DMs, Facebook Messenger, and Google My Business messages. They support plain text, emoji, custom values, trigger links, and file attachments.
### Creating a text snippet
Text snippets are short-form templates for SMS, Instagram DMs, Facebook Messenger, and Google My Business messages. They support plain text, emoji, custom values, trigger links, and file attachments.
### Creating a text snippet
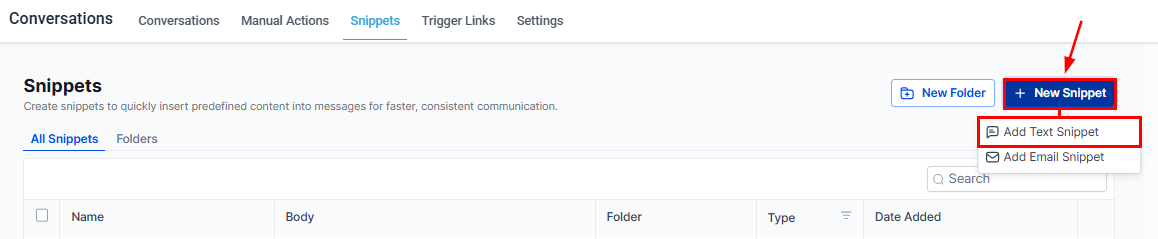 Go to **Conversations → Snippets** in the left navigation.
Click **+ New Snippet** in the top right and select **Add Text Snippet**.
Enter a descriptive name. Your team sees this name in the snippet selector during conversations, so make it easy to find quickly. For example: "Follow-up after missed call" or "Appointment confirmation."
Type the message text. Enhance it with:
* **Custom values** (tag icon) — insert merge fields like `{{contact.first_name}}` or `{{appointment.date}}`
* **Trigger links** (lightning bolt icon) — add trackable links that fire automations when clicked
* **Attachments** — click **Add Attachment** to include an image or document
Enter a phone number in the **Test SMS** field and click **Send Test** to preview exactly how the snippet appears when received on a mobile device.
Click **Save**. The snippet is available immediately to all team members.
### Using a text snippet in a conversation
Go to **Conversations → Snippets** in the left navigation.
Click **+ New Snippet** in the top right and select **Add Text Snippet**.
Enter a descriptive name. Your team sees this name in the snippet selector during conversations, so make it easy to find quickly. For example: "Follow-up after missed call" or "Appointment confirmation."
Type the message text. Enhance it with:
* **Custom values** (tag icon) — insert merge fields like `{{contact.first_name}}` or `{{appointment.date}}`
* **Trigger links** (lightning bolt icon) — add trackable links that fire automations when clicked
* **Attachments** — click **Add Attachment** to include an image or document
Enter a phone number in the **Test SMS** field and click **Send Test** to preview exactly how the snippet appears when received on a mobile device.
Click **Save**. The snippet is available immediately to all team members.
### Using a text snippet in a conversation
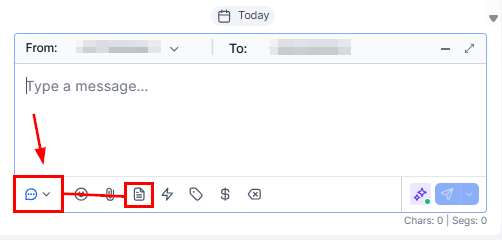 Navigate to the contact's conversation and choose SMS, Instagram, Facebook, or another text channel.
Click the **paper icon** in the message toolbar. The snippet library slides open.
Browse by folder or search by name. Click the snippet you want — it populates the message box instantly.
Make any final edits. Custom value fields are resolved automatically — for example, `{{contact.first_name}}` becomes the contact's actual first name. Review the populated text before sending.
Click **Send** (or schedule for later).
***
## Email snippets
Email snippets work identically to text snippets but include a subject line and support rich text formatting — ideal for confirmation emails, follow-ups, and templated responses that do not warrant a full email campaign.
### Creating an email snippet
From **Conversations → Snippets**, click **+ New Snippet** and choose **Add Email Snippet**.
* **Name** — internal identifier for your team.
* **Subject** — the email subject line the contact sees.
Use the rich text editor to format the message body. Apply bold, italics, bullet lists, links, and custom merge fields. The **tag icon** inserts custom values; the **thunderbolt icon** inserts trigger links.
Click **Add Attachment** to include a file from your computer.
Fill in a From and To address, then click **Send Test** to see how the email renders in an actual inbox.
Click **Save**.
Navigate to the contact's conversation and choose SMS, Instagram, Facebook, or another text channel.
Click the **paper icon** in the message toolbar. The snippet library slides open.
Browse by folder or search by name. Click the snippet you want — it populates the message box instantly.
Make any final edits. Custom value fields are resolved automatically — for example, `{{contact.first_name}}` becomes the contact's actual first name. Review the populated text before sending.
Click **Send** (or schedule for later).
***
## Email snippets
Email snippets work identically to text snippets but include a subject line and support rich text formatting — ideal for confirmation emails, follow-ups, and templated responses that do not warrant a full email campaign.
### Creating an email snippet
From **Conversations → Snippets**, click **+ New Snippet** and choose **Add Email Snippet**.
* **Name** — internal identifier for your team.
* **Subject** — the email subject line the contact sees.
Use the rich text editor to format the message body. Apply bold, italics, bullet lists, links, and custom merge fields. The **tag icon** inserts custom values; the **thunderbolt icon** inserts trigger links.
Click **Add Attachment** to include a file from your computer.
Fill in a From and To address, then click **Send Test** to see how the email renders in an actual inbox.
Click **Save**.
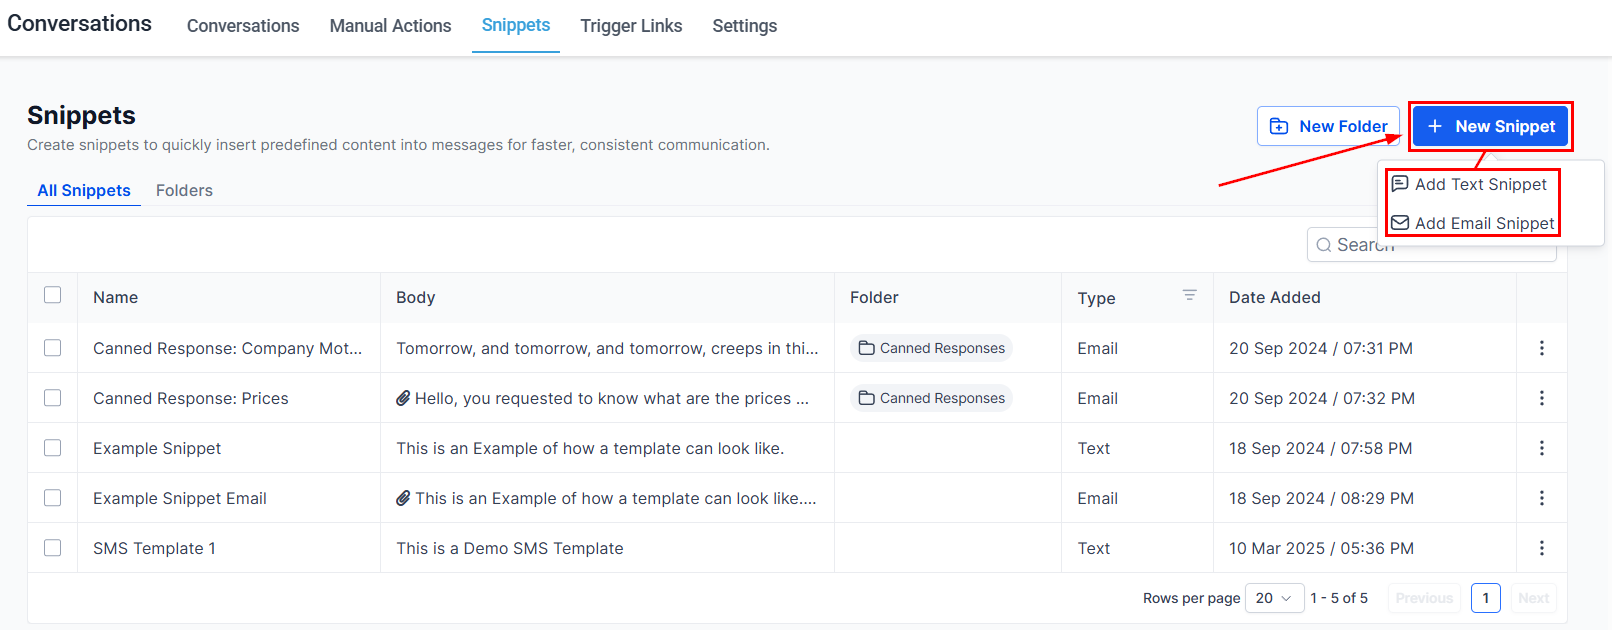 ### Using an email snippet in a conversation
In the email composer, click the **paper icon** to open the snippet selector. Templates are organized in folders. Click a template to apply both the subject and body to the current email. Edit the populated content before sending if any personalization is needed.
***
## WhatsApp templates
WhatsApp templates are pre-approved message formats required by Meta for:
* Initiating any outbound WhatsApp conversation (when your business messages a contact first)
* Re-opening a conversation after the 24-hour session window has closed
WhatsApp templates must be submitted to and approved by Meta before they can be used. Approval typically takes a few minutes to a few hours.
### Template categories
| Category | Use |
| -------------- | ------------------------------------------------------------- |
| Marketing | Promotions, special offers, announcements |
| Utility | Appointment reminders, order updates, receipts, confirmations |
| Authentication | One-time passcodes, login verification |
### Creating and submitting a WhatsApp template
Navigate to **Settings → Integrations → WhatsApp** and select the **Templates** tab.
Click **+ Create Template**.
* **Name** — lowercase letters, numbers, and underscores only; no spaces.
* **Category** — Marketing, Utility, or Authentication.
* **Language** — select the language the template is written in.
Write the message text. Use double curly braces for dynamic variables: `{{1}}`, `{{2}}`, etc. These are filled in at send time.
Example: `Hi {{1}}, your appointment is confirmed for {{2}} at {{3}}. Reply STOP to opt out.`
* **Header** — text, image, document, or video displayed above the message body.
* **Footer** — small text displayed below the body; often used for opt-out instructions.
Choose from:
* **Quick reply buttons** — up to 3 one-tap reply options.
* **Call-to-action buttons** — link to a URL or trigger a phone call.
Click **Submit**. Meta reviews the template. You will see the status update to **Approved** or **Rejected** in the Templates list.
Rejected templates display a reason for rejection. Common reasons include missing opt-out language in marketing templates or variable usage that does not match the declared category. Edit and resubmit after addressing the feedback.
### Using a WhatsApp template in a conversation
Navigate to the contact's conversation and select the **WhatsApp** tab.
The template selector opens, showing all your approved templates.
Click the template. Variable fields (e.g., `{{1}}`, `{{2}}`) appear as editable inputs.
Enter the values for each dynamic field — contact name, appointment details, offer text, etc.
Click **Send**. The message is delivered even if the 24-hour session window is closed.
***
## Organizing templates with folders
Both text and email snippets can be organized into folders for easier navigation.
In the Snippets library, click **+ New Snippet → Add Folder**, name it, and save.
Click the **three-dot icon** next to a snippet, select **Move to Folder**, choose the folder, and confirm.
Use the search bar at the top of the Snippets panel to find a specific snippet by name across all folders.
Deleting a folder may also delete the snippets it contains. Move snippets to another folder before deleting if you want to keep them.
### Using an email snippet in a conversation
In the email composer, click the **paper icon** to open the snippet selector. Templates are organized in folders. Click a template to apply both the subject and body to the current email. Edit the populated content before sending if any personalization is needed.
***
## WhatsApp templates
WhatsApp templates are pre-approved message formats required by Meta for:
* Initiating any outbound WhatsApp conversation (when your business messages a contact first)
* Re-opening a conversation after the 24-hour session window has closed
WhatsApp templates must be submitted to and approved by Meta before they can be used. Approval typically takes a few minutes to a few hours.
### Template categories
| Category | Use |
| -------------- | ------------------------------------------------------------- |
| Marketing | Promotions, special offers, announcements |
| Utility | Appointment reminders, order updates, receipts, confirmations |
| Authentication | One-time passcodes, login verification |
### Creating and submitting a WhatsApp template
Navigate to **Settings → Integrations → WhatsApp** and select the **Templates** tab.
Click **+ Create Template**.
* **Name** — lowercase letters, numbers, and underscores only; no spaces.
* **Category** — Marketing, Utility, or Authentication.
* **Language** — select the language the template is written in.
Write the message text. Use double curly braces for dynamic variables: `{{1}}`, `{{2}}`, etc. These are filled in at send time.
Example: `Hi {{1}}, your appointment is confirmed for {{2}} at {{3}}. Reply STOP to opt out.`
* **Header** — text, image, document, or video displayed above the message body.
* **Footer** — small text displayed below the body; often used for opt-out instructions.
Choose from:
* **Quick reply buttons** — up to 3 one-tap reply options.
* **Call-to-action buttons** — link to a URL or trigger a phone call.
Click **Submit**. Meta reviews the template. You will see the status update to **Approved** or **Rejected** in the Templates list.
Rejected templates display a reason for rejection. Common reasons include missing opt-out language in marketing templates or variable usage that does not match the declared category. Edit and resubmit after addressing the feedback.
### Using a WhatsApp template in a conversation
Navigate to the contact's conversation and select the **WhatsApp** tab.
The template selector opens, showing all your approved templates.
Click the template. Variable fields (e.g., `{{1}}`, `{{2}}`) appear as editable inputs.
Enter the values for each dynamic field — contact name, appointment details, offer text, etc.
Click **Send**. The message is delivered even if the 24-hour session window is closed.
***
## Organizing templates with folders
Both text and email snippets can be organized into folders for easier navigation.
In the Snippets library, click **+ New Snippet → Add Folder**, name it, and save.
Click the **three-dot icon** next to a snippet, select **Move to Folder**, choose the folder, and confirm.
Use the search bar at the top of the Snippets panel to find a specific snippet by name across all folders.
Deleting a folder may also delete the snippets it contains. Move snippets to another folder before deleting if you want to keep them.