> ## Documentation Index
> Fetch the complete documentation index at: https://help.hoopai.com/llms.txt
> Use this file to discover all available pages before exploring further.
# Conversation labels
> Create, apply, and filter by labels to categorize and organize conversations in the HoopAI platform inbox.
Labels are color-coded tags you attach to conversations to categorize them by topic, status, priority, or any classification that fits your team's workflow. They give you a fast visual signal about what a conversation is about without needing to open it, and they make filtering your inbox precise and powerful.
## What labels are for
Labels are applied at the conversation level — not the contact level — which means the same contact can have conversations with different labels applied to each one. Common use cases include:
* Marking conversations by pipeline stage (e.g., "New Lead," "Proposal Sent," "Closed Won")
* Flagging urgency (e.g., "Urgent," "VIP," "Escalated")
* Categorizing by topic (e.g., "Billing," "Support," "Onboarding")
* Tracking follow-up state (e.g., "Awaiting Reply," "Call Back Later")
Labels are visible in the conversation list as colored chips next to the contact name, making it easy to scan your inbox and understand status at a glance.
## Creating labels
Labels are created in account settings and are available to all users once created.
Navigate to **Settings → Conversations → Labels** (or **Settings → Labels**, depending on your account layout).
Click **Add Label** or the **+** icon.
Enter a short, descriptive name. Keep names concise — they appear as chips in the conversation list and long names can be truncated.
Select a color from the palette. Choose colors that create clear visual contrast between label categories. For example, use red for urgent items and green for completed ones.
Click **Save**. The label is immediately available to all team members.
Limit your label set to the categories your team actually uses. Too many labels create noise and slow down the categorization process. Start with 5-10 well-defined labels and add more only as genuine needs emerge.
## Applying a label to a conversation
Navigate to **Conversations** and open the contact's conversation.
Labels are accessible from two places:
* The **conversation header** — look for the label icon or the Labels field near the top of the open conversation.
* The **Contact Details panel** on the right side — scroll to the **Conversation** section.
Click the Labels field to open the dropdown list of available labels. Click a label to apply it. You can apply multiple labels to a single conversation.
Click the **X** on an applied label chip to remove it, or open the label dropdown and deselect it.
## Applying labels in bulk
To label multiple conversations at once:
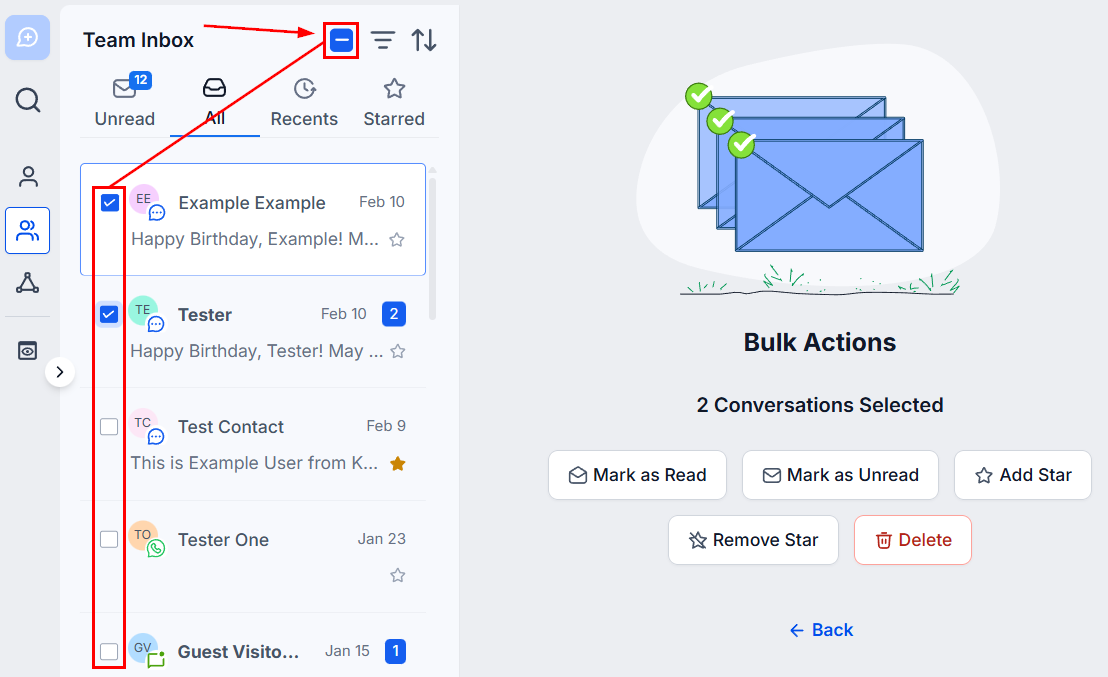 In the conversation list, check the boxes next to the conversations you want to label. Check the top box to select all visible conversations (up to 100 at a time).
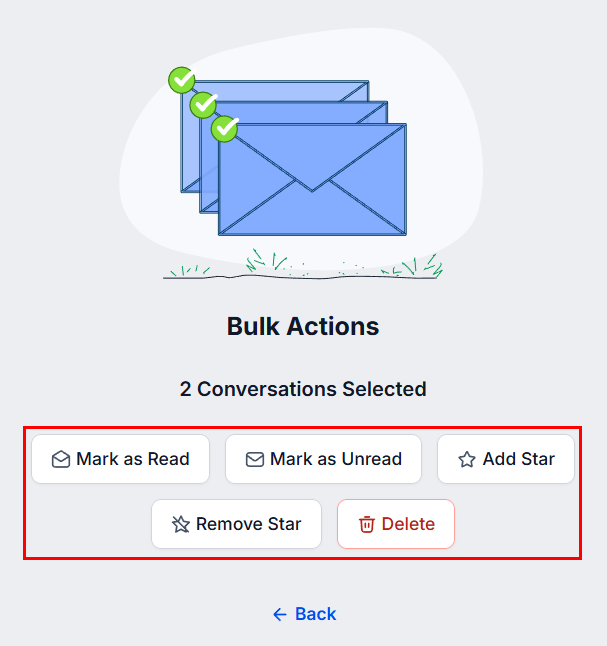
Click the bulk actions menu that appears and select **Add Label**.
Select the label to apply. The label is added to all selected conversations simultaneously.
In the conversation list, check the boxes next to the conversations you want to label. Check the top box to select all visible conversations (up to 100 at a time).
Click the bulk actions menu that appears and select **Add Label**.
Select the label to apply. The label is added to all selected conversations simultaneously.
 ## Filtering by label
Labels are most powerful when combined with filters to create focused inbox views.
## Filtering by label
Labels are most powerful when combined with filters to create focused inbox views.
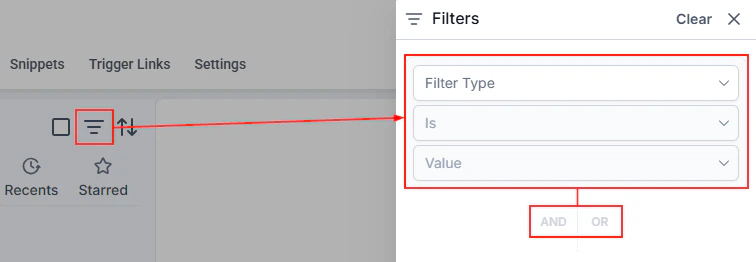 Click the **three-line icon** next to the search bar in the Conversations inbox.
Scroll to the **Labels** section in the filter panel.
Select one or more labels. The inbox immediately updates to show only conversations with those labels applied.
Layer additional filters — such as **Assigned To** or **Last message channel** — to narrow results further. Use **And / Or** logic to control how multiple filters interact.
If this filter combination is one you will use regularly, click **Create View** and give it a name. The view appears in your left sidebar for one-click access.
## Automating label application
Labels can be applied automatically through workflows, removing the need for manual tagging when contacts meet specific criteria.
To automate label application:
1. Go to **Automation → Workflows**.
2. Create or edit a workflow.
3. Add a **Conversation Label** action.
4. Choose **Add Label** and select the label to apply.
5. Save and publish the workflow.
Example automation: When a contact submits a payment form, a workflow automatically applies the "Payment Received" label to their conversation. When a contact books an appointment, the "Appointment Set" label is applied.
Workflow-applied labels appear immediately in the conversation and are visible to all team members with access.
## Managing labels
### Editing a label
Navigate to **Settings → Conversations → Labels**, click the label you want to update, change the name or color, and save. The change applies everywhere that label is currently in use.
### Deleting a label
Click the label in settings and choose **Delete**. Deleting a label removes it from all conversations where it was applied. This action cannot be undone. Before deleting, ensure no active workflows or saved views depend on that label.
### Renaming for clarity
As your team's processes evolve, rename labels to reflect updated terminology. Because labels are centrally managed, a rename propagates instantly to every conversation and every user.
## Labels vs. contact tags
Labels and tags serve different purposes:
| Feature | Labels | Contact tags |
| ----------------------------- | --------------------------- | ---------------------------------- |
| Applied to | Individual conversations | The contact record |
| Persists across conversations | No — per conversation | Yes — on the contact |
| Visible in | Conversations inbox | Contacts list and record |
| Used for | Conversation categorization | Contact segmentation and targeting |
Use labels to track conversation state and priority. Use contact tags to classify the contact themselves for segmentation, automation targeting, and reporting.
Click the **three-line icon** next to the search bar in the Conversations inbox.
Scroll to the **Labels** section in the filter panel.
Select one or more labels. The inbox immediately updates to show only conversations with those labels applied.
Layer additional filters — such as **Assigned To** or **Last message channel** — to narrow results further. Use **And / Or** logic to control how multiple filters interact.
If this filter combination is one you will use regularly, click **Create View** and give it a name. The view appears in your left sidebar for one-click access.
## Automating label application
Labels can be applied automatically through workflows, removing the need for manual tagging when contacts meet specific criteria.
To automate label application:
1. Go to **Automation → Workflows**.
2. Create or edit a workflow.
3. Add a **Conversation Label** action.
4. Choose **Add Label** and select the label to apply.
5. Save and publish the workflow.
Example automation: When a contact submits a payment form, a workflow automatically applies the "Payment Received" label to their conversation. When a contact books an appointment, the "Appointment Set" label is applied.
Workflow-applied labels appear immediately in the conversation and are visible to all team members with access.
## Managing labels
### Editing a label
Navigate to **Settings → Conversations → Labels**, click the label you want to update, change the name or color, and save. The change applies everywhere that label is currently in use.
### Deleting a label
Click the label in settings and choose **Delete**. Deleting a label removes it from all conversations where it was applied. This action cannot be undone. Before deleting, ensure no active workflows or saved views depend on that label.
### Renaming for clarity
As your team's processes evolve, rename labels to reflect updated terminology. Because labels are centrally managed, a rename propagates instantly to every conversation and every user.
## Labels vs. contact tags
Labels and tags serve different purposes:
| Feature | Labels | Contact tags |
| ----------------------------- | --------------------------- | ---------------------------------- |
| Applied to | Individual conversations | The contact record |
| Persists across conversations | No — per conversation | Yes — on the contact |
| Visible in | Conversations inbox | Contacts list and record |
| Used for | Conversation categorization | Contact segmentation and targeting |
Use labels to track conversation state and priority. Use contact tags to classify the contact themselves for segmentation, automation targeting, and reporting.