> ## Documentation Index
> Fetch the complete documentation index at: https://help.hoopai.com/llms.txt
> Use this file to discover all available pages before exploring further.
# Creating calendars
> Step-by-step guide to creating every calendar type in the HoopAI Platform — event, round robin, class, collective, personal, and schedule-based.
This guide walks through creating each calendar type and configuring the five Advanced Settings tabs that appear across all calendar types.
## Getting started
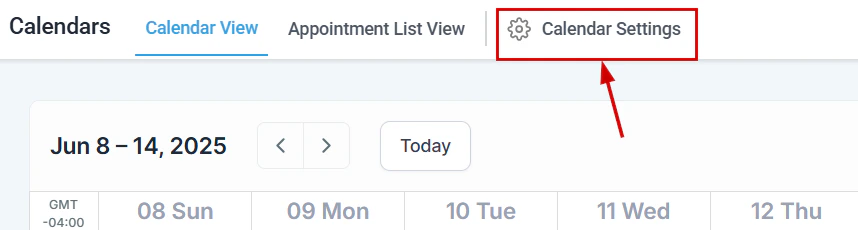
Navigate to **Calendars** in the left sidebar, then click **Calendar Settings**. Click **+ New Calendar** to begin.
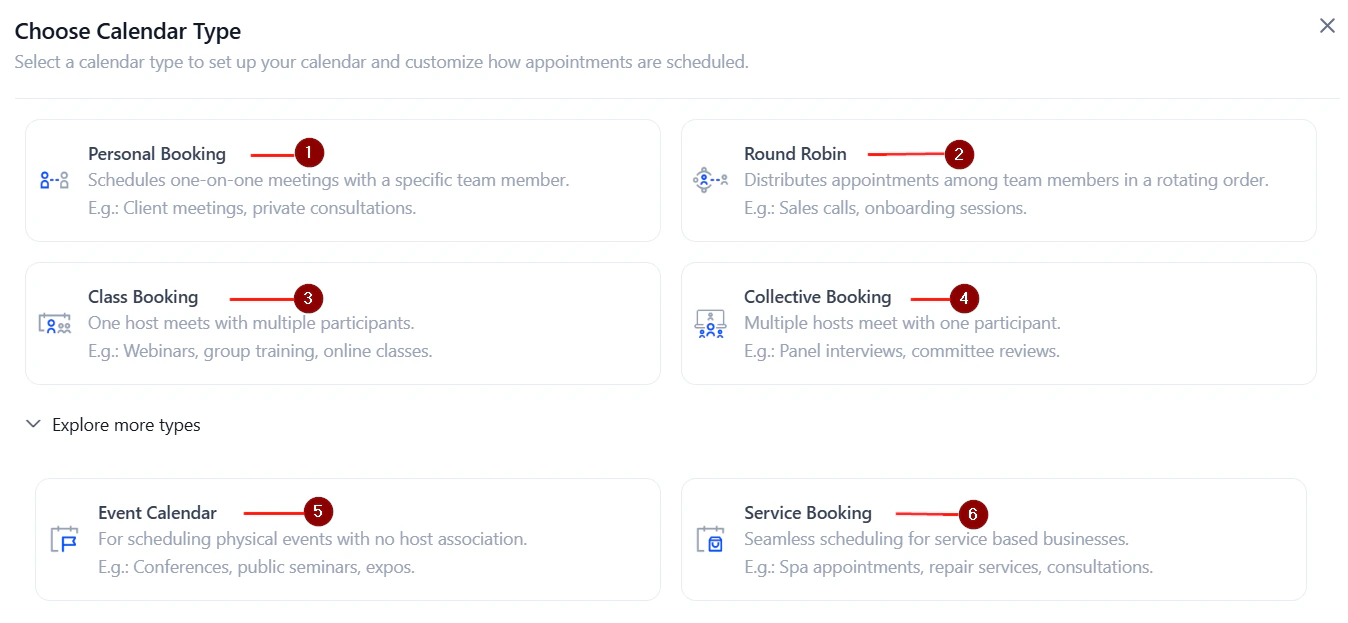
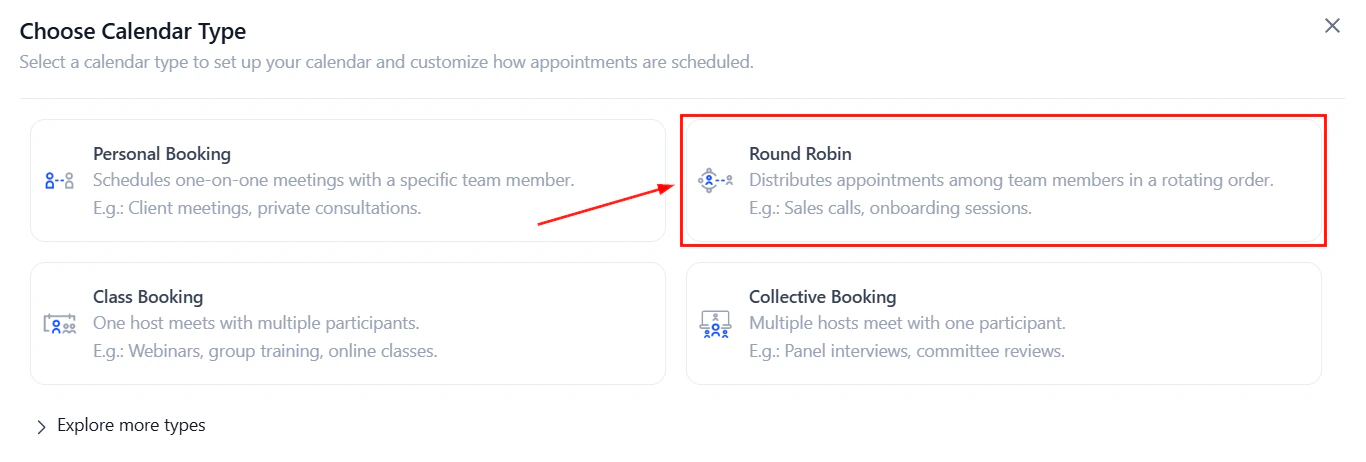
 You will be prompted to select a calendar type. For types not shown by default, expand **Explore more types**.
 ***
## Quick-start setup
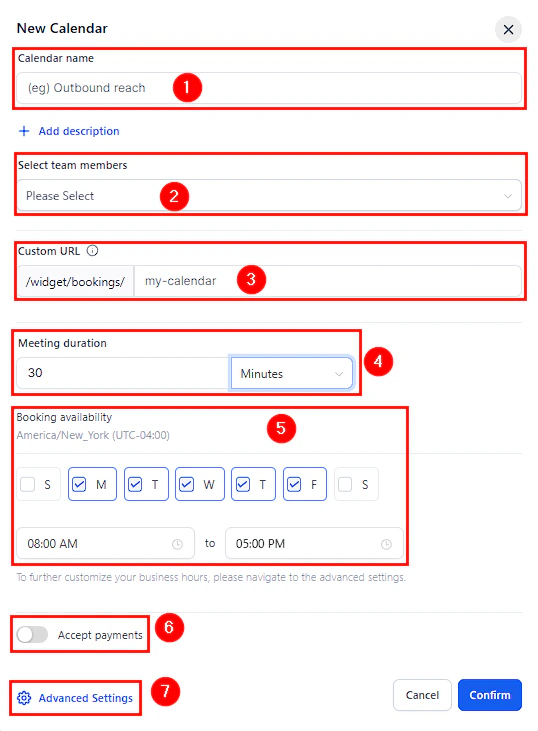
After selecting a type, you complete an **Initial Setup** with the core fields:
| Field | Description |
| ------------------------ | -------------------------------------------------- |
| **Calendar name** | Displayed on booking pages and confirmation emails |
| **Team member(s)** | Who is assigned to receive bookings |
| **Calendar URL** | The custom slug for the booking link |
| **Meeting duration** | Length of each appointment slot |
| **Booking availability** | Default days and times available for booking |
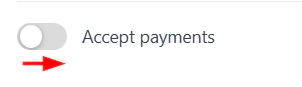
| **Accept payments** | Toggle to require payment at booking time |
***
## Quick-start setup
After selecting a type, you complete an **Initial Setup** with the core fields:
| Field | Description |
| ------------------------ | -------------------------------------------------- |
| **Calendar name** | Displayed on booking pages and confirmation emails |
| **Team member(s)** | Who is assigned to receive bookings |
| **Calendar URL** | The custom slug for the booking link |
| **Meeting duration** | Length of each appointment slot |
| **Booking availability** | Default days and times available for booking |
| **Accept payments** | Toggle to require payment at booking time |
 Click **Confirm** to save immediately, or click **Advanced Settings** for full configuration.
***
## Advanced settings tabs
All calendar types share the same five Advanced Settings sections.
### Meeting details
Configure what contacts see on the booking widget and in confirmation emails:
* **Calendar logo** — upload a brand image displayed on the booking page
* **Description** — context for what the appointment is about, visible to bookers
* **Calendar group** — assign this calendar to a group
* **Custom URL** — modify the booking link slug
* **Meeting invite title** — what appears in the calendar entry and confirmation email
* **Team member** — select who conducts the meeting
* **Meeting location** — physical address, Zoom/Google Meet/Teams link, phone number, or custom
* **Event color** — color code for the in-app calendar display
### Availability
Controls all timing and scheduling settings:
**Weekly available hours** — set which days and time ranges accept bookings by checking the day boxes and configuring start/end times.
**Date-specific hours** — override the regular schedule for specific dates. Use this to block holidays, add extended hours, or mark vacation days.
**Recurring meetings** — toggle on to create appointments that repeat on a schedule. Configure:
* **Frequency** — daily, weekly, or custom interval
* **Times to repeat** — total consecutive occurrences
* **Unavailable slot behavior** — skip the slot, book the next available slot, or continue regardless
**Appointment slot settings:**
| Setting | What it does |
| ----------------------------- | ---------------------------------------------------------------------------------------------- |
| **Meeting interval** | Gap between available time slots (e.g., 30-minute intervals show slots at 10:00, 10:30, 11:00) |
| **Meeting duration** | Length of each appointment in minutes or hours |
| **Minimum scheduling notice** | How far in advance a booking must be made |
| **Date range** | How far in advance contacts can book |
| **Max bookings per day** | Daily cap on this type of appointment |
| **Max bookings per slot** | Maximum concurrent bookings in a single slot |
| **Pre-buffer time** | Extra preparation time before an appointment |
| **Post-buffer time** | Wrap-up time after an appointment |
| **Seats per class** | (Class calendars only) Maximum attendees per slot |
**Look Busy** (round robin calendars): hides a configured percentage of available slots to create booking urgency.
### Forms and payment
**Select form** — choose the booking form contacts complete when scheduling.
**Consent checkbox** — adds a compliance opt-in checkbox that contacts must check before booking.
**Add guests** — allow the booker to invite additional attendees.
**Confirmation page** — configure what appears after a booking:
* **Default** — display a custom thank-you message
* **Redirect URL** — send the contact to a specific website
**Payment** — enable to collect fees at booking time. Options include:
* **Partial payment** — let the customer pay a deposit to secure the appointment
* **Per-attendee billing** — charge each attendee including guests (class calendars)
* **Coupon codes** — allow discount codes at checkout
### Notifications and additional options
**Notifications** — pre-written email and SMS notifications are included for:
* Booking confirmation
* Appointment reminders (configurable timing)
* Cancellations
* Rescheduling confirmations
**Assign contacts to team members** — when enabled, the contact is assigned to the team member who takes their booking.
**Reschedule policy** — toggle on to include a rescheduling link in confirmation emails.
**Cancellation policy** — toggle on to include a cancellation link.
### Customizations
**Calendar widget style** — select between the classic widget and the Neo widget.
**Color scheme** — customize button, date, time slot, and action colors.
**Button text** — personalize the call-to-action button label.
***
## Creating a round robin calendar
In the calendar type selection, choose **Round Robin**.
Click **Confirm** to save immediately, or click **Advanced Settings** for full configuration.
***
## Advanced settings tabs
All calendar types share the same five Advanced Settings sections.
### Meeting details
Configure what contacts see on the booking widget and in confirmation emails:
* **Calendar logo** — upload a brand image displayed on the booking page
* **Description** — context for what the appointment is about, visible to bookers
* **Calendar group** — assign this calendar to a group
* **Custom URL** — modify the booking link slug
* **Meeting invite title** — what appears in the calendar entry and confirmation email
* **Team member** — select who conducts the meeting
* **Meeting location** — physical address, Zoom/Google Meet/Teams link, phone number, or custom
* **Event color** — color code for the in-app calendar display
### Availability
Controls all timing and scheduling settings:
**Weekly available hours** — set which days and time ranges accept bookings by checking the day boxes and configuring start/end times.
**Date-specific hours** — override the regular schedule for specific dates. Use this to block holidays, add extended hours, or mark vacation days.
**Recurring meetings** — toggle on to create appointments that repeat on a schedule. Configure:
* **Frequency** — daily, weekly, or custom interval
* **Times to repeat** — total consecutive occurrences
* **Unavailable slot behavior** — skip the slot, book the next available slot, or continue regardless
**Appointment slot settings:**
| Setting | What it does |
| ----------------------------- | ---------------------------------------------------------------------------------------------- |
| **Meeting interval** | Gap between available time slots (e.g., 30-minute intervals show slots at 10:00, 10:30, 11:00) |
| **Meeting duration** | Length of each appointment in minutes or hours |
| **Minimum scheduling notice** | How far in advance a booking must be made |
| **Date range** | How far in advance contacts can book |
| **Max bookings per day** | Daily cap on this type of appointment |
| **Max bookings per slot** | Maximum concurrent bookings in a single slot |
| **Pre-buffer time** | Extra preparation time before an appointment |
| **Post-buffer time** | Wrap-up time after an appointment |
| **Seats per class** | (Class calendars only) Maximum attendees per slot |
**Look Busy** (round robin calendars): hides a configured percentage of available slots to create booking urgency.
### Forms and payment
**Select form** — choose the booking form contacts complete when scheduling.
**Consent checkbox** — adds a compliance opt-in checkbox that contacts must check before booking.
**Add guests** — allow the booker to invite additional attendees.
**Confirmation page** — configure what appears after a booking:
* **Default** — display a custom thank-you message
* **Redirect URL** — send the contact to a specific website
**Payment** — enable to collect fees at booking time. Options include:
* **Partial payment** — let the customer pay a deposit to secure the appointment
* **Per-attendee billing** — charge each attendee including guests (class calendars)
* **Coupon codes** — allow discount codes at checkout
### Notifications and additional options
**Notifications** — pre-written email and SMS notifications are included for:
* Booking confirmation
* Appointment reminders (configurable timing)
* Cancellations
* Rescheduling confirmations
**Assign contacts to team members** — when enabled, the contact is assigned to the team member who takes their booking.
**Reschedule policy** — toggle on to include a rescheduling link in confirmation emails.
**Cancellation policy** — toggle on to include a cancellation link.
### Customizations
**Calendar widget style** — select between the classic widget and the Neo widget.
**Color scheme** — customize button, date, time slot, and action colors.
**Button text** — personalize the call-to-action button label.
***
## Creating a round robin calendar
In the calendar type selection, choose **Round Robin**.
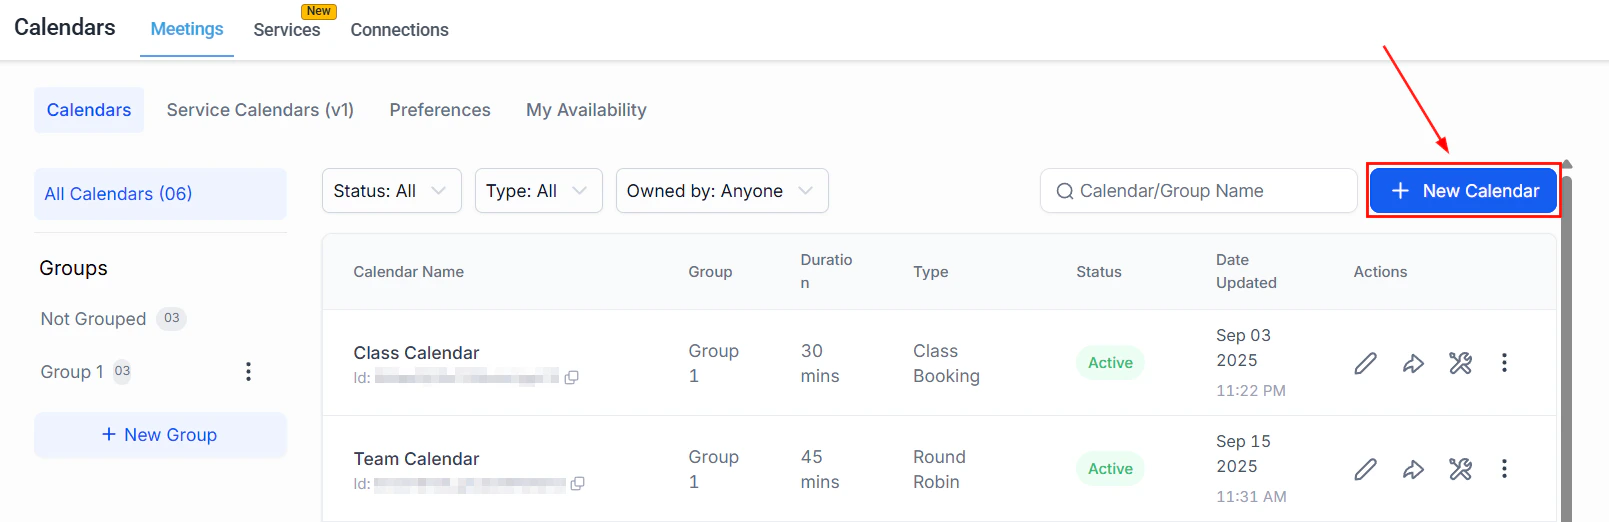 Select all users who will receive bookings from this calendar.
 Under **Appointment Distribution**, choose:
* **Optimize for availability** — assign to the highest-priority available user
* **Optimize for equal distribution** — assign randomly to balance workloads
Under **Appointment Distribution**, choose:
* **Optimize for availability** — assign to the highest-priority available user
* **Optimize for equal distribution** — assign randomly to balance workloads
 In **Advanced Settings > Meeting Details > Advanced Settings**, configure:
* **Reschedule preference** — keep the same team member or reassign at random
* **New appointment preference** — auto-assign to the contact's assigned user
Set availability hours, duration, buffer times, and notification settings. Click **Save**.
***
## Creating a class calendar
Choose **Class Booking** as the calendar type.
Enter the maximum number of attendees per slot. This can also be configured in **Advanced Settings > Availability > Seats Per Class**.
Set available hours, duration, notifications, and payment options. Enable **Seats Per Slot** in Customizations to show remaining spots on the booking widget. Click **Save**.
***
## Creating a collective booking calendar
Choose **Collective Booking** as the calendar type.
Add all team members who must be simultaneously available for a slot to be bookable.
Click **Confirm**. To set the primary owner, edit the calendar and click **Make Owner** next to the team member who should lead appointments.
Click **Save** after completing all settings.
***
## Creating a calendar schedule
Calendar schedules let you define a reusable availability template and apply it across multiple calendars.
In **Calendar Settings**, switch to the **My Availability** tab.
Choose which user the schedule is for.
Click **+ Create Schedule** next to Work Hours. Enter a name and click **Create**.
Select a timezone. Check the boxes next to available days and set start/end times.
Click **+ Add Date Specific Hours** for holidays or irregular days.
Scroll to the top of the schedule and select the calendars you want this schedule applied to.
Click **Save Changes**.
***
## Sharing your calendar
To share your booking link or embed code, click the **share icon** (arrow pointing out) in the top right of the calendar editor. This opens a module with:
* **Direct link** — copy the booking URL
* **Embed code** — copy the iframe snippet to add to a website or funnel
Clicking the share button automatically saves any unsaved changes to the calendar URL, team member selection, and meeting locations.
***
## Troubleshooting calendar availability
Click the **tools icon** in the calendar editor to open the Troubleshooting view. This runs a live diagnostic to check availability configuration and flag any issues that may prevent bookings.
In **Advanced Settings > Meeting Details > Advanced Settings**, configure:
* **Reschedule preference** — keep the same team member or reassign at random
* **New appointment preference** — auto-assign to the contact's assigned user
Set availability hours, duration, buffer times, and notification settings. Click **Save**.
***
## Creating a class calendar
Choose **Class Booking** as the calendar type.
Enter the maximum number of attendees per slot. This can also be configured in **Advanced Settings > Availability > Seats Per Class**.
Set available hours, duration, notifications, and payment options. Enable **Seats Per Slot** in Customizations to show remaining spots on the booking widget. Click **Save**.
***
## Creating a collective booking calendar
Choose **Collective Booking** as the calendar type.
Add all team members who must be simultaneously available for a slot to be bookable.
Click **Confirm**. To set the primary owner, edit the calendar and click **Make Owner** next to the team member who should lead appointments.
Click **Save** after completing all settings.
***
## Creating a calendar schedule
Calendar schedules let you define a reusable availability template and apply it across multiple calendars.
In **Calendar Settings**, switch to the **My Availability** tab.
Choose which user the schedule is for.
Click **+ Create Schedule** next to Work Hours. Enter a name and click **Create**.
Select a timezone. Check the boxes next to available days and set start/end times.
Click **+ Add Date Specific Hours** for holidays or irregular days.
Scroll to the top of the schedule and select the calendars you want this schedule applied to.
Click **Save Changes**.
***
## Sharing your calendar
To share your booking link or embed code, click the **share icon** (arrow pointing out) in the top right of the calendar editor. This opens a module with:
* **Direct link** — copy the booking URL
* **Embed code** — copy the iframe snippet to add to a website or funnel
Clicking the share button automatically saves any unsaved changes to the calendar URL, team member selection, and meeting locations.
***
## Troubleshooting calendar availability
Click the **tools icon** in the calendar editor to open the Troubleshooting view. This runs a live diagnostic to check availability configuration and flag any issues that may prevent bookings.