> ## Documentation Index
> Fetch the complete documentation index at: https://help.hoopai.com/llms.txt
> Use this file to discover all available pages before exploring further.
# Calendar settings
> Configure availability, integrations, notifications, payment collection, groups, booking links, and compliance settings for your Hoop calendars.
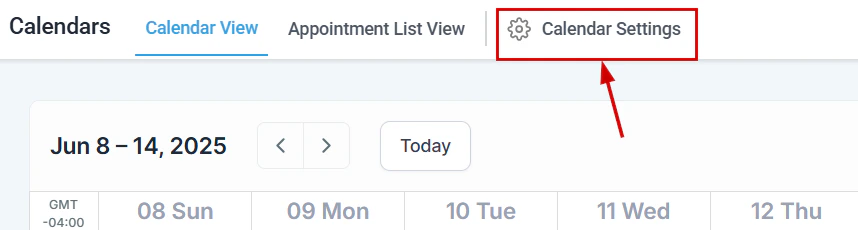
Calendar Settings is the control center for all calendar configuration — from availability and sync integrations to payment collection, notifications, groups, and compliance. Access it from **Calendars > Calendar Settings**.
 ## Availability and slot settings
Each calendar has its own availability configuration. Navigate to a calendar's **Advanced Settings > Availability** tab to configure:
| Setting | Description |
| ----------------------------- | ---------------------------------------------- |
| **Available days** | Which days of the week accept bookings |
| **Available hours** | Start and end times for each available day |
| **Meeting interval** | Gap between bookable time slots (e.g., 30 min) |
| **Meeting duration** | Length of each appointment |
| **Pre-buffer time** | Preparation time before each appointment |
| **Post-buffer time** | Wrap-up time after each appointment |
| **Minimum scheduling notice** | How far in advance a booking must be made |
| **Date range** | How far in advance contacts can book |
| **Max bookings per day** | Daily cap on appointments |
| **Max bookings per slot** | Concurrent bookings allowed per time slot |
Use **Date-Specific Hours** to override the weekly schedule for specific dates — holidays, extended hours, or blocked periods.
***
## Calendar connections (integrations)
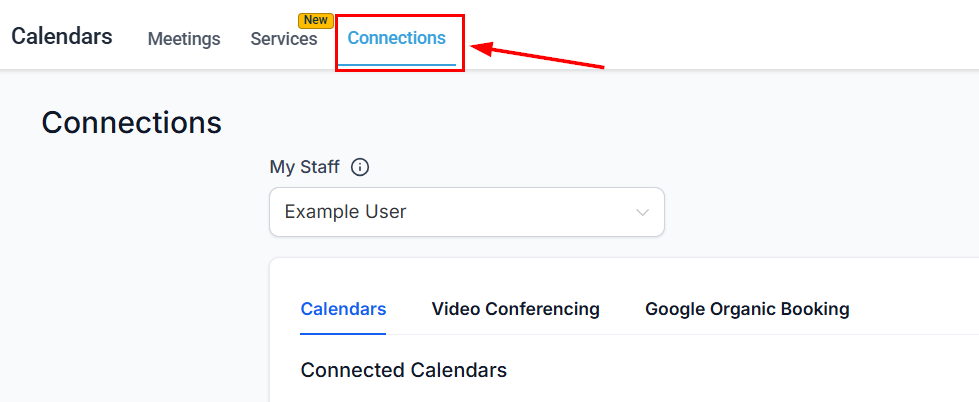
Connect external calendar services so appointments sync automatically. Navigate to a calendar's **Advanced Settings > Connections** tab.
## Availability and slot settings
Each calendar has its own availability configuration. Navigate to a calendar's **Advanced Settings > Availability** tab to configure:
| Setting | Description |
| ----------------------------- | ---------------------------------------------- |
| **Available days** | Which days of the week accept bookings |
| **Available hours** | Start and end times for each available day |
| **Meeting interval** | Gap between bookable time slots (e.g., 30 min) |
| **Meeting duration** | Length of each appointment |
| **Pre-buffer time** | Preparation time before each appointment |
| **Post-buffer time** | Wrap-up time after each appointment |
| **Minimum scheduling notice** | How far in advance a booking must be made |
| **Date range** | How far in advance contacts can book |
| **Max bookings per day** | Daily cap on appointments |
| **Max bookings per slot** | Concurrent bookings allowed per time slot |
Use **Date-Specific Hours** to override the weekly schedule for specific dates — holidays, extended hours, or blocked periods.
***
## Calendar connections (integrations)
Connect external calendar services so appointments sync automatically. Navigate to a calendar's **Advanced Settings > Connections** tab.
 ### Google Calendar
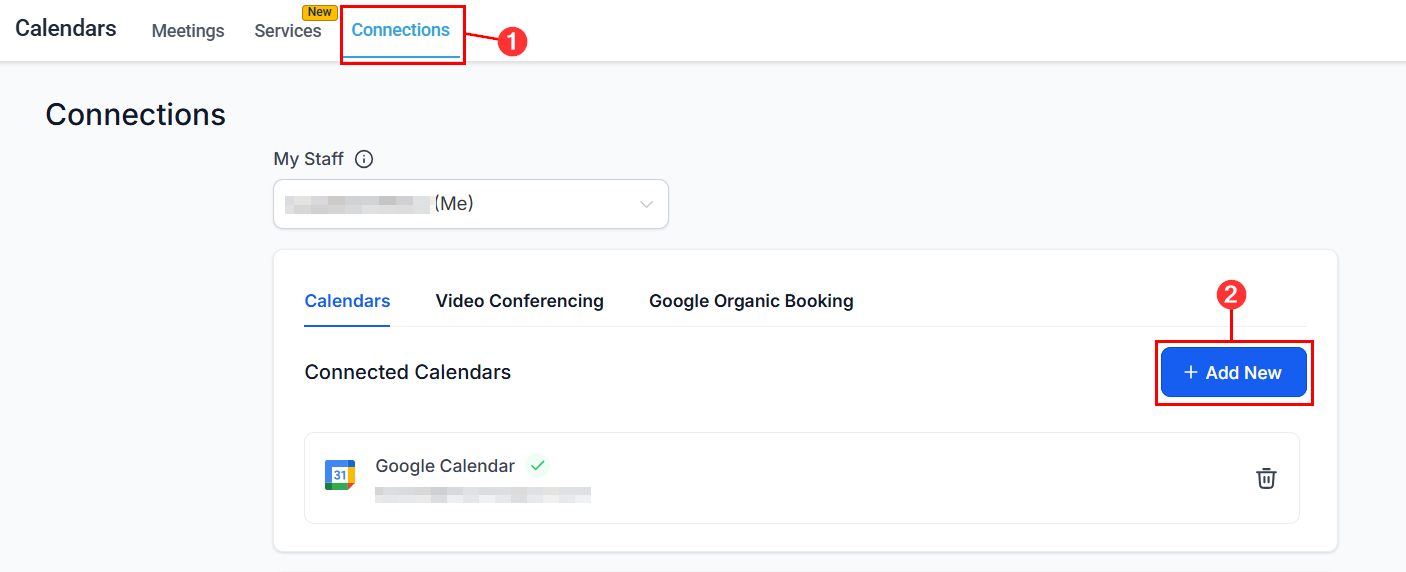
Open the calendar's Connections tab and click **Connect Google Calendar**.
### Google Calendar
Open the calendar's Connections tab and click **Connect Google Calendar**.
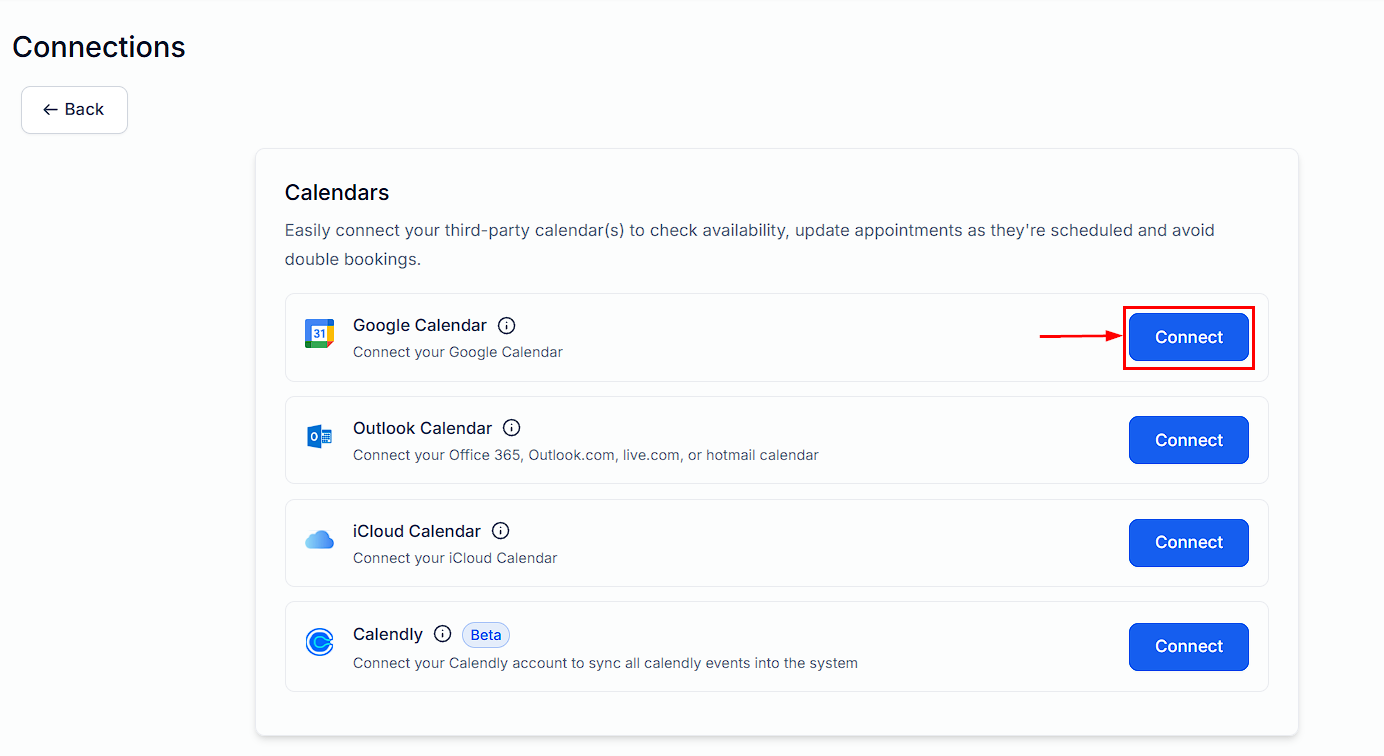 Sign in to your Google account and grant the required permissions.
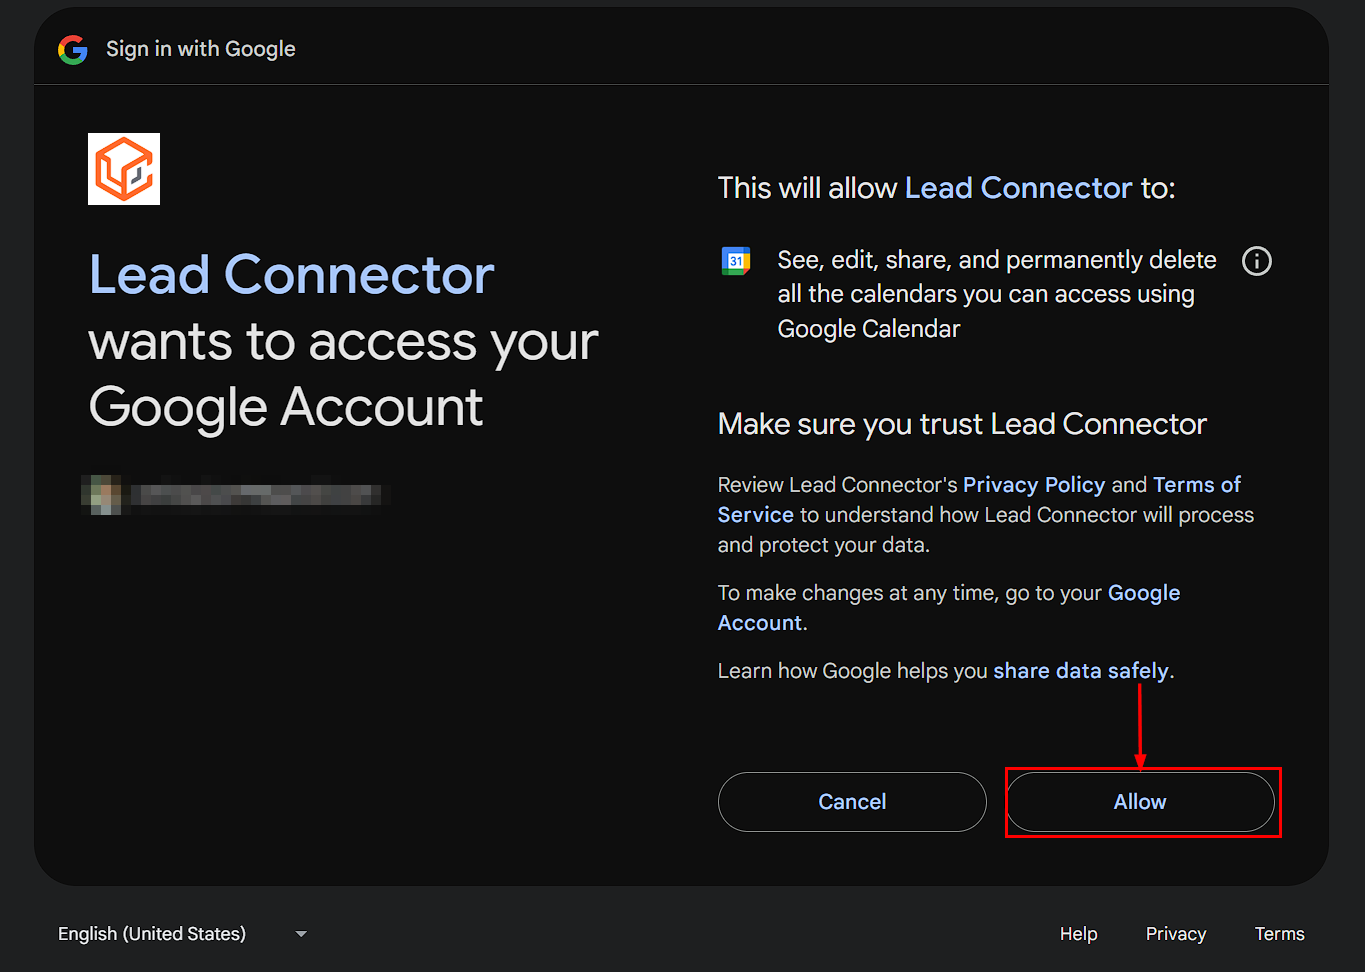 Choose which Google Calendar to sync appointments to and from.
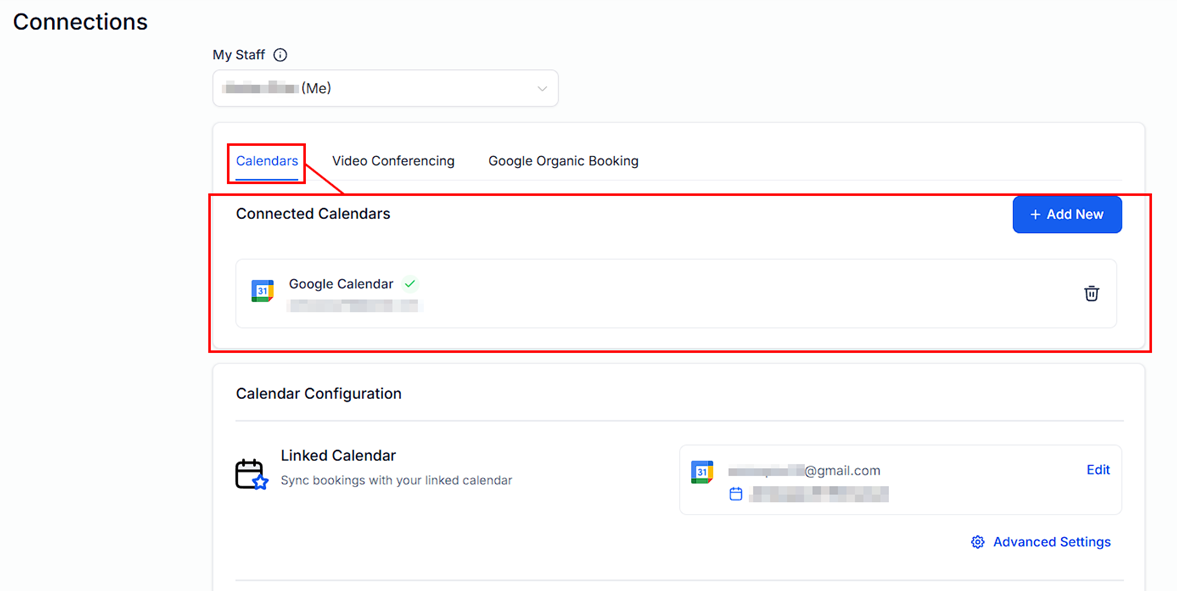 Set any additional configuration options, then click **Save**.
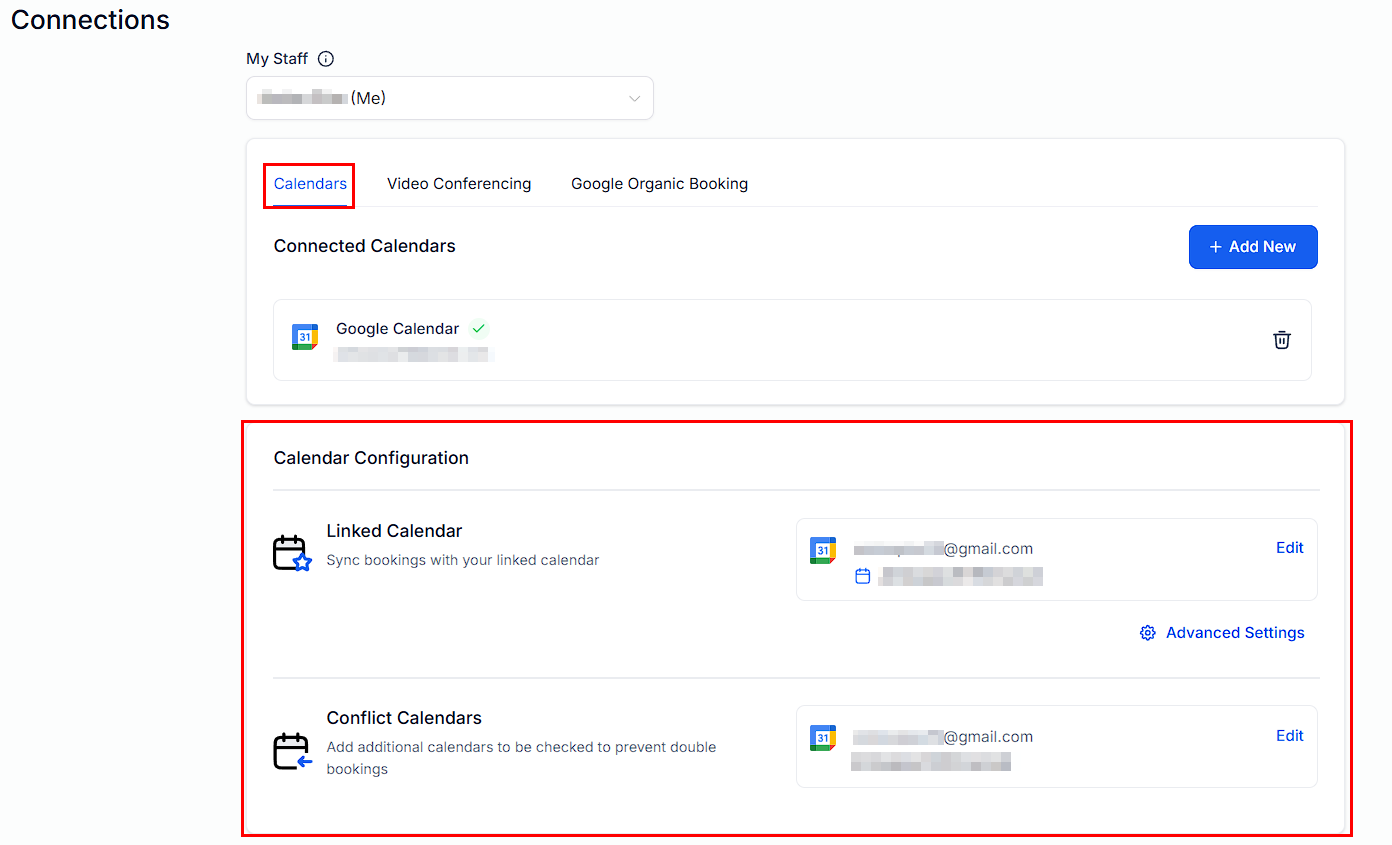 Appointments now sync bi-directionally — changes in Hoop appear in Google Calendar and vice versa.
### Zoom
In the Connections tab, click **Connect Zoom**.
Appointments now sync bi-directionally — changes in Hoop appear in Google Calendar and vice versa.
### Zoom
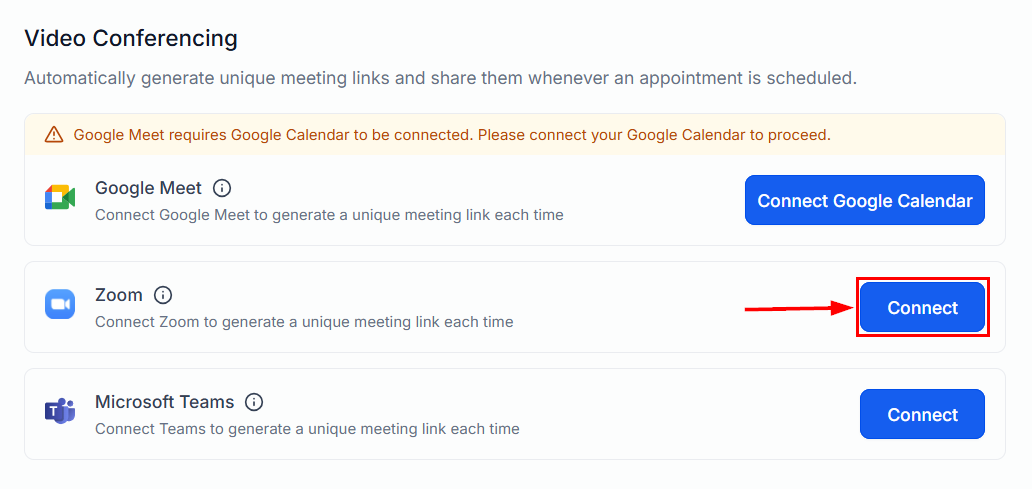
In the Connections tab, click **Connect Zoom**.
 Click **Connect** and authorize with your Zoom account.
 Review and allow the required Zoom permissions.
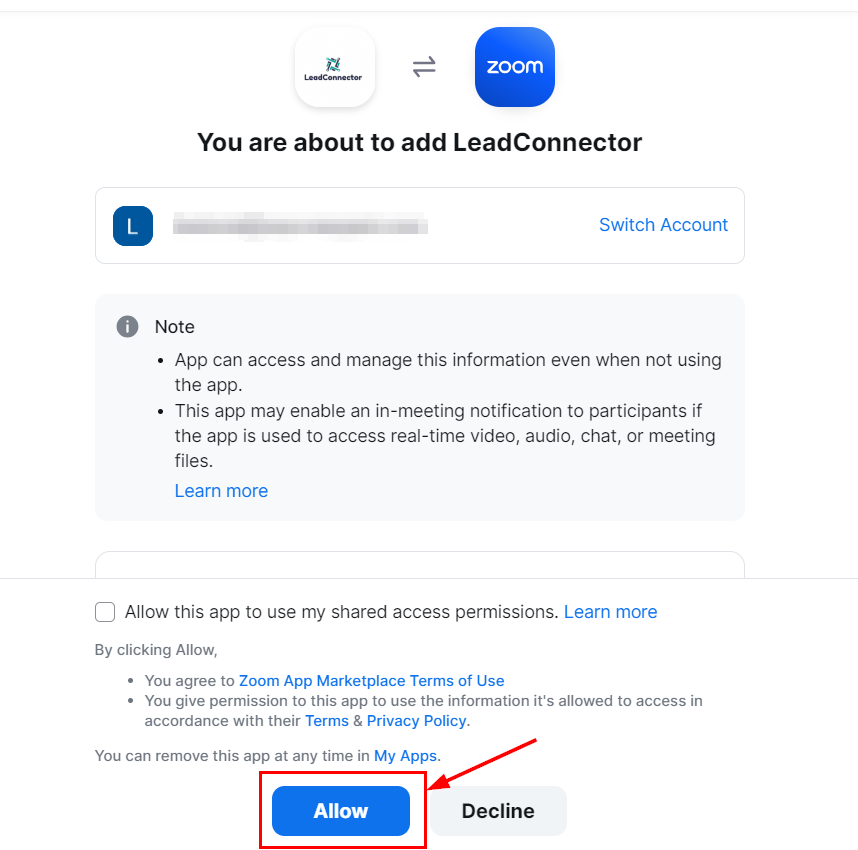 Click **Save**. New appointments will automatically include a unique Zoom meeting link.
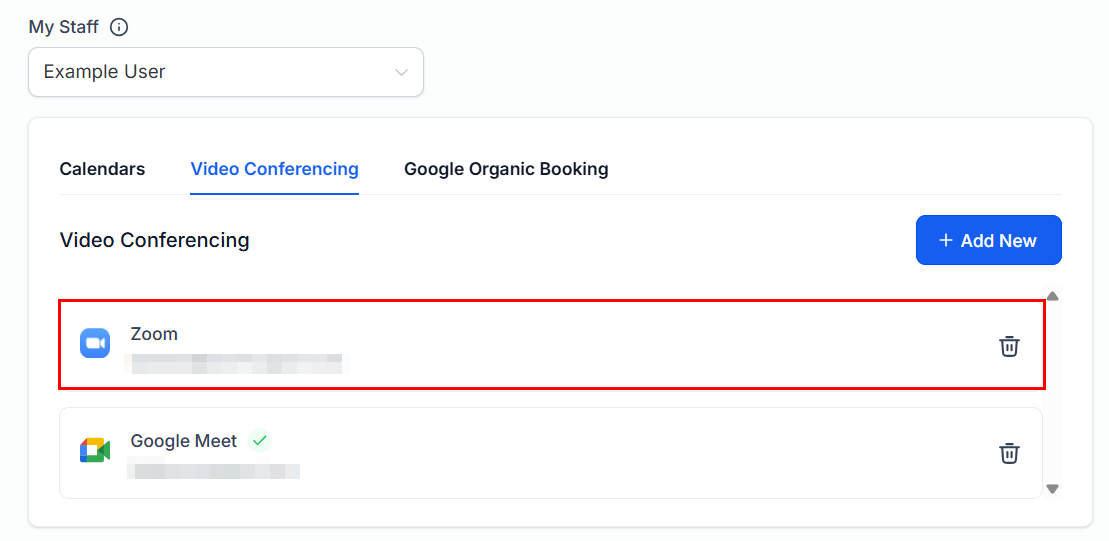 ### Microsoft Teams
In the Connections tab, click **Connect Microsoft Teams**.
### Microsoft Teams
In the Connections tab, click **Connect Microsoft Teams**.
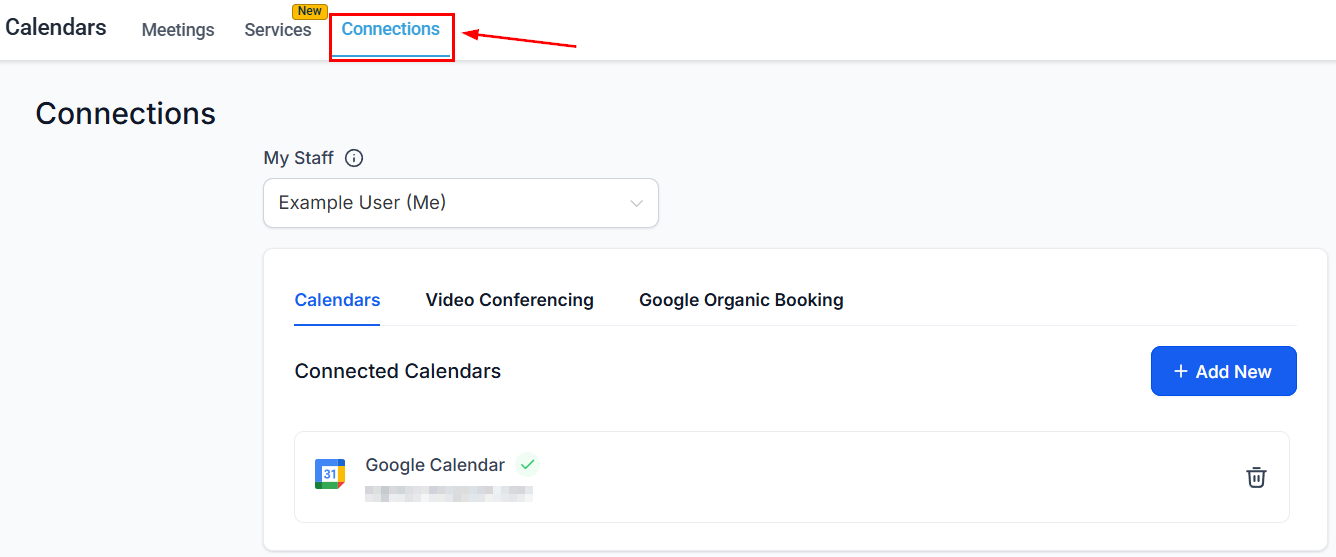 Click the **Connect** button to initiate the Microsoft authorization flow.
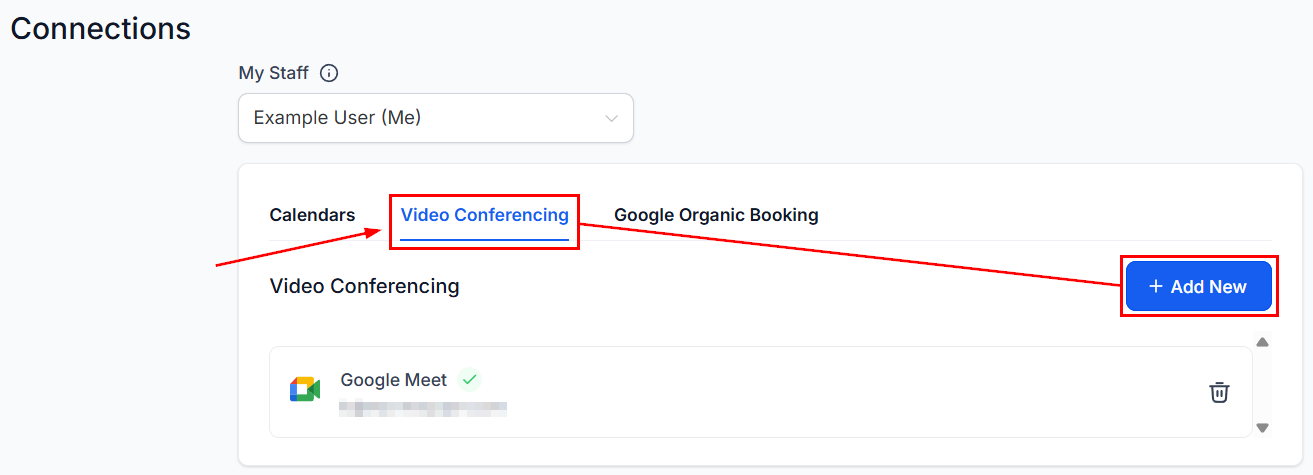 Sign in with your Microsoft account and grant permissions.
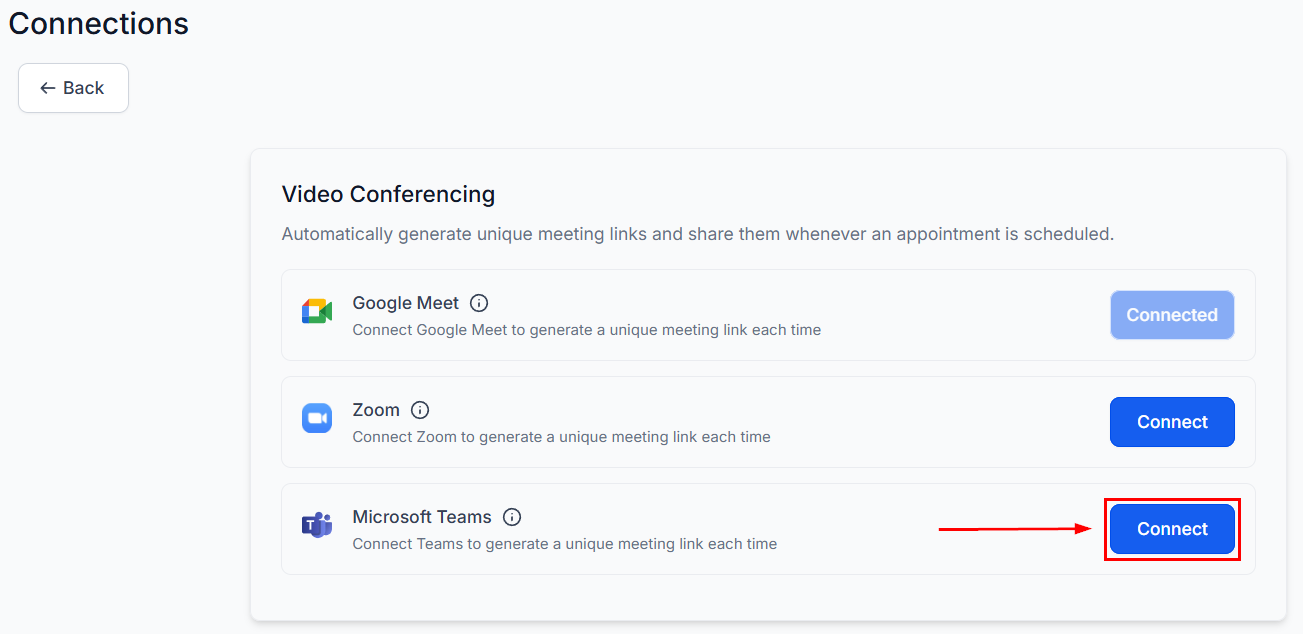 Click **Save**. New appointments will include a Teams meeting link.
### iCloud Calendar
Visit appleid.apple.com and sign in with your Apple ID.
Click **Save**. New appointments will include a Teams meeting link.
### iCloud Calendar
Visit appleid.apple.com and sign in with your Apple ID.
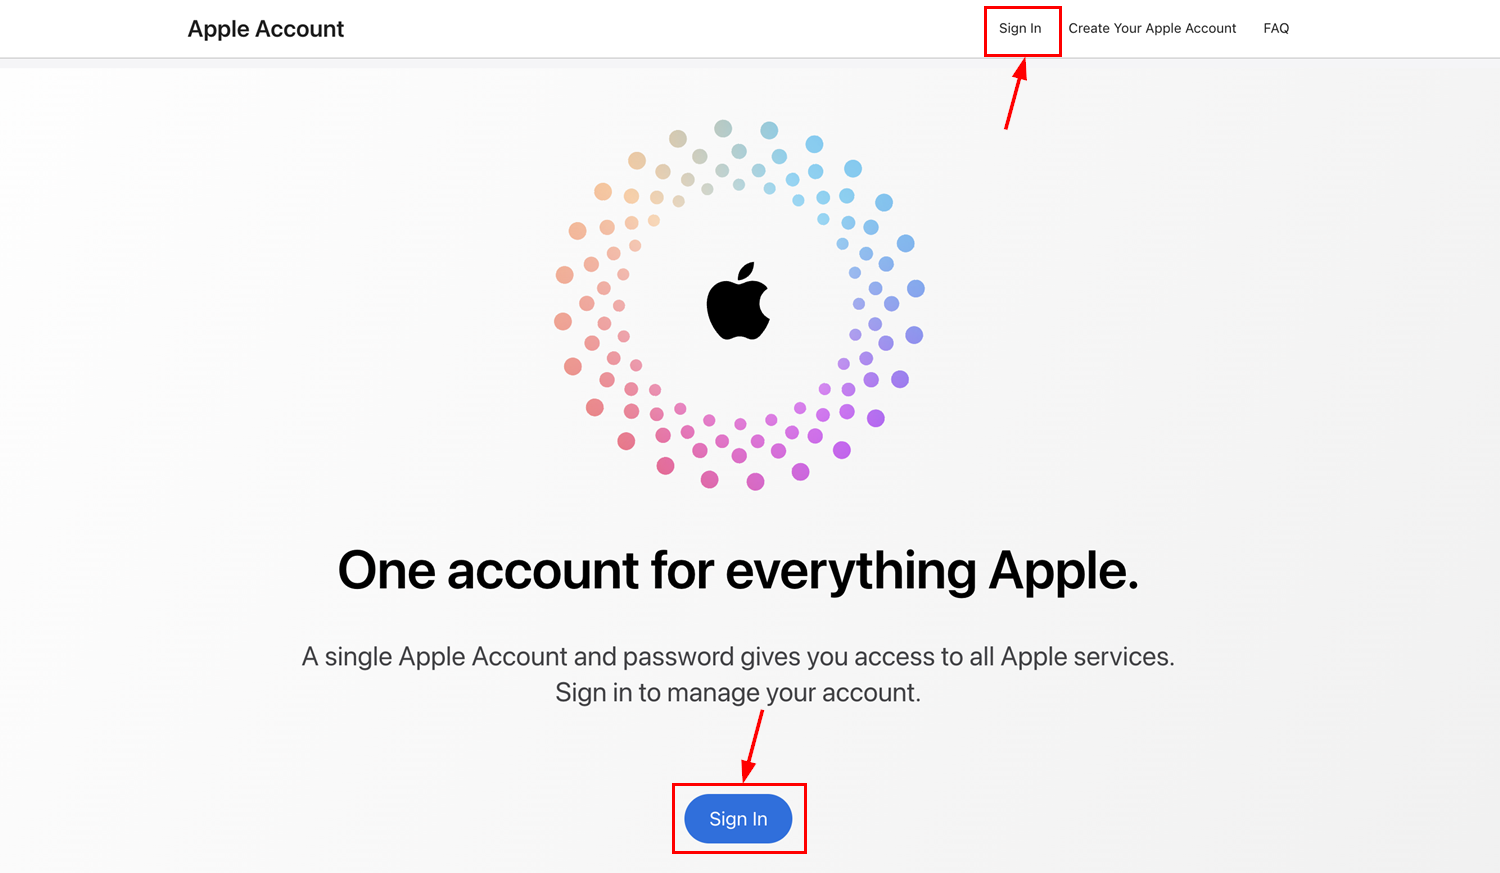 Enter the Apple ID email associated with your iCloud calendar.
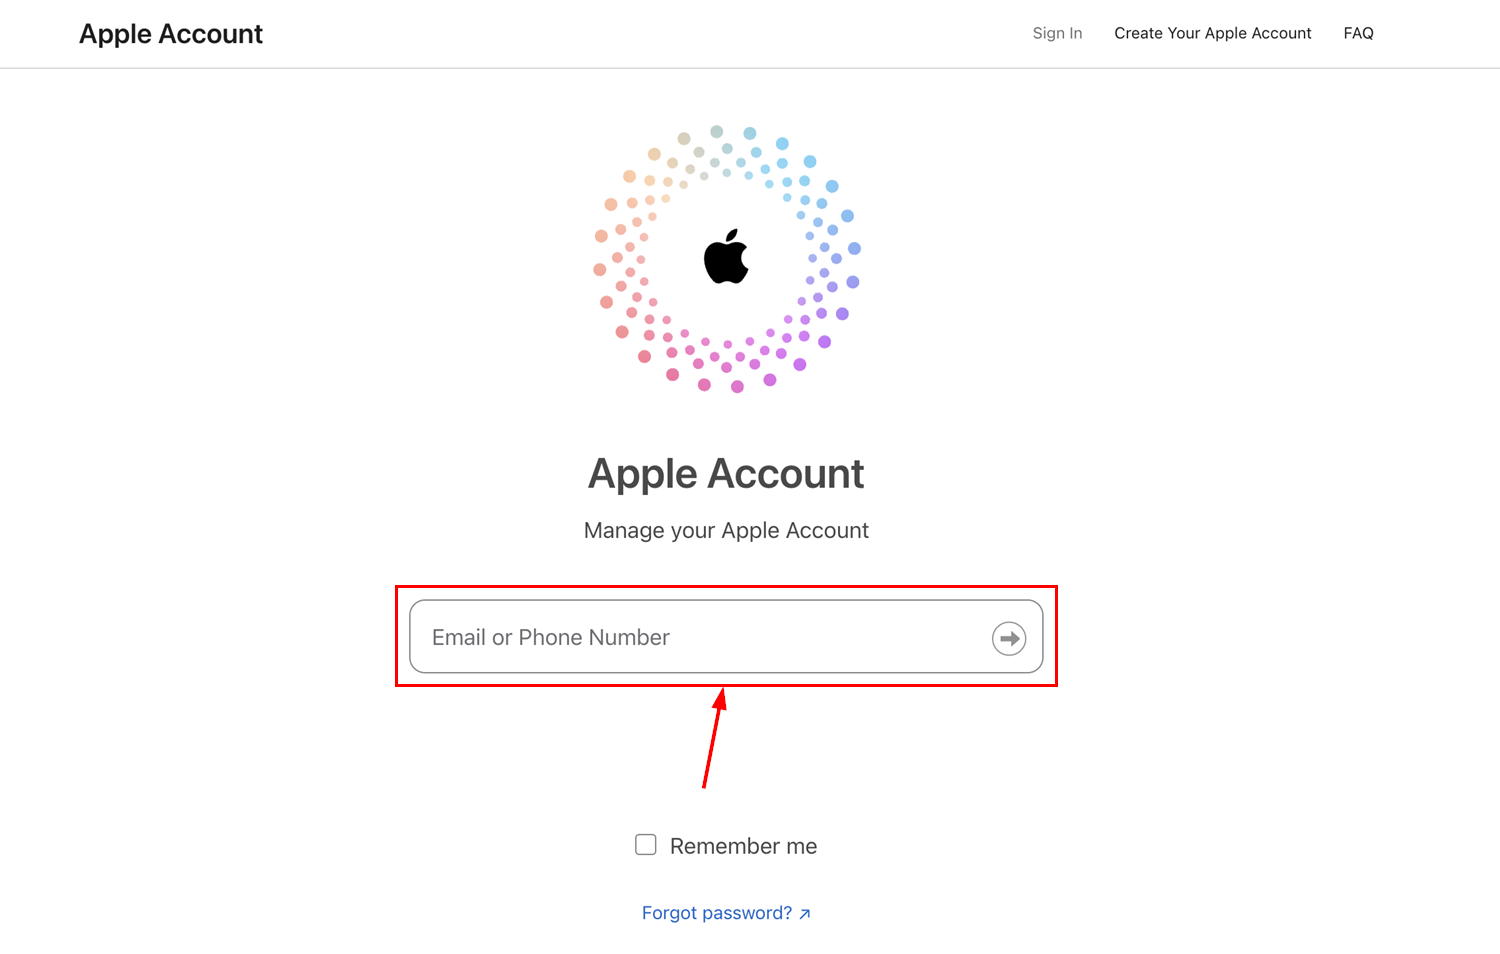 Enter the verification code sent to your trusted device.
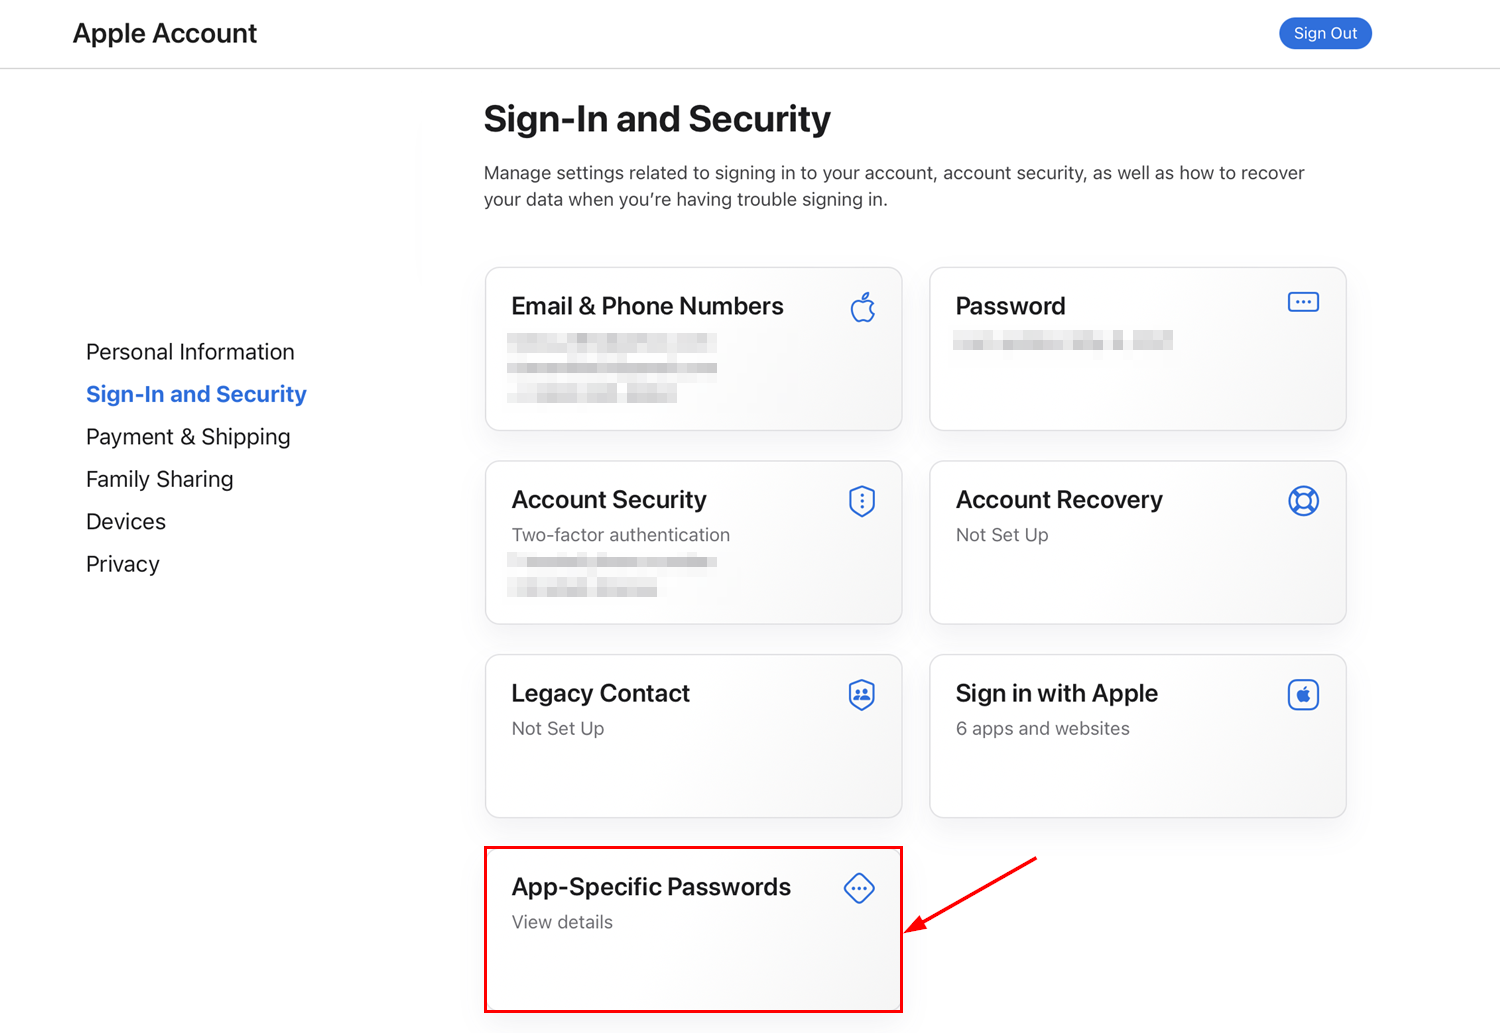
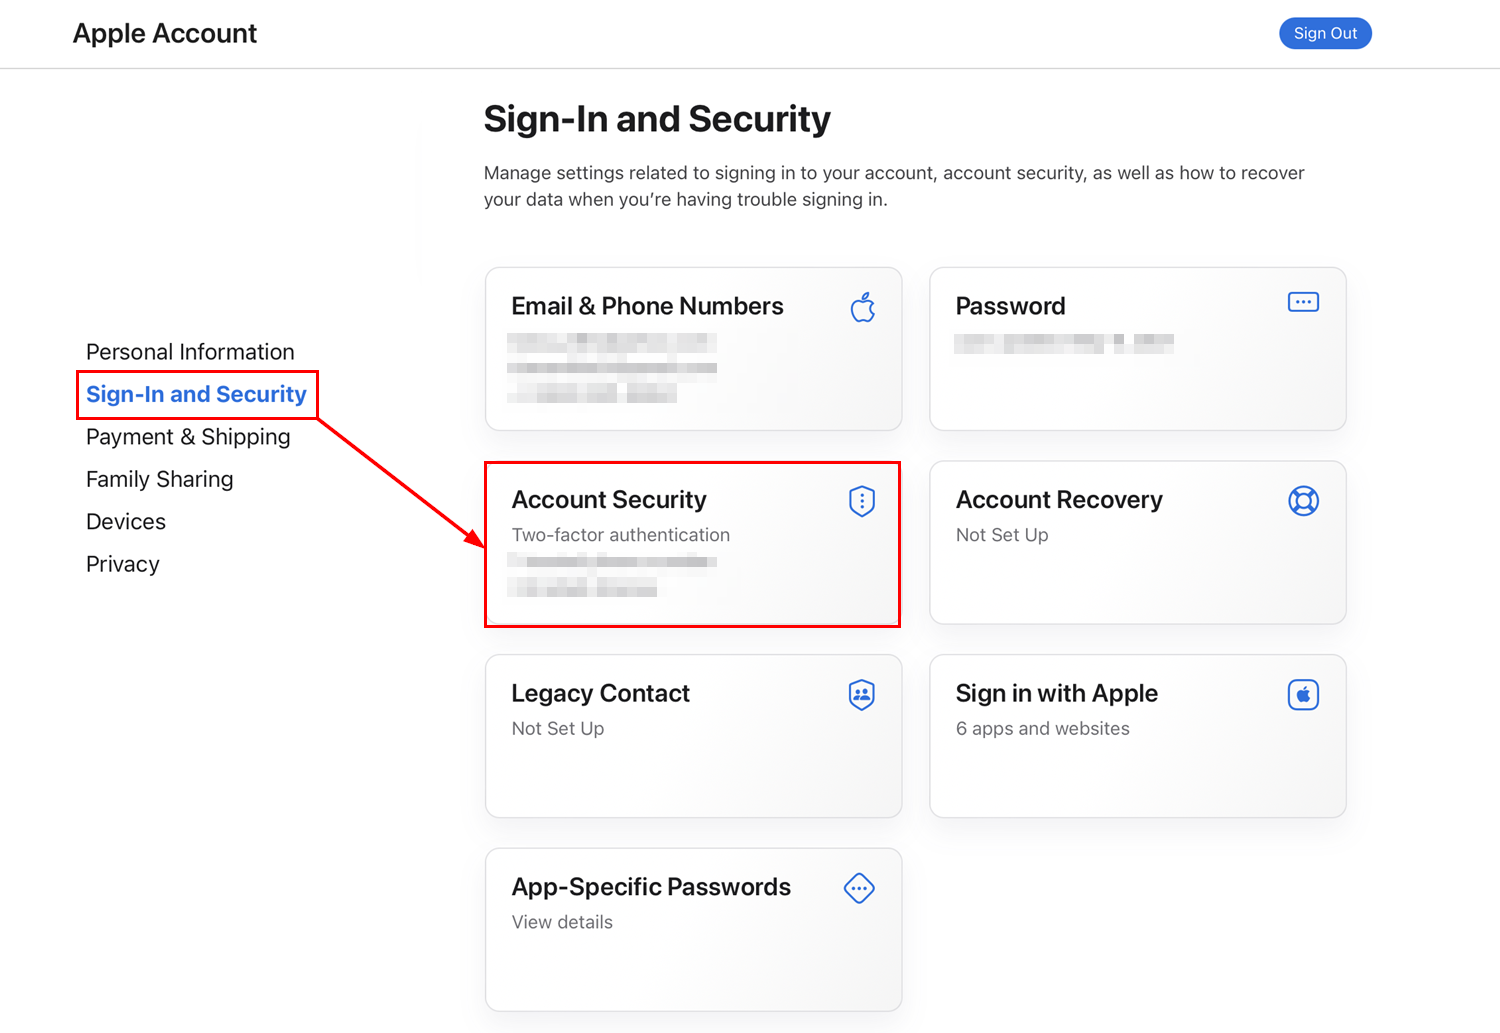 In your Apple ID settings, navigate to Sign-In & Security and create an app-specific password for Hoop.
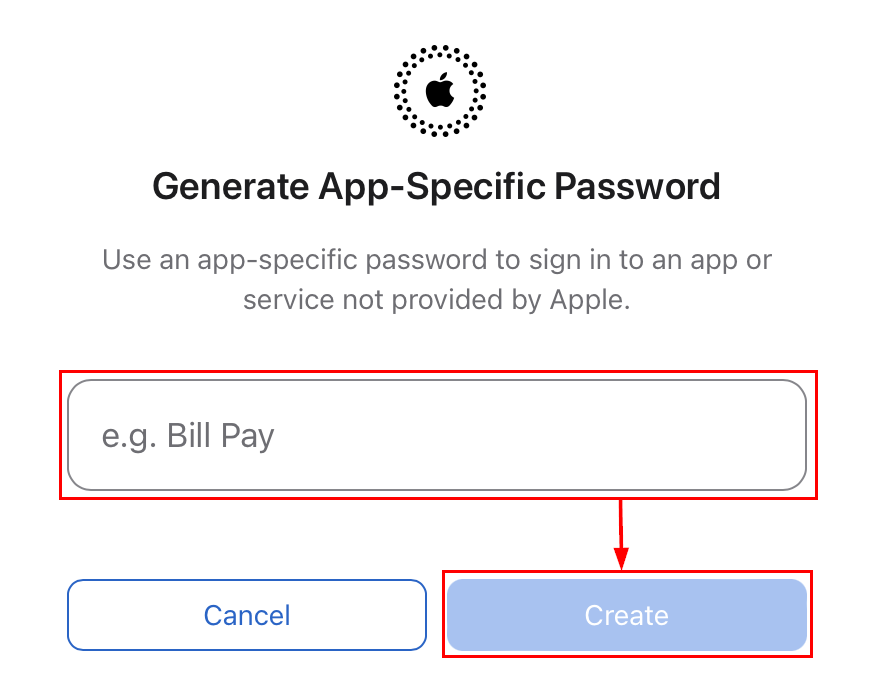
 Name the password (e.g., "Hoop Calendar") and click **Create**. Copy the generated password.
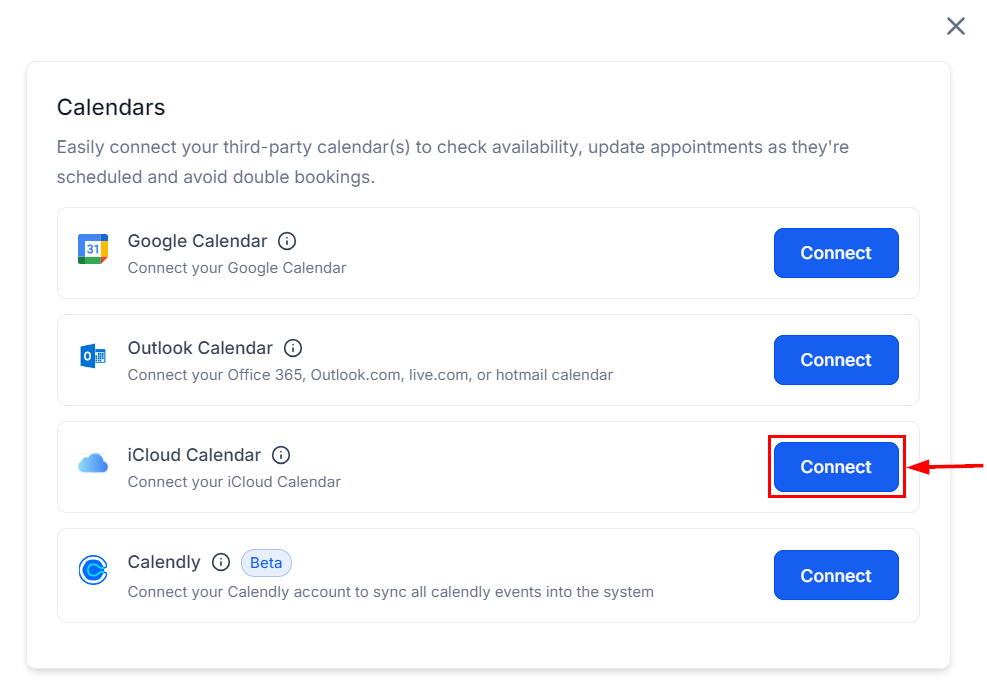
 In the Hoop Connections tab, select **iCloud**. Enter your Apple ID and the app-specific password. Click **Connect**.
 ### Calendly
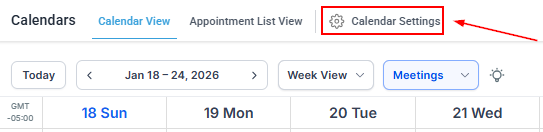
Navigate to **Calendar Settings** and click on **Calendar Connections**.
### Calendly
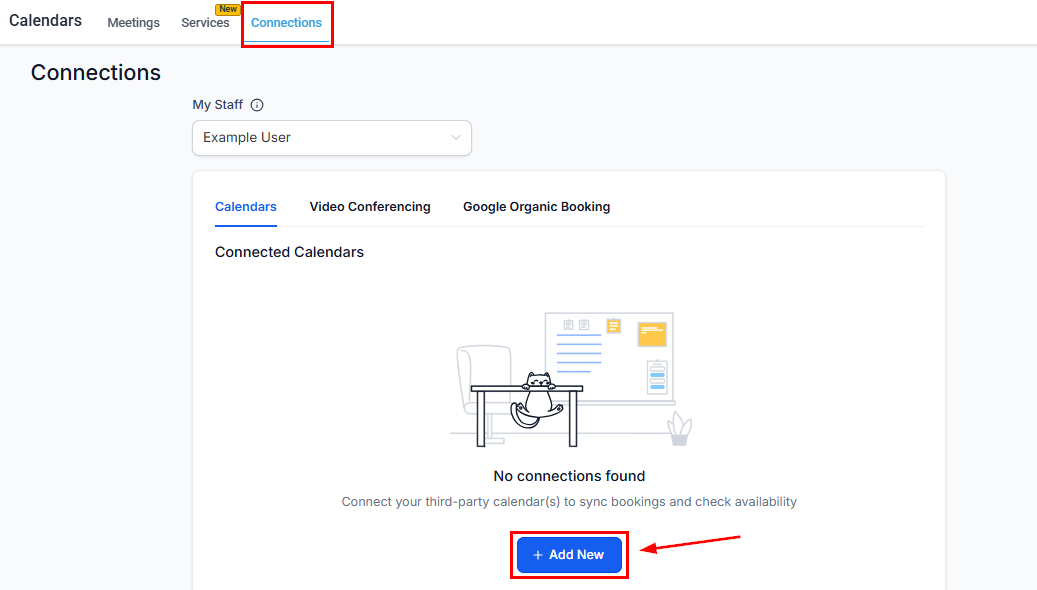
Navigate to **Calendar Settings** and click on **Calendar Connections**.
 Click **+ Add New** to open the integration options.
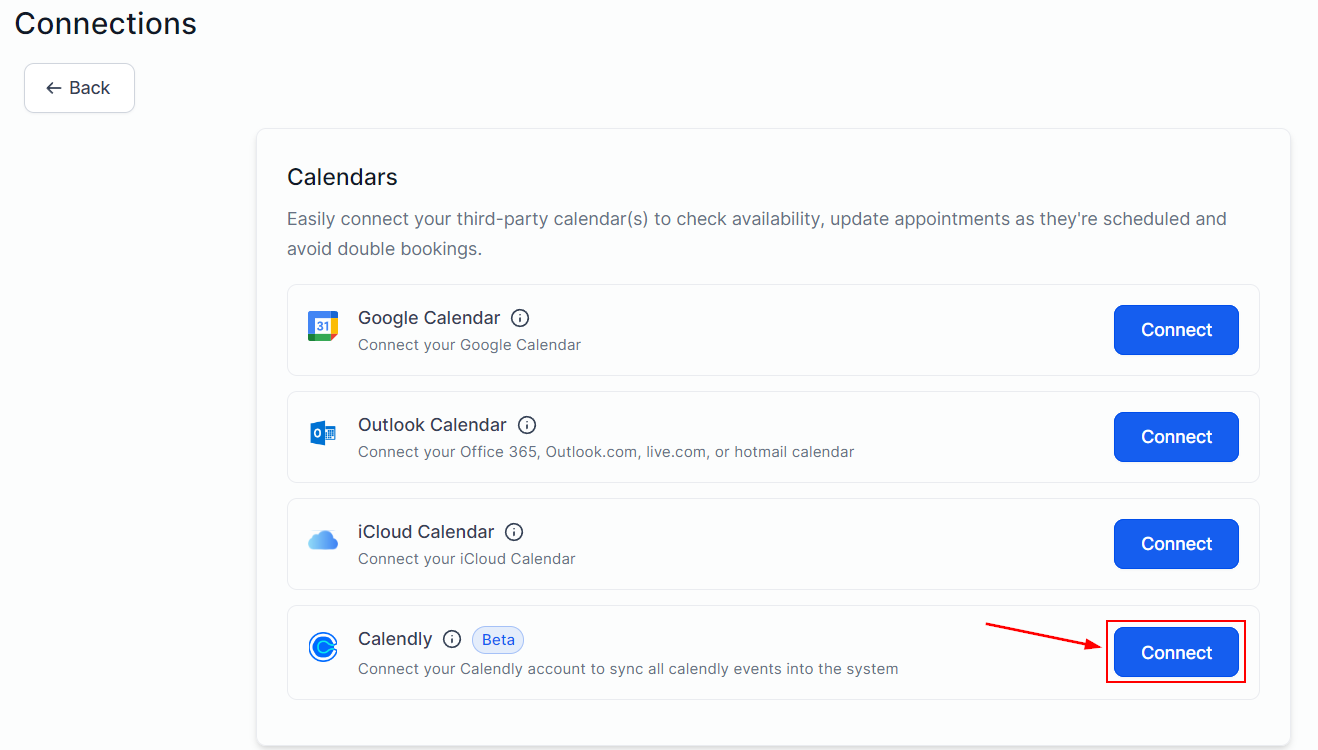
 Choose **Calendly** from the list and click **Connect**. Authenticate with your Calendly account.
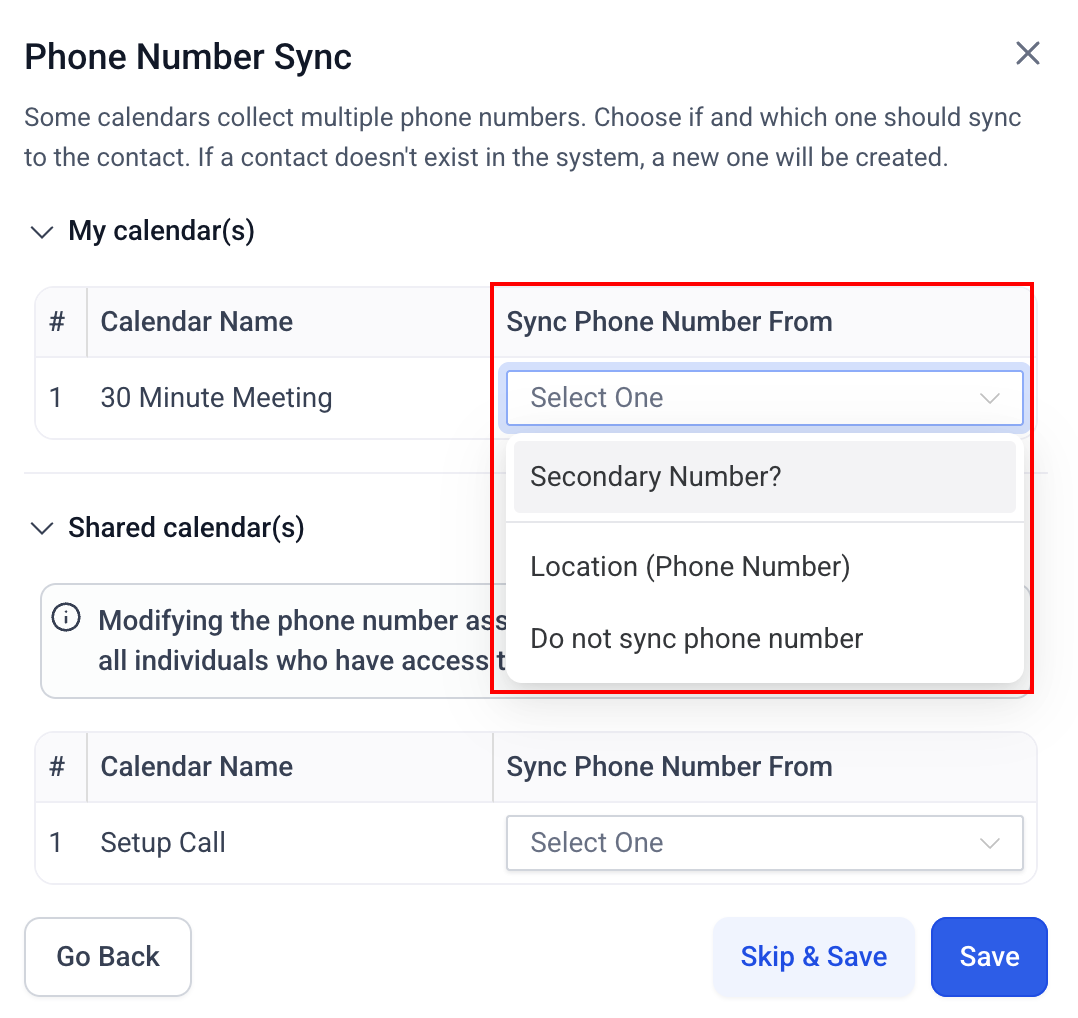
 After connecting, review the number of events being synced from your Calendly account.
 ***
## Calendar groups
Calendar groups bundle multiple calendars into a single shared booking page.
In Calendar Settings, click **+ New Group**. Enter a group name, URL slug, and optional description. Click **Create**.
From the calendar list, click the three-dot menu next to a calendar and select **Move to Group**. Choose the group and confirm.
Each calendar can only belong to one group at a time. To deactivate all calendars in a group at once, use the **Deactivate all calendars in group** option from the group's action dropdown.
***
## Enabling and disabling a calendar
Navigate to **Calendar Settings** and find the calendar in the list.
Click the **Active/Inactive** toggle on the calendar card. Disabled calendars stop accepting new bookings but retain all existing appointments and configuration.
***
## Accepting payments at booking
Enable payment collection so contacts pay when they book:
Navigate to the calendar and go to **Advanced Settings > Forms & Payment**.
Toggle on **Payment** and connect a payment provider if not already connected.
* **Full payment** — charge the full amount at booking
* **Partial payment / deposit** — let customers pay a fraction to secure the slot
* **Per-attendee billing** — charge each attendee including guests (class calendars)
* **Coupon codes** — allow discount codes at checkout
Click **Save**. The booking form now includes a payment step.
***
## One-time booking links
One-time booking links expire after a single use — ideal for sending to a specific contact without making the link reusable.
Open the calendar you want to create a one-time link for.
Find the **One-Time Booking Links** option and click **+ Create Link**.
Copy the generated link and send it to the contact. It expires after one use.
***
## Google organic booking
Enable Google Organic Booking to let contacts book directly from your Google Business Profile:
Navigate to the calendar you want to list on Google.
***
## Calendar groups
Calendar groups bundle multiple calendars into a single shared booking page.
In Calendar Settings, click **+ New Group**. Enter a group name, URL slug, and optional description. Click **Create**.
From the calendar list, click the three-dot menu next to a calendar and select **Move to Group**. Choose the group and confirm.
Each calendar can only belong to one group at a time. To deactivate all calendars in a group at once, use the **Deactivate all calendars in group** option from the group's action dropdown.
***
## Enabling and disabling a calendar
Navigate to **Calendar Settings** and find the calendar in the list.
Click the **Active/Inactive** toggle on the calendar card. Disabled calendars stop accepting new bookings but retain all existing appointments and configuration.
***
## Accepting payments at booking
Enable payment collection so contacts pay when they book:
Navigate to the calendar and go to **Advanced Settings > Forms & Payment**.
Toggle on **Payment** and connect a payment provider if not already connected.
* **Full payment** — charge the full amount at booking
* **Partial payment / deposit** — let customers pay a fraction to secure the slot
* **Per-attendee billing** — charge each attendee including guests (class calendars)
* **Coupon codes** — allow discount codes at checkout
Click **Save**. The booking form now includes a payment step.
***
## One-time booking links
One-time booking links expire after a single use — ideal for sending to a specific contact without making the link reusable.
Open the calendar you want to create a one-time link for.
Find the **One-Time Booking Links** option and click **+ Create Link**.
Copy the generated link and send it to the contact. It expires after one use.
***
## Google organic booking
Enable Google Organic Booking to let contacts book directly from your Google Business Profile:
Navigate to the calendar you want to list on Google.
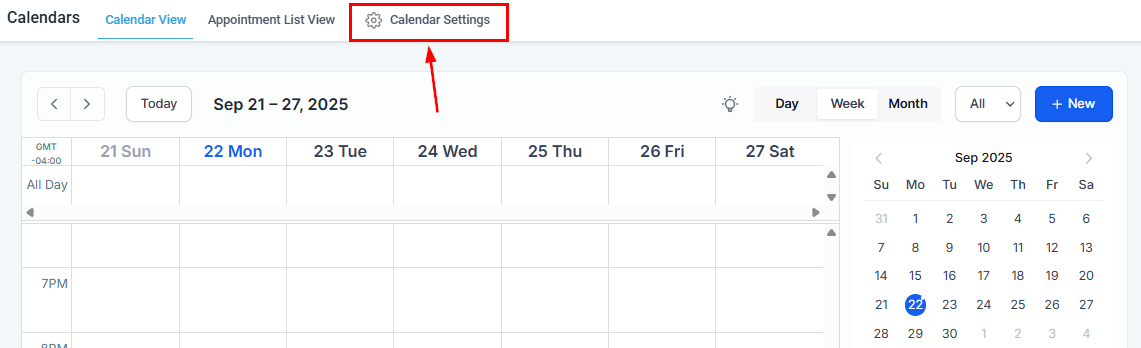 Find and toggle on **Google Organic Booking** in the calendar settings.
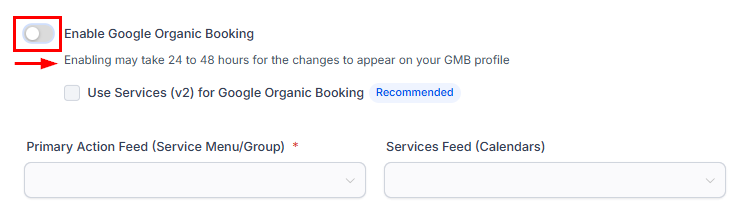
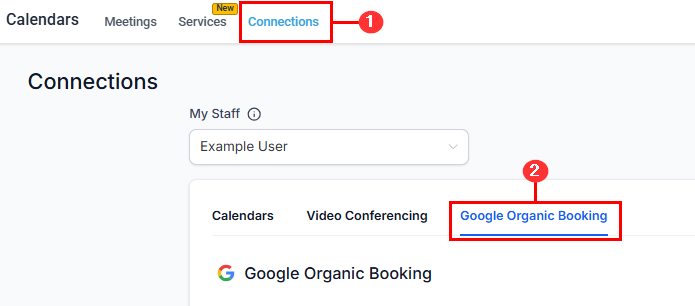 Toggle the setting to enabled and configure the services to display.
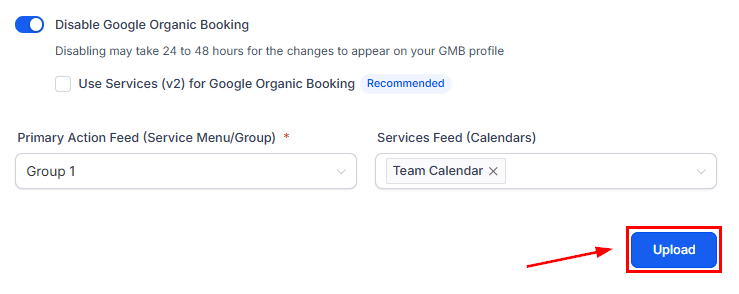
 Upload the required images and business information for your Google Business Profile listing.
 ***
## Staff member selection in round robin calendars
By default in round robin calendars, the system assigns the team member. To let bookers choose their own:
Go to **Advanced Settings > Customizations** and toggle on **Staff Selection**. Contacts will see a staff selector on the booking widget.
***
## SMS compliance consent checkbox
Add a required consent checkbox to booking forms for SMS marketing compliance:
Go to **Advanced Settings > Forms & Payment** and toggle on **Consent Checkbox**. Contacts must check this box before completing their booking.
***
## Customizing notifications
Go to **Advanced Settings > Notifications & Additional Options** to customize:
* **Appointment confirmation** — sent immediately after booking
* **Appointment reminders** — configure timing (e.g., 24 hours before, 1 hour before)
* **Cancellation notices** — sent when an appointment is cancelled
* **Rescheduling updates** — sent when an appointment is moved
***
## Restore deleted calendars
If a calendar is accidentally deleted, you can restore it within 30 days:
1. Go to **Calendar Settings** and click the **Trash** icon or **Deleted Calendars** tab
2. Find the deleted calendar in the list
3. Click **Restore** to bring it back with all its original settings, appointments, and configuration
Calendars in the trash are permanently removed after 30 days and cannot be recovered. Restore promptly if deletion was unintentional.
***
## View calendar in user timezone
By default, calendars display times in the account's timezone. To view and manage appointments in your personal timezone:
1. Click the **timezone selector** in the top-right corner of the calendar view
2. Select your preferred timezone
3. All appointment times adjust to reflect the selected timezone
This setting is personal and does not affect how contacts see available slots on the booking page — contacts always see slots in their own detected timezone.
***
## Multiple meeting location selector
For calendars that offer multiple meeting options (in-person, Zoom, phone call), you can let contacts choose their preferred location during booking:
1. Open the calendar's **Advanced Settings > Meeting Location**
2. Add multiple locations (e.g., office address, Zoom, phone number)
3. Toggle on **Let contact choose location**
4. Save
The booking widget displays a location selector before the time picker. Contacts pick their preferred option, and the appointment record stores their choice.
***
## Troubleshooting
Use the built-in **Troubleshooting Tool** to diagnose availability issues without leaving the calendar editor.
| Issue | Likely cause | Solution |
| ------------------------------------- | -------------------------------- | --------------------------------------------------------- |
| Calendar shows no available slots | No working hours configured | Add available hours in the Availability tab |
| External calendar events not blocking | Integration not connected | Reconnect Google/Outlook in Connections |
| Notifications not sending | Notification templates disabled | Check Notifications tab and enable the relevant templates |
| Group link returns 404 | Group is inactive or draft | Activate the calendar group |
| Double booking occurring | No conflict check or buffer time | Enable external calendar sync and add buffer time |
***
## FAQs
Yes. Create a reusable schedule in **Calendar Settings > My Availability**, then link it to as many calendars as you need from the top of the schedule editor. Any changes to the schedule automatically apply to all linked calendars.
Look Busy hides a configurable percentage of your available time slots from bookers, making the calendar appear more in-demand. It is available on round robin calendars and is configured in **Advanced Settings > Availability**. For example, setting it to 30% means roughly 30% of genuinely available slots are hidden.
Yes, if you enable the **Reschedule Policy** and **Cancellation Policy** toggles in **Advanced Settings > Notifications & Additional Options**. When enabled, confirmation emails include a self-service link. You can configure how far in advance contacts are allowed to make changes.
Go to **Advanced Settings > Availability** and enable **Manual Confirmation**. New bookings arrive in a Pending state and must be approved or rejected from the Appointments section before they are confirmed to the contact.
Pre-buffer adds preparation time before an appointment — for example, 10 minutes to set up a room. Post-buffer adds wrap-up time after — for example, 15 minutes to clean up or write notes. Both prevent back-to-back bookings and are set per calendar in **Advanced Settings > Availability**.
This usually means the sync connection needs refreshing. Go to **Advanced Settings > Connections**, disconnect Google Calendar, and reconnect. Make sure you select the correct Google Calendar to sync during setup. If the problem persists, check that the connected Google account still has the required permissions granted to Hoop.
***
## Staff member selection in round robin calendars
By default in round robin calendars, the system assigns the team member. To let bookers choose their own:
Go to **Advanced Settings > Customizations** and toggle on **Staff Selection**. Contacts will see a staff selector on the booking widget.
***
## SMS compliance consent checkbox
Add a required consent checkbox to booking forms for SMS marketing compliance:
Go to **Advanced Settings > Forms & Payment** and toggle on **Consent Checkbox**. Contacts must check this box before completing their booking.
***
## Customizing notifications
Go to **Advanced Settings > Notifications & Additional Options** to customize:
* **Appointment confirmation** — sent immediately after booking
* **Appointment reminders** — configure timing (e.g., 24 hours before, 1 hour before)
* **Cancellation notices** — sent when an appointment is cancelled
* **Rescheduling updates** — sent when an appointment is moved
***
## Restore deleted calendars
If a calendar is accidentally deleted, you can restore it within 30 days:
1. Go to **Calendar Settings** and click the **Trash** icon or **Deleted Calendars** tab
2. Find the deleted calendar in the list
3. Click **Restore** to bring it back with all its original settings, appointments, and configuration
Calendars in the trash are permanently removed after 30 days and cannot be recovered. Restore promptly if deletion was unintentional.
***
## View calendar in user timezone
By default, calendars display times in the account's timezone. To view and manage appointments in your personal timezone:
1. Click the **timezone selector** in the top-right corner of the calendar view
2. Select your preferred timezone
3. All appointment times adjust to reflect the selected timezone
This setting is personal and does not affect how contacts see available slots on the booking page — contacts always see slots in their own detected timezone.
***
## Multiple meeting location selector
For calendars that offer multiple meeting options (in-person, Zoom, phone call), you can let contacts choose their preferred location during booking:
1. Open the calendar's **Advanced Settings > Meeting Location**
2. Add multiple locations (e.g., office address, Zoom, phone number)
3. Toggle on **Let contact choose location**
4. Save
The booking widget displays a location selector before the time picker. Contacts pick their preferred option, and the appointment record stores their choice.
***
## Troubleshooting
Use the built-in **Troubleshooting Tool** to diagnose availability issues without leaving the calendar editor.
| Issue | Likely cause | Solution |
| ------------------------------------- | -------------------------------- | --------------------------------------------------------- |
| Calendar shows no available slots | No working hours configured | Add available hours in the Availability tab |
| External calendar events not blocking | Integration not connected | Reconnect Google/Outlook in Connections |
| Notifications not sending | Notification templates disabled | Check Notifications tab and enable the relevant templates |
| Group link returns 404 | Group is inactive or draft | Activate the calendar group |
| Double booking occurring | No conflict check or buffer time | Enable external calendar sync and add buffer time |
***
## FAQs
Yes. Create a reusable schedule in **Calendar Settings > My Availability**, then link it to as many calendars as you need from the top of the schedule editor. Any changes to the schedule automatically apply to all linked calendars.
Look Busy hides a configurable percentage of your available time slots from bookers, making the calendar appear more in-demand. It is available on round robin calendars and is configured in **Advanced Settings > Availability**. For example, setting it to 30% means roughly 30% of genuinely available slots are hidden.
Yes, if you enable the **Reschedule Policy** and **Cancellation Policy** toggles in **Advanced Settings > Notifications & Additional Options**. When enabled, confirmation emails include a self-service link. You can configure how far in advance contacts are allowed to make changes.
Go to **Advanced Settings > Availability** and enable **Manual Confirmation**. New bookings arrive in a Pending state and must be approved or rejected from the Appointments section before they are confirmed to the contact.
Pre-buffer adds preparation time before an appointment — for example, 10 minutes to set up a room. Post-buffer adds wrap-up time after — for example, 15 minutes to clean up or write notes. Both prevent back-to-back bookings and are set per calendar in **Advanced Settings > Availability**.
This usually means the sync connection needs refreshing. Go to **Advanced Settings > Connections**, disconnect Google Calendar, and reconnect. Make sure you select the correct Google Calendar to sync during setup. If the problem persists, check that the connected Google account still has the required permissions granted to Hoop.