> ## Documentation Index
> Fetch the complete documentation index at: https://help.hoopai.com/llms.txt
> Use this file to discover all available pages before exploring further.
# Calendar integrations
> Connect Google Calendar, iCloud, Microsoft Teams, Zoom, and Calendly to the HoopAI Platform to sync appointments and add video conferencing.
The HoopAI Platform connects with the most popular calendar and video conferencing services, keeping your schedule in sync and automatically generating meeting links for every appointment.
 ## Google Calendar
Connecting Google Calendar creates a bi-directional sync — appointments booked in Hoop appear in Google Calendar, and events added in Google Calendar block availability in Hoop.
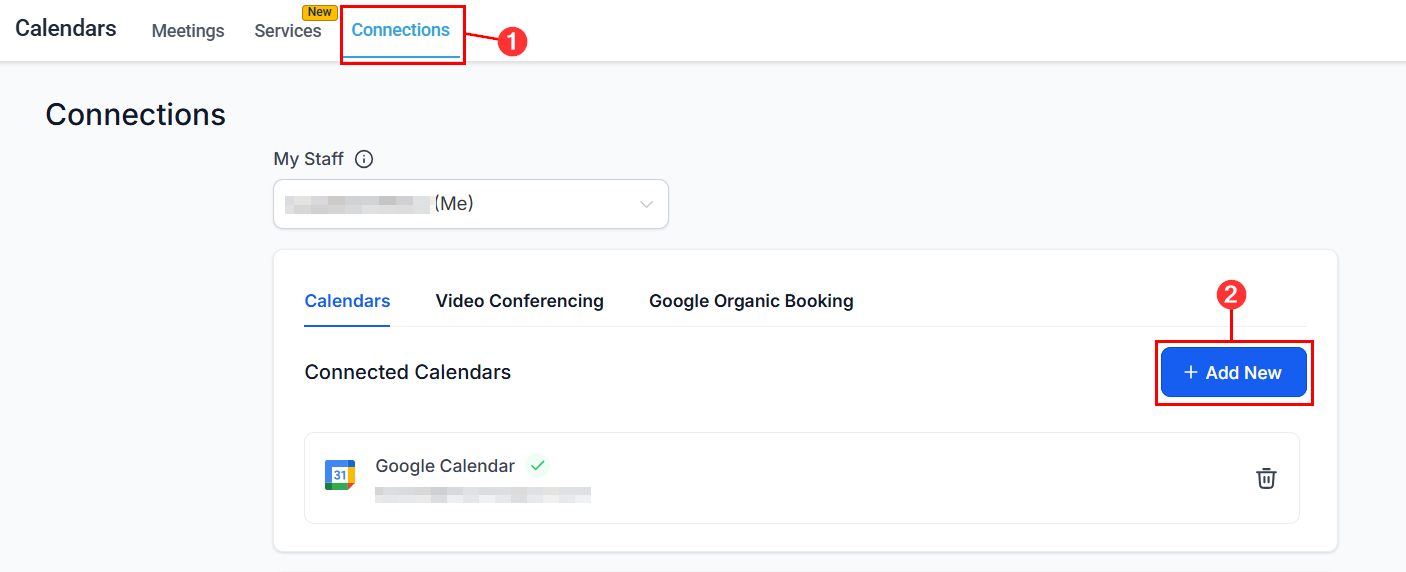
Navigate to **Calendar Settings** for the calendar you want to connect. Go to **Advanced Settings > Connections**.
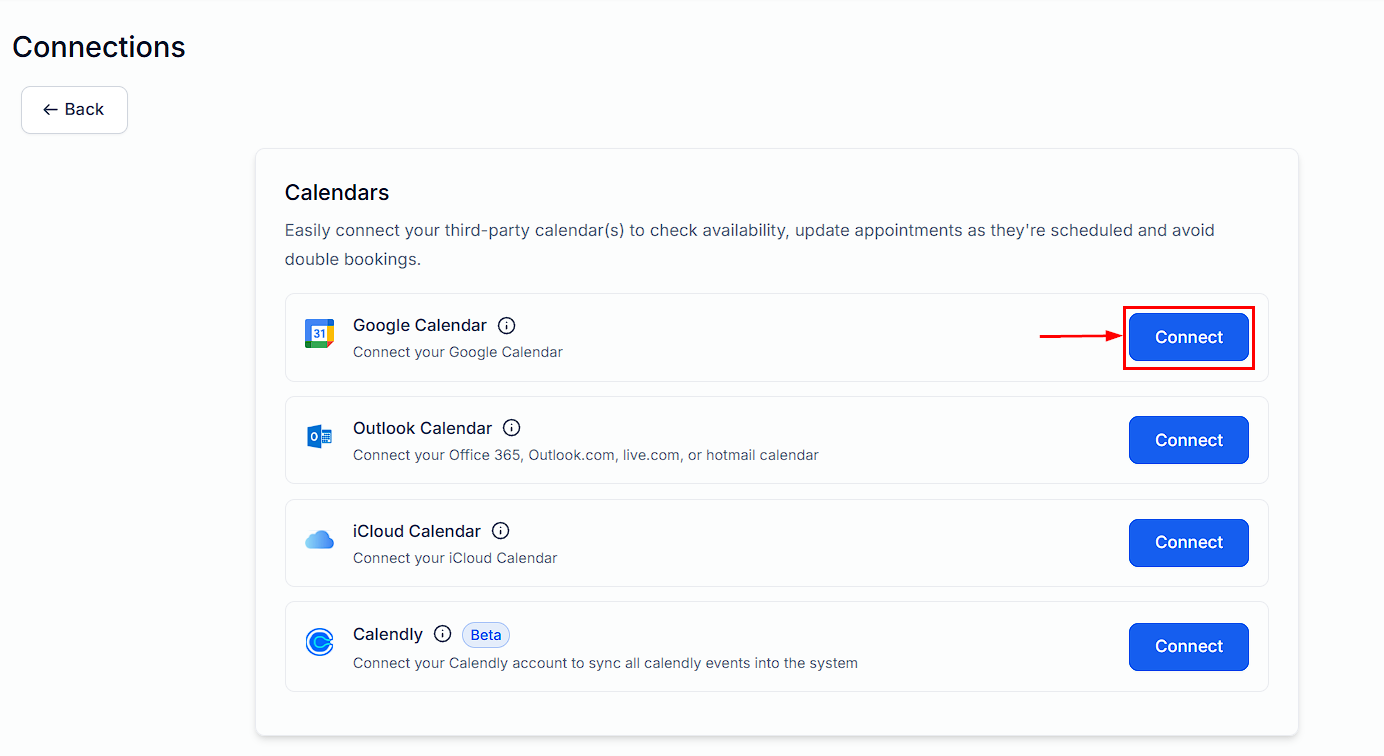
Select Google Calendar from the list and click **Connect**.
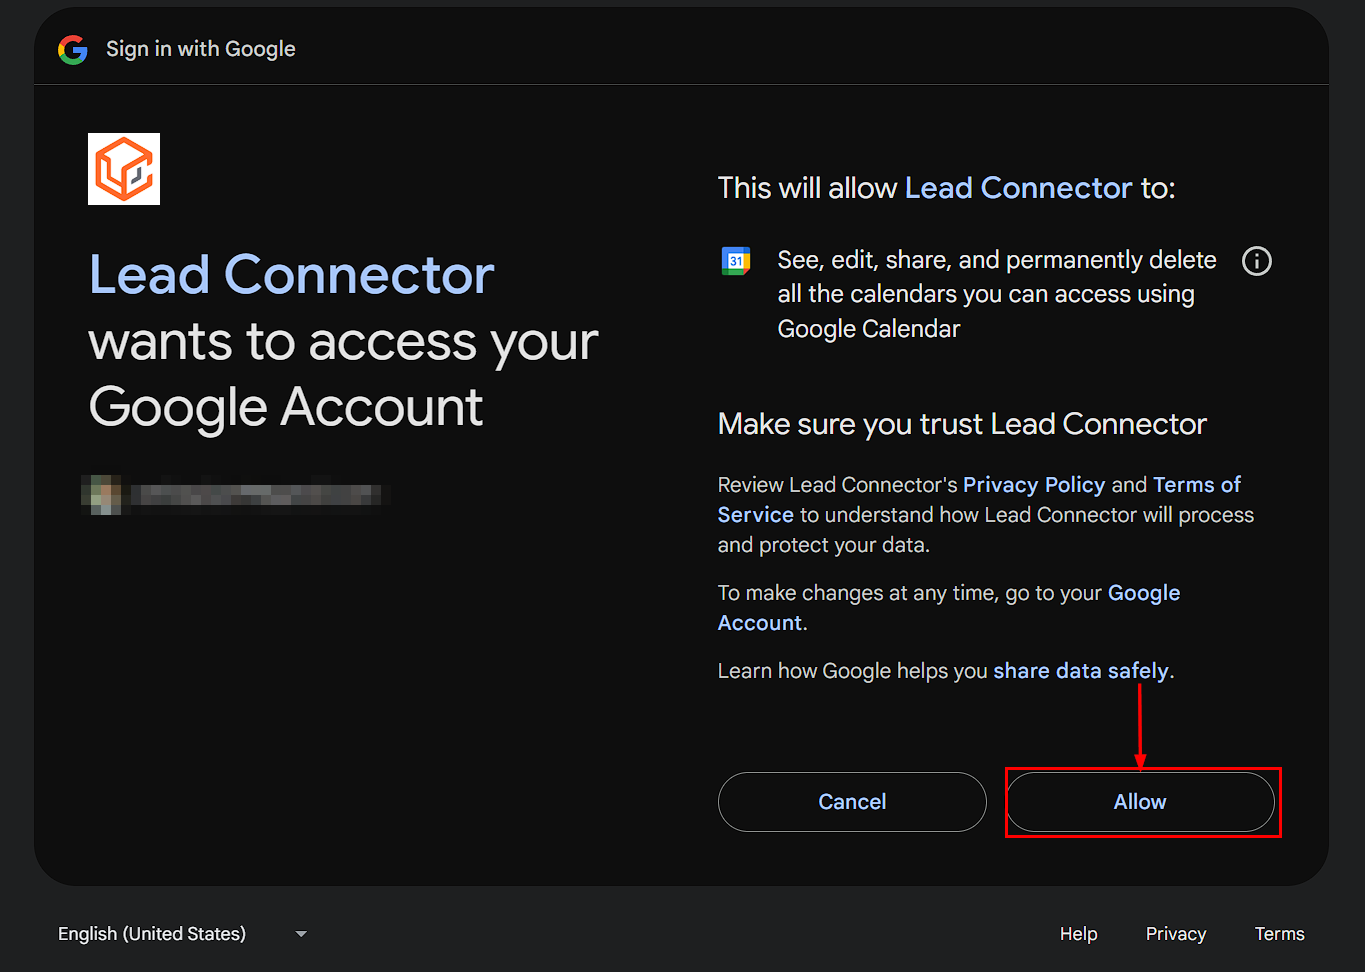
Sign in to your Google account and grant the required calendar permissions.
## Google Calendar
Connecting Google Calendar creates a bi-directional sync — appointments booked in Hoop appear in Google Calendar, and events added in Google Calendar block availability in Hoop.
Navigate to **Calendar Settings** for the calendar you want to connect. Go to **Advanced Settings > Connections**.
Select Google Calendar from the list and click **Connect**.
Sign in to your Google account and grant the required calendar permissions.
 Choose which Google Calendar to sync appointments with.
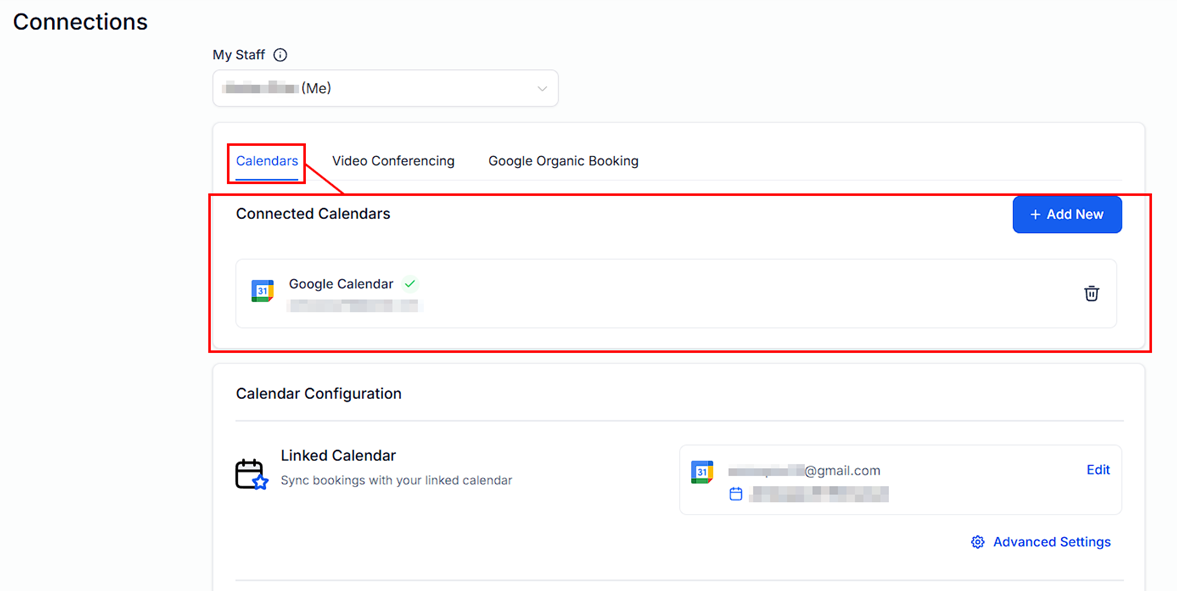 Configure any additional options, then click **Save**.
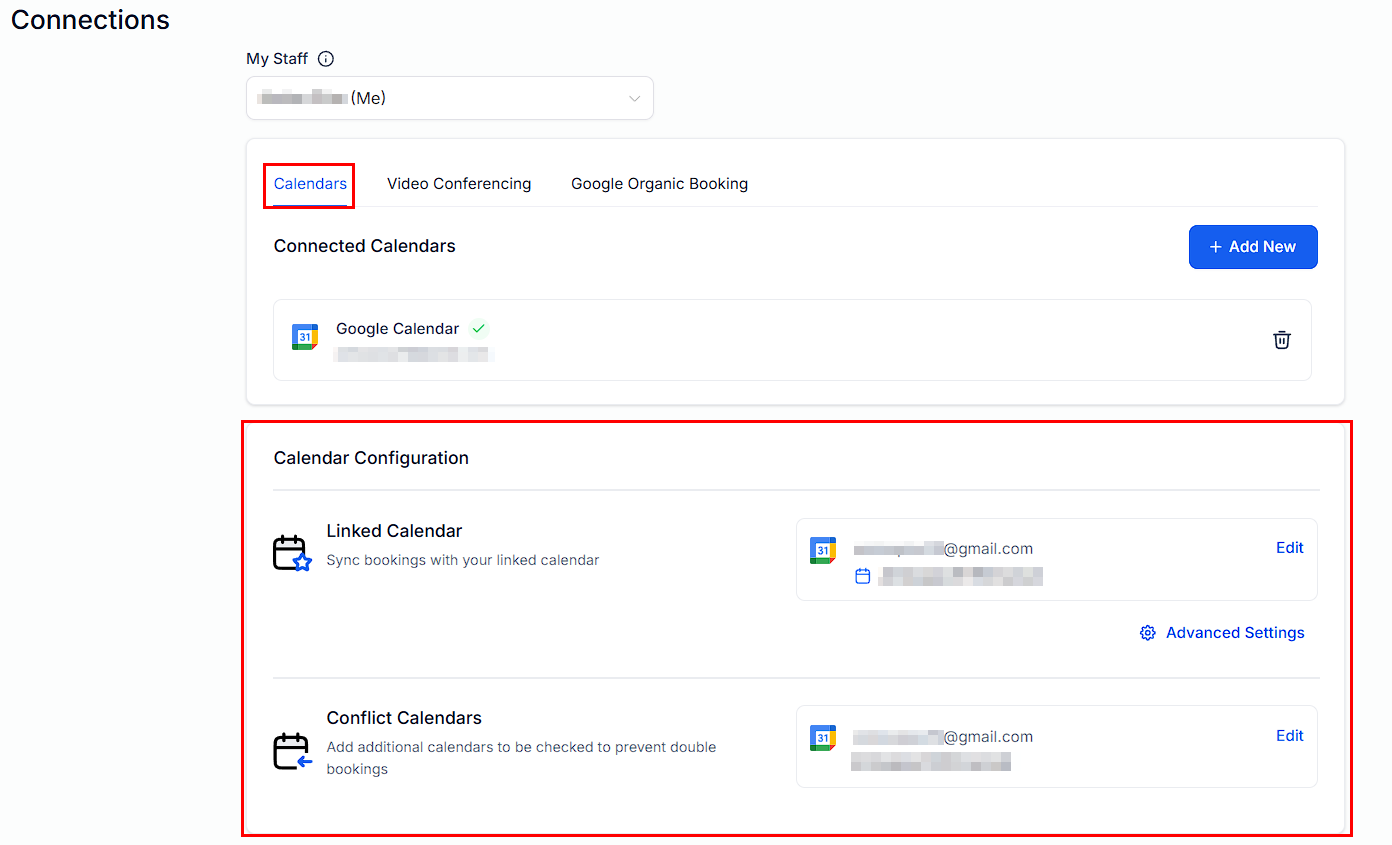 Connect Google Calendar to prevent double booking — events in your personal Google Calendar will automatically block corresponding slots in Hoop.
***
## Zoom
The Zoom integration automatically generates a unique Zoom meeting link for every appointment booked, eliminating the need to manually create and share meeting links.
Navigate to **Calendar Settings > Advanced Settings > Connections** for your calendar.
Connect Google Calendar to prevent double booking — events in your personal Google Calendar will automatically block corresponding slots in Hoop.
***
## Zoom
The Zoom integration automatically generates a unique Zoom meeting link for every appointment booked, eliminating the need to manually create and share meeting links.
Navigate to **Calendar Settings > Advanced Settings > Connections** for your calendar.
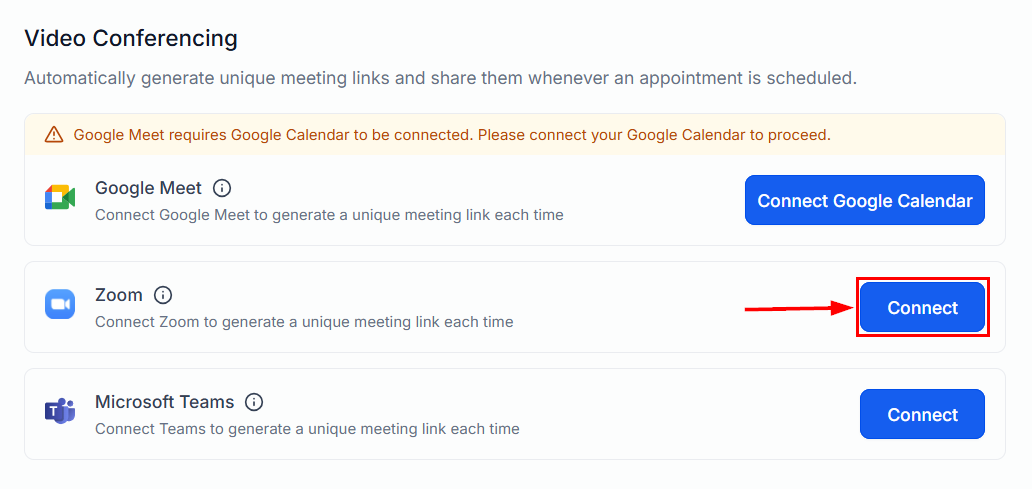
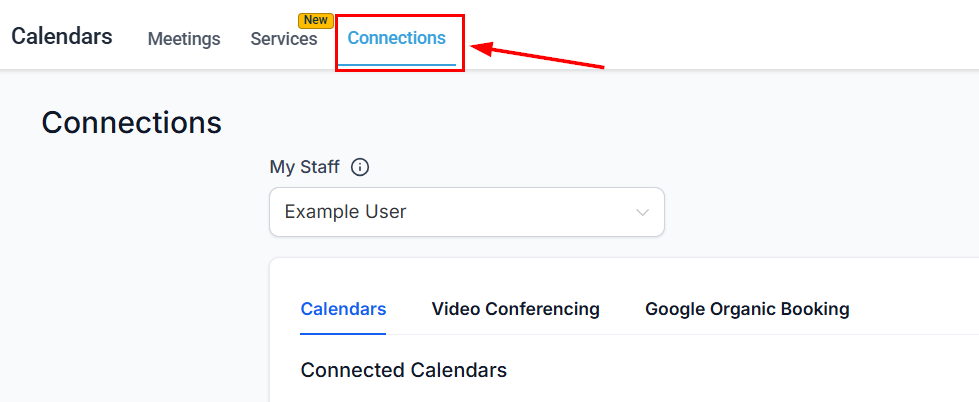 Click **Connect Zoom** to begin the authorization process.
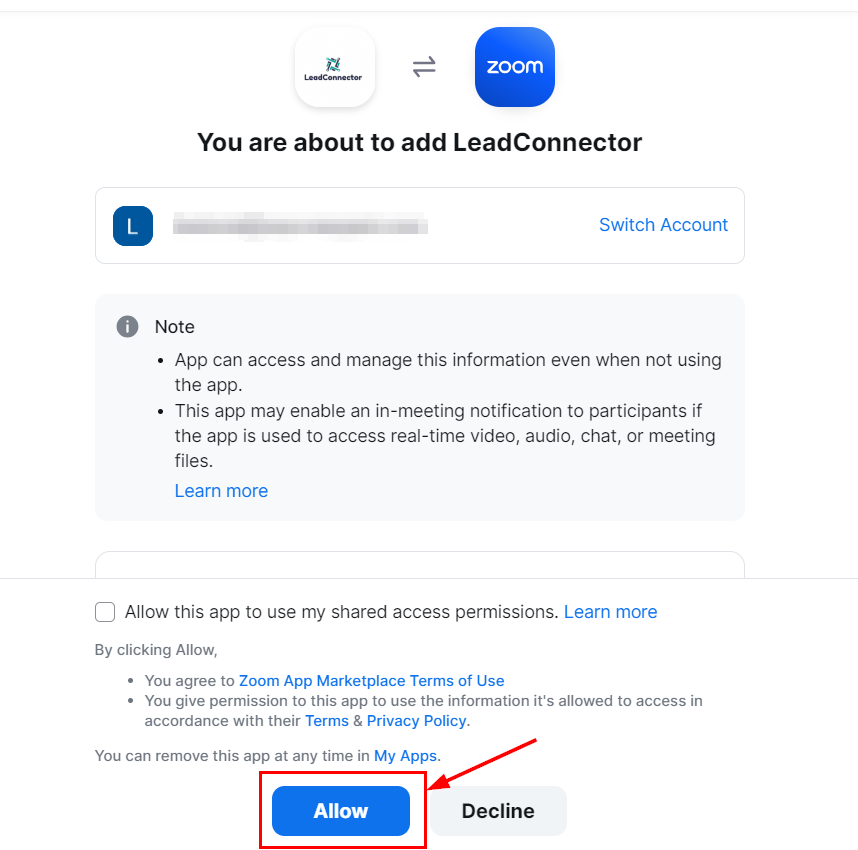
 Review the permissions and click **Allow** to grant Hoop access to your Zoom account.
 Once connected, the Zoom integration shows as active. Click **Save**.
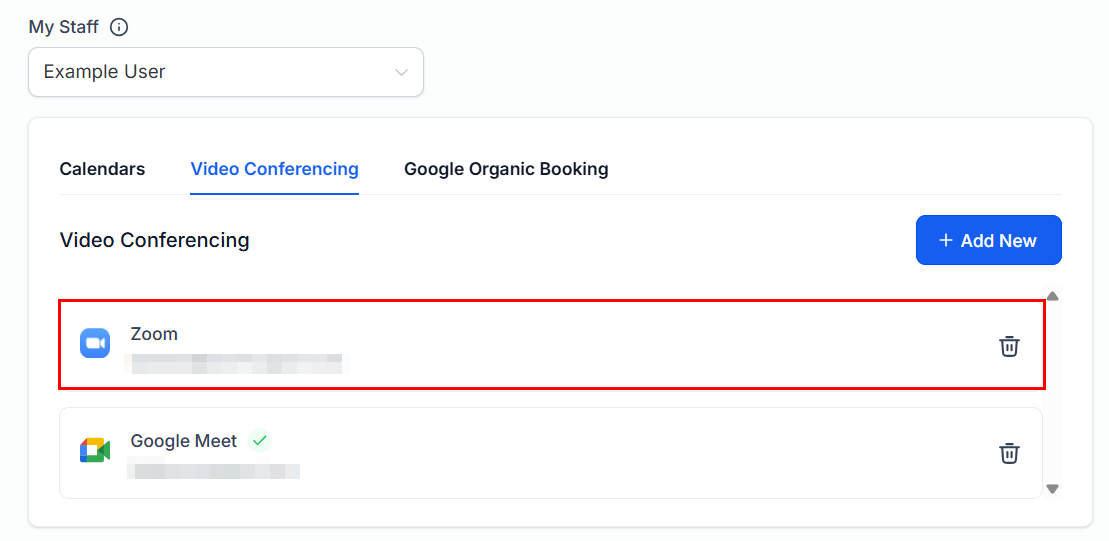 Zoom meeting links are unique per appointment. Each booking generates its own link — links are not reused between appointments.
***
## Microsoft Teams
The Microsoft Teams integration adds a Teams meeting link to every appointment confirmation, making virtual meetings seamless for organizations already using Microsoft 365.
In **Calendar Settings**, navigate to the Connections tab for your calendar.
Zoom meeting links are unique per appointment. Each booking generates its own link — links are not reused between appointments.
***
## Microsoft Teams
The Microsoft Teams integration adds a Teams meeting link to every appointment confirmation, making virtual meetings seamless for organizations already using Microsoft 365.
In **Calendar Settings**, navigate to the Connections tab for your calendar.
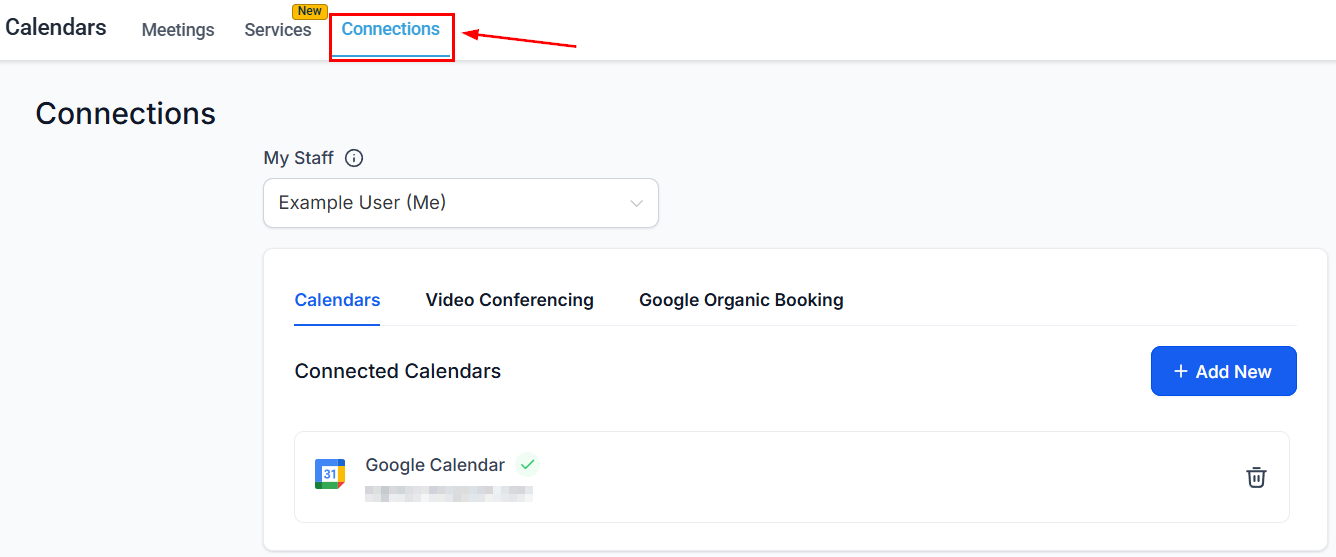 Select Microsoft Teams from the connections list.
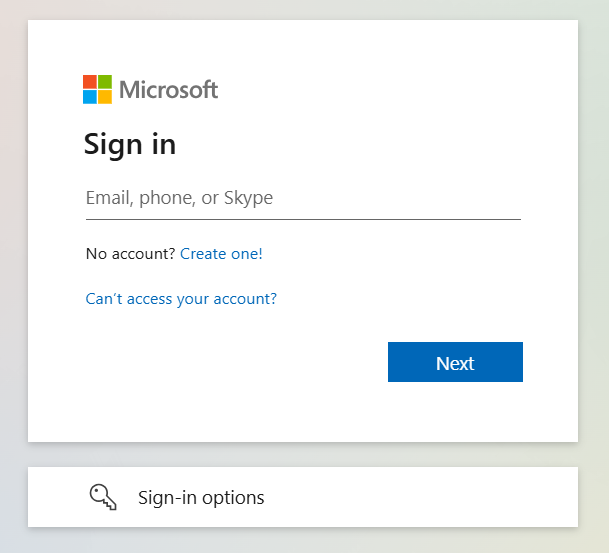
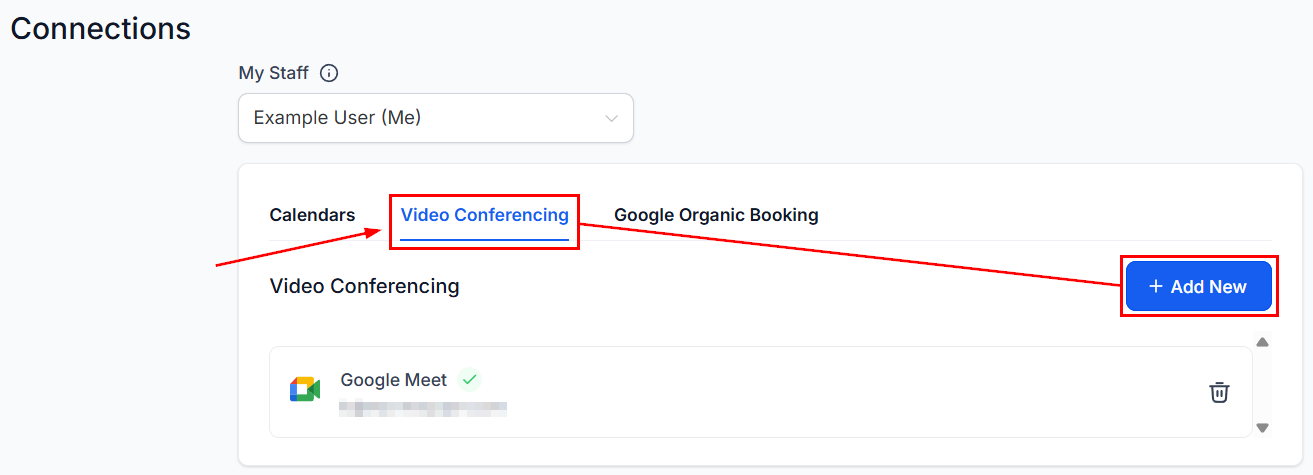 You will be redirected to the Microsoft sign-in page. Enter your Microsoft 365 credentials.
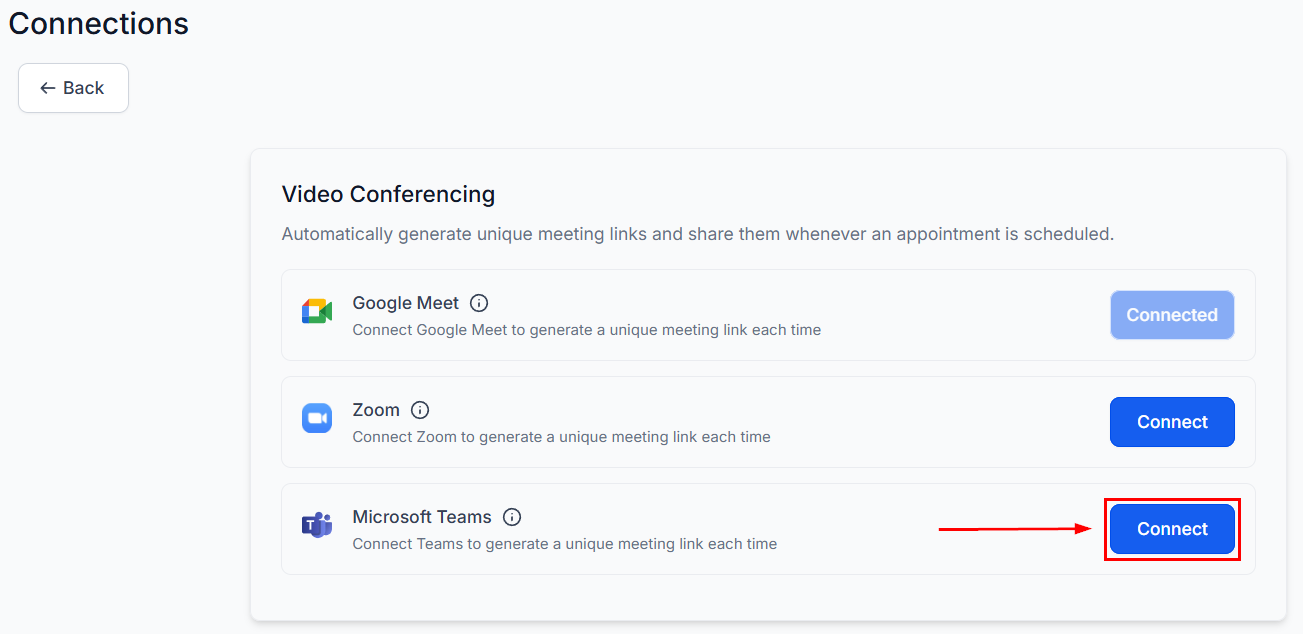 Accept the permission request. Click **Save** in Hoop to complete the connection.
 Microsoft Teams integration requires a Microsoft 365 account with Teams enabled. Personal Microsoft accounts (Outlook.com) are not supported.
***
## iCloud Calendar
The iCloud Calendar integration syncs Hoop appointments with Apple Calendar across all your Apple devices, ensuring your schedule stays up to date on iPhone, iPad, and Mac.
Go to [appleid.apple.com](https://appleid.apple.com) and sign in with your Apple ID.
Microsoft Teams integration requires a Microsoft 365 account with Teams enabled. Personal Microsoft accounts (Outlook.com) are not supported.
***
## iCloud Calendar
The iCloud Calendar integration syncs Hoop appointments with Apple Calendar across all your Apple devices, ensuring your schedule stays up to date on iPhone, iPad, and Mac.
Go to [appleid.apple.com](https://appleid.apple.com) and sign in with your Apple ID.
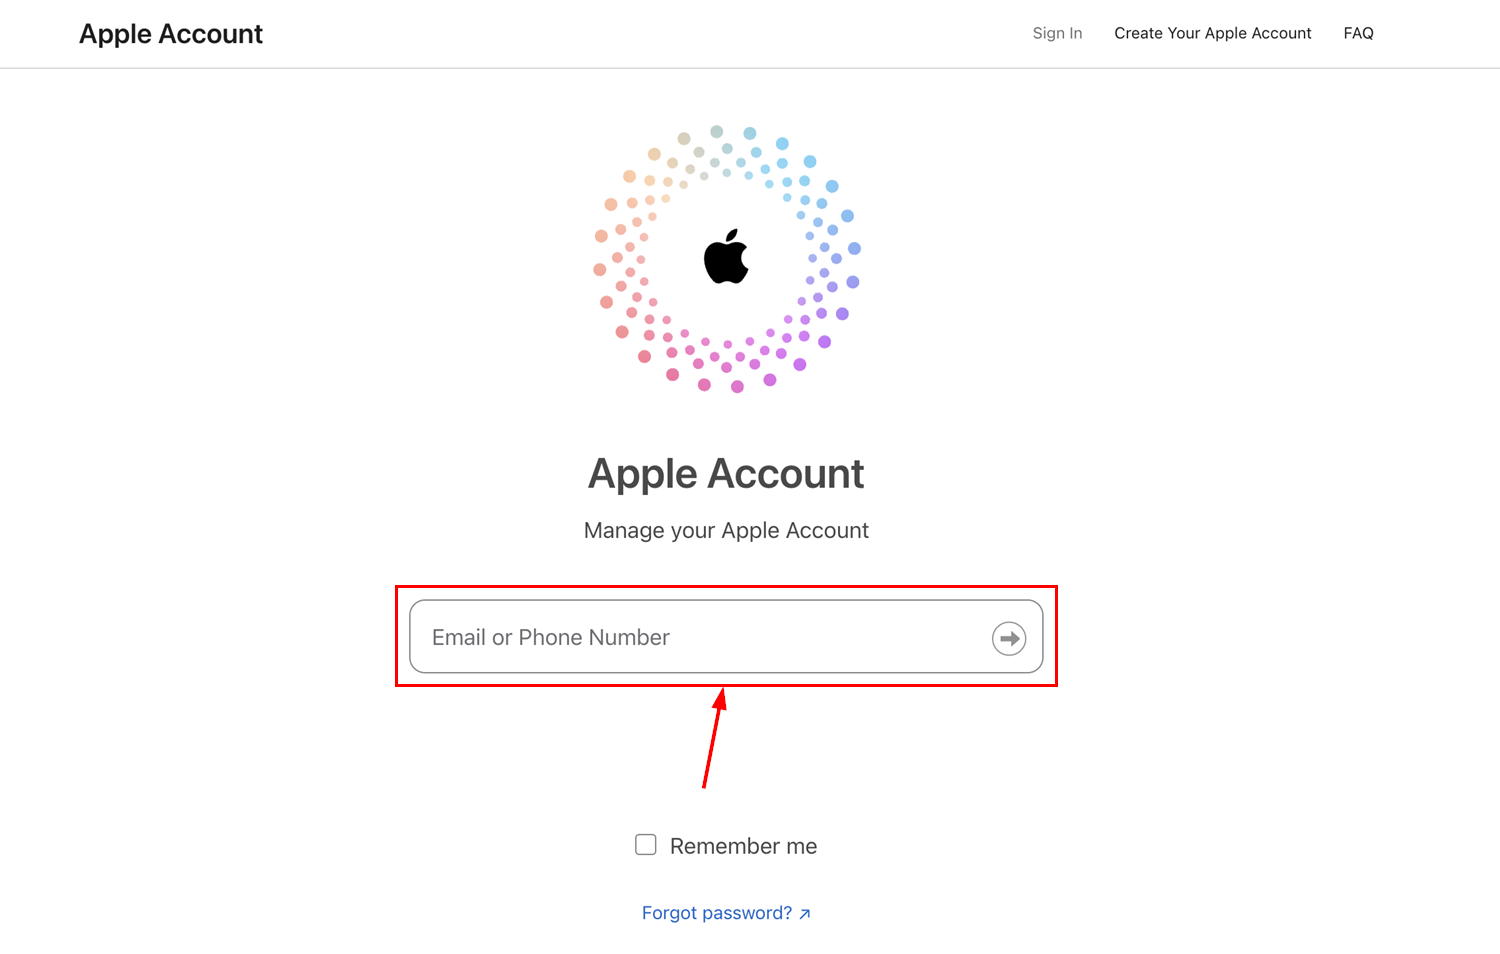
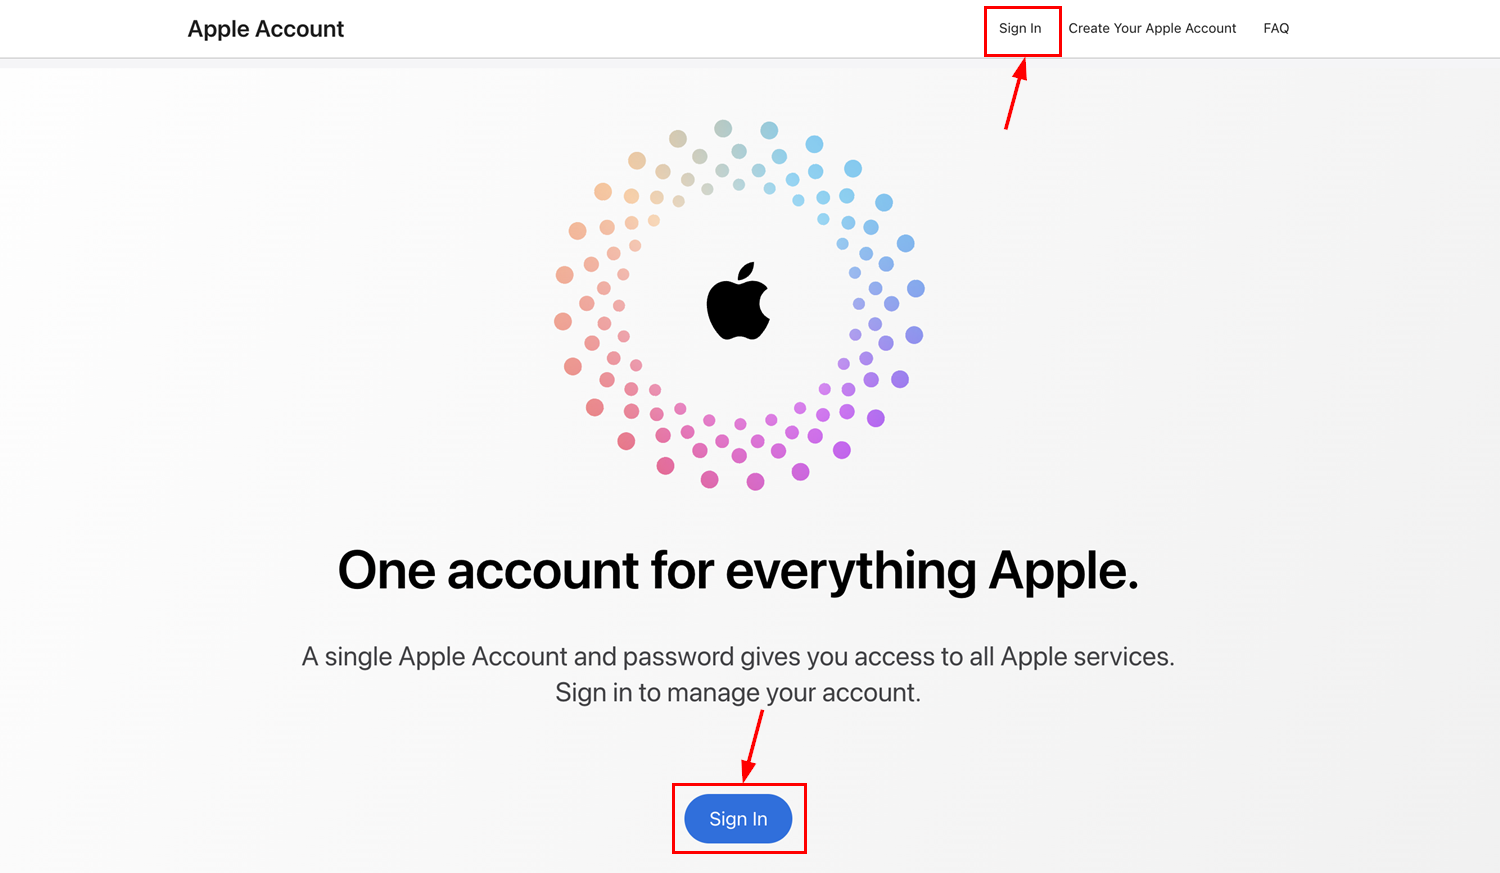 Enter the Apple ID associated with your iCloud calendar account.
 Enter the 6-digit verification code sent to your trusted Apple device.
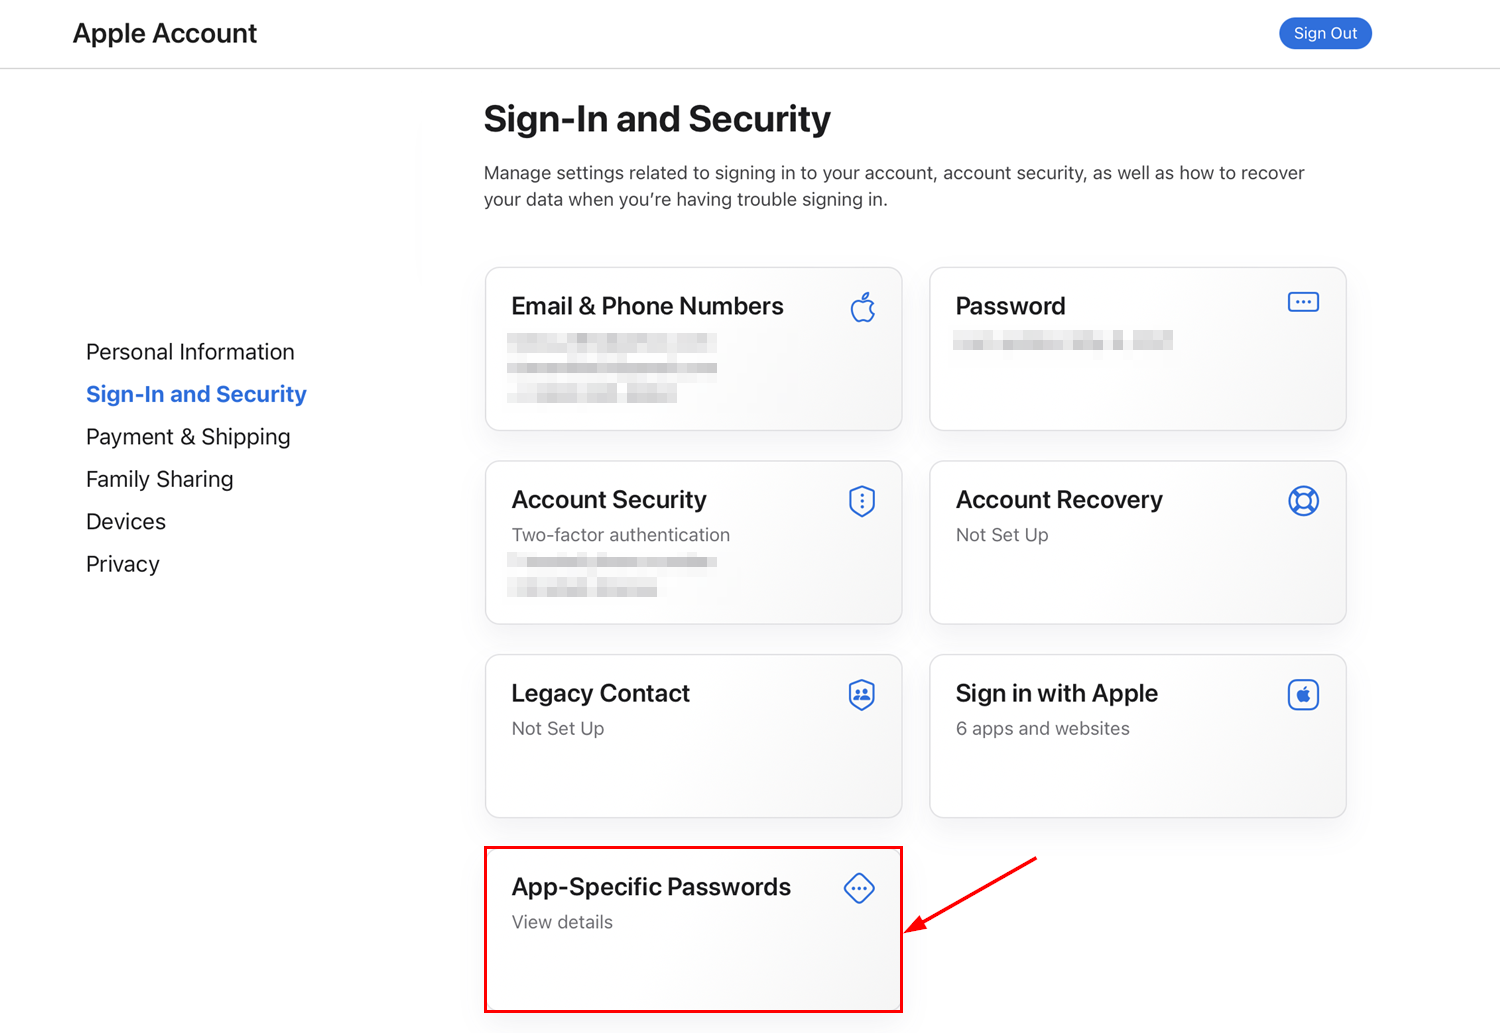
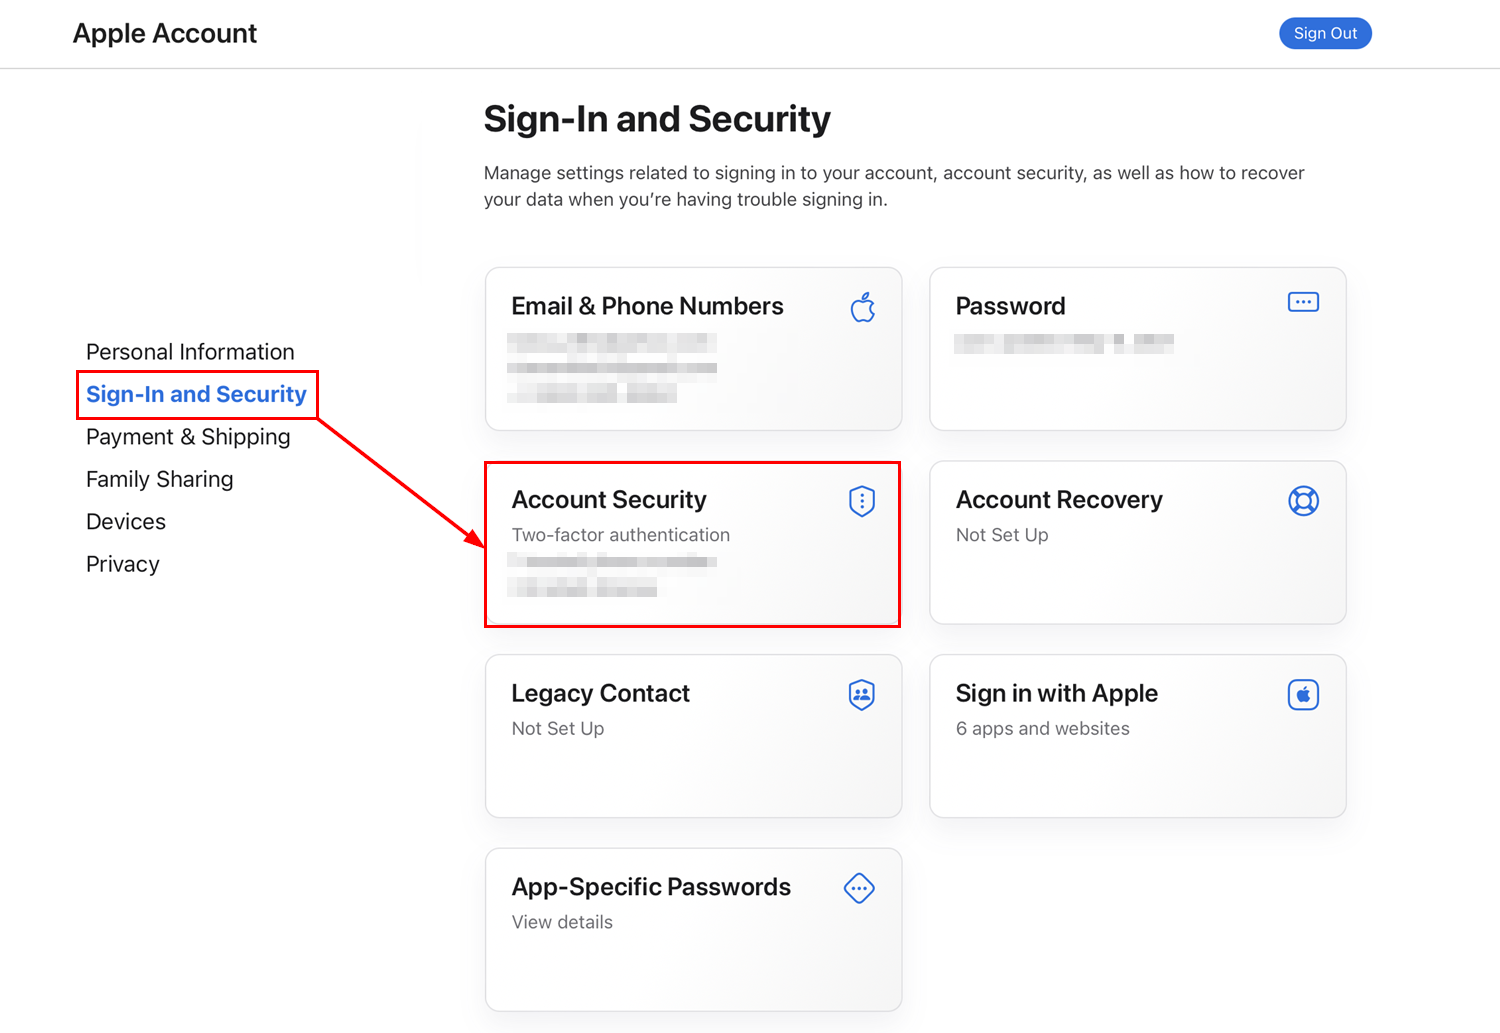 In your Apple ID security settings, find the **App-Specific Passwords** section and click **Generate Password**.
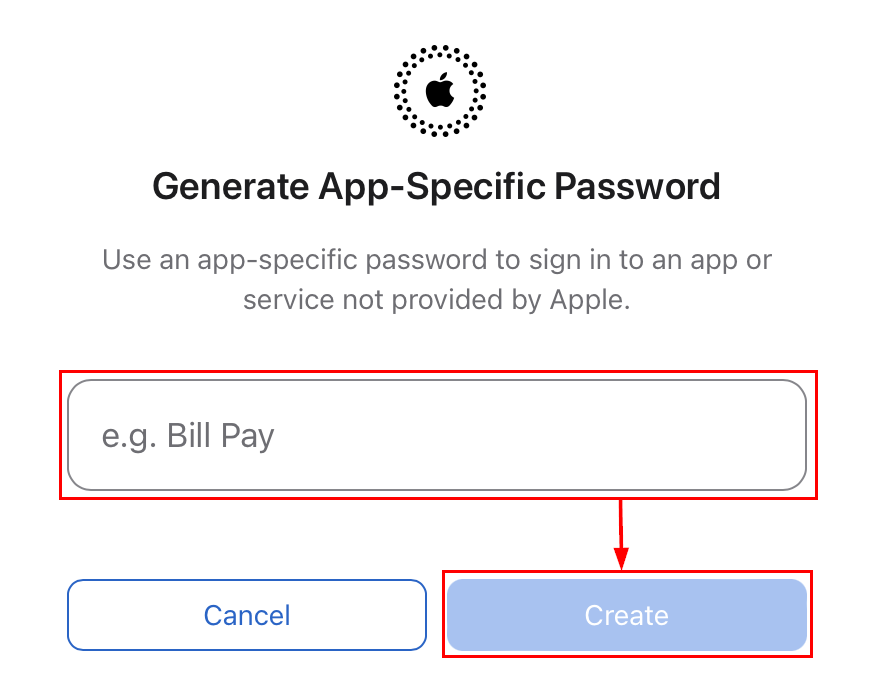
 Name the password (e.g., "Hoop") and click **Create**. Copy the generated password — it will only be shown once.
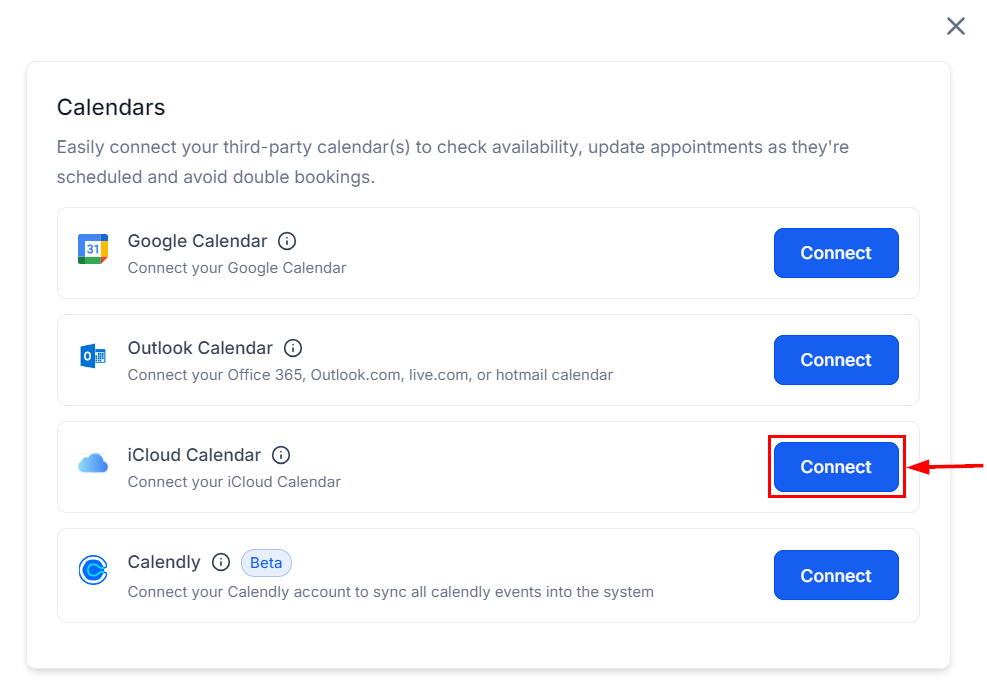
 In Hoop's Calendar Connections tab, select **iCloud**. Enter your Apple ID email and the app-specific password, then click **Connect**.
 App-specific passwords can only be viewed once. Store it securely before closing the Apple ID page.
***
## Calendly
Importing from Calendly brings your existing Calendly event types into the HoopAI Platform, allowing you to consolidate scheduling in one place.
Navigate to **Calendar Settings** and click **Calendar Connections**.
App-specific passwords can only be viewed once. Store it securely before closing the Apple ID page.
***
## Calendly
Importing from Calendly brings your existing Calendly event types into the HoopAI Platform, allowing you to consolidate scheduling in one place.
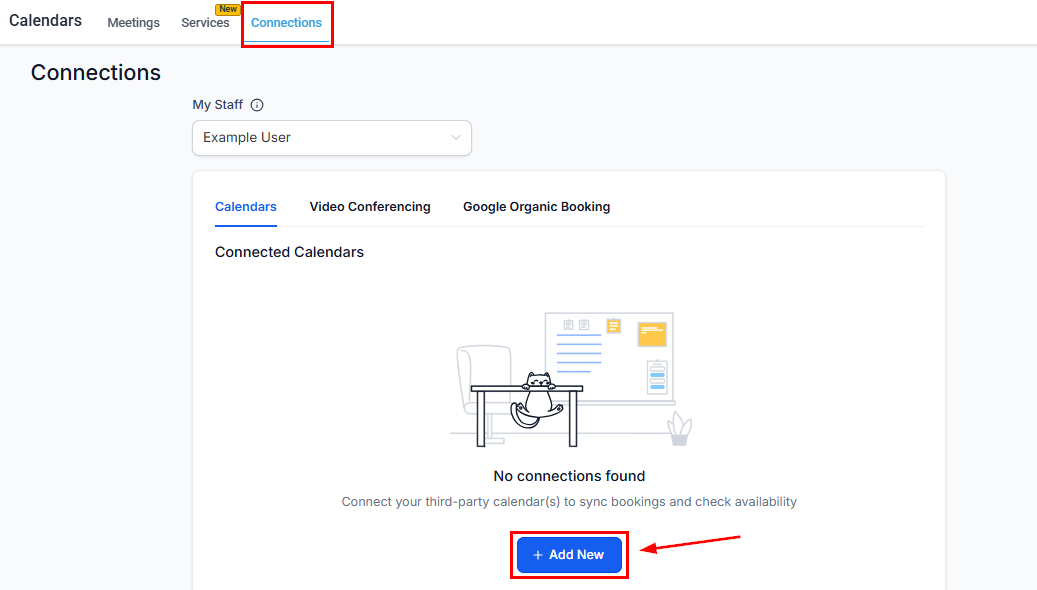
Navigate to **Calendar Settings** and click **Calendar Connections**.
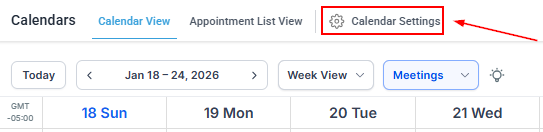 Click **+ Add New** to open the integrations panel.
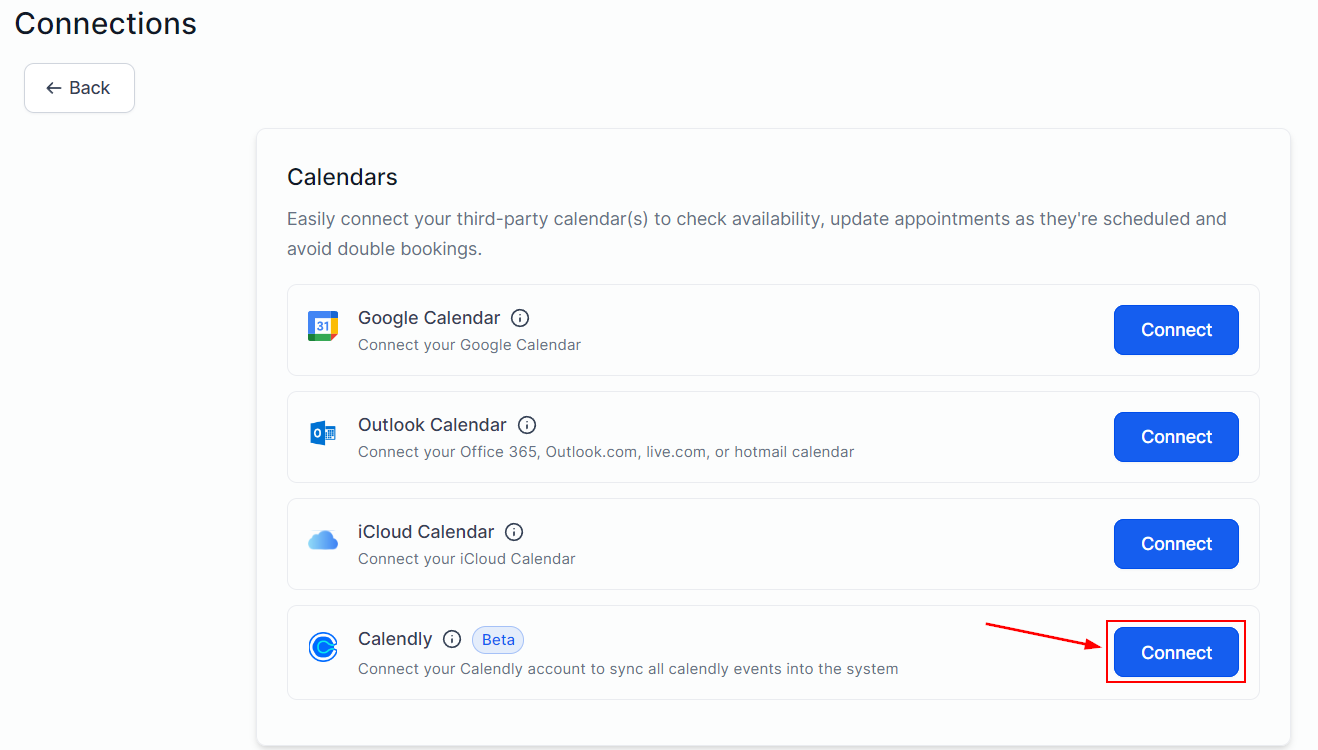
 Choose Calendly from the list and click **Connect**. You will be redirected to Calendly to authorize the integration.
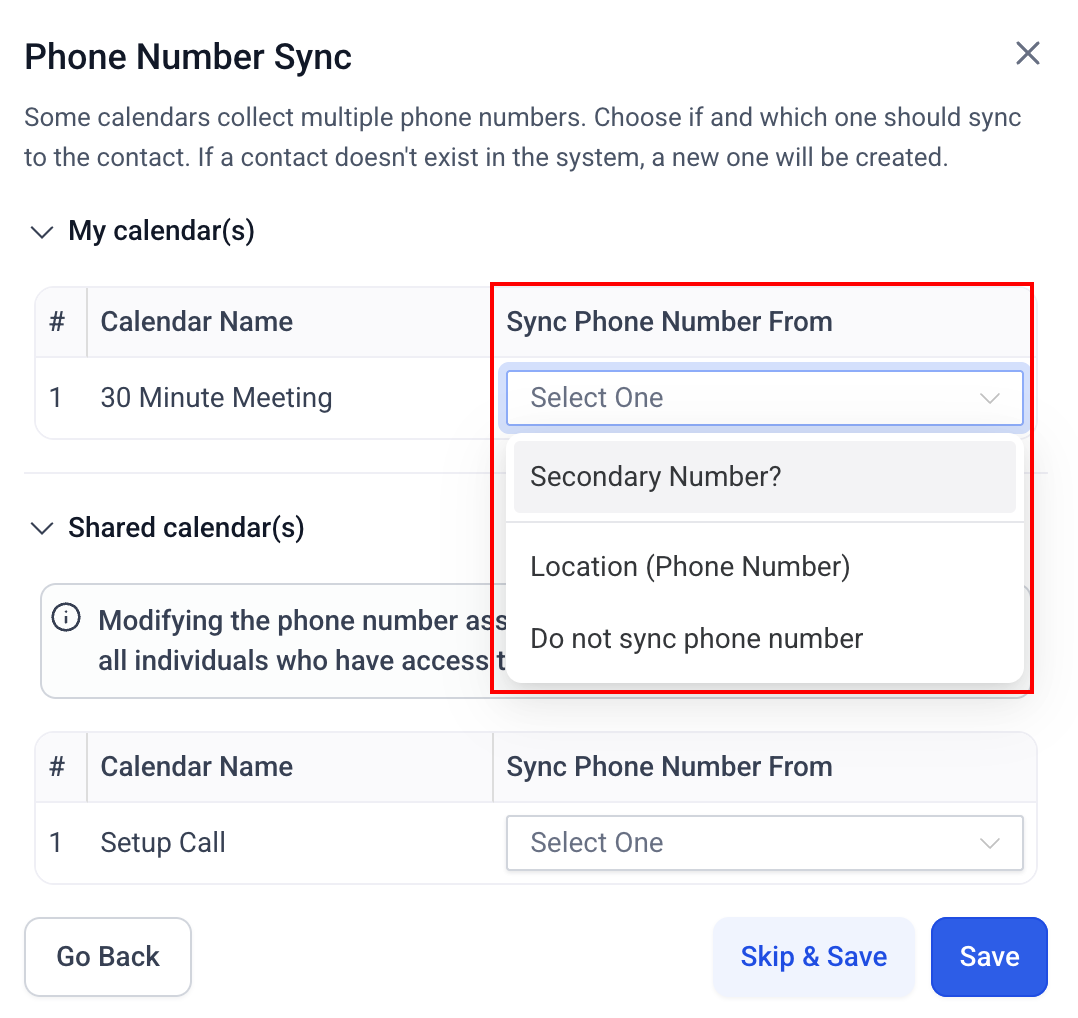
 After connecting, Hoop displays the number of Calendly events being synced into your account.
 Calendly integration is an import only — it does not create a live bi-directional sync. New events created in Calendly after the initial import will not automatically appear in Hoop.
***
## Disconnection notifications
When a calendar integration loses its connection — due to expired tokens, revoked permissions, or account changes — HoopAI sends an automatic notification to the account owner. This ensures you are aware of sync issues before they cause missed appointments or double bookings.
Disconnection notifications are sent via email and appear as in-app alerts. To reconnect, go to **Calendar Settings > Advanced Settings > Connections** and re-authenticate the affected integration.
***
## Hiding third-party calendar details
By default, events synced from external calendars (Google, Outlook, iCloud) show their full details in Hoop — including event titles and descriptions. If you prefer to keep external calendar details private and only use them to block availability:
1. Open the calendar's **Advanced Settings > Connections**
2. Find the connected integration
3. Enable **Hide Third-Party Calendar Details**
When enabled, external events appear as "Busy" blocks without titles or descriptions. This is useful when a personal calendar is connected and you do not want team members to see personal event details.
***
## Managing integrations
To view all active calendar connections, go to **Calendar Settings > Calendar Connections**. From here you can:
* **View status** — see which integrations are active, pending, or disconnected
* **Reconfigure** — update sync settings for an existing connection
* **Disconnect** — remove an integration at any time
Disconnect and reconnect the Google Calendar integration in Calendar Connections. This refreshes the OAuth token and usually resolves sync issues. If the problem persists, ensure the Google Calendar account has not had its permissions revoked.
Each calendar can only be connected to one Google Calendar account at a time. If you need to sync a different Google account, disconnect the existing one and reconnect with the new account.
Yes. Each occurrence in a recurring series receives its own unique meeting link (for Zoom and Teams). Links are generated at the time of booking.
Calendly integration is an import only — it does not create a live bi-directional sync. New events created in Calendly after the initial import will not automatically appear in Hoop.
***
## Disconnection notifications
When a calendar integration loses its connection — due to expired tokens, revoked permissions, or account changes — HoopAI sends an automatic notification to the account owner. This ensures you are aware of sync issues before they cause missed appointments or double bookings.
Disconnection notifications are sent via email and appear as in-app alerts. To reconnect, go to **Calendar Settings > Advanced Settings > Connections** and re-authenticate the affected integration.
***
## Hiding third-party calendar details
By default, events synced from external calendars (Google, Outlook, iCloud) show their full details in Hoop — including event titles and descriptions. If you prefer to keep external calendar details private and only use them to block availability:
1. Open the calendar's **Advanced Settings > Connections**
2. Find the connected integration
3. Enable **Hide Third-Party Calendar Details**
When enabled, external events appear as "Busy" blocks without titles or descriptions. This is useful when a personal calendar is connected and you do not want team members to see personal event details.
***
## Managing integrations
To view all active calendar connections, go to **Calendar Settings > Calendar Connections**. From here you can:
* **View status** — see which integrations are active, pending, or disconnected
* **Reconfigure** — update sync settings for an existing connection
* **Disconnect** — remove an integration at any time
Disconnect and reconnect the Google Calendar integration in Calendar Connections. This refreshes the OAuth token and usually resolves sync issues. If the problem persists, ensure the Google Calendar account has not had its permissions revoked.
Each calendar can only be connected to one Google Calendar account at a time. If you need to sync a different Google account, disconnect the existing one and reconnect with the new account.
Yes. Each occurrence in a recurring series receives its own unique meeting link (for Zoom and Teams). Links are generated at the time of booking.