> ## Documentation Index
> Fetch the complete documentation index at: https://help.hoopai.com/llms.txt
> Use this file to discover all available pages before exploring further.
# Set up booking pages, embeds, and one-time links
> Share booking links, embed your calendar on any website, create one-time links, and enable Google organic booking in HoopAI.
Booking pages are how contacts access your calendars — whether through a direct link, an embedded widget on your website, a Google Business Profile listing, or a single-use link for a specific contact. This guide covers all methods for sharing and embedding your calendars.
## Sharing your booking link
Every calendar in Hoop has a unique booking URL. Share this link anywhere — email signatures, SMS messages, social profiles, or your website.
To copy your booking URL:
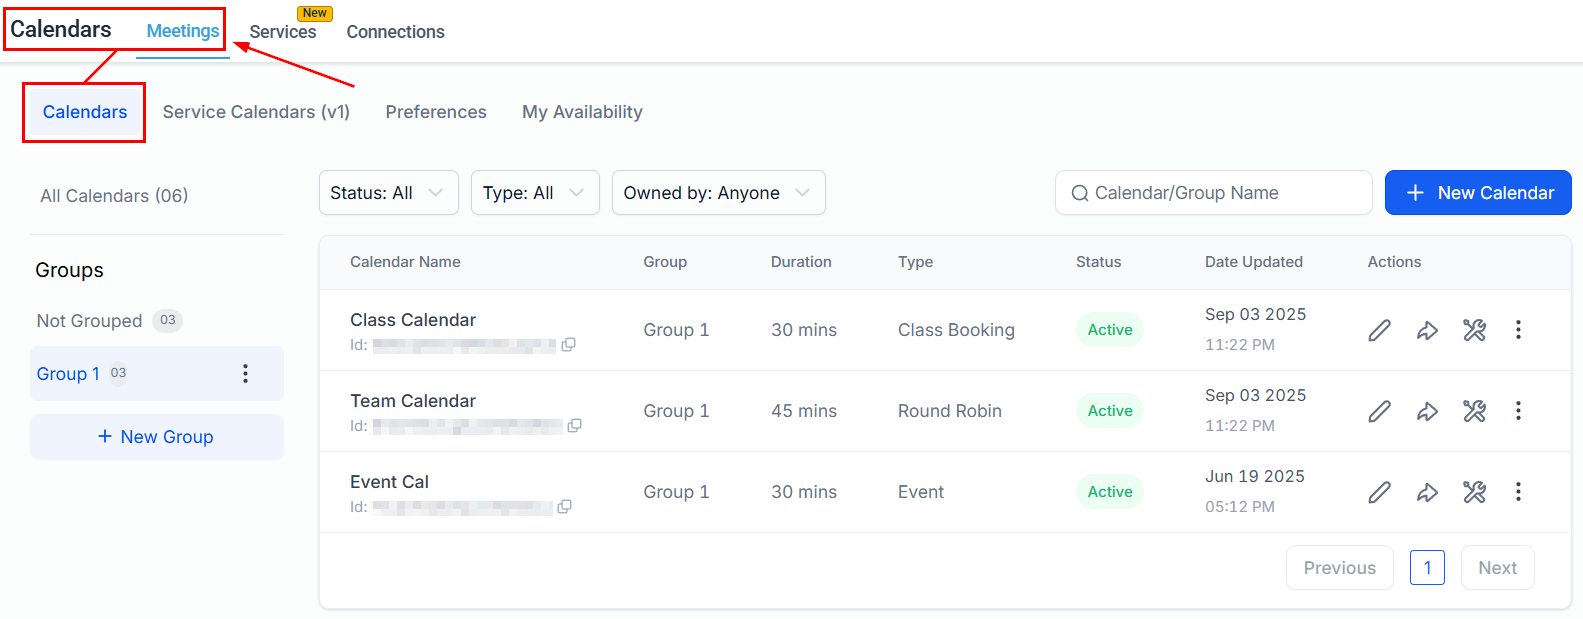
1. Go to **Calendar Settings**
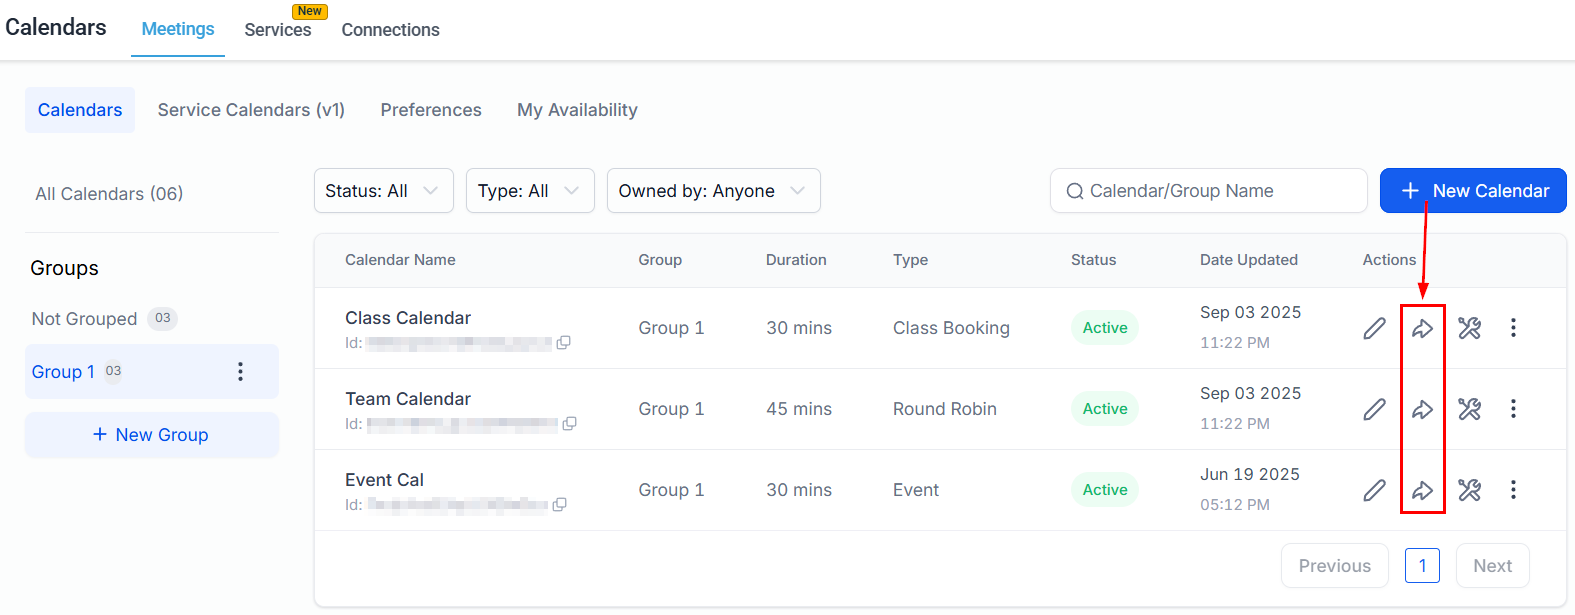
2. Click the **share icon** (arrow pointing right) on the calendar card
3. Copy the **Direct Link** from the Share modal
 ***
## Embedding your calendar on a website
Embed a booking widget directly in your website so visitors can book without leaving your page.
In Calendar Settings, click the share icon on the calendar you want to embed.
***
## Embedding your calendar on a website
Embed a booking widget directly in your website so visitors can book without leaving your page.
In Calendar Settings, click the share icon on the calendar you want to embed.
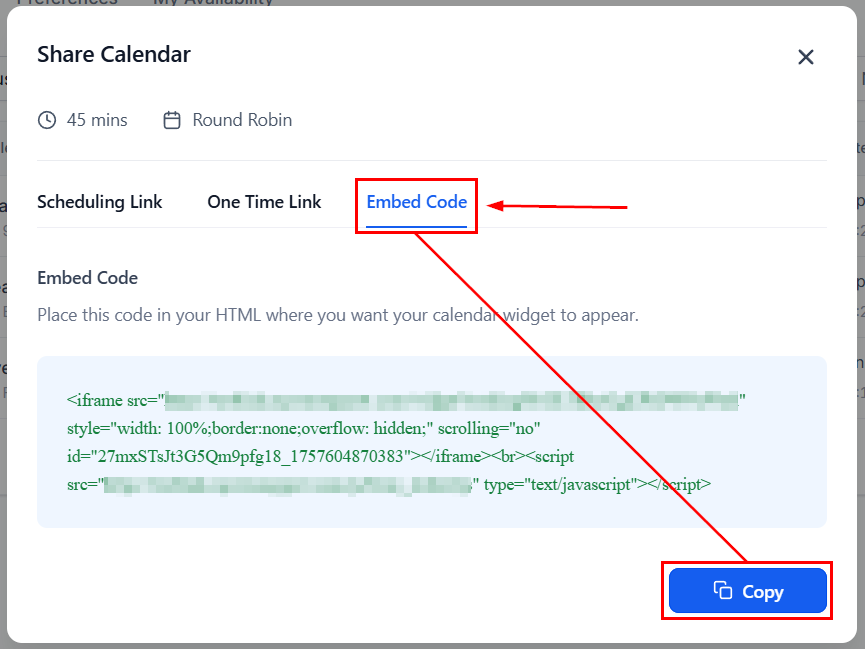
 In the Share modal, switch to the **Embed** tab. Copy the iframe code snippet.
 Add the embed code to your website's HTML where you want the calendar widget to appear.
 ### Embedding in a Hoop funnel or website
To add your calendar to a Hoop-built funnel or website:
Navigate to **Sites > Funnels** or **Sites > Websites** and open the page editor.
Drag a **Custom Code** element onto the page where you want the calendar to appear.
Open the element settings and paste the calendar iframe code.
Click **Publish** to make the embedded calendar live on your page.
For a seamless experience, use the booking widget's color customization settings to match your website's brand colors before embedding.
***
## One-time booking links
One-time booking links expire after a single use — ideal for sending to a specific contact without making the link publicly reusable.
**Common use cases:**
* Sending a booking link to a VIP client without opening up your calendar to others
* Creating discovery call links that cannot be forwarded or reused
* Secure scheduling for sensitive appointments
Navigate to the calendar for which you want to create a one-time link.
In the calendar settings, scroll to or click **One-Time Booking Links**.
### Embedding in a Hoop funnel or website
To add your calendar to a Hoop-built funnel or website:
Navigate to **Sites > Funnels** or **Sites > Websites** and open the page editor.
Drag a **Custom Code** element onto the page where you want the calendar to appear.
Open the element settings and paste the calendar iframe code.
Click **Publish** to make the embedded calendar live on your page.
For a seamless experience, use the booking widget's color customization settings to match your website's brand colors before embedding.
***
## One-time booking links
One-time booking links expire after a single use — ideal for sending to a specific contact without making the link publicly reusable.
**Common use cases:**
* Sending a booking link to a VIP client without opening up your calendar to others
* Creating discovery call links that cannot be forwarded or reused
* Secure scheduling for sensitive appointments
Navigate to the calendar for which you want to create a one-time link.
In the calendar settings, scroll to or click **One-Time Booking Links**.
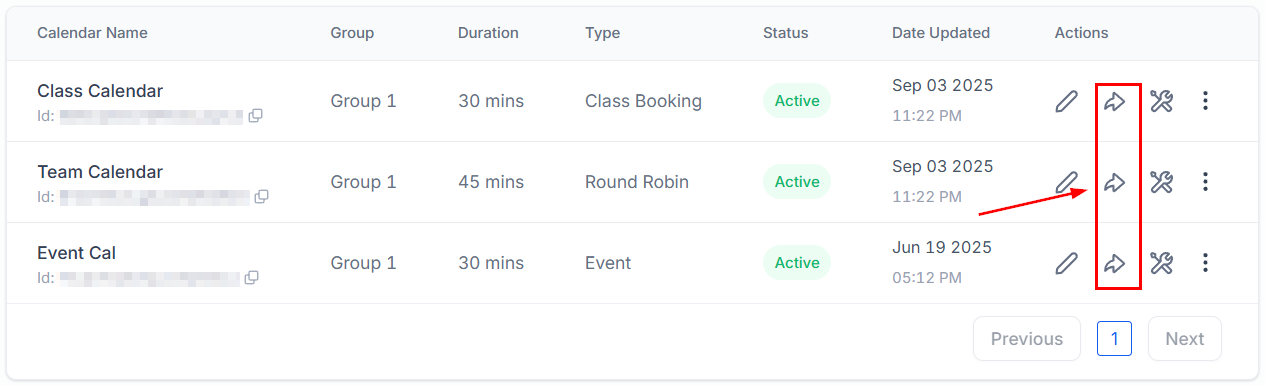 Click **+ Create Link**. Copy the generated URL and send it directly to the contact.
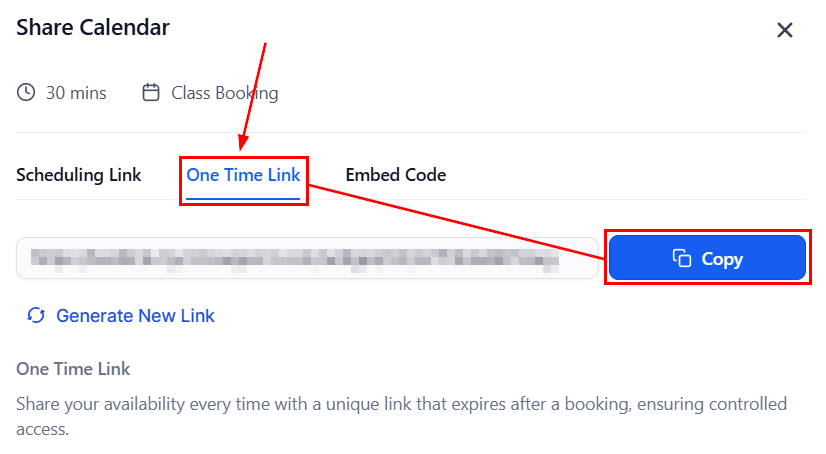 One-time booking links expire immediately after use or can be set to expire after a set period. They cannot be recovered once expired.
***
## Google organic booking
Google Organic Booking lets contacts book directly from your Google Business Profile — right from Google Search or Google Maps results.
Navigate to **Calendar Settings** and click on the calendar you want to list on Google.
One-time booking links expire immediately after use or can be set to expire after a set period. They cannot be recovered once expired.
***
## Google organic booking
Google Organic Booking lets contacts book directly from your Google Business Profile — right from Google Search or Google Maps results.
Navigate to **Calendar Settings** and click on the calendar you want to list on Google.
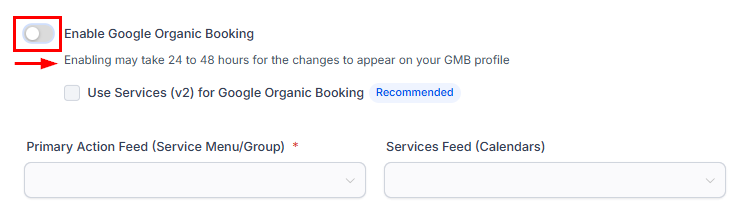
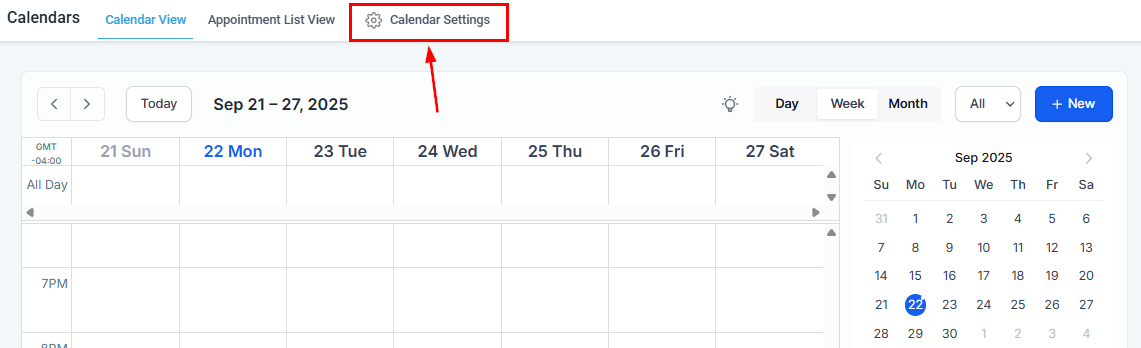 Find the **Google Organic Booking** section and toggle it on.
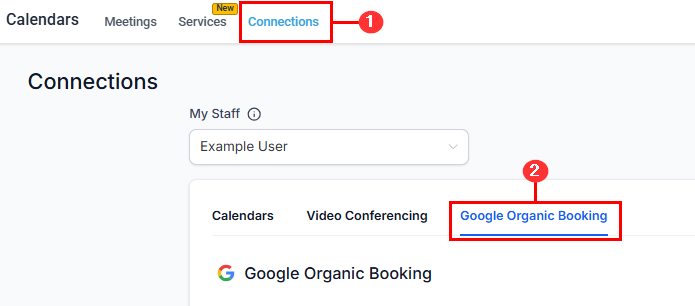 Toggle on the booking listing so it becomes active on your Google Business Profile.
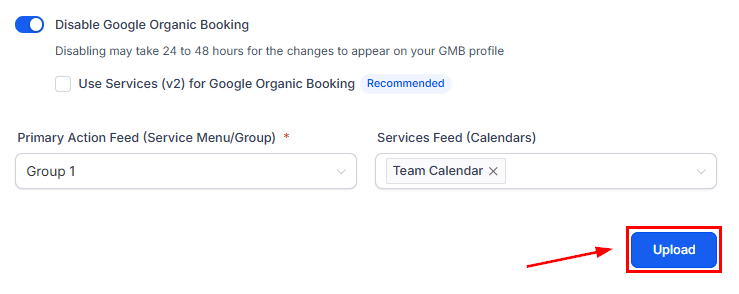
 Upload photos and other assets required by Google for Business Profile listings.
 Your Google Business Profile must be verified and connected in your account integrations before enabling Google Organic Booking.
### Disabling Google organic booking
To remove your calendar from Google Business Profile:
1. Go to **Calendar Settings** for the calendar
2. Find the **Google Organic Booking** section
3. Toggle the setting off
4. Save the changes
The listing is removed from Google Business Profile within 24–48 hours.
***
## Calendar groups as booking pages
Calendar groups create a combined booking page that displays multiple calendars together. This is useful for teams, multi-service offerings, and multi-location businesses.
To set up a calendar group:
1. Go to **Calendar Settings > Groups**
2. Click **+ New Group** and give it a name and URL slug
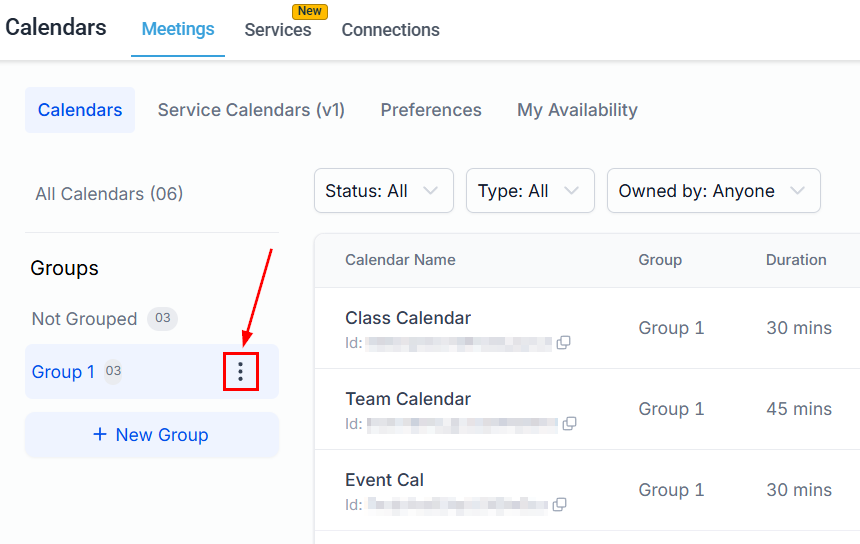
3. Add calendars to the group via the calendar settings or the three-dot menu on each calendar card
4. Share the group booking link — contacts can browse all calendars in the group and choose their preferred slot
Use calendar groups to create a team booking page where contacts can see all available team members and pick their preferred one.
***
## Customizing your booking page
Each calendar's booking widget can be customized to match your brand:
* **Color scheme** — button color, date highlight color, time slot color, and action colors
* **Background color** — the backdrop behind the booking form
* **Button text** — replace "Book Now" with custom copy
* **Calendar logo** — displayed at the top of the booking widget
* **Cover image** — appears in group/Neo widget views
* **Widget style** — choose between Classic and Neo layouts
* **Show/hide details** — toggle calendar name, description, duration, and timezone display
Access customization options in **Calendar Settings > Advanced Settings > Customizations**.
***
## Consent checkbox for compliance
Add a required consent checkbox to your booking form for SMS marketing and data privacy compliance. When enabled, contacts must check the box before completing their booking.
To enable the consent checkbox:
1. Go to **Calendar Settings > Advanced Settings > Forms & Payment**
2. Toggle on **Consent Checkbox**
3. Customize the consent text (e.g., "I agree to receive SMS messages from \[Business Name]")
4. Save the calendar
The consent checkbox is recommended for businesses that send SMS follow-ups or marketing messages to contacts who book appointments. It helps maintain compliance with TCPA and other messaging regulations.
***
## Add guests feature in bookings
The Add Guests feature lets contacts include additional attendees when booking an appointment. This is useful for group meetings, family appointments, or any scenario where multiple people need to attend.
When guests are added:
* Each guest receives their own confirmation and reminder notifications
* Guest names and email addresses are stored on the appointment record
* For class booking calendars with per-attendee pricing, the total is calculated based on the number of guests
To enable:
1. Go to **Calendar Settings > Forms & Payment**
2. Toggle on **Allow Guests**
3. Optionally enable **Require Guests** to make guest information mandatory
4. Save
***
## FAQs
Yes. Generate an embed code for each calendar individually and paste the iframe snippets side by side or stacked in your page HTML. Alternatively, create a calendar group and embed the group booking page as a single widget that shows all calendars together.
Yes. The embed is a live iframe that always reflects the current availability settings of your calendar. You do not need to update the embed code after changing hours, buffer times, or other settings.
No. One-time links must be created individually — each link is tied to a single use. For sending personalized booking links to many contacts, use a workflow action that sends the calendar booking link via SMS or email, which remains reusable but is delivered to one contact at a time.
Unused one-time links remain valid indefinitely until they are either used or manually deleted from the One-Time Booking Links section in Calendar Settings.
After enabling the feature and uploading the required assets, it typically takes 24–72 hours for the booking option to appear on your Google Business Profile. Google reviews and activates the listing on their side.
Yes. Calendar groups have their own shareable and embeddable booking pages. In Calendar Settings, find the group, use its three-dot action menu, and select **Copy embed code** to get the iframe snippet for the group's combined booking page.
Your Google Business Profile must be verified and connected in your account integrations before enabling Google Organic Booking.
### Disabling Google organic booking
To remove your calendar from Google Business Profile:
1. Go to **Calendar Settings** for the calendar
2. Find the **Google Organic Booking** section
3. Toggle the setting off
4. Save the changes
The listing is removed from Google Business Profile within 24–48 hours.
***
## Calendar groups as booking pages
Calendar groups create a combined booking page that displays multiple calendars together. This is useful for teams, multi-service offerings, and multi-location businesses.
To set up a calendar group:
1. Go to **Calendar Settings > Groups**
2. Click **+ New Group** and give it a name and URL slug
3. Add calendars to the group via the calendar settings or the three-dot menu on each calendar card
4. Share the group booking link — contacts can browse all calendars in the group and choose their preferred slot
Use calendar groups to create a team booking page where contacts can see all available team members and pick their preferred one.
***
## Customizing your booking page
Each calendar's booking widget can be customized to match your brand:
* **Color scheme** — button color, date highlight color, time slot color, and action colors
* **Background color** — the backdrop behind the booking form
* **Button text** — replace "Book Now" with custom copy
* **Calendar logo** — displayed at the top of the booking widget
* **Cover image** — appears in group/Neo widget views
* **Widget style** — choose between Classic and Neo layouts
* **Show/hide details** — toggle calendar name, description, duration, and timezone display
Access customization options in **Calendar Settings > Advanced Settings > Customizations**.
***
## Consent checkbox for compliance
Add a required consent checkbox to your booking form for SMS marketing and data privacy compliance. When enabled, contacts must check the box before completing their booking.
To enable the consent checkbox:
1. Go to **Calendar Settings > Advanced Settings > Forms & Payment**
2. Toggle on **Consent Checkbox**
3. Customize the consent text (e.g., "I agree to receive SMS messages from \[Business Name]")
4. Save the calendar
The consent checkbox is recommended for businesses that send SMS follow-ups or marketing messages to contacts who book appointments. It helps maintain compliance with TCPA and other messaging regulations.
***
## Add guests feature in bookings
The Add Guests feature lets contacts include additional attendees when booking an appointment. This is useful for group meetings, family appointments, or any scenario where multiple people need to attend.
When guests are added:
* Each guest receives their own confirmation and reminder notifications
* Guest names and email addresses are stored on the appointment record
* For class booking calendars with per-attendee pricing, the total is calculated based on the number of guests
To enable:
1. Go to **Calendar Settings > Forms & Payment**
2. Toggle on **Allow Guests**
3. Optionally enable **Require Guests** to make guest information mandatory
4. Save
***
## FAQs
Yes. Generate an embed code for each calendar individually and paste the iframe snippets side by side or stacked in your page HTML. Alternatively, create a calendar group and embed the group booking page as a single widget that shows all calendars together.
Yes. The embed is a live iframe that always reflects the current availability settings of your calendar. You do not need to update the embed code after changing hours, buffer times, or other settings.
No. One-time links must be created individually — each link is tied to a single use. For sending personalized booking links to many contacts, use a workflow action that sends the calendar booking link via SMS or email, which remains reusable but is delivered to one contact at a time.
Unused one-time links remain valid indefinitely until they are either used or manually deleted from the One-Time Booking Links section in Calendar Settings.
After enabling the feature and uploading the required assets, it typically takes 24–72 hours for the booking option to appear on your Google Business Profile. Google reviews and activates the listing on their side.
Yes. Calendar groups have their own shareable and embeddable booking pages. In Calendar Settings, find the group, use its three-dot action menu, and select **Copy embed code** to get the iframe snippet for the group's combined booking page.