> ## Documentation Index
> Fetch the complete documentation index at: https://help.hoopai.com/llms.txt
> Use this file to discover all available pages before exploring further.
# Book and manage appointments in HoopAI
> Book, edit, cancel, and track appointments in HoopAI. Add guests, set recurring bookings, filter with smart lists, and update statuses.
The Appointments section within Calendars lets you manage all scheduled appointments across your account. You can book new ones manually, edit existing ones, add guests, create recurring appointments, add notes, and use smart list filters to find appointments quickly.
## Viewing appointments
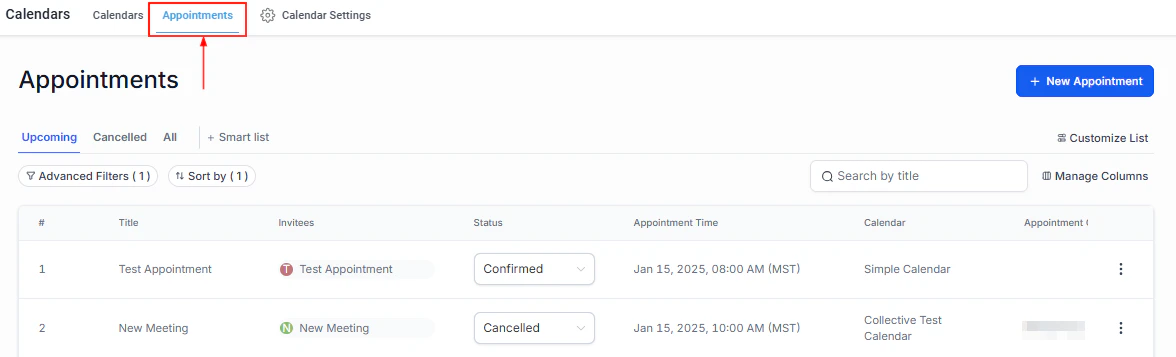
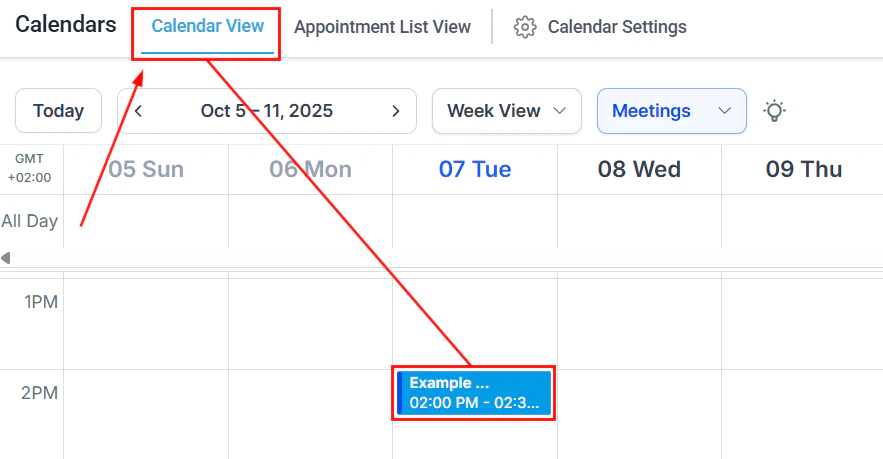
Appointments can be viewed in two places:
* **Calendar view** — the main calendar in the Calendars section displays all appointments in day, week, or month layout
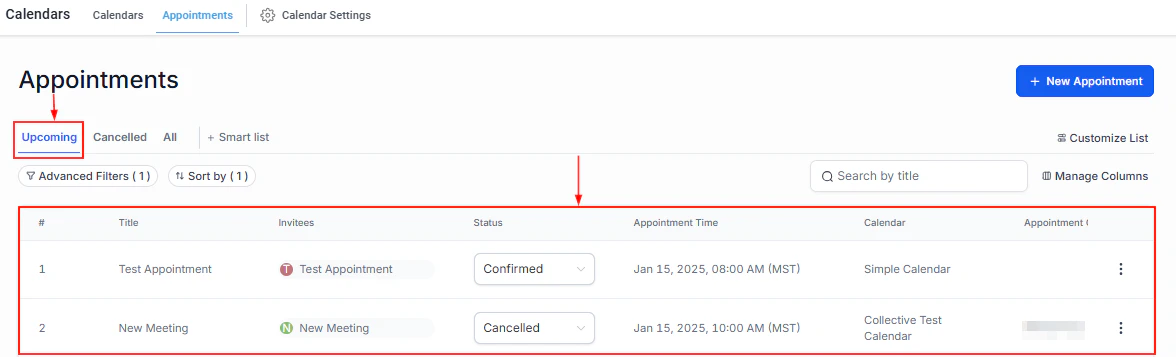
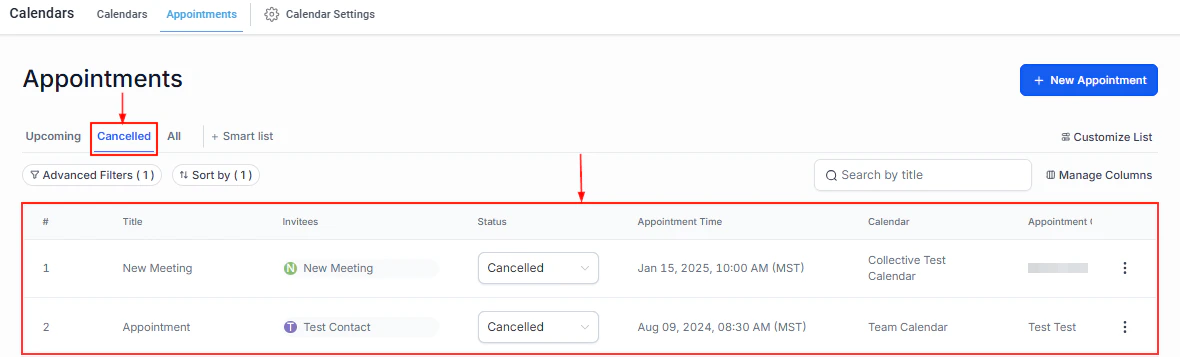
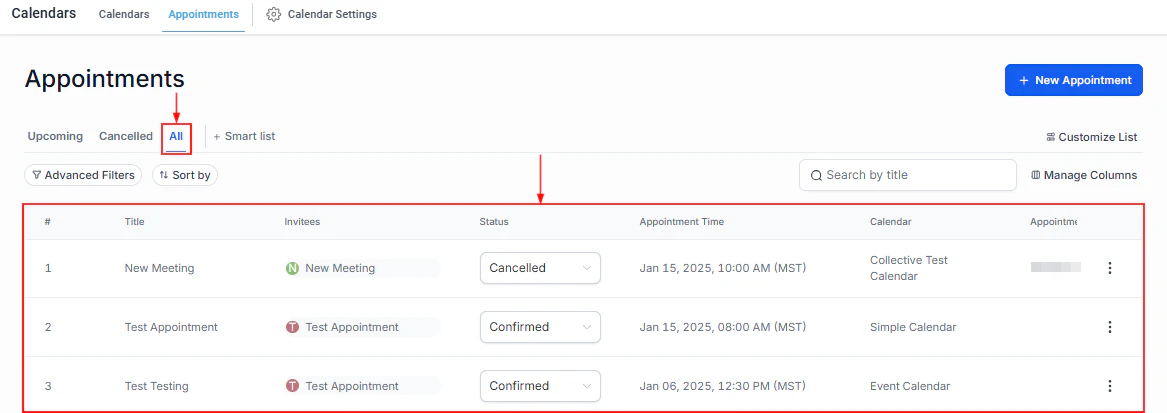
* **Appointments list** — a dedicated list view within the Calendars section with filtering, sorting, and column customization
 ### Appointment list columns
The appointments list shows the following information by default:
| Column | What it shows |
| ----------------- | ---------------------------------------------------- |
| **Contact name** | The person who booked or was booked |
| **Calendar** | Which calendar the appointment is on |
| **Status** | Confirmed, Pending, Cancelled, Showed, No Show, etc. |
| **Date and time** | When the appointment is scheduled |
| **Assigned user** | Team member responsible for the appointment |
| **Notes** | Any appointment notes added |
Use the **Manage Columns** option to show or hide additional fields.
### Filtering and sorting
Click the **Filter** icon to filter appointments by:
* **Date range** — past, upcoming, or a custom range
* **Status** — Confirmed, Pending, Cancelled, No Show, etc.
* **Calendar** — filter to a specific calendar
* **Assigned user** — show only appointments for a specific team member
* **Contact** — find all appointments for a specific contact
### Appointment list columns
The appointments list shows the following information by default:
| Column | What it shows |
| ----------------- | ---------------------------------------------------- |
| **Contact name** | The person who booked or was booked |
| **Calendar** | Which calendar the appointment is on |
| **Status** | Confirmed, Pending, Cancelled, Showed, No Show, etc. |
| **Date and time** | When the appointment is scheduled |
| **Assigned user** | Team member responsible for the appointment |
| **Notes** | Any appointment notes added |
Use the **Manage Columns** option to show or hide additional fields.
### Filtering and sorting
Click the **Filter** icon to filter appointments by:
* **Date range** — past, upcoming, or a custom range
* **Status** — Confirmed, Pending, Cancelled, No Show, etc.
* **Calendar** — filter to a specific calendar
* **Assigned user** — show only appointments for a specific team member
* **Contact** — find all appointments for a specific contact
 ### Smart lists in appointments
Save a filter configuration as a **smart list** to reuse it later:
Set the filters and sort options you want to save.
Click **Save as Smart List**, enter a name, and save.
Smart lists appear in the left sidebar of the Appointments section for one-click access.
***
## Viewing an appointment in calendar view
Click on any appointment in the calendar to open the appointment modal.
### Smart lists in appointments
Save a filter configuration as a **smart list** to reuse it later:
Set the filters and sort options you want to save.
Click **Save as Smart List**, enter a name, and save.
Smart lists appear in the left sidebar of the Appointments section for one-click access.
***
## Viewing an appointment in calendar view
Click on any appointment in the calendar to open the appointment modal.
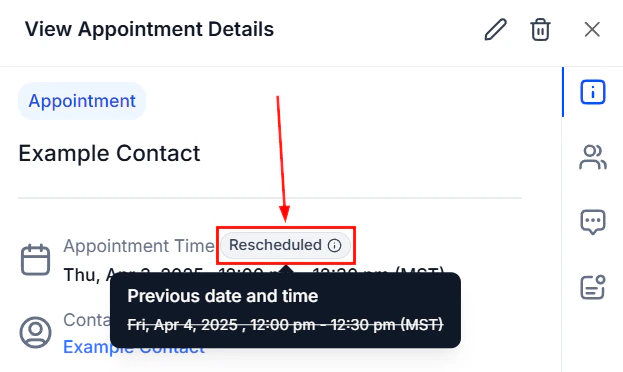
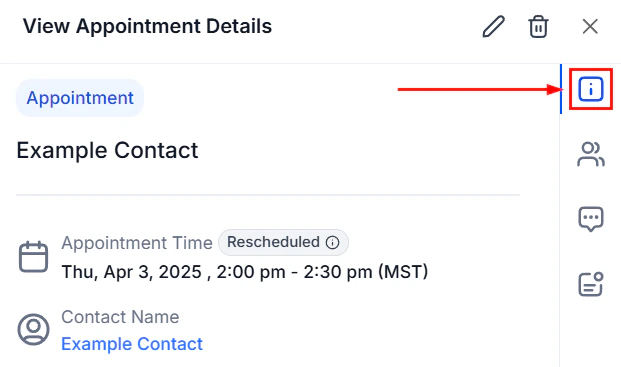
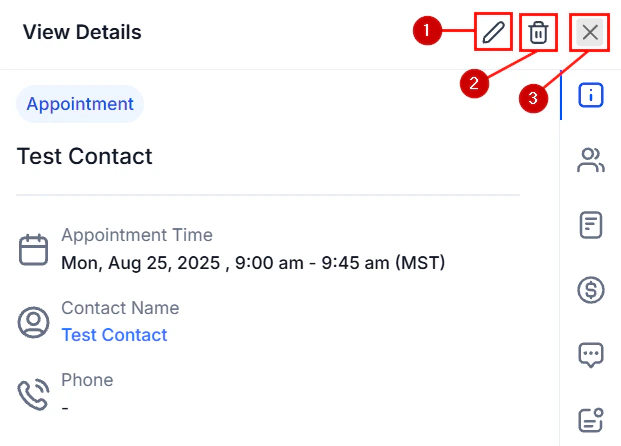 The modal shows:
* Contact name (linked to the contact record)
* Calendar name and assigned user
* Appointment status
* Date, time, and duration
* Meeting location or video link
* Notes
* Guest list
* Actions: edit, cancel, reschedule, or change status
The modal shows:
* Contact name (linked to the contact record)
* Calendar name and assigned user
* Appointment status
* Date, time, and duration
* Meeting location or video link
* Notes
* Guest list
* Actions: edit, cancel, reschedule, or change status
 ***
## Booking a new appointment
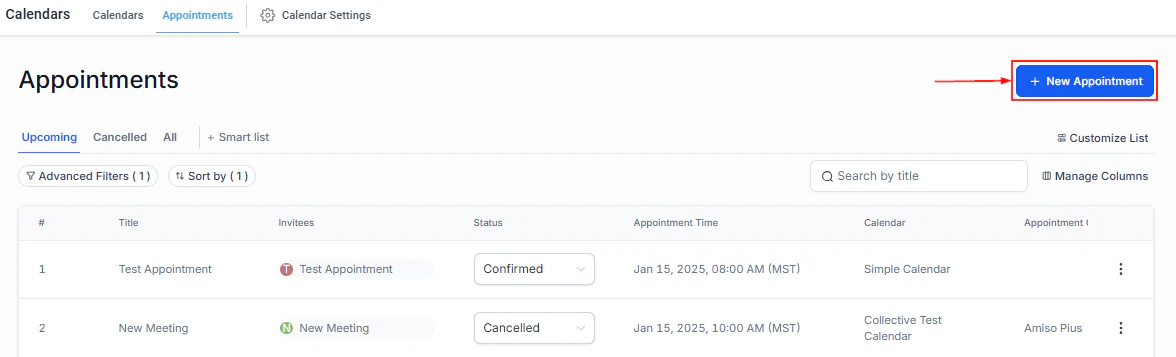
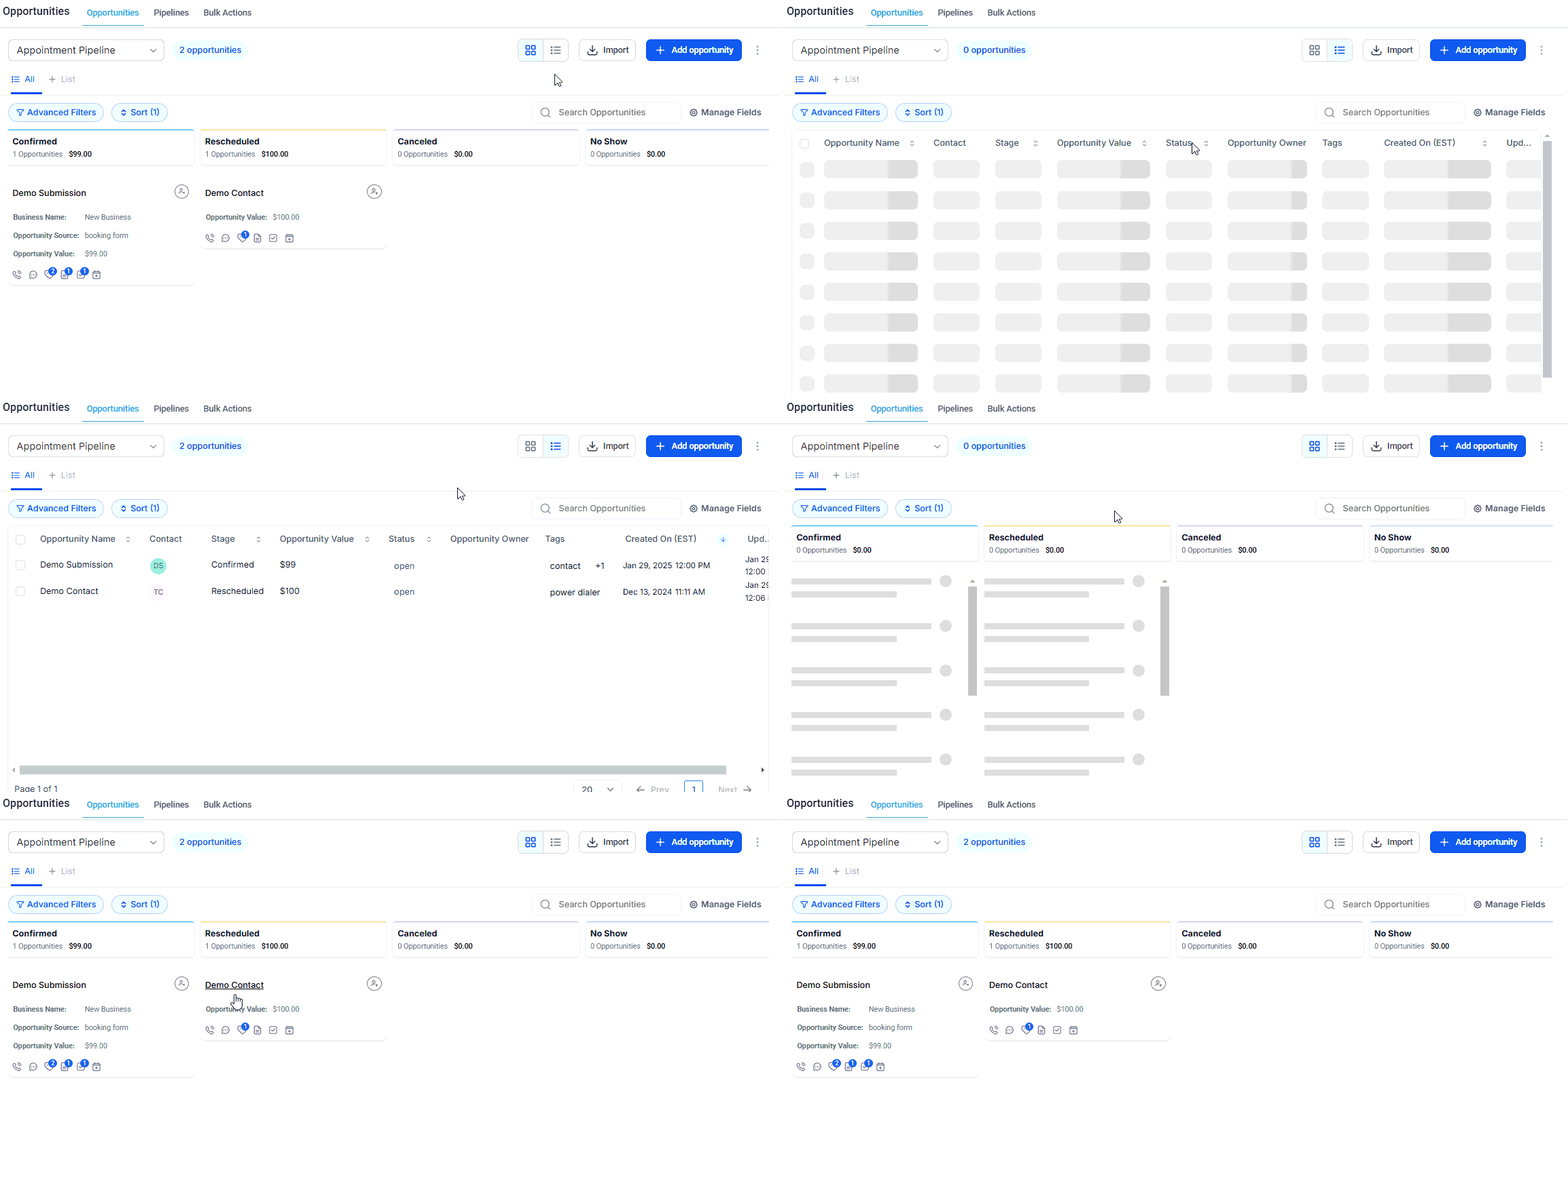
In the Calendars section, click the **+ New Appointment** button at the top of the calendar or appointment list.
***
## Booking a new appointment
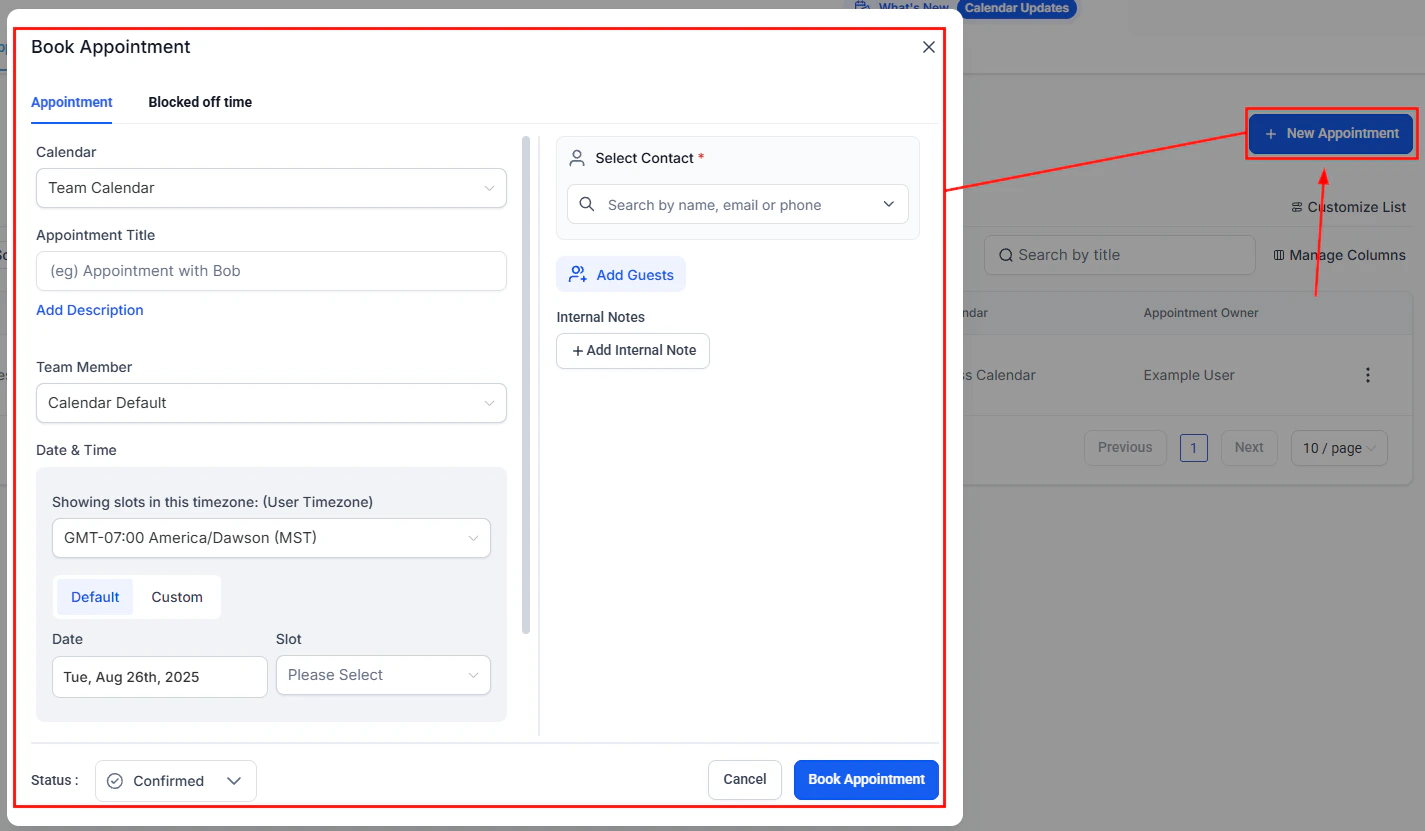
In the Calendars section, click the **+ New Appointment** button at the top of the calendar or appointment list.
 Search for an existing contact by name, email, or phone, or create a new contact directly from the booking form.
Choose which calendar this appointment belongs to.
Pick the appointment date and time slot. Unavailable times are automatically hidden.
Search for an existing contact by name, email, or phone, or create a new contact directly from the booking form.
Choose which calendar this appointment belongs to.
Pick the appointment date and time slot. Unavailable times are automatically hidden.
 * **Assigned user** — which team member is hosting
* **Meeting location** — address, virtual link, or platform
* **Status** — Confirmed, Pending, or other
* **Notes** — any pre-meeting context
* **Guests** — additional attendees
Click **Save** to book the appointment. The contact receives a confirmation notification if configured.
***
## Editing an appointment
Click on the appointment in the calendar view or the appointments list.
Click the **Edit** button or the pencil icon to open the editing form.
Modify any fields — date, time, status, notes, guests, or assigned user.
* **Assigned user** — which team member is hosting
* **Meeting location** — address, virtual link, or platform
* **Status** — Confirmed, Pending, or other
* **Notes** — any pre-meeting context
* **Guests** — additional attendees
Click **Save** to book the appointment. The contact receives a confirmation notification if configured.
***
## Editing an appointment
Click on the appointment in the calendar view or the appointments list.
Click the **Edit** button or the pencil icon to open the editing form.
Modify any fields — date, time, status, notes, guests, or assigned user.
 Click **Save** to apply your changes. If notifications are configured, the contact will receive an update.
***
## Adding guests to an appointment
Guests are additional attendees beyond the primary contact.
Click **Save** to apply your changes. If notifications are configured, the contact will receive an update.
***
## Adding guests to an appointment
Guests are additional attendees beyond the primary contact.
 Go to **Calendar Settings > Forms & Payment** and enable **Add Guests**. Choose whether to require guest name and email, or count only.
During appointment creation or editing, enter guest email addresses. Guests receive a calendar invitation and can accept or decline.
If guests are mandatory (Require Guests is enabled), the booking cannot be completed without adding at least one guest.
***
## Creating a recurring appointment
Recurring appointments repeat on a defined schedule from a single booking.
Go to **Calendar Settings > Forms & Payment** and enable **Add Guests**. Choose whether to require guest name and email, or count only.
During appointment creation or editing, enter guest email addresses. Guests receive a calendar invitation and can accept or decline.
If guests are mandatory (Require Guests is enabled), the booking cannot be completed without adding at least one guest.
***
## Creating a recurring appointment
Recurring appointments repeat on a defined schedule from a single booking.
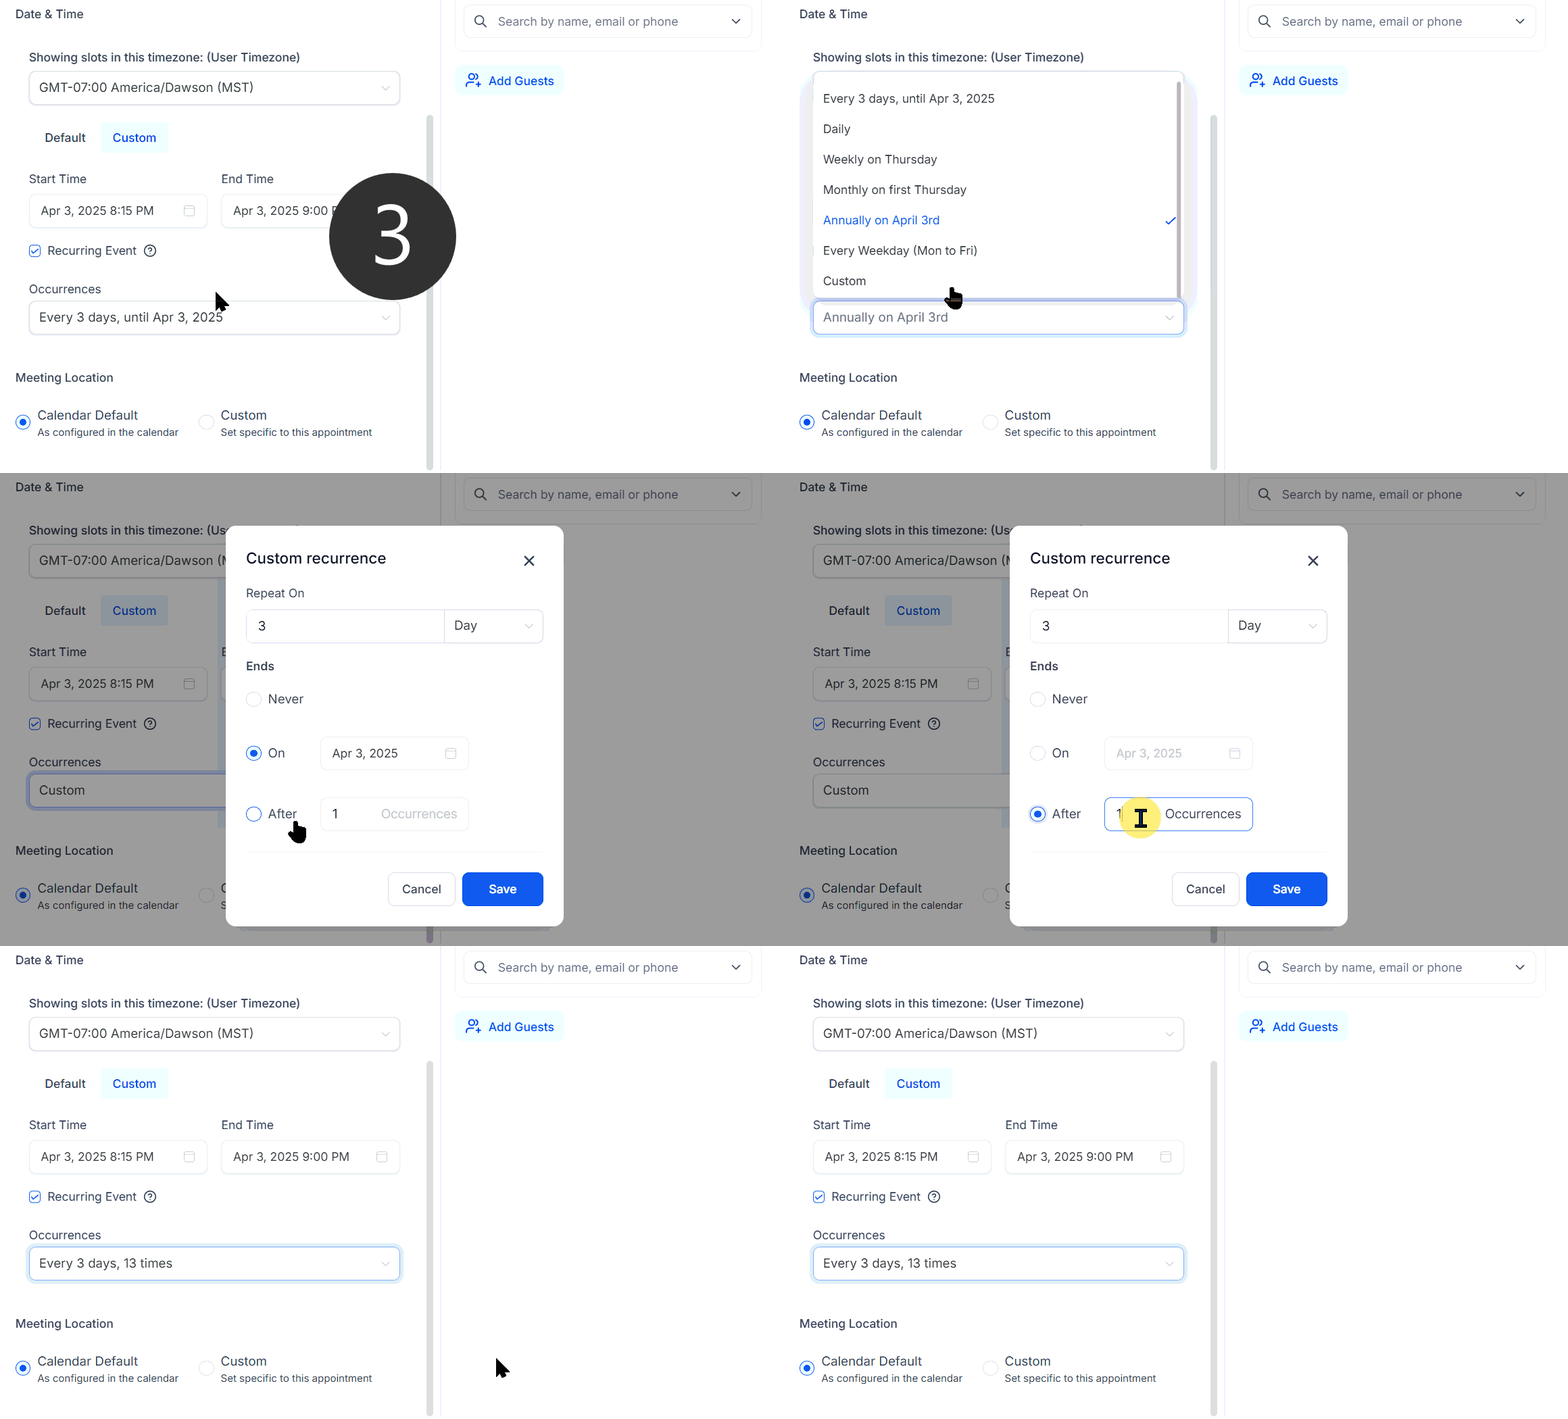 Go to the calendar's **Advanced Settings > Availability** and toggle on **Recurring Meeting**.
Set:
* **Frequency** — how often the appointment repeats (daily, weekly, monthly)
* **Times to repeat** — total number of consecutive occurrences
* **Unavailable slot handling** — skip, book next available, or continue regardless
When a contact books through this calendar, the system creates all recurring appointments in the series at once.
### Editing a recurring series
When you edit a recurring appointment, you can choose to:
* **Edit this appointment only** — change only the selected occurrence
* **Edit this and all following appointments** — update the remaining series from this point
* **Edit all appointments in the series** — apply changes to every occurrence
Cancelling a recurring appointment typically affects only the single selected occurrence. Use "this and all following" to cancel the full remaining series.
***
## Manual confirmation of appointments
When a calendar has **Manual Confirmation** enabled, new bookings arrive in **Pending** status rather than being immediately confirmed. A team member must approve or reject the appointment before the contact receives a confirmation.
To approve a pending appointment:
1. Open the appointment from the Appointments list or calendar view.
2. Change the status from **Pending** to **Confirmed**.
3. The contact receives their confirmation notification at that point.
To enable manual confirmation, go to the calendar's **Advanced Settings > Availability** and enable the **Manual Confirmation** toggle.
***
## Cancelling an appointment
Open the appointment and click **Cancel** (or select **Cancel** from the three-dots menu). If the cancellation policy is configured in the calendar, the contact may also have a self-service cancellation link in their confirmation email.
***
## Appointment list view
The appointment list view provides a spreadsheet-style interface for managing appointments in bulk, as an alternative to the visual calendar view.
### Switching to list view
In the **Calendars** section, click the **List** tab (next to the Calendar tab) to switch to list view. The list displays all appointments in a sortable, filterable table.
### List view capabilities
* **Sort** by date, status, calendar, contact name, or assigned user
* **Filter** using the filter bar — combine date range, status, calendar, and user filters
* **Bulk actions** — select multiple appointments to update statuses, export, or cancel in bulk
* **Column customization** — click **Manage Columns** to show or hide fields like notes, payment status, and custom fields
* **Quick edit** — click on any appointment row to open the detail modal for editing
### When to use list view vs. calendar view
| Use case | Best view |
| ------------------------------------------------- | ------------- |
| Reviewing today's schedule | Calendar view |
| Filtering appointments by status across all dates | List view |
| Exporting appointment data | List view |
| Visualizing availability gaps | Calendar view |
| Bulk status updates | List view |
***
## Appointment statuses
Appointment statuses track the lifecycle of a booking:
| Status | Meaning |
| ------------- | --------------------------------------------- |
| **Confirmed** | Appointment is scheduled and confirmed |
| **Pending** | Awaiting manual confirmation by a team member |
| **Cancelled** | Appointment has been cancelled |
| **Showed** | Contact attended the appointment |
| **No Show** | Contact did not attend |
Go to the calendar's **Advanced Settings > Availability** and toggle on **Recurring Meeting**.
Set:
* **Frequency** — how often the appointment repeats (daily, weekly, monthly)
* **Times to repeat** — total number of consecutive occurrences
* **Unavailable slot handling** — skip, book next available, or continue regardless
When a contact books through this calendar, the system creates all recurring appointments in the series at once.
### Editing a recurring series
When you edit a recurring appointment, you can choose to:
* **Edit this appointment only** — change only the selected occurrence
* **Edit this and all following appointments** — update the remaining series from this point
* **Edit all appointments in the series** — apply changes to every occurrence
Cancelling a recurring appointment typically affects only the single selected occurrence. Use "this and all following" to cancel the full remaining series.
***
## Manual confirmation of appointments
When a calendar has **Manual Confirmation** enabled, new bookings arrive in **Pending** status rather than being immediately confirmed. A team member must approve or reject the appointment before the contact receives a confirmation.
To approve a pending appointment:
1. Open the appointment from the Appointments list or calendar view.
2. Change the status from **Pending** to **Confirmed**.
3. The contact receives their confirmation notification at that point.
To enable manual confirmation, go to the calendar's **Advanced Settings > Availability** and enable the **Manual Confirmation** toggle.
***
## Cancelling an appointment
Open the appointment and click **Cancel** (or select **Cancel** from the three-dots menu). If the cancellation policy is configured in the calendar, the contact may also have a self-service cancellation link in their confirmation email.
***
## Appointment list view
The appointment list view provides a spreadsheet-style interface for managing appointments in bulk, as an alternative to the visual calendar view.
### Switching to list view
In the **Calendars** section, click the **List** tab (next to the Calendar tab) to switch to list view. The list displays all appointments in a sortable, filterable table.
### List view capabilities
* **Sort** by date, status, calendar, contact name, or assigned user
* **Filter** using the filter bar — combine date range, status, calendar, and user filters
* **Bulk actions** — select multiple appointments to update statuses, export, or cancel in bulk
* **Column customization** — click **Manage Columns** to show or hide fields like notes, payment status, and custom fields
* **Quick edit** — click on any appointment row to open the detail modal for editing
### When to use list view vs. calendar view
| Use case | Best view |
| ------------------------------------------------- | ------------- |
| Reviewing today's schedule | Calendar view |
| Filtering appointments by status across all dates | List view |
| Exporting appointment data | List view |
| Visualizing availability gaps | Calendar view |
| Bulk status updates | List view |
***
## Appointment statuses
Appointment statuses track the lifecycle of a booking:
| Status | Meaning |
| ------------- | --------------------------------------------- |
| **Confirmed** | Appointment is scheduled and confirmed |
| **Pending** | Awaiting manual confirmation by a team member |
| **Cancelled** | Appointment has been cancelled |
| **Showed** | Contact attended the appointment |
| **No Show** | Contact did not attend |
 Update the status by opening the appointment and selecting the new status from the dropdown.