> ## Documentation Index
> Fetch the complete documentation index at: https://help.hoopai.com/llms.txt
> Use this file to discover all available pages before exploring further.
# Workflow Troubleshooting
> Diagnose and fix common workflow issues using execution logs, enrollment history, and error checking tools.
When a workflow is not behaving as expected, the HoopAI Platform provides tools to diagnose the issue — including execution logs, enrollment history, and built-in error checking.
***
## Execution logs
The Execution Logs Tab in Workflows provides an overview of every action customers take during the workflow process. By using this tab, you can make sure that your workflow operates effectively and identify any potential issues that may arise during execution.
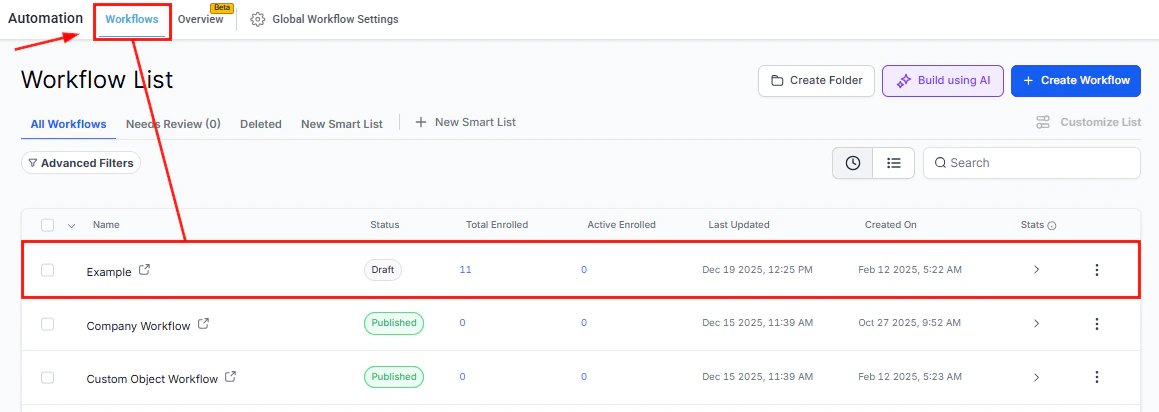
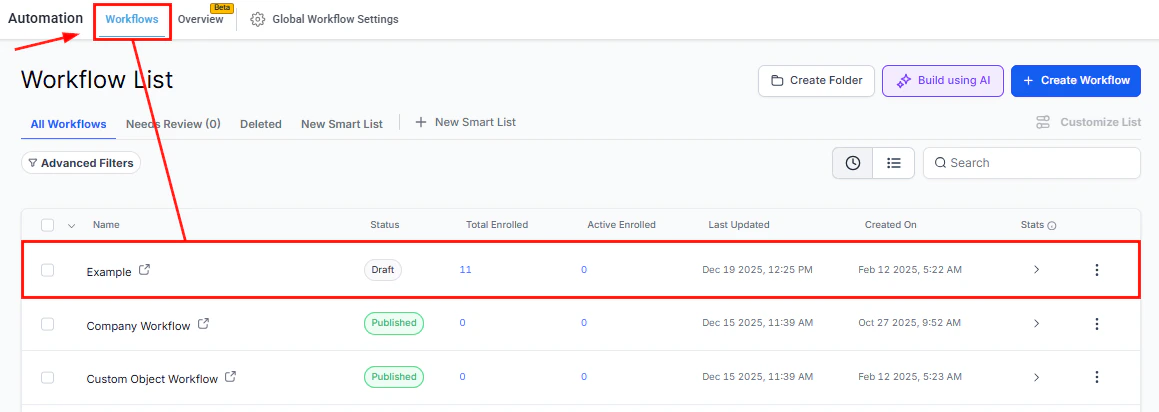
Select a workflow from the Automation tab to get started.
 ### Workflow Title
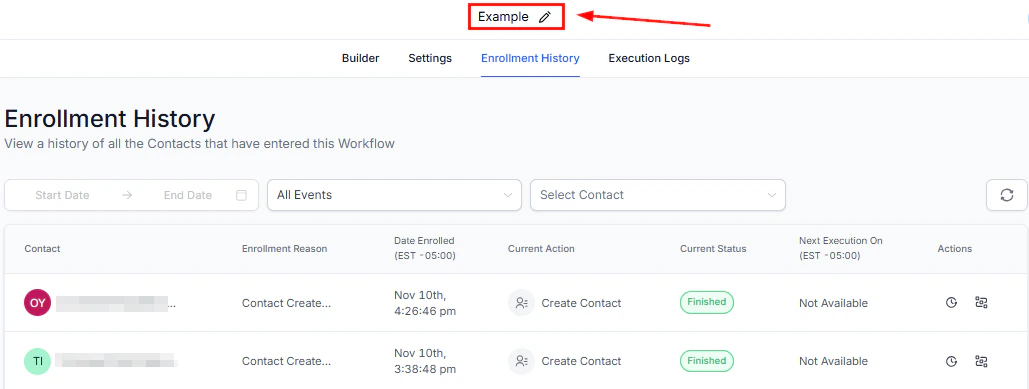
The title of the workflow is shown at the top center of the page. To rename the title, simply click on it and enter the new name in the provided field.
### Workflow Title
The title of the workflow is shown at the top center of the page. To rename the title, simply click on it and enter the new name in the provided field.
 ***
## Execution Logs
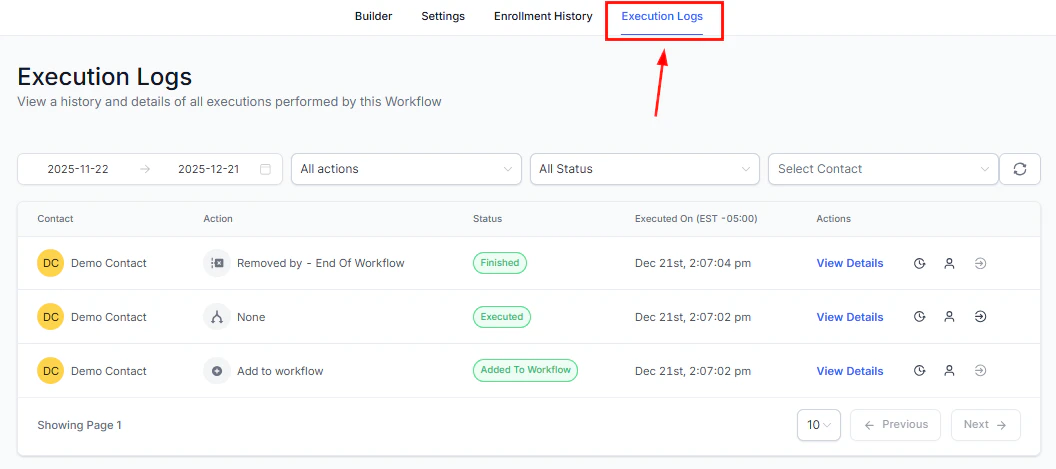
Below the workflow title, select the Execution Logs option to get a clear picture of how your contacts are moving through the workflow.
***
## Execution Logs
Below the workflow title, select the Execution Logs option to get a clear picture of how your contacts are moving through the workflow.
 ### Filter By Date
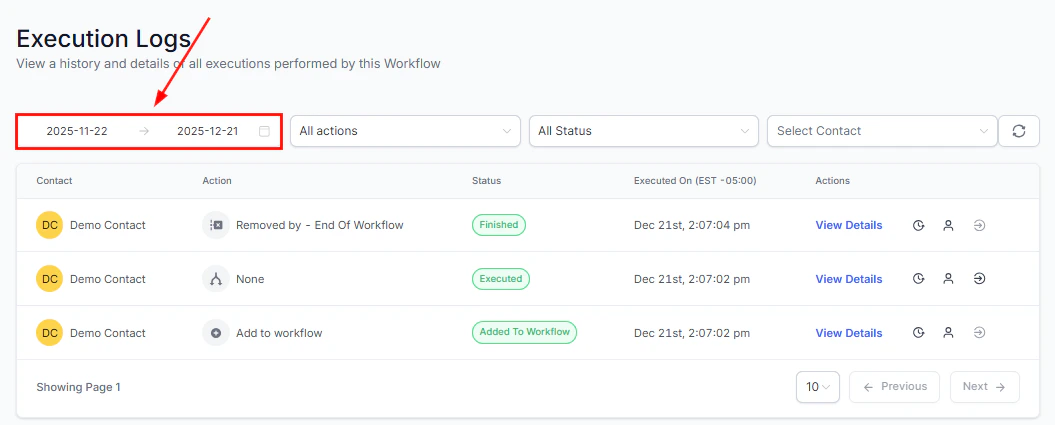
Easily filter execution logs by their execution date by selecting a desired time frame from the dropdown menu.
****📌Note****: Execution Logs are available up to last 30 days.
### Filter By Date
Easily filter execution logs by their execution date by selecting a desired time frame from the dropdown menu.
****📌Note****: Execution Logs are available up to last 30 days.
 ### Filter By Action
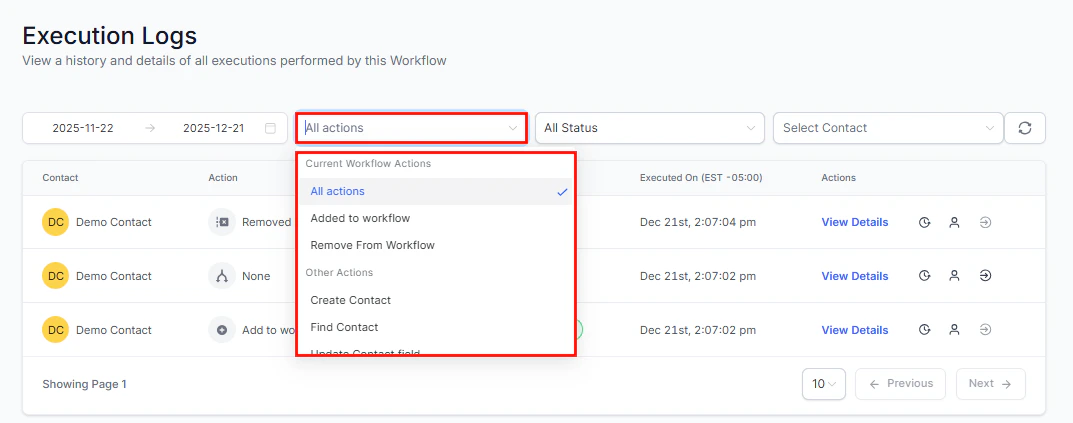
Use the All Actions filter to view contacts on a specific step. Enter a few characters in the search bar to locate the action easily.
### Filter By Action
Use the All Actions filter to view contacts on a specific step. Enter a few characters in the search bar to locate the action easily.
 ### Filter By Status
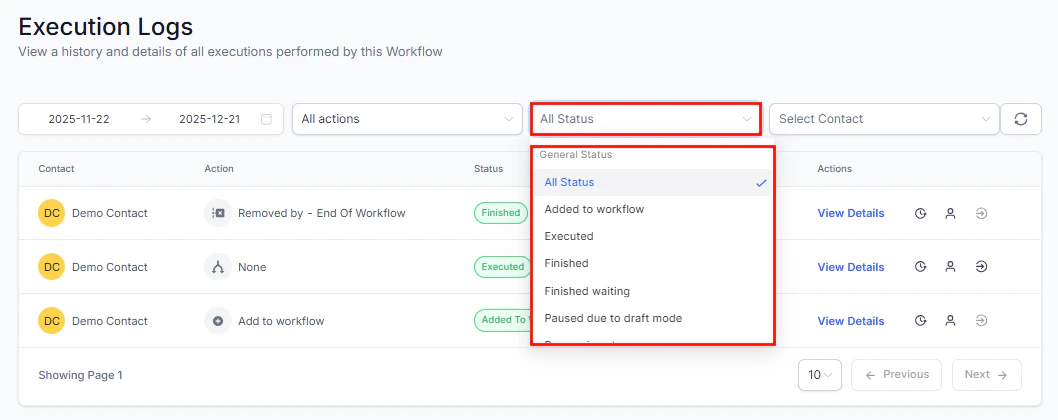
To view contacts with a certain status, click on the All Status dropdown menu and choose the specific status. Utilize the search bar to streamline your search process.
### Filter By Status
To view contacts with a certain status, click on the All Status dropdown menu and choose the specific status. Utilize the search bar to streamline your search process.
 ### Filter by Contact
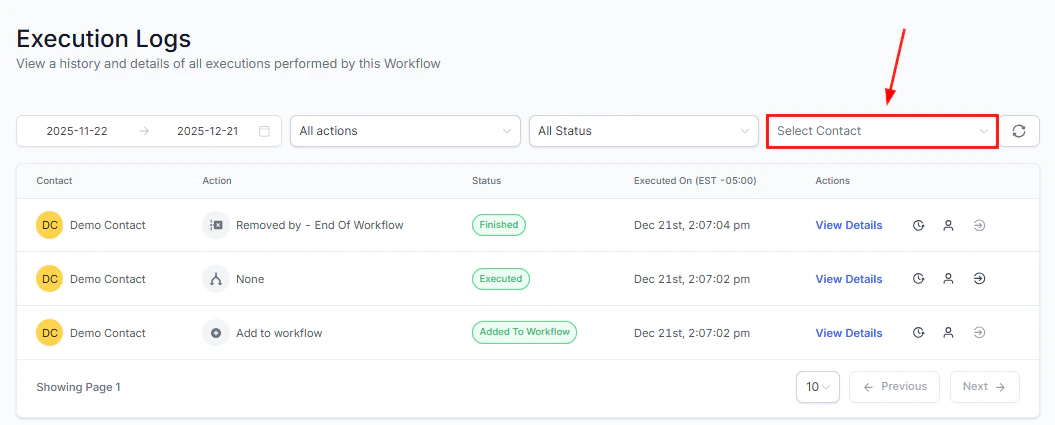
If you are navigating a lengthy list of action items, you can efficiently search for a specific customer by typing their name in the "Select Contact" field.
### Filter by Contact
If you are navigating a lengthy list of action items, you can efficiently search for a specific customer by typing their name in the "Select Contact" field.
 ### Refresh
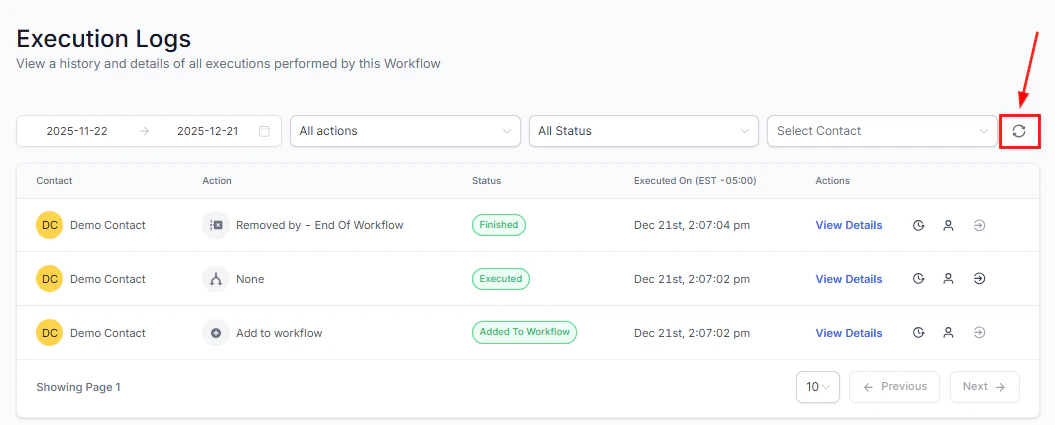
Click the refresh icon to display the most current data in your Execution Logs.
### Refresh
Click the refresh icon to display the most current data in your Execution Logs.
 ### Execution Logs Table
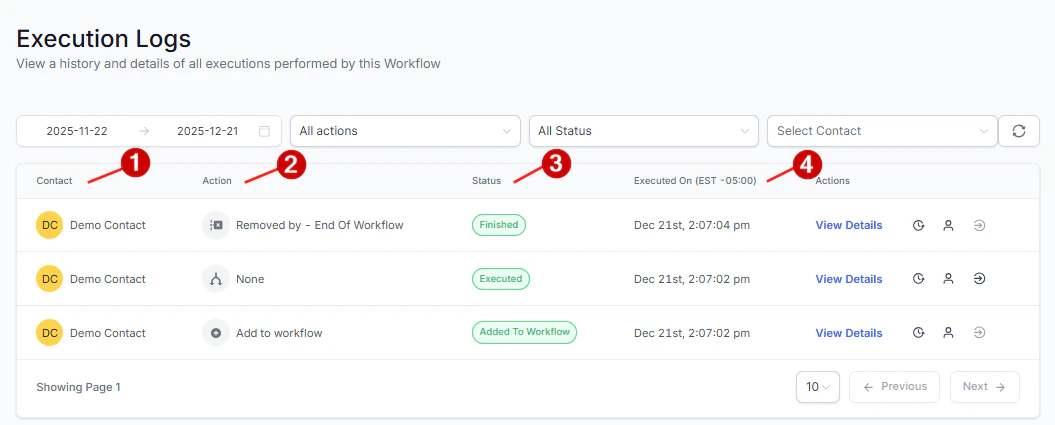
The Execution Logs table offers a detailed list of all data related to actions performed on contacts. This includes:
1. Name of the contact the action is associated with
2. Current Action being performed on the contacts as identified by the chosen action name
3. Status of the action
4. Date and time the action was executed
### Execution Logs Table
The Execution Logs table offers a detailed list of all data related to actions performed on contacts. This includes:
1. Name of the contact the action is associated with
2. Current Action being performed on the contacts as identified by the chosen action name
3. Status of the action
4. Date and time the action was executed
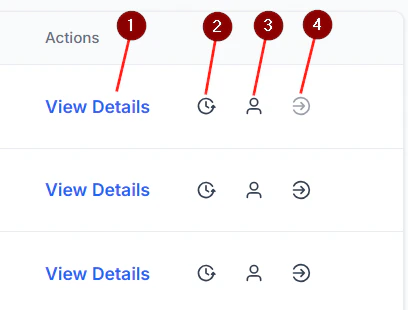
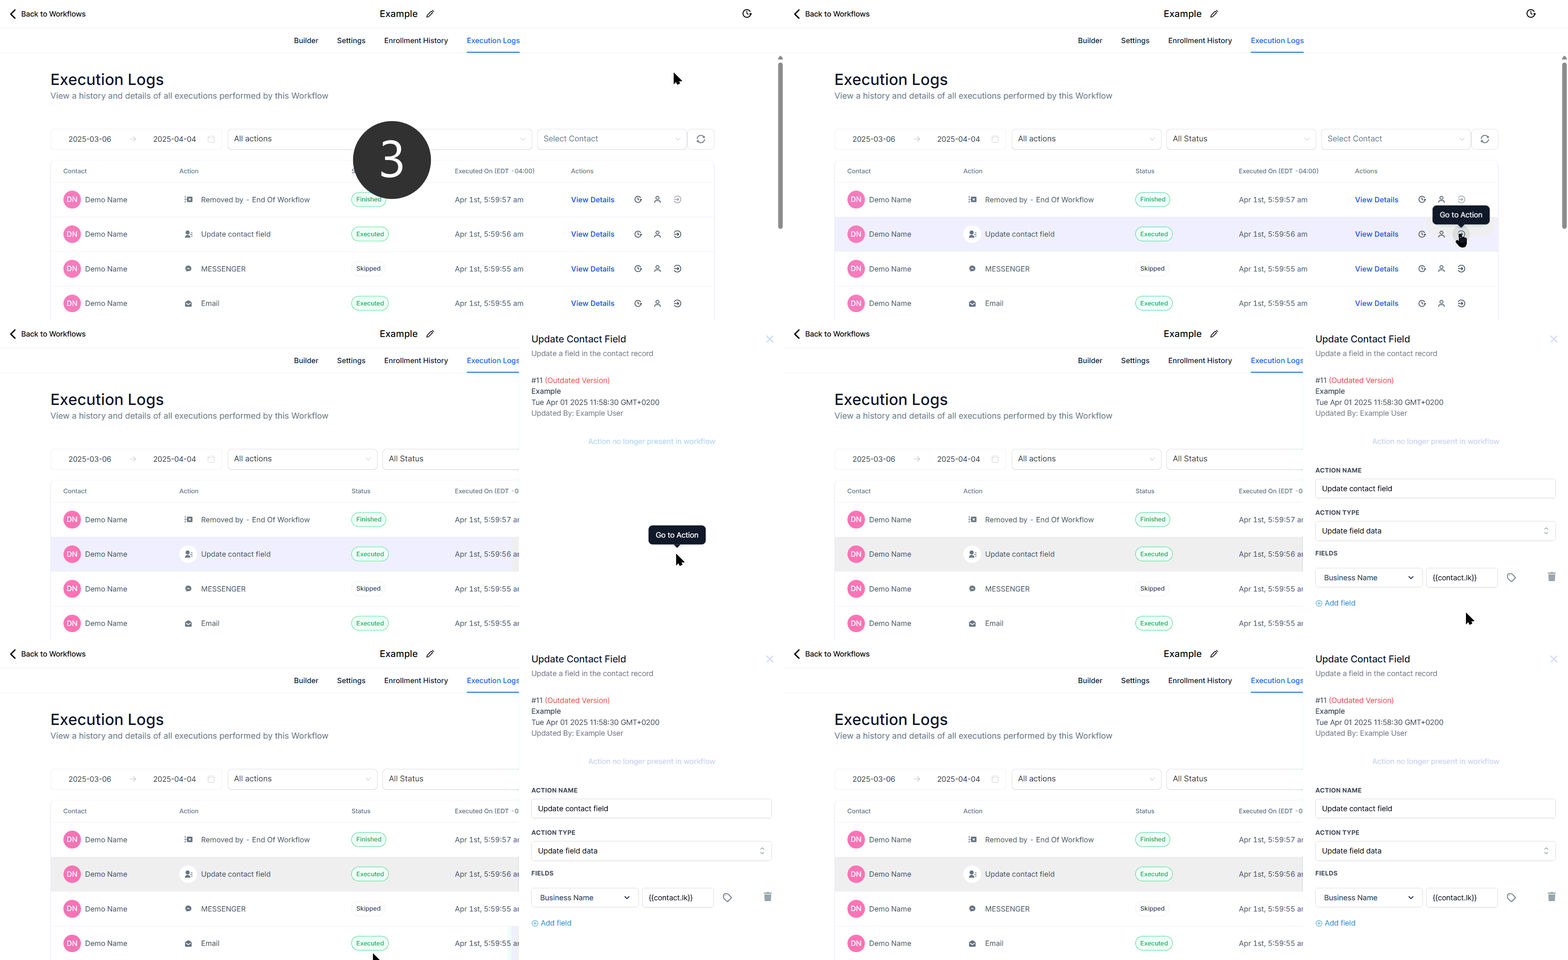
 In the Actions column, you can access execution details for any specific action (1), view the execution history of all actions associated with the current action and contact (2), review action executions of the contact for all enrollments the contacts have had for this workflow (3), or go to the action which opens a side panel with the actions details and redirection to the builder (4).
 📌 ****Note****: For workflows with the Allow re-entry setting disabled, the execution history and contact history buttons will display the same data.
 When an action encounters an error, the Status field and the View Details button will be highlighted, enabling users to quickly identify issues and take appropriate action.
 Consistently assess the execution logs of your workflows to confirm that processes are executing as intended. To learn more about the other workflow settings, please explore the other articles in this section.
***
## Enrollment history
The Enrollment History Tab within workflows provides a list of contacts who have entered the selected workflow. It displays important details, including the contact name, the date each contact began the workflow, and their current status, and allows you to access additional information such as their contact path and execution history.
Select a workflow from the Automation tab to get started.
Consistently assess the execution logs of your workflows to confirm that processes are executing as intended. To learn more about the other workflow settings, please explore the other articles in this section.
***
## Enrollment history
The Enrollment History Tab within workflows provides a list of contacts who have entered the selected workflow. It displays important details, including the contact name, the date each contact began the workflow, and their current status, and allows you to access additional information such as their contact path and execution history.
Select a workflow from the Automation tab to get started.
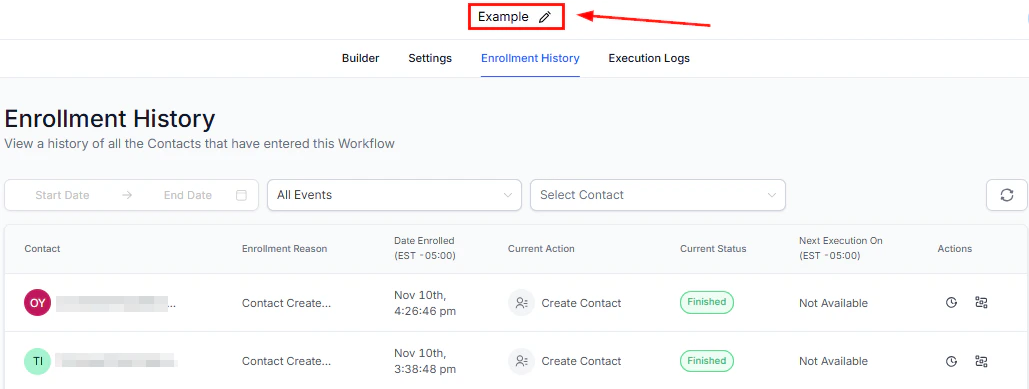
 ### Workflow Title
The title of the workflow is shown at the top center of the page. To rename the title, simply click on it and enter the new name in the provided field.
### Workflow Title
The title of the workflow is shown at the top center of the page. To rename the title, simply click on it and enter the new name in the provided field.
 ***
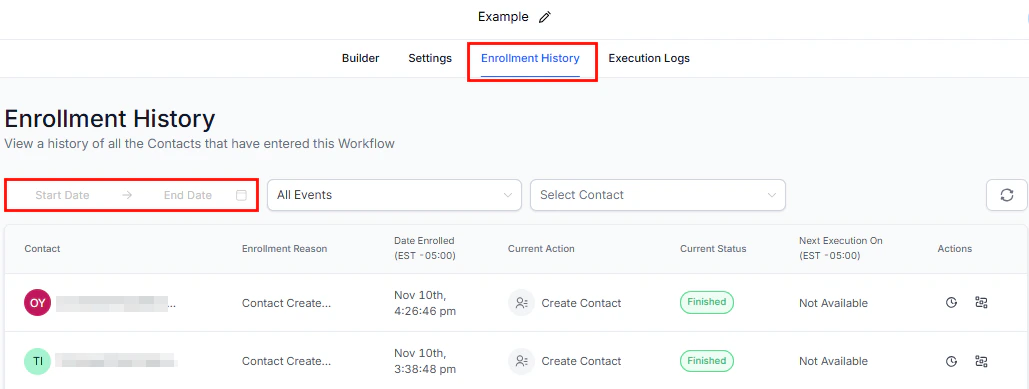
## Enrollment History
Beneath the workflow name, click on the Enrollment History option to access detailed information regarding contact enrollment and activity within the workflow.
### Filter By Date
Easily filter contacts by the date enrolled by selecting a desired time frame from the dropdown menu.
***
## Enrollment History
Beneath the workflow name, click on the Enrollment History option to access detailed information regarding contact enrollment and activity within the workflow.
### Filter By Date
Easily filter contacts by the date enrolled by selecting a desired time frame from the dropdown menu.
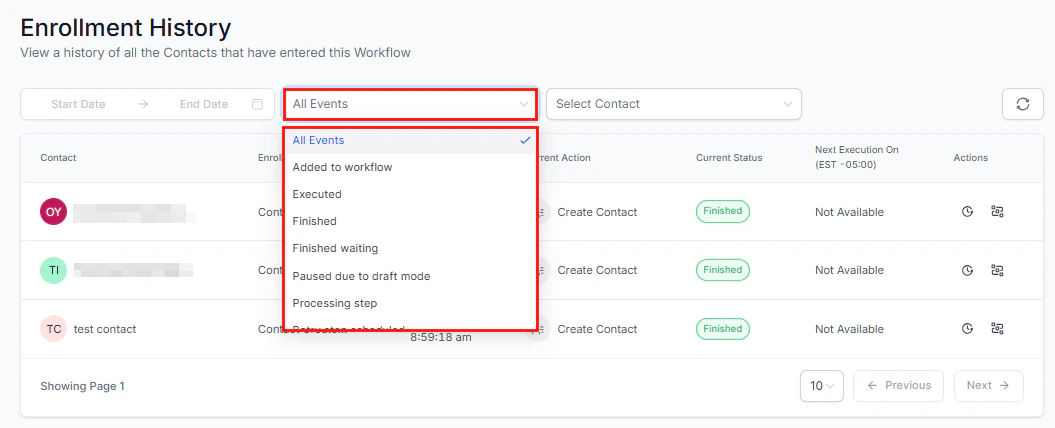
 ### Filter By Status
To view contacts with a certain status, click on the Events dropdown menu and choose the specific status. Utilize the search bar to streamline your search process.
### Filter By Status
To view contacts with a certain status, click on the Events dropdown menu and choose the specific status. Utilize the search bar to streamline your search process.
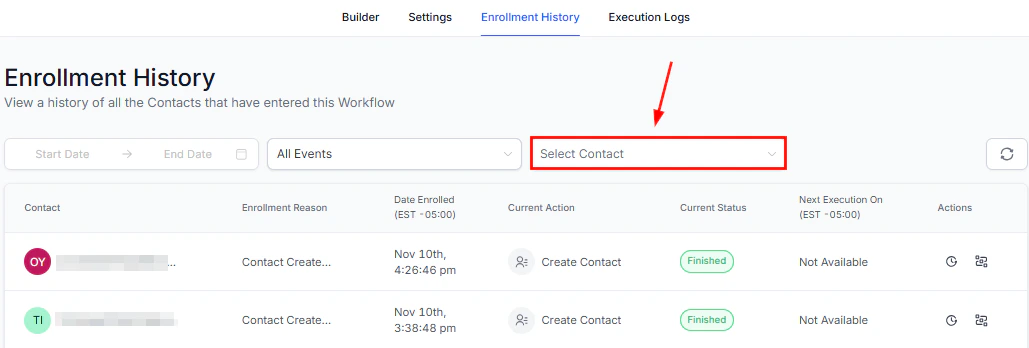
 ### Filter by Contact
If you are navigating a lengthy list of contacts, you can efficiently search for a specific customer by typing their name in the "Select Contact" box on the right.
### Filter by Contact
If you are navigating a lengthy list of contacts, you can efficiently search for a specific customer by typing their name in the "Select Contact" box on the right.
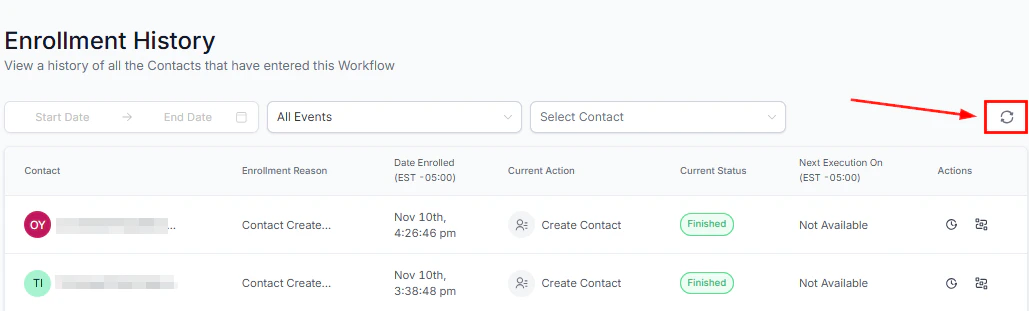
 ### Refresh
Click the refresh icon to update the enrollment history and display the most current data.
### Refresh
Click the refresh icon to update the enrollment history and display the most current data.
 ### Enrollment History Table
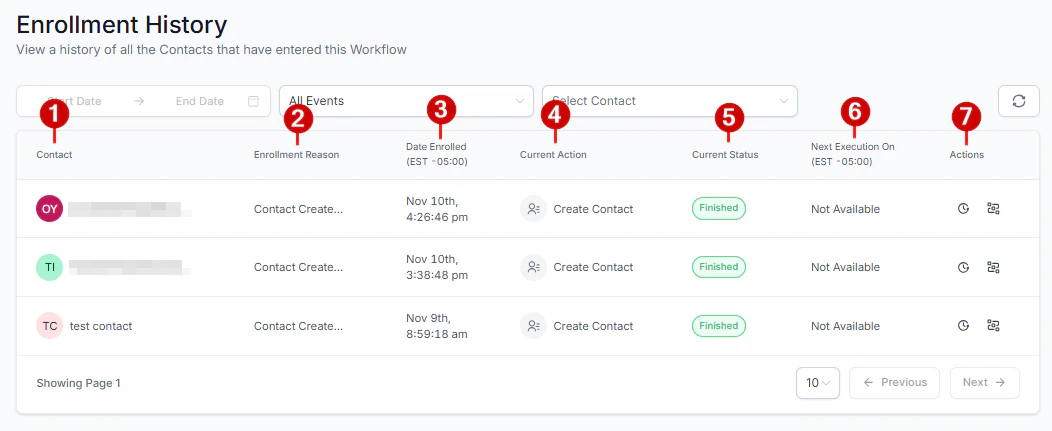
The Enrollment History table offers a detailed list of all data related to actions performed on contacts. This includes:
1. Names of the contacts added
2. The trigger that enrolled the contact in the workflow
3. Date and time the contacts entered the workflow
4. Current Action being performed on the contacts
5. Status of the contacts
6. The scheduled date and time for the upcoming action on contacts. Contacts who have completed the workflow will not have data displayed in this field.
7. Actions column
### Enrollment History Table
The Enrollment History table offers a detailed list of all data related to actions performed on contacts. This includes:
1. Names of the contacts added
2. The trigger that enrolled the contact in the workflow
3. Date and time the contacts entered the workflow
4. Current Action being performed on the contacts
5. Status of the contacts
6. The scheduled date and time for the upcoming action on contacts. Contacts who have completed the workflow will not have data displayed in this field.
7. Actions column
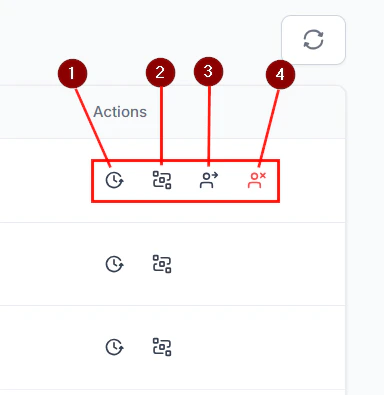
 In the Actions column, you can review each contact’s execution history (1), view their execution path (2), advance the contact to the next workflow step (3), or remove the contact from the workflow (4). For contacts who have already completed the workflow, only their execution history and path will be accessible.
 Consistently assess the enrollment history of your workflows to confirm that contacts are being added to your workflow as intended. To learn more about the other workflow settings, please explore the other articles in this section.
***
## Checking for errors
The Error Highlight and Error Resolution using AI feature is designed to streamline your workflow management by quickly identifying, understanding, and resolving errors. Leveraging advanced AI capabilities, this feature provides visual cues, actionable insights, and clear troubleshooting guidance, all available directly from the Error Tab in the side panel. It ensures that your workflows remain efficient and error-free, enhancing overall productivity.
### Why This Feature Matters
* ****Improves Workflow Reliability:**** Swiftly highlights and assists in resolving errors to ensure your workflows run smoothly without disruption.
* ****Saves Time:**** It offers clear explanations and suggested fixes for any detected errors.
* ****Increases User Confidence:**** Simplifies troubleshooting of complex workflows, empowering you to resolve issues independently without relying on external support.
### Using Error Resolution AI
Errors are indicated in the Workflow Builder with an Error Icon, which appears next to actions and triggers in the bottom-right corner.
Consistently assess the enrollment history of your workflows to confirm that contacts are being added to your workflow as intended. To learn more about the other workflow settings, please explore the other articles in this section.
***
## Checking for errors
The Error Highlight and Error Resolution using AI feature is designed to streamline your workflow management by quickly identifying, understanding, and resolving errors. Leveraging advanced AI capabilities, this feature provides visual cues, actionable insights, and clear troubleshooting guidance, all available directly from the Error Tab in the side panel. It ensures that your workflows remain efficient and error-free, enhancing overall productivity.
### Why This Feature Matters
* ****Improves Workflow Reliability:**** Swiftly highlights and assists in resolving errors to ensure your workflows run smoothly without disruption.
* ****Saves Time:**** It offers clear explanations and suggested fixes for any detected errors.
* ****Increases User Confidence:**** Simplifies troubleshooting of complex workflows, empowering you to resolve issues independently without relying on external support.
### Using Error Resolution AI
Errors are indicated in the Workflow Builder with an Error Icon, which appears next to actions and triggers in the bottom-right corner.
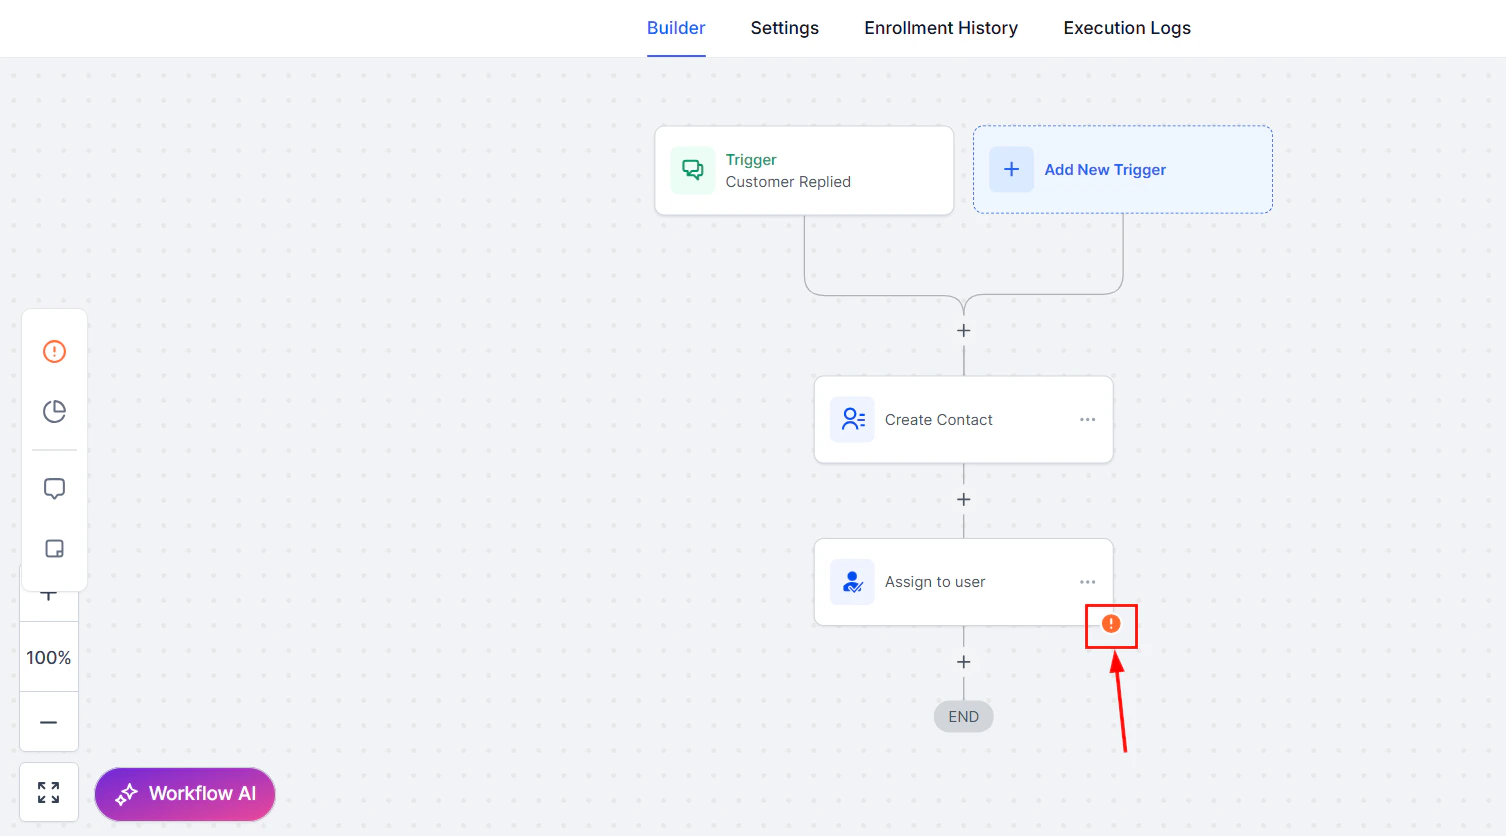 Alternatively, you can click the Error Tab in the side panel to view a detailed list of all errors.
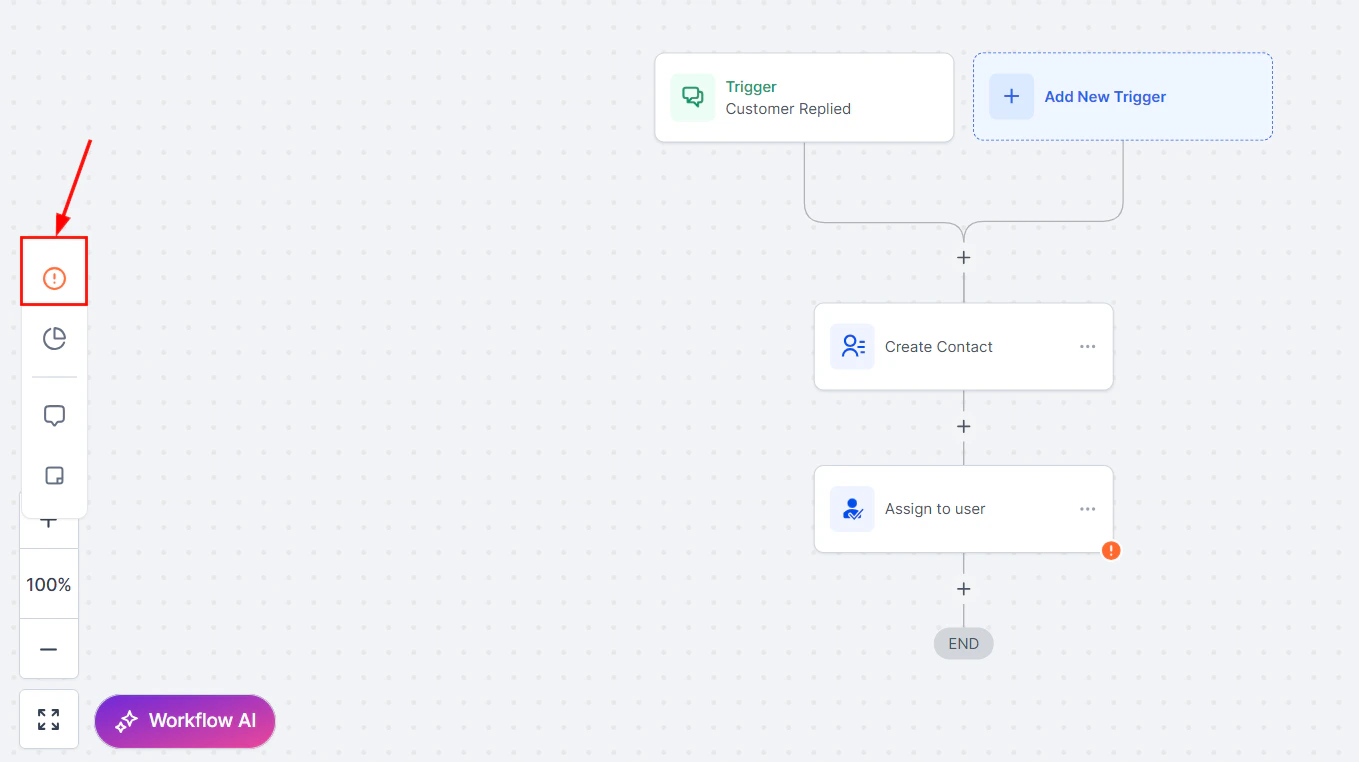 Errors are categorized into:
* ****Integration Issues****: Errors related to integrations.
* ****Missing Mandatory Fields****: Errors caused by missing essential data in any action or trigger.
### Using the AI Assistant to Resolve Errors
Click the error icon to open the resolution window, then click the \*\*\*\*“\*\*\*\*Ask AI to resolve” button next to the relevant error.
Errors are categorized into:
* ****Integration Issues****: Errors related to integrations.
* ****Missing Mandatory Fields****: Errors caused by missing essential data in any action or trigger.
### Using the AI Assistant to Resolve Errors
Click the error icon to open the resolution window, then click the \*\*\*\*“\*\*\*\*Ask AI to resolve” button next to the relevant error.
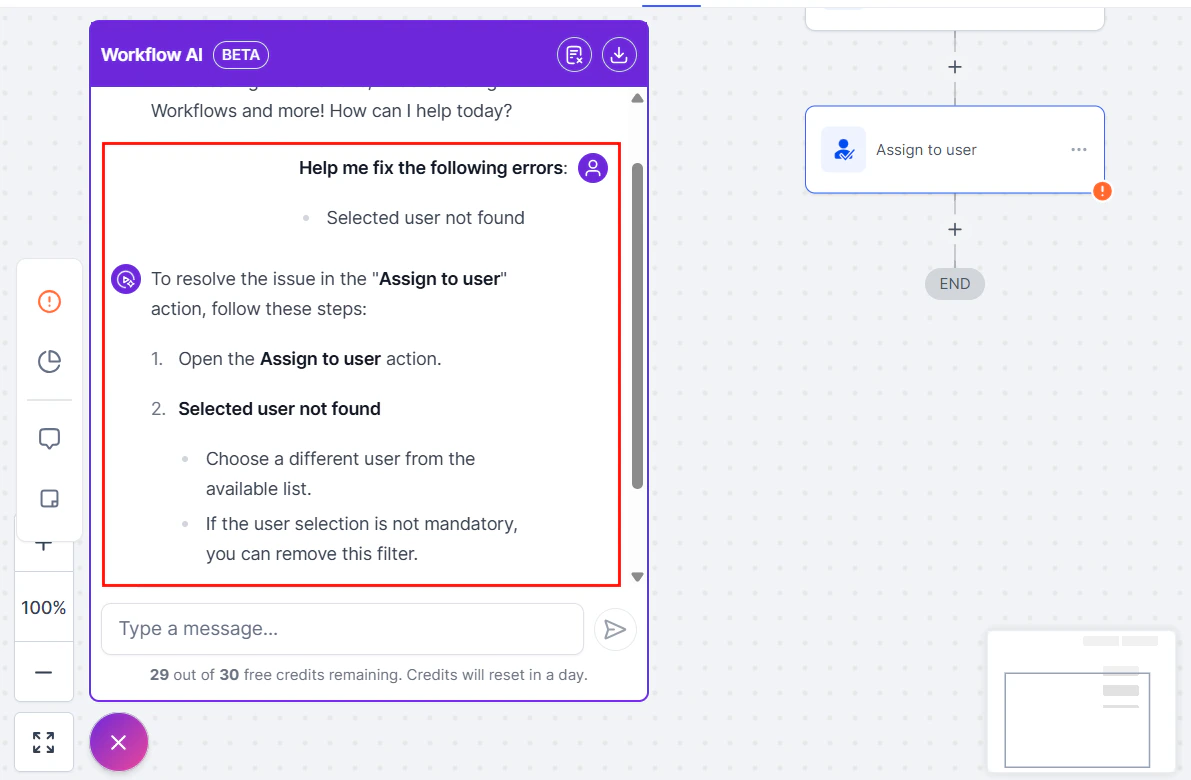
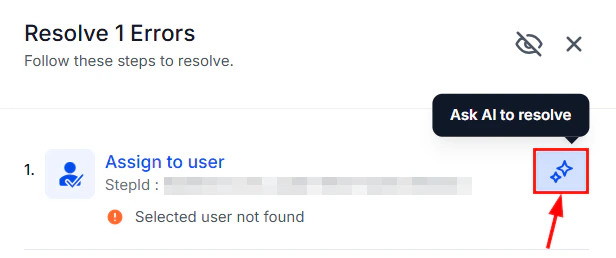 The AI Assistant will open in the left panel, providing an error explanation outlining the cause of the issue, along with suggested fixes that offer actionable steps to resolve it.
 ### Applying Fixes
Apply the suggested fixes directly within the action/trigger sidebar. If the fix involves external integrations, the AI will guide you to the appropriate configuration settings.
### Applying Fixes
Apply the suggested fixes directly within the action/trigger sidebar. If the fix involves external integrations, the AI will guide you to the appropriate configuration settings.
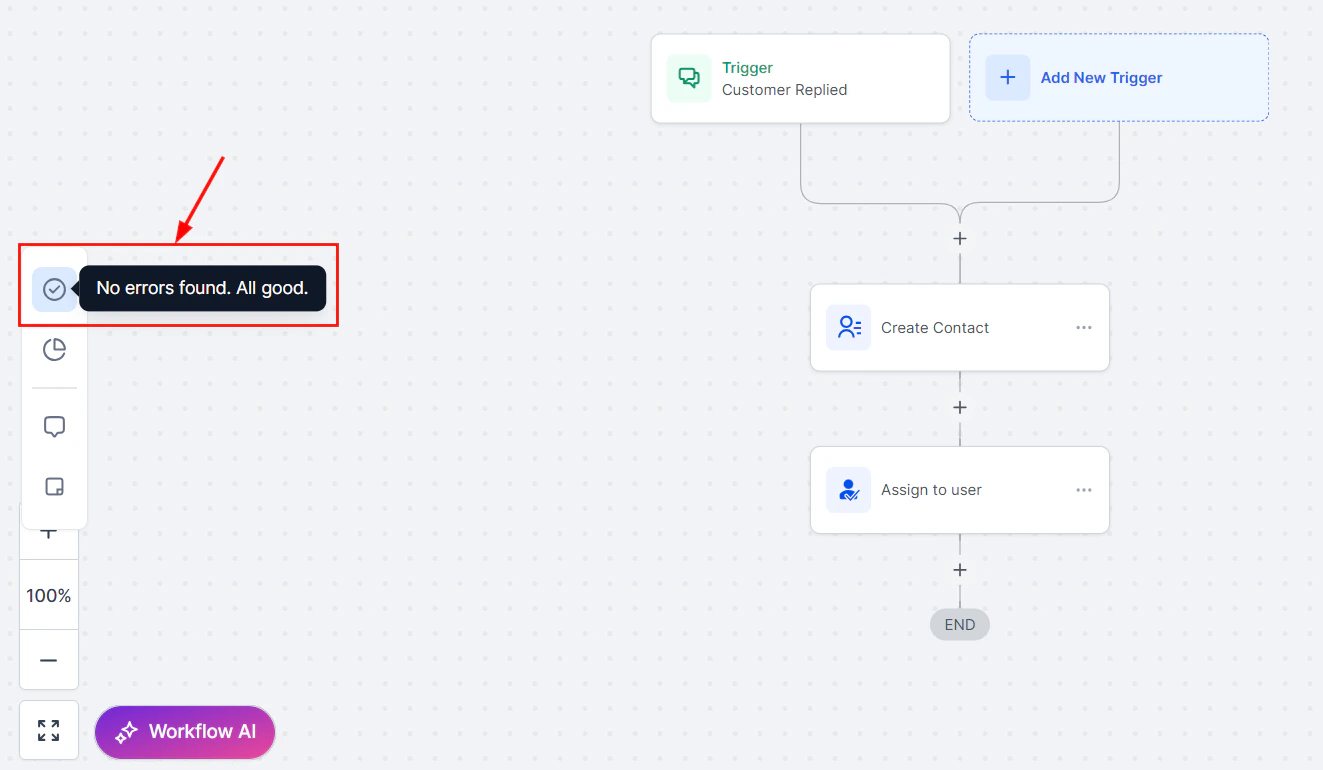
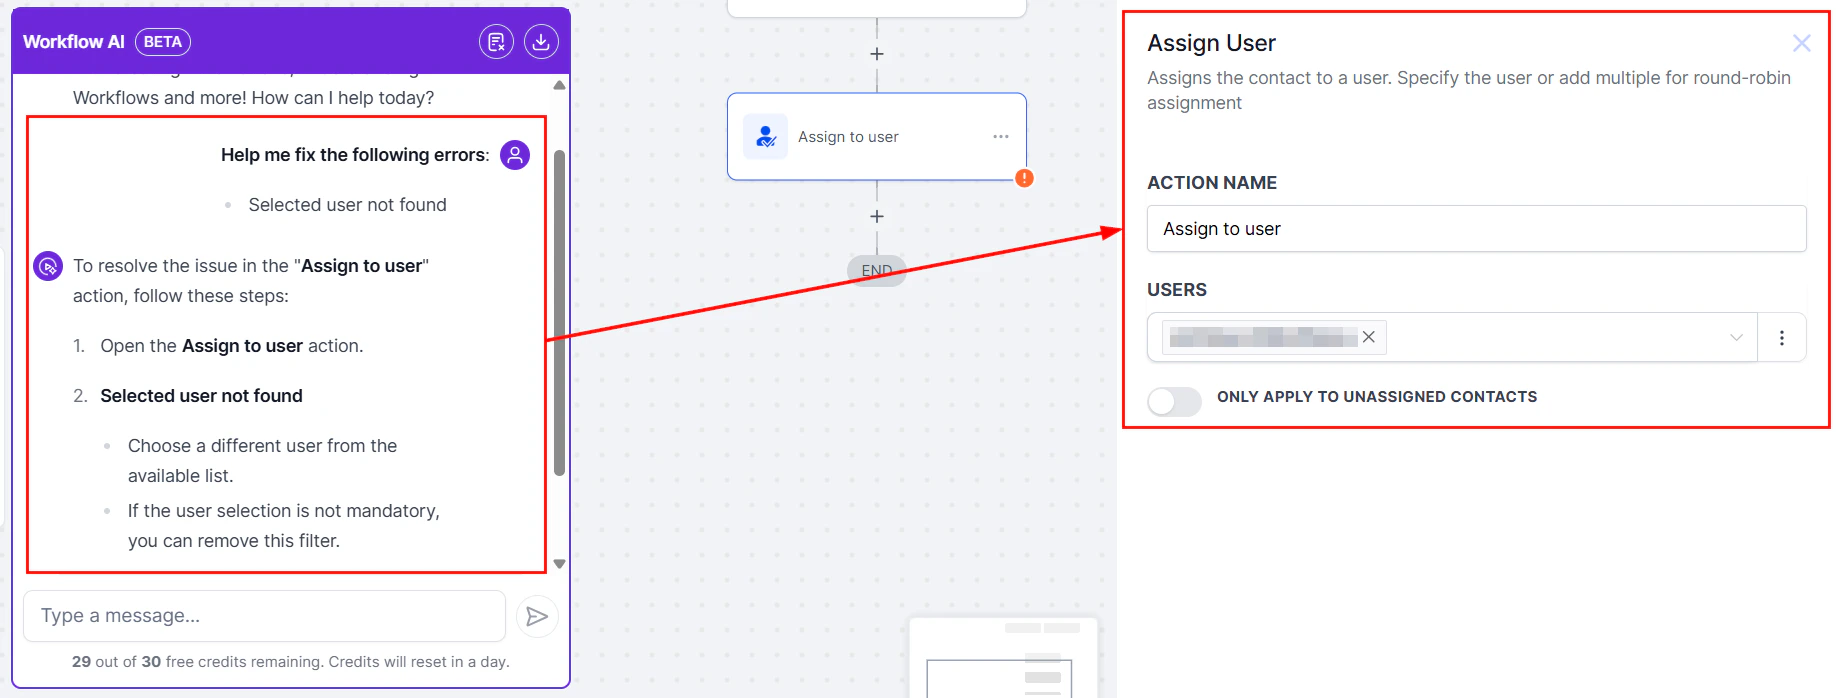 Upon resolution of the error, the Error Icon will disappear, indicating that the issue has been successfully addressed. Additionally, errors will be automatically removed from the side panel list once resolved.
 ### Adjusting Error Tab Visibility
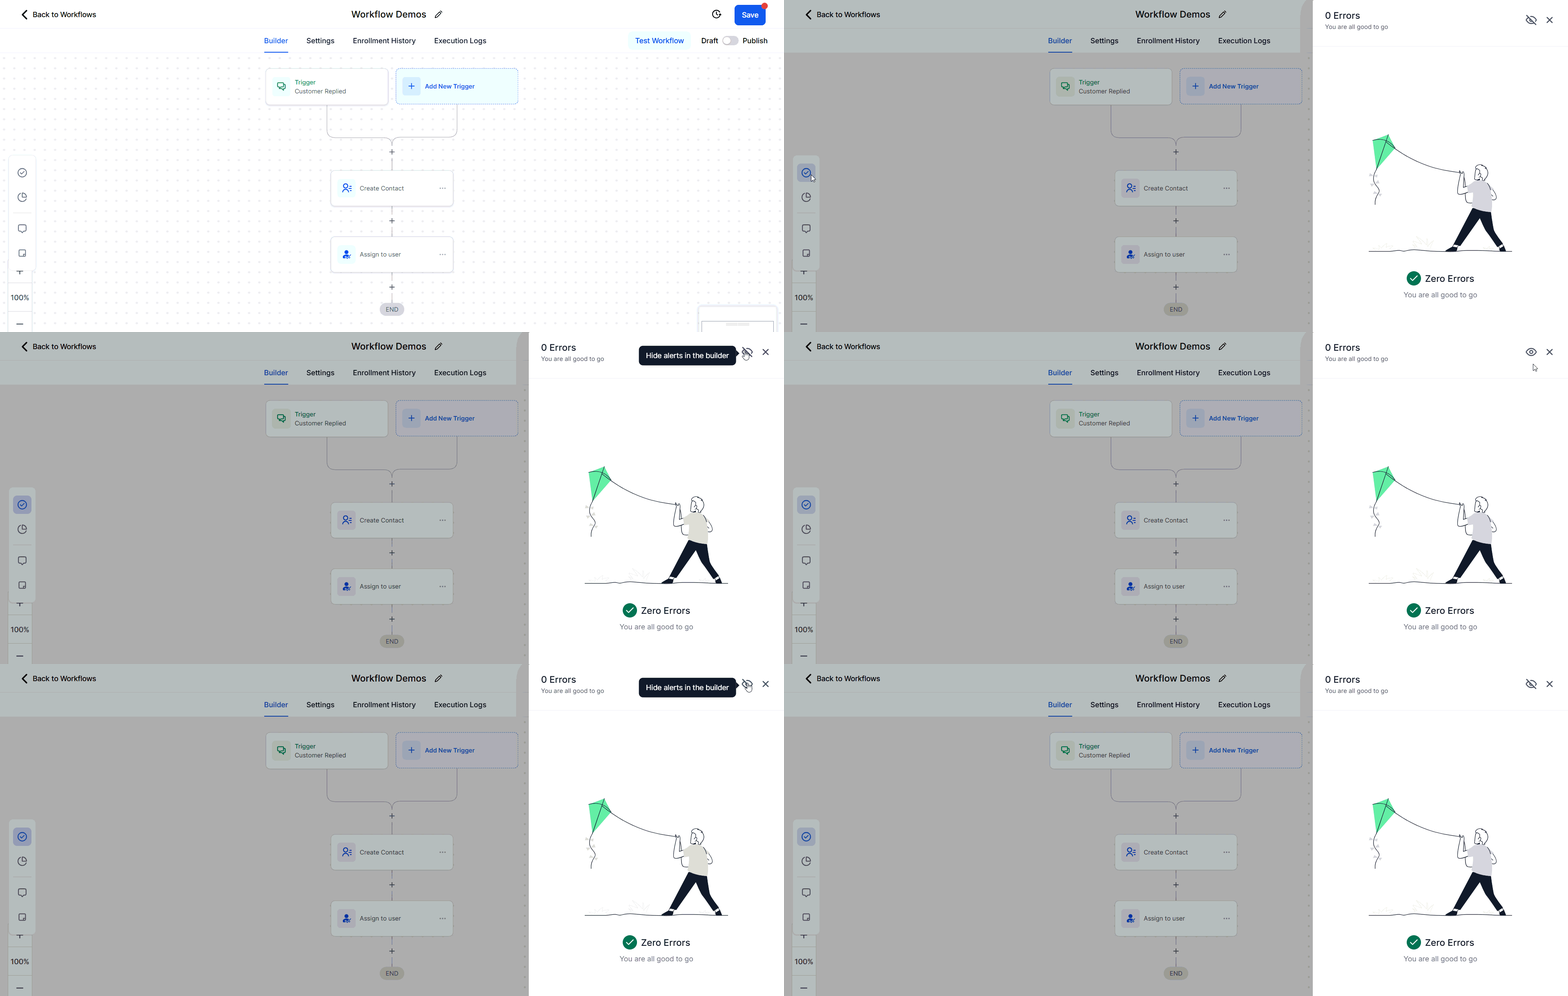
Disable or re-enable the error tab based on your preferences by clicking the eye button in the error panel settings. By doing so, you can remove clutter and utilize your workflow customization options.
### Adjusting Error Tab Visibility
Disable or re-enable the error tab based on your preferences by clicking the eye button in the error panel settings. By doing so, you can remove clutter and utilize your workflow customization options.
 The Error Highlight and Error Resolution using AI feature significantly enhances the ease and efficiency of managing workflows. Quickly identifying issues and providing clear solutions reduces the time and effort spent on troubleshooting, allowing you to confidently manage and resolve errors. Whether you're dealing with integration issues or missing data, this feature ensures smooth, reliable workflows every time.
### Error Resolution Types
****Integration Issues****
* ****Error:**** Integration with Facebook failed due to incorrect authentication.
* ****Resolution:**** The AI Assistant prompts you to reconnect or re-authenticate the integration.
****Missing Mandatory Fields****
* ****Error:**** An action is missing required fields (e.g., Appointment Date, Custom Fields, etc.).
* ****Resolution:**** The AI Assistant lists the missing fields and offers options to map them.
Yes, you can toggle them off from the side panel settings.
No, the workflow will not move to the Draft stage if an error is found.
***
## Testing a workflow
Before going live, use the **Test Workflow** button in the builder to manually trigger the workflow for a specific contact. This lets you verify the execution path without waiting for a real event to occur.
The Error Highlight and Error Resolution using AI feature significantly enhances the ease and efficiency of managing workflows. Quickly identifying issues and providing clear solutions reduces the time and effort spent on troubleshooting, allowing you to confidently manage and resolve errors. Whether you're dealing with integration issues or missing data, this feature ensures smooth, reliable workflows every time.
### Error Resolution Types
****Integration Issues****
* ****Error:**** Integration with Facebook failed due to incorrect authentication.
* ****Resolution:**** The AI Assistant prompts you to reconnect or re-authenticate the integration.
****Missing Mandatory Fields****
* ****Error:**** An action is missing required fields (e.g., Appointment Date, Custom Fields, etc.).
* ****Resolution:**** The AI Assistant lists the missing fields and offers options to map them.
Yes, you can toggle them off from the side panel settings.
No, the workflow will not move to the Draft stage if an error is found.
***
## Testing a workflow
Before going live, use the **Test Workflow** button in the builder to manually trigger the workflow for a specific contact. This lets you verify the execution path without waiting for a real event to occur.
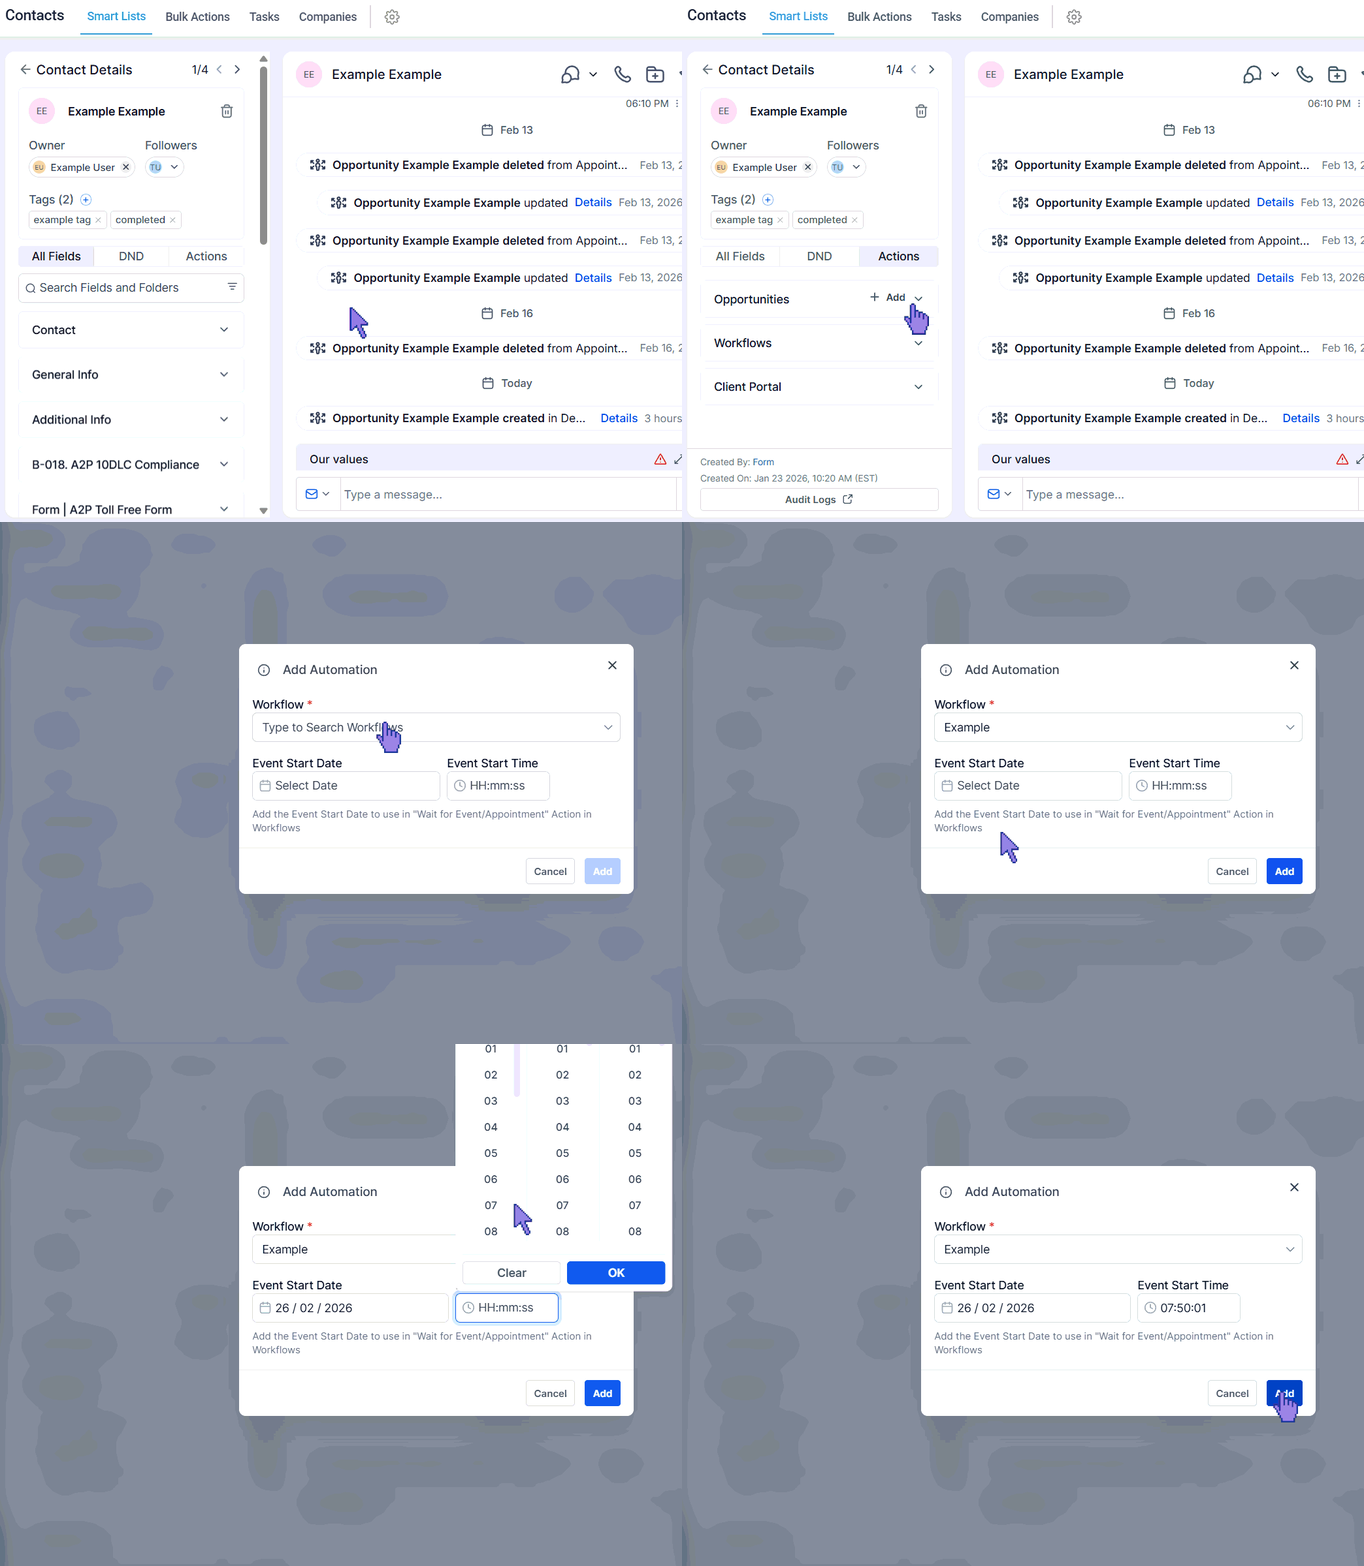 After clicking Test Workflow, select the contact you want to use for testing, then click Run Test. The workflow will execute as if the trigger fired for that contact. Switch to the **Execution Logs** tab immediately after to review each step's status and confirm the workflow behaved as expected.
***
## Race conditions
Race conditions occur when two servers attempt to update the status of a contact at nearly the same time. Race conditions commonly occur due to several factors, including multiple triggers being set for the same action, actions being executed simultaneously for a contact, or similar timing of executions within automation for the same contact. These scenarios can cause conflicts or unpredictable behavior in workflows, as the system may attempt to process overlapping actions at the same time, leading to unintended outcomes.
****Examples:****
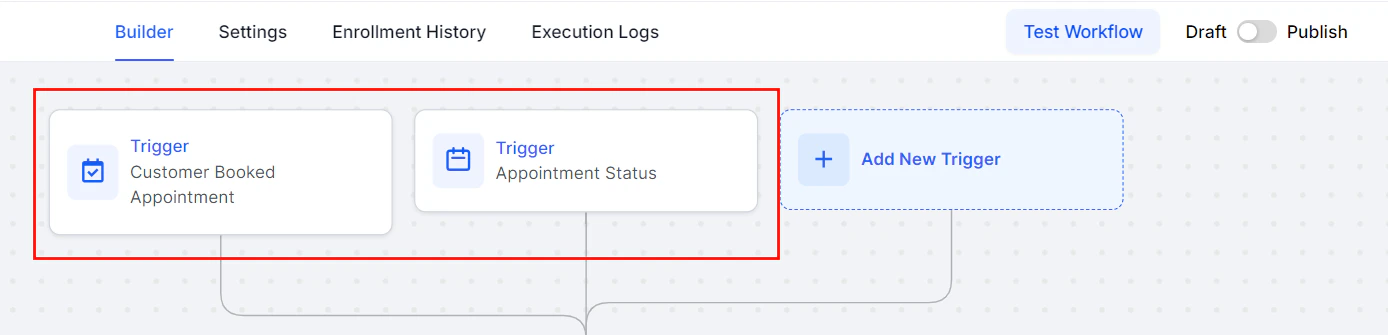
1. Utilizing both the Appointment Status and Customer Booked Appointment triggers for identical functions can create conflicts.
2. Simultaneous firing of opportunity changes and appointment triggers within the same workflow.
3. Adding a contact tag at the same time across multiple workflows.
### Identifying Race Conditions
To determine if you're experiencing a race condition, investigate the workflow execution history/status and timing. Look for:
1. Duplicate messages.
2. Workflow history indicating a different trigger than intended.
3. Tags are being added without reflecting in the contact.
4. Unexpected behavior due to similar timing in triggers.
***
## Preventing Race Conditions
Implementing the following strategies can help prevent race conditions:
### Add a Wait Step
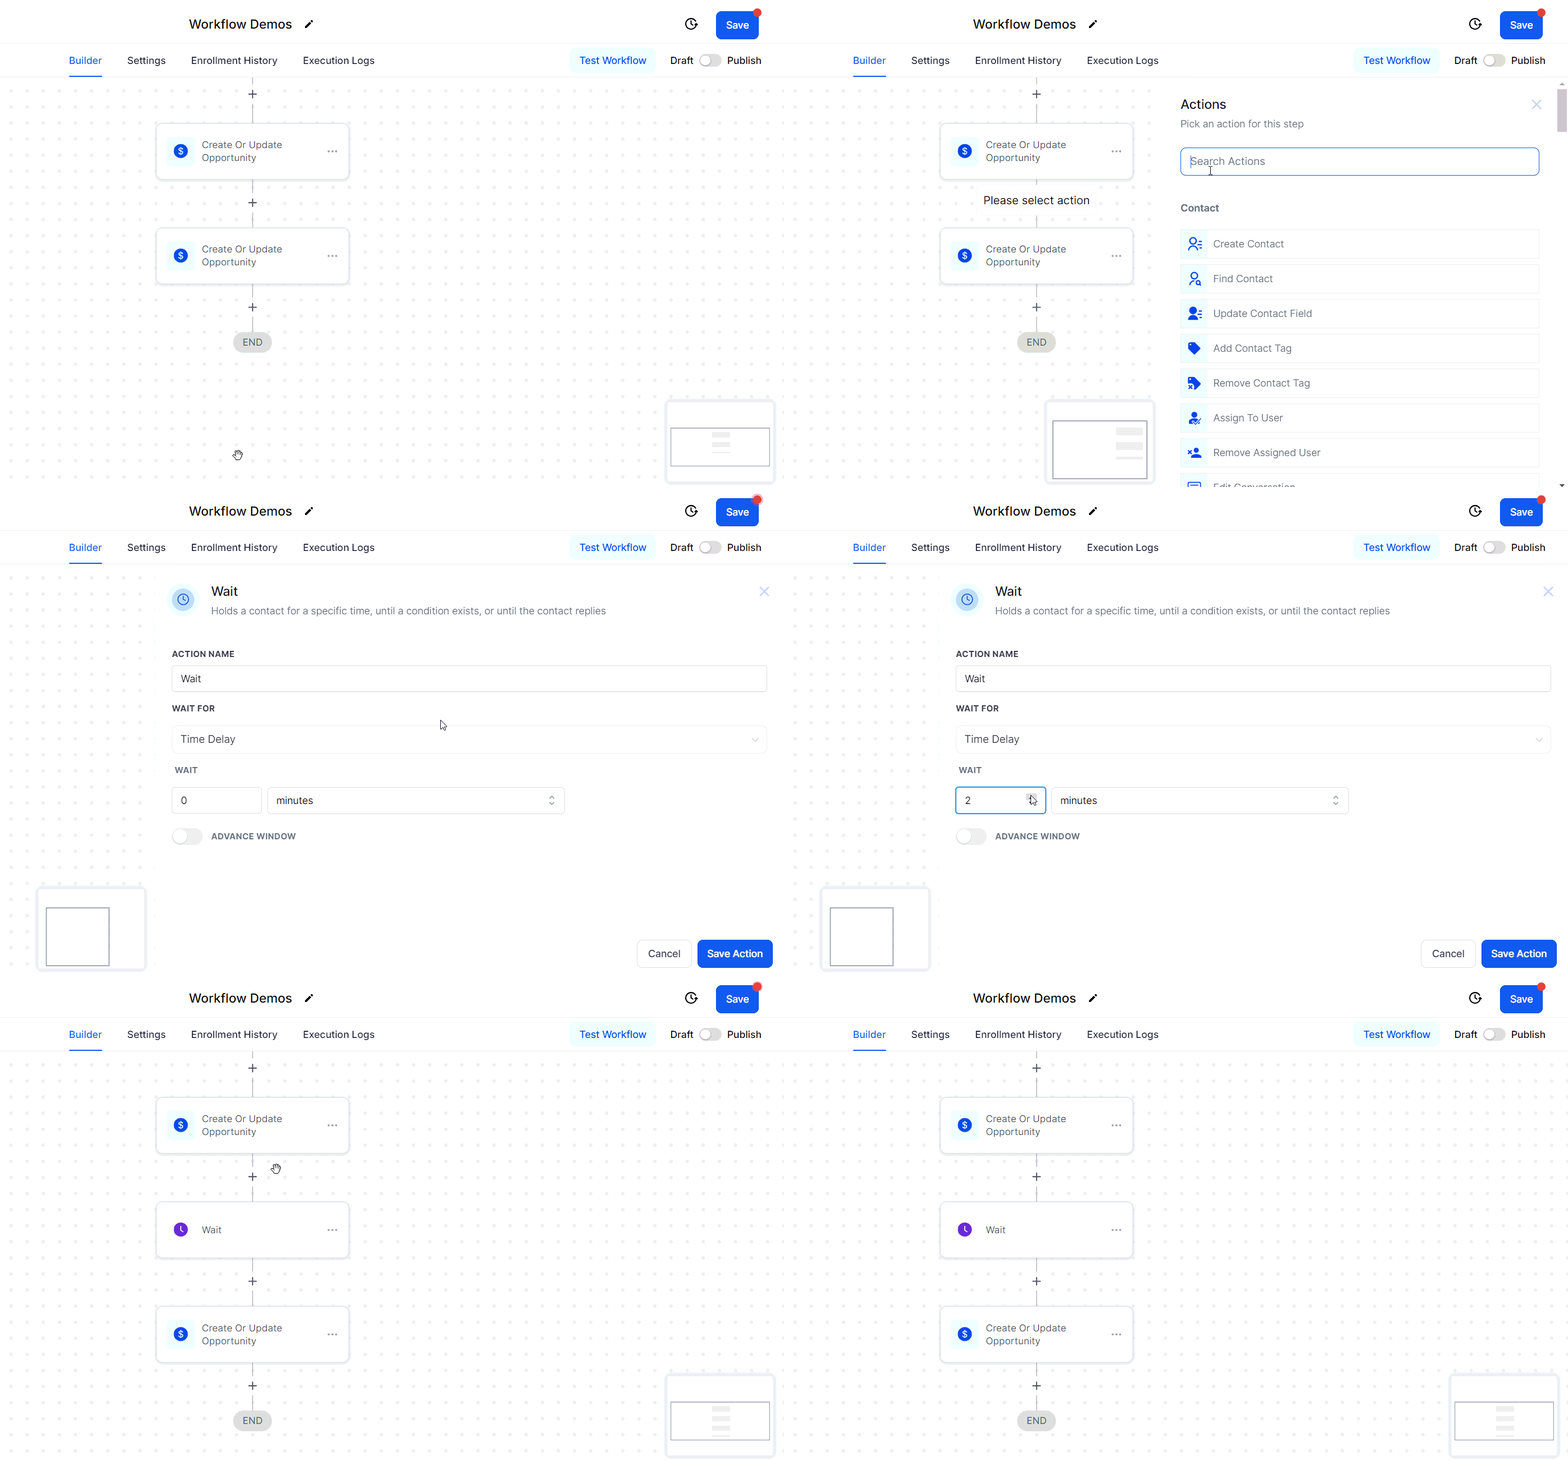
Insert a 2-minute wait step before actions that might be affected by race conditions. This allows the system to process actions correctly.
After clicking Test Workflow, select the contact you want to use for testing, then click Run Test. The workflow will execute as if the trigger fired for that contact. Switch to the **Execution Logs** tab immediately after to review each step's status and confirm the workflow behaved as expected.
***
## Race conditions
Race conditions occur when two servers attempt to update the status of a contact at nearly the same time. Race conditions commonly occur due to several factors, including multiple triggers being set for the same action, actions being executed simultaneously for a contact, or similar timing of executions within automation for the same contact. These scenarios can cause conflicts or unpredictable behavior in workflows, as the system may attempt to process overlapping actions at the same time, leading to unintended outcomes.
****Examples:****
1. Utilizing both the Appointment Status and Customer Booked Appointment triggers for identical functions can create conflicts.
2. Simultaneous firing of opportunity changes and appointment triggers within the same workflow.
3. Adding a contact tag at the same time across multiple workflows.
### Identifying Race Conditions
To determine if you're experiencing a race condition, investigate the workflow execution history/status and timing. Look for:
1. Duplicate messages.
2. Workflow history indicating a different trigger than intended.
3. Tags are being added without reflecting in the contact.
4. Unexpected behavior due to similar timing in triggers.
***
## Preventing Race Conditions
Implementing the following strategies can help prevent race conditions:
### Add a Wait Step
Insert a 2-minute wait step before actions that might be affected by race conditions. This allows the system to process actions correctly.
 ### Use Distinct Triggers
Avoid using the same or similar triggers for the same actions across workflows.
### Use Distinct Triggers
Avoid using the same or similar triggers for the same actions across workflows.
 ### Be Specific with Filters
Tailor your filters to the specific actions a lead might take, reducing the chance of simultaneous trigger firing.
### Pass Input Trigger Parameters
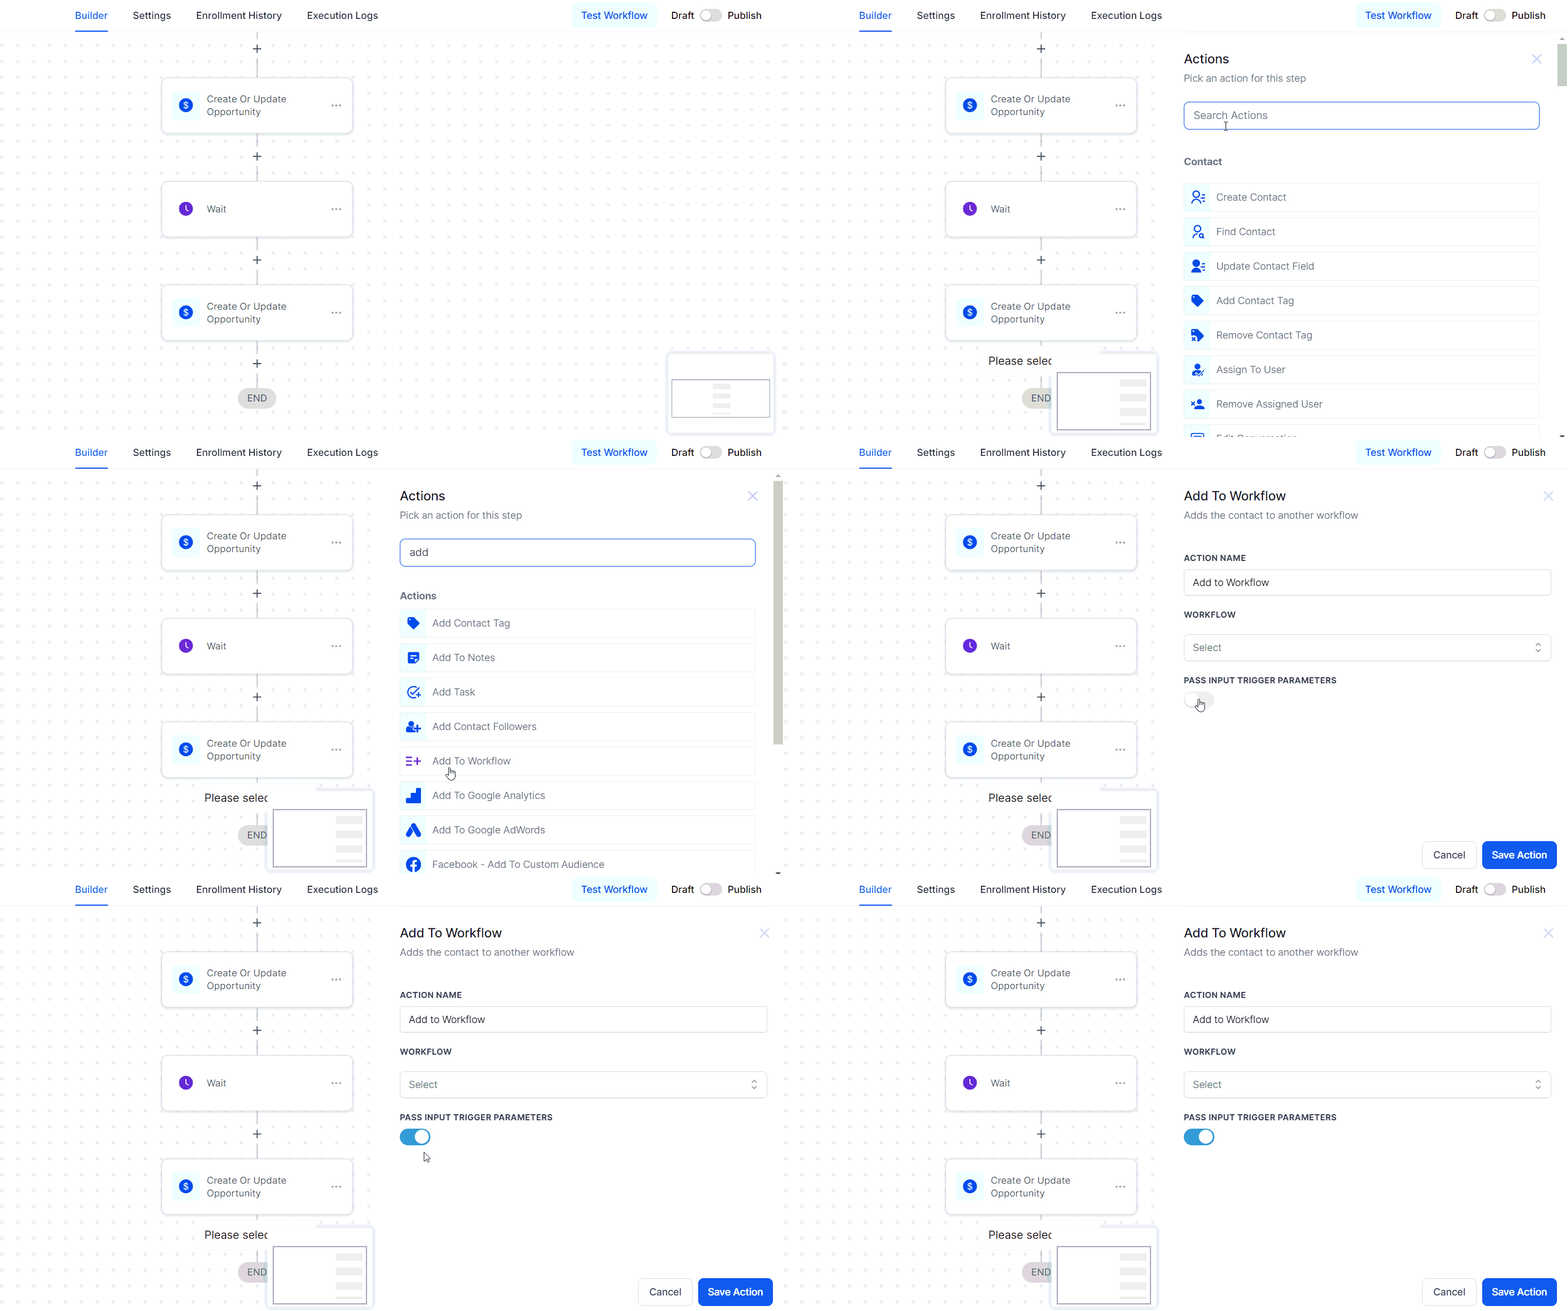
When adding a contact to another workflow, use the "Pass Input Trigger Parameters" option with the "Add To Workflow" action to ensure data is passed correctly.
### Be Specific with Filters
Tailor your filters to the specific actions a lead might take, reducing the chance of simultaneous trigger firing.
### Pass Input Trigger Parameters
When adding a contact to another workflow, use the "Pass Input Trigger Parameters" option with the "Add To Workflow" action to ensure data is passed correctly.
 ### Troubleshooting Tips and Best Practices
If you encounter unexpected behavior, follow these troubleshooting steps:
1. ****Check Enrollment History and Execution Logs:**** This can provide insights into timing and trigger issues.
2. ****Investigate Multiple Workflows:**** Look for workflows that may fire at the same time due to customer actions.
3. ****Use Unique Trigger-to-Action Implementations:**** Avoid using multiple workflows for the same actions.
***
## Loop lockouts
In certain workflow scenarios, there exists a risk of inadvertently creating a loop, where two processes continuously trigger each other or a single process repeatedly triggers itself. These loops can lead to performance issues and significant complications. To mitigate this risk, we have implemented a solution known as the Loop Lock feature.
### How Loop Lock Works
Loop Lock is built to detect and halt unintended loops within Workflows. It automatically activates if five contacts are added to the blacklist within a specified time frame. Contacts are added to this list if they repeatedly enter a workflow within a short period and will remain on the list for a set period. For example, Loop Lock will trigger if a contact is added to a Workflow 50 times in under 30 minutes.
Should you encounter this error, rest assured that our Support team is ready to assist. Simply reach out to us, and we will promptly investigate your Workflow to identify and resolve the loop.
While loops can disrupt processes, Loop Lock ensures the stability of your workflows. For more advanced insights, we recommend reviewing our article on Understanding and Preventing Race Conditions in Workflows.
***
## FAQs
Loop Lock is an automated system designed to protect workflows from looping errors. As such, its core functionality cannot be altered, but our Support team can assist you in adjusting your workflows to avoid future loops.
### Troubleshooting Tips
****Review Your Workflow Settings****
* Examine your workflow triggers and actions to ensure that processes are not set up to repeatedly loop contacts.
****Check Workflow Conditions****
* Ensure that conditions within the workflow prevent repetitive entries for the same contact, such as time delays or unique triggers.
****Monitor Error Logs****
* If you experience performance issues or receive a Loop Lock error, review the workflow logs to identify the contact or action causing the loop.
***
## Meta Conversion API trigger not working
When your Meta Conversion API (CAPI) workflow isn’t working as expected, it can disrupt tracking and affect your campaign performance. Resolving these issues requires a clear understanding of how workflows integrate with Meta’s system and the right approach to testing and optimizing them. This guide walks you through practical steps to identify and fix common problems with your CAPI workflows, ensuring smooth and accurate conversion tracking.
### Select the Right Trigger
Triggers are the foundation of any workflow, and the Meta Conversion API works best with specific triggers. Ensure your workflow uses either one of the following: ****Form Submission**** (e.g., contact forms), ****Survey Submission**** (from feedback or lead generation surveys), ****Appointment Submission**** (client bookings), or ****Two-step Order Form Submission**** (for product purchases).
Choosing the right trigger ensures your workflow activates at the correct moment, allowing accurate conversion tracking.
### Avoid Using The Test Workflow Button
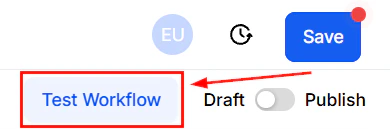
The ****Test Workflow**** button might seem convenient, but it doesn’t provide the most accurate results for Meta CAPI workflows. Instead, replicate real user interactions by using live triggers, such as submitting a form or booking an appointment. Testing this way ensures the workflow behaves as intended in real-world scenarios.
### Troubleshooting Tips and Best Practices
If you encounter unexpected behavior, follow these troubleshooting steps:
1. ****Check Enrollment History and Execution Logs:**** This can provide insights into timing and trigger issues.
2. ****Investigate Multiple Workflows:**** Look for workflows that may fire at the same time due to customer actions.
3. ****Use Unique Trigger-to-Action Implementations:**** Avoid using multiple workflows for the same actions.
***
## Loop lockouts
In certain workflow scenarios, there exists a risk of inadvertently creating a loop, where two processes continuously trigger each other or a single process repeatedly triggers itself. These loops can lead to performance issues and significant complications. To mitigate this risk, we have implemented a solution known as the Loop Lock feature.
### How Loop Lock Works
Loop Lock is built to detect and halt unintended loops within Workflows. It automatically activates if five contacts are added to the blacklist within a specified time frame. Contacts are added to this list if they repeatedly enter a workflow within a short period and will remain on the list for a set period. For example, Loop Lock will trigger if a contact is added to a Workflow 50 times in under 30 minutes.
Should you encounter this error, rest assured that our Support team is ready to assist. Simply reach out to us, and we will promptly investigate your Workflow to identify and resolve the loop.
While loops can disrupt processes, Loop Lock ensures the stability of your workflows. For more advanced insights, we recommend reviewing our article on Understanding and Preventing Race Conditions in Workflows.
***
## FAQs
Loop Lock is an automated system designed to protect workflows from looping errors. As such, its core functionality cannot be altered, but our Support team can assist you in adjusting your workflows to avoid future loops.
### Troubleshooting Tips
****Review Your Workflow Settings****
* Examine your workflow triggers and actions to ensure that processes are not set up to repeatedly loop contacts.
****Check Workflow Conditions****
* Ensure that conditions within the workflow prevent repetitive entries for the same contact, such as time delays or unique triggers.
****Monitor Error Logs****
* If you experience performance issues or receive a Loop Lock error, review the workflow logs to identify the contact or action causing the loop.
***
## Meta Conversion API trigger not working
When your Meta Conversion API (CAPI) workflow isn’t working as expected, it can disrupt tracking and affect your campaign performance. Resolving these issues requires a clear understanding of how workflows integrate with Meta’s system and the right approach to testing and optimizing them. This guide walks you through practical steps to identify and fix common problems with your CAPI workflows, ensuring smooth and accurate conversion tracking.
### Select the Right Trigger
Triggers are the foundation of any workflow, and the Meta Conversion API works best with specific triggers. Ensure your workflow uses either one of the following: ****Form Submission**** (e.g., contact forms), ****Survey Submission**** (from feedback or lead generation surveys), ****Appointment Submission**** (client bookings), or ****Two-step Order Form Submission**** (for product purchases).
Choosing the right trigger ensures your workflow activates at the correct moment, allowing accurate conversion tracking.
### Avoid Using The Test Workflow Button
The ****Test Workflow**** button might seem convenient, but it doesn’t provide the most accurate results for Meta CAPI workflows. Instead, replicate real user interactions by using live triggers, such as submitting a form or booking an appointment. Testing this way ensures the workflow behaves as intended in real-world scenarios.
 ### Use Appointment Triggers Correctly
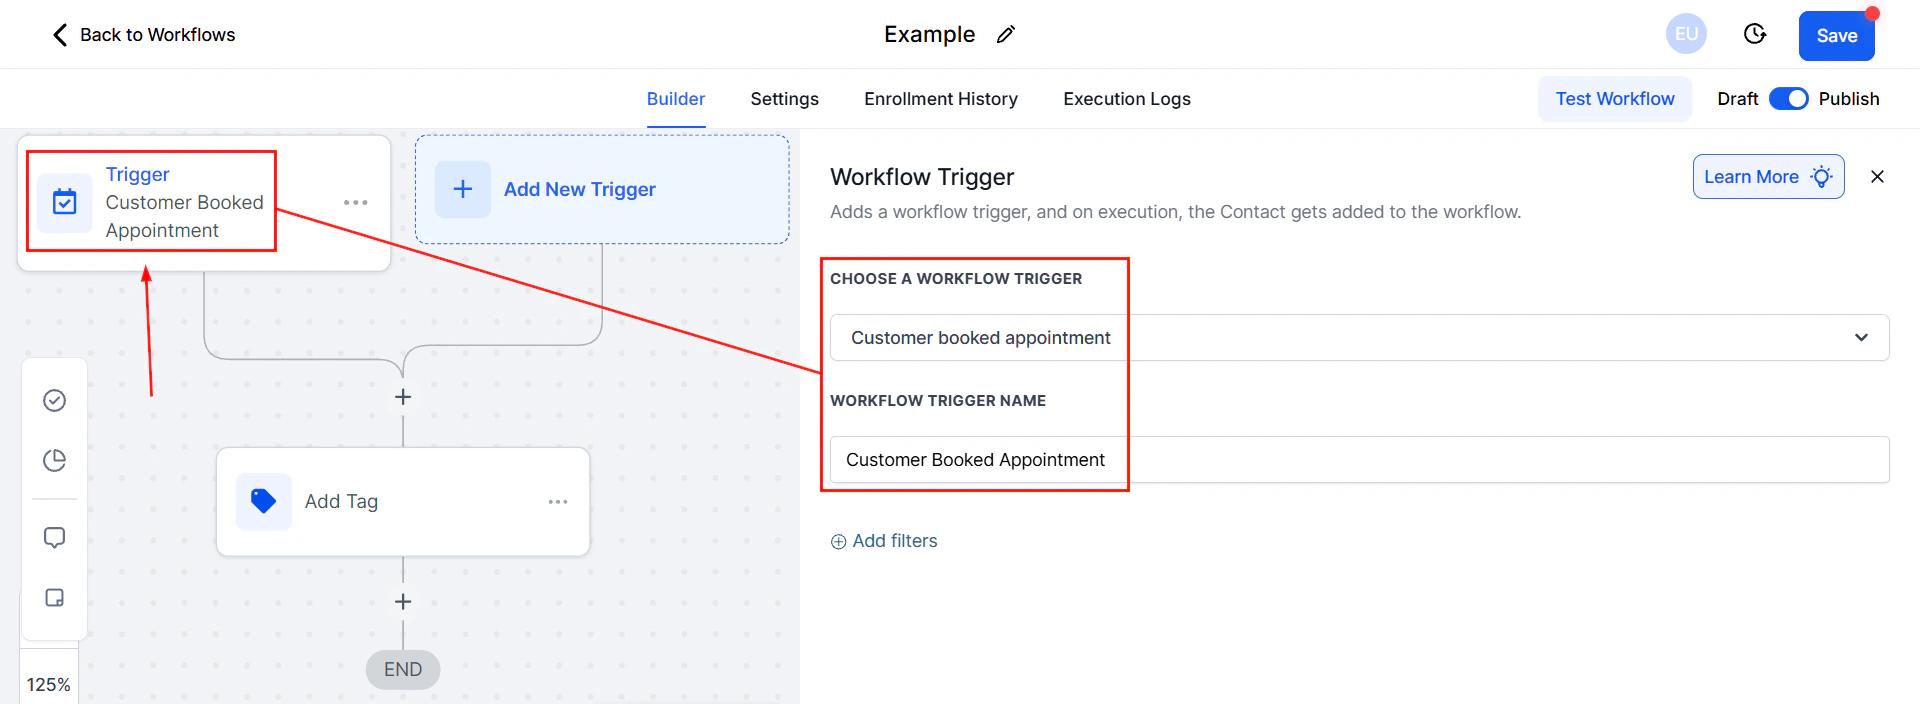
If your workflow involves appointments, it’s crucial to select the ****Customer Booked Appointment**** trigger rather than a general appointment trigger. Using the wrong option can cause the workflow to fail or misfire, disrupting your conversion tracking.
### Use Appointment Triggers Correctly
If your workflow involves appointments, it’s crucial to select the ****Customer Booked Appointment**** trigger rather than a general appointment trigger. Using the wrong option can cause the workflow to fail or misfire, disrupting your conversion tracking.
 ### Save and Publish
This might sound simple, but forgetting to\*\*\*\* Save\*\*\*\* and \*\*\*\*Publish \*\*\*\*your workflow is a common mistake. Without this step, your changes won’t take effect, and your workflow will remain inactive. Double-check that your updates are saved, and always publish the workflow when you’re done making changes.
### Save and Publish
This might sound simple, but forgetting to\*\*\*\* Save\*\*\*\* and \*\*\*\*Publish \*\*\*\*your workflow is a common mistake. Without this step, your changes won’t take effect, and your workflow will remain inactive. Double-check that your updates are saved, and always publish the workflow when you’re done making changes.
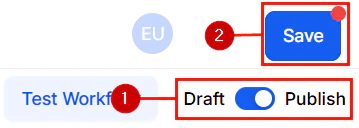 Remember, the Meta Conversion API can be sensitive to configuration details. Thorough testing and careful attention to your setup are crucial for successfully tracking conversions.
### Important Notes
1. When using the Purchase event in your workflow, include a lead value to optimize your ad campaigns. This value helps Meta understand the worth of conversions for better targeting and optimization. If your workflow doesn’t include the Purchase event, leaving this field blank is fine.
2. \*\*\*\*Test with Real Data: \*\*\*\*Always test your Meta CAPI workflow with real user data. Simulated interactions may not provide a full picture of how conversions are tracked. Use real submissions, appointments, or purchases to identify potential issues and ensure the workflow runs smoothly.
3. \*\*\*\*Address Errors Promptly: \*\*\*\*Keep an eye on error messages or warnings during setup or testing. These messages provide clues about misconfigurations or missing components in your workflow. Addressing errors promptly can save you time and prevent long-term issues.
4. \*\*\*\*Stay Updated With Meta's Documentation: \*\*\*\*Meta’s official documentation for business tools is a valuable resource. It offers detailed, up-to-date guidance on using the Conversion API, troubleshooting issues, and implementing best practices. Bookmarking and reviewing this material regularly is a good habit.
5. \*\*\*\*Contact Meta Support: \*\*\*\*If you’ve tried everything and still face issues, don’t hesitate to contact Meta Support. Their team can provide tailored assistance for your specific setup and help resolve any lingering problems.
***
## Troubleshooting webhooks
When using webhooks to import affiliate sign-up information into your CRM, it’s essential to ensure that all necessary data fields are populated. However, incomplete data—such as missing first names, company names, or phone numbers—can disrupt workflows and hinder communication. Often, webhooks only capture the email address, leaving other critical fields empty. This can impact personalization and automation, as these processes rely on complete data.
To address this issue, you can modify your workflow to identify and correct missing information. Focus on the very first step in your workflow where the affiliate sign-up information is captured. This is crucial for ensuring the contact record is as complete as possible before proceeding through the rest of the workflow.
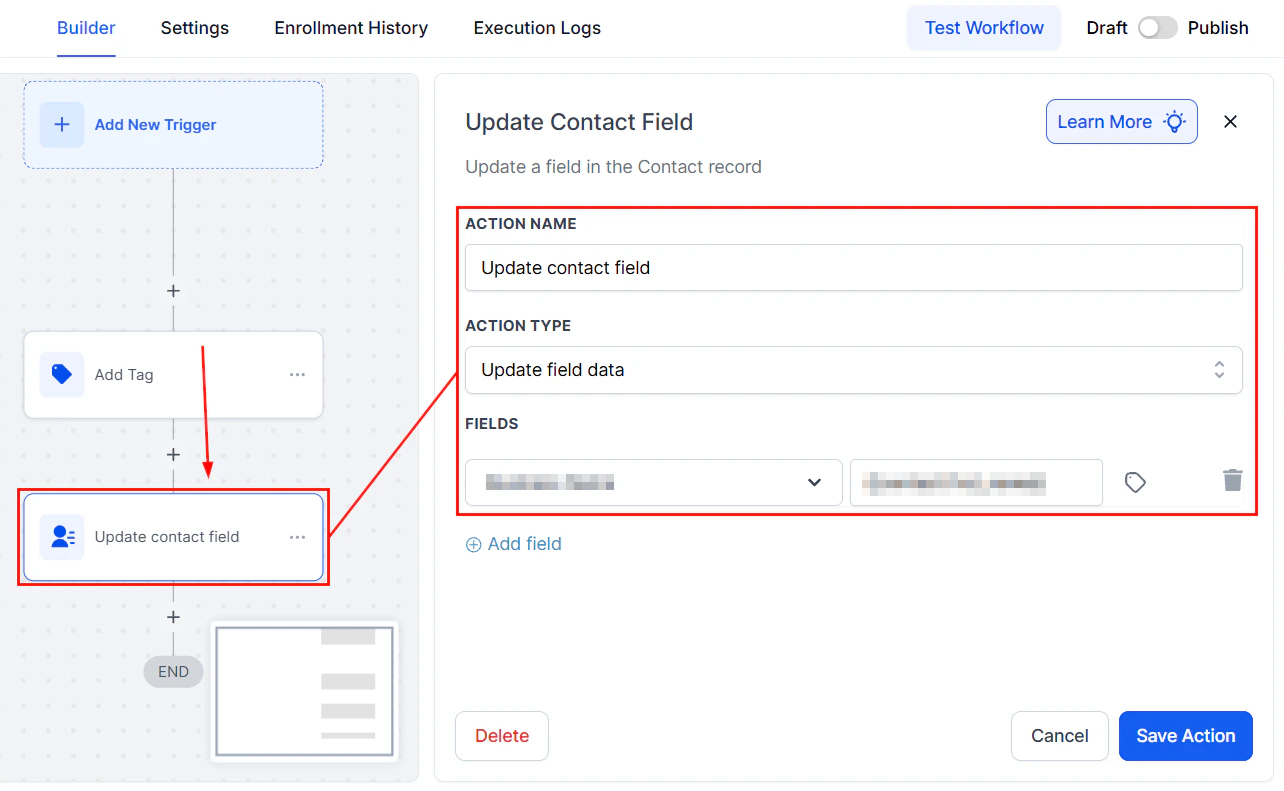
### Create or Update Contact Action
Ensure this action is in place to map the incoming webhook data (email address, business name, phone, full name) to the corresponding fields in the CRM.
Remember, the Meta Conversion API can be sensitive to configuration details. Thorough testing and careful attention to your setup are crucial for successfully tracking conversions.
### Important Notes
1. When using the Purchase event in your workflow, include a lead value to optimize your ad campaigns. This value helps Meta understand the worth of conversions for better targeting and optimization. If your workflow doesn’t include the Purchase event, leaving this field blank is fine.
2. \*\*\*\*Test with Real Data: \*\*\*\*Always test your Meta CAPI workflow with real user data. Simulated interactions may not provide a full picture of how conversions are tracked. Use real submissions, appointments, or purchases to identify potential issues and ensure the workflow runs smoothly.
3. \*\*\*\*Address Errors Promptly: \*\*\*\*Keep an eye on error messages or warnings during setup or testing. These messages provide clues about misconfigurations or missing components in your workflow. Addressing errors promptly can save you time and prevent long-term issues.
4. \*\*\*\*Stay Updated With Meta's Documentation: \*\*\*\*Meta’s official documentation for business tools is a valuable resource. It offers detailed, up-to-date guidance on using the Conversion API, troubleshooting issues, and implementing best practices. Bookmarking and reviewing this material regularly is a good habit.
5. \*\*\*\*Contact Meta Support: \*\*\*\*If you’ve tried everything and still face issues, don’t hesitate to contact Meta Support. Their team can provide tailored assistance for your specific setup and help resolve any lingering problems.
***
## Troubleshooting webhooks
When using webhooks to import affiliate sign-up information into your CRM, it’s essential to ensure that all necessary data fields are populated. However, incomplete data—such as missing first names, company names, or phone numbers—can disrupt workflows and hinder communication. Often, webhooks only capture the email address, leaving other critical fields empty. This can impact personalization and automation, as these processes rely on complete data.
To address this issue, you can modify your workflow to identify and correct missing information. Focus on the very first step in your workflow where the affiliate sign-up information is captured. This is crucial for ensuring the contact record is as complete as possible before proceeding through the rest of the workflow.
### Create or Update Contact Action
Ensure this action is in place to map the incoming webhook data (email address, business name, phone, full name) to the corresponding fields in the CRM.
 ### Add an If/Else Condition
Introduce a condition to check if essential fields (e.g., first name) are empty:
* ****If the field is not empty:**** The workflow continues as expected.
* ****If the field is empty:**** Trigger a notification for manual intervention.
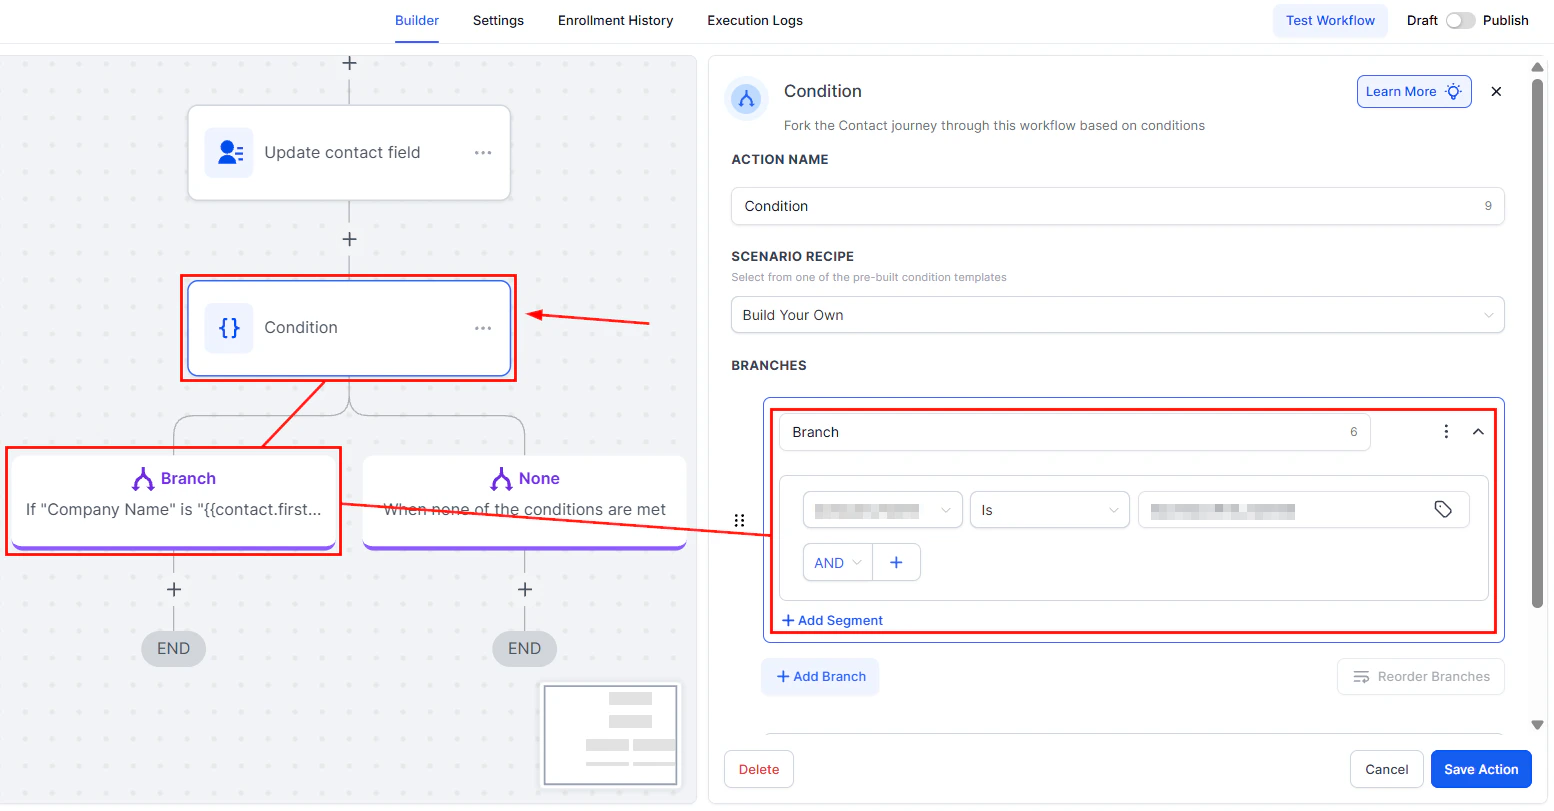
### Add an If/Else Condition
Introduce a condition to check if essential fields (e.g., first name) are empty:
* ****If the field is not empty:**** The workflow continues as expected.
* ****If the field is empty:**** Trigger a notification for manual intervention.
 ### Notification for Missing Information
Configure an internal notification (e.g., SMS or email) to alert you or your team about the missing information, prompting a manual update.
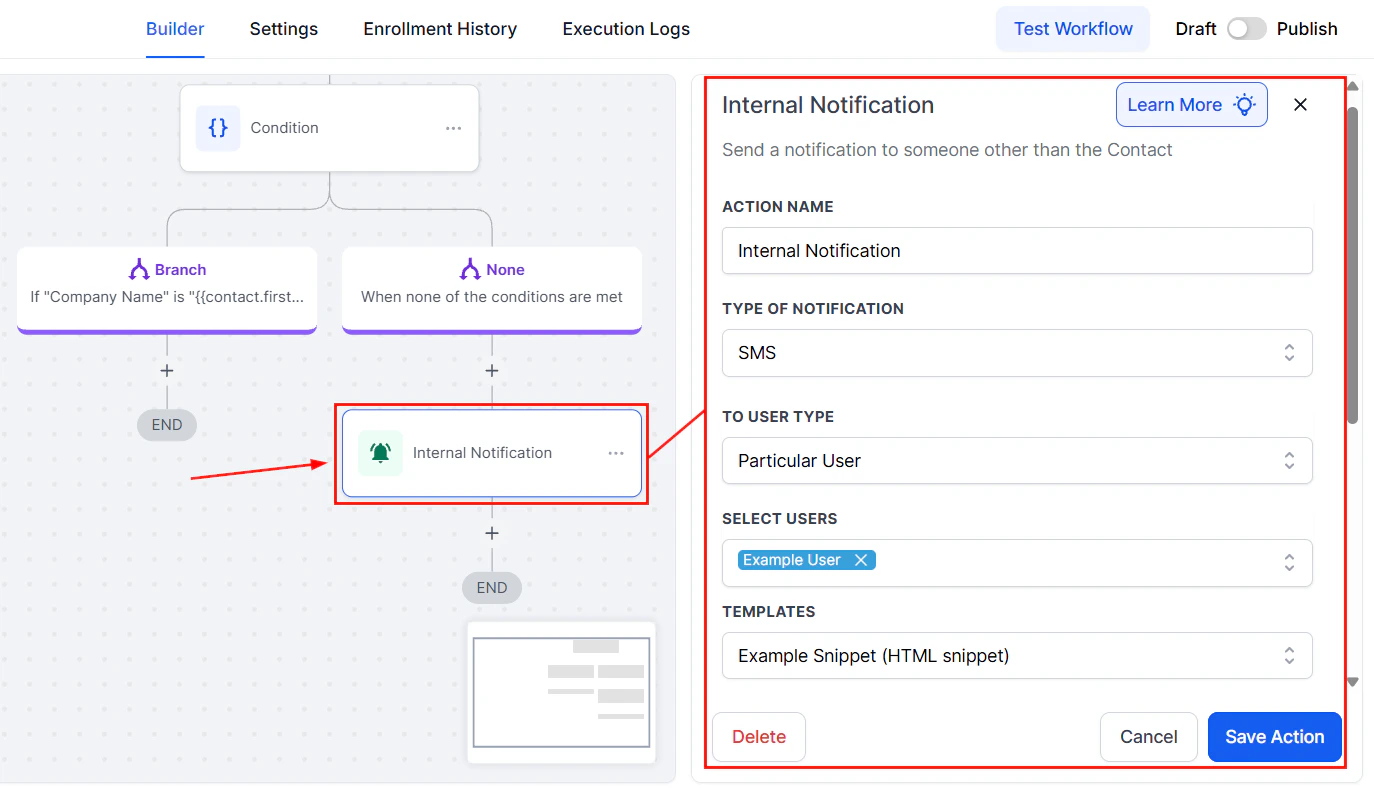
### Notification for Missing Information
Configure an internal notification (e.g., SMS or email) to alert you or your team about the missing information, prompting a manual update.
 ### Manual Update Process
Access the affiliate platform (e.g., First Promoter) to find the missing information based on the email address provided. Manually update the contact record in the CRM with the retrieved information.
### Pause and Wait
Set a conditional wait step in the workflow, giving you or your team time to update the missing information manually. Configure this step to allow a few days for the manual update to be completed.
### Manual Update Process
Access the affiliate platform (e.g., First Promoter) to find the missing information based on the email address provided. Manually update the contact record in the CRM with the retrieved information.
### Pause and Wait
Set a conditional wait step in the workflow, giving you or your team time to update the missing information manually. Configure this step to allow a few days for the manual update to be completed.
 ### Resume Workflow
Once the missing information is updated, manually move the contact to the next step in the workflow, ensuring they proceed through the remaining actions as intended.
Incomplete data from webhooks can hinder the effectiveness of your workflows, but with the right adjustments, these issues can be managed efficiently. By implementing conditional checks, setting up notifications, and proactively monitoring your data, you can ensure smooth operations. While manual intervention remains the most reliable solution for now, collaborating with your affiliate platform can help minimize such issues in the future.
### Troubleshooting Tips
* ****Regularly Check for Incomplete Data****: Make it a habit to periodically review incoming webhook data for completeness to proactively address any issues.
* ****Collaborate with Your Affiliate Platform****: If missing data becomes a frequent issue, reach out to your affiliate platform's support team for assistance in troubleshooting the webhook configuration.
***
## FAQs
Automating the update of missing information is challenging without access to a direct source for the missing data. The manual update process is currently the most reliable method.
If the missing information is not available on the affiliate platform, consider reaching out directly to the affiliate for the necessary details.
Yes, this general approach of adding conditional checks and manual intervention steps can be adapted to address various webhook-related data issues.
***
### Resume Workflow
Once the missing information is updated, manually move the contact to the next step in the workflow, ensuring they proceed through the remaining actions as intended.
Incomplete data from webhooks can hinder the effectiveness of your workflows, but with the right adjustments, these issues can be managed efficiently. By implementing conditional checks, setting up notifications, and proactively monitoring your data, you can ensure smooth operations. While manual intervention remains the most reliable solution for now, collaborating with your affiliate platform can help minimize such issues in the future.
### Troubleshooting Tips
* ****Regularly Check for Incomplete Data****: Make it a habit to periodically review incoming webhook data for completeness to proactively address any issues.
* ****Collaborate with Your Affiliate Platform****: If missing data becomes a frequent issue, reach out to your affiliate platform's support team for assistance in troubleshooting the webhook configuration.
***
## FAQs
Automating the update of missing information is challenging without access to a direct source for the missing data. The manual update process is currently the most reliable method.
If the missing information is not available on the affiliate platform, consider reaching out directly to the affiliate for the necessary details.
Yes, this general approach of adding conditional checks and manual intervention steps can be adapted to address various webhook-related data issues.
***