> ## Documentation Index
> Fetch the complete documentation index at: https://help.hoopai.com/llms.txt
> Use this file to discover all available pages before exploring further.
# Wait Actions
> Pause a workflow for a fixed duration, until a specific time, or until a contact completes a defined action before moving to the next step.
The Wait action is one of the most important building blocks in any workflow. It controls *when* the next step executes — introducing intentional pauses so your communications arrive at the right moment, your follow-ups feel natural, and your automations respond to real contact behavior rather than firing all at once.
## Types of wait actions
### Wait for (fixed duration)
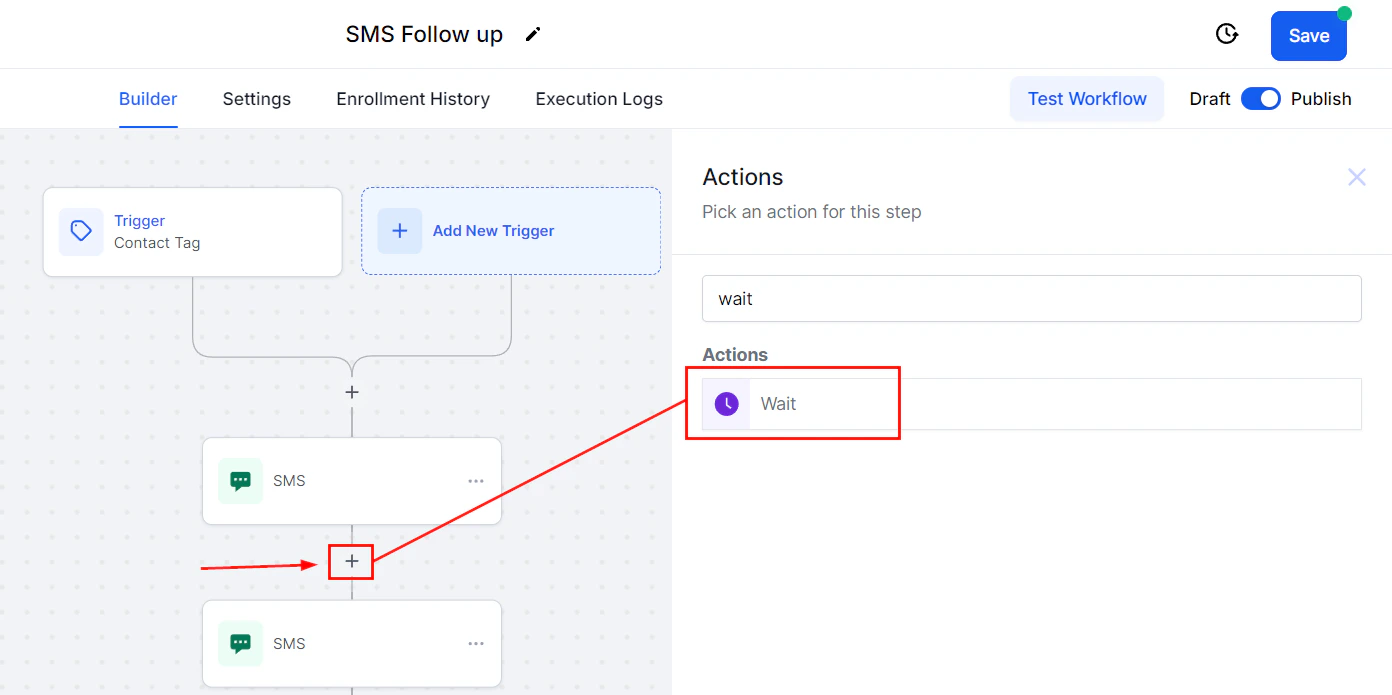
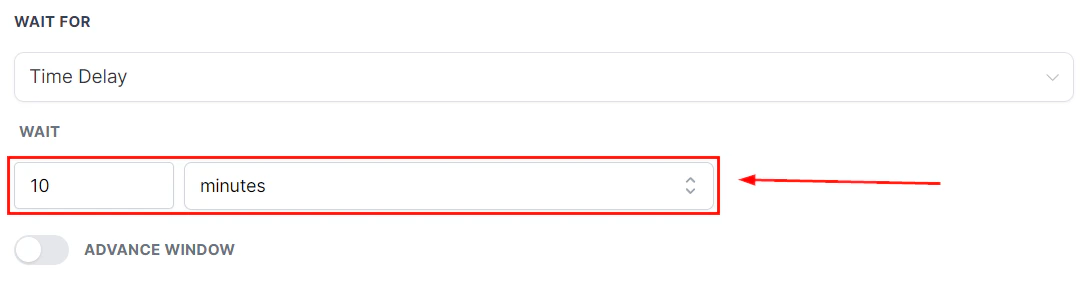
Delays the workflow by a set amount of time before moving the contact forward. This is the simplest wait type and is used to space out messages over hours, days, or weeks.
**Configuration:**
* Enter the duration as a number
* Choose the unit: minutes, hours, days, or weeks
Example: waiting 3 days before sending a follow-up email, or waiting 1 hour before sending an SMS after a form is submitted.
 ### Wait until (specific date or time)
Holds the contact at the wait step until a specific date and time is reached. Useful when you want actions to occur on a particular calendar date regardless of when the contact entered the workflow.
**Configuration:**
* Select a fixed date and time, or reference a date custom field on the contact (e.g., their subscription renewal date or appointment date)
* Optionally specify a number of days before or after the referenced date
Example: sending a renewal reminder exactly 7 days before a contact's contract expiration date stored in a custom field.
### Wait for event (event-based pause)
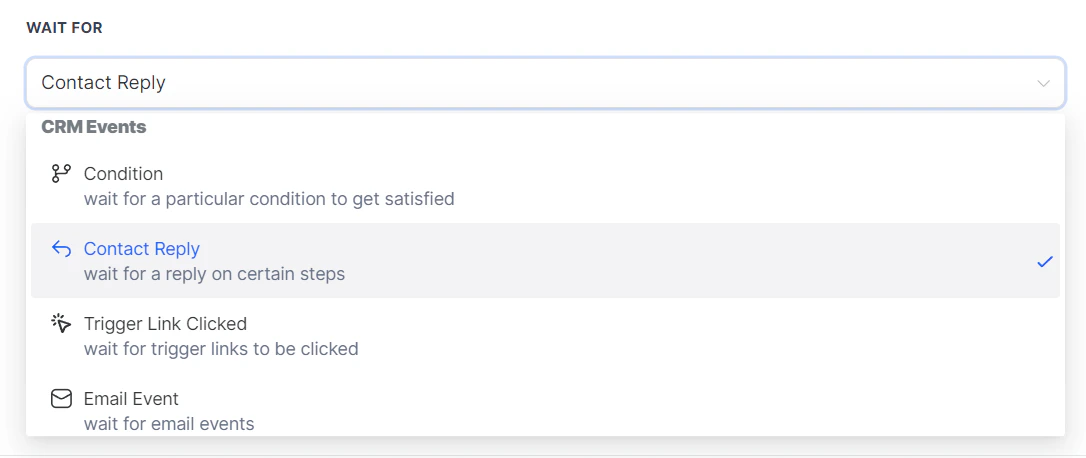
Pauses the workflow until the contact performs a specific action. If the contact completes the event during the wait period, the workflow immediately advances. If the timeout expires before the event occurs, the workflow continues anyway or takes a fallback path.
**Supported events:**
* Replied to an email or SMS
* Clicked a trigger link
* Opened an email
* Submitted a form
* Appointment status changed (confirmed, showed, no-showed)
* Tag added or removed
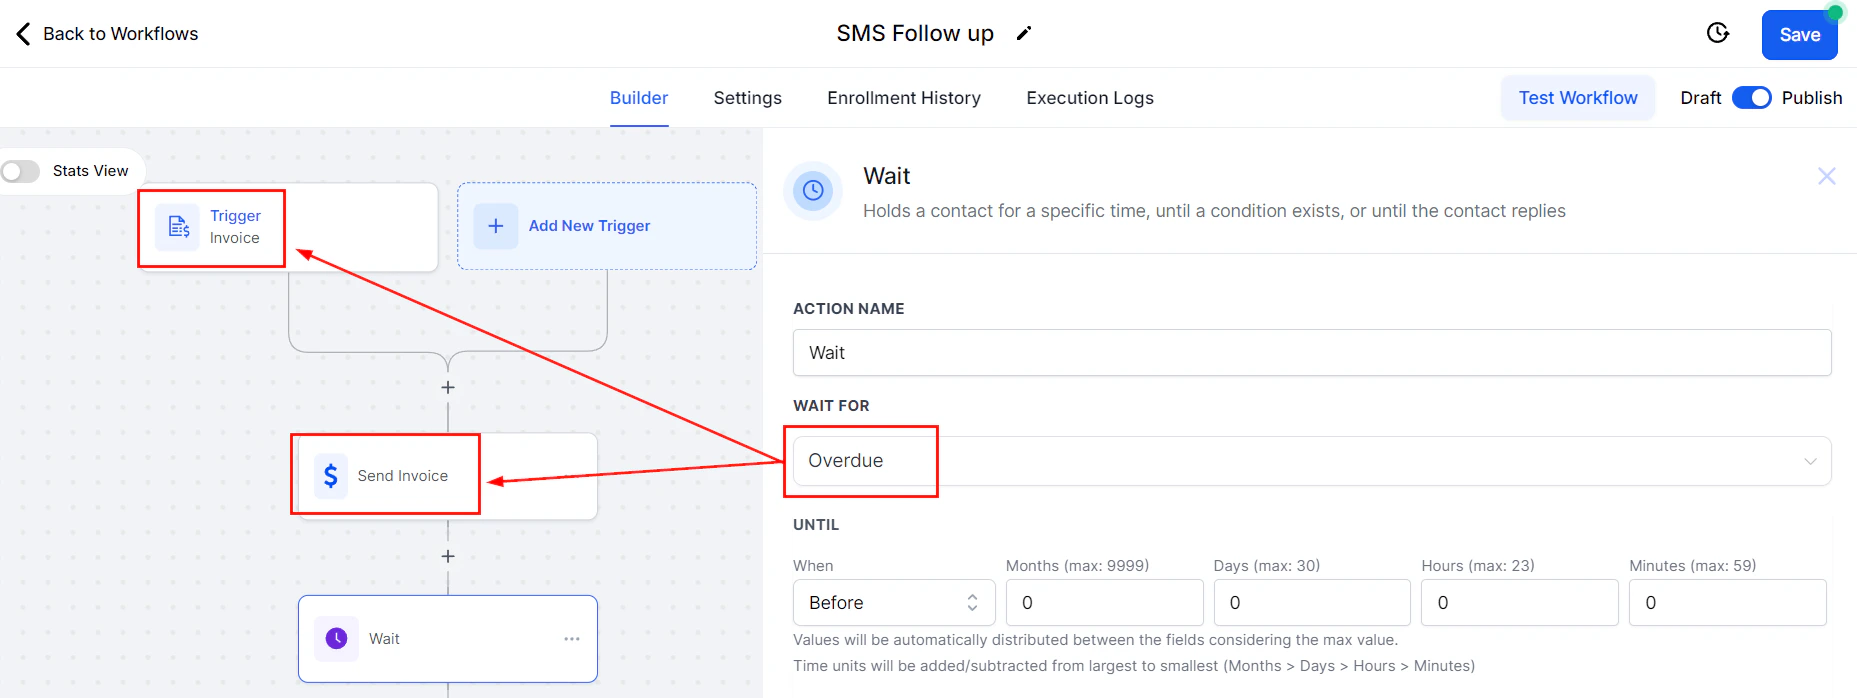
* Invoice status changed
**Configuration:**
* Select the event type and specify the target (e.g., which trigger link, which form)
* Set a timeout duration — how long to wait before giving up and continuing
* Choose whether to continue to the next step or take a different action when the timeout fires
### Wait until (specific date or time)
Holds the contact at the wait step until a specific date and time is reached. Useful when you want actions to occur on a particular calendar date regardless of when the contact entered the workflow.
**Configuration:**
* Select a fixed date and time, or reference a date custom field on the contact (e.g., their subscription renewal date or appointment date)
* Optionally specify a number of days before or after the referenced date
Example: sending a renewal reminder exactly 7 days before a contact's contract expiration date stored in a custom field.
### Wait for event (event-based pause)
Pauses the workflow until the contact performs a specific action. If the contact completes the event during the wait period, the workflow immediately advances. If the timeout expires before the event occurs, the workflow continues anyway or takes a fallback path.
**Supported events:**
* Replied to an email or SMS
* Clicked a trigger link
* Opened an email
* Submitted a form
* Appointment status changed (confirmed, showed, no-showed)
* Tag added or removed
* Invoice status changed
**Configuration:**
* Select the event type and specify the target (e.g., which trigger link, which form)
* Set a timeout duration — how long to wait before giving up and continuing
* Choose whether to continue to the next step or take a different action when the timeout fires
 Combine a "Wait for event" with an If/Else action immediately after. If the contact completed the event, the If/Else can detect the tag or reply and route them accordingly. If the timeout fired, they fall through to a different branch.
 ## Advance window
The Advance Window setting restricts the days and hours during which the wait period counts down. This ensures contacts don't receive messages at inconvenient times — for example, on weekends or outside business hours.
**How it works:**
If a contact reaches a wait step on a Saturday and your Advance Window is set to Monday through Friday, the wait duration will not begin counting until Monday morning. The contact stays paused at the wait step over the weekend and automatically resumes at the configured start time.
**Configuration options:**
* **Active days** — which days of the week the window is open (e.g., Monday–Friday)
* **Active hours** — the start and end time within each active day (e.g., 9:00 AM to 5:00 PM)
The Advance Window applies only to time-based wait types (Wait For and Wait Until). It does not affect event-based waits, which resume as soon as the event occurs regardless of time.
## Resume between hours
The **Resume Between Hours** setting works alongside fixed duration waits. Even if the wait period elapses, the workflow will only move the contact to the next step during the configured hours. This prevents messages from being sent at 3:00 AM simply because a 24-hour delay happened to expire at that time.
## Combining wait types in a sequence
Real nurture sequences typically chain multiple wait actions together with messages in between. A simple post-lead sequence might look like:
1. Send welcome email (immediate)
2. Wait 1 day
3. Send follow-up SMS
4. Wait 2 days
5. Wait for event: replied to SMS (timeout: 3 days)
6. If/Else: did they reply?
* Yes → assign to sales rep
* No → send breakup email
## Best practices
**Use Advance Window on all communication steps** to avoid contacting people outside business hours. This is especially important for SMS, which feels intrusive when received late at night.
**Set realistic timeouts on event-based waits.** A timeout that is too short may advance contacts before they have a chance to respond. A timeout that is too long can stall contacts unnecessarily. A 3–7 day timeout is reasonable for most reply-based waits.
**Add a short wait (1–2 minutes) before conditional checks.** When checking a condition that depends on a just-completed action (like a tag being applied), a brief wait gives the platform time to process the previous step before the If/Else evaluates.
**Name your wait steps descriptively.** Instead of leaving every wait step labeled "Wait," use names like "Wait 3 days before follow-up" or "Wait for appointment confirmation (7-day timeout)" so the workflow builder is self-documenting.
## FAQs
No. You must set a timeout on event-based waits. Once the timeout expires, the contact advances to the next step. Without a timeout, event-based waits will hold contacts until the event occurs, which could be never.
No. The Advance Window and Resume Between Hours settings only restrict *communication* actions (email, SMS, calls). Internal actions like adding a tag, updating a field, or creating an opportunity run immediately regardless of the time window.
Yes. Select the dynamic date option in the Wait Until configuration, then choose a date custom field from the contact. You can also offset by a number of days before or after that date.
Yes. In the Enrollment History tab, locate the contact and use the advance action to manually move them to the next step. This overrides the remaining wait duration.
## Advance window
The Advance Window setting restricts the days and hours during which the wait period counts down. This ensures contacts don't receive messages at inconvenient times — for example, on weekends or outside business hours.
**How it works:**
If a contact reaches a wait step on a Saturday and your Advance Window is set to Monday through Friday, the wait duration will not begin counting until Monday morning. The contact stays paused at the wait step over the weekend and automatically resumes at the configured start time.
**Configuration options:**
* **Active days** — which days of the week the window is open (e.g., Monday–Friday)
* **Active hours** — the start and end time within each active day (e.g., 9:00 AM to 5:00 PM)
The Advance Window applies only to time-based wait types (Wait For and Wait Until). It does not affect event-based waits, which resume as soon as the event occurs regardless of time.
## Resume between hours
The **Resume Between Hours** setting works alongside fixed duration waits. Even if the wait period elapses, the workflow will only move the contact to the next step during the configured hours. This prevents messages from being sent at 3:00 AM simply because a 24-hour delay happened to expire at that time.
## Combining wait types in a sequence
Real nurture sequences typically chain multiple wait actions together with messages in between. A simple post-lead sequence might look like:
1. Send welcome email (immediate)
2. Wait 1 day
3. Send follow-up SMS
4. Wait 2 days
5. Wait for event: replied to SMS (timeout: 3 days)
6. If/Else: did they reply?
* Yes → assign to sales rep
* No → send breakup email
## Best practices
**Use Advance Window on all communication steps** to avoid contacting people outside business hours. This is especially important for SMS, which feels intrusive when received late at night.
**Set realistic timeouts on event-based waits.** A timeout that is too short may advance contacts before they have a chance to respond. A timeout that is too long can stall contacts unnecessarily. A 3–7 day timeout is reasonable for most reply-based waits.
**Add a short wait (1–2 minutes) before conditional checks.** When checking a condition that depends on a just-completed action (like a tag being applied), a brief wait gives the platform time to process the previous step before the If/Else evaluates.
**Name your wait steps descriptively.** Instead of leaving every wait step labeled "Wait," use names like "Wait 3 days before follow-up" or "Wait for appointment confirmation (7-day timeout)" so the workflow builder is self-documenting.
## FAQs
No. You must set a timeout on event-based waits. Once the timeout expires, the contact advances to the next step. Without a timeout, event-based waits will hold contacts until the event occurs, which could be never.
No. The Advance Window and Resume Between Hours settings only restrict *communication* actions (email, SMS, calls). Internal actions like adding a tag, updating a field, or creating an opportunity run immediately regardless of the time window.
Yes. Select the dynamic date option in the Wait Until configuration, then choose a date custom field from the contact. You can also offset by a number of days before or after that date.
Yes. In the Enrollment History tab, locate the contact and use the advance action to manually move them to the next step. This overrides the remaining wait duration.