> ## Documentation Index
> Fetch the complete documentation index at: https://help.hoopai.com/llms.txt
> Use this file to discover all available pages before exploring further.
# Inbound Webhooks
> Trigger a HoopAI workflow from an external system by sending an HTTP request to a unique webhook URL, then map the incoming data to contact fields.
The Inbound Webhook trigger lets any external system — a payment processor, a form tool, a custom application, or another platform — start a HoopAI workflow by sending an HTTP request to a unique URL. When data arrives at that URL, the platform creates or matches a contact and enrolls them in the workflow using the values from the incoming request.
This is the reverse of the Custom Webhook action. Instead of HoopAI sending data *out* to another system, the Inbound Webhook receives data *in* from another system and uses it to drive automation.
## Common use cases
* A payment processor notifies HoopAI when a purchase is completed, triggering a fulfillment or onboarding workflow
* A third-party form tool (outside HoopAI) submits lead data that enrolls the contact in a nurture sequence
* A custom application fires an event (e.g., a user reached a milestone) that triggers a follow-up workflow
* An external scheduling tool sends booking data to create or update a contact and enroll them in a reminder sequence
* Another automation platform (such as Make or Zapier) sends data to HoopAI after completing its own logic
## Setting up an inbound webhook trigger
### Step 1: Add the trigger
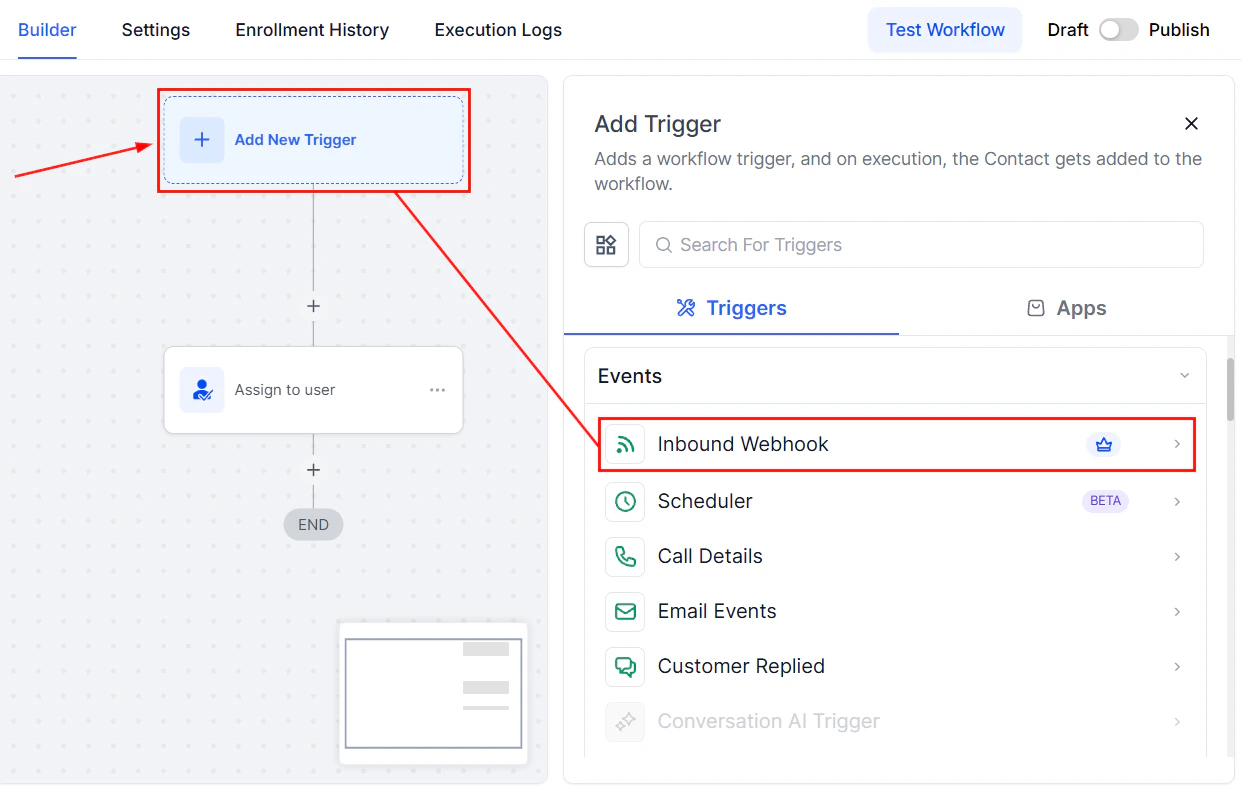
1. Open or create a workflow in the builder.
2. Click **Add Trigger** and select **Inbound Webhook** from the trigger list.
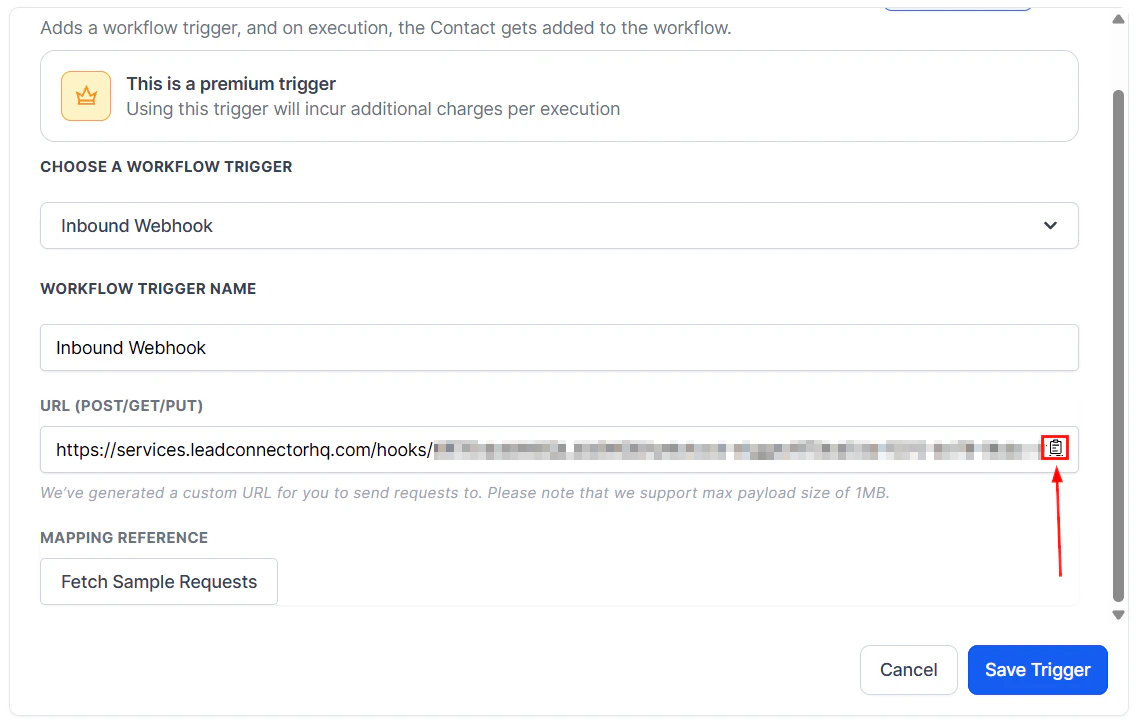
3. The platform immediately generates a unique webhook URL for this workflow. Copy that URL.
 ### Step 2: Send a test request
Configure your external system to send an HTTP POST request to the copied URL. The request body should contain JSON data representing the contact and any additional fields you want to pass.
A minimal example:
```json theme={null}
{
"email": "alex@example.com",
"first_name": "Alex",
"last_name": "Johnson",
"phone": "+15551234567",
"source": "payment_processor",
"plan": "professional"
}
```
The HoopAI platform requires at least one of **email** or **phone** in the payload to identify or create a contact. Requests without either field will not enroll a contact.
### Step 3: Capture sample data
After sending a test request, return to the trigger configuration in the HoopAI workflow builder. The platform shows the data it received. Select the request you want to use as the sample — this defines the field structure the trigger will recognize for future requests.
### Step 2: Send a test request
Configure your external system to send an HTTP POST request to the copied URL. The request body should contain JSON data representing the contact and any additional fields you want to pass.
A minimal example:
```json theme={null}
{
"email": "alex@example.com",
"first_name": "Alex",
"last_name": "Johnson",
"phone": "+15551234567",
"source": "payment_processor",
"plan": "professional"
}
```
The HoopAI platform requires at least one of **email** or **phone** in the payload to identify or create a contact. Requests without either field will not enroll a contact.
### Step 3: Capture sample data
After sending a test request, return to the trigger configuration in the HoopAI workflow builder. The platform shows the data it received. Select the request you want to use as the sample — this defines the field structure the trigger will recognize for future requests.
 ### Step 4: Map fields
Once sample data is captured, you can map incoming data keys to HoopAI contact fields and workflow variables. Mapped values update the contact record and become available as custom variables throughout the rest of the workflow.
For example, you can map the `plan` key from the incoming JSON to a custom contact field called "Subscription Plan," so every contact enrolled via this webhook has their plan recorded automatically.
## Supported HTTP methods
The Inbound Webhook trigger accepts:
* **POST** — the standard method for sending JSON data; use this in most cases
* **GET** — passes data as query parameters in the URL rather than a body; useful for simpler integrations
* **PUT** — updates an existing resource; some platforms use this for event notifications
POST is the most widely supported and recommended method.
## Data format
The incoming request body should be **JSON-encoded**. Most modern platforms and APIs send JSON by default. Set the `Content-Type: application/json` header in your request to ensure the platform parses the body correctly.
Query parameters are also accessible as variables within the workflow when using GET requests.
## Accessing incoming data in the workflow
After mapping fields from the inbound webhook, you can reference the incoming values anywhere in the workflow using custom variables. For example, if your webhook sends a `subscription_plan` field and you map it to a workflow variable, you can use `{{custom_variables.subscription_plan}}` in email bodies, SMS messages, If/Else conditions, and other actions.
This allows a single workflow to behave differently depending on the data received — routing contacts to different branches based on what the external system sent.
## Security considerations
**Keep the webhook URL private.** The unique URL is essentially an authentication token — anyone who knows the URL can trigger the workflow. Do not publish it in public documentation or commit it to source code repositories.
**Validate incoming data.** Add trigger filters or an early If/Else condition to verify that incoming data meets expectations before proceeding. For example, check that a required field (such as `email`) is not empty before running subsequent steps.
**Use HTTPS only.** All webhook URLs generated by the HoopAI platform use HTTPS. Ensure your external system sends requests to the HTTPS URL, not HTTP.
## Generating a new webhook URL
If a webhook URL is compromised or you want to rotate it for security reasons, you can generate a new URL from the trigger configuration. Any external systems using the old URL will need to be updated with the new address.
When integrating with a platform that supports webhook retry logic (sending the request again if no response is received), ensure your workflow handles duplicate enrollments gracefully. Consider adding a contact tag on enrollment and using a trigger filter to prevent re-enrollment if that tag is already present.
## FAQs
Yes. If no existing contact matches the incoming email or phone number, the platform creates a new contact using the data provided in the request. If a match is found, the existing contact is enrolled and their record is updated with any mapped fields.
No. Each workflow generates its own unique webhook URL. If you need to trigger multiple workflows from one external event, either chain the workflows (one enrolls the contact in another) or set up separate webhook endpoints for each.
The platform returns a 200 OK response to confirm receipt of the webhook payload. If the request is malformed or missing required fields, a 4xx response is returned.
Yes. Include your custom field values in the JSON payload and map them to the corresponding contact custom fields in the trigger configuration. The contact record will be updated with those values upon enrollment.
### Step 4: Map fields
Once sample data is captured, you can map incoming data keys to HoopAI contact fields and workflow variables. Mapped values update the contact record and become available as custom variables throughout the rest of the workflow.
For example, you can map the `plan` key from the incoming JSON to a custom contact field called "Subscription Plan," so every contact enrolled via this webhook has their plan recorded automatically.
## Supported HTTP methods
The Inbound Webhook trigger accepts:
* **POST** — the standard method for sending JSON data; use this in most cases
* **GET** — passes data as query parameters in the URL rather than a body; useful for simpler integrations
* **PUT** — updates an existing resource; some platforms use this for event notifications
POST is the most widely supported and recommended method.
## Data format
The incoming request body should be **JSON-encoded**. Most modern platforms and APIs send JSON by default. Set the `Content-Type: application/json` header in your request to ensure the platform parses the body correctly.
Query parameters are also accessible as variables within the workflow when using GET requests.
## Accessing incoming data in the workflow
After mapping fields from the inbound webhook, you can reference the incoming values anywhere in the workflow using custom variables. For example, if your webhook sends a `subscription_plan` field and you map it to a workflow variable, you can use `{{custom_variables.subscription_plan}}` in email bodies, SMS messages, If/Else conditions, and other actions.
This allows a single workflow to behave differently depending on the data received — routing contacts to different branches based on what the external system sent.
## Security considerations
**Keep the webhook URL private.** The unique URL is essentially an authentication token — anyone who knows the URL can trigger the workflow. Do not publish it in public documentation or commit it to source code repositories.
**Validate incoming data.** Add trigger filters or an early If/Else condition to verify that incoming data meets expectations before proceeding. For example, check that a required field (such as `email`) is not empty before running subsequent steps.
**Use HTTPS only.** All webhook URLs generated by the HoopAI platform use HTTPS. Ensure your external system sends requests to the HTTPS URL, not HTTP.
## Generating a new webhook URL
If a webhook URL is compromised or you want to rotate it for security reasons, you can generate a new URL from the trigger configuration. Any external systems using the old URL will need to be updated with the new address.
When integrating with a platform that supports webhook retry logic (sending the request again if no response is received), ensure your workflow handles duplicate enrollments gracefully. Consider adding a contact tag on enrollment and using a trigger filter to prevent re-enrollment if that tag is already present.
## FAQs
Yes. If no existing contact matches the incoming email or phone number, the platform creates a new contact using the data provided in the request. If a match is found, the existing contact is enrolled and their record is updated with any mapped fields.
No. Each workflow generates its own unique webhook URL. If you need to trigger multiple workflows from one external event, either chain the workflows (one enrolls the contact in another) or set up separate webhook endpoints for each.
The platform returns a 200 OK response to confirm receipt of the webhook payload. If the request is malformed or missing required fields, a 4xx response is returned.
Yes. Include your custom field values in the JSON payload and map them to the corresponding contact custom fields in the trigger configuration. The contact record will be updated with those values upon enrollment.