> ## Documentation Index
> Fetch the complete documentation index at: https://help.hoopai.com/llms.txt
> Use this file to discover all available pages before exploring further.
# If/Else Conditions
> Use conditional branching to route contacts down different paths in a workflow based on their data, tags, behavior, and more.
If/Else conditions let you split a workflow into multiple branches so that different contacts follow different paths based on rules you define. Rather than sending every contact through the same sequence of steps, you can check a contact's field values, tags, appointment status, or other attributes — and route each contact accordingly.
## How if/else branching works
When a contact reaches an If/Else action, the HoopAI platform evaluates that contact against each branch in order, from top to bottom. The contact is sent down the first branch whose conditions are true. If no branch condition matches, the contact falls through to the **None** (else) branch, which is created automatically and always runs as the final fallback.
This top-down evaluation means branch order matters. Place your most specific or highest-priority conditions at the top.
## Adding an if/else action
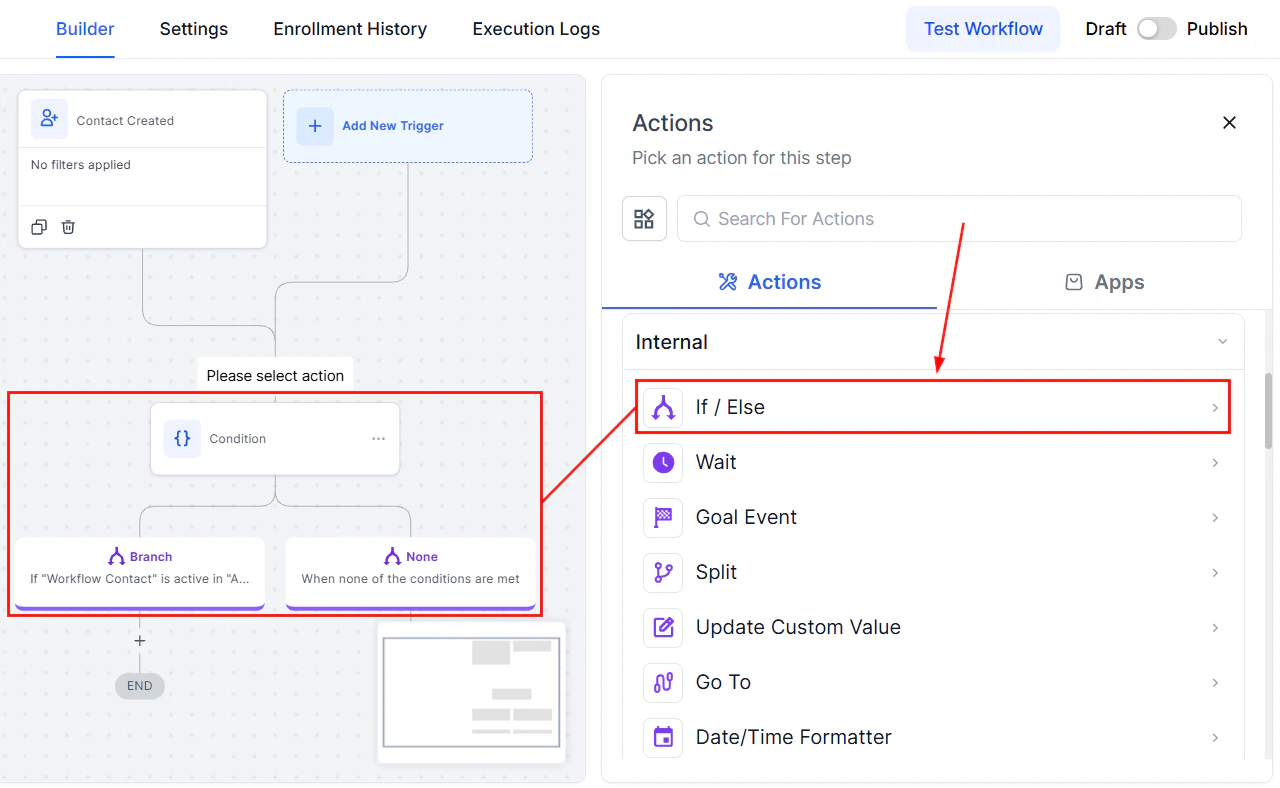
1. Open your workflow in the builder and click the **+** icon where you want to add a branch point.
2. Search for or select **If/Else** from the action list.
3. The action opens with a default branch and a **None** branch already created.
 ## Configuring conditions
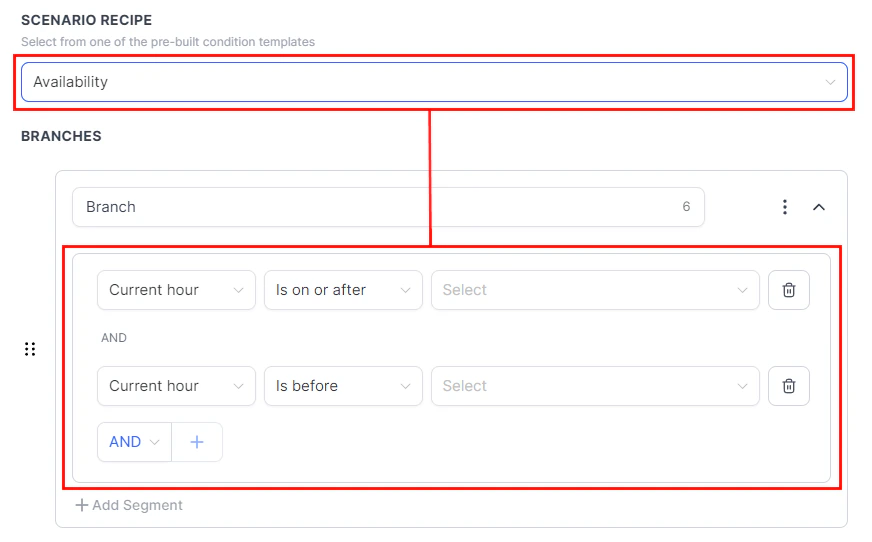
Each branch is made up of one or more conditions. A condition has three parts:
* **Field** — the data point to evaluate (contact field, tag, appointment status, opportunity stage, custom field, etc.)
* **Operator** — the comparison rule (is, is not, contains, is empty, greater than, less than, etc.)
* **Value** — the target value to compare against
To add a condition inside a branch, click **Add Condition** and fill in those three parts.
## Configuring conditions
Each branch is made up of one or more conditions. A condition has three parts:
* **Field** — the data point to evaluate (contact field, tag, appointment status, opportunity stage, custom field, etc.)
* **Operator** — the comparison rule (is, is not, contains, is empty, greater than, less than, etc.)
* **Value** — the target value to compare against
To add a condition inside a branch, click **Add Condition** and fill in those three parts.
 ### AND vs. OR logic
When a branch contains multiple conditions, you control how they combine:
* **AND** — all conditions must be true for the branch to match
* **OR** — any single condition being true is enough to match
### AND vs. OR logic
When a branch contains multiple conditions, you control how they combine:
* **AND** — all conditions must be true for the branch to match
* **OR** — any single condition being true is enough to match
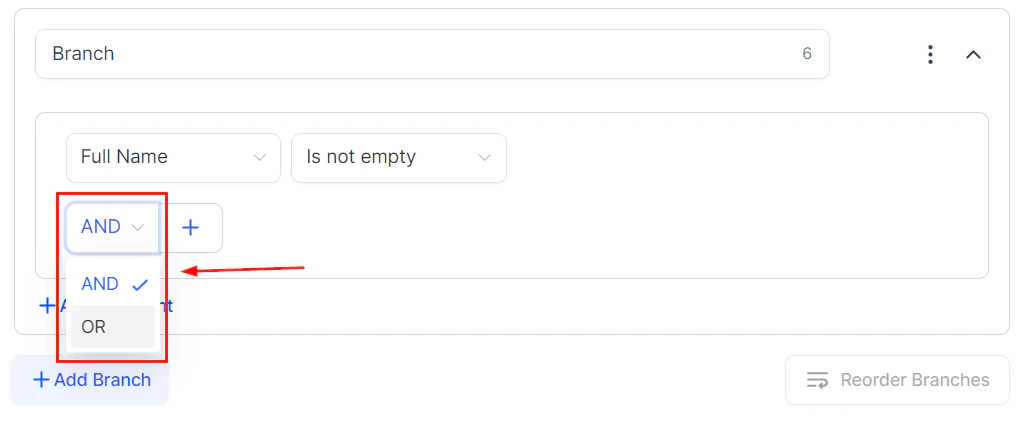 You can mix AND and OR within the same branch by grouping conditions into segments. Click **Add Segment** to start a new group. Within a segment, conditions use AND. Between segments, the relationship is OR. This lets you express logic like: *(field A = X AND field B = Y) OR (field C = Z)*.
## Adding multiple branches
Click **Add Branch** to define additional paths. Give each branch a descriptive name so the workflow is easy to read at a glance. Each branch can have its own set of conditions and its own chain of subsequent actions.
A common pattern:
* Branch 1: Contact has tag "VIP" → send premium onboarding sequence
* Branch 2: Contact came from referral source "Partner" → assign to partner rep
* None: All other contacts → standard onboarding sequence
## Supported field types and operators
The If/Else action supports a wide range of fields:
| Field type | Example operators |
| ------------------ | ---------------------------------------------- |
| Text fields | is, is not, contains, starts with, is empty |
| Tags | has tag, does not have tag |
| Number / score | equals, greater than, less than, between |
| Date fields | is before, is after, is within the last N days |
| Dropdown / select | is, is not |
| Appointment status | is confirmed, is cancelled, has appointment |
| Opportunity stage | is in stage, is not in stage |
| Pipeline value | greater than, less than |
## Using dynamic values in conditions
Instead of typing a fixed comparison value, you can use a **dynamic value** pulled from an earlier workflow step or a stored custom field. This is useful when you want to compare two live data points — for example, checking whether a contact's score exceeds the value captured from a previous form submission.
To use a dynamic value, click the value field in your condition and switch to the dynamic value picker. Dynamic values work with numeric, date, monetary, and select field types.
For dropdown and select fields, dynamic values require the option's internal ID, not the display label. Check your custom field settings to find the correct IDs.
## Best practices
**Add a Wait action before If/Else when timing matters.** For example, if you want to check whether a contact opened an email before branching, place a Wait action (set to "Wait for event: email opened" with a timeout) before the If/Else check.
**Name your branches clearly.** The builder shows a text summary of each branch's conditions. Use descriptive branch names like "High-value lead" or "No appointment yet" so the logic is immediately readable.
**Always configure the None branch.** Even if most contacts will match a defined branch, the None branch ensures no one falls off the end of the workflow unexpectedly. At minimum, add a tag or internal notification to the None branch so you know when contacts land there.
**Keep branches to a manageable number.** If you need more than five or six branches, consider splitting your workflow into multiple smaller workflows, each focused on a narrower decision.
## FAQs
The contact is sent down only the first matching branch, evaluated from top to bottom. Subsequent branches are not checked once a match is found.
Yes. You can add another If/Else action inside any branch to create deeper decision trees. Each nested If/Else evaluates independently.
The None branch runs only when no other branch condition is met. It is not optional — every If/Else action has a None branch, and it is always evaluated last.
Yes. Drag the branch handle to reorder branches within the If/Else action. Remember that order affects which branch a contact matches first.
You can mix AND and OR within the same branch by grouping conditions into segments. Click **Add Segment** to start a new group. Within a segment, conditions use AND. Between segments, the relationship is OR. This lets you express logic like: *(field A = X AND field B = Y) OR (field C = Z)*.
## Adding multiple branches
Click **Add Branch** to define additional paths. Give each branch a descriptive name so the workflow is easy to read at a glance. Each branch can have its own set of conditions and its own chain of subsequent actions.
A common pattern:
* Branch 1: Contact has tag "VIP" → send premium onboarding sequence
* Branch 2: Contact came from referral source "Partner" → assign to partner rep
* None: All other contacts → standard onboarding sequence
## Supported field types and operators
The If/Else action supports a wide range of fields:
| Field type | Example operators |
| ------------------ | ---------------------------------------------- |
| Text fields | is, is not, contains, starts with, is empty |
| Tags | has tag, does not have tag |
| Number / score | equals, greater than, less than, between |
| Date fields | is before, is after, is within the last N days |
| Dropdown / select | is, is not |
| Appointment status | is confirmed, is cancelled, has appointment |
| Opportunity stage | is in stage, is not in stage |
| Pipeline value | greater than, less than |
## Using dynamic values in conditions
Instead of typing a fixed comparison value, you can use a **dynamic value** pulled from an earlier workflow step or a stored custom field. This is useful when you want to compare two live data points — for example, checking whether a contact's score exceeds the value captured from a previous form submission.
To use a dynamic value, click the value field in your condition and switch to the dynamic value picker. Dynamic values work with numeric, date, monetary, and select field types.
For dropdown and select fields, dynamic values require the option's internal ID, not the display label. Check your custom field settings to find the correct IDs.
## Best practices
**Add a Wait action before If/Else when timing matters.** For example, if you want to check whether a contact opened an email before branching, place a Wait action (set to "Wait for event: email opened" with a timeout) before the If/Else check.
**Name your branches clearly.** The builder shows a text summary of each branch's conditions. Use descriptive branch names like "High-value lead" or "No appointment yet" so the logic is immediately readable.
**Always configure the None branch.** Even if most contacts will match a defined branch, the None branch ensures no one falls off the end of the workflow unexpectedly. At minimum, add a tag or internal notification to the None branch so you know when contacts land there.
**Keep branches to a manageable number.** If you need more than five or six branches, consider splitting your workflow into multiple smaller workflows, each focused on a narrower decision.
## FAQs
The contact is sent down only the first matching branch, evaluated from top to bottom. Subsequent branches are not checked once a match is found.
Yes. You can add another If/Else action inside any branch to create deeper decision trees. Each nested If/Else evaluates independently.
The None branch runs only when no other branch condition is met. It is not optional — every If/Else action has a None branch, and it is always evaluated last.
Yes. Drag the branch handle to reorder branches within the If/Else action. Remember that order affects which branch a contact matches first.