> ## Documentation Index
> Fetch the complete documentation index at: https://help.hoopai.com/llms.txt
> Use this file to discover all available pages before exploring further.
# Creating Voice AI agents
> Complete step-by-step guide to creating your first Voice AI agent in HoopAI.
Your Voice AI agent is a virtual phone representative that can answer calls, make outbound calls, book appointments, and handle customer inquiries around the clock. This guide walks you through every step of creating and configuring your first agent.
Before you begin, make sure you have access to the **AI Agents** section in your HoopAI account and at least one phone number available for assignment. If you need to set up a phone number first, see [Voice AI phone number setup](/ai/voice-ai/phone-setup).
## Choosing your agent type
The first decision you will make is whether your agent handles **inbound** calls, **outbound** calls, or both. This choice affects the configuration options available to you and how the agent behaves during conversations.
* **Inbound agents** answer calls from customers who dial your business number. Common use cases include reception, customer support, and after-hours answering.
* **Outbound agents** place calls on your behalf. Common use cases include appointment reminders, lead follow-ups, and satisfaction surveys.
For a detailed comparison, see [Inbound vs outbound Voice AI calls](/ai/voice-ai/inbound-outbound).
 ## Step-by-step agent creation
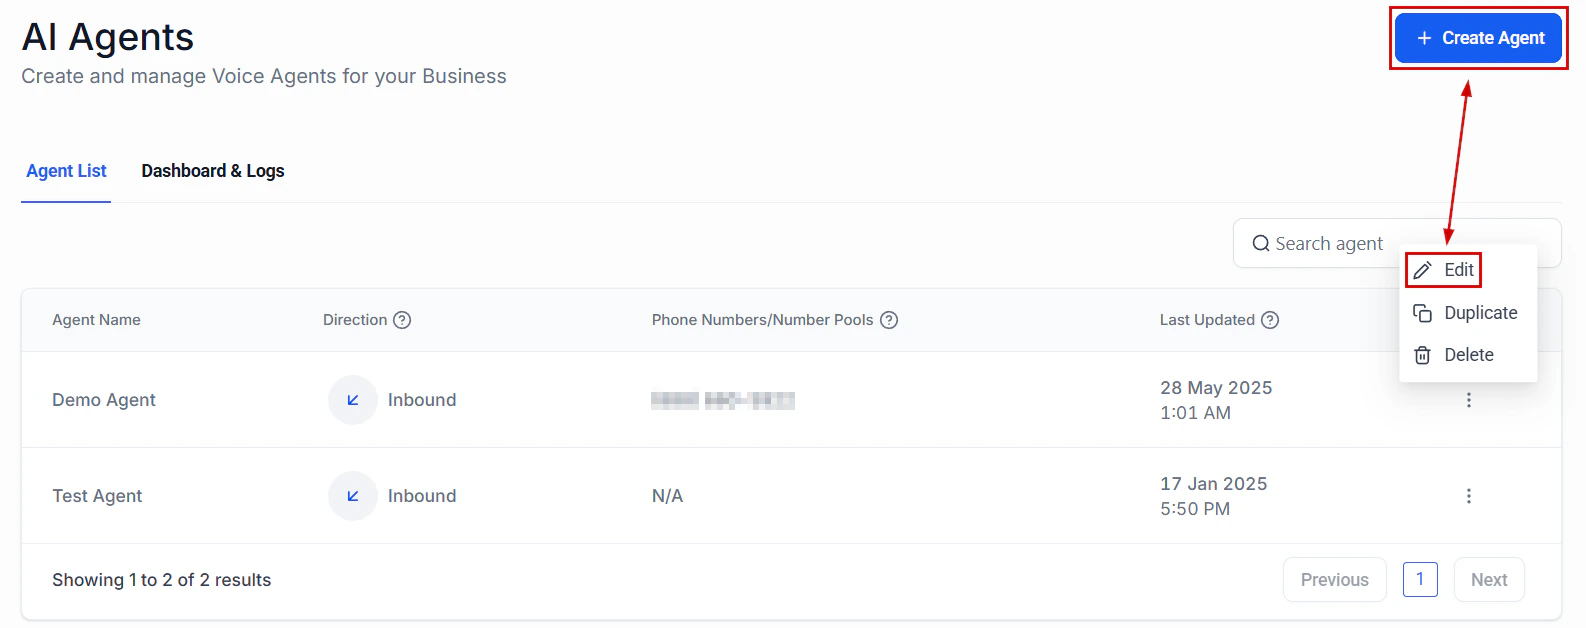
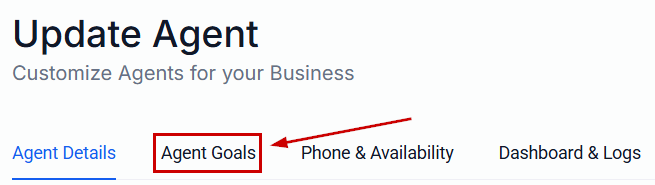
Go to **AI Agents** in the left sidebar of your HoopAI account, then select the **Voice AI** tab. Click the **Create Agent** button in the top-right corner to open the agent creation wizard.
## Step-by-step agent creation
Go to **AI Agents** in the left sidebar of your HoopAI account, then select the **Voice AI** tab. Click the **Create Agent** button in the top-right corner to open the agent creation wizard.
 Give your agent a descriptive name that reflects its purpose — for example, "Front Desk Receptionist" or "Appointment Reminder Bot." Names are internal-only and not spoken to callers.
Select the call direction:
| Direction | Description |
| ------------ | ------------------------------------------------------------------------------- |
| **Inbound** | Agent answers incoming calls to an assigned phone number |
| **Outbound** | Agent places calls to contacts from workflows, bulk actions, or manual triggers |
| **Both** | Agent can handle calls in either direction |
If you are unsure, start with **Inbound**. You can always add outbound capabilities later by editing the agent.
Choose the voice your agent will use during calls. HoopAI offers a library of natural-sounding AI voices across different genders, accents, and speaking styles.
When selecting a voice, consider:
* **Brand alignment** — Pick a voice that matches your brand personality. A law firm may prefer a calm, measured tone, while a fitness studio might choose something more energetic.
* **Clarity** — Some voices perform better for technical or medical terminology. Test a few options with your specific vocabulary.
* **Speed** — Each voice has a natural cadence. You can adjust speaking speed in advanced settings, but starting with a voice that naturally matches your desired pace produces better results.
Click the **Play** icon next to any voice to hear a sample. You can change the voice at any time without recreating the agent.
Select the primary language your agent will use. HoopAI Voice AI supports multiple languages including English, Spanish, French, Portuguese, German, and more.
If your business serves multilingual callers, you can enable **automatic language detection** in the advanced settings. The agent will detect the caller's language and respond accordingly, though performance is strongest in the primary language you select here.
For inbound agents, assign at least one phone number that the agent will answer. You can assign numbers you have already purchased in HoopAI, or purchase a new number directly from this screen.
For outbound agents, select the caller ID number that will appear when the agent places calls.
If you need to purchase or configure phone numbers, see the [phone setup guide](/ai/voice-ai/phone-setup) for detailed instructions.
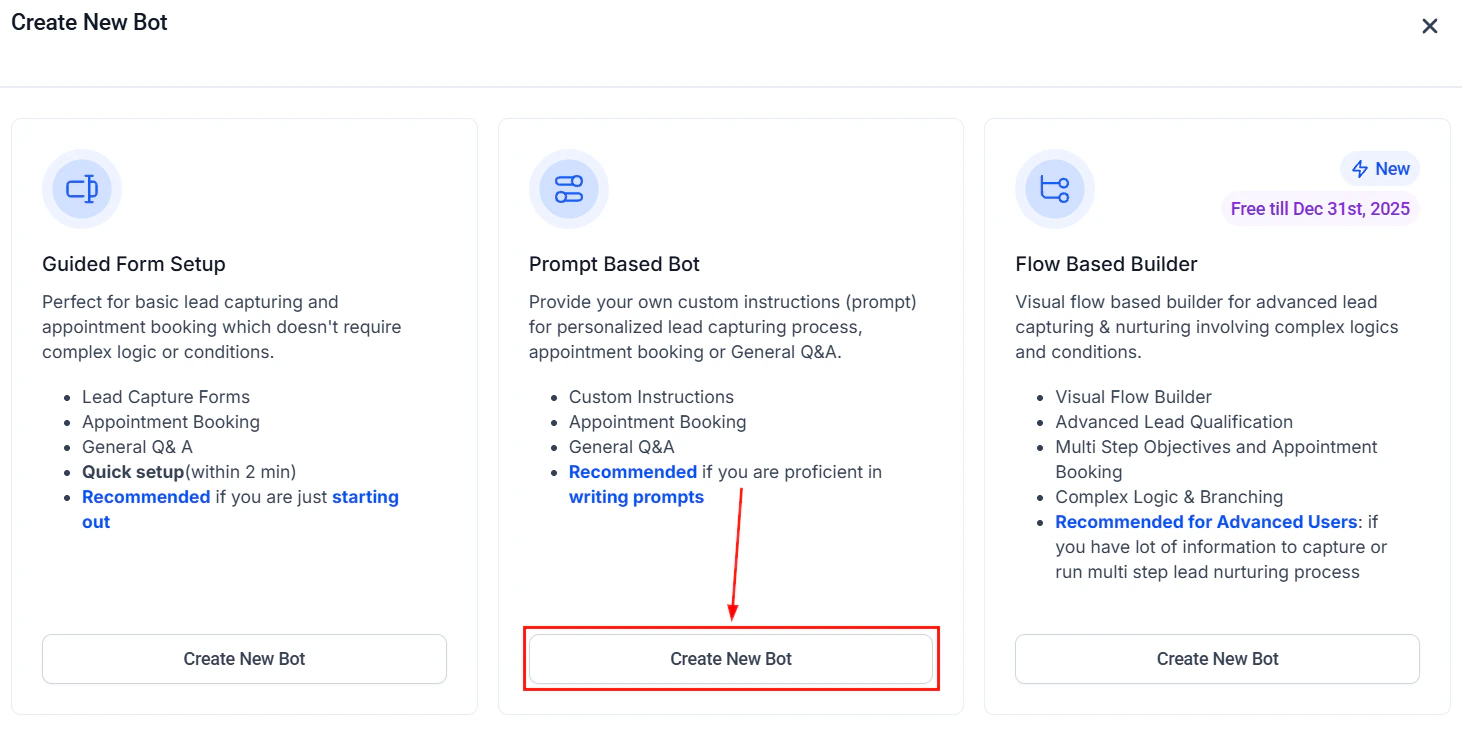
The prompt is the set of instructions that tells your agent who it is, what it knows, and how to behave. HoopAI offers two prompt modes:
### Basic mode
Basic mode provides a structured form where you fill in key fields:
* **Agent role** — A short description like "You are a friendly receptionist for Sunrise Dental."
* **Business information** — Key facts about your business (hours, location, services).
* **Greeting message** — What the agent says when it first answers or the caller picks up.
* **Objective** — The primary goal of the call (book an appointment, answer questions, collect information).
Basic mode is ideal for simple use cases and getting started quickly.
### Advanced mode
Advanced mode gives you a single freeform text area where you write a complete system prompt. This provides full control over the agent's personality, conversation flow, decision-making logic, and response style.
Advanced mode is recommended when you need:
* Complex branching conversation flows
* Specific objection handling scripts
* Detailed persona instructions
* Custom escalation rules
For prompt writing best practices and templates, see [Voice AI prompt engineering](/ai/prompt-engineering/voice-ai-prompts).
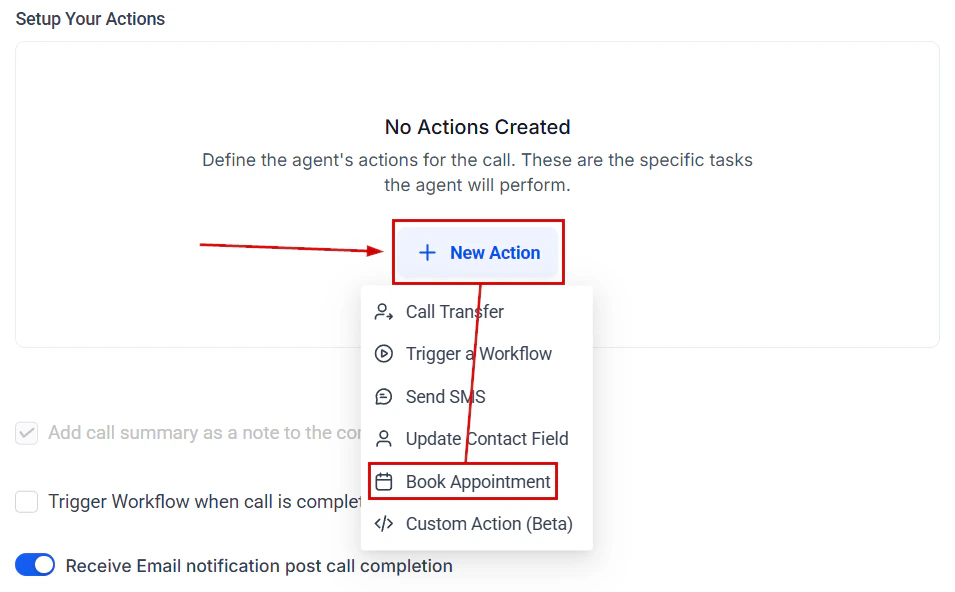
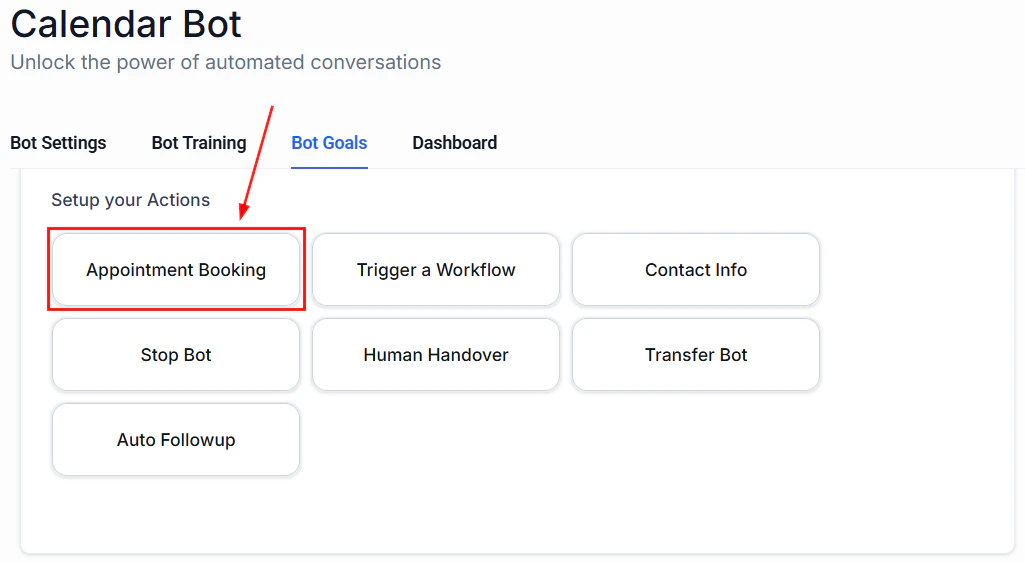
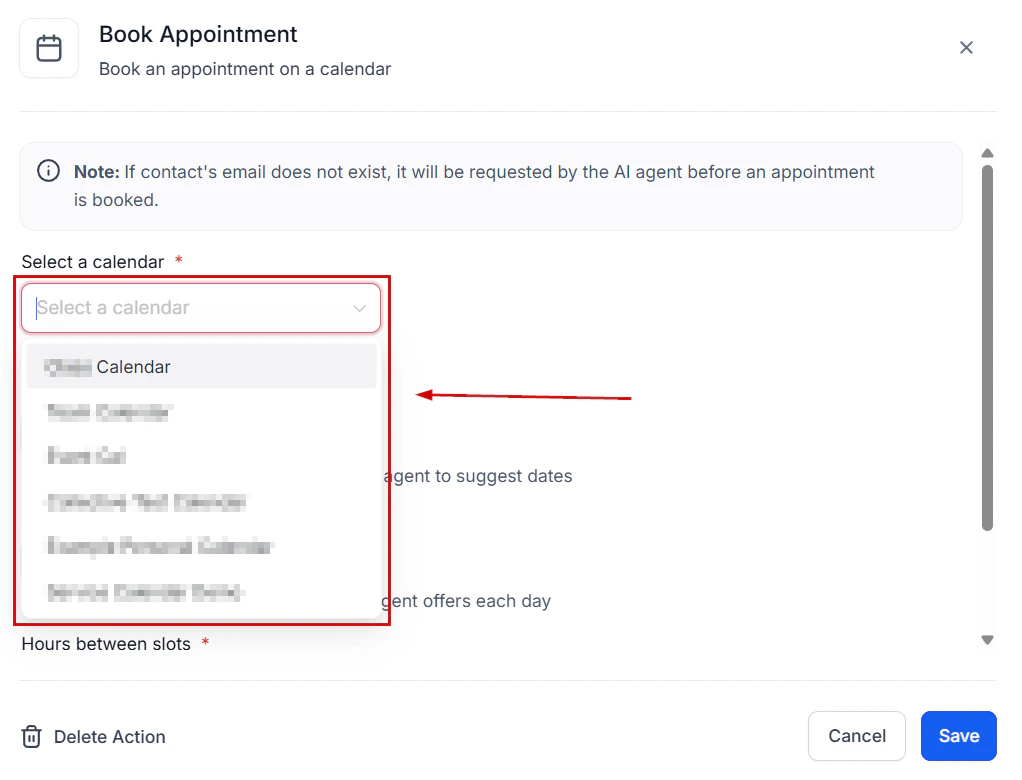
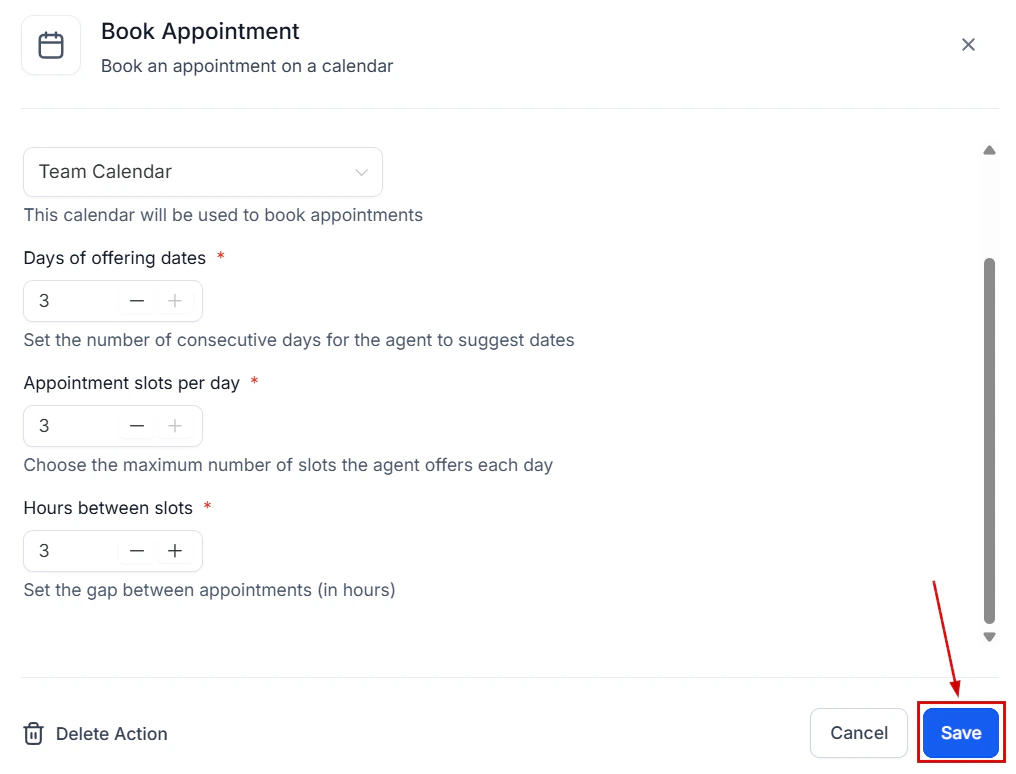
Actions define what your agent can do beyond having a conversation. Common actions include:
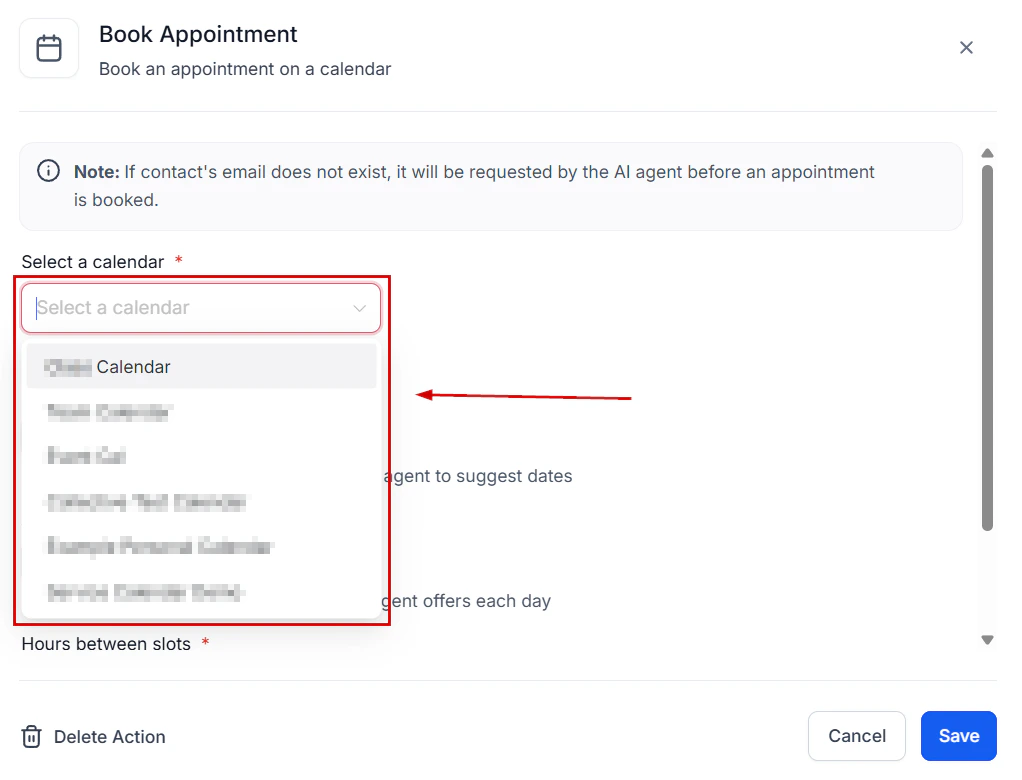
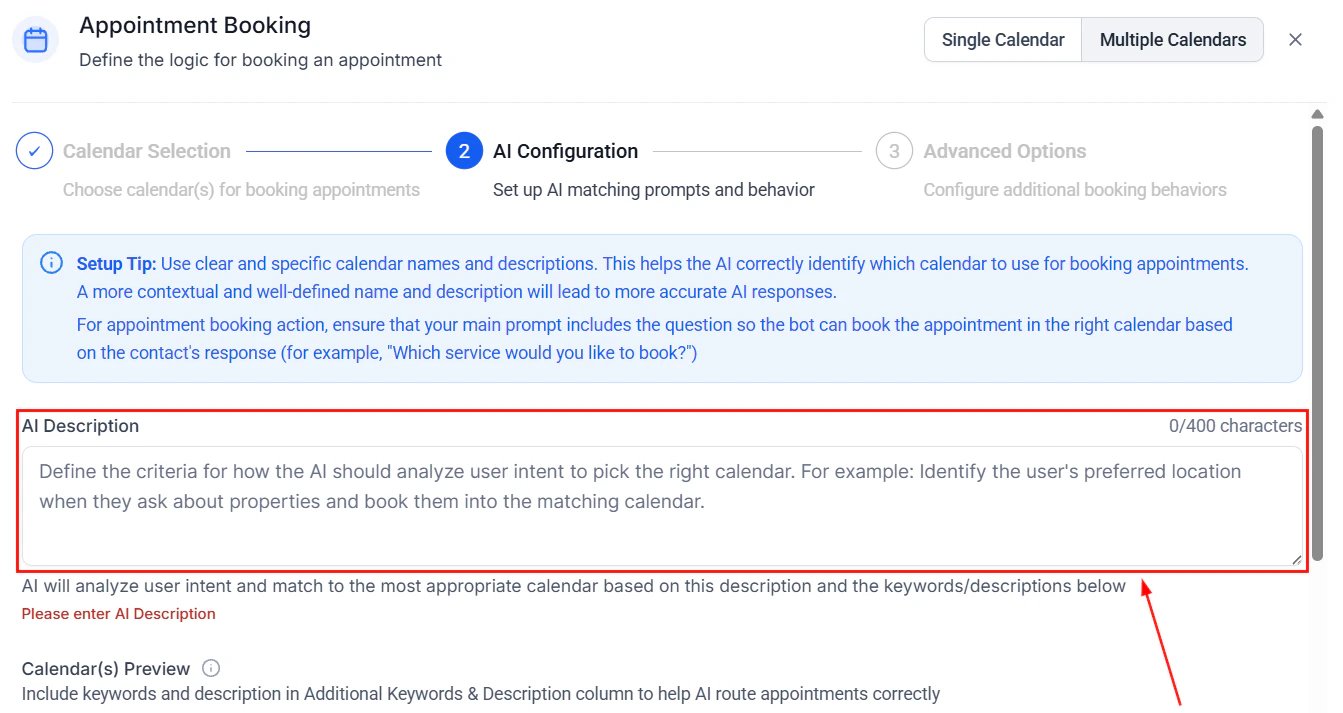
* **Book appointment** — Check calendar availability and schedule meetings. See [Voice AI appointment booking](/ai/voice-ai/appointment-booking).
* **Transfer call** — Hand off to a human team member. See [Call escalation and transfer](/ai/voice-ai/call-escalation).
* **End call** — Gracefully wrap up the conversation.
* **Send SMS** — Text the caller a link, confirmation, or follow-up message.
* **Add to workflow** — Enroll the contact in an automation workflow after the call.
* **Update contact** — Save information collected during the call to CRM custom fields.
Toggle on each action you want and configure its settings. You can add or remove actions later.
Give your agent a descriptive name that reflects its purpose — for example, "Front Desk Receptionist" or "Appointment Reminder Bot." Names are internal-only and not spoken to callers.
Select the call direction:
| Direction | Description |
| ------------ | ------------------------------------------------------------------------------- |
| **Inbound** | Agent answers incoming calls to an assigned phone number |
| **Outbound** | Agent places calls to contacts from workflows, bulk actions, or manual triggers |
| **Both** | Agent can handle calls in either direction |
If you are unsure, start with **Inbound**. You can always add outbound capabilities later by editing the agent.
Choose the voice your agent will use during calls. HoopAI offers a library of natural-sounding AI voices across different genders, accents, and speaking styles.
When selecting a voice, consider:
* **Brand alignment** — Pick a voice that matches your brand personality. A law firm may prefer a calm, measured tone, while a fitness studio might choose something more energetic.
* **Clarity** — Some voices perform better for technical or medical terminology. Test a few options with your specific vocabulary.
* **Speed** — Each voice has a natural cadence. You can adjust speaking speed in advanced settings, but starting with a voice that naturally matches your desired pace produces better results.
Click the **Play** icon next to any voice to hear a sample. You can change the voice at any time without recreating the agent.
Select the primary language your agent will use. HoopAI Voice AI supports multiple languages including English, Spanish, French, Portuguese, German, and more.
If your business serves multilingual callers, you can enable **automatic language detection** in the advanced settings. The agent will detect the caller's language and respond accordingly, though performance is strongest in the primary language you select here.
For inbound agents, assign at least one phone number that the agent will answer. You can assign numbers you have already purchased in HoopAI, or purchase a new number directly from this screen.
For outbound agents, select the caller ID number that will appear when the agent places calls.
If you need to purchase or configure phone numbers, see the [phone setup guide](/ai/voice-ai/phone-setup) for detailed instructions.
The prompt is the set of instructions that tells your agent who it is, what it knows, and how to behave. HoopAI offers two prompt modes:
### Basic mode
Basic mode provides a structured form where you fill in key fields:
* **Agent role** — A short description like "You are a friendly receptionist for Sunrise Dental."
* **Business information** — Key facts about your business (hours, location, services).
* **Greeting message** — What the agent says when it first answers or the caller picks up.
* **Objective** — The primary goal of the call (book an appointment, answer questions, collect information).
Basic mode is ideal for simple use cases and getting started quickly.
### Advanced mode
Advanced mode gives you a single freeform text area where you write a complete system prompt. This provides full control over the agent's personality, conversation flow, decision-making logic, and response style.
Advanced mode is recommended when you need:
* Complex branching conversation flows
* Specific objection handling scripts
* Detailed persona instructions
* Custom escalation rules
For prompt writing best practices and templates, see [Voice AI prompt engineering](/ai/prompt-engineering/voice-ai-prompts).
Actions define what your agent can do beyond having a conversation. Common actions include:
* **Book appointment** — Check calendar availability and schedule meetings. See [Voice AI appointment booking](/ai/voice-ai/appointment-booking).
* **Transfer call** — Hand off to a human team member. See [Call escalation and transfer](/ai/voice-ai/call-escalation).
* **End call** — Gracefully wrap up the conversation.
* **Send SMS** — Text the caller a link, confirmation, or follow-up message.
* **Add to workflow** — Enroll the contact in an automation workflow after the call.
* **Update contact** — Save information collected during the call to CRM custom fields.
Toggle on each action you want and configure its settings. You can add or remove actions later.
 Before saving, review the advanced settings panel:
* **Call timeout** — How long the phone rings before going to voicemail or failover (default: 30 seconds for inbound).
* **Max call duration** — Set a maximum length to prevent unexpectedly long calls (recommended: 10-15 minutes for most use cases).
* **Silence threshold** — How long the agent waits during silence before prompting the caller (default: 5 seconds).
* **Recording** — Enable or disable call recording. Recorded calls are stored in the call logs for review.
* **Transcription** — Enable real-time transcription for all calls (recommended for debugging and quality assurance).
* **Working hours** — Define when the agent is active. Outside of working hours, calls route to voicemail or a fallback action.
If you enable call recording, ensure you comply with your jurisdiction's consent laws. Many states and countries require two-party consent. You can add a recording disclosure to your agent's greeting message.
Click **Save** to create your agent. Once saved, you are taken to the agent detail page where you can immediately test it.
Click the **Test Call** button to initiate a web-based test call directly in your browser. This lets you have a live conversation with your agent without using phone minutes.
During testing, pay attention to:
* Does the greeting sound natural?
* Does the agent understand your questions?
* Does it correctly perform actions (booking, transferring)?
* Is the conversation flow logical?
Make adjustments to your prompt and settings, then test again. For a comprehensive testing workflow, see [Testing and debugging Voice AI](/ai/voice-ai/testing-debugging).
## After creation: what to do next
Once your agent is live, there are several important next steps to ensure it performs well in production.
### Monitor early calls
Check your call logs daily for the first week. Listen to recordings and read transcripts to identify areas where the agent struggles. Common early adjustments include:
* Adding FAQ answers the agent does not yet know
* Refining the greeting to set better expectations
* Adjusting the prompt to reduce unnecessary verbosity
### Connect your calendar
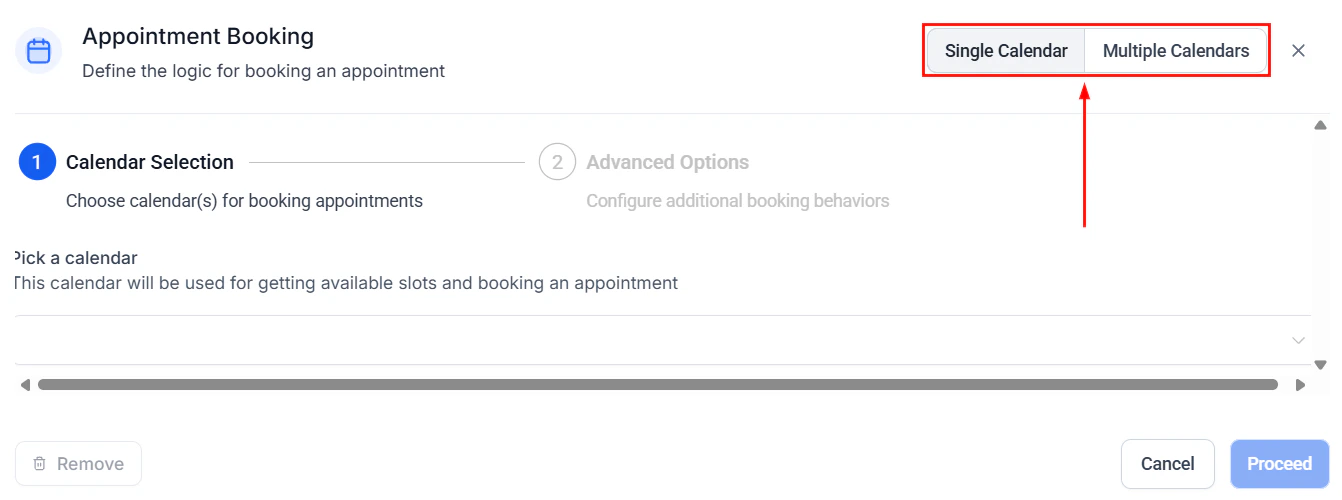
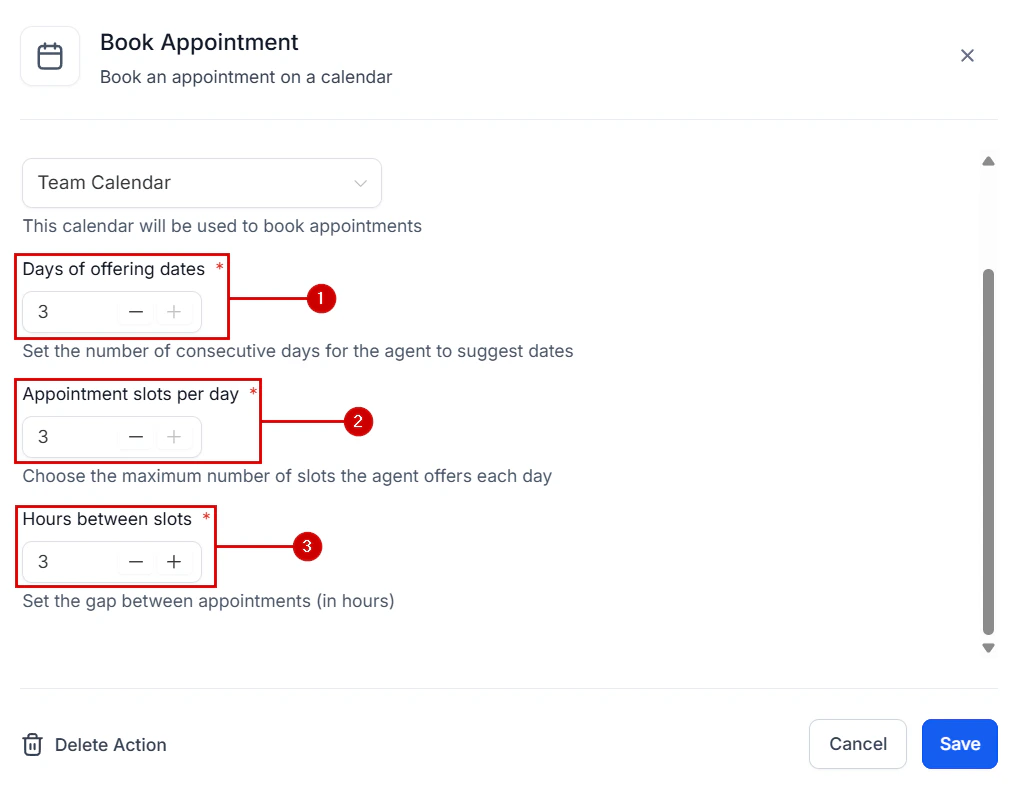
If your agent books appointments, make sure your calendar integration is properly configured and the correct calendar is selected. See [Voice AI appointment booking](/ai/voice-ai/appointment-booking) for setup instructions.
Before saving, review the advanced settings panel:
* **Call timeout** — How long the phone rings before going to voicemail or failover (default: 30 seconds for inbound).
* **Max call duration** — Set a maximum length to prevent unexpectedly long calls (recommended: 10-15 minutes for most use cases).
* **Silence threshold** — How long the agent waits during silence before prompting the caller (default: 5 seconds).
* **Recording** — Enable or disable call recording. Recorded calls are stored in the call logs for review.
* **Transcription** — Enable real-time transcription for all calls (recommended for debugging and quality assurance).
* **Working hours** — Define when the agent is active. Outside of working hours, calls route to voicemail or a fallback action.
If you enable call recording, ensure you comply with your jurisdiction's consent laws. Many states and countries require two-party consent. You can add a recording disclosure to your agent's greeting message.
Click **Save** to create your agent. Once saved, you are taken to the agent detail page where you can immediately test it.
Click the **Test Call** button to initiate a web-based test call directly in your browser. This lets you have a live conversation with your agent without using phone minutes.
During testing, pay attention to:
* Does the greeting sound natural?
* Does the agent understand your questions?
* Does it correctly perform actions (booking, transferring)?
* Is the conversation flow logical?
Make adjustments to your prompt and settings, then test again. For a comprehensive testing workflow, see [Testing and debugging Voice AI](/ai/voice-ai/testing-debugging).
## After creation: what to do next
Once your agent is live, there are several important next steps to ensure it performs well in production.
### Monitor early calls
Check your call logs daily for the first week. Listen to recordings and read transcripts to identify areas where the agent struggles. Common early adjustments include:
* Adding FAQ answers the agent does not yet know
* Refining the greeting to set better expectations
* Adjusting the prompt to reduce unnecessary verbosity
### Connect your calendar
If your agent books appointments, make sure your calendar integration is properly configured and the correct calendar is selected. See [Voice AI appointment booking](/ai/voice-ai/appointment-booking) for setup instructions.
 ### Set up escalation paths
No AI agent can handle every situation. Configure call escalation rules so that complex or sensitive calls are routed to the right human team member. See [Call escalation and transfer](/ai/voice-ai/call-escalation).
### Set up escalation paths
No AI agent can handle every situation. Configure call escalation rules so that complex or sensitive calls are routed to the right human team member. See [Call escalation and transfer](/ai/voice-ai/call-escalation).
 ### Add the website widget
Let website visitors call your Voice AI agent directly from their browser without dialing a phone number. See [Voice AI widget for websites](/ai/voice-ai/website-widget).
## Tips for success
Do not try to build the perfect agent on day one. Start with a focused use case — such as answering basic questions and booking appointments — and expand capabilities over time as you learn from real call data.
When testing, simulate real customer calls. Mumble, pause mid-sentence, ask off-topic questions, and interrupt the agent. Real callers will do all of these things, and you need to know how your agent responds.
Shorter, clearer prompts generally outperform long, complex ones. Focus on the core instructions and let the AI handle natural conversation flow. If you find yourself writing paragraphs of edge case handling, consider using actions and workflows instead.
### Add the website widget
Let website visitors call your Voice AI agent directly from their browser without dialing a phone number. See [Voice AI widget for websites](/ai/voice-ai/website-widget).
## Tips for success
Do not try to build the perfect agent on day one. Start with a focused use case — such as answering basic questions and booking appointments — and expand capabilities over time as you learn from real call data.
When testing, simulate real customer calls. Mumble, pause mid-sentence, ask off-topic questions, and interrupt the agent. Real callers will do all of these things, and you need to know how your agent responds.
Shorter, clearer prompts generally outperform long, complex ones. Focus on the core instructions and let the AI handle natural conversation flow. If you find yourself writing paragraphs of edge case handling, consider using actions and workflows instead.
 Review call transcripts weekly and update your agent's prompt to address recurring issues. Your Voice AI agent should improve continuously based on real interaction data.
## Next steps
Purchase and assign phone numbers to your Voice AI agent.
Understand the differences between inbound and outbound calling.
Let your agent check availability and book meetings during calls.
Master prompt engineering for natural, effective voice conversations.
Review call transcripts weekly and update your agent's prompt to address recurring issues. Your Voice AI agent should improve continuously based on real interaction data.
## Next steps
Purchase and assign phone numbers to your Voice AI agent.
Understand the differences between inbound and outbound calling.
Let your agent check availability and book meetings during calls.
Master prompt engineering for natural, effective voice conversations.