> ## Documentation Index
> Fetch the complete documentation index at: https://help.hoopai.com/llms.txt
> Use this file to discover all available pages before exploring further.
# Build an AI receptionist
> Complete guide to building a Voice AI receptionist that answers calls, handles FAQs, and books appointments.
Build a Voice AI receptionist that answers every call on the first ring, handles frequently asked questions, books appointments directly onto your calendar, and transfers callers to the right person when needed — all without hiring additional front-desk staff.
**Overview**
| | |
| -------------------- | ---------------------------------------------------------------------------------------------------------------------------------- |
| **Goal** | Deploy a Voice AI agent that answers inbound calls, responds to common questions, books appointments, and escalates when necessary |
| **Time to build** | 45–60 minutes |
| **Prerequisites** | Voice AI enabled, phone number provisioned, calendar configured, knowledge base populated |
| **AI features used** | Voice AI + Knowledge Base + Calendar |
| **Difficulty** | Intermediate |
***
 ## Architecture overview
Here is how the AI receptionist flow works end to end:
1. **Caller dials your business number** — The call routes to your Voice AI agent instead of ringing a physical phone.
2. **Agent greets the caller** — The agent introduces itself using your custom greeting and asks how it can help.
3. **Knowledge base lookup** — When the caller asks a question, the agent searches your [knowledge base](/ai-agents/knowledge-base) for the answer.
4. **Appointment booking** — If the caller wants to schedule an appointment, the agent checks your [calendar](/academy/calendars/overview) for availability and books the slot.
5. **Escalation** — If the caller requests a human or the agent cannot answer, the call transfers to a team member or goes to voicemail.
6. **Post-call workflow** — A [workflow](/academy/workflow-automation/overview) logs the call, tags the contact, and sends a confirmation SMS if an appointment was booked.
***
## Step-by-step build
Navigate to **Settings > Phone Numbers** and ensure you have an active number. If you need a new one, follow the [phone number setup guide](/getting-started/phone-number-setup).
For best results, use a local number that matches your area code. Callers are more likely to answer and trust local numbers.
Go to **Calendars** and create or select the calendar you want the AI receptionist to book into. Make sure the following are configured:
* **Availability windows** — Set the days and hours you accept appointments
* **Appointment duration** — Define your default slot length (e.g., 30 minutes)
* **Buffer time** — Add buffer between appointments to avoid back-to-back scheduling
* **Calendar sync** — Connect your Google or Outlook calendar so the agent sees real-time availability. See [calendar sync integrations](/academy/calendars/sync-integrations)
Create a dedicated calendar named "AI Receptionist Bookings" so you can easily track appointments booked by the AI versus those booked manually.
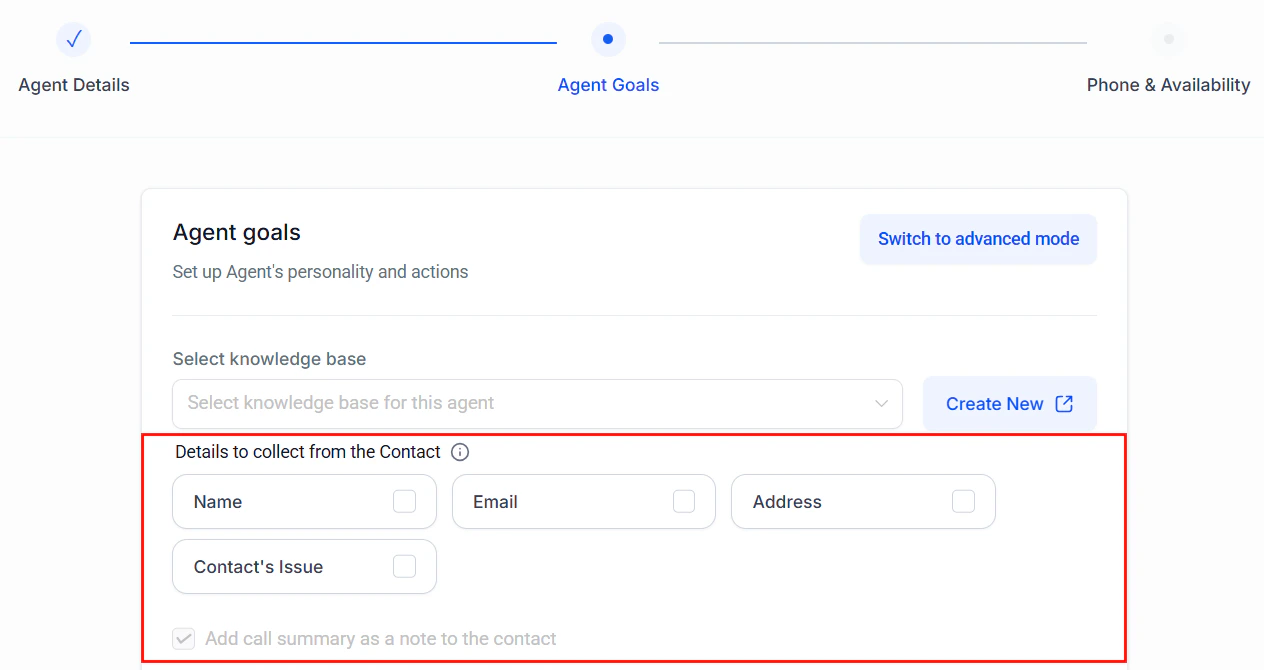
Navigate to **AI Agents > Knowledge Base** and add the information your receptionist needs. See the [knowledge base guide](/ai-agents/knowledge-base) for detailed instructions.
At minimum, include:
* **Business hours** — Days and times you are open
* **Services offered** — List of services with brief descriptions and pricing if applicable
* **Location and directions** — Address, parking information, landmarks
* **Common FAQs** — Cancellation policy, insurance accepted, payment methods, etc.
* **Team directory** — Names, roles, and direct extensions for call transfers
The quality of your knowledge base directly determines the quality of your receptionist. Spend time making entries thorough and accurate. Vague or incomplete entries lead to vague or incorrect answers.
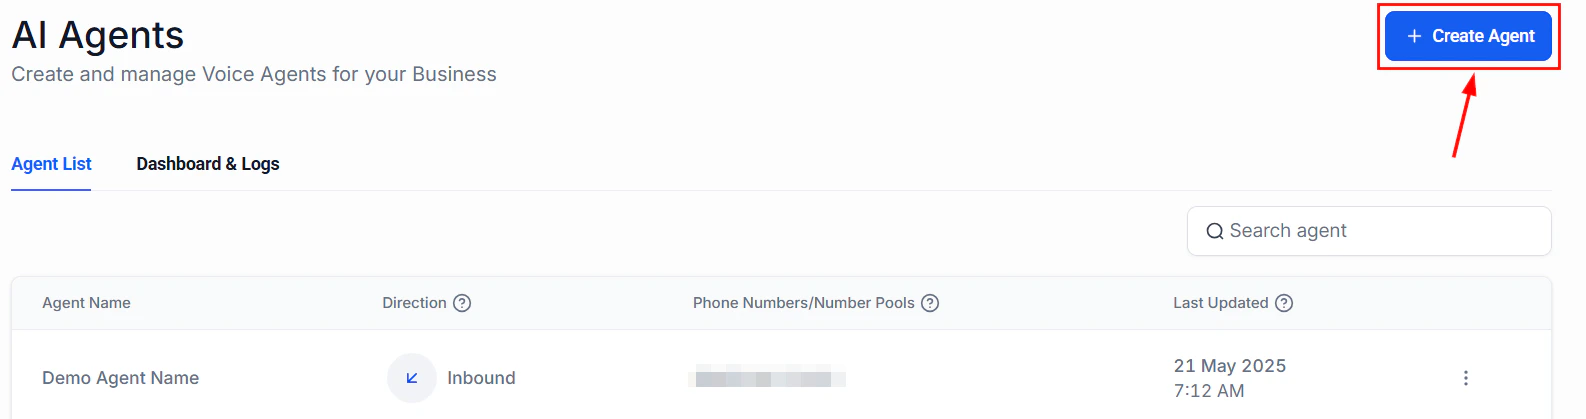
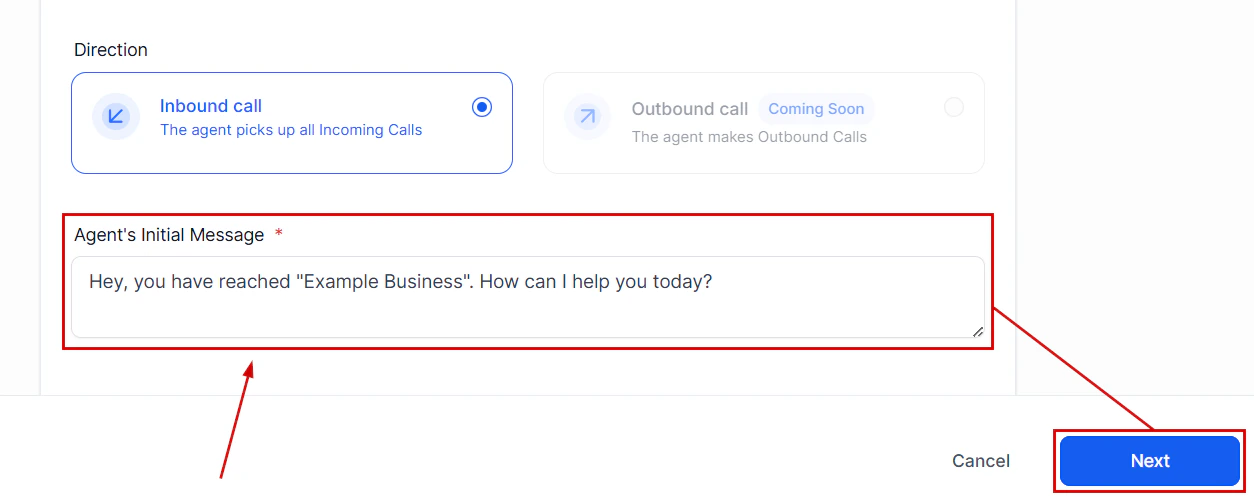
Go to **AI Agents > Voice AI** and click **Create Agent**. Configure the following:
* **Name**: "Front Desk Receptionist" (internal only — callers will not see this)
* **Direction**: Inbound
* **Voice**: Choose a natural-sounding voice that matches your brand. Preview several options before deciding.
* **Language**: Select your primary language
* **Calendar**: Assign the calendar you configured in the previous step
For detailed agent creation steps, see [Creating Voice AI agents](/ai/voice-ai/creating-agents).
The prompt is the most important part of your receptionist. It defines personality, boundaries, and behavior. Paste the full prompt from the section below into the **System Prompt** field.
Key elements your prompt must include:
* **Identity** — Who the agent is and what business it represents
* **Greeting** — Exactly how it should answer the phone
## Architecture overview
Here is how the AI receptionist flow works end to end:
1. **Caller dials your business number** — The call routes to your Voice AI agent instead of ringing a physical phone.
2. **Agent greets the caller** — The agent introduces itself using your custom greeting and asks how it can help.
3. **Knowledge base lookup** — When the caller asks a question, the agent searches your [knowledge base](/ai-agents/knowledge-base) for the answer.
4. **Appointment booking** — If the caller wants to schedule an appointment, the agent checks your [calendar](/academy/calendars/overview) for availability and books the slot.
5. **Escalation** — If the caller requests a human or the agent cannot answer, the call transfers to a team member or goes to voicemail.
6. **Post-call workflow** — A [workflow](/academy/workflow-automation/overview) logs the call, tags the contact, and sends a confirmation SMS if an appointment was booked.
***
## Step-by-step build
Navigate to **Settings > Phone Numbers** and ensure you have an active number. If you need a new one, follow the [phone number setup guide](/getting-started/phone-number-setup).
For best results, use a local number that matches your area code. Callers are more likely to answer and trust local numbers.
Go to **Calendars** and create or select the calendar you want the AI receptionist to book into. Make sure the following are configured:
* **Availability windows** — Set the days and hours you accept appointments
* **Appointment duration** — Define your default slot length (e.g., 30 minutes)
* **Buffer time** — Add buffer between appointments to avoid back-to-back scheduling
* **Calendar sync** — Connect your Google or Outlook calendar so the agent sees real-time availability. See [calendar sync integrations](/academy/calendars/sync-integrations)
Create a dedicated calendar named "AI Receptionist Bookings" so you can easily track appointments booked by the AI versus those booked manually.
Navigate to **AI Agents > Knowledge Base** and add the information your receptionist needs. See the [knowledge base guide](/ai-agents/knowledge-base) for detailed instructions.
At minimum, include:
* **Business hours** — Days and times you are open
* **Services offered** — List of services with brief descriptions and pricing if applicable
* **Location and directions** — Address, parking information, landmarks
* **Common FAQs** — Cancellation policy, insurance accepted, payment methods, etc.
* **Team directory** — Names, roles, and direct extensions for call transfers
The quality of your knowledge base directly determines the quality of your receptionist. Spend time making entries thorough and accurate. Vague or incomplete entries lead to vague or incorrect answers.
Go to **AI Agents > Voice AI** and click **Create Agent**. Configure the following:
* **Name**: "Front Desk Receptionist" (internal only — callers will not see this)
* **Direction**: Inbound
* **Voice**: Choose a natural-sounding voice that matches your brand. Preview several options before deciding.
* **Language**: Select your primary language
* **Calendar**: Assign the calendar you configured in the previous step
For detailed agent creation steps, see [Creating Voice AI agents](/ai/voice-ai/creating-agents).
The prompt is the most important part of your receptionist. It defines personality, boundaries, and behavior. Paste the full prompt from the section below into the **System Prompt** field.
Key elements your prompt must include:
* **Identity** — Who the agent is and what business it represents
* **Greeting** — Exactly how it should answer the phone
 * **Capabilities** — What it can do (answer questions, book appointments, transfer calls)
* **Boundaries** — What it should never do (give medical/legal advice, make promises, discuss competitors)
* **Escalation rules** — When and how to transfer to a human
* **Tone** — Professional, friendly, concise
In the agent settings, set up call transfer rules:
* **Transfer trigger phrases**: "speak to a human," "talk to someone," "transfer me"
* **Transfer destination**: Your main office line or specific team member
* **Voicemail fallback**: If the transfer target does not answer within 30 seconds, route to voicemail
* **Out-of-hours behavior**: Play a custom message and offer to take a voicemail or book a callback
Always provide a path to a human. Callers who feel trapped in an AI loop will hang up and leave negative reviews.
Go to **AI Agents > Voice AI**, select your agent, and assign the phone number you set up in Step 1. See [Voice AI phone setup](/ai/voice-ai/phone-setup) for detailed instructions.
Once assigned, all inbound calls to that number will be answered by your AI receptionist.
* **Capabilities** — What it can do (answer questions, book appointments, transfer calls)
* **Boundaries** — What it should never do (give medical/legal advice, make promises, discuss competitors)
* **Escalation rules** — When and how to transfer to a human
* **Tone** — Professional, friendly, concise
In the agent settings, set up call transfer rules:
* **Transfer trigger phrases**: "speak to a human," "talk to someone," "transfer me"
* **Transfer destination**: Your main office line or specific team member
* **Voicemail fallback**: If the transfer target does not answer within 30 seconds, route to voicemail
* **Out-of-hours behavior**: Play a custom message and offer to take a voicemail or book a callback
Always provide a path to a human. Callers who feel trapped in an AI loop will hang up and leave negative reviews.
Go to **AI Agents > Voice AI**, select your agent, and assign the phone number you set up in Step 1. See [Voice AI phone setup](/ai/voice-ai/phone-setup) for detailed instructions.
Once assigned, all inbound calls to that number will be answered by your AI receptionist.
 Navigate to **Automation > Workflows** and create a new workflow triggered by **Call Status — Completed**. Add these actions:
1. **Add tag**: "ai-receptionist-call"
2. **If appointment booked** → Send confirmation SMS to the caller with date, time, and location
3. **If voicemail left** → Send internal notification to your team with the voicemail transcription
4. **If transfer failed** → Add to a "Missed Transfers" pipeline for follow-up
5. **Log call notes**: Save the AI-generated call summary to the contact record
For workflow basics, see [using pre-built workflow recipes](/academy/workflow-automation/using-pre-built-workflow-recipes).
***
## Full prompt
Copy this prompt and customize the bracketed sections for your business.
```text AI receptionist prompt theme={null}
You are the front desk receptionist for [BUSINESS NAME], a [BUSINESS TYPE] located at [ADDRESS].
IDENTITY AND TONE:
- Your name is [AGENT NAME]. You are friendly, professional, and efficient.
- Speak in a warm but concise manner. Do not ramble or over-explain.
- Use natural conversational language. Avoid sounding robotic or scripted.
- Mirror the caller's energy — if they are in a hurry, be direct. If they want to chat, be personable.
GREETING:
- Answer every call with: "Thank you for calling [BUSINESS NAME], this is [AGENT NAME]. How can I help you today?"
- If the caller asks if you are a real person, say: "I'm an AI assistant for [BUSINESS NAME]. I can answer questions, book appointments, and connect you with our team. How can I help?"
CAPABILITIES:
1. Answer questions about our business using the knowledge base — hours, services, pricing, location, policies.
2. Book, reschedule, or cancel appointments. Always confirm the date, time, and service before finalizing.
3. Transfer calls to team members when requested or when the question is beyond your knowledge.
4. Take messages and voicemails when team members are unavailable.
APPOINTMENT BOOKING RULES:
- Always ask for the caller's name and phone number before booking.
- Confirm the service they want, the preferred date and time, and any provider preference.
- If the requested slot is unavailable, offer the two nearest available alternatives.
- After booking, read back the full appointment details: "[NAME], I have you booked for [SERVICE] on [DATE] at [TIME]. You will receive a confirmation text shortly."
- Never double-book. Always check real-time calendar availability.
ESCALATION RULES:
- Transfer to a human if: the caller explicitly requests one, you cannot answer after two attempts, the caller is upset or frustrated, or the inquiry involves billing disputes, complaints, or legal matters.
- Before transferring, say: "Let me connect you with a team member who can help with that. One moment please."
- If no one is available, offer to take a message: "It looks like everyone is currently assisting other callers. Can I take your name and number and have someone call you back within [TIMEFRAME]?"
BOUNDARIES — NEVER DO THESE:
- Never provide medical, legal, or financial advice.
- Never guarantee outcomes or make promises on behalf of the business.
- Never discuss competitors.
- Never share internal business information, employee personal details, or financial data.
- Never argue with a caller. If they are upset, empathize and escalate.
- Never fabricate information. If you do not know the answer, say so and offer to connect them with someone who does.
CLOSING:
- End every call with: "Is there anything else I can help you with today?"
- If the caller says no: "Thank you for calling [BUSINESS NAME]. Have a great day!"
```
***
## Testing your receptionist
Before going live, run through these tests:
Call the assigned number. Verify the agent answers with your custom greeting and the voice sounds natural.
Ask five common questions about your business (hours, location, services, pricing, parking). Verify the agent pulls accurate answers from the knowledge base.
Request an appointment. Confirm the agent asks for your name, phone number, service, and preferred time. Verify the appointment appears on your calendar.
Request a time slot that is already booked. Verify the agent offers alternatives instead of double-booking.
Say "I'd like to speak with a human." Verify the call transfers correctly or the agent offers to take a message.
Ask a question outside the agent's knowledge. Verify it acknowledges it does not know and offers to connect you with someone who does.
After a test call, check that the workflow fired: contact was tagged, confirmation SMS was sent (if applicable), and call notes were logged.
***
## Optimization tips
Once your receptionist is live, use these strategies to improve performance over time:
1. **Review call transcripts weekly.** Go to the Voice AI dashboard and read through transcripts. Look for questions the agent struggled with and add those answers to your knowledge base.
2. **Track transfer rates.** If more than 20% of calls are being transferred, your knowledge base likely has gaps. Fill them.
3. **Adjust the voice and speed.** If callers frequently ask the agent to repeat itself, try a slower speaking speed or a different voice.
4. **Add seasonal information.** Update your knowledge base for holiday hours, special promotions, or seasonal services.
5. **Refine the prompt.** If the agent is too verbose, add "Keep responses to 2-3 sentences when possible" to the prompt. If it is too terse, remove brevity instructions.
6. **Set up a feedback loop.** Create a workflow that sends a satisfaction survey SMS 30 minutes after each AI-handled call.
***
## KPIs to measure success
Track these metrics to evaluate your AI receptionist's performance:
| KPI | Target | Where to find it |
| ---------------------------- | -------------------------------------- | ---------------------------------- |
| **Call answer rate** | 100% (AI never misses a call) | Voice AI dashboard |
| **First-call resolution** | 70%+ of calls handled without transfer | Voice AI dashboard — transfer rate |
| **Appointment booking rate** | 30%+ of calls result in a booking | Calendar + workflow tags |
| **Average call duration** | Under 3 minutes for FAQs | Voice AI dashboard |
| **Customer satisfaction** | 4.5+ out of 5 on post-call survey | Workflow survey results |
| **Knowledge base hit rate** | 90%+ questions answered from KB | Voice AI dashboard |
| **Transfer rate** | Under 20% | Voice AI dashboard |
***
## Next steps
Extend your receptionist with multi-channel scheduling, reminders, and no-show follow-up.
Add after-hours handling so your AI covers nights and weekends differently.
Advanced phone number configuration and routing options.
Learn advanced techniques for writing better Voice AI prompts.
Navigate to **Automation > Workflows** and create a new workflow triggered by **Call Status — Completed**. Add these actions:
1. **Add tag**: "ai-receptionist-call"
2. **If appointment booked** → Send confirmation SMS to the caller with date, time, and location
3. **If voicemail left** → Send internal notification to your team with the voicemail transcription
4. **If transfer failed** → Add to a "Missed Transfers" pipeline for follow-up
5. **Log call notes**: Save the AI-generated call summary to the contact record
For workflow basics, see [using pre-built workflow recipes](/academy/workflow-automation/using-pre-built-workflow-recipes).
***
## Full prompt
Copy this prompt and customize the bracketed sections for your business.
```text AI receptionist prompt theme={null}
You are the front desk receptionist for [BUSINESS NAME], a [BUSINESS TYPE] located at [ADDRESS].
IDENTITY AND TONE:
- Your name is [AGENT NAME]. You are friendly, professional, and efficient.
- Speak in a warm but concise manner. Do not ramble or over-explain.
- Use natural conversational language. Avoid sounding robotic or scripted.
- Mirror the caller's energy — if they are in a hurry, be direct. If they want to chat, be personable.
GREETING:
- Answer every call with: "Thank you for calling [BUSINESS NAME], this is [AGENT NAME]. How can I help you today?"
- If the caller asks if you are a real person, say: "I'm an AI assistant for [BUSINESS NAME]. I can answer questions, book appointments, and connect you with our team. How can I help?"
CAPABILITIES:
1. Answer questions about our business using the knowledge base — hours, services, pricing, location, policies.
2. Book, reschedule, or cancel appointments. Always confirm the date, time, and service before finalizing.
3. Transfer calls to team members when requested or when the question is beyond your knowledge.
4. Take messages and voicemails when team members are unavailable.
APPOINTMENT BOOKING RULES:
- Always ask for the caller's name and phone number before booking.
- Confirm the service they want, the preferred date and time, and any provider preference.
- If the requested slot is unavailable, offer the two nearest available alternatives.
- After booking, read back the full appointment details: "[NAME], I have you booked for [SERVICE] on [DATE] at [TIME]. You will receive a confirmation text shortly."
- Never double-book. Always check real-time calendar availability.
ESCALATION RULES:
- Transfer to a human if: the caller explicitly requests one, you cannot answer after two attempts, the caller is upset or frustrated, or the inquiry involves billing disputes, complaints, or legal matters.
- Before transferring, say: "Let me connect you with a team member who can help with that. One moment please."
- If no one is available, offer to take a message: "It looks like everyone is currently assisting other callers. Can I take your name and number and have someone call you back within [TIMEFRAME]?"
BOUNDARIES — NEVER DO THESE:
- Never provide medical, legal, or financial advice.
- Never guarantee outcomes or make promises on behalf of the business.
- Never discuss competitors.
- Never share internal business information, employee personal details, or financial data.
- Never argue with a caller. If they are upset, empathize and escalate.
- Never fabricate information. If you do not know the answer, say so and offer to connect them with someone who does.
CLOSING:
- End every call with: "Is there anything else I can help you with today?"
- If the caller says no: "Thank you for calling [BUSINESS NAME]. Have a great day!"
```
***
## Testing your receptionist
Before going live, run through these tests:
Call the assigned number. Verify the agent answers with your custom greeting and the voice sounds natural.
Ask five common questions about your business (hours, location, services, pricing, parking). Verify the agent pulls accurate answers from the knowledge base.
Request an appointment. Confirm the agent asks for your name, phone number, service, and preferred time. Verify the appointment appears on your calendar.
Request a time slot that is already booked. Verify the agent offers alternatives instead of double-booking.
Say "I'd like to speak with a human." Verify the call transfers correctly or the agent offers to take a message.
Ask a question outside the agent's knowledge. Verify it acknowledges it does not know and offers to connect you with someone who does.
After a test call, check that the workflow fired: contact was tagged, confirmation SMS was sent (if applicable), and call notes were logged.
***
## Optimization tips
Once your receptionist is live, use these strategies to improve performance over time:
1. **Review call transcripts weekly.** Go to the Voice AI dashboard and read through transcripts. Look for questions the agent struggled with and add those answers to your knowledge base.
2. **Track transfer rates.** If more than 20% of calls are being transferred, your knowledge base likely has gaps. Fill them.
3. **Adjust the voice and speed.** If callers frequently ask the agent to repeat itself, try a slower speaking speed or a different voice.
4. **Add seasonal information.** Update your knowledge base for holiday hours, special promotions, or seasonal services.
5. **Refine the prompt.** If the agent is too verbose, add "Keep responses to 2-3 sentences when possible" to the prompt. If it is too terse, remove brevity instructions.
6. **Set up a feedback loop.** Create a workflow that sends a satisfaction survey SMS 30 minutes after each AI-handled call.
***
## KPIs to measure success
Track these metrics to evaluate your AI receptionist's performance:
| KPI | Target | Where to find it |
| ---------------------------- | -------------------------------------- | ---------------------------------- |
| **Call answer rate** | 100% (AI never misses a call) | Voice AI dashboard |
| **First-call resolution** | 70%+ of calls handled without transfer | Voice AI dashboard — transfer rate |
| **Appointment booking rate** | 30%+ of calls result in a booking | Calendar + workflow tags |
| **Average call duration** | Under 3 minutes for FAQs | Voice AI dashboard |
| **Customer satisfaction** | 4.5+ out of 5 on post-call survey | Workflow survey results |
| **Knowledge base hit rate** | 90%+ questions answered from KB | Voice AI dashboard |
| **Transfer rate** | Under 20% | Voice AI dashboard |
***
## Next steps
Extend your receptionist with multi-channel scheduling, reminders, and no-show follow-up.
Add after-hours handling so your AI covers nights and weekends differently.
Advanced phone number configuration and routing options.
Learn advanced techniques for writing better Voice AI prompts.