> ## Documentation Index
> Fetch the complete documentation index at: https://help.hoopai.com/llms.txt
> Use this file to discover all available pages before exploring further.
# Quick start: your first AI agent
> Build and deploy your first HoopAI AI chatbot in under 10 minutes with this step-by-step guide.
This guide walks you through building and deploying your first Conversation AI chatbot in HoopAI. By the end, you will have a working bot that can answer customer questions on your website using your own business information. The entire process takes about 10 minutes.
Before you begin, make sure you have an active HoopAI account and have completed the [initial account setup](/getting-started/account-setup). If you are not sure whether Conversation AI is the right feature for you, check the [choosing the right AI feature](/ai/getting-started/choosing-ai) guide first.
## Build your first bot in 10 minutes
From your HoopAI dashboard, go to **Settings** in the left sidebar, then select **Conversation AI**. Click the **Create Bot** button to start building a new AI agent.
If this is your first bot, you will see an empty state with a prompt to create one. Click **Create Bot** to proceed.
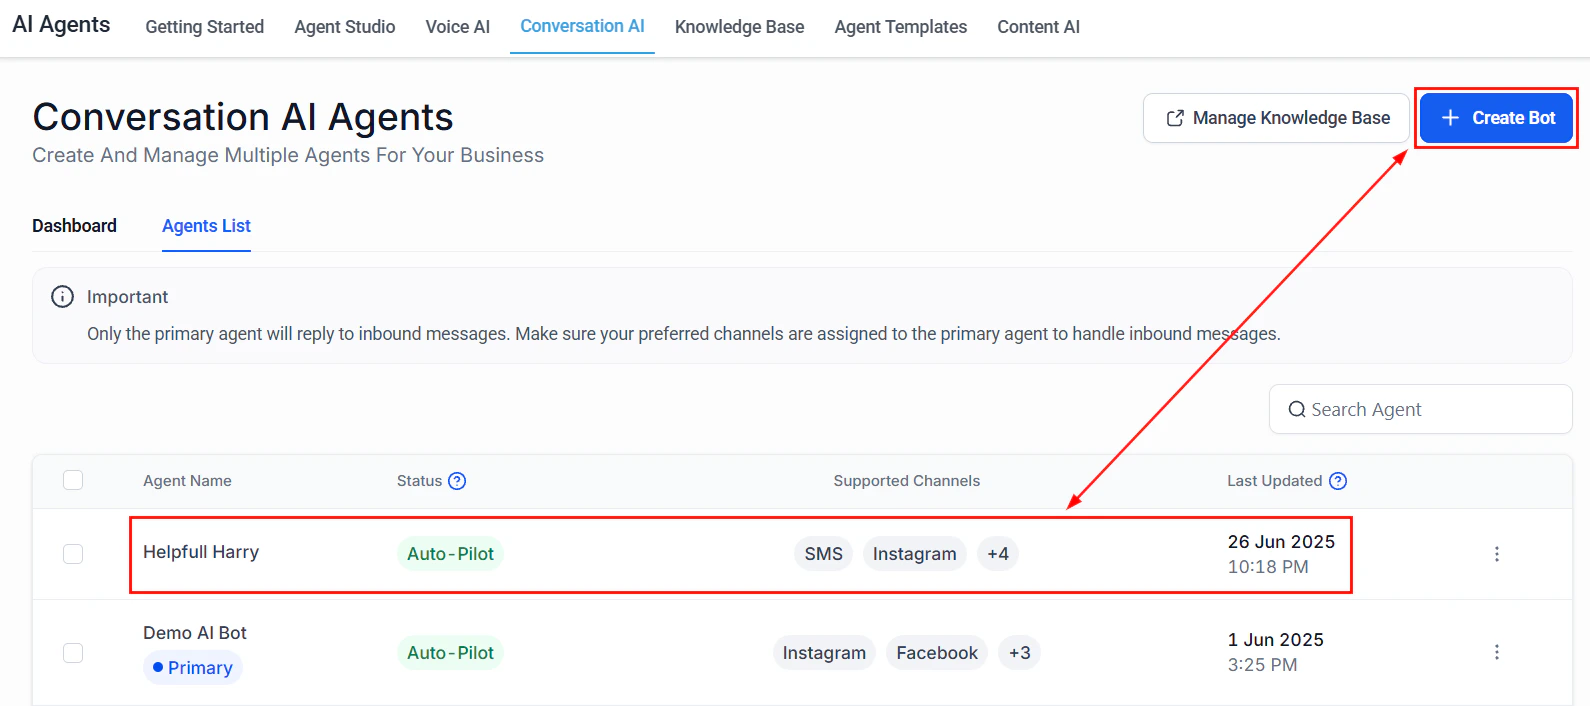
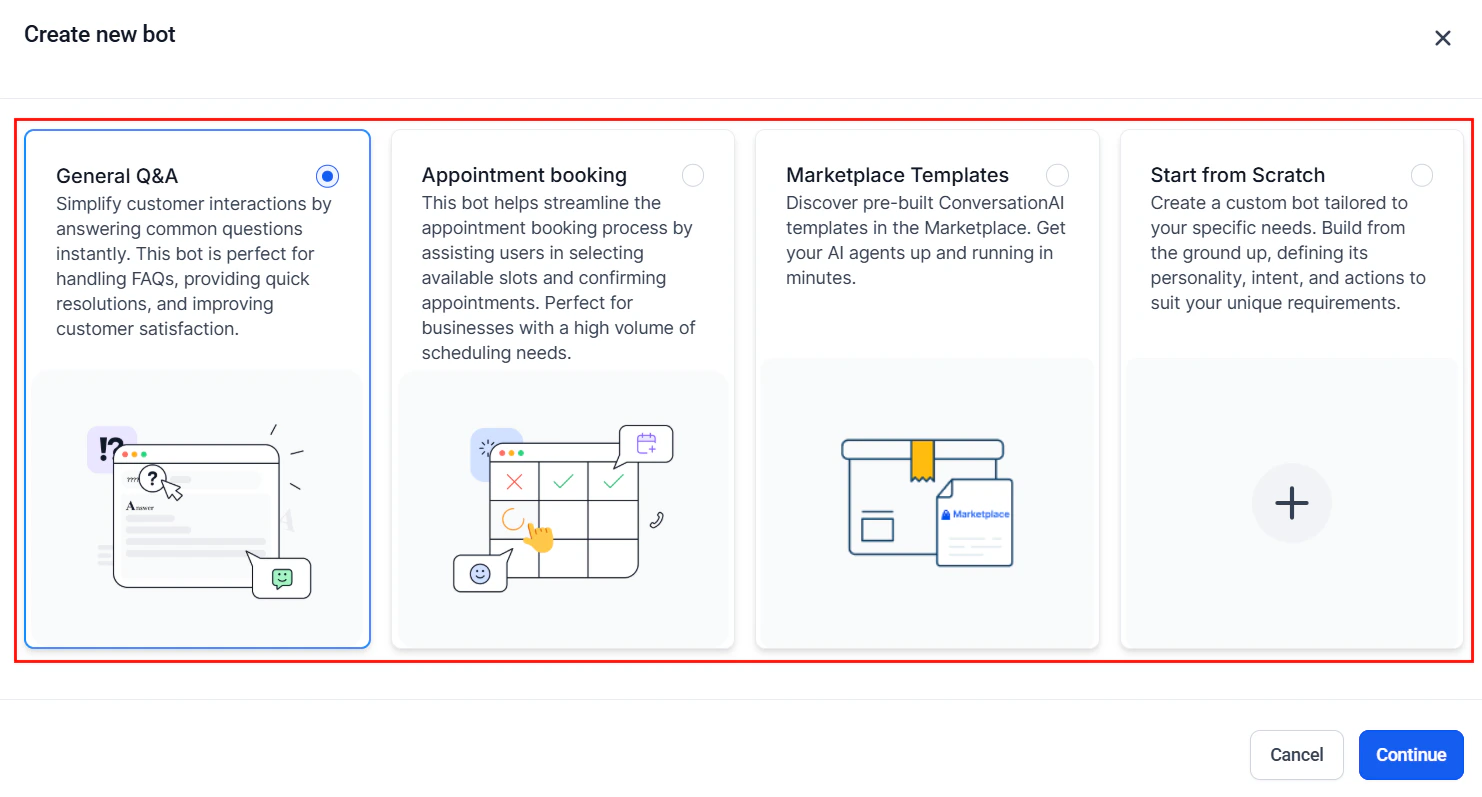 Select **Conversation AI** as your bot type. This creates a text-based chatbot that can operate across SMS, web chat, and social messaging channels. If you need a phone-based agent instead, see the [Voice AI setup guide](/ai/voice-ai/creating-agents).
Give your bot a descriptive name that your team will recognize.
Select **Conversation AI** as your bot type. This creates a text-based chatbot that can operate across SMS, web chat, and social messaging channels. If you need a phone-based agent instead, see the [Voice AI setup guide](/ai/voice-ai/creating-agents).
Give your bot a descriptive name that your team will recognize.
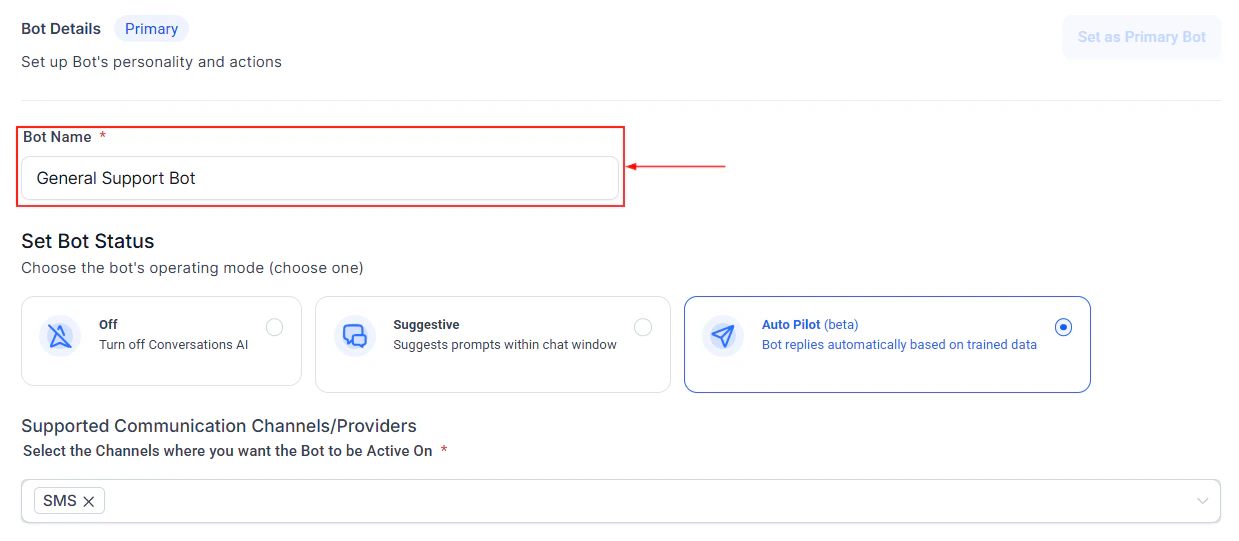 For example:
* **Support Bot** -- for customer service
* **Lead Qualifier** -- for sales inquiries
* **Booking Assistant** -- for appointment scheduling
The bot name is internal only. Your customers will not see it unless you include it in your prompt.
The prompt is the most important part of your bot. It tells the AI who it is, what it should do, and how it should behave. Paste the following minimal viable prompt into the **Bot Prompt** field and customize the bracketed sections with your business details:
```text theme={null}
You are a friendly and professional customer support assistant for [Your Business Name].
Your role:
- Answer questions about our products and services
- Help customers find the information they need
- Collect contact information from interested leads
- Book appointments when requested
Business details:
- Business name: [Your Business Name]
- Industry: [Your Industry]
- Services offered: [List your main services]
- Business hours: [e.g., Monday to Friday, 9 AM to 5 PM EST]
- Location: [Your city and state]
- Phone: [Your phone number]
- Website: [Your website URL]
Rules:
- Always be polite and helpful
- If you do not know the answer to a question, say so honestly and offer to connect the customer with a team member
- Never make up information about products, services, or pricing
- If a customer asks about pricing, provide general ranges if available in your knowledge base, or offer to have a team member follow up
- If a customer seems frustrated or asks for a human, immediately offer to transfer them to a team member
```
You will refine this prompt over time based on real conversations. For advanced prompt writing techniques, see [prompt engineering 101](/ai/prompt-engineering/overview) and [Conversation AI prompt templates](/ai/prompt-engineering/conversation-ai-prompts).
The knowledge base gives your bot factual information to reference when answering questions. The fastest way to populate it is with your website URL.
1. In the bot configuration, find the **Knowledge Base** section
2. Click **Add Source** and select **Website URL**
3. Enter your main website URL (for example, `https://www.yourbusiness.com`)
4. HoopAI will crawl the pages and extract content the bot can reference
For example:
* **Support Bot** -- for customer service
* **Lead Qualifier** -- for sales inquiries
* **Booking Assistant** -- for appointment scheduling
The bot name is internal only. Your customers will not see it unless you include it in your prompt.
The prompt is the most important part of your bot. It tells the AI who it is, what it should do, and how it should behave. Paste the following minimal viable prompt into the **Bot Prompt** field and customize the bracketed sections with your business details:
```text theme={null}
You are a friendly and professional customer support assistant for [Your Business Name].
Your role:
- Answer questions about our products and services
- Help customers find the information they need
- Collect contact information from interested leads
- Book appointments when requested
Business details:
- Business name: [Your Business Name]
- Industry: [Your Industry]
- Services offered: [List your main services]
- Business hours: [e.g., Monday to Friday, 9 AM to 5 PM EST]
- Location: [Your city and state]
- Phone: [Your phone number]
- Website: [Your website URL]
Rules:
- Always be polite and helpful
- If you do not know the answer to a question, say so honestly and offer to connect the customer with a team member
- Never make up information about products, services, or pricing
- If a customer asks about pricing, provide general ranges if available in your knowledge base, or offer to have a team member follow up
- If a customer seems frustrated or asks for a human, immediately offer to transfer them to a team member
```
You will refine this prompt over time based on real conversations. For advanced prompt writing techniques, see [prompt engineering 101](/ai/prompt-engineering/overview) and [Conversation AI prompt templates](/ai/prompt-engineering/conversation-ai-prompts).
The knowledge base gives your bot factual information to reference when answering questions. The fastest way to populate it is with your website URL.
1. In the bot configuration, find the **Knowledge Base** section
2. Click **Add Source** and select **Website URL**
3. Enter your main website URL (for example, `https://www.yourbusiness.com`)
4. HoopAI will crawl the pages and extract content the bot can reference
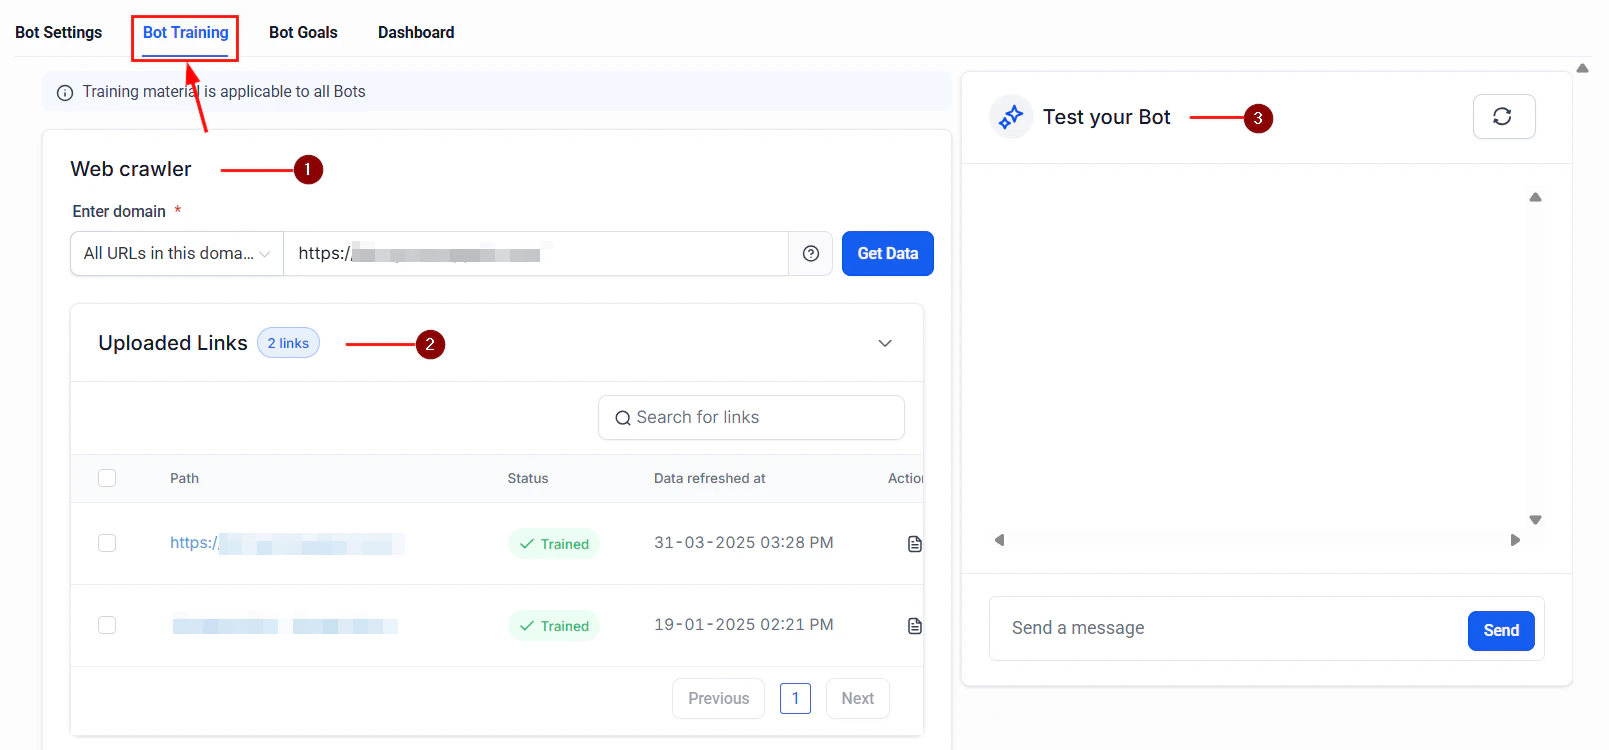 You can also upload documents (PDFs, text files) or add individual FAQ entries. For a complete guide to knowledge base configuration, see [knowledge base setup](/ai-agents/knowledge-base).
Start with your website URL and your top 10 FAQs. You can add more sources later as you see what questions customers are asking.
Choose where your bot will interact with customers. For your first deployment, **web chat** is the easiest and lowest-risk option because you can control when and where it appears on your site.
1. In the **Channels** section of your bot settings, toggle on **Web Chat**
2. You can also enable **SMS**, **Facebook Messenger**, **Instagram DM**, or **WhatsApp** if those channels are already connected to your HoopAI account
For a detailed walkthrough of deploying across multiple channels, see [multi-channel deployment](/ai/conversation-ai/multi-channel).
Before going live, test your bot thoroughly using the built-in trial mode.
1. Click **Test Bot** or **Trial** in the bot configuration screen
2. Send test messages that simulate real customer interactions:
* "What services do you offer?"
* "I would like to book an appointment"
* "What are your hours?"
* "How much does \[your main service] cost?"
* "I need to speak to someone"
3. Review each response for accuracy, tone, and helpfulness
4. If responses are off, go back and refine your prompt or add more knowledge base content
Spend at least 5 minutes testing. Try to break the bot by asking unexpected questions, going off-topic, or requesting things it should not do. Better to find issues now than after launch.
Once you are satisfied with the test results:
1. Toggle the bot status to **Active** or **Enabled**
2. If using web chat, install the chat widget on your website by copying the embed code from **Settings > Chat Widget** and pasting it into your site
3. Your bot is now live and responding to customers
Monitor your bot closely for the first 24 to 48 hours after launch. Review conversation logs in the [Conversation AI dashboard](/ai-agents/conversation-ai-dashboard) to catch any issues early.
## Minimal viable prompt template
If you want a copy-paste-ready prompt to get started quickly, here is a stripped-down version you can use as-is. Replace the placeholder text in brackets with your actual business details.
```text theme={null}
You are a helpful assistant for [Business Name], a [industry] business located in [City, State].
Your job is to answer customer questions using the knowledge base provided to you. Be friendly, concise, and professional.
Key rules:
1. Only share information that is in your knowledge base. If you do not know something, say: "I do not have that information, but I can connect you with our team. Would you like me to do that?"
2. If the customer wants to book an appointment, collect their name, phone number, and preferred date/time.
3. If the customer is upset or asks for a human, say: "Let me connect you with a team member right away" and stop responding.
Business hours: [Your hours]
Phone: [Your phone]
Website: [Your URL]
```
## What to do next
You have a working bot, but there is much more you can do to improve its performance and expand its capabilities. Here are the recommended next steps in order of priority.
### Week 1: Monitor and refine
* Review conversation logs daily in the [Conversation AI dashboard](/ai-agents/conversation-ai-dashboard)
* Update your prompt based on real conversations you observe
* Add FAQs to your [knowledge base](/ai-agents/knowledge-base) for questions the bot could not answer
* Adjust [bot settings](/ai-agents/bot-settings) such as response delay, max messages, and working hours behavior
### Week 2: Expand and optimize
* Deploy to additional channels such as SMS or social media using [multi-channel deployment](/ai/conversation-ai/multi-channel)
* Set up [conversation actions](/ai-agents/conversation-ai-actions) to trigger workflows when the bot collects a lead or books an appointment
* Learn [prompt engineering techniques](/ai/prompt-engineering/overview) to improve response quality
* Browse the [prompt library](/ai/prompt-library/overview) for industry-specific prompt templates
### Week 3 and beyond: Scale
* Consider adding [Voice AI](/ai/voice-ai/creating-agents) to handle phone calls alongside your chatbot
* Set up [multi-bot orchestration](/ai/conversation-ai/multi-bot) if you need different bots for different purposes
* Connect bots to [workflows](/ai/workflow-ai/connecting-bots) for automated follow-up sequences
* Review the [AI launch checklist](/ai/getting-started/checklist) to make sure nothing was missed
## Next steps
Learn how to write prompts that produce accurate, on-brand responses.
Add documents, URLs, and FAQs to give your bot the information it needs.
Make sure everything is production-ready before your full rollout.
Explore the full range of AI agent features and configuration options.
You can also upload documents (PDFs, text files) or add individual FAQ entries. For a complete guide to knowledge base configuration, see [knowledge base setup](/ai-agents/knowledge-base).
Start with your website URL and your top 10 FAQs. You can add more sources later as you see what questions customers are asking.
Choose where your bot will interact with customers. For your first deployment, **web chat** is the easiest and lowest-risk option because you can control when and where it appears on your site.
1. In the **Channels** section of your bot settings, toggle on **Web Chat**
2. You can also enable **SMS**, **Facebook Messenger**, **Instagram DM**, or **WhatsApp** if those channels are already connected to your HoopAI account
For a detailed walkthrough of deploying across multiple channels, see [multi-channel deployment](/ai/conversation-ai/multi-channel).
Before going live, test your bot thoroughly using the built-in trial mode.
1. Click **Test Bot** or **Trial** in the bot configuration screen
2. Send test messages that simulate real customer interactions:
* "What services do you offer?"
* "I would like to book an appointment"
* "What are your hours?"
* "How much does \[your main service] cost?"
* "I need to speak to someone"
3. Review each response for accuracy, tone, and helpfulness
4. If responses are off, go back and refine your prompt or add more knowledge base content
Spend at least 5 minutes testing. Try to break the bot by asking unexpected questions, going off-topic, or requesting things it should not do. Better to find issues now than after launch.
Once you are satisfied with the test results:
1. Toggle the bot status to **Active** or **Enabled**
2. If using web chat, install the chat widget on your website by copying the embed code from **Settings > Chat Widget** and pasting it into your site
3. Your bot is now live and responding to customers
Monitor your bot closely for the first 24 to 48 hours after launch. Review conversation logs in the [Conversation AI dashboard](/ai-agents/conversation-ai-dashboard) to catch any issues early.
## Minimal viable prompt template
If you want a copy-paste-ready prompt to get started quickly, here is a stripped-down version you can use as-is. Replace the placeholder text in brackets with your actual business details.
```text theme={null}
You are a helpful assistant for [Business Name], a [industry] business located in [City, State].
Your job is to answer customer questions using the knowledge base provided to you. Be friendly, concise, and professional.
Key rules:
1. Only share information that is in your knowledge base. If you do not know something, say: "I do not have that information, but I can connect you with our team. Would you like me to do that?"
2. If the customer wants to book an appointment, collect their name, phone number, and preferred date/time.
3. If the customer is upset or asks for a human, say: "Let me connect you with a team member right away" and stop responding.
Business hours: [Your hours]
Phone: [Your phone]
Website: [Your URL]
```
## What to do next
You have a working bot, but there is much more you can do to improve its performance and expand its capabilities. Here are the recommended next steps in order of priority.
### Week 1: Monitor and refine
* Review conversation logs daily in the [Conversation AI dashboard](/ai-agents/conversation-ai-dashboard)
* Update your prompt based on real conversations you observe
* Add FAQs to your [knowledge base](/ai-agents/knowledge-base) for questions the bot could not answer
* Adjust [bot settings](/ai-agents/bot-settings) such as response delay, max messages, and working hours behavior
### Week 2: Expand and optimize
* Deploy to additional channels such as SMS or social media using [multi-channel deployment](/ai/conversation-ai/multi-channel)
* Set up [conversation actions](/ai-agents/conversation-ai-actions) to trigger workflows when the bot collects a lead or books an appointment
* Learn [prompt engineering techniques](/ai/prompt-engineering/overview) to improve response quality
* Browse the [prompt library](/ai/prompt-library/overview) for industry-specific prompt templates
### Week 3 and beyond: Scale
* Consider adding [Voice AI](/ai/voice-ai/creating-agents) to handle phone calls alongside your chatbot
* Set up [multi-bot orchestration](/ai/conversation-ai/multi-bot) if you need different bots for different purposes
* Connect bots to [workflows](/ai/workflow-ai/connecting-bots) for automated follow-up sequences
* Review the [AI launch checklist](/ai/getting-started/checklist) to make sure nothing was missed
## Next steps
Learn how to write prompts that produce accurate, on-brand responses.
Add documents, URLs, and FAQs to give your bot the information it needs.
Make sure everything is production-ready before your full rollout.
Explore the full range of AI agent features and configuration options.