> ## Documentation Index
> Fetch the complete documentation index at: https://help.hoopai.com/llms.txt
> Use this file to discover all available pages before exploring further.
# AI launch checklist
> A comprehensive pre-launch checklist to ensure your HoopAI AI agent is ready for production.
Launching an AI agent without proper preparation leads to poor customer experiences, unnecessary escalations, and wasted time fixing issues that could have been caught early. This checklist covers everything you need to verify before, during, and after going live with your HoopAI AI agent.
Use this page as a reference each time you deploy a new bot or make significant changes to an existing one. For a faster first-time setup, start with the [quick start guide](/ai/getting-started/quick-start) and come back here to verify everything before your full production rollout.
 ## Pre-build preparation
Complete these items before you start configuring your bot. The time you invest in preparation directly impacts how well your AI agent performs from day one.
Write a clear one-sentence description of what your bot should do and who it serves. For example: "This bot answers customer support questions for our dental practice and books appointments for new and existing patients."
Having a focused purpose prevents scope creep and helps you write a tighter [prompt](/ai/prompt-engineering/overview). A bot that tries to do everything does nothing well.
Talk to your front-desk staff, review recent support tickets, check your Google Business reviews, and scan your email inbox for the most common customer questions. Write them down along with the ideal answers.
These questions become the foundation of your [knowledge base](/ai-agents/knowledge-base) and help you test whether the bot handles real-world scenarios correctly.
Decide whether you need [Conversation AI](/ai-agents/conversation-ai) (text-based), [Voice AI](/ai/voice-ai/creating-agents) (phone-based), or both. If you are unsure, use the [choosing the right AI feature](/ai/getting-started/choosing-ai) guide to find the best fit for your business.
Gather the materials your bot will reference when answering questions:
* **Website URL** -- Your main business website (HoopAI will crawl it automatically)
* **FAQ document** -- A list of questions and answers covering your most common topics
* **Service descriptions** -- Details about what you offer, including pricing ranges if applicable
* **Policies** -- Return policies, cancellation policies, insurance information, etc.
* **Business details** -- Hours, location, phone number, team bios
Upload these to your [knowledge base](/ai-agents/knowledge-base) before writing your prompt so you can reference them during testing.
## Bot configuration
These are the core setup tasks that determine how your bot behaves in conversations.
Your prompt is the single most important factor in your bot's performance. A well-written prompt produces natural, accurate, on-brand responses. A vague prompt produces generic or incorrect answers.
* Start with the [minimal viable prompt template](/ai/getting-started/quick-start#minimal-viable-prompt-template)
* Follow the guidelines in [prompt engineering 101](/ai/prompt-engineering/overview)
* Review [Conversation AI prompt templates](/ai/prompt-engineering/conversation-ai-prompts) for industry-specific examples
* Browse the [prompt library](/ai/prompt-library/overview) for ready-to-use templates
Include explicit rules about what the bot should NOT do. For example: "Never discuss competitor products," "Never provide medical advice," or "Never quote exact pricing without checking the knowledge base first."
Add all the content you prepared in the pre-build phase to your [knowledge base](/ai-agents/knowledge-base):
* Website URLs (your main site and any key landing pages)
* FAQ documents (PDF, TXT, or DOCX format)
* Individual FAQ entries for critical questions
* Any product catalogs or service descriptions
Test the knowledge base by asking your bot questions that should be answered from these sources.
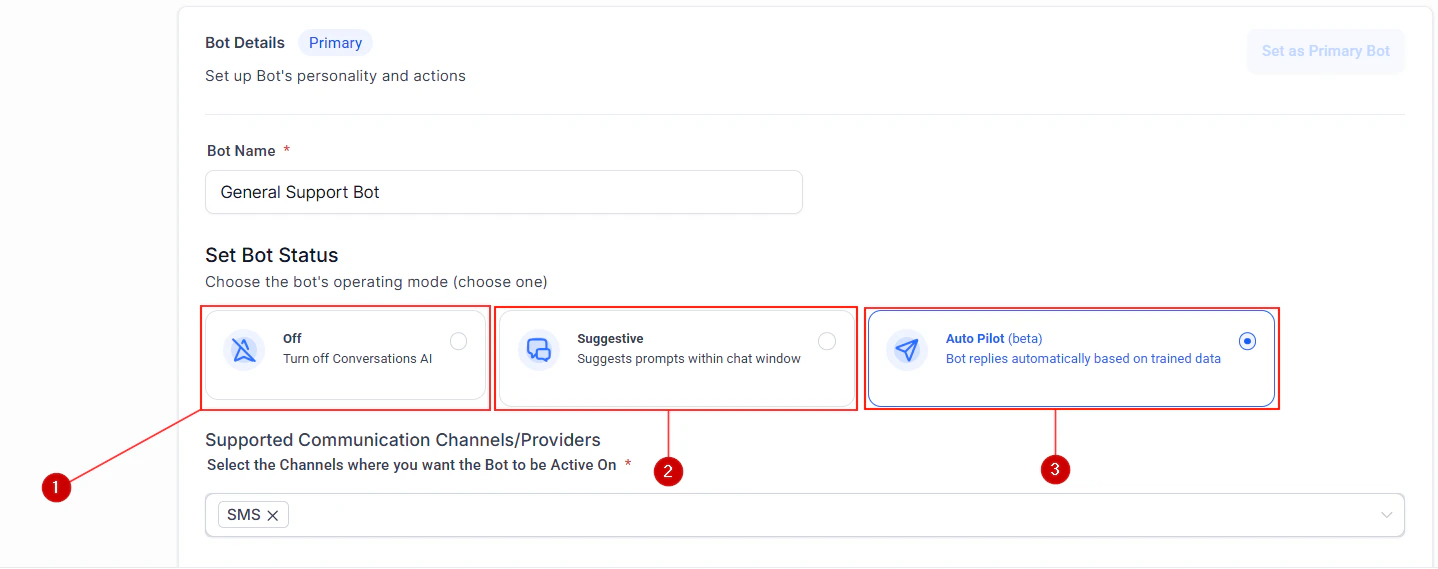
Decide which channels your bot will operate on and enable them in [bot settings](/ai-agents/bot-settings):
* **Web chat** -- Lowest risk for first deployment; install the [chat widget](/academy/onboarding/webchat-widget) on your website
* **SMS** -- Requires an active [phone number](/getting-started/phone-number-setup) and [A2P 10DLC registration](/getting-started/a2p-10dlc-registration)
* **Facebook Messenger** -- Requires a connected Facebook page
* **Instagram DM** -- Requires a connected Instagram business account
* **WhatsApp** -- Requires a connected WhatsApp Business account
For channel-specific setup details, see [multi-channel deployment](/ai/conversation-ai/multi-channel).
If your bot will book appointments, make sure your calendar integration is active and properly configured:
* Connect your Google Calendar or Outlook Calendar in **Settings > Calendars**
* Verify available time slots are showing correctly
* Set buffer times between appointments if needed
* Test the booking flow end-to-end by asking the bot to schedule an appointment
Configure when and how the bot should hand off to a human team member. Common escalation triggers include:
* Customer explicitly asks for a human ("Let me talk to a person")
* Customer expresses frustration or anger
* Bot cannot find an answer after a set number of attempts
* Conversation involves sensitive topics (billing disputes, complaints, legal questions)
Set these up in your [bot settings](/ai-agents/bot-settings) and make sure your team knows how to pick up escalated conversations in the [conversations view](/getting-started/crm-overview).
Configure guardrails to prevent runaway conversations:
* **Max messages** -- Set a maximum number of AI responses per conversation (recommended: 15 to 25 messages)
* **Conversation timeout** -- Define how long the bot waits before considering a conversation inactive
* **Re-engagement rules** -- Decide whether the bot should follow up if the customer stops responding
These settings are available in [bot settings](/ai-agents/bot-settings).
Decide how your bot behaves during and outside business hours:
* **During business hours** -- Bot responds and can escalate to live team members
* **Outside business hours** -- Bot responds and collects contact information for follow-up the next business day
* **After-hours message** -- Customize the message the bot sends when no team members are available for escalation
This is especially important for [Voice AI agents](/ai/voice-ai/creating-agents), where callers expect different behavior during business hours vs. evenings and weekends.
## Testing
Thorough testing is what separates a good AI agent from a frustrating one. Do not skip these steps.
Using the trial mode in your bot settings, simulate at least 10 full conversations covering your most common customer scenarios:
* General information questions ("What are your hours?", "Where are you located?")
* Service inquiries ("How much does X cost?", "Do you offer Y?")
* Appointment booking ("I need to schedule a visit")
* Lead qualification ("I am interested in your services")
* Follow-up questions ("What about Z?" after an initial answer)
Verify that each response is accurate, helpful, and matches your brand tone.
Push your bot beyond typical scenarios to find weaknesses:
* **Off-topic questions** -- "What is the weather today?" or "Tell me a joke"
* **Hostile or rude messages** -- Verify the bot stays professional and offers escalation
* **Complex multi-part questions** -- "I need to reschedule my appointment from Tuesday to Thursday and also change the service from X to Y"
* **Gibberish or empty messages** -- Make sure the bot handles non-sensical input gracefully
* **Requests the bot should not fulfill** -- Test with questions about competitors, requests for personal opinions, or topics outside your business scope
If the bot provides incorrect information during testing, do not assume it will fix itself. Update your prompt or knowledge base immediately.
Trigger an escalation by saying something like "I want to speak to a human" and verify the entire flow:
1. Bot acknowledges the request
2. Conversation is routed to the correct team member or queue
3. Team member receives a notification
4. Team member can see the full conversation history when they pick up
5. Bot stops responding once the human takes over
Complete a full appointment booking flow:
1. Ask the bot to book an appointment
2. Verify it offers available time slots from your connected calendar
3. Confirm the booking
4. Check that the appointment appears in your calendar
5. Verify the customer receives a confirmation (if configured)
6. Test rescheduling and cancellation flows
After testing, go to the [Conversation AI dashboard](/ai-agents/conversation-ai-dashboard) and review every test conversation. Look for:
* Responses that are too long or too short
* Moments where the bot missed the intent of the question
* Factual inaccuracies or information not found in your knowledge base
* Awkward phrasing or tone mismatches
* Missed opportunities to collect contact information or book appointments
Update your prompt and knowledge base based on what you find, then re-test.
## Go-live
When testing is complete and you are confident in your bot's performance, follow these steps to launch.
Toggle your bot to **Active** on each channel you want to launch on. If you are launching on multiple channels, consider a staged rollout:
1. Start with web chat only for 24 to 48 hours
2. Add SMS after confirming web chat performance
3. Add social channels (Facebook, Instagram, WhatsApp) after SMS is stable
See [multi-channel deployment](/ai/conversation-ai/multi-channel) for channel-specific activation steps.
Let everyone on your team know that an AI agent is now handling initial customer interactions. Make sure they understand:
* Which channels the bot is active on
* How escalated conversations will appear in their queue
* How to pick up conversations from the bot
* Who to contact if the bot is behaving incorrectly
* How to temporarily disable the bot in an emergency
Configure the [Conversation AI dashboard](/ai-agents/conversation-ai-dashboard) to track key metrics from day one:
* Total conversations handled by the bot
* Resolution rate (conversations resolved without human intervention)
* Escalation rate (conversations handed off to a human)
* Average conversation length
* Customer satisfaction signals (if feedback collection is enabled)
Bookmark this dashboard and check it multiple times per day during the first week.
Set a calendar reminder for 48 hours after launch to do a thorough review:
* Read through at least 20 real customer conversations
* Identify patterns in questions the bot handles well and poorly
* Note any missing knowledge base content
* Check escalation rate (aim for under 25% for most businesses)
* Decide on any immediate prompt or knowledge base updates
## Post-launch optimization
Launching your bot is the beginning, not the end. Continuous optimization based on real data is what turns a decent bot into an excellent one.
Set a recurring weekly review to check your bot's performance in the [Conversation AI dashboard](/ai-agents/conversation-ai-dashboard). Track trends in:
* Resolution rate (should increase over time as you refine the bot)
* Escalation rate (should decrease over time)
* Conversation volume by channel
* Peak hours and days
Look for patterns. If every Tuesday at 2 PM the escalation rate spikes, dig into those conversations to find out why.
Every week, review conversations where the bot could not answer a question. Add those answers to your [knowledge base](/ai-agents/knowledge-base). Common additions include:
* New services or products you have launched
* Seasonal information (holiday hours, special promotions)
* Answers to questions you did not anticipate during initial setup
* Updated pricing, policies, or procedures
Use real customer conversations to improve your prompt. Common refinements include:
* Adding rules for edge cases you discovered ("If someone asks about X, respond with Y")
* Adjusting tone (too formal? too casual?)
* Adding or removing personality traits
* Tightening guardrails for topics the bot should avoid
* Improving the escalation trigger phrases
For advanced techniques, see [prompt engineering 101](/ai/prompt-engineering/overview).
Measure your AI agent against concrete business metrics:
* **Resolution rate** -- Percentage of conversations resolved without human intervention (target: 70% or higher)
* **Escalation rate** -- Percentage of conversations handed to a human (target: under 25%)
* **Response accuracy** -- Spot-check 10 conversations per week and score accuracy (target: 90%+)
* **Customer satisfaction** -- If you collect post-conversation feedback, track the average score
* **Appointments booked** -- If your bot books appointments, track the weekly count
* **Lead capture rate** -- Number of new contact records created through bot conversations
Set monthly improvement targets for each metric and review progress at the end of each month.
## Quick reference: printable checklist
Here is a condensed version of the full checklist for quick reference.
**Pre-build:**
* Defined bot purpose and target audience
* Identified top 20 customer questions
* Chosen AI feature (Conversation AI, Voice AI, or both)
* Prepared knowledge base content
**Configuration:**
* Written and refined prompt
* Uploaded knowledge base sources
* Configured channels (web chat, SMS, social, phone)
* Set up calendar connection (if booking)
* Defined escalation rules and human handoff triggers
* Set max messages and conversation limits
* Configured working hours behavior
**Testing:**
* Completed 10+ test conversations for common scenarios
* Tested edge cases (off-topic, rude, complex, gibberish)
* Tested escalation flow end-to-end
* Tested appointment booking (if applicable)
* Reviewed all conversation logs for quality
**Go-live:**
* Enabled bot on selected channels
* Notified team about deployment
* Set up monitoring dashboards
* Scheduled 48-hour review
**Post-launch:**
* Reviewing conversation analytics weekly
* Updating knowledge base with new FAQs
* Refining prompt based on real conversations
* Tracking KPIs with monthly targets
## Next steps
Master the art of writing prompts that produce accurate, on-brand responses.
Monitor your bot performance and review conversation analytics.
Expand your bot to SMS, social media, and additional messaging channels.
Add phone-based AI agents to complement your chatbot.
## Pre-build preparation
Complete these items before you start configuring your bot. The time you invest in preparation directly impacts how well your AI agent performs from day one.
Write a clear one-sentence description of what your bot should do and who it serves. For example: "This bot answers customer support questions for our dental practice and books appointments for new and existing patients."
Having a focused purpose prevents scope creep and helps you write a tighter [prompt](/ai/prompt-engineering/overview). A bot that tries to do everything does nothing well.
Talk to your front-desk staff, review recent support tickets, check your Google Business reviews, and scan your email inbox for the most common customer questions. Write them down along with the ideal answers.
These questions become the foundation of your [knowledge base](/ai-agents/knowledge-base) and help you test whether the bot handles real-world scenarios correctly.
Decide whether you need [Conversation AI](/ai-agents/conversation-ai) (text-based), [Voice AI](/ai/voice-ai/creating-agents) (phone-based), or both. If you are unsure, use the [choosing the right AI feature](/ai/getting-started/choosing-ai) guide to find the best fit for your business.
Gather the materials your bot will reference when answering questions:
* **Website URL** -- Your main business website (HoopAI will crawl it automatically)
* **FAQ document** -- A list of questions and answers covering your most common topics
* **Service descriptions** -- Details about what you offer, including pricing ranges if applicable
* **Policies** -- Return policies, cancellation policies, insurance information, etc.
* **Business details** -- Hours, location, phone number, team bios
Upload these to your [knowledge base](/ai-agents/knowledge-base) before writing your prompt so you can reference them during testing.
## Bot configuration
These are the core setup tasks that determine how your bot behaves in conversations.
Your prompt is the single most important factor in your bot's performance. A well-written prompt produces natural, accurate, on-brand responses. A vague prompt produces generic or incorrect answers.
* Start with the [minimal viable prompt template](/ai/getting-started/quick-start#minimal-viable-prompt-template)
* Follow the guidelines in [prompt engineering 101](/ai/prompt-engineering/overview)
* Review [Conversation AI prompt templates](/ai/prompt-engineering/conversation-ai-prompts) for industry-specific examples
* Browse the [prompt library](/ai/prompt-library/overview) for ready-to-use templates
Include explicit rules about what the bot should NOT do. For example: "Never discuss competitor products," "Never provide medical advice," or "Never quote exact pricing without checking the knowledge base first."
Add all the content you prepared in the pre-build phase to your [knowledge base](/ai-agents/knowledge-base):
* Website URLs (your main site and any key landing pages)
* FAQ documents (PDF, TXT, or DOCX format)
* Individual FAQ entries for critical questions
* Any product catalogs or service descriptions
Test the knowledge base by asking your bot questions that should be answered from these sources.
Decide which channels your bot will operate on and enable them in [bot settings](/ai-agents/bot-settings):
* **Web chat** -- Lowest risk for first deployment; install the [chat widget](/academy/onboarding/webchat-widget) on your website
* **SMS** -- Requires an active [phone number](/getting-started/phone-number-setup) and [A2P 10DLC registration](/getting-started/a2p-10dlc-registration)
* **Facebook Messenger** -- Requires a connected Facebook page
* **Instagram DM** -- Requires a connected Instagram business account
* **WhatsApp** -- Requires a connected WhatsApp Business account
For channel-specific setup details, see [multi-channel deployment](/ai/conversation-ai/multi-channel).
If your bot will book appointments, make sure your calendar integration is active and properly configured:
* Connect your Google Calendar or Outlook Calendar in **Settings > Calendars**
* Verify available time slots are showing correctly
* Set buffer times between appointments if needed
* Test the booking flow end-to-end by asking the bot to schedule an appointment
Configure when and how the bot should hand off to a human team member. Common escalation triggers include:
* Customer explicitly asks for a human ("Let me talk to a person")
* Customer expresses frustration or anger
* Bot cannot find an answer after a set number of attempts
* Conversation involves sensitive topics (billing disputes, complaints, legal questions)
Set these up in your [bot settings](/ai-agents/bot-settings) and make sure your team knows how to pick up escalated conversations in the [conversations view](/getting-started/crm-overview).
Configure guardrails to prevent runaway conversations:
* **Max messages** -- Set a maximum number of AI responses per conversation (recommended: 15 to 25 messages)
* **Conversation timeout** -- Define how long the bot waits before considering a conversation inactive
* **Re-engagement rules** -- Decide whether the bot should follow up if the customer stops responding
These settings are available in [bot settings](/ai-agents/bot-settings).
Decide how your bot behaves during and outside business hours:
* **During business hours** -- Bot responds and can escalate to live team members
* **Outside business hours** -- Bot responds and collects contact information for follow-up the next business day
* **After-hours message** -- Customize the message the bot sends when no team members are available for escalation
This is especially important for [Voice AI agents](/ai/voice-ai/creating-agents), where callers expect different behavior during business hours vs. evenings and weekends.
## Testing
Thorough testing is what separates a good AI agent from a frustrating one. Do not skip these steps.
Using the trial mode in your bot settings, simulate at least 10 full conversations covering your most common customer scenarios:
* General information questions ("What are your hours?", "Where are you located?")
* Service inquiries ("How much does X cost?", "Do you offer Y?")
* Appointment booking ("I need to schedule a visit")
* Lead qualification ("I am interested in your services")
* Follow-up questions ("What about Z?" after an initial answer)
Verify that each response is accurate, helpful, and matches your brand tone.
Push your bot beyond typical scenarios to find weaknesses:
* **Off-topic questions** -- "What is the weather today?" or "Tell me a joke"
* **Hostile or rude messages** -- Verify the bot stays professional and offers escalation
* **Complex multi-part questions** -- "I need to reschedule my appointment from Tuesday to Thursday and also change the service from X to Y"
* **Gibberish or empty messages** -- Make sure the bot handles non-sensical input gracefully
* **Requests the bot should not fulfill** -- Test with questions about competitors, requests for personal opinions, or topics outside your business scope
If the bot provides incorrect information during testing, do not assume it will fix itself. Update your prompt or knowledge base immediately.
Trigger an escalation by saying something like "I want to speak to a human" and verify the entire flow:
1. Bot acknowledges the request
2. Conversation is routed to the correct team member or queue
3. Team member receives a notification
4. Team member can see the full conversation history when they pick up
5. Bot stops responding once the human takes over
Complete a full appointment booking flow:
1. Ask the bot to book an appointment
2. Verify it offers available time slots from your connected calendar
3. Confirm the booking
4. Check that the appointment appears in your calendar
5. Verify the customer receives a confirmation (if configured)
6. Test rescheduling and cancellation flows
After testing, go to the [Conversation AI dashboard](/ai-agents/conversation-ai-dashboard) and review every test conversation. Look for:
* Responses that are too long or too short
* Moments where the bot missed the intent of the question
* Factual inaccuracies or information not found in your knowledge base
* Awkward phrasing or tone mismatches
* Missed opportunities to collect contact information or book appointments
Update your prompt and knowledge base based on what you find, then re-test.
## Go-live
When testing is complete and you are confident in your bot's performance, follow these steps to launch.
Toggle your bot to **Active** on each channel you want to launch on. If you are launching on multiple channels, consider a staged rollout:
1. Start with web chat only for 24 to 48 hours
2. Add SMS after confirming web chat performance
3. Add social channels (Facebook, Instagram, WhatsApp) after SMS is stable
See [multi-channel deployment](/ai/conversation-ai/multi-channel) for channel-specific activation steps.
Let everyone on your team know that an AI agent is now handling initial customer interactions. Make sure they understand:
* Which channels the bot is active on
* How escalated conversations will appear in their queue
* How to pick up conversations from the bot
* Who to contact if the bot is behaving incorrectly
* How to temporarily disable the bot in an emergency
Configure the [Conversation AI dashboard](/ai-agents/conversation-ai-dashboard) to track key metrics from day one:
* Total conversations handled by the bot
* Resolution rate (conversations resolved without human intervention)
* Escalation rate (conversations handed off to a human)
* Average conversation length
* Customer satisfaction signals (if feedback collection is enabled)
Bookmark this dashboard and check it multiple times per day during the first week.
Set a calendar reminder for 48 hours after launch to do a thorough review:
* Read through at least 20 real customer conversations
* Identify patterns in questions the bot handles well and poorly
* Note any missing knowledge base content
* Check escalation rate (aim for under 25% for most businesses)
* Decide on any immediate prompt or knowledge base updates
## Post-launch optimization
Launching your bot is the beginning, not the end. Continuous optimization based on real data is what turns a decent bot into an excellent one.
Set a recurring weekly review to check your bot's performance in the [Conversation AI dashboard](/ai-agents/conversation-ai-dashboard). Track trends in:
* Resolution rate (should increase over time as you refine the bot)
* Escalation rate (should decrease over time)
* Conversation volume by channel
* Peak hours and days
Look for patterns. If every Tuesday at 2 PM the escalation rate spikes, dig into those conversations to find out why.
Every week, review conversations where the bot could not answer a question. Add those answers to your [knowledge base](/ai-agents/knowledge-base). Common additions include:
* New services or products you have launched
* Seasonal information (holiday hours, special promotions)
* Answers to questions you did not anticipate during initial setup
* Updated pricing, policies, or procedures
Use real customer conversations to improve your prompt. Common refinements include:
* Adding rules for edge cases you discovered ("If someone asks about X, respond with Y")
* Adjusting tone (too formal? too casual?)
* Adding or removing personality traits
* Tightening guardrails for topics the bot should avoid
* Improving the escalation trigger phrases
For advanced techniques, see [prompt engineering 101](/ai/prompt-engineering/overview).
Measure your AI agent against concrete business metrics:
* **Resolution rate** -- Percentage of conversations resolved without human intervention (target: 70% or higher)
* **Escalation rate** -- Percentage of conversations handed to a human (target: under 25%)
* **Response accuracy** -- Spot-check 10 conversations per week and score accuracy (target: 90%+)
* **Customer satisfaction** -- If you collect post-conversation feedback, track the average score
* **Appointments booked** -- If your bot books appointments, track the weekly count
* **Lead capture rate** -- Number of new contact records created through bot conversations
Set monthly improvement targets for each metric and review progress at the end of each month.
## Quick reference: printable checklist
Here is a condensed version of the full checklist for quick reference.
**Pre-build:**
* Defined bot purpose and target audience
* Identified top 20 customer questions
* Chosen AI feature (Conversation AI, Voice AI, or both)
* Prepared knowledge base content
**Configuration:**
* Written and refined prompt
* Uploaded knowledge base sources
* Configured channels (web chat, SMS, social, phone)
* Set up calendar connection (if booking)
* Defined escalation rules and human handoff triggers
* Set max messages and conversation limits
* Configured working hours behavior
**Testing:**
* Completed 10+ test conversations for common scenarios
* Tested edge cases (off-topic, rude, complex, gibberish)
* Tested escalation flow end-to-end
* Tested appointment booking (if applicable)
* Reviewed all conversation logs for quality
**Go-live:**
* Enabled bot on selected channels
* Notified team about deployment
* Set up monitoring dashboards
* Scheduled 48-hour review
**Post-launch:**
* Reviewing conversation analytics weekly
* Updating knowledge base with new FAQs
* Refining prompt based on real conversations
* Tracking KPIs with monthly targets
## Next steps
Master the art of writing prompts that produce accurate, on-brand responses.
Monitor your bot performance and review conversation analytics.
Expand your bot to SMS, social media, and additional messaging channels.
Add phone-based AI agents to complement your chatbot.