> ## Documentation Index
> Fetch the complete documentation index at: https://help.hoopai.com/llms.txt
> Use this file to discover all available pages before exploring further.
# Train your AI agent
> Add knowledge sources, connect Google Docs as training data, and configure your agent to collect contact information.
Training your Conversation AI bot involves adding knowledge sources, writing effective prompts, and configuring what information the bot captures during conversations.
Bot training is the process of teaching your AI bot to provide accurate, context-specific responses to customer queries. Utilizing tools like the Web Crawler and Custom Bot Responses, you can build a robust knowledge base to support seamless customer interactions. Whether addressing general or specific inquiries, a well-trained bot ensures customers receive timely and accurate answers.
### Key Benefits of Training Your Bot
* ****Improved Accuracy:**** By accessing relevant data sources, your bot can deliver precise responses tailored to customer questions.
* ****Enhanced Efficiency:**** Automated responses reduce manual intervention, saving time for both your team and customers.
* ****Consistency:**** Ensure customers receive consistent, high-quality information across all interactions.
* ****Scalability:**** Support a growing customer base without increasing resource requirements.
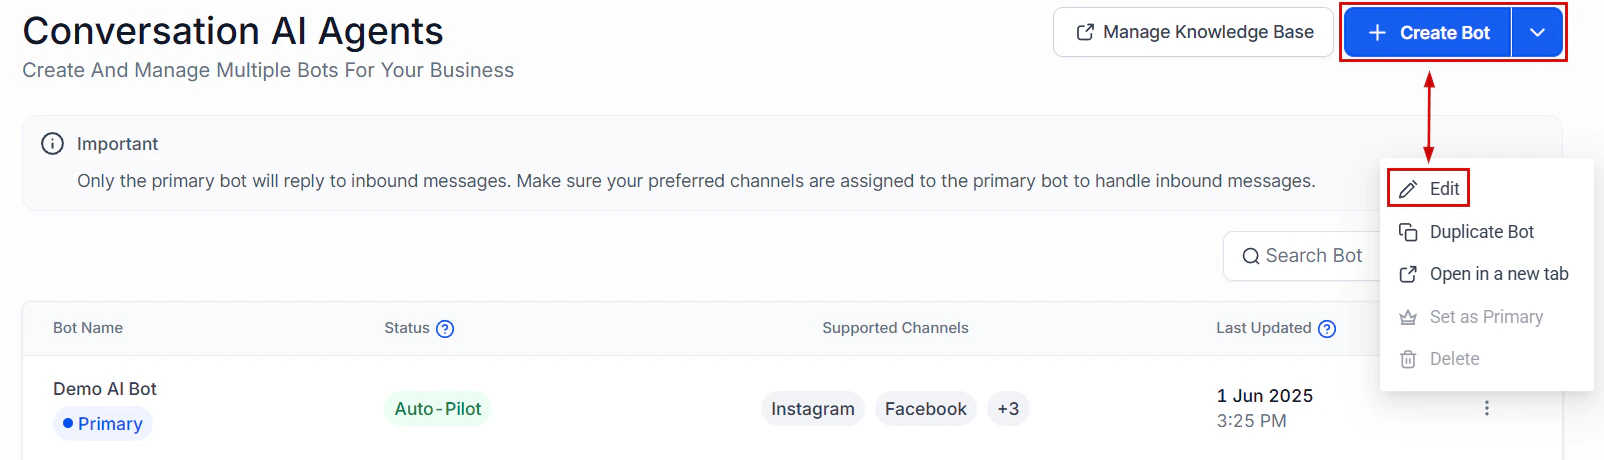
Navigate to the Conversation AI tab within your account settings to get started.
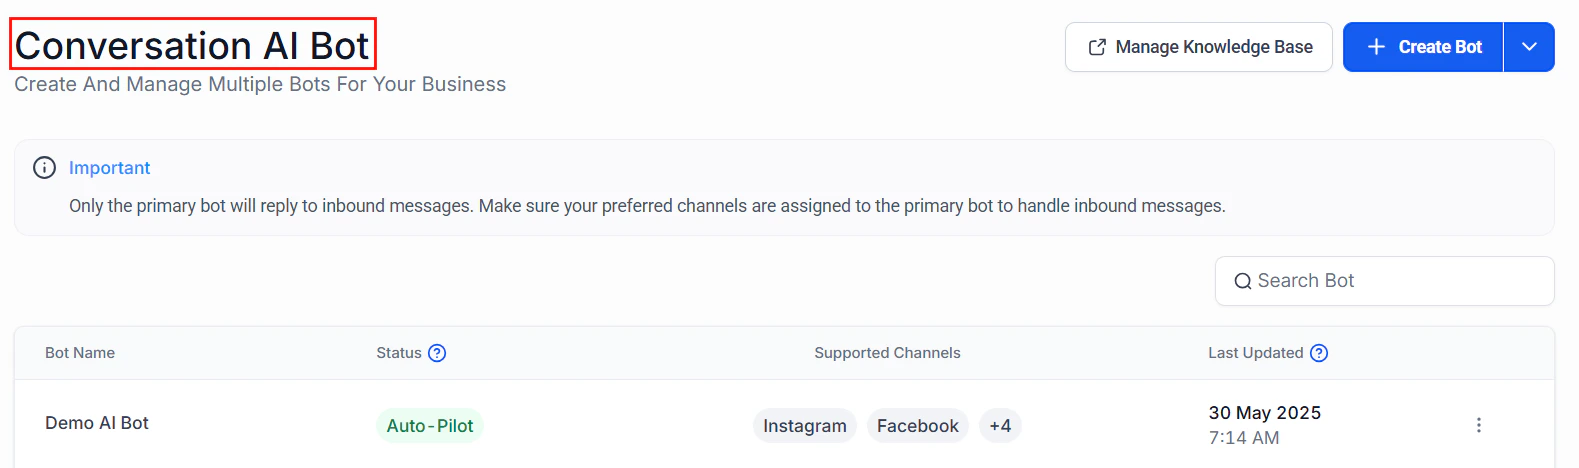 Click on the name of any configured bot.
��****Note****: The training material applies to all bots, meaning the AI bot from which the training is initiated does not impact the outcome.
Click on the name of any configured bot.
��****Note****: The training material applies to all bots, meaning the AI bot from which the training is initiated does not impact the outcome.
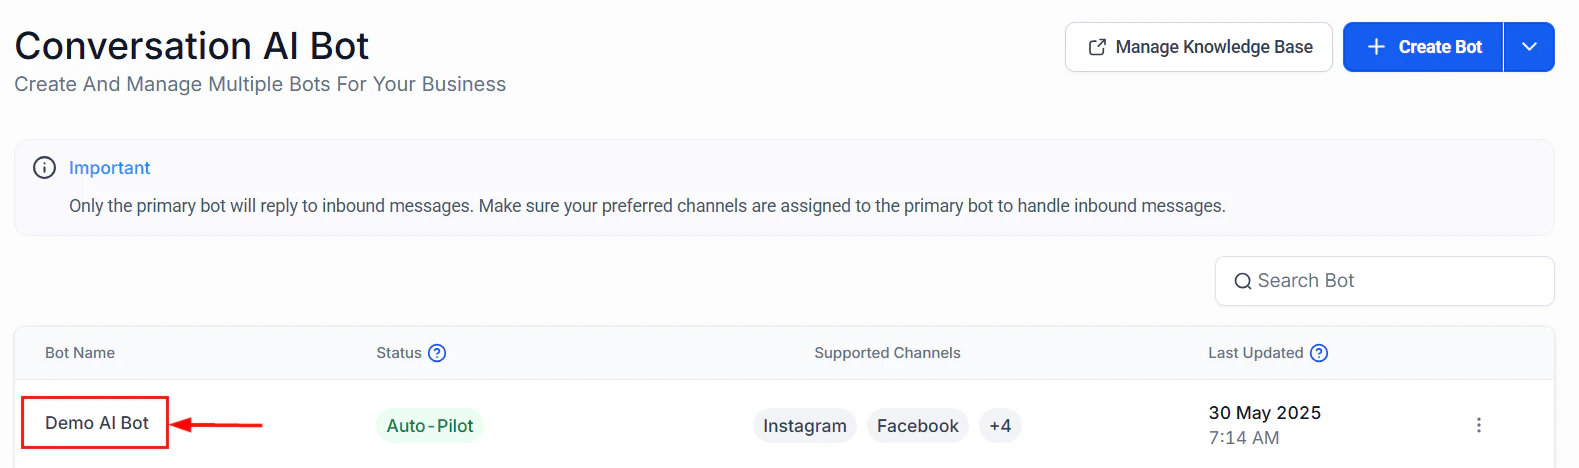 ## Bot Training
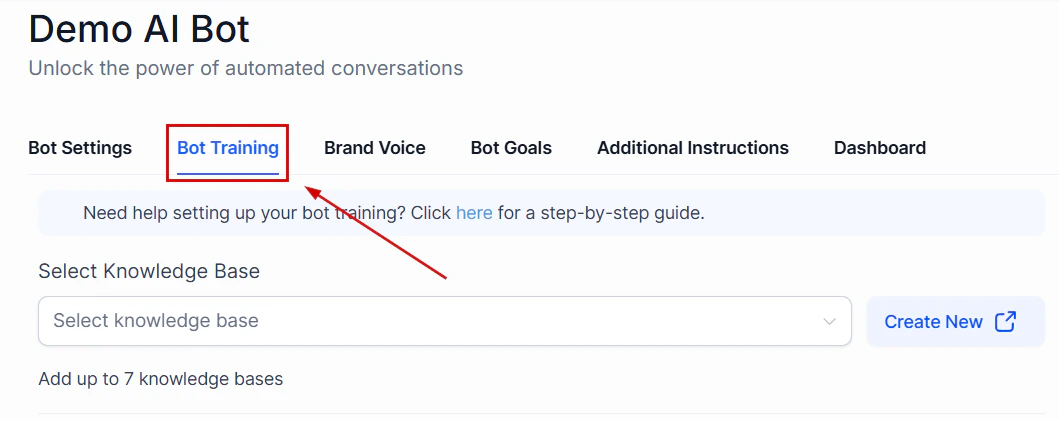
Switch to the Bot Training tab to train your AI bot, ensuring it delivers accurate and relevant responses.
Here, you can choose whether to select up to 7 knowledge bases from the dropdown or create a new knowledge base. For step-by-step instructions on how to create a knowledge base, refer to the "How to Create a Knowledge Base" article.
## Bot Training
Switch to the Bot Training tab to train your AI bot, ensuring it delivers accurate and relevant responses.
Here, you can choose whether to select up to 7 knowledge bases from the dropdown or create a new knowledge base. For step-by-step instructions on how to create a knowledge base, refer to the "How to Create a Knowledge Base" article.
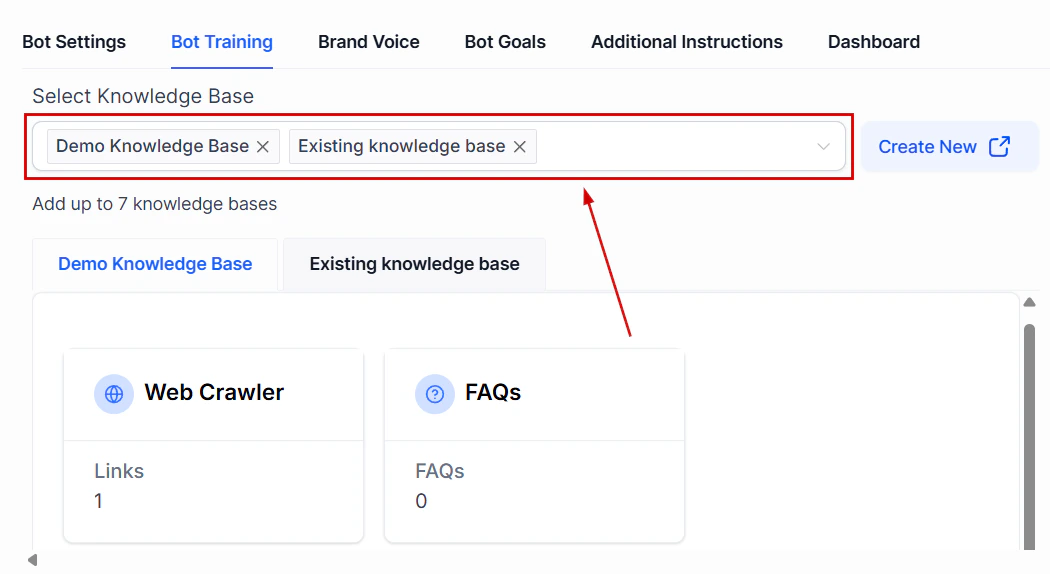
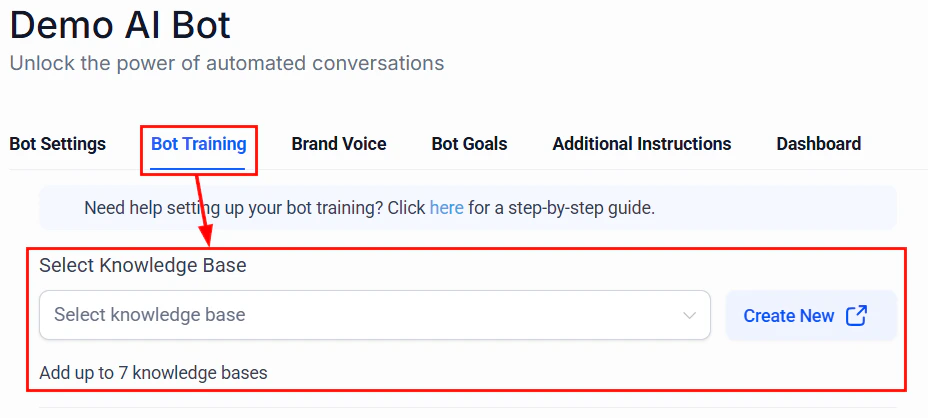 Once selected, you will have options to include additional links via the web crawler or customize bot responses via FAQs.
### Web Crawler
The Web Crawler enables you to train your bot using publicly available information from websites, helping ensure it delivers accurate and contextually relevant responses. You can configure the Web Crawler to extract data from specific URLs, site paths, entire domains, or even public Google Docs. By default, any links added to the knowledge base will be processed and displayed here.
Once selected, you will have options to include additional links via the web crawler or customize bot responses via FAQs.
### Web Crawler
The Web Crawler enables you to train your bot using publicly available information from websites, helping ensure it delivers accurate and contextually relevant responses. You can configure the Web Crawler to extract data from specific URLs, site paths, entire domains, or even public Google Docs. By default, any links added to the knowledge base will be processed and displayed here.
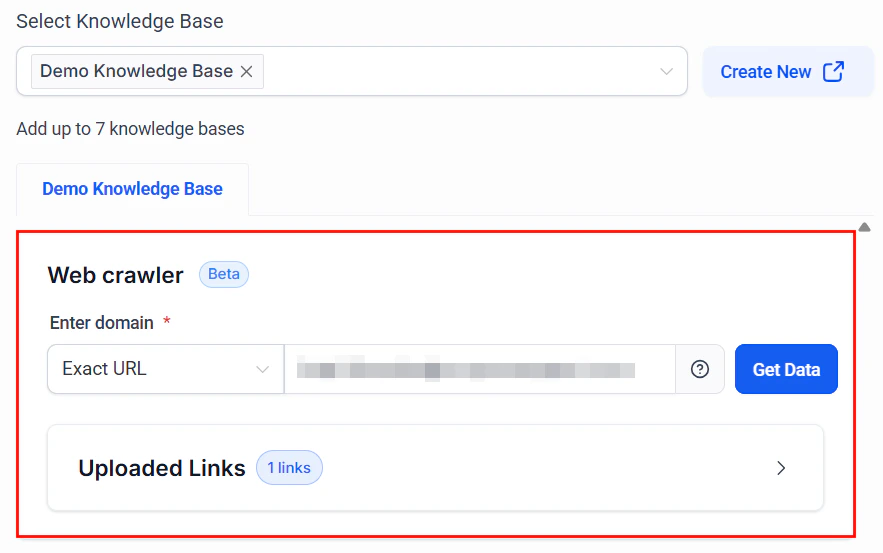 To include additional links, select from multiple domain types based on how broadly you want to crawl the site. You can choose exact URLs, URLs with specific paths, or entire domains.
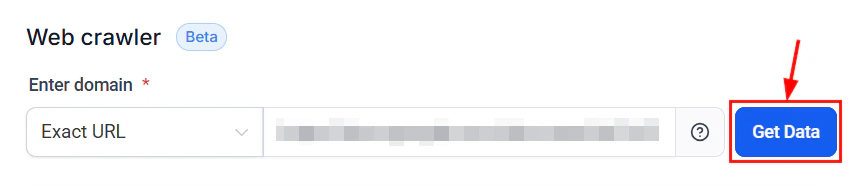
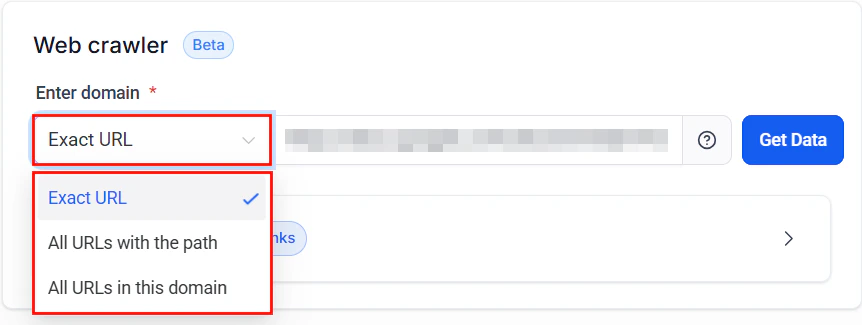 Once you have selected the appropriate URL type, enter the URL in the provided field, then click the "Get Data" button to begin crawling the URLs. The process duration will depend on the number of URLs being crawled.
 Once the crawl is complete, you can select individual URLs or opt to "select all" to include links obtained from the "All URLs with the path" or "All URLs in this domain" options in your bot's training data.
By providing the bot with URLs, you enable the Web Crawler to extract relevant information, ensuring your bot has access to up-to-date and contextually appropriate data for customer interactions.
### Custom Bot Responses (FAQs)
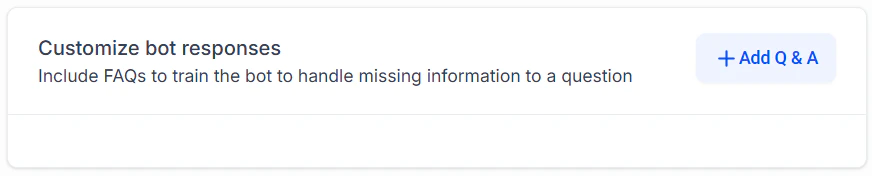
Custom Bot Responses allow you to define precise answers for frequently asked questions, ensuring the bot provides consistent and accurate information, particularly for critical customer queries.
Once the crawl is complete, you can select individual URLs or opt to "select all" to include links obtained from the "All URLs with the path" or "All URLs in this domain" options in your bot's training data.
By providing the bot with URLs, you enable the Web Crawler to extract relevant information, ensuring your bot has access to up-to-date and contextually appropriate data for customer interactions.
### Custom Bot Responses (FAQs)
Custom Bot Responses allow you to define precise answers for frequently asked questions, ensuring the bot provides consistent and accurate information, particularly for critical customer queries.
 ### Best Practices for Custom Bot Responses:
* Keep responses clear and concise.
* Anticipate variations of commonly asked questions.
* Regularly update responses to match evolving customer needs.
Custom Bot Responses can be added by manually entering FAQs or by providing feedback during live conversations.
### Best Practices for Custom Bot Responses:
* Keep responses clear and concise.
* Anticipate variations of commonly asked questions.
* Regularly update responses to match evolving customer needs.
Custom Bot Responses can be added by manually entering FAQs or by providing feedback during live conversations.
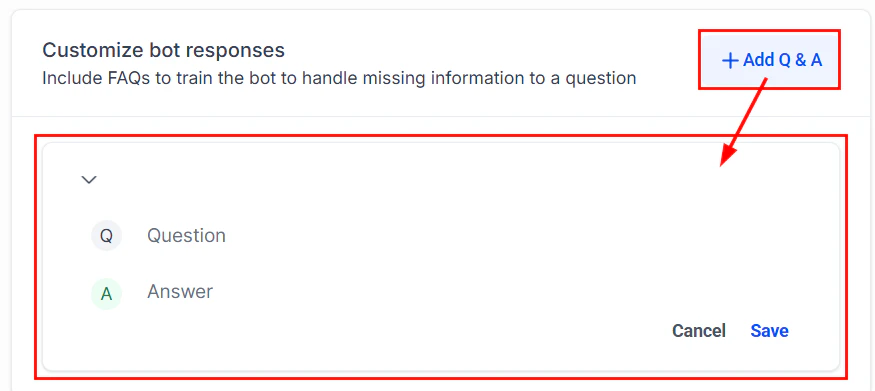 These responses help improve the bot's consistency, accuracy, and overall effectiveness in addressing customer inquiries.
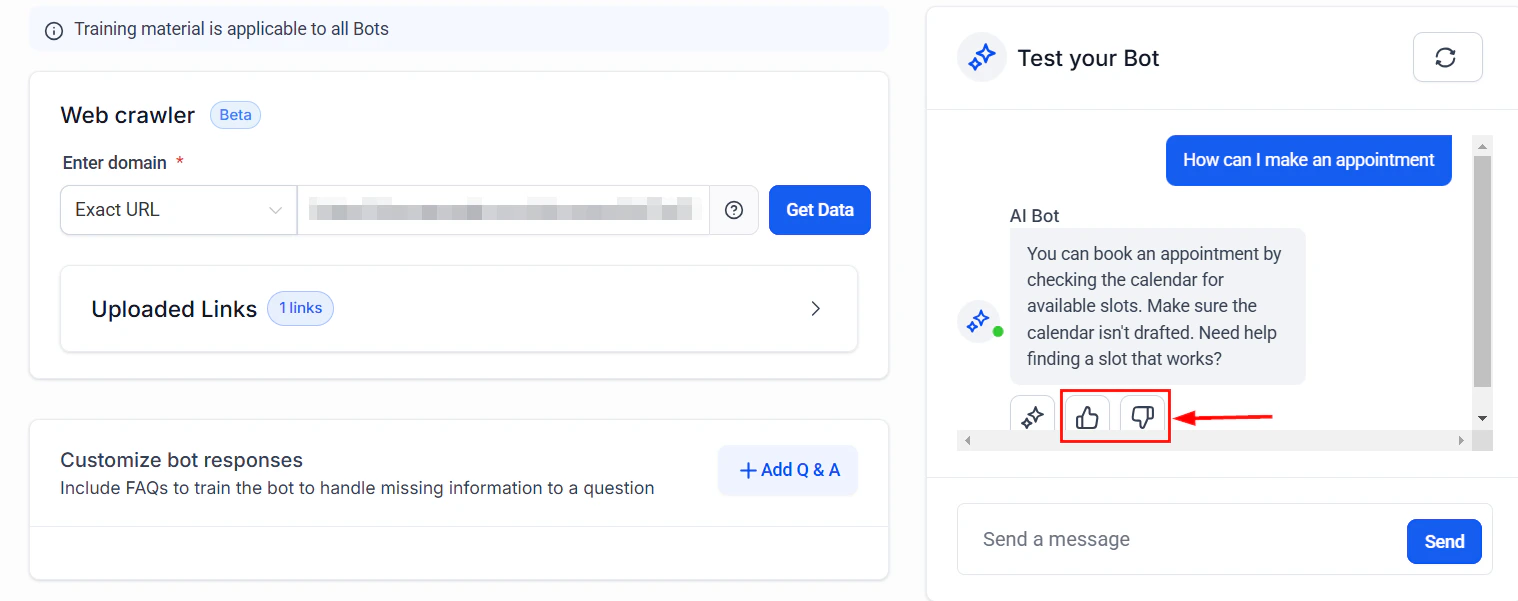 By leveraging the Web Crawler and Custom Bot Responses (FAQs), you can craft precise answers to common customer queries, improving your bot's ability to handle customer interactions efficiently and consistently.
***
## Frequently Asked Questions
Updating your bot's training data quarterly or following major service updates ensures it remains accurate and relevant.
Yes, combining various types of URLs (Exact, Path-specific, and Domain-level) can help create a more comprehensive knowledge base. Simply redo the steps listed in the Web Crawler section to train the bot using multiple URLs.
Use the feedback system, regularly test your bot by simulating customer queries, and frequently update your FAQs.
The bot may request clarification or escalate the query to a human agent based on its configuration.
Provide precise, critical information like pricing, policies, and instructions to effectively address common customer inquiries.
***
## Training with Google Docs
Leveraging Google Docs for training your Conversation AI bot offers numerous benefits, including efficient training processes, real-time corrections, and expanded training options. This integration provides a streamlined approach to enhancing your bot's conversational abilities, making it easier to ensure accurate and relevant interactions. Follow these steps to utilize Google Docs in your bot training and take advantage of its versatile capabilities.
### Benefits
* ****Efficient Training****: Google Docs provides a straightforward and effective platform for enhancing your bots' conversational abilities, streamlining the training process.
* ****Real-time Corrections****: This integration allows for the flexibility to make corrections and refine bot responses in real-time, ensuring interactions are accurate and contextually relevant.
* ****Expanded Training Options****: With the addition of Google Docs, users now have an alternative to website URLs for comprehensive bot training, offering more versatility in training materials.
***
## Setting The Knowledge Base
### Check Document Permissions
Ensure the Google Docs document is set to public permissions to allow data fetching. Adjust permissions if necessary.
### Creating The Knowledge Base
Navigate to the "Knowledge Base" section in your account settings and click "+ Create Knowledge Base."
By leveraging the Web Crawler and Custom Bot Responses (FAQs), you can craft precise answers to common customer queries, improving your bot's ability to handle customer interactions efficiently and consistently.
***
## Frequently Asked Questions
Updating your bot's training data quarterly or following major service updates ensures it remains accurate and relevant.
Yes, combining various types of URLs (Exact, Path-specific, and Domain-level) can help create a more comprehensive knowledge base. Simply redo the steps listed in the Web Crawler section to train the bot using multiple URLs.
Use the feedback system, regularly test your bot by simulating customer queries, and frequently update your FAQs.
The bot may request clarification or escalate the query to a human agent based on its configuration.
Provide precise, critical information like pricing, policies, and instructions to effectively address common customer inquiries.
***
## Training with Google Docs
Leveraging Google Docs for training your Conversation AI bot offers numerous benefits, including efficient training processes, real-time corrections, and expanded training options. This integration provides a streamlined approach to enhancing your bot's conversational abilities, making it easier to ensure accurate and relevant interactions. Follow these steps to utilize Google Docs in your bot training and take advantage of its versatile capabilities.
### Benefits
* ****Efficient Training****: Google Docs provides a straightforward and effective platform for enhancing your bots' conversational abilities, streamlining the training process.
* ****Real-time Corrections****: This integration allows for the flexibility to make corrections and refine bot responses in real-time, ensuring interactions are accurate and contextually relevant.
* ****Expanded Training Options****: With the addition of Google Docs, users now have an alternative to website URLs for comprehensive bot training, offering more versatility in training materials.
***
## Setting The Knowledge Base
### Check Document Permissions
Ensure the Google Docs document is set to public permissions to allow data fetching. Adjust permissions if necessary.
### Creating The Knowledge Base
Navigate to the "Knowledge Base" section in your account settings and click "+ Create Knowledge Base."
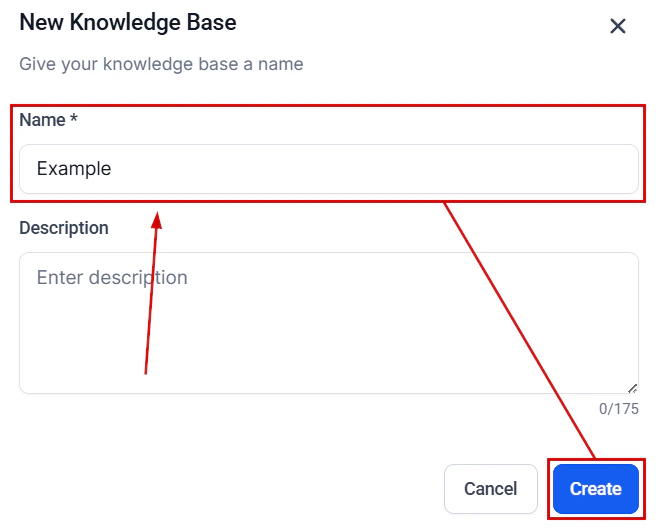
 Enter a Name to easily identify the knowledge base, optionally you can add a Description as well, then click Create.
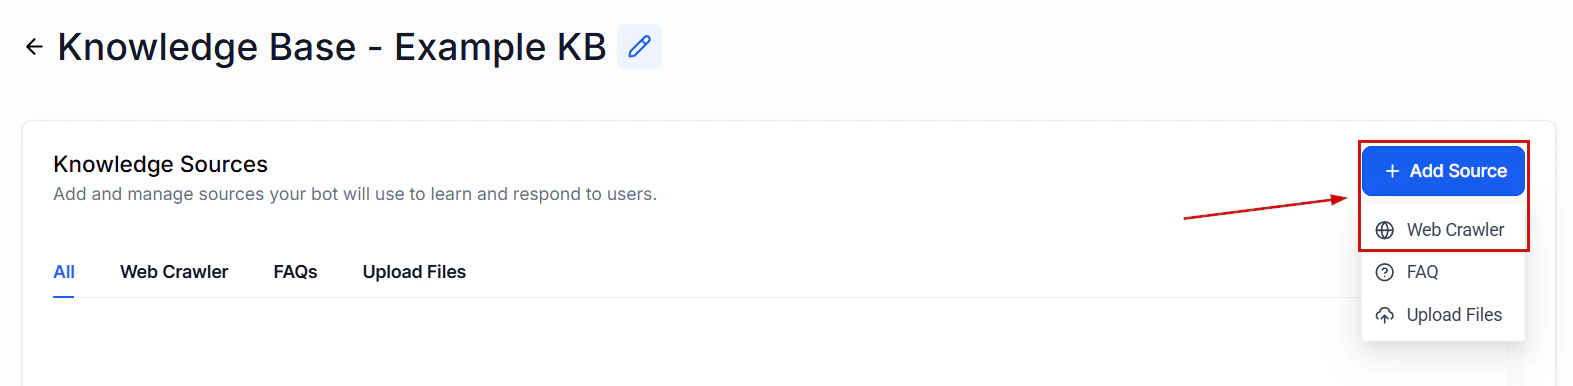
 Click "+ Add Source" and select Web Crawler.
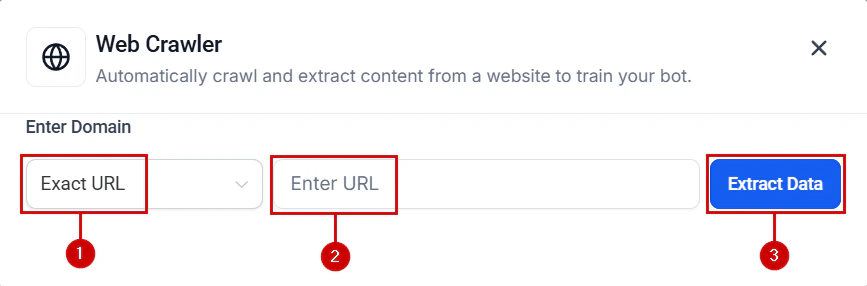
 Select Exact URL (1), enter the public URL of the Google Docs document (2) you wish to use for training, then click Extract Data (3).
 ***
## Adding The Knowledge Base
To add it, navigate to the Conversation AI tab and edit or create a bot.
***
## Adding The Knowledge Base
To add it, navigate to the Conversation AI tab and edit or create a bot.
 Navigate to the Bot Training Tab.
 Select your Knowledge Base from the drop-down menu.
 Click Save in the bottom right corner, and you're done. With the data fetched, you can now leverage Google Docs for training your conversational bot, enhancing its capabilities for handling FAQs, appointment scheduling, and more across various channels.
***
## Collecting contact information
The Add Contact Info feature is designed to help users easily add or update contact information directly through an AI bot. This feature allows for seamless management of contact details, including name, phone number, email, business name, and more. By using this tool, users can ensure that their contact data is always accurate and up-to-date, significantly improving data management processes.
***
## How It Works
### Access the Add Contact Info Feature
Navigate to the Conversation AI settings in your account, then edit an existing bot, or create a new one.
Click Save in the bottom right corner, and you're done. With the data fetched, you can now leverage Google Docs for training your conversational bot, enhancing its capabilities for handling FAQs, appointment scheduling, and more across various channels.
***
## Collecting contact information
The Add Contact Info feature is designed to help users easily add or update contact information directly through an AI bot. This feature allows for seamless management of contact details, including name, phone number, email, business name, and more. By using this tool, users can ensure that their contact data is always accurate and up-to-date, significantly improving data management processes.
***
## How It Works
### Access the Add Contact Info Feature
Navigate to the Conversation AI settings in your account, then edit an existing bot, or create a new one.
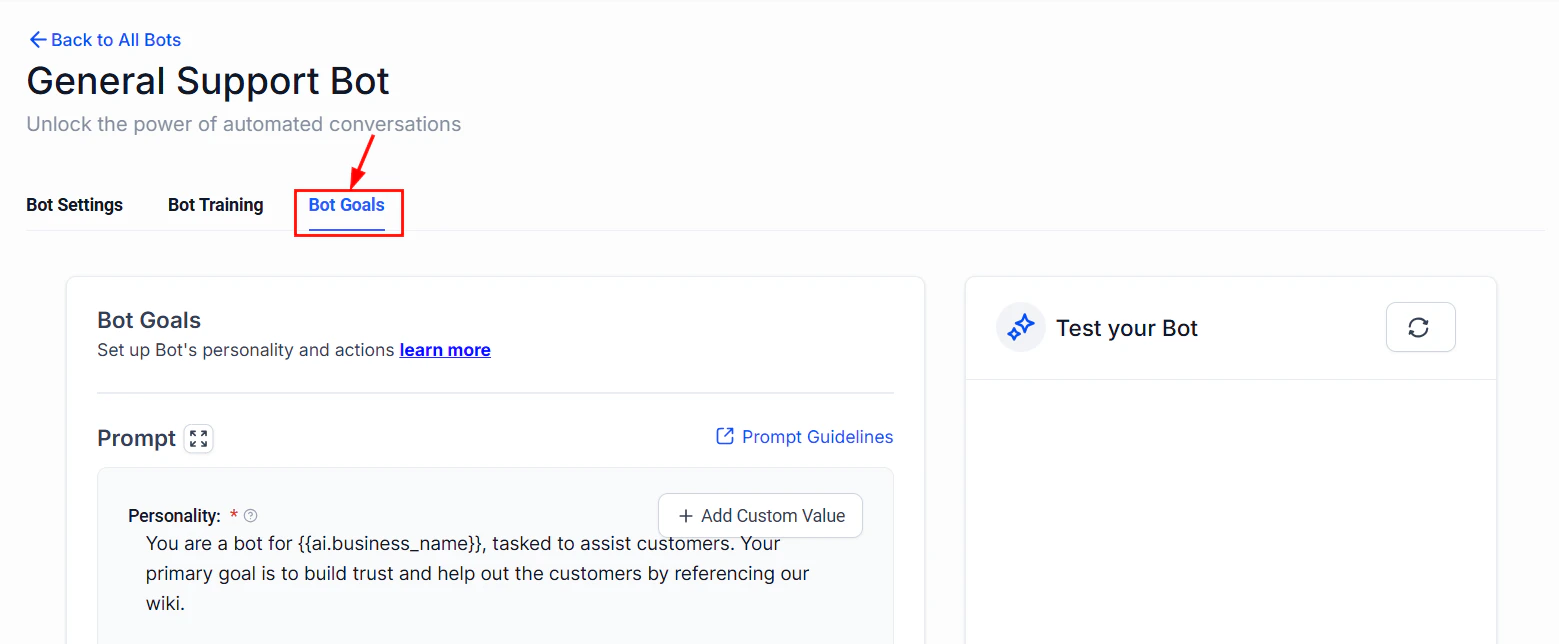
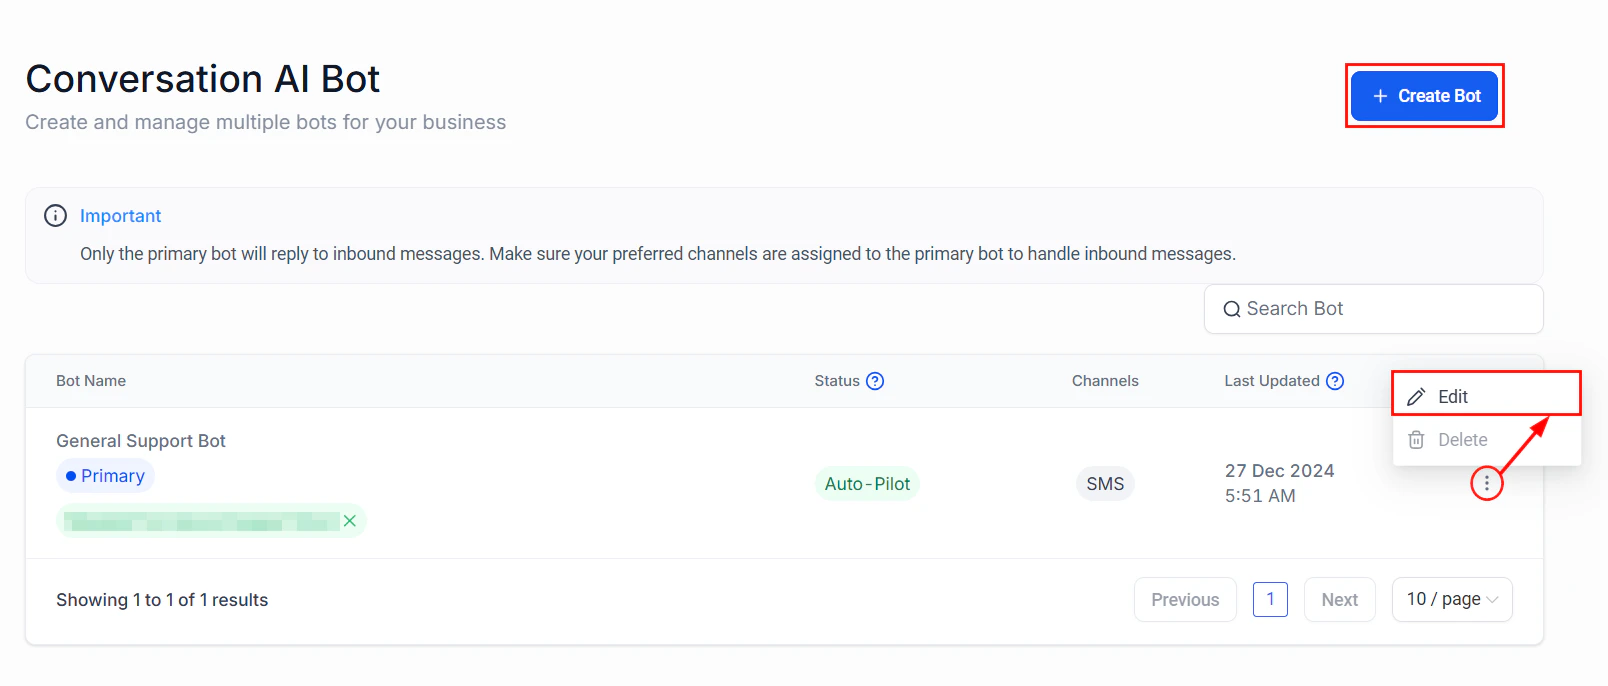 Head to the Bot Goals tab.
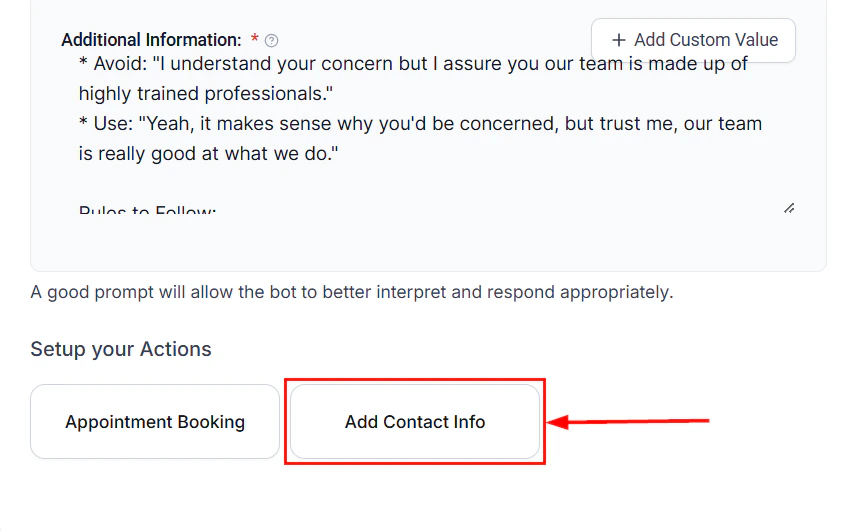
 Click on the Add Contact Info button to access the contact details.
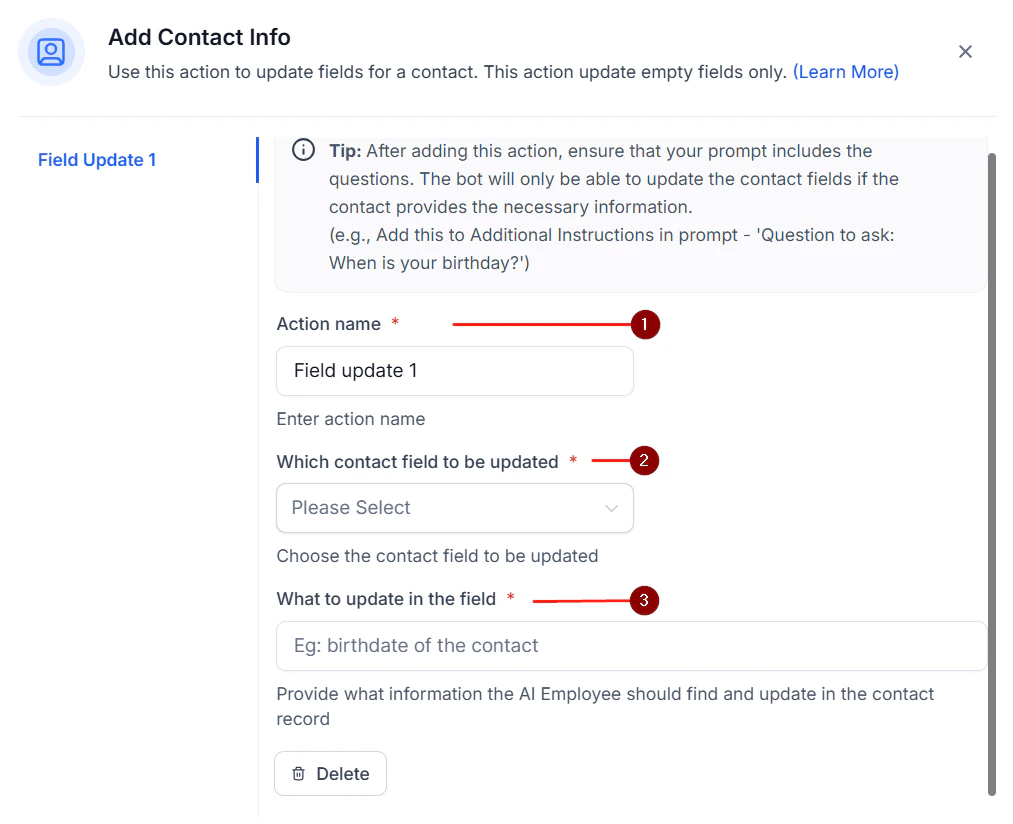
 If you're creating a new bot, ensure that the bot name is edited or a new name is assigned before accessing this feature.
### Set Up the Fields
1. ****Action Name****: Assign an action name to clearly identify the update. For example, "Contact's Date of Birth."
2. ****Select Field****: Choose the specific field you wish to update, such as name, phone number, email, business name, or date of birth.
3. ****What to Update****: Provide a brief description of the update. For instance:
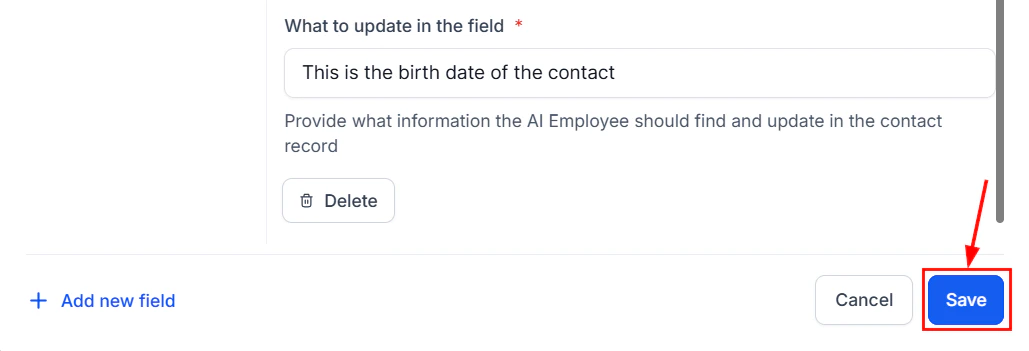
* For ****Date of Birth****: "This is the birth date of the contact."
* For ****Business Name****: "This is the business name of the contact."
If you're creating a new bot, ensure that the bot name is edited or a new name is assigned before accessing this feature.
### Set Up the Fields
1. ****Action Name****: Assign an action name to clearly identify the update. For example, "Contact's Date of Birth."
2. ****Select Field****: Choose the specific field you wish to update, such as name, phone number, email, business name, or date of birth.
3. ****What to Update****: Provide a brief description of the update. For instance:
* For ****Date of Birth****: "This is the birth date of the contact."
* For ****Business Name****: "This is the business name of the contact."
 Add extra fields if necessary, by inputting the required information in the provided fields.
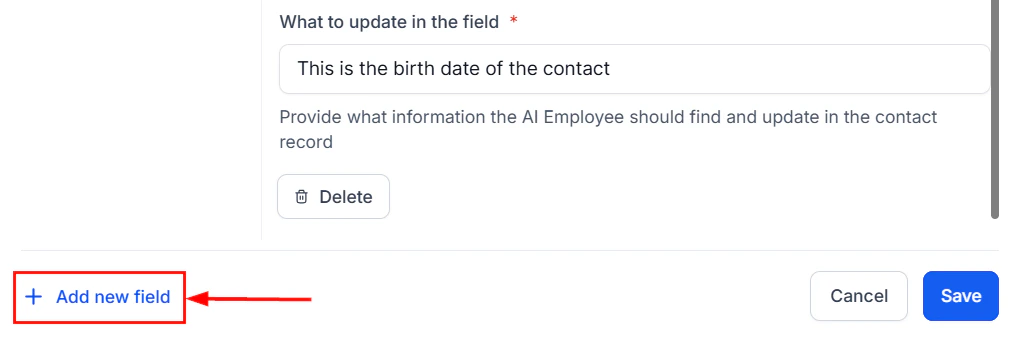 Click Save to finalize the settings.
 ### Output Example (Optional)
Include an example of the updated information in the additional information section for clarity (e.g., "5th Jan 1990").
### Output Example (Optional)
Include an example of the updated information in the additional information section for clarity (e.g., "5th Jan 1990").
 By following the outlined steps, you can ensure that your bot efficiently manages contact information, enhancing the overall customer experience and operational efficiency.
### ✍️Important Notes
* The bot will only update fields that are empty in the contact information.
* Email and phone numbers are automatically updated and do not require manual input through this feature.
### Best Practices for Bot Prompts
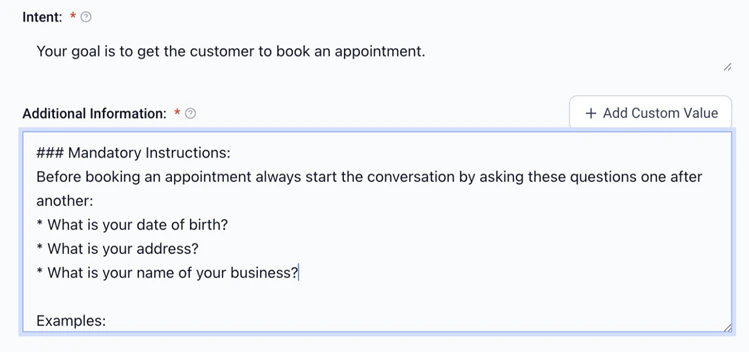
After saving or updating contact information, it is essential to provide explicit instructions in the bot's prompt for collecting customer details. For example: "Ask the customer for their date of birth."
Without this instruction, the bot will not prompt for the required information, and the field will remain unfilled.
### Example Prompt for Collecting Contact Information:
Before booking an appointment, always ask the following questions in order:
1. Ask for the customer's name.
2. Ask for the customer's email.
3. Ask for the customer's phone number.
4. Ask for the customer's date of birth.
5. Ask for the customer's business name.
By following the outlined steps, you can ensure that your bot efficiently manages contact information, enhancing the overall customer experience and operational efficiency.
### ✍️Important Notes
* The bot will only update fields that are empty in the contact information.
* Email and phone numbers are automatically updated and do not require manual input through this feature.
### Best Practices for Bot Prompts
After saving or updating contact information, it is essential to provide explicit instructions in the bot's prompt for collecting customer details. For example: "Ask the customer for their date of birth."
Without this instruction, the bot will not prompt for the required information, and the field will remain unfilled.
### Example Prompt for Collecting Contact Information:
Before booking an appointment, always ask the following questions in order:
1. Ask for the customer's name.
2. Ask for the customer's email.
3. Ask for the customer's phone number.
4. Ask for the customer's date of birth.
5. Ask for the customer's business name.